1、Prop
父组件
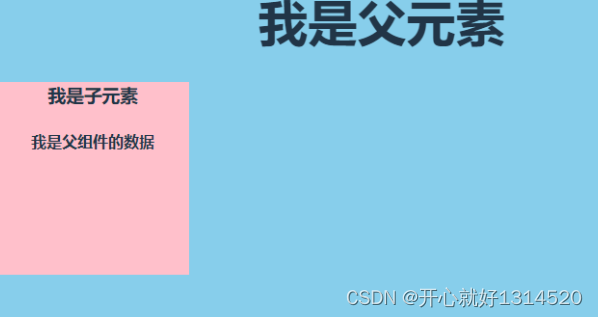
<template><div class="parent"><h1>我是父元素</h1><Child :msg="msg"></Child></div>
</template><script setup>
import Child from './Child.vue'
let msg = ref('我是父组件的数据')
</script><style scoped>
.parent{width: 800px;height: 600px;background: skyblue;
}
</style>
子组件
<template><div class="son"><h3>我是子元素</h3><h4>{{ msg }}</h4></div>
</template><script setup>
// 1、let props = defineProps(['msg'])
//2、defineProps(['msg'])
//3、
defineProps({msg:{type:String,default:'默认数据'}
})
</script><style scoped>
.son{width: 200px;height: 200px;background: pink;
}
</style>
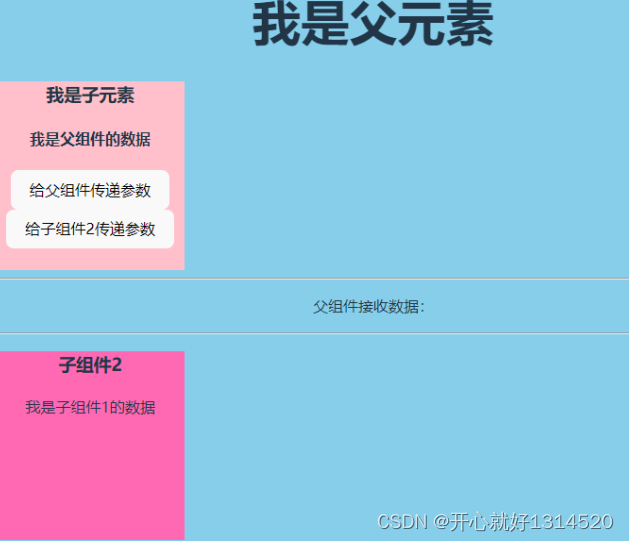
2、自定义事件
父组件
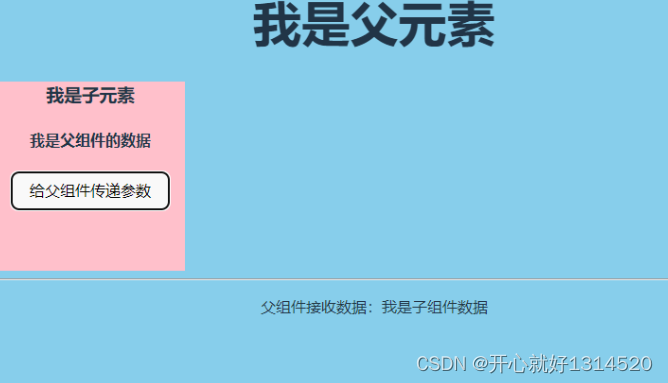
<template><div class="parent"><h1>我是父元素</h1><Child :msg="msg" @getData="getData"></Child><hr><p>父组件接收数据:{{passStr}}</p></div>
</template><script setup>
import Child from './Child.vue'
let msg = ref('我是父组件的数据');
let passStr = ref('')
const getData = (e)=>{passStr.value=e
}
</script><style scoped>
.parent{width: 800px;height: 600px;background: skyblue;
}
</style>
子组件
<template><div class="son"><h3>我是子元素</h3><h4>{{ msg }}</h4><button @click="passData('我是子组件数据')">给父组件传递参数</button></div>
</template><script setup>
// 1、let props = defineProps(['msg'])
//2、defineProps(['msg'])
//3、
defineProps({msg:{type:String,default:'默认数据'}
})
let $emit = defineEmits('getData')
const passData = (msg)=>{$emit('getData',msg)
}
</script><style scoped>
.son{width: 200px;height: 200px;background: pink;
}
</style>
3、全局事件总线
1、安装
npm install --save mitt
2、新建utils/mitt.js
import mitt from 'mitt'const emitter =new mitt()export default emitter
3、使用
子组件1
<template><div class="son"><h3>我是子元素</h3><h4>{{ msg }}</h4><button @click="passData('我是子组件数据')">给父组件传递参数</button><button @click="passBusData('我是子组件1的数据')">给子组件2传递参数</button></div>
</template><script setup>
import emitter from '../utils/mitt'
// 1、let props = defineProps(['msg'])
//2、defineProps(['msg'])
//3、
defineProps({msg:{type:String,default:'默认数据'}
})
let $emit = defineEmits('getData')
const passData = (msg)=>{$emit('getData',msg)
}
const instance = getCurrentInstance()
const passBusData = (msg) =>{emitter.emit("passBusData",msg)
}
</script><style scoped>
.son{width: 200px;height: 200px;background: pink;
}
</style>
子组件2
<template><div class="child1"><h3>子组件2</h3><p>{{msg}}</p></div>
</template><script setup>
import emitter from '../utils/mitt'
let msg = ref('')
onMounted(() => {emitter.on("passBusData",(data) =>{msg.value=data})
});
</script><style  scoped>
.child1{width: 200px;height: 200px;background: hotpink;
}
</style>
4、v-model
1、绑定单个数据
父组件
<template><div class="parent"><h1>父组件钱数:{{money}}</h1><input type="number" v-model="money"><!-- props:父组件给子组件传值 --><!-- <Child :modelValue="money" @update:modelValue="getData" /> --><!-- v-model组件身上使用1、相当于给子组件传递props[modelValue] = 10002、给子组件绑定自定义事件update:modelValue--><Child v-model="money" /></div>
</template><script setup>
import Child from './Child.vue';
import { ref } from 'vue';
// v-model 指令 收集表单数据,双向数据绑定
// v-model也可以实现组件之间通信,实现父子组件数据同步
// 父组件给子组件传数据 props
// 子组件给父组件传数据 自定义事件
let money = ref(1000);
const getData = (data)=>{money.value = data
}
</script><style lang="scss" scoped>
.parent{width:800px;height:500px;background: pink;
}
</style>
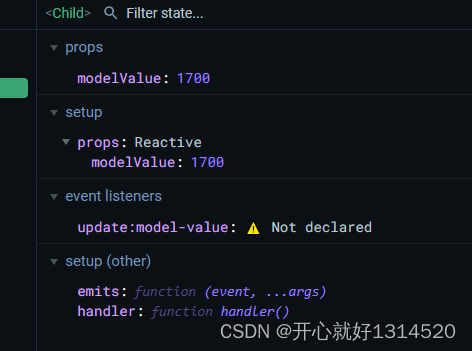
子组件
<template><div class="child"><h3>子组件接收父组件钱数{{modelValue}}</h3><button @click="handler">子组件改变数据</button></div>
</template><script setup>
let props = defineProps(['modelValue']);
let emits = defineEmits(['update:modelValue']);
const handler = () => {emits('update:modelValue',props.modelValue+100)
}
</script><style lang="scss" scoped>
.child{width: 300px;height: 200px;background: skyblue;
}
</style>
2、绑定多个数据
父组件
<template><div class="parent"><h2>父组件钱数:{{money}}当前页{{currentPage}}每页条数{{pageSize}}</h2><input type="number" v-model="money"><!-- props:父组件给子组件传值 --><!-- <Child :modelValue="money" @update:modelValue="getData" /> --><!-- v-model组件身上使用1、相当于给子组件传递props[modelValue] = 10002、给子组件绑定自定义事件update:modelValue--><Child v-model="money" /><Child2 v-model:currentPage="currentPage" v-model:pageSize="pageSize"></Child2></div>
</template><script setup>
import Child from './Child.vue';
import Child2 from './Child2.vue';
import { ref } from 'vue';
// v-model 指令 收集表单数据,双向数据绑定
// v-model也可以实现组件之间通信,实现父子组件数据同步
// 父组件给子组件传数据 props
// 子组件给父组件传数据 自定义事件
let money = ref(1000);
const getData = (data)=>{money.value = data
}
//
let currentPage =ref(1)
let pageSize =ref(20)
</script><style lang="scss" scoped>
.parent{width:800px;height:600px;background: pink;
}
</style>
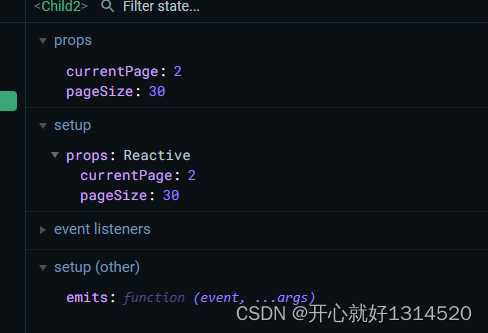
子组件
<template><div class="child2"><h3>子组件2接收父组传递的数据{{currentPage}}{{ pageSize }}</h3><button @click="emits('update:currentPage',currentPage+1)">改变父组件currentPage</button><button @click="emits('update:pageSize',pageSize+10)">改变父组件pageSize</button></div>
</template><script setup>
let props=defineProps(['currentPage','pageSize'])
let emits= defineEmits(['update:currentPage','update:pageSize'])
</script><style lang="scss" scoped>
.child2{width:300px;height:200px;background: hotpink;
}
</style>
5、useAttr
父组件
<template><div class="parent"><h2>父组件</h2><Child type="primary" title="编辑按钮" size="small" @click="handler" /></div>
</template><script setup>
import Child from './Child.vue';
const handler = ()=>{alert('点击了')
}
</script><style lang="scss" scoped>
.parent{width:800px;height:600px;background: pink;
}
</style>
子组件
<template><div class="child"><h3>子组件</h3><!-- <el-button :type="$attrs.type" :size="$attrs.size">按钮</el-button> --><el-button :="$attrs">按钮</el-button></div>
</template><script setup>
//引入useAttrs方法:获取组件标签身上属性与事件
let $attrs = useAttrs()let props= defineProps(['title'])
console.log(props)
console.log($attrs)
//props和useAttrs方法都可以获取父组件传过来的属性和属性值
//但是props接收了useAttrs方法就获取不到了
</script><style lang="scss" scoped>
.child{width: 300px;height: 200px;background: skyblue;
}
</style>

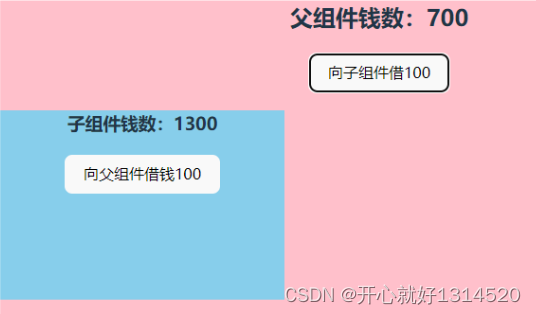
6、ref与$parent
父组件
<template><div class="parent"><h2>父组件钱数:{{money}}</h2><button @click="borrowMoney">向子组件借100</button><Child ref="child" /></div>
</template><script setup>
import Child from './Child.vue';
// ref可以获取真实的DOM节点,可以获取到组件真实VC
//$parent 可以在子组件内部获取父组件的实例
let money = ref(1000)//向外暴露
defineExpose({money
})
//获取子组件实例
let child = ref();//借钱
let borrowMoney = ()=>{money.value+=100;child.value.money-=100;//child.value.handler()
}
</script><style lang="scss" scoped>
.parent{width:800px;height:600px;background: pink;
}
</style>
子组件
<template><div class="child"><h3>子组件钱数:{{money}}</h3><button @click="handler($parent)">向父组件借钱100</button></div>
</template><script setup>
let money = ref(1000)
//组件内部的数据是对外关闭的,别人不能访问
//如果想让外部访问需要通过defineExpose方法对外暴露
let handler = ($parent)=>{console.log('子组件事件');money.value+=100;$parent.money-=100
}
defineExpose({money,handler
})
</script><style lang="scss" scoped>
.child{width: 300px;height: 200px;background: skyblue;
}
</style>
7、Provide与Inject
父组件
<template><div class="parent"><h2>父组件数据:{{car}}</h2><Child ref="child" /></div>
</template><script setup>
import Child from './Child.vue';
//vue3提供provide(提供)与inject(注入)可以实现隔辈组件传递数据
let car = ref('法拉利');
//祖先组件给后代组件传递数据
//两个参数,第一个参数是提供数据的数据key
//第二个参数 祖先组件提供的数据
provide('car', car);
</script><style lang="scss" scoped>
.parent{width:800px;height:600px;background: pink;
}
</style>
子组件
<template><div class="child"><h3>子组件</h3><Grandson></Grandson></div>
</template><script setup>
import Grandson from './Grandson.vue';
</script><style lang="scss" scoped>
.child{width: 300px;height: 200px;background: skyblue;
}
</style>
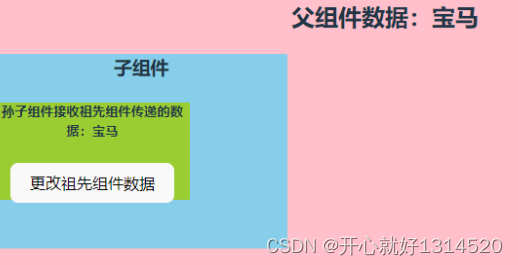
孙子组件
<template><div class="grandson"><h5>孙子组件接收祖先组件传递的数据:{{car}}</h5><button @click="updateData">更改祖先组件数据</button></div>
</template><script setup>
//注入祖先组件提供的数据
//需要参数:即为祖先组件提供数据的key
let car = inject("car");
let updateData = ()=>{car.value='宝马'
}
</script><style lang="scss" scoped>
.grandson{width:200px;height: 100px;background: yellowgreen;
}
</style>
8、pinia
1、安装
pnpm i pinia
2、在src文件夹下创建store文件夹,新建index.js
//创建大仓库
import { createPinia } from 'pinia';
//createPinia方法可以用来创建大仓库
let store = createPinia();
//对外暴露,安装仓库
export default store
3、在main.js中引入使用
//引入仓库
import store from './store'
let app= createApp(App);app.use(store).mount('#app')
4、在store文件夹下新建modules文件夹,新建info.js
1、选择式写法
1、info.js
//定义info小仓库
import { defineStore } from "pinia";//2个参数:1、小仓库名称 2小仓库配置对象
//defineStore方法执行返回一个函数,函数作用让组件获取到仓库数据
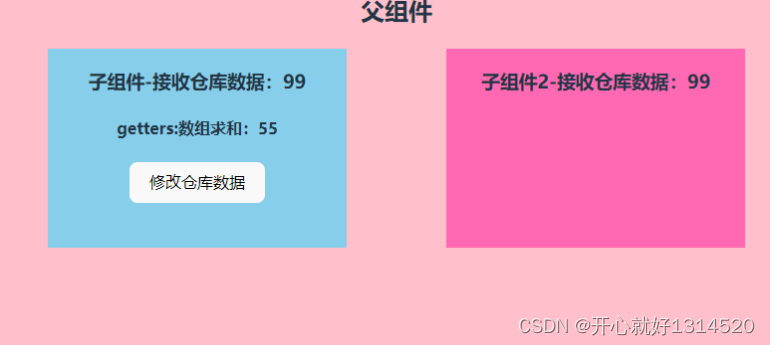
let useInfoStore = defineStore("info",{//存储数据 statestate: ()=>{return {count:99,arr:[1,2,3,4,5,6,7,8,9,10]}},actions:{updateCount(num){// this.count++this.count+=num;}},getters:{total(){return this.arr.reduce((pre,next)=>{return pre+next},0)}}
})//对外暴露
export default useInfoStore;
2、在组件1中使用
<template><div class="child"><h3>子组件-接收仓库数据:{{infoStore.count}}</h3><h4>getters:数组求和:{{infoStore.total}}</h4><button @click="updateCount">修改仓库数据</button></div>
</template><script setup>
import useInfoStore from '../store/modules/info';
//获取小仓库对象
let infoStore = useInfoStore();
console.log(infoStore)
//修改仓库数据
let updateCount = ()=>{//1、直接修改//infoStore.count++//2、patch// infoStore.$patch({//     count:100// })//3、调用store方法infoStore.updateCount(10)
}
</script><style lang="scss" scoped>
.child{width: 300px;height: 200px;background: skyblue;
}
</style>
3、在组件2中使用
<template><div class="child2"><h3>子组件2-接收仓库数据:{{infoStore.count}}</h3></div>
</template><script setup>
import useInfoStore from '../store/modules/info';
//获取小仓库对象
let infoStore = useInfoStore();</script><style lang="scss" scoped>
.child2{width:300px;height:200px;background: hotpink;
}
</style>
2、组合式API写法
1、在modules文件夹下新建todo.js
//定义组合式API
import { defineStore } from "pinia";
import { ref , computed } from 'vue'
//创建小仓库
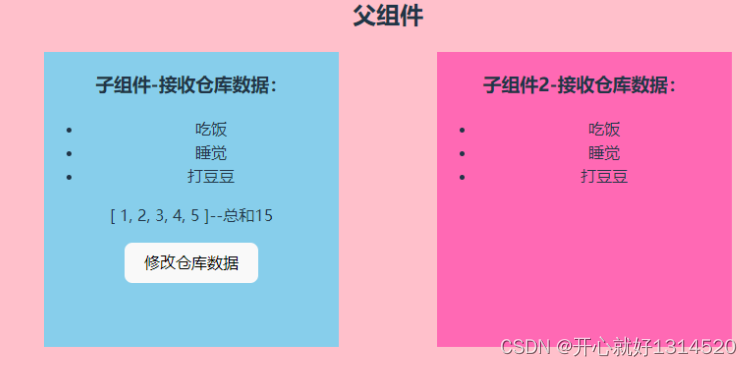
let useTodoStore = defineStore('todo',()=>{//务必返回一个对象,对象的属性和方法提供给组件使用let todos = ref([{id:1,title:'吃饭'},{id:2,title:'睡觉'},{id:3,title:'打豆豆'},])let arr=ref([1,2,3,4,5])const total = computed(()=>{return arr.value.reduce((prev, curr) => {return prev+curr}, 0)})return {todos,//相当于选择式API的statearr,total,updateTodos(){todos.value.push({id:4,title:'摆烂'})},//相当于选择式API的actions}})export default useTodoStore
2、在组件1中使用
<template><div class="child"><h3>子组件-接收仓库数据:</h3><ul><li v-for="item in todosStore.todos" :key="item.id">{{item.title}}</li></ul><p>{{ todosStore.arr }}--总和{{todosStore.total}}</p><button @click="updateTodos">修改仓库数据</button></div>
</template><script setup>
//引入组合式API函数仓库
import useTodosStore from '../store/modules/todo';
let todosStore = useTodosStore();
//修改仓库数据
let updateTodos = ()=>{todosStore.updateTodos()
}
</script><style lang="scss" scoped>
.child{width: 300px;height: 300px;background: skyblue;
}
</style>
3、在组件2中使用
<template><div class="child2"><h3>子组件2-接收仓库数据:</h3><ul><li v-for="item in todosStore.todos" :key="item.id">{{item.title}}</li></ul></div>
</template><script setup>
import useTodosStore from '../store/modules/todo';
//获取小仓库对象
let todosStore = useTodosStore();</script><style lang="scss" scoped>
.child2{width:300px;height:300px;background: hotpink;
}
</style>
9、slot
1、默认插槽
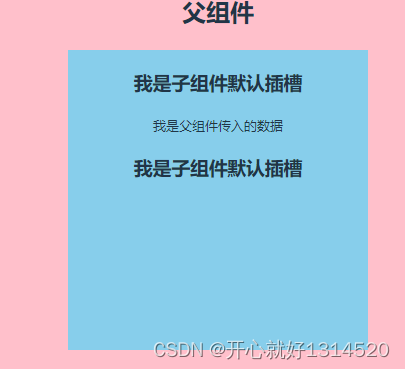
父组件
<template><div class="parent"><h2>父组件</h2><div class="container"><Child><pre>我是父组件传入的数据</pre></Child></div></div>
</template><script setup>
import Child from './Child.vue';
//插槽:默认插槽、具名插槽、作用域插槽
</script><style lang="scss" scoped>
.parent{width:800px;height:400px;background: pink;.container{display: flex;align-items: center;justify-content: space-around;}
}
</style>
子组件
<template><div class="child"><h3>我是子组件默认插槽</h3><!-- 默认插销 --><slot></slot><h3>我是子组件默认插槽</h3></div>
</template><script setup>
//引入组合式API函数仓库
import useTodosStore from '../store/modules/todo';
let todosStore = useTodosStore();
//修改仓库数据
let updateTodos = ()=>{todosStore.updateTodos()
}
</script><style lang="scss" scoped>
.child{width: 300px;height: 300px;background: skyblue;
}
</style>
2、具名插槽
父组件
<template><div class="parent"><h2>父组件</h2><div class="container"><Child><!-- 具名插槽填充 v-slot:简写问# --><template v-slot:a><p>我是填充具名插槽a位置结构</p></template><template #b><p>我是填充具名插槽b位置结构</p></template></Child></div></div>
</template><script setup>
import Child from './Child.vue';
//插槽:默认插槽、具名插槽、作用域插槽
</script><style lang="scss" scoped>
.parent{width:800px;height:400px;background: pink;.container{display: flex;align-items: center;justify-content: space-around;}
}
</style>
子组件
<template><div class="child"><h3>我是子组件具名插槽</h3><slot name="a"></slot><h3>我是子组件具名插槽</h3><hr><h3>我是子组件具名插槽</h3><slot name="b"></slot><h3>我是子组件具名插槽</h3></div>
</template><script setup>
//引入组合式API函数仓库
import useTodosStore from '../store/modules/todo';
let todosStore = useTodosStore();
//修改仓库数据
let updateTodos = ()=>{todosStore.updateTodos()
}
</script><style lang="scss" scoped>
.child{width: 300px;height: 300px;background: skyblue;
}
</style>
3、作用域插槽
父组件
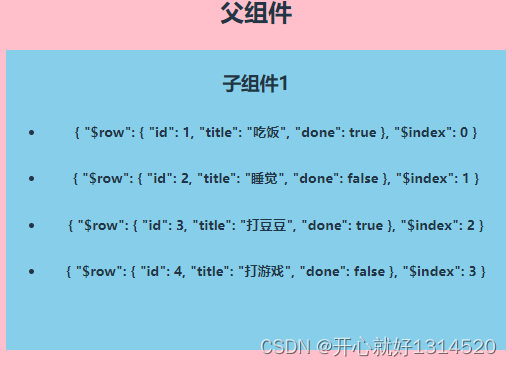
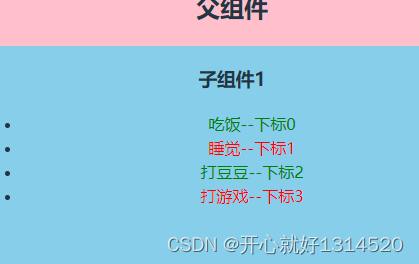
<template><div class="parent"><h2>父组件</h2><div class="container"><Child :todos="todos"><template v-slot="{$row,$index}"><span :style="{color:$row.done?'green':'red'}">{{ $row.title }}--下标{{$index}}</span></template></Child></div></div>
</template><script setup>
import Child from './Child.vue';
// import Child2 from './Child2.vue';
//插槽:默认插槽、具名插槽、作用域插槽
//作用域插槽:就是可以传递数据的插槽,子组件可以将数据回传给父组件,
//父组件可以决定这些回传的数据是以何种结构或者外观在子组件内部去展示
let todos = ref([{id:1,title:'吃饭',done:true},{id:2,title:'睡觉',done:false},{id:3,title:'打豆豆',done:true},{id:4,title:'打游戏',done:false},
])
</script><style lang="scss" scoped>
.parent{width:800px;height:400px;background: pink;.container{display: flex;align-items: center;justify-content: space-around;}
}
</style>
子组件
<template><div class="child"><h3>子组件1</h3><ul><li v-for="(item,index) in todos" :key="item.id"><!-- 作用域插槽:可以将数据回传给父组件 --><slot :$row="item" :$index="index"></slot></li></ul></div>
</template><script setup>
let props = defineProps(['todos'])
</script><style lang="scss" scoped>
.child{width: 500px;height: 300px;background: skyblue;
}
</style>


![java八股文面试[数据库]——explain](https://img-blog.csdn.net/20131108110428796?watermark/2/text/aHR0cDovL2Jsb2cuY3Nkbi5uZXQvemh1eGluZWxp/font/5a6L5L2T/fontsize/400/fill/I0JBQkFCMA==/dissolve/70/gravity/SouthEast)