备份
热备
即MySQL服务在运行的时候进行的备份
mysqldump命令
mysqldump --databases db1 db2 db3 > dump.sql
mysqldump -uroot -p'Sanchuang1234#' --all-databases >all_db.sql
mysqldump -uroot -p'Sanchuang123#' --databases TENNIS  >/backup/tennis.sql
mysqldump -uroot -p'Sanchuang123#'  TENNIS  PLAYERS  >tennis_players.sql
冷备
即关闭MySQL服务,不关闭机器时,进行的备份
cp tar scp rsync命令
异地备份
配置ssh免密码登录
写脚本
[root@wudang-mysql-2 mysql]# cat backup_db.sh
#!/bin/bash#得到时间
ctime=$(date +%F_%H%M%S)#在本地新建存放目录/backup_db
mkdir  -p  /backup_db#备份TENNIS库到/backup_db叫tennis.sql
mysqldump -uroot -pSanchuang1234#  TENNIS >/backup_db/${ctime}_tennis.sql#备份mysql库里user表
mysqldump -uroot -pSanchuang1234#  mysql  user >/backup_db/${ctime}_mysql_user.sql#备份服务器上新建文件夹/backup_db
ssh root@192.168.0.136  mkdir -p /backup_db
#上传当天备份的文件到备份服务器里192.168.0.136
scp /backup_db/${ctime}*.sql  root@192.168.0.136:/backup_db#本地保留最近30天的备份文件
find  /backup_db  -mtime +30 -type f -name "*.sql" -exec rm -rf {} \;#备份服务器上也保留最近30天的文件
#生成一个脚本文件
cat >del_30days_file.sh <<EOF
find  /backup_db  -mtime +30 -type f -name "*.sql" -exec rm -rf {} \;
EOF#上传脚本文件到备份服务器
scp del_30days_file.sh root@192.168.0.136:/root#远程执行脚本
ssh root@192.168.0.136 bash /root/del_30days_file.sh
备份方式
参考:https://www.cnblogs.com/zywu-king/p/10745600.html
完全备份(全备)
mysqldump命令
优点:备份了所有内容
缺点:备份的东西比较多的话,时间比较长
增量备份
备份的好处是每次备份需要备份的数据较少,耗时较短,占用的空间较小;
坏处是数据恢复比较麻烦
差异备份
差异备份也要先进行一次完全备份,但是和增量备份不同的是,每次差异备份都备份和原始的完全备份不同的数据。也就是说,差异备份每次备份的参照物都是原始的完全备份,而不是上一次的差异备份。
案例
备份方案:
每天的下午16:50点做全备,刚好到了下午17点10分的时候,数据库被删除了,如何将数据恢复到17点10分的状态?
mysqlbinlog命令
根据位置号来恢复
备份和还原操作:
1.产生一个全新的二进制文件
root@(none) 10:33  sc-mysql>show master status;
+---------------------+----------+--------------+------------------+-------------------+
| File                | Position | Binlog_Do_DB | Binlog_Ignore_DB | Executed_Gtid_Set |
+---------------------+----------+--------------+------------------+-------------------+
| sc-mysql-bin.000004 |    23054 |              |                  |                   |
+---------------------+----------+--------------+------------------+-------------------+
1 row in set (0.00 sec)root@(none) 10:34  sc-mysql>flush logs;
Query OK, 0 rows affected (0.01 sec)root@(none) 10:35  sc-mysql>show master status;
+---------------------+----------+--------------+------------------+-------------------+
| File                | Position | Binlog_Do_DB | Binlog_Ignore_DB | Executed_Gtid_Set |
+---------------------+----------+--------------+------------------+-------------------+
| sc-mysql-bin.000005 |      154 |              |                  |                   |
+---------------------+----------+--------------+------------------+-------------------+
1 row in set (0.01 sec)root@(none) 10:35  sc-mysql>2.给数据库做全备
[root@sc-mysql mysql]# mysqldump -uroot -p'Sanchuang123#' --databases sanchuang >/backup/sanchuang.sql3.让数据发生变化,进行insert 和删除操作等
root@sanchuang 10:40  sc-mysql>insert into emp(id,name,deptid) values(3,'苏文洋',20);
Query OK, 1 row affected (0.00 sec)root@sanchuang 10:40  sc-mysql>insert into emp(id,name,deptid) values(4,'qinjiahui',20);
Query OK, 1 row affected (0.00 sec)root@sanchuang 10:40  sc-mysql>insert into emp(id,name,deptid) values(5,'chenran',20);
Query OK, 1 row affected (0.00 sec)root@sanchuang 10:41  sc-mysql>show master status;
+---------------------+----------+--------------+------------------+-------------------+
| File                | Position | Binlog_Do_DB | Binlog_Ignore_DB | Executed_Gtid_Set |
+---------------------+----------+--------------+------------------+-------------------+
| sc-mysql-bin.000005 |      998 |              |                  |                   |
+---------------------+----------+--------------+------------------+-------------------+
1 row in set (0.00 sec)root@sanchuang 10:41  sc-mysql>4.模拟出现故障,删除数据库
root@sanchuang 10:41  sc-mysql>drop database sanchuang;5.开始取恢复数据第1步恢复全备[root@sc-mysql backup]# mysql -uroot -p'Sanchuang123#' < sanchuang.sql
mysql: [Warning] Using a password on the command line interface can be insecure.
[root@sc-mysql backup]#第2步:查看二进制日志找到删除数据库之前的position 位置号
[root@sc-mysql mysql]# mysqlbinlog  -v sc-mysql-bin.000005|egrep -C 5 "drop database"
#210401 10:42:39 server id 1  end_log_pos 1063 CRC32 0x8623d686 	Anonymous_GTID	last_committed=3	sequence_number=4	rbr_only=no
SET @@SESSION.GTID_NEXT= 'ANONYMOUS'/*!*/;
# at 1063
#210401 10:42:39 server id 1  end_log_pos 1170 CRC32 0xf9eee347 	Query	thread_id=14	exec_time=0	error_code=0
SET TIMESTAMP=1617244959/*!*/;
drop database sanchuang
/*!*/;
# at 1170
#210401 10:44:13 server id 1  end_log_pos 1235 CRC32 0xa92ef3c4 	Anonymous_GTID	last_committed=4	sequence_number=5	rbr_only=no
SET @@SESSION.GTID_NEXT= 'ANONYMOUS'/*!*/;
# at 1235
[root@sc-mysql mysql]#第3步:使用二进制日志去恢复
[root@sc-mysql mysql]# mysqlbinlog   --start-position=154 --stop-position=1063  sc-mysql-bin.000005|mysql -uroot -p'Sanchuang123#'
mysql: [Warning] Using a password on the command line interface can be insecure.
[root@sc-mysql mysql]#6.查看数据是否恢复
root@sanchuang 10:54  sc-mysql>select * from emp;
+----+-----------+--------+
| id | NAME      | deptid |
+----+-----------+--------+
|  1 | 张三      |     10 |
|  2 | 李四      |     10 |
|  3 | 苏文洋    |     20 |
|  4 | qinjiahui |     20 |
|  5 | chenran   |     20 |
| 19 | 吴佩      |     10 |
+----+-----------+--------+
6 rows in set (0.00 sec)root@sanchuang 10:55  sc-mysql>
根据时间点来恢复
mysqlbinlog --start-datetime="2005-04-20 9:55:00" \--stop-datetime="2005-04-20 10:05:00" \/var/log/mysql/bin.123456 > /tmp/mysql_restore.sql难点是找到起始点和结束点
配合grep语句,当时最后做的删除操作
[root@zabbix-4-centos7 mysql]# mysqlbinlog -vv zabbix-4-centos7-bin.000003|grep -i -n -A 150 "create table student"自动化脚本——计划任务
练习:
1.编写一个脚本备份tennis库和mysql库到/backup目录下,要求备份的文件里有时间,精确到秒
2.每天的凌晨3点开始备份
3.本地备份完成后,上传到专门的网络上的另外一台备份服务器里/backup/业务+机器名.tar.gz
[root@wudang-mysql-2 mysql]# cat backup_db.sh
#!/bin/bash#得到时间
ctime=$(date +%F_%H%M%S)#在本地新建存放目录/backup_db
mkdir  -p  /backup_db#备份TENNIS库到/backup_db叫tennis.sql
mysqldump -uroot -pSanchuang1234#  TENNIS >/backup_db/${ctime}_tennis.sql#备份mysql库里user表
mysqldump -uroot -pSanchuang1234#  mysql  user >/backup_db/${ctime}_mysql_user.sql#备份服务器上新建文件夹/backup_db
ssh root@192.168.0.136  mkdir -p /backup_db
#上传当天备份的文件到备份服务器里192.168.0.136
scp /backup_db/${ctime}*.sql  root@192.168.0.136:/backup_db#本地保留最近30天的备份文件
find  /backup_db  -mtime +30 -type f -name "*.sql" -exec rm -rf {} \;#备份服务器上也保留最近30天的文件
#生成一个脚本文件
cat >del_30days_file.sh <<EOF
find  /backup_db  -mtime +30 -type f -name "*.sql" -exec rm -rf {} \;
EOF#上传脚本文件到备份服务器
scp del_30days_file.sh root@192.168.0.136:/root#远程执行脚本
ssh root@192.168.0.136 bash /root/del_30days_file.sh
物理备份和逻辑备份
物理备份由存储数据库内容的目录和文件的原始副本组成。这种类型的备份适用于需要在出现问题时快速恢复的大型、重要的数据库。
逻辑备份保存以逻辑数据库结构(CREATE DATABASE、 CREATE TABLE语句)和内容(INSERT语句或分隔文本文件)表示的信息。这种类型的备份适用于较小的数据量,您可以在其中编辑数据值或表结构,或者在不同的机器架构上重新创建数据。
物理备份: 直接是数据 --》鱼
逻辑备份: 备份是表结构和产生数据的过程(create,insert) --》工艺(方法)和流程--》可以产生想要的数据 --》渔
物理的: 硬件的
磁盘对拷:
逻辑的: 软件的
远程备份rsync
rsync是linux系统下的数据镜像备份工具。使用快速增量备份工具Remote Sync可以远程同步,支持本地复制,或者与其他SSH、rsync主机同步。已支持跨平台,可以在Windows与Linux间进行数据同步。
参考:https://blog.csdn.net/qq_36045024/article/details/105072818
实验步骤
rsync命令的使用
scp[root@sc-mysql backup]# ssh-keygen -t rsa
[root@sc-mysql backup]# ssh-copy-id -i /root/.ssh/id_rsa.pub root@192.168.2.197
[root@sc-mysql backup]# ssh 'root@192.168.2.197' mkdir /backup
[root@sc-mysql backup]# ssh 'root@192.168.2.197' mkdir /backup/fengdeyong
[root@sc-mysql backup]# ls
all_db.sql hunan_liangliang.sql tennis_player.sql ws.sql
[root@sc-mysql backup]# scp ws.sql root@192.168.2.197:/backup
ws.sql 100% 2024 454.2KB/s 00:00
[root@sc-mysql backup]# 每天的晚上2点30分钟备份所有的数据库,然后scp到备份服务器上[root@sc-mysql backup]# cat backup_db.sh
#!/bin/bash#导出数据
mysqldump -uroot -p'Sanchuang1234#' --databases wangshuai >/backup/$(date +%F)_wangshuai.sql#scp到远程的备份服务器
scp /backup/$(date +%F)_wangshuai.sql root@192.168.2.197:/backup[root@sc-mysql backup]# bash backup_db.sh
mysqldump: [Warning] Using a password on the command line interface can be insecure.
2022-08-18_wangshuai.sql 100% 2077 660.9KB/s 00:00
[root@sc-mysql backup]#
[root@sc-mysql backup]# crontab -e
[root@sc-mysql backup]# crontab -l
30 2 * * * bash /backup/bacup_db.sh[root@sc-mysql backup]#
======================rsync是linux系统下的数据镜像备份工具。使用快速增量备份工具Remote Sync可以远程同步,支持本地复制,或者与其他SSH、rsync主机同步。
已支持跨平台,可以在Windows与Linux间进行数据同步。raid1 5 6 10镜像卷: raid12块,可以坏一块,两块磁盘里存放相同的数据mirror 镜像,镜子rsync 全称 remote synchronize,即 远程同步。
使用 rsync 进行数据同步时,第一次进行完全备份,以后则是增量备份,利用 rsync 算法(差分编码),只传输差异部分数据。====rsync+sersync文件实时同步原文链接:https://blog.csdn.net/qq_36045024/article/details/105072818
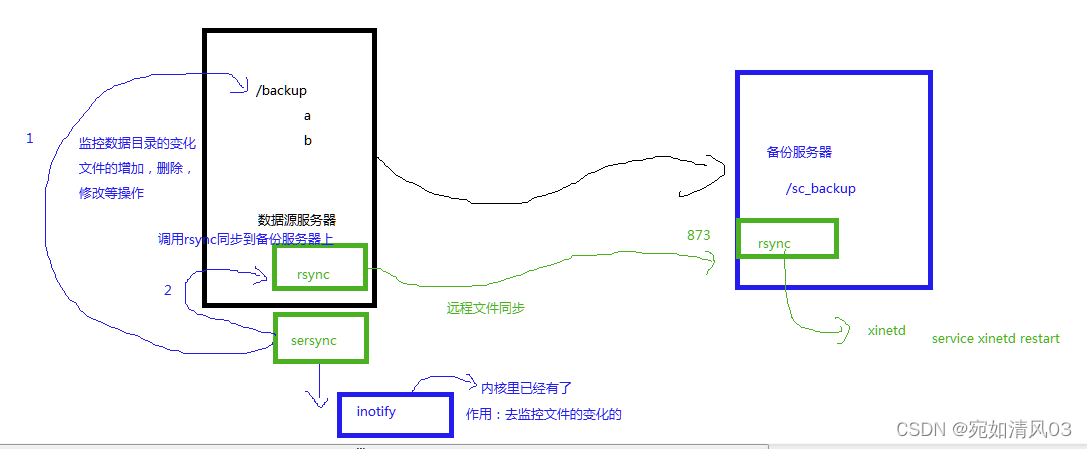
一:什么是Rsync?Rsync(Remote Synchronize)是一款开源的、快速的、多功能的、可以实现全量及增量的本地或远程数据同步备份的优秀工具,并且支持多种操作系统平台运行。
二:什么Sersync?1、sersync是基于inotify开发的,类似于inotify-tools的工具,Sersync可以记录下被监听目录中发生变化的(包括增加、删除、修改)具体某一个文件或者某一个目录的名字,然后使用rsync同步的时候,只同步发生变化的文件或者目录,因此效率更高。2、主要应用场景为数据体积大,并且文件很多。小结:Rsync+sersync1、sersync可以记录下被监听目录中发生变化的(包括增加、删除、修改)具体某一个文件或某一个目录的名字;2、rsync在同步的时候,只同步发生变化的这个文件或者这个目录(每次发生变化的数据相对整个同步目录数据来说是很小的,rsync在遍历查找比对文件时,速度很快),因此,效率很高。三:环境备份服务器:192.168.2.197 操作系统:Centos7.9 数据源服务器:192.168.2.196 操作系统:Centos7.9[root@sc-mysql2 backup]# cat /etc/centos-releaseCentOS Linux release 7.9.2009 (Core)[root@sc-mysql2 backup]#四:备份服务器操作1、关闭 selinux #永久关闭linux防火墙[root@sc-mysql2 backup]# getenforce Permissive[root@sc-mysql2 backup]# vim /etc/selinux/config SELINUX=disabled2、关闭防火墙[root@sc-mysql2 backup]# service firewalld stopRedirecting to /bin/systemctl stop firewalld.service3、安装rsync服务端软件[root@sc-mysql2 backup]# yum install rsync xinetd -y[root@sc-mysql2 backup]# vi /etc/rc.d/rc.local # #设置开机启动/usr/bin/rsync --daemon --config=/etc/rsyncd.conf # 添加开机启动[root@sc-mysql2 backup]# chmod +x /etc/rc.d/rc.local [root@sc-mysql2 backup]# systemctl start xinetd #启动xinetdxinetd是一个提供保姆服务的进程,rsync是它照顾的进程独立的服务:ssh,dhcp,mysql非独立的服务,非独立的服务需要依赖其他的服务来管理,rsync就是一个非独立的服务,依赖xinetd来管理4、创建rsyncd.conf配置文件
[root@sc-mysql2 backup]# vim /etc/rsyncd.conf 添加下面的配置
uid = root
gid = root
use chroot = yes
max connections = 0
log file = /var/log/rsyncd.log
pid file = /var/run/rsyncd.pid
lock file = /var/run/rsync.lock
secrets file = /etc/rsync.pass
motd file = /etc/rsyncd.Motd
[back_data] #配置项名称(自定义)path = /backup #备份文件存储地址comment = A directory in which data is storedignore errors = yesread only = nohosts allow = 192.168.2.196 #允许的ip地址(数据源服务器地址)
5、创建用户认证文件
$ vi /etc/rsync.pass # 配置文件,添加以下内容,添加允许传输用户和密码sunline:sunline # 格式,用户名:密码,可以设置多个,每行一个用户名:密码sc:sc123456
6、设置文件权限
$ chmod 600 /etc/rsyncd.conf #设置文件所有者读取、写入权限
$ chmod 600 /etc/rsync.pass #设置文件所有者读取、写入权限
7、启动rsync和xinetd
[root@sc-mysql2 backup]# /usr/bin/rsync --daemon --config=/etc/rsyncd.conf
[root@sc-mysql2 backup]# ps aux|grep rsync
root 9455 0.0 0.0 114844 584 ? Ss 16:13 0:00 /usr/bin/rsync --daemon --config=/etc/rsyncd.conf
root 9457 0.0 0.0 112824 988 pts/0 S+ 16:13 0:00 grep --color=auto rsync
[root@sc-mysql2 backup]#
[root@sc-mysql2 backup]# systemctl start xinetd
[root@sc-mysql2 backup]# ps aux|grep xinetd
root 9425 0.0 0.0 25044 584 ? Ss 16:00 0:00 /usr/sbin/xinetd -stayalive -pidfile /var/run/xinetd.pid
root 9465 0.0 0.0 112824 988 pts/0 S+ 16:14 0:00 grep --color=auto xinetd
[root@sc-mysql2 backup]#
8.查看rsync监听的端口号
[root@sc-mysql2 backup]# netstat -anplut
Active Internet connections (servers and established)
Proto Recv-Q Send-Q Local Address Foreign Address State PID/Program name
tcp 0 0 0.0.0.0:873 0.0.0.0:* LISTEN 9455/rsync
tcp 0 0 0.0.0.0:22 0.0.0.0:* LISTEN 1040/sshd
tcp 0 0 127.0.0.1:25 0.0.0.0:* LISTEN 1256/master
tcp 0 36 192.168.2.197:22 192.168.2.105:58059 ESTABLISHED 3556/sshd: root@pts
tcp6 0 0 :::873 :::* LISTEN 9455/rsync
tcp6 0 0 :::3306 :::* LISTEN 2597/mysqld
tcp6 0 0 :::22 :::* LISTEN 1040/sshd
tcp6 0 0 ::1:25 :::* LISTEN 1256/master
udp 0 0 127.0.0.1:323 0.0.0.0:* 675/chronyd
udp6 0 0 ::1:323 :::* 675/chronyd
[root@sc-mysql2 backup]# =================
五:数据源服务器操作
(1)安装rsync客户端软件1、关闭 selinux #永久关闭linux防火墙[root@sc-mysql2 backup]# getenforce Permissive[root@sc-mysql2 backup]# vim /etc/selinux/config SELINUX=disabled2、关闭防火墙[root@sc-mysql2 backup]# service firewalld stopRedirecting to /bin/systemctl stop firewalld.service3、安装rsync服务端软件[root@sc-mysql2 backup]# yum install rsync xinetd -y[root@sc-mysql2 backup]# vi /etc/rc.d/rc.local # #设置开机启动/usr/bin/rsync --daemon --config=/etc/rsyncd.conf # 添加开机启动[root@sc-mysql2 backup]# chmod +x /etc/rc.d/rc.local [root@sc-mysql2 backup]# systemctl start xinetd #启动xinetd
[root@sc-mysql backup]# vim /etc/rsyncd.conf
log file = /var/log/rsyncd.log
pid file = /var/run/rsyncd.pid
lock file = /var/run/rsync.lock
motd file = /etc/rsyncd.Motd
[Sync]comment = Syncuid = rootgid = rootport= 873
$ systemctl start xinetd #启动(CentOS中是以xinetd来管理rsync服务的)4、创建认证密码文件
[root@sc-mysql backup]# vim /etc/passwd.txt
sc123456 #编辑文件,添加以下内容,该密码应与目标服务器中的/etc/rsync.pass中的密码一致
[root@sc-mysql backup]#
[root@sc-mysql backup]# chmod 600 /etc/passwd.txt #设置文件权限,只设置文件所有者具有读取、写入权限即可
[root@sc-mysql backup]#
5、测试数据同步
数据源服务器192.168.2.196 到备份服务器192.168.2.197之间的数据同步
$ rsync -avH --port=873 --progress --delete /var/www/data(要备份的数据源目录 ) root@***.***.***.222::back_data(rsyncd.conf文件配置名称) --password-file=/etc/passwd.txt$ rsync -avH --port=873 --progress --delete /backup root@192.168.2.197::back_data --password-file=/etc/passwd.txtrsync --help[root@sc-mysql backup]# rsync -avH --port=873 --progress --delete /backup root@192.168.2.197::back_data --password-file=/etc/passwd.txtsending incremental file list
backup/
backup/2022-08-18_wangshuai.sql2,077 100% 0.00kB/s 0:00:00 (xfr#1, to-chk=5/7)
backup/all_db.sql936,290 100% 34.34MB/s 0:00:00 (xfr#2, to-chk=4/7)
backup/backup_db.sh222 100% 8.34kB/s 0:00:00 (xfr#3, to-chk=3/7)
backup/hunan_liangliang.sql19,833 100% 717.34kB/s 0:00:00 (xfr#4, to-chk=2/7)
backup/tennis_player.sql3,106 100% 112.34kB/s 0:00:00 (xfr#5, to-chk=1/7)
backup/ws.sql2,024 100% 73.21kB/s 0:00:00 (xfr#6, to-chk=0/7)sent 964,284 bytes received 134 bytes 1,928,836.00 bytes/sec
total size is 963,552 speedup is 1.00
[root@sc-mysql backup]# 增加文件,或者删除文件,测试是否可以增量备份
[root@sc-mysql backup]# ls
2022-08-18_wangshuai.sql all_db.sql backup_db.sh hunan_liangliang.sql passwd tennis_player.sql ws.sql
[root@sc-mysql backup]# rm -rf passwd
[root@sc-mysql backup]# cp /etc/hosts .
[root@sc-mysql backup]# ls
2022-08-18_wangshuai.sql all_db.sql backup_db.sh hosts hunan_liangliang.sql tennis_player.sql ws.sql
[root@sc-mysql backup]# rsync -avH --port=873 --progress --delete /backup root@192.168.2.197::back_data --password-file=/etc/passwd.txtsending incremental file list
deleting backup/passwd
backup/
backup/hosts158 100% 0.00kB/s 0:00:00 (xfr#1, to-chk=3/8)sent 472 bytes received 56 bytes 1,056.00 bytes/sec
total size is 963,710 speedup is 1,825.21目前为止,只是实现了手工的去同步数据还没有实现自动的实时的同步
===
(2)安装sersync工具,实时触发rsync进行同步 --》安装到数据源服务器上
备注:Linux下支持inotify的内核最小为2.6.13,可以输入命令:#uname -a查看内核
CentOS 7.0内核为3.10.0,默认已经支持inotifyinotify已经默认在内核里安装了,不需要安装1、修改inotify默认参数(inotify默认内核参数值太小) 修改参数:
[root@sc-mysql backup]# sysctl -w fs.inotify.max_queued_events="99999999"
fs.inotify.max_queued_events = 99999999
[root@sc-mysql backup]# sysctl -w fs.inotify.max_user_watches="99999999"
fs.inotify.max_user_watches = 99999999
[root@sc-mysql backup]# sysctl -w fs.inotify.max_user_instances="65535"
fs.inotify.max_user_instances = 65535
[root@sc-mysql backup]#
永久修改参数
[root@sc-mysql backup]# vim /etc/sysctl.conf
fs.inotify.max_queued_events=99999999
fs.inotify.max_user_watches=99999999
fs.inotify.max_user_instances=655352、安装sersync
[root@sc-mysql backup]# yum install wget -y
[root@sc-mysql backup]# wget http://down.whsir.com/downloads/sersync2.5.4_64bit_binary_stable_final.tar.gz
[root@sc-mysql backup]# tar xf sersync2.5.4_64bit_binary_stable_final.tar.gz
[root@sc-mysql backup]# mv GNU-Linux-x86/ /usr/local/sersync
3、创建rsync
[root@sc-mysql backup]# cd /usr/local/sersync/
[root@sc-mysql sersync]# ls
confxml.xml sersync2
[root@sc-mysql sersync]#
备份配置文件,防止修改错了,不知道哪里出错,好还原
[root@sc-mysql sersync]# cp confxml.xml confxml.xml.bak
[root@sc-mysql sersync]# cp confxml.xml data_configxml.xml
[root@sc-mysql sersync]# ls
confxml.xml confxml.xml.bak data_configxml.xml sersync2
[root@sc-mysql sersync]#
data_configxml.xml 是后面需要使用的配置文件
4、修改配置 data_configxml.xml 文件第24行后的配置
<localpath watch="/backup"><remote ip="192.168.2.197" name="back_data"/><!--<remote ip="192.168.8.39" name="tongbu"/>--><!--<remote ip="192.168.8.40" name="tongbu"/>--></localpath><rsync><commonParams params="-artuz"/><auth start="false" users="root" passwordfile="/etc/passwd.txt"/><userDefinedPort start="false" port="874"/><!-- port=874 --><timeout start="false" time="100"/><!-- timeout=100 --><ssh start="false"/>
5、启动服务[root@sc-mysql sersync]# PATH=/usr/local/sersync/:$PATH
[root@sc-mysql sersync]# which sersync2
/usr/local/sersync/sersync2
[root@sc-mysql sersync]# [root@sc-mysql sersync]# echo 'PATH=/usr/local/sersync/:$PATH' >>/root/.bashrc
[root@sc-mysql sersync]# sersync2 -d -r -o /usr/local/sersync/data_configxml.xml
set the system param
execute:echo 50000000 > /proc/sys/fs/inotify/max_user_watches
execute:echo 327679 > /proc/sys/fs/inotify/max_queued_events
parse the command param
option: -d run as a daemon
option: -r rsync all the local files to the remote servers before the sersync work
option: -o config xml name: /usr/local/sersync/data_configxml.xml
daemon thread num: 10
parse xml config file
host ip : localhost host port: 8008
daemon start,sersync run behind the console
config xml parse success
please set /etc/rsyncd.conf max connections=0 Manually
sersync working thread 12 = 1(primary thread) + 1(fail retry thread) + 10(daemon sub threads)
Max threads numbers is: 22 = 12(Thread pool nums) + 10(Sub threads)
please according your cpu ,use -n param to adjust the cpu rate
------------------------------------------
rsync the directory recursivly to the remote servers once
working please wait...
execute command: cd /backup && rsync -artuz -R --delete ./ 192.168.2.197::back_data >/dev/null 2>&1
run the sersync:
watch path is: /backup
[root@sc-mysql sersync]#
[root@sc-mysql backup]# ps aux|grep sersync
root 25655 0.0 0.0 92324 704 ? Ssl 17:47 0:00 sersync2 -d -r -o /usr/local/sersync/data_configxml.xml
root 25673 0.0 0.0 112824 988 pts/1 S+ 17:48 0:00 grep --color=auto sersync
[root@sc-mysql backup]#
验证:去/backup目录下新建一些文件或者文件夹,测试是否在备份服务器上可以看到6、设置sersync监控开机自动执行
[root@sc-mysql backup]# vim /etc/rc.local
/usr/local/sersync/sersync2 -d -r -o /usr/local/sersync/data_configxml.xml密码不正确或者用户名不正确,也可以实时同步文件,思考底层是否利用了我们建立的ssh免密通道?熟悉rsync+sersync实现文件的实时同步=====
错误的问题:1.配置文件没有写内容,或者打错2.两边的服务器没有新建目录/backup -->特别是备份服务器上没有新建/backup[root@sc-mysql2 backup]# vim /etc/rsyncd.conf
uid = root
gid = root
use chroot = yes
max connections = 0
log file = /var/log/rsyncd.log
pid file = /var/run/rsyncd.pid
lock file = /var/run/rsync.lock
secrets file = /etc/rsync.pass
motd file = /etc/rsyncd.Motd
[back_data]path = /backup2 #存放备份文件的目录comment = A directory in which data is storedignore errors = yesread only = nohosts allow = 192.168.2.196备份服务器里的备份目录是/backup2,但是这个文件没有创建,导致不能备份过去
在备份服务器上需要我们去创建mkdir /backup2修改了rsyncd.conf配置文件,需要重启xinetd服务,会帮我们去重启rsync进程
[root@sc-mysql2 backup]# service xinetd restart
Redirecting to /bin/systemctl restart xinetd.service
[root@sc-mysql2 backup]# 排错查看日志
[root@sc-mysql2 backup]# cat /var/log/rsyncd.log
2022/08/18 16:13:19 [9455] rsyncd version 3.1.2 starting, listening on port 873
2022/08/18 16:35:08 [9472] name lookup failed for 192.168.2.196: Name or service not known
2022/08/18 16:35:08 [9472] connect from UNKNOWN (192.168.2.196)
2022/08/18 17:16:37 [9532] rsync: chroot /backup2 failed: No such file or directory (2) 错误信息
[root@sc-mysql2 backup]# [root@sc-mysql backup]# rsync -avH --port=873 --progress --delete /backup root@192.168.2.197::back_data --password-file=/etc/passwd.txt@ERROR: chroot failed
rsync error: error starting client-server protocol (code 5) at main.c(1649) [sender=3.1.2]
[root@sc-mysql backup]#
还原
[root@Sanchuang backup]# mysql -uroot -p'Sanchuang123#' <tennis.sql 基于时间:https://dev.mysql.com/doc/refman/5.7/en/point-in-time-recovery-binlog.html
基于位置号:https://dev.mysql.com/doc/refman/5.7/en/point-in-time-recovery-positions.html