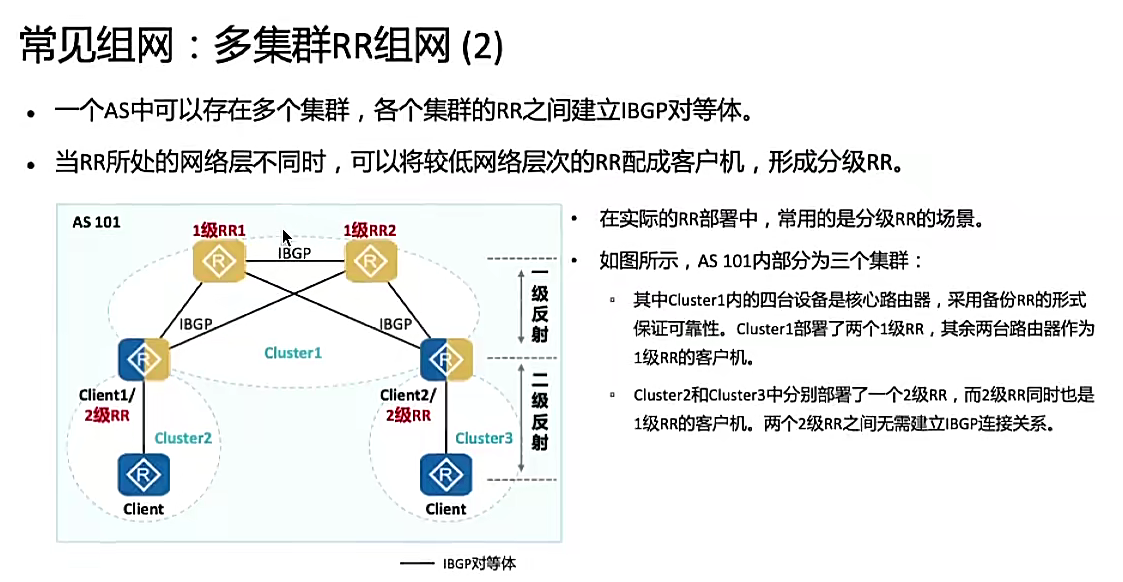
代码源码:
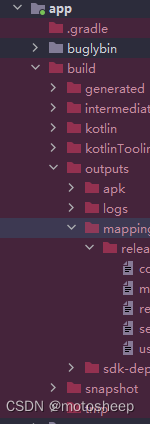
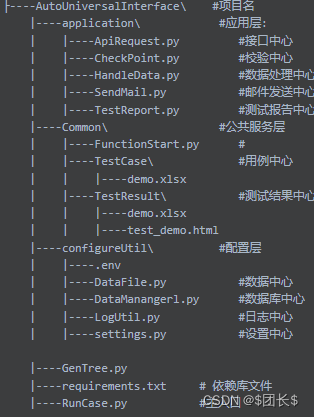
框架结构
核心代码
excel用例demo

excel数据处理
from configureUtil.LogUtil import getlog
logger = getlog(targetName='HandleData')
import xlrd
from openpyxl import load_workbook,workbook
from openpyxl.styles import Font, colors
import openpyxl
import os
# from Common.FunctionStart import MoveSpace
# from openpyxl import load_workbook
# from openpyxl.reader.excel import load_workbook
# from openpyxl.styles import Color, Font, Alignment
# from openpyxl.styles import colors
'''
1、cope一份用例所保存的excel,当做执行环境保证测试数据清洁。
2、读取excle数据,返回dick形式的结果。
'''class ExcelHander():'''excel操作类,对外提供取excle返回dick结果功能、新增excel、sheet、cope excel功能、写入excel功能等。'''def __init__(self,filepath):self.filepath=filepathself.wb=xlrd.open_workbook(filepath)#加载excelself.sheet_names=self.wb.sheet_names()#获取excel所有sheet名集合形如:['test', 'test2', 'test3']def ExcelDick(self,SheetName):''':param SheetName: excel的sheet名字:return: 返回读取excel字典类型数据'''table = self.wb.sheet_by_name(SheetName)# 获取总行数rowNum = table.nrows# 获取总列数colNum = table.ncolsif rowNum<=1:logger.error('总行数小于等于1行')else:logger.debug('开始解析excel----excel总行数:%s'%rowNum)# 获取第一行(表头)keys = table.row_values(0)print(keys)r=[]j=1for i in range(rowNum-1):s={}# 从第二行开始values=table.row_values(j)print(values)for x in range(colNum):s[keys[x]]=values[x]r.append(s)j+=1# logger.debug('返回列名:%s'%r)ExcelDick={}ExcelDick[SheetName]=rlogger.debug('ExcelDick:%s' % ExcelDick)return ExcelDick #形如ExcelDick{'sheetName':[{列名:values},{列名:values}]}def sheet_method(self,work_book, add_sheet=[]):wk = work_book# rename default sheetss_sheet = wk["Sheet"]# ss_sheet = wk.get_sheet_by_name('Sheet')ss_sheet.title = add_sheet[0]for i in range(1, len(add_sheet)):# add new sheetwk.create_sheet(add_sheet[i])# switch to active sheet# sheet_num = wk.get_sheet_names()sheet_num = wk.sheetnameslast_sheet = len(sheet_num) - 1sheet_index = sheet_num.index(sheet_num[last_sheet])wk.active = sheet_indexdef CreateExcel(self,filepath,add_sheet=[]):''':param filepath: excel地址:return: 无'''# 新建一个工作簿p1=os.path.exists(filepath)#判断是否存在if p1:os.remove(filepath)wb2 = workbook.Workbook()self.sheet_method(wb2,add_sheet)logger.debug('新建excle:%s' % filepath)wb2.save(filepath)def CopeExcel(self,filepath,newexcelPath,i=0):''':param filepath: 原excel地址:param newexcelPath: 新excel地址:param SheetName: 原sheet的名字:return: 无'''# 读取数据logger.debug('读取数据excle:%s' % filepath)source = openpyxl.load_workbook(filepath)target = openpyxl.load_workbook(newexcelPath)sheets1 = source.sheetnamessheets2 = target.sheetnameslogger.info('源sheet列表:%s,目标sheet列表:%s'%(sheets1,sheets2))sheet1 = source[sheets1[i]]logger.debug('获取sheet:%s' % sheet1)sheet2 = target[sheets2[i]]table = self.wb.sheet_by_name(sheets1[i])# 获取总行数max_row = table.nrows# 获取总列数max_cloumn = table.ncolsfor m in list(range(1, max_row + 1)):for n in list(range(97, 97 + max_cloumn)):  # 字母a=97n = chr(n)i = '%s%d' % (n, m)cell1 = sheet1[i].value  # 获取文本数据# log.debug('获取文本数据:%s'%cell1)sheet2[i].value = cell1logger.debug('保存数据')target.save(newexcelPath)  # 保存数据source.close()target.close()def WriteExcel(self,filepath,row,cloumn,values,i):''':param filepath: excel地址:param row: 行号:param cloumn: 列号:param values: 值:param i: sheet的索引:return: 无'''excelpath = load_workbook(filepath)sheets = excelpath.sheetnamesexcelpath[sheets[i]].cell(row, cloumn).value = valuesexcelpath.save(filepath)logger.debug('写数据完成:sheet:%s 行:%s,列:%s,值:%s' % (sheets[i],row, cloumn, values))def AssembleCase(filepath,newexcelPath):'''测试用例组装工厂:return: 测试用例'''#新增同名excel、sheettest = ExcelHander(filepath)#实例化add_sheet = test.sheet_names#获取sheetname列表:['sheet1','sheet2']test.CreateExcel(newexcelPath, add_sheet)#创建excel及sheet(cope原excel新建空的execle)#给excel填充数据for i in range(len(add_sheet)):test.CopeExcel( filepath, newexcelPath, i)#按sheet分组,组装request数据wb = xlrd.open_workbook(newexcelPath)  # 加载新excelsheet_names = wb.sheet_names()  # 获取excel所有sheet名集合形如:['sheet1', 'sheet2', 'sheet3']caselist=[]for i in range(len(sheet_names)):caselist.append(test.ExcelDick(sheet_names[i]))#返回所有sheet集合,形如ExcelDick[{'sheetName':[{列名:values},{列名:values}]},{'sheetName':[{列名:values},None]#接口请求数据return caselistdef wordFormat(filepath,postition,size,name,bold,italic,i=0):'''格式化表格数据postition,位置如A1size,字体大小name,字体类型名color,字体颜色bold,是否加粗italic,是否斜体i,sheet索引:param filepath:指定excle:return:'''#激活exclewb = openpyxl.load_workbook(filepath)sheet1 = wb.worksheets[i]italic24Font = Font(size=size, name=name, bold=bold ,italic=italic)sheet1[postition].font = italic24Fontwb.save(filepath)def backFormat(filepath,n,m,fgColor,i=0):''':param n: 行号:param m: 列号:param fgColor: 颜色 # blue 23ff00 greet 6e6fff  red ff0f06:param i: sheet索引:return:'''import openpyxl.styles as stywb = openpyxl.load_workbook(filepath)sheet1 = wb.worksheets[i]sheet1.cell(row=n, column=m).fill = sty.fills.PatternFill(fill_type='solid',fgColor=fgColor)wb.save(filepath)def excleFormat(filepath):'''filepath 格式化excle:return:excel表头宋体斜体加粗背景色blue 12号 6e6fff其他内容宋体背景色无 11号 ffffff成功的 宋体背景色绿色 11号 23ff00失败 宋体背景色绿色 11号 ff0f06'''wb = xlrd.open_workbook(filepath)#加载sheet_names = wb.sheet_names()  # 获取excel所有sheet名集合形如:['test', 'test2', 'test3']#######字体if sheet_names==[]:logger.debug('excel是空sheet')passelse:for i,SheetName in enumerate(sheet_names)  :table = wb.sheet_by_name(SheetName)# logger.debug('获取第%s个sheet=%s'%(i,SheetName))# 获取总行数rowNum = table.nrows# logger.debug('行数:%s'%(rowNum))# 获取总列数colNum = table.ncols# logger.debug('列数:%s' % (colNum))name='Times New Roman'if rowNum<1:# logger.debug('空sheet')passelse:for m in list(range(1, rowNum + 1)):for n in list(range(97, 97 + colNum)):  # 字母a=97if m==1:n = chr(n)postition = '%s%d' % (n, m)color='6e6fff'bold=Trueitalic=Truesize=12# logger.debug('格式第一行数据')wordFormat(filepath, postition, size, name, bold, italic, i)fgColor='6e6fff'backFormat(filepath,m, ord(n)-96, fgColor, i)else:n = chr(n)postition = '%s%d' % (n, m)color = '6e6fff'bold = Falseitalic = Falsesize = 11# logger.debug('格式化%s行数据'%(m))wordFormat(filepath, postition, size, name, bold, italic, i)cell_value = table.cell_value(m-1,10)if cell_value=='TRUE'or cell_value==1 :fgColor='23ff00'# logger.debug('获取到结果:TRUE')backFormat(filepath,m, 11, fgColor, i)elif cell_value=='FLASE' or cell_value==0:fgColor = 'ff0f06'# logger.debug('获取到结果:FLASE')backFormat(filepath,m, 11, fgColor, i)else:logger.error('行号:%s ' % (m - 1))# logger.error('没有获取到结果:%s'%cell_value)########背景色if __name__=='__main__':filepath = r'E:\plant\AutoUniversalInterface\Common\TestCase\demo.xlsx'newexcelPath=r'E:\plant\AutoUniversalInterface\Common\TestResult\demo.xlsx'# 打开excelpostition='A1'size=14#大小name='Times New Roman'#字体color=colors.BLACK#字体颜色bold = False #是否加粗italic = True #是否斜体# headerFormat(filepath, postition,size, name, color,bold,italic)# wordFormat(filepath, postition, size, name, bold, italic, i=0)# fgColor = '23ff00'# n=2# m=11# backFormat(filepath,n, m, fgColor, i=0)# wb = xlrd.open_workbook(filepath)# table = wb.sheet_by_name('test')## cell_value = table.cell_value(1, 10)# print(cell_value)excleFormat(newexcelPath)
requests请求封装
import requests
# 禁用安全请求警告
import urllib3
urllib3.disable_warnings()
import jsondef callInterface(session,url, param=None,parammode='data', method='post', headers=None,verify=False,  jsonResponse=True):"""封装的http请求方法,接受session url, param, method, verify, headers 发起http请求并返回接口返回的json:param session: requests session 对象:param url: 请求地址:param param: 请求参数:param parammode:请求参数传入方式 data/json:param method: 请求方式 默认post:param verify: ssl检验 默认关:param headers: http headers:param jsonResponse: 是否json格式response标志:return: 接口返回内容/None"""logger.debug(f'开始调用接口:{url},参数为:{param}')res = NonereturnJson = Noneif method == 'POST':logger.debug(f'请求方法为:%s'%method)if parammode=='data':logger.debug(f'请求参数类型为:%s' % parammode)res = session.post(url, data=param, verify=verify, headers=headers)elif parammode=='json':logger.debug(f'请求参数类型为:%s' % parammode)res = session.post(url, json=param, verify=verify, headers=headers)elif method == 'GET':logger.debug(f'请求方法为:%s' % method)res = session.get(url, params=param, verify=verify, headers=headers)try:if res.status_code == 200:logger.debug(f'接口响应码:200')if jsonResponse:try:returnJson = res.json()except (TypeError, json.JSONDecodeError) as e:logger.error(f'请求接口:{url}出错,返回:{res.text}')logger.error(e)return {'fail':str(e)}else:try:returnJson = {'returnText': res.text[:1000]}except Exception as e:logger.error('请求接口出错')logger.error(e)return {}else:logger.error('请求接口失败!响应码非200!')logger.debug(f'接口调用完成 返回:{returnJson}')return returnJsonexcept Exception as e:return {'fail':str(e)}
检查点函数
"""
检查中心
1、检查结果是否包含于预期结果
2、结果的sql执行结果是否等于预期
3、没有检查条件走默认检查
"""
from configureUtil.LogUtil import getlog
logger = getlog(targetName='CheckPoint')
from configureUtil.DataManangerl import DBmananger#判断dict1的key是否存在dict2中
def KeyExist(dict1,dict2):n = 0if dict1=={}:return Falsefor key in dict1.keys():if key in dict2.keys():passn=n+1if n==len(dict1):return Trueelse:return False#判断dict2是否包含dict1
def Compare_ListDict(dick1, dick2):flag = Falsen = 0keyexist=KeyExist(dick1, dick2)if keyexist ==True:for i in dick1.keys():n=n+1if dick1[i] != dick2[i]:breakelif n==len(dick1):flag = Trueelif dick1=={}:flag = Trueelse:passreturn flag"""判断sql结果是否为()"""def JudgeSqlEmpty(sql,env):''':param sql: 需要执行sql:param env: 执行环境:return: 执行结果:true或者false'''try:result=DBmananger(env).callMysql(sql)logger.debug(result)except Exception as e:logger.error(e)result=()if result==():return Falseelse:return True
数据处理工厂
# 预置条件、用例依赖处理中心:
# 1、用例依赖标志
# 2、数据处理:支持sql增删改查操作
from configureUtil.LogUtil import getlog
from Common.FunctionStart import MoveSpace
logger = getlog(targetName='Precondition')
def DataSplit(SplitSign=';',StringOne=''):if isinstance(StringOne,str):result=StringOne.split(SplitSign,-1)else:result=[]result=list(filter(None, result))#去掉列表空字符及Nonereturn resultdef todict(func,SplitSign=';',StringOne=''):'''数据分离器:param StringOne: string类型入参:param SplitSign: 分离标志:如以冒号分离,则传入":":return: 分离list结果:{[{'SQL':[,]}],['$':[,]]}'''MoveSpace(StringOne)SplitSign = ';'SplitSign1 = (func(SplitSign,StringOne))# print(SplitSign1)dict = {}list1 = []list2 = []list3 = []# print(SplitSign1)import re# keys=re.findall(r'SQL:',StringOne,re.I)+re.findall(r'(\$[a-z]+):',StringOne,re.I)for i in SplitSign1:values = i.split(':')list1.append(MoveSpace(values[-1]))  # valueslist2.append(MoveSpace(values[0]))  # keysif MoveSpace(values[0]) in dict.keys():for i in dict[MoveSpace(values[0])]:list3.append(i)list3.append(MoveSpace(values[-1]))dict[MoveSpace(values[0])] = list3else:list4=[]list4.append(MoveSpace(values[-1]))dict[MoveSpace(values[0])] = list4return dict
发送邮件函数
import smtplib
from email.mime.text import MIMEText
from email.mime.multipart import MIMEMultipart
from email.header import Header
from email import encoders
from email.mime.base import MIMEBase
from email.utils import parseaddr, formataddr
from configureUtil.DataFile import mailenv# 格式化邮件地址
def formatAddr(s):name, addr = parseaddr(s)return formataddr((Header(name, 'utf-8').encode(), addr))
def sendMail(body, attachment,title='接口自动化测试报告'):# smtp_server = 'smtp.163.com'smtp_server = 'mail.suishouji.com'smtp_server = mailenv['smtp_server']from_mail = mailenv['from_mail']mail_pass =mailenv['smtp_server']mail_passwd=mailenv['mail_passwd']to_mail = mailenv['to_mail']cc_mail = mailenv['cc_mail']# 构造一个MIMEMultipart对象代表邮件本身msg = MIMEMultipart()# msg = MIMEText('hello, send by Python...', 'plain', 'utf-8')# Header对中文进行转码msg['From'] = formatAddr('<%s>' % (from_mail))msg['To'] = formatAddr('<%s>' % (to_mail))msg['Cc'] = formatAddr('<%s>' % (cc_mail))msg['Subject'] = Header('%s'% title).encode()# to_mail = to_mail.split(',')# cc_mail= cc_mail.split(',')to_mail.extend(cc_mail)# plain代表纯文本msg.attach(MIMEText(body, 'plain', 'utf-8'))# 二进制方式模式文件for i in range(len(attachment)):with open(attachment[i], 'rb') as f:# MIMEBase表示附件的对象mime = MIMEBase('text', 'txt', filename=attachment[i])# filename是显示附件名字,加上必要的头信息:mime.add_header('Content-Disposition', 'attachment', filename=attachment[i])mime.add_header('Content-ID', '<0>')mime.add_header('X-Attachment-Id', '0')# 获取附件内容mime.set_payload(f.read())# 用Base64编码:encoders.encode_base64(mime)# 作为附件添加到邮件msg.attach(mime)# msg.attach(MIMEText(html, 'html', 'utf-8'))try:server = smtplib.SMTP(smtp_server, "25")server.set_debuglevel(1)server.login(from_mail, mail_passwd)server.sendmail(from_mail,to_mail,msg.as_string())  # as_string()把MIMEText对象变成strlogger.info ("邮件发送成功!")server.quit()except smtplib.SMTPException as e:logger.error ("Error: %s" % e)