在2021年1月,OpenAI宣布了两个新模型:DALL-E和CLIP,它们都是以某种方式连接文本和图像的多模态模型。CLIP全称是Contrastive Language–Image Pre-training,一种基于对比文本-图像对的预训练方法。为什么要介绍CLIP呢?因为现在大火得Stable Diffusion 并不是单一模型,而是多个模型组成。其中会用到一个 Text encoder 将用户的文本输入进行编码,这个 text encoder 就是 CLIP 模型中 text encoder
CLIP模型在训练时,可以给它一个输入句子,并提取最相关的图像来配合它。CLIP学习了一个完整的句子和它所描述的图像之间的关系。也就是说它是在完整的句子上训练的,而不是像“汽车”、“狗”等离散的分类,这一点对于应用至关重要。当训练完整的短语时,模型可以学习更多的东西,并识别照片和文本之间的模式。他们还证明,当在相当大的照片和与之相对应的句子数据集上进行训练时,该模型是可以作为分类器的。CLIP在发布的时候能在无任何微调的情况下(zero-shot ),在 ImageNet 数据集上的分类表现超 ResNets-50 微调后的效果,也就是说他是非常有用的。

所以在本文中,我们将使用PyTorch中从头开始实现CLIP模型,以便我们对CLIP有一个更好的理解
这里就需要用到2个库:timm和transformers,我们先导入代码
import osimport cv2import gcimport numpy as npimport pandas as pdimport itertoolsfrom tqdm.autonotebook import tqdmimport albumentations as Aimport matplotlib.pyplot as pltimport torchfrom torch import nnimport torch.nn.functional as Fimport timmfrom transformers import DistilBertModel, DistilBertConfig, DistilBertTokenizer
下一步就是预处理数据和通用配置config。config是一个普通的python文件,我们将所有的超参数放在里面,如果使用Jupyter Notebook的情况下,它是一个在Notebook开头定义的类。
class CFG:debug = Falseimage_path = "../input/flickr-image-dataset/flickr30k_images/flickr30k_images"captions_path = "."batch_size = 32num_workers = 4head_lr = 1e-3image_encoder_lr = 1e-4text_encoder_lr = 1e-5weight_decay = 1e-3patience = 1factor = 0.8epochs = 2device = torch.device("cuda" if torch.cuda.is_available() else "cpu")model_name = 'resnet50'image_embedding = 2048text_encoder_model = "distilbert-base-uncased"text_embedding = 768text_tokenizer = "distilbert-base-uncased"max_length = 200pretrained = True # for both image encoder and text encodertrainable = True # for both image encoder and text encodertemperature = 1.0# image sizesize = 224# for projection head; used for both image and text encodersnum_projection_layers = 1projection_dim = 256 dropout = 0.1
还有一些我们自定义指标的辅助类
class AvgMeter:def __init__(self, name="Metric"):self.name = nameself.reset()def reset(self):self.avg, self.sum, self.count = [0] * 3def update(self, val, count=1):self.count += countself.sum += val * countself.avg = self.sum / self.countdef __repr__(self):text = f"{self.name}: {self.avg:.4f}"return textdef get_lr(optimizer):for param_group in optimizer.param_groups:return param_group["lr"]
我们的目标是描述图像和句子。所以数据集必须同时返回句子和图像。所以需要使用DistilBERT标记器对句子(标题)进行标记,然后将标记id (input_ids)和注意掩码提供给DistilBERT。DistilBERT比BERT 模型要小,但是模型的结果都差不多,所以我们选择使用它。
下一步就是使用HuggingFace tokenizer进行标记化。在__init__中获得的tokenizer对象,将在模型运行时加载。标题被填充并截断到预定的最大长度。在加载相关图像之前,我们将在**getitem**中加载一个编码的标题,这是一个带有键input_ids和attention_mask的字典,并对其进行转换和扩充(如果有的话)。然后把它变成一个张量,并以“image”作为键存储在字典中。最后我们将标题的原始文本与关键字“标题”一起输入字典。
class CLIPDataset(torch.utils.data.Dataset):def __init__(self, image_filenames, captions, tokenizer, transforms):"""image_filenames and cpations must have the same length; so, if there aremultiple captions for each image, the image_filenames must have repetitivefile names """self.image_filenames = image_filenamesself.captions = list(captions)self.encoded_captions = tokenizer(list(captions), padding=True, truncation=True, max_length=CFG.max_length)self.transforms = transformsdef __getitem__(self, idx):item = {key: torch.tensor(values[idx])for key, values in self.encoded_captions.items()}image = cv2.imread(f"{CFG.image_path}/{self.image_filenames[idx]}")image = cv2.cvtColor(image, cv2.COLOR_BGR2RGB)image = self.transforms(image=image)['image']item['image'] = torch.tensor(image).permute(2, 0, 1).float()item['caption'] = self.captions[idx]return itemdef __len__(self):return len(self.captions)def get_transforms(mode="train"):if mode == "train":return A.Compose([A.Resize(CFG.size, CFG.size, always_apply=True),A.Normalize(max_pixel_value=255.0, always_apply=True),])else:return A.Compose([A.Resize(CFG.size, CFG.size, always_apply=True),A.Normalize(max_pixel_value=255.0, always_apply=True),])
图像和文本编码器:我们将使用ResNet50作为图像编码器。
class ImageEncoder(nn.Module):"""Encode images to a fixed size vector"""def __init__(self, model_name=CFG.model_name, pretrained=CFG.pretrained, trainable=CFG.trainable):super().__init__()self.model = timm.create_model(model_name, pretrained, num_classes=0, global_pool="avg")for p in self.model.parameters():p.requires_grad = trainabledef forward(self, x):return self.model(x)
使用DistilBERT作为文本编码器。使用CLS令牌的最终表示来获得句子的整个表示。
class TextEncoder(nn.Module):def __init__(self, model_name=CFG.text_encoder_model, pretrained=CFG.pretrained, trainable=CFG.trainable):super().__init__()if pretrained:self.model = DistilBertModel.from_pretrained(model_name)else:self.model = DistilBertModel(config=DistilBertConfig())for p in self.model.parameters():p.requires_grad = trainable# we are using the CLS token hidden representation as the sentence's embeddingself.target_token_idx = 0def forward(self, input_ids, attention_mask):output = self.model(input_ids=input_ids, attention_mask=attention_mask)last_hidden_state = output.last_hidden_statereturn last_hidden_state[:, self.target_token_idx, :]
上面的代码已经将图像和文本编码为固定大小的向量(图像2048,文本768),我们需要图像和文本具有相似的尺寸,以便能够比较它们,所以我们把2048维和768维向量投影到256维(projection_dim),只有维度相同我们才能比较它们。
class ProjectionHead(nn.Module):def __init__(self,embedding_dim,projection_dim=CFG.projection_dim,dropout=CFG.dropout):super().__init__()self.projection = nn.Linear(embedding_dim, projection_dim)self.gelu = nn.GELU()self.fc = nn.Linear(projection_dim, projection_dim)self.dropout = nn.Dropout(dropout)self.layer_norm = nn.LayerNorm(projection_dim)def forward(self, x):projected = self.projection(x)x = self.gelu(projected)x = self.fc(x)x = self.dropout(x)x = x + projectedx = self.layer_norm(x)return x
所以最后我们的CLIP模型就是这样:
class CLIPModel(nn.Module):def __init__(self,temperature=CFG.temperature,image_embedding=CFG.image_embedding,text_embedding=CFG.text_embedding,):super().__init__()self.image_encoder = ImageEncoder()self.text_encoder = TextEncoder()self.image_projection = ProjectionHead(embedding_dim=image_embedding)self.text_projection = ProjectionHead(embedding_dim=text_embedding)self.temperature = temperaturedef forward(self, batch):# Getting Image and Text Featuresimage_features = self.image_encoder(batch["image"])text_features = self.text_encoder(input_ids=batch["input_ids"], attention_mask=batch["attention_mask"])# Getting Image and Text Embeddings (with same dimension)image_embeddings = self.image_projection(image_features)text_embeddings = self.text_projection(text_features)# Calculating the Losslogits = (text_embeddings @ image_embeddings.T) / self.temperatureimages_similarity = image_embeddings @ image_embeddings.Ttexts_similarity = text_embeddings @ text_embeddings.Ttargets = F.softmax((images_similarity + texts_similarity) / 2 * self.temperature, dim=-1)texts_loss = cross_entropy(logits, targets, reduction='none')images_loss = cross_entropy(logits.T, targets.T, reduction='none')loss = (images_loss + texts_loss) / 2.0 # shape: (batch_size)return loss.mean()#这里还加了一个交叉熵函数def cross_entropy(preds, targets, reduction='none'):log_softmax = nn.LogSoftmax(dim=-1)loss = (-targets * log_softmax(preds)).sum(1)if reduction == "none":return losselif reduction == "mean":return loss.mean()
这里需要说明下,CLIP使用 symmetric cross entropy 作为损失函数,可以降低噪音影响,提高模型鲁棒性,我们这里为了简单只是用cross entropy 。
我们可以进行测试:
# A simple Examplebatch_size = 4dim = 256embeddings = torch.randn(batch_size, dim)out = embeddings @ embeddings.Tprint(F.softmax(out, dim=-1))
下一步就是训练了,有一些函数可以帮助我们加载训练和验证的dataloader
def make_train_valid_dfs():dataframe = pd.read_csv(f"{CFG.captions_path}/captions.csv")max_id = dataframe["id"].max() + 1 if not CFG.debug else 100image_ids = np.arange(0, max_id)np.random.seed(42)valid_ids = np.random.choice(image_ids, size=int(0.2 * len(image_ids)), replace=False)train_ids = [id_ for id_ in image_ids if id_ not in valid_ids]train_dataframe = dataframe[dataframe["id"].isin(train_ids)].reset_index(drop=True)valid_dataframe = dataframe[dataframe["id"].isin(valid_ids)].reset_index(drop=True)return train_dataframe, valid_dataframedef build_loaders(dataframe, tokenizer, mode):transforms = get_transforms(mode=mode)dataset = CLIPDataset(dataframe["image"].values,dataframe["caption"].values,tokenizer=tokenizer,transforms=transforms,)dataloader = torch.utils.data.DataLoader(dataset,batch_size=CFG.batch_size,num_workers=CFG.num_workers,shuffle=True if mode == "train" else False,)return dataloader
然后就是训练和评估
def train_epoch(model, train_loader, optimizer, lr_scheduler, step):loss_meter = AvgMeter()tqdm_object = tqdm(train_loader, total=len(train_loader))for batch in tqdm_object:batch = {k: v.to(CFG.device) for k, v in batch.items() if k != "caption"}loss = model(batch)optimizer.zero_grad()loss.backward()optimizer.step()if step == "batch":lr_scheduler.step()count = batch["image"].size(0)loss_meter.update(loss.item(), count)tqdm_object.set_postfix(train_loss=loss_meter.avg, lr=get_lr(optimizer))return loss_meterdef valid_epoch(model, valid_loader):loss_meter = AvgMeter()tqdm_object = tqdm(valid_loader, total=len(valid_loader))for batch in tqdm_object:batch = {k: v.to(CFG.device) for k, v in batch.items() if k != "caption"}loss = model(batch)count = batch["image"].size(0)loss_meter.update(loss.item(), count)tqdm_object.set_postfix(valid_loss=loss_meter.avg)return loss_meter
最后整合起来就是全部流程
def main():train_df, valid_df = make_train_valid_dfs()tokenizer = DistilBertTokenizer.from_pretrained(CFG.text_tokenizer)train_loader = build_loaders(train_df, tokenizer, mode="train")valid_loader = build_loaders(valid_df, tokenizer, mode="valid")model = CLIPModel().to(CFG.device)params = [{"params": model.image_encoder.parameters(), "lr": CFG.image_encoder_lr},{"params": model.text_encoder.parameters(), "lr": CFG.text_encoder_lr},{"params": itertools.chain(model.image_projection.parameters(), model.text_projection.parameters()), "lr": CFG.head_lr, "weight_decay": CFG.weight_decay}]optimizer = torch.optim.AdamW(params, weight_decay=0.)lr_scheduler = torch.optim.lr_scheduler.ReduceLROnPlateau(optimizer, mode="min", patience=CFG.patience, factor=CFG.factor)step = "epoch"best_loss = float('inf')for epoch in range(CFG.epochs):print(f"Epoch: {epoch + 1}")model.train()train_loss = train_epoch(model, train_loader, optimizer, lr_scheduler, step)model.eval()with torch.no_grad():valid_loss = valid_epoch(model, valid_loader)if valid_loss.avg < best_loss:best_loss = valid_loss.avgtorch.save(model.state_dict(), "best.pt")print("Saved Best Model!")lr_scheduler.step(valid_loss.avg)
应用:获取图像嵌入并找到匹配。
我们训练完成后如何实际应用呢?我们需要编写一个函数加载训练后的模型,为其提供验证集中的图像,并返回形状(valid_set_size, 256)和模型本身的image_embeddings。
def get_image_embeddings(valid_df, model_path):tokenizer = DistilBertTokenizer.from_pretrained(CFG.text_tokenizer)valid_loader = build_loaders(valid_df, tokenizer, mode="valid")model = CLIPModel().to(CFG.device)model.load_state_dict(torch.load(model_path, map_location=CFG.device))model.eval()valid_image_embeddings = []with torch.no_grad():for batch in tqdm(valid_loader):image_features = model.image_encoder(batch["image"].to(CFG.device))image_embeddings = model.image_projection(image_features)valid_image_embeddings.append(image_embeddings)return model, torch.cat(valid_image_embeddings)_, valid_df = make_train_valid_dfs()model, image_embeddings = get_image_embeddings(valid_df, "best.pt")def find_matches(model, image_embeddings, query, image_filenames, n=9):tokenizer = DistilBertTokenizer.from_pretrained(CFG.text_tokenizer)encoded_query = tokenizer([query])batch = {key: torch.tensor(values).to(CFG.device)for key, values in encoded_query.items()}with torch.no_grad():text_features = model.text_encoder(input_ids=batch["input_ids"], attention_mask=batch["attention_mask"])text_embeddings = model.text_projection(text_features)image_embeddings_n = F.normalize(image_embeddings, p=2, dim=-1)text_embeddings_n = F.normalize(text_embeddings, p=2, dim=-1)dot_similarity = text_embeddings_n @ image_embeddings_n.Tvalues, indices = torch.topk(dot_similarity.squeeze(0), n * 5)matches = [image_filenames[idx] for idx in indices[::5]]_, axes = plt.subplots(3, 3, figsize=(10, 10))for match, ax in zip(matches, axes.flatten()):image = cv2.imread(f"{CFG.image_path}/{match}")image = cv2.cvtColor(image, cv2.COLOR_BGR2RGB)ax.imshow(image)ax.axis("off")plt.show()
调用方法如下:
find_matches(model, image_embeddings,query="one dog sitting on the grass",image_filenames=valid_df['image'].values,n=9)
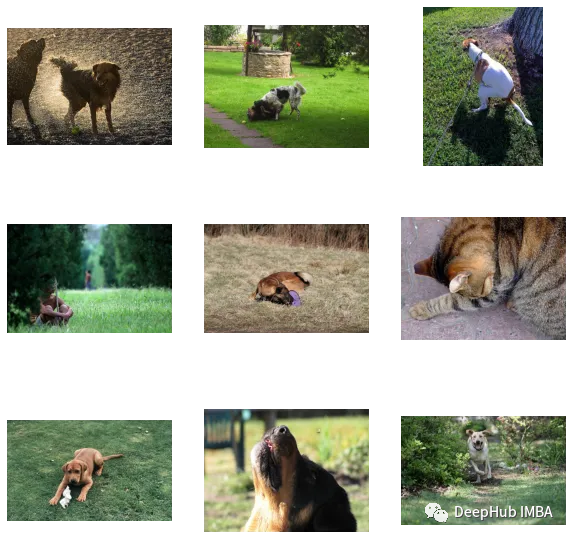
可以看到我们自定义效果还是不错的(但是图里面有个猫,哈)。也就是说CLIP这种方法在小数据集上自定义也是可行的。
以下是本文的代码和数据集:
https://avoid.overfit.cn/post/25295aa8daee45fc8336b2e86a29106a
作者:Jyoti Dabass, Ph.D


![【Flutter】引入网络图片时,提示:Failed host lookup: ‘[图片host]‘](https://img-blog.csdnimg.cn/img_convert/598930c90963d9f6bff62257d937d0b8.png)