目录
1. 修改源码,让模型能够生成出对于单个图像的标注。
2. 把数据转为yolo格式
3.把yolo格式转化为xml格式
这两天想偷懒,想让模型先在数据上标一遍,然后我再做修正,主要是图个省事。由于我们主要是利用paddle,模型也是基于paddle推理的,因此即便我对paddle有一万个吐槽但也不得不用它。但在利用paddle保存推理结果文件时,遇到了一个大问题:就是paddle推理出来的所有数据都在同一个json文件,并且导入labelimg中也不能正常的显示到标注的框,不能对数据进行矫正。因此我就想着在代码中间能不能修改某些内容。
如果你是真想把json文件转化为yolo或者xml的话,那哥们儿,你的思路走窄了,从json里面分离出那么多垃圾消息出来,很难的 !!!
接下来介绍一下我的做法:
1. 修改源码,让模型能够生成出对于单个图像的标注。
首先就是修改源码,对应的文件为 PaddleDetection/ppdet/engine/trainer.py 。
添加下述代码:
class_label=['背景','添加你的检测物品标签']
def save_result_txt(save_path,boxs,threshold=0.5):#,tszie=640,osize=608with open(save_path,'w') as f:for msg in boxs:if msg['score']>threshold:bbox=msg['bbox']x1,y1,w,h=bboximg_m = Image.open('dataset/yz_new_0815/data/0.5data/'+save_path.split('/')[-1].replace('txt','jpg'))# dw = 1./img_m.width  # 图片的宽# dh = 1./img_m.height  # 图片的高print(save_path)# returnbbox=np.array([x1,y1,x1+w,y1+h])#bbox=bbox*(tszie/osize)bbox=bbox.astype(np.int32)x1,y1,x2,y2=bbox# strs='%s %s %s %s %s %s\n'%(class_label[msg['category_id']],msg['score'],x1,y1,x2,y2)strs='%s %s %s %s %s\n'%(msg['category_id'],x1,y1,x2,y2)f.write(strs)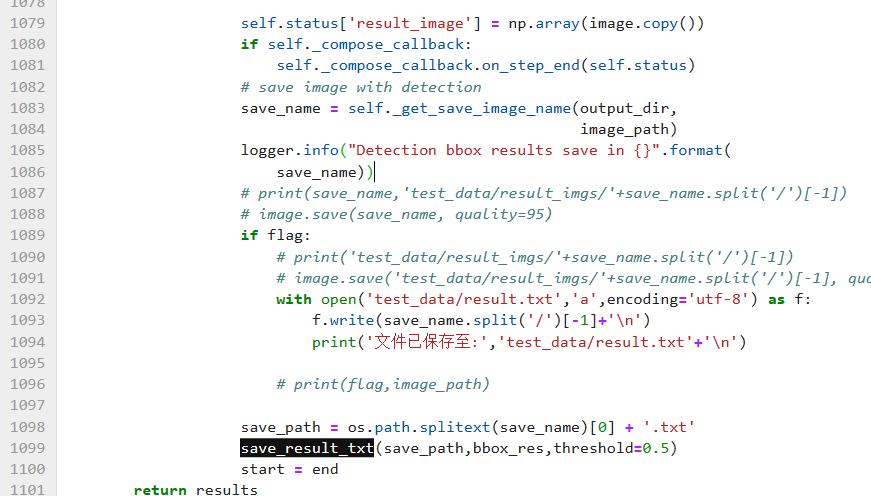
之后在命令行中,令save_result为True,就能保存推理的结果了。从代码中可以看出,得到的数据就是四个点的坐标,非常真诚,不想yolo那种还得归一化或者相对长宽啥的。讲真的,我就听喜欢四个点坐标这种格式的,真诚永远是必杀技。但是没办法,我目前好像没见有这种格式的。
2. 把数据转为yolo格式
书接上回,上回说到我们已经把数据变成yolo的形式,而非格式,因为我们没有对数据进行一个归一化的处理。因此在这一回我们把数据归一化,得到yolo格式的数据。代码如下:
# -*- coding:utf-8 -*-
# 作用:
# 将图片标注文件转化成yolo格式的txt标注文件
#
#
import sys
import os
import cv2
import randomdata_base_dir = "./20221210_result/"  # 这里就是推理出来的yolo形式的数据(姑且叫position数据)文件所在的文件夹file_list = []for file in os.listdir(data_base_dir):if file == 'classes.txt':continueif file.endswith(".txt"):# print(file)img_name = file[:-4]print(file)# print(file[:-4])    #得到图片名,不带后缀imginfo = cv2.imread('图像所在位置文件夹' + img_name + '.jpg').shape# h = shape[0]  w = shape[1]raw_file = open(data_base_dir + file)  # 返回一个文件对象print('raw_file is ' + data_base_dir + file)new_file = open('yolo格式标注文件位置文件夹' + file, 'a+')line = raw_file.readline()  # 调用文件的 readline()方法while line:print(line)line = line.split(" ")print(line[1])# line[0] = float(line[0])x1 = float(line[1])print(x1)y1 = float(line[2])x2 = float(line[3])y2 = float(line[4])h = imginfo[0]w = imginfo[1]print('h== ' + str(h))print('w== ' + str(w))new_x = "%.6s" % ((x1 + x2) / (2 * w))new_y = "%.6s" % ((y1 + y2) / (2 * h))new_w = "%.6s" % ((x2 - x1) / w)new_h = "%.6s" % ((y2 - y1) / h)new_file.write(line[0] + ' ' + new_x + ' ' + new_y + ' ' + new_w + ' ' + new_h + '\n')print(line[0] + ' ' + new_x + ' ' + new_y + ' ' + new_w + ' ' + new_h + '\n')# print line                  # 后面跟 ',' 将忽略换行符# print(line, end = '')       # 在 Python 3 中使用line = raw_file.readline()
new_file.close()
raw_file.close()
到这一步如果不出意外的话,我们就已经把position数据转化为了yolo数据。但是如果你打开labelimg,你会发现报错了,报错的原因是没有classes.txt文件。因此在yolo格式中,一定要加上一个classes.txt文件,要不然就会报错。
一定要加上一个classes.txt文件,要不然就会报错。
一定要加上一个classes.txt文件,要不然就会报错。
一定要加上一个classes.txt文件,要不然就会报错。
重要的事情说三遍哈,已经四遍了哈哈哈。

3.把yolo格式转化为xml格式
上回说到,我们已经把position数据转化成了yolo格式,但是paddle这个挨千刀的,不支持yolo格式训练,至少在现在还没有对应的yaml文件。因此要是真的把数据调好了,用yolo格式还是没用,因为根本训练不了。这就提到了把yolo格式转化为xml格式的必要性了。代码如下:
import os
import xml.etree.ElementTree as ET
from xml.dom.minidom import Document
import cv2'''
import xml
xml.dom.minidom.Document().writexml()
def writexml(self,writer: Any,indent: str = "",addindent: str = "",newl: str = "",encoding: Any = None) -> None
'''class YOLO2VOCConvert:def __init__(self, txts_path, xmls_path, imgs_path):self.txts_path = txts_path  # 标注的yolo格式标签文件路径self.xmls_path = xmls_path  # 转化为voc格式标签之后保存路径self.imgs_path = imgs_path  # 读取读片的路径各图片名字,存储到xml标签文件中self.classes = ['添加你的检测物品标签']# 从所有的txt文件中提取出所有的类别, yolo格式的标签格式类别为数字 0,1,...# writer为True时,把提取的类别保存到'./Annotations/classes.txt'文件中def search_all_classes(self, writer=False):# 读取每一个txt标签文件,取出每个目标的标注信息all_names = set()txts = os.listdir(self.txts_path)# 使用列表生成式过滤出只有后缀名为txt的标签文件txts = [txt for txt in txts if txt.split('.')[-1] == 'txt' and txt is not 'classes.txt']print(len(txts), txts)# 11 ['0002030.txt', '0002031.txt', ... '0002039.txt', '0002040.txt']for txt in txts:txt_file = os.path.join(self.txts_path, txt)with open(txt_file, 'r') as f:print(txt_file)objects = f.readlines()for object in objects:object = object.strip().split(' ')print(object)  # ['2', '0.506667', '0.553333', '0.490667', '0.658667']all_names.add(int(object[0]))# print(objects)  # ['2 0.506667 0.553333 0.490667 0.658667\n', '0 0.496000 0.285333 0.133333 0.096000\n', '8 0.501333 0.412000 0.074667 0.237333\n']print("所有的类别标签:", all_names, "共标注数据集:%d张" % len(txts))return list(all_names)def yolo2voc(self):# 创建一个保存xml标签文件的文件夹if not os.path.exists(self.xmls_path):os.mkdir(self.xmls_path)# 把上面的两个循环改写成为一个循环:imgs = os.listdir(self.imgs_path)txts = os.listdir(self.txts_path)txts = [txt for txt in txts if not txt.split('.')[0] == "classes"]  # 过滤掉classes.txt文件print(txts)# 注意,这里保持图片的数量和标签txt文件数量相等,且要保证名字是一一对应的   (后面改进,通过判断txt文件名是否在imgs中即可)if len(imgs) == len(txts):  # 注意:./Annotation_txt 不要把classes.txt文件放进去map_imgs_txts = [(img, txt) for img, txt in zip(imgs, txts)]txts = [txt for txt in txts if txt.split('.')[-1] == 'txt']print(len(txts), txts)for img_name, txt_name in map_imgs_txts:# 读取图片的尺度信息print("读取图片:", img_name)img = cv2.imread(os.path.join(self.imgs_path, img_name))height_img, width_img, depth_img = img.shapeprint(height_img, width_img, depth_img)  # h 就是多少行(对应图片的高度), w就是多少列(对应图片的宽度)# 获取标注文件txt中的标注信息all_objects = []txt_file = os.path.join(self.txts_path, txt_name)with open(txt_file, 'r') as f:objects = f.readlines()for object in objects:object = object.strip().split(' ')all_objects.append(object)print(object)  # ['2', '0.506667', '0.553333', '0.490667', '0.658667']# 创建xml标签文件中的标签xmlBuilder = Document()# 创建annotation标签,也是根标签annotation = xmlBuilder.createElement("annotation")# 给标签annotation添加一个子标签xmlBuilder.appendChild(annotation)# 创建子标签folderfolder = xmlBuilder.createElement("folder")# 给子标签folder中存入内容,folder标签中的内容是存放图片的文件夹,例如:JPEGImagesfolderContent = xmlBuilder.createTextNode(self.imgs_path.split('/')[-1])  # 标签内存folder.appendChild(folderContent)  # 把内容存入标签annotation.appendChild(folder)  # 把存好内容的folder标签放到 annotation根标签下# 创建子标签filenamefilename = xmlBuilder.createElement("filename")# 给子标签filename中存入内容,filename标签中的内容是图片的名字,例如:000250.jpgfilenameContent = xmlBuilder.createTextNode(txt_name.split('.')[0] + '.jpg')  # 标签内容filename.appendChild(filenameContent)annotation.appendChild(filename)# 把图片的shape存入xml标签中size = xmlBuilder.createElement("size")# 给size标签创建子标签widthwidth = xmlBuilder.createElement("width")  # size子标签widthwidthContent = xmlBuilder.createTextNode(str(width_img))width.appendChild(widthContent)size.appendChild(width)  # 把width添加为size的子标签# 给size标签创建子标签heightheight = xmlBuilder.createElement("height")  # size子标签heightheightContent = xmlBuilder.createTextNode(str(height_img))  # xml标签中存入的内容都是字符串height.appendChild(heightContent)size.appendChild(height)  # 把width添加为size的子标签# 给size标签创建子标签depthdepth = xmlBuilder.createElement("depth")  # size子标签widthdepthContent = xmlBuilder.createTextNode(str(depth_img))depth.appendChild(depthContent)size.appendChild(depth)  # 把width添加为size的子标签annotation.appendChild(size)  # 把size添加为annotation的子标签# 每一个object中存储的都是['2', '0.506667', '0.553333', '0.490667', '0.658667']一个标注目标for object_info in all_objects:# 开始创建标注目标的label信息的标签object = xmlBuilder.createElement("object")  # 创建object标签# 创建label类别标签# 创建name标签imgName = xmlBuilder.createElement("name")  # 创建name标签# print(len(self.classes))imgNameContent = xmlBuilder.createTextNode(self.classes[int(object_info[0])])imgName.appendChild(imgNameContent)object.appendChild(imgName)  # 把name添加为object的子标签# 创建pose标签pose = xmlBuilder.createElement("pose")poseContent = xmlBuilder.createTextNode("Unspecified")pose.appendChild(poseContent)object.appendChild(pose)  # 把pose添加为object的标签# 创建truncated标签truncated = xmlBuilder.createElement("truncated")truncatedContent = xmlBuilder.createTextNode("0")truncated.appendChild(truncatedContent)object.appendChild(truncated)# 创建difficult标签difficult = xmlBuilder.createElement("difficult")difficultContent = xmlBuilder.createTextNode("0")difficult.appendChild(difficultContent)object.appendChild(difficult)# 先转换一下坐标# (objx_center, objy_center, obj_width, obj_height)->(xmin,ymin, xmax,ymax)x_center = float(object_info[1]) * width_img + 1y_center = float(object_info[2]) * height_img + 1xminVal = int(x_center - 0.5 * float(object_info[3]) * width_img)  # object_info列表中的元素都是字符串类型yminVal = int(y_center - 0.5 * float(object_info[4]) * height_img)xmaxVal = int(x_center + 0.5 * float(object_info[3]) * width_img)ymaxVal = int(y_center + 0.5 * float(object_info[4]) * height_img)# 创建bndbox标签(三级标签)bndbox = xmlBuilder.createElement("bndbox")# 在bndbox标签下再创建四个子标签(xmin,ymin, xmax,ymax) 即标注物体的坐标和宽高信息# 在voc格式中,标注信息:左上角坐标(xmin, ymin) (xmax, ymax)右下角坐标# 1、创建xmin标签xmin = xmlBuilder.createElement("xmin")  # 创建xmin标签(四级标签)xminContent = xmlBuilder.createTextNode(str(xminVal))xmin.appendChild(xminContent)bndbox.appendChild(xmin)# 2、创建ymin标签ymin = xmlBuilder.createElement("ymin")  # 创建ymin标签(四级标签)yminContent = xmlBuilder.createTextNode(str(yminVal))ymin.appendChild(yminContent)bndbox.appendChild(ymin)# 3、创建xmax标签xmax = xmlBuilder.createElement("xmax")  # 创建xmax标签(四级标签)xmaxContent = xmlBuilder.createTextNode(str(xmaxVal))xmax.appendChild(xmaxContent)bndbox.appendChild(xmax)# 4、创建ymax标签ymax = xmlBuilder.createElement("ymax")  # 创建ymax标签(四级标签)ymaxContent = xmlBuilder.createTextNode(str(ymaxVal))ymax.appendChild(ymaxContent)bndbox.appendChild(ymax)object.appendChild(bndbox)annotation.appendChild(object)  # 把object添加为annotation的子标签f = open(os.path.join(self.xmls_path, txt_name.split('.')[0] + '.xml'), 'w')xmlBuilder.writexml(f, indent='\t', newl='\n', addindent='\t', encoding='utf-8')f.close()if __name__ == '__main__':# 把yolo的txt标签文件转化为voc格式的xml标签文件# yolo格式txt标签文件相对路径txts_path1 = ''# 转化为voc格式xml标签文件存储的相对路径xmls_path1 = ''# 存放图片的相对路径imgs_path1 = ''yolo2voc_obj1 = YOLO2VOCConvert(txts_path1, xmls_path1, imgs_path1)labels = yolo2voc_obj1.search_all_classes()print('labels: ', labels)yolo2voc_obj1.yolo2voc()
如果你嫌列表要一点一点写类别太麻烦了,可以用这种方式:(classes.txt就是前面提到的类别文本)
cls = []
cnt = 0
for i in open(txtPath + 'classes.txt', 'r', encoding='utf-8').readlines():cls.append(i)
至此,就可以把paddle里面图里的数据转化为xml格式了。

![[管理与领导-102]:经营与管理的关系:攻守关系;武将文官关系;开疆拓土与守护城池的关系;战斗与练兵的关系;水涨船高,水落船低的关系。](https://img-blog.csdnimg.cn/15882cfb98834563a56d0040cff25b15.png)
