Spring MVC
- 数据绑定
- 数据类型转换
- 数据格式化
- 数据校验
- 附

数据绑定
数据绑定,指 Web 页面上请求和响应的数据与 Controller 中对应处理方法上的对象绑定(即是将用户提交的表单数据绑定到 Java 对象中)。

过程如下:
- ServletRequest 对象会传递给 WebDataBinderFactory 对象
- 同时,目标方法的入参对象也会传递给 WebDataBinderFactory 对象。而 WebDataBinderFactory 对象会根据传递的参数来创建 DataBinder 对象
- DataBinder 对象会调用 ConversionService 组件进行数据类型转换或格式化,然后再将 Servlet 中的请求信息填充到 Controller 中对应处理方法上的入参对象里
- DataBinder 对象接着调用 Validator 组件对已经绑定的请求信息的入参对象进行数据合法性校验,并且生成数据绑定结果 BindingResult 对象
- 校验的结果都存放在 BindingResult 对象里,DataBinder 对象可以将其赋给处理方法的相应入参上
数据类型转换
请求的数据和响应的数据是需要进行数据类型转换的。在 Spring MVC 的 ConversionService 组件中,包含了许多 Spring MVC 内建的转换器,可以完成绝大部分的 Java 类型转换工作。当然也可以创建自定义转换器,利用 ConversionServiceFactoryBean 在 Spring IoC 容器中定义一个 ConversionService 。Spring 将自动识别自定义的 ConversionService ,并且在 Bean 属性配置与 Spring MVC 处理方法的入参绑定数据中自动调用自定义转换器来进行数据类型转换。
数据格式化
通常,使用数据格式化的方式将字符串类型转换为日期类型。
简单示例:
在上一章 Spring + Spring MVC + JDBCTemplate 的整合案例基础上,增加对象的日期属性和实现添加功能
1.使用 @DateTimeFormat(pattern = “yyyy-MM-dd”) 注解将字符串类型转换为日期类型

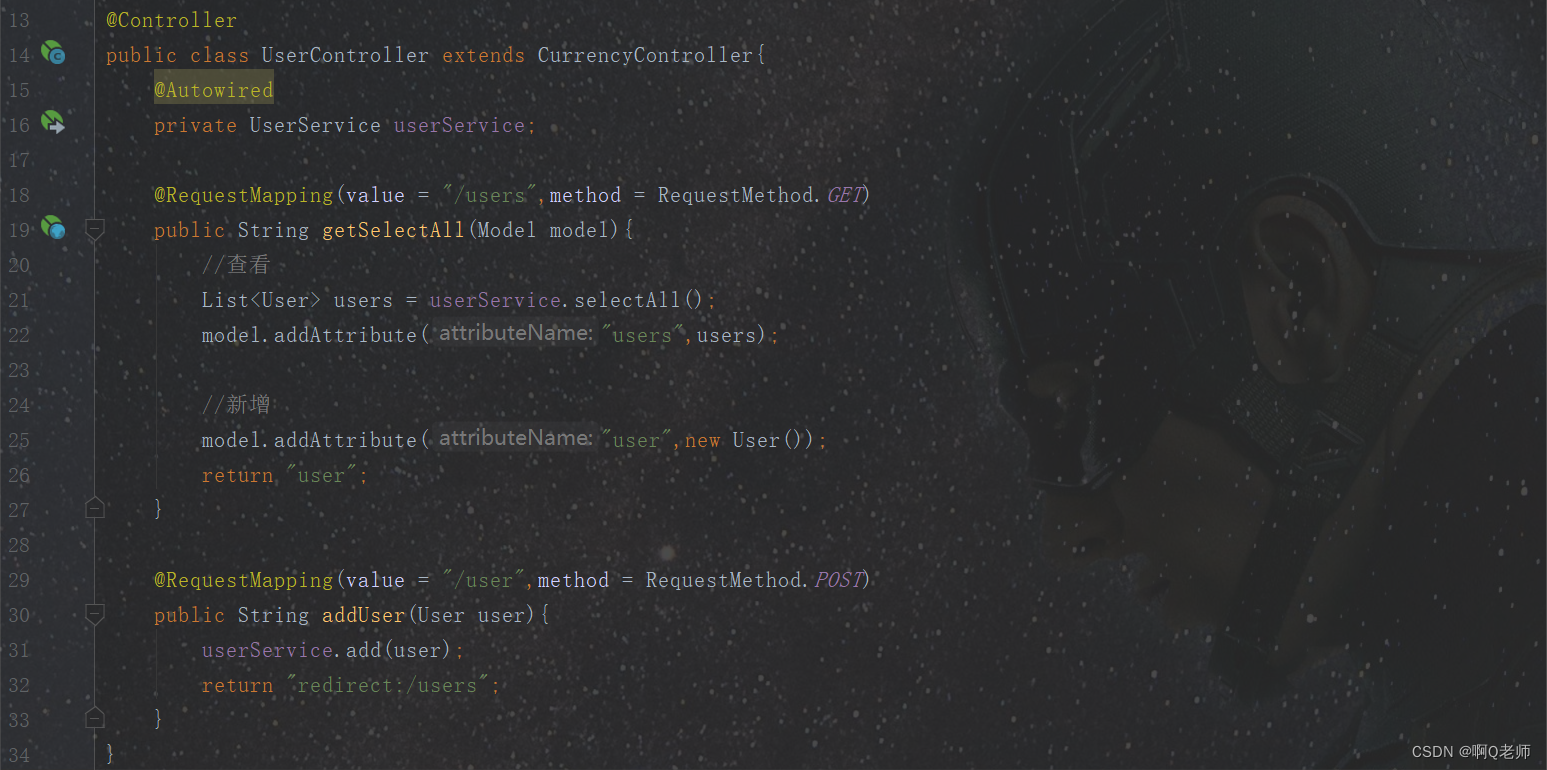
添加方法实现类如图:

在 controller 层中通过 RESTful 风格添加用户信息
package cn.edu.springmvcdemo.controller;import cn.edu.springmvcdemo.model.User;
import cn.edu.springmvcdemo.service.UserService;
import org.springframework.beans.factory.annotation.Autowired;
import org.springframework.stereotype.Controller;
import org.springframework.ui.Model;
import org.springframework.web.bind.annotation.RequestMapping;
import org.springframework.web.bind.annotation.RequestMethod;import java.util.List;@Controller
public class UserController {@Autowiredprivate UserService userService;@RequestMapping(value = "/users",method = RequestMethod.GET)public String getSelectAll(Model model){//查看List<User> users = userService.selectAll();model.addAttribute("users",users);//新增model.addAttribute("user",new User());return "user";}@RequestMapping(value = "/user",method = RequestMethod.POST)public String addUser(User user){userService.add(user);return "redirect:/users";}
}
在 user.jsp 中添加以下内容
<br><br><br>
<form:form action="${pageContext.request.contextPath}/user" method="post" modelAttribute="user">用户姓名:<form:input path="name" /> <br>用户年龄:<form:input path="age" /> <br>用户班级:<form:input path="grade" /> <br>入学日期:<form:input path="date" /> <br><input type="submit" value="添加">
</form:form>
另外,为了防止中文乱码,需要在 web.xml 配置文件中添加以下配置
<!-- 防止出现中文乱码配置 -->
<filter><filter-name>encoding</filter-name><filter-class>org.springframework.web.filter.CharacterEncodingFilter</filter-class><init-param><param-name>encoding</param-name><param-value>utf-8</param-value></init-param>
</filter>
<filter-mapping><filter-name>encoding</filter-name><url-pattern>/*</url-pattern>
</filter-mapping>
还有,日期数据在前端传递给后端可以正常获取,但是后端插入数据库后会相差一天。在 jdbc.properties 配置文件中将 serverTimezone=UTC 改成 serverTimezone=Asia/Shanghai 即可

注:UTC 为世界统一时间,比北京时间早8个小时
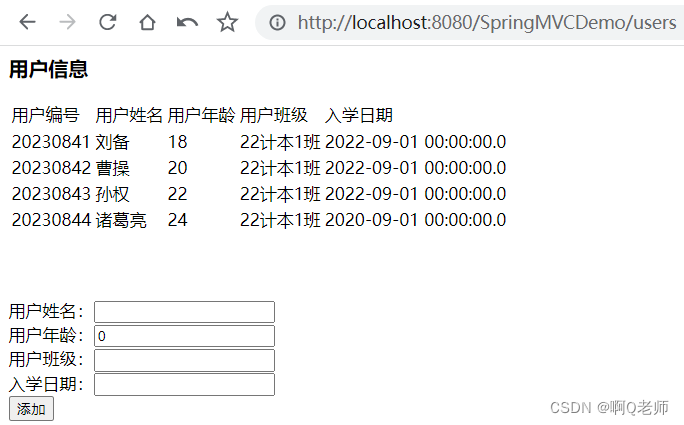
结果如图:

2.创建一个使用 @InitBinder 注解的数据格式化通用类,需要日期格式化的 controller 类继承即可
package cn.edu.springmvcdemo.controller;import org.springframework.beans.propertyeditors.CustomDateEditor;
import org.springframework.web.bind.WebDataBinder;
import org.springframework.web.bind.annotation.InitBinder;import java.text.SimpleDateFormat;
import java.util.Date;//设置数据格式化通用类
public class CurrencyController {@InitBinderpublic void initBinder(WebDataBinder webDataBinder){SimpleDateFormat simpleDateFormat = new SimpleDateFormat("yyyy-MM-dd");//设定为合法的日期格式simpleDateFormat.setLenient(false);//注册到编辑器中webDataBinder.registerCustomEditor(Date.class,new CustomDateEditor(simpleDateFormat,false));}
}
其他不变,controller 类继承数据格式化通用类和注释 @DateTimeFormat(pattern = “yyyy-MM-dd”) 注解

结果如图:
数据校验
数据校验,是为保证数据完整性进行的一种验证操作。下面简单介绍使用 JSR-303 进行验证。
JSR-303(Java Specification Requests ,Java 规范提案),是 Java 标准的验证框架。JSR-303 的校验是基于注解的,注解标记在需要验证的实体类的属性或 get() 方法后将自动进行验证。
常用校验注解
| 注解 | 说明 |
|---|---|
| @Null | 空检查。验证对象是否为 NULL |
| @NotNull | 空检查。验证对象是否不为 NULL ,无法查检长度为0的字符串 |
| @NotBlank | 空检查。检查约束字符串是否为 NULL 和删除前后空格的长度是否大于0 |
| @NotEmpty | 空检查。检查约束元素是否为 NULL 或 EMPTY |
| @Past | 日期检查。验证 Date 和 Calendar 对象是否在当前时间之前(验证通过的时间必须是过去的) |
| @Future | 日期检查。验证 Date 和 Calendar 对象是否在当前时间之后(验证通过的时间必须是未来的) |
| @DecimalMax | 数值检查。验证通过的值不会大于约束中指定的最大值,小数存在精度 |
| @DecimalMin | 数值检查。验证通过的值不会小于约束中指定的最小值,小数存在精度 |
| 数值检查。验证是否为邮件地址。若为 NULL ,不用验证就可以通过 |
简单示例:
在上面添加用户案例的基础上,进行数据校验
首先,在 pom.xml 中添加以下依赖
<!-- https://mvnrepository.com/artifact/org.hibernate.validator/hibernate-validator -->
<dependency><groupId>org.hibernate.validator</groupId><artifactId>hibernate-validator</artifactId><version>6.2.5.Final</version>
</dependency><!-- https://mvnrepository.com/artifact/org.hibernate.validator/hibernate-validator-annotation-processor -->
<dependency><groupId>org.hibernate.validator</groupId><artifactId>hibernate-validator-annotation-processor</artifactId><version>6.2.5.Final</version>
</dependency>
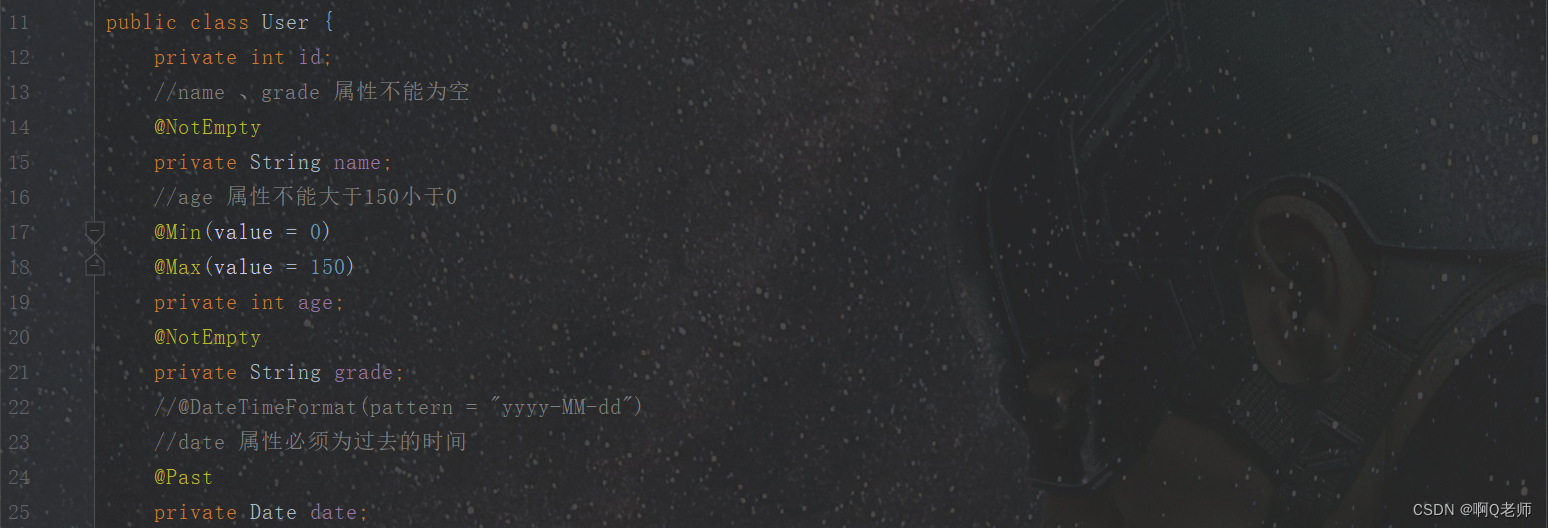
接着,在实体类的属性上加上校验注解
然后,在 controller 类的添加用户方法上的参数前使用 @Valid 注解,并使用 BindingResult 对象获取校验结果
@RequestMapping(value = "/user",method = RequestMethod.POST)
//注:这两个参数必须紧靠着(即当有第三个参数时,第三个参数不能放在这两个参数的中间)
public String addUser(@Valid User user, BindingResult bindingResult,Model model){//当不符合数据校验时,结果存放在 bindingResult 中if(bindingResult.getErrorCount() > 0){//遍历获取for (FieldError fieldError:bindingResult.getFieldErrors()){System.out.println("校验结果 == " + fieldError.getField() + ":" + fieldError.getDefaultMessage());}//添加数据不符,不作添加并返回//查看List<User> users = userService.selectAll();model.addAttribute("users",users);return "user";}userService.add(user);return "redirect:/users";
}
随之,在 user.jsp 上使用 < form:errors > 标签把校验结果进行回显
<form:form action="${pageContext.request.contextPath}/user" method="post" modelAttribute="user">用户姓名:<form:input path="name" /> <form:errors path="name" /> <br>用户年龄:<form:input path="age" /> <form:errors path="age" /> <br>用户班级:<form:input path="grade" /> <form:errors path="grade" /> <br>入学日期:<form:input path="date" /> <form:errors path="date" /> <br><input type="submit" value="添加">
</form:form>
最后,测试结果
结果如图:


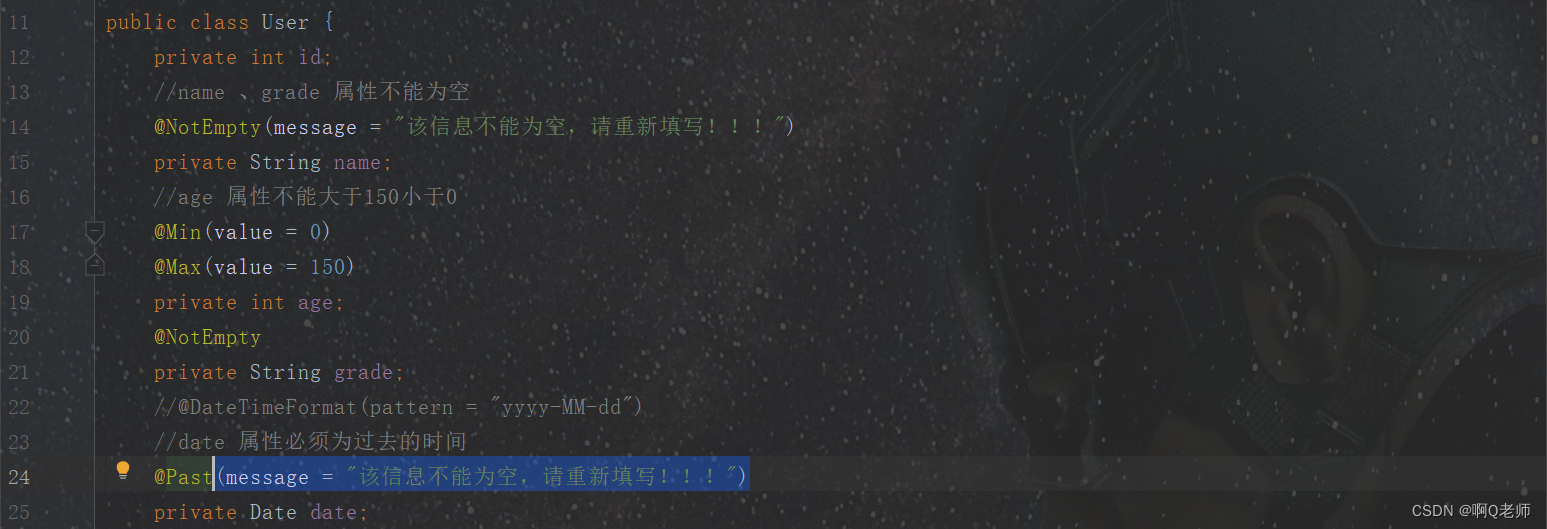
一般使用默认的校验结果进行回显即可。当然,也可以自定义回显信息。
1.使用校验注解中的 message 属性即可,但出现英文结果是无法自定义回显的

2.使用国际化配置文件配置自定义回显信息
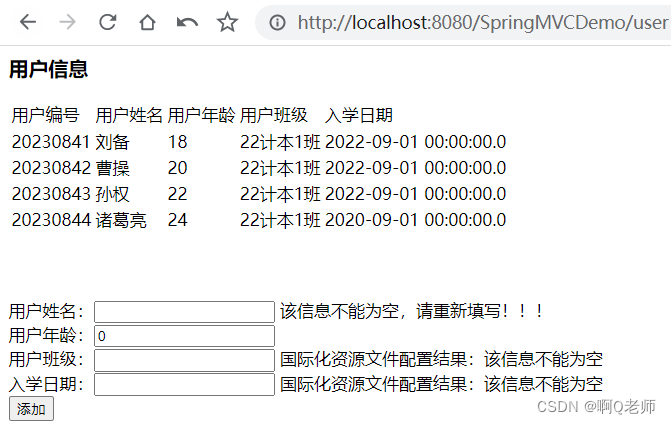
在 Spring MVC:视图与视图解析器的文章中配置国际化资源文件案例的基础上,在 i18n.properties 配置文件下添加以下内容
注:一般为注解名+实体类名首字母小写+属性名;数据类型转换错误信息时则为 typeMismatch +实体类名首字母小写+属性名
NotEmpty.user.grade=国际化资源文件配置结果:该信息不能为空
typeMismatch.user.date=国际化资源文件配置结果:该信息不能为空
结果如图:
附
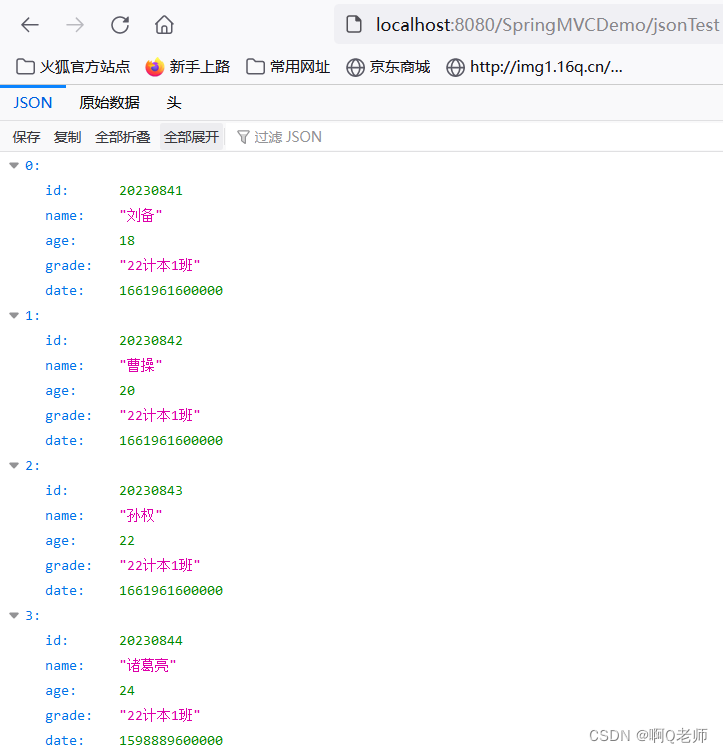
在 Spring MVC 中,在 Controller 层中经常使用 @RequestBody 和 @ResponseBody 注解将 Java 对象在 Controller 层中直接作为请求参数和返回内容。下面实现 JSON 数据返回。
简单示例:
首先,在 pom.xml 中添加以下依赖
<!-- https://mvnrepository.com/artifact/com.fasterxml.jackson.core/jackson-core -->
<dependency><groupId>com.fasterxml.jackson.core</groupId><artifactId>jackson-core</artifactId><version>2.12.0</version>
</dependency><!-- https://mvnrepository.com/artifact/com.fasterxml.jackson.core/jackson-annotations -->
<dependency><groupId>com.fasterxml.jackson.core</groupId><artifactId>jackson-annotations</artifactId><version>2.12.0</version>
</dependency><!-- https://mvnrepository.com/artifact/com.fasterxml.jackson.core/jackson-databind -->
<dependency><groupId>com.fasterxml.jackson.core</groupId><artifactId>jackson-databind</artifactId><version>2.12.0</version>
</dependency>
接着,在 controller 类上添加以下方法
@RequestMapping(value = "jsonViewTest")
public String jsonViewTest(){return "json";
}@ResponseBody
@RequestMapping(value = "jsonTest",method = RequestMethod.GET)
public List<User> jsonTest(){List<User> users = userService.selectAll();System.out.println(users);return users;
}
然后,创建 json.jsp 。同时在 src\main\webapp\resources\js\jquery 的目录下导入 jquery-2.1.2.js 文件(点击下载获取)
<%--Created by IntelliJ IDEA.User: dellDate: 2023/8/8Time: 15:55To change this template use File | Settings | File Templates.
--%>
<%@ page contentType="text/html;charset=UTF-8" language="java" %>
<html>
<head><script type="text/javascript" src="${pageContext.request.contextPath}/resources/js/jquery/jquery-2.1.2.js" /><script type="text/javascript">$(function () {$("#jsonid").click(function(){var href = this.href;var args = {};$.post(href,args,function (data) {alert(data);})return false;})</script>
</head>
<body><a id="jsonid" href="${pageContext.request.contextPath}/jsonTest" >获取 json 数据格式的所有用户信息</a>
</body>
</html>
最后,测试结果
1.点击获取

2.结果如图:
