祝大家中秋国庆双节快乐!
回过头来,我们在编程过程中,经常会遇到各种各样的问题。然而,很多问题都无法解决,网上夹杂着各种冗余的回答,也缺乏系统的实战技巧归纳。为更好地从事科学研究和编程学习,后续将总结各类常见实战技巧,希望对您有所帮助。
本文主要介绍LaTeX论文撰写的常见用法和实战技巧总结,包括论文的基本结构、算法、图片、表格、公式、特殊符号、参考文献、序号等方法。全文将持续更新,一方面作为自己的学习笔记,另一方面希望能帮助初学者解决实际问题,且看且珍惜!
文章目录
- 基本论文结构
- 什么是LaTeX
- 基本结构
- 篇章结构
- 算法
- algorithm
- algorithm2e
- 图片
- 基本用法
- 双栏显示
- 双图显示
- 表格
- 基本用法
- 含注释的表格
- 复杂表格合并multirow
- 解决自动换行
- 公式
- 特殊符号
- 圆圈数字
- 半圆
- 勾叉
- 纸牌
- 参考文献
- 序号
- 总结
基本论文结构
什么是LaTeX
LaTeX是一种基于ΤΕΧ的排版系统,由美国计算机学家莱斯利·兰伯特在20世纪80年代初期开发,利用这种格式,即使使用者没有排版和程序设计的知识也可以充分发挥由TeX所提供的强大功能,能在几天、甚至几小时内生成很多具有书籍质量的印刷品。对于生成复杂表格和数学公式,这一点表现得尤为突出。因此它非常适用于生成高印刷质量的科技和数学类文档。
LaTeX的工作方式类似网页,它们都是由源文件(.tex or .html)经由引擎(TeX or browser)渲染产生最终效果,从而得到PDF文件或生成页面。两者极其神似,包括语法规则与工作方式。

官方下载地址如下:
- Tex Live下载地址:http://www.tug.org/texlive/
- 清华大学镜像地址:https://mirrors.tuna.tsinghua.edu.cn/CTAN/systems/texlive/Images/
- Tex studio下载地址:http://www.texstudio.org/
强烈推荐大家直接下载LaTex模块进行修改,这篇文章更多是告诉大家基本语法,安装过程请大家下来去尝试,希望对您有所帮助!
基本结构
LaTeX文档分为导言区和正文区(文稿区),在导言区我们可以使用documentclass命令引入一个文档类,也可以有book类、report类、letter类,其中百分号表示注释,不参与文档编译且不作为输出。在正文区用begin和end输入一个环境,如下图所示:

接着将环境的名称设置为document,一个LaTeX文件有且只能有一个document文件,添加正文内容再编译文档。

导言区主要用于全局设置,比如文档标题、作者、日期,再通过maketitle显示标题。
% 导言区
\documentclass{article}\title{My First Document}
\author{Eastmount}
\date{\today}% 正文区
\begin{document}\maketitleHello World!
\end{document}
显示如下图所示:

篇章结构
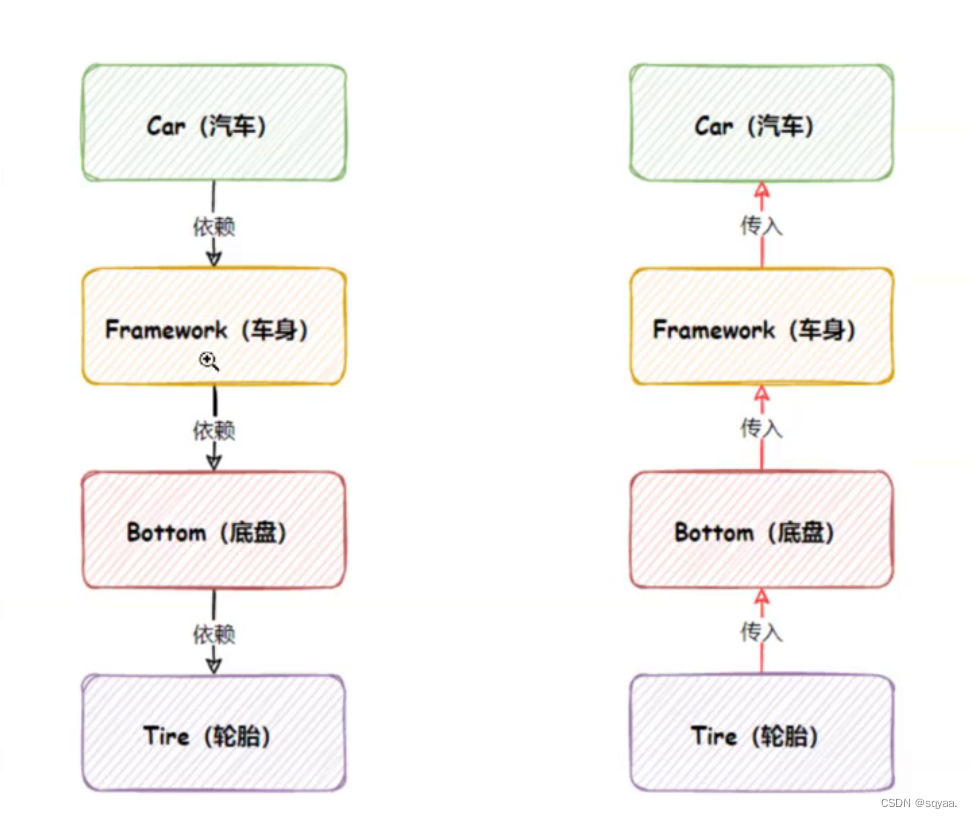
学术论文通常包括两种结构,如下图所示,左边表示理论型,右边表示实验型。

在LaTeX中我们可以通过section定义小结,也可以用subsection定义子小结。同时更推荐大家下载IEEE结构进行修改,后面我也会讲到。
- \section{Section title}
- \label{sec:mysection}
- \subsection{title}
- \subsubsection{title}
- \section*{} unnumbered section
- \appendix
举个示例:
% 导言区
\documentclass{article}
\usepackage{ctex}\title{My First Document}
\author{Eastmount}
\date{\today}% 正文区
\begin{document}\maketitle% 构建文章小结\section{Introduction}\section{Related Work}\section{System Model}\section{Mathematics and algorithms}\section{Experiments}\subsection{Datasets}\subsubsection{实验条件}\subsubsection{评价指标}\subsection{Results}\section{Acknowledgment}\end{document}
输出结果如下图所示:

算法
通常采用两种方法进行算法的编写,包括:
- 使用algorithm、algorithmic宏包
- 使用algorithm2e宏包
algorithm
导入包:
\usepackage{algorithm}
\usepackage{algorithmic}
算法代码:
\begin{algorithm}[!ht]\caption{Feature extraction based on abstract syntax tree.}\begin{algorithmic}[1]\REQUIRE {$X=\left\{x_1,x_2,...,x_n\right\}$, where $x_i$ is the $i^{th}$ PowerShell script.}\ENSURE {$V^{(ast)}=\left\{v_1,v_2,...,v_n\right\}$, where $v_i$ is the $i^{th}$ sequence vector generated by AST-based feature extraction method (i.e., AST2Vec).}\STATE $V^{(ast)} \leftarrow \emptyset$ , $S \leftarrow \emptyset$, $F \leftarrow \emptyset$, $W \leftarrow \emptyset$ \FOR{$i \leftarrow 1$ {\bf to} $n$}\STATE $t_i = ExtractAstSequences( x_i )$ \STATE $s_i = PostorderTraversal( t_i )$ \STATE $S.append( s_i )$\ENDFOR\STATE $F = BuildFeatureSetFromAst(S) $\STATE $//$ Count all distinct features of AST sequences.\FOR{each $f_k \in F$}\STATE $w_k = CalculateWordVectors( f_k )$ \STATE $W.append( w_k )$\ENDFOR\STATE $//$ Calculate word vectors for each AST node.\FOR{each $s_i \in S$}\STATE $v_i = GenerateAstEmbedding( s_i )$ \STATE $V^{(ast)}.append( v_i )$\ENDFOR\STATE {\bf return} {$V^{(ast)}$}
\end{algorithmic}
\label{algorithm1}
\end{algorithm}
运行结果如下图所示:

algorithm2e
导入包:
\usepackage{algorithm}
\usepackage[algo2e]{algorithm2e}
算法代码:
\begin{algorithm}[!ht]\caption{Feature extraction based on abstract syntax tree.}\label{algorithm1}\SetAlgoLined\SetKwInOut{Input}{Input}\SetKwInOut{Output}{Output}\Input{$X=\left\{x_1,x_2,...,x_n\right\}$, where $x_i$ is the $i^{th}$ PowerShell script.}\Output{$V^{(ast)}=\left\{v_1,v_2,...,v_n\right\}$, where $v_i$ is the $i^{th}$ sequence vector generated by AST-based feature extraction method (i.e., AST2Vec).}Initialization: $V^{(ast)} \leftarrow \emptyset$ , $S \leftarrow \emptyset$, $F \leftarrow \emptyset$, $W \leftarrow \emptyset$ \For{$i \leftarrow 1$ \KwTo $n$}{$t_i = ExtractAstSequences( x_i )$ $s_i = PostorderTraversal( t_i )$ $S.append( s_i )$}$F = BuildFeatureSetFromAst(S) $\tcc{Count all distinct features of AST sequences}\For{$f_k \in F$}{$w_k = CalculateWordVectors( f_k )$ $W.append( w_k )$}\tcc{Calculate word vectors for each AST node}\For{$s_i \in S$}{$v_i = GenerateAstEmbedding( s_i )$ $V^{(ast)}.append( v_i )$}\Return{$V^{(ast)}$}
\end{algorithm}
运行结果如下图所示:

图片
基本用法
在LaTeX中插入图片的基本语法如下:
- 导言区插入:\usepackage{graphicx}
- 语法:\includegraphics[ < 选项 > ] { < 文件名 > }
- 格式:EPS、PDF、PNG、JPEG、BMP

下面举例说明:
% 导言区
\documentclass{article}
\usepackage{ctex}
\usepackage{graphicx}% 指定图片在当前目录下figures目录下
\graphicspath{{figures/}}% 正文区
\begin{document}% 插入图片\includegraphics{fig1}% 缩放比例\includegraphics[scale=0.5]{fig1}% 固定图像高度\includegraphics[height=2cm]{fig1.png}% 固定图像宽度\includegraphics[width=2cm]{fig1.png}% 图像高度和宽度基于\includegraphics[height=0.2\textheight]{fig1.png}\includegraphics[width=0.2\textwidth]{fig1.png}% 指定多个参数\includegraphics[angle=-45,width=0.5\textwidth]{fig1.png}
\end{document}
显示结果如下图所示,scale=0.5是将图片大小缩小为真实大小的一半,[width=0.2\textwidth] 将图形缩放到文本的0.2倍。

双栏显示
注意,在论文中通常会遇到要横跨两栏的应用场景,此时我们需要这样设置:
- \begin{figure*}
- \end{figure*}
\usepackage{stfloats}
\begin{figure*}[ht]\centering\includegraphics[width=0.8\textwidth]{4.eps}\caption{BER performance of original OFDM system and different companding schemes over AWGN channel (QPSK).}\label{fig8}
\end{figure*}
上面代码中,figure* 表示跨双栏,htbp表示的意思是latex会尽量满足排在前面的浮动格式,就是h-t-b-p这个顺序,让排版的效果尽量好。其中,h-here表示在此处,t-top表示在顶部,b-bottom表示底部,p-page表示在本页。为了防止跨页图片跑到最后一页,我们需要在导言区加入stfloats包,然后设置\begin{figure*}[ht] 即可。
h——放置在此处
t——放置在顶部
b——放置在底部
p——浮动放置
*——两栏放置

双图显示
第一种方式——调用minipage实现,也是最常见的方式。
\begin{figure*}\begin{minipage}[t]{0.48\linewidth}\centering\includegraphics[scale=0.30]{Figure-7.eps}\caption{The loss curve of different models.}\label{fig7}\end{minipage}\begin{minipage}[t]{0.48\linewidth}\centering\includegraphics[scale=0.30]{Figure-8.eps}\caption{The accuracy curve of different models.}\label{fig8}\end{minipage}
\end{figure*}
显示效果如下图所示:

第二种方式——调用subfigure实现。
\usepackage{caption}
\usepackage{subfigure}\begin{figure}[htbp]\centering    %居中\subfigure[name of the first figure] %第一张子图{\begin{minipage}[t]{0.4\textwidth}\centering\includegraphics[scale=0.15]{fig2}\end{minipage}}\subfigure[name of the second figure] %第二张子图{\begin{minipage}[t]{0.4\textwidth}\centering      \includegraphics[scale=0.2]{fig3} \end{minipage}}\caption{name of the figure}        %大图名称\label{fig-1}  %图片引用标记
\end{figure}
显示如下图所示:

第三种方法——调用宏包宏包subfig。使用subfig宏包提供的\subfloat命令,需要使用宏包\usepackage{graphicx}和\usepackage{subfig}。
\begin{figure}[!hb]\centering\subfloat[\label{fig:arm1}$Q^{*}$ values for arm 1]{\includegraphics[width=.5\linewidth]{1.eps}}%\subfloat[\label{fig:arm2}$Q^{*}$ values for arm 2]{\includegraphics[width=.5\linewidth]{1.eps}}\\\subfloat[\label{fig:arm3}$Q^{*}$ values for arm 3]{\includegraphics[width=.8\linewidth]{1.eps}}\caption{$Q^{*}$ values for different arms.}\label{fig:arms}
\end{figure}
显示如下图所示:

表格
基本用法
在LaTeX中使用tabular生成表格,插入时需要设置对齐方式(l-左对齐、c-居中对齐、r-右对齐),然后插入数据,其中&用于分割每列,\\用于换行。下面的代码展示常见的三线表。
\begin{table}\caption{Symbol Table}\centering\begin{tabular}{lll}\hlineSymbol & Definition & Unitis\\\noalign{\global\arrayrulewidth1pt}\hline\noalign{\global\arrayrulewidth0.4pt}\multicolumn{3}{c}{\textbf{Constants}}\\$\lambda$ & Mean of Poisson distribution & unitless\\$p_{slow}$ & Probability that a vehicle slows down randomly & unitless\\\hline\end{tabular}
\end{table}
显示如下图所示:

含注释的表格
在IEEE的LaTex模板里希望添加表格的注释,即说明表格字符的含义。具体流程如下:
- 使用\usepackage{threeparttable}
- \begin{tabular}后加上\begin{threeparttable},和\end{tabular}前加上\end{threeparttable}
- 注释加在\begin{tablenotes} 和 \end{tablenotes}之间
导入扩展包如下所示:
\usepackage{threeparttable}
\usepackage{float}
\usepackage{bbding}
\usepackage{pifont}
代码如下:
\begin{table*}[!ht]\centering\caption{Related work comparison.}\begin{threeparttable}\resizebox{\textwidth}{!}{\begin{tabular}{ccccm{1.2cm}<{\centering}m{1.2cm}<{\centering}cc}\hlineRelated work & Techniques & Focus & Deobfuscation &  AST & KG & Multi-modal & Transformer  \\\hlineLi et al. \cite{b3} & \makecell[c]{subtree-based deobfuscation \\ OOA mining algorithm} & deobfuscation & \Checkmark & \Checkmark & \XSolid & \XSolid  & \XSolid \\\hlinePSDEM \cite{b12} & \makecell[c]{two-layer deobfuscation \\  monitor process by dynamic analysis} & deobfuscation & \Checkmark & \XSolid & \XSolid & \XSolid & \XSolid \\\hlinePowerDrive \cite{b13} & \makecell[c]{multi-stage deobfuscator \\  static analysis by regex \\ dynamic analysis by cmdlet} & deobfuscation & \Checkmark & \XSolid & \XSolid & \XSolid & \XSolid \\\hlinePowerDecode \cite{b15} & \makecell[c]{syntax check and remove base64 encoding \\ deobfuscate by cmdlet overriding  \\ deobfuscate by regex} & deobfuscation & \Checkmark & \XSolid & \XSolid & \XSolid & \XSolid \\\hlineHendler et al. \cite{b18} & \makecell[c]{character-level CNN \\ 4-layer CNN} & binary classification & \XSolid & \XSolid & \XSolid & \XSolid & \XSolid \\\hlineFang et al. \cite{b19} & \makecell[c]{hybrid features \\ FastText \\ random forest} & binary classification & \Checkmark & \Checkmark & \XSolid & $\bigcirc$ & \XSolid \\\hlineHendler et al. \cite{b2} & \makecell[c]{AMSI-based detection \\ contextual embeddings \\ Token-Char-FastText} & binary classification & \XSolid & \XSolid & \XSolid & \XSolid & \XSolid \\\hlineFC-PSDS \cite{b25} & \makecell[c]{ features combination \\ random forest and DNN} & binary classification & \Checkmark & \Checkmark & \XSolid & \XSolid & \XSolid \\\hlineRuscak et al. \cite{b20} & \makecell[c]{abstract syntax tree \\ random forest} & multi-classification task & \XSolid & \Checkmark & \XSolid & \XSolid & \XSolid \\\hline\makecell[c]{\textbf{Our method} \\ \textbf{PowerDetector}} & \makecell[c]{multi-modal embedding \\ Transformer-CNN-BiLSTM \\ multi-layer deobfuscation algorithm } & \makecell[c]{malicious family detection \\ multi-classification task} & \Checkmark & \Checkmark & \Checkmark & \Checkmark & \Checkmark \\\hline\end{tabular}}\begin{tablenotes}\footnotesize\item In this table, \Checkmark stands for fully cover, $\bigcirc$ stands for partial cover, \XSolid means cannot cover.\end{tablenotes}\end{threeparttable}\label{tab1}
\end{table*}
运行结果如下图所示:

复杂表格合并multirow
利用multirow宏包实现,multirow命令的基本语法格式如下:
- \multirow{[行数]}{[宽度]}{[内容]}
- \multirow{[行数]}*{[内容]}
导入包:
\usepackage{multirow}
代码如下:
\begin{table*}[!ht]\centering\caption{Detailed performance comparison of single-modal and multi-modal.}\resizebox{\textwidth}{!}{\begin{tabular}{ccccccccccc}\hline\multirow{3}{*}{Model} & \multicolumn{8}{c}{Single-modal} & \multicolumn{2}{c}{\multirow{2}{*}{Multi-modal}} \\\cline{2-9}& \multicolumn{2}{c}{Token-level} & \multicolumn{2}{c}{Character-level} & \multicolumn{2}{c}{AST-level} & \multicolumn{2}{c}{KG-level} & \multicolumn{2}{c}{} \\\cline{2-11}& $F_1$ & Acc & $F_1$ & Acc & $F_1$ & Acc & $F_1$ & Acc & $F_1$ & Acc \\\hlineLR & 0.8727 & 0.8629 & 0.8496 & 0.8528 & 0.8661 & 0.8700 & 0.8646 & 0.8559 & 0.8895 & 0.8857 \\RF & 0.8723 & \textbf{0.8676} & \textbf{0.8610} & \textbf{0.8567} & \textbf{0.8807} & \textbf{0.8786} & 0.8723 & 0.8676 & \textbf{0.9017} & \textbf{0.8943}  \\SVM & 0.8764 & 0.8661 & 0.8527 & 0.8519 & 0.8755 & 0.8786 & \textbf{0.8771} & 0.8676 & 0.8934 & 0.8912  \\KNN & 0.8706 & 0.8669 & 0.8554 & 0.8536 & 0.8644 & 0.8637 & 0.8741 & \textbf{0.8715} & 0.8804 & 0.8771 \\\hlineCNN & 0.9002 & 0.8974 & 0.8826 & 0.8808 & 0.9019 & 0.8998 & 0.9025 & 0.8998 & 0.9153 &  0.9115 \\TextCNN & 0.9049 & 0.9013 & 0.9012 & 0.8966 & 0.9083 & 0.9076 & 0.9036 & 0.9005 & 0.9186 & 0.9178  \\BiLSTM & 0.9076 & 0.9069 & 0.9037 & 0.9036 & 0.9126 & 0.9107 & 0.9054 & 0.9025 & 0.9226 & 0.9209  \\BiGRU & 0.9041 & 0.9021 & 0.8989 & 0.8966 & 0.9092 & 0.9045 & 0.9046 & 0.9013 & 0.9205 & 0.9201  \\Transformer & 0.9123 & 0.9107 & 0.9053 & 0.9029 & 0.9116 & 0.9092 & 0.9121 & 0.9115 & 0.9224 & 0.9178  \\CNN-BiLSTM+ATT & \textbf{0.9142} & \textbf{0.9123} & \textbf{0.9081} & \textbf{0.9076} & \textbf{0.9144} & \textbf{0.9139} & \textbf{0.9139} & \textbf{0.9123} & \textbf{0.9262} & \textbf{0.9209} \\\hline\textbf{Our Method} & \textbf{0.9236} & \textbf{0.9225} & \textbf{0.9170} & \textbf{0.9169} & \textbf{0.9248} & \textbf{0.9233} & \textbf{0.9204} & \textbf{0.9201} & \textbf{0.9374} &\textbf{0.9358}	\\\hline                                \end{tabular}}\label{tab5}
\end{table*}
运行结果如下图所示:

解决自动换行
采用taularx解决相关问题,参考下列这篇博客。
- https://blog.csdn.net/wanjiac/article/details/107489700
正常显示会越界,如下图所示:
\begin{table*}[h]\centering\begin{tabular}{cc} \hlineUse Case Navn: & Opret Server \\\hlineScenarie: & At oprette en server med bestemte regler som tillader folk at spille sammen. The nonlinear companding function introduce some nonlinear distortion to original OFDM signal, which can be eliminated theoretically by the decompanding function. \\\hline\end{tabular}\label{tab5}
\end{table*}
运行结果如下图所示,显然越界。

导入包:
\usepackage{tabularx}
代码如下:
\begin{table*}[h]\centering\begin{tabularx}{\textwidth}{p{4cm} X} \hlineUse Case Navn: & Opret Server \\\hlineScenarie: & At oprette en server med bestemte regler som tillader folk at spille sammen. The nonlinear companding function introduce some nonlinear distortion to original OFDM signal, which can be eliminated theoretically by the decompanding function. \\\hline\end{tabularx}\label{tab5}
\end{table*}
运行结果如下图所示:

公式
LaTeX中的数学模式有两种形式:inline 和 display。前者是指在正文插入行间数学公式,后者独立排列,可以有或没有编号。
- 行内公式(inline): 用 $…$将公式括起来进行排版,也可以使用小括号和\begin{math}排版。
- 行间公式(displayed): 用 $ $…$ $ 将公式括起来是无编号的形式,还有 \ [ … \ ]的无编号独立公式形式,块间元素默认是居中显示的。
- 上标使用^符号,下表使用_符号。
- 常见数学函数包括 \log、\sin、\cos、\arcsin、\arccos、\ln、\sqrt等。
- 分数建议使用\frac{3}{4}表示3/4。
- 如果需要对公式进行自动编号,要在equation环境下进行排版,同时调用\ref直接引用。
- 各类希腊字母编辑表,常见符号如下图所示。

如果您正在编写包含许多复杂公式的科学文档,则amsmath包引入了几个新命令,这些命令比基本LaTeX提供的命令更强大,更灵活。
- \usepackage {amsmath}
- \usepackage {mathtools}
Stone_Stan4d老师的文章“Latex的公式输入”归纳总结了常见的符号,如下图所示:

接着给出一些示例:

(1)矩阵公式:
\begin{equation}
\begin{aligned}V^{(token)}=\begin{bmatrix}v_{11} & v_{12} & \cdots & v_{1m} \\v_{21} & v_{22} & \cdots & v_{2m} \\\vdots & \vdots & \ddots & \vdots \\v_{n1} & v_{n2} & \cdots & v_{nm} \\\end{bmatrix}
\end{aligned}
\label{eq1}
\end{equation}
显示如下图所示:

(2)分段函数公式:
\begin{equation}
\begin{aligned}TokenPairs[j][k] = \begin{cases}v_{jk} + 1 & \exists <f_j,f_k>  \\v_{jk} + 0 & other  \\\end{cases}.
\end{aligned}\label{eq2}
\end{equation}
显示如下图所示:

(3)分数函数:
\begin{equation}
\begin{aligned}Attention(\textbf{Q},\textbf{K},\textbf{V}) = softmax \left( \frac{\textbf{Q}\textbf{K}^T}{\sqrt{d_k}} \right) \textbf{V}.
\end{aligned}\label{eq5}
\end{equation}
显示如下图所示:

(4)准确率公式:
\begin{equation}
\begin{aligned}Accuracy = \sum_{i=1}^N Accuracy_i \times w_i .
\end{aligned}\label{eq15}
\end{equation}
显示如下图所示:

需要注意,不同于图表使用“\ref{tab1}”的引用,公式使用“\eqref{eq1}”引用。区别是显示是否带有括号。

详细的公式使用文章推荐如下:
- https://zhuanlan.zhihu.com/p/450465546
特殊符号
圆圈数字
正常推荐使用pifont宏包。
- https://zhuanlan.zhihu.com/p/615066252
- https://milde.users.sourceforge.net/LUCR/Math/mathpackages/amssymb-symbols.pdf
\usepackage{pifont}
\ding{184}

各种样式如下:
\ding{182}\ding{183}\ding{184}\ding{185}\ding{186}\ding{187}\ding{188}\ding{189}\ding{190}\ding{191}\\\ding{192}\ding{193}\ding{194}\ding{195}\ding{196}\ding{197}\ding{198}\ding{199}\ding{200}\ding{201}\\\ding{202}\ding{203}\ding{204}\ding{205}\ding{206}\ding{207}\ding{208}\ding{209}\ding{210}\ding{211}\\
显示效果如下图所示:

然后,有时候出版社的模板无法引用pifont宏包,则使用如下:
$\textcircled{3}$
但数字编号大的时候,数字会跑到圆圈外面。

解决方法如下:
\normalsize{\textcircled{\scriptsize{3}}}\normalsize\enspace

半圆
导入引用包和代码:
\usepackage{tikz}
\newcommand*\emptycirc[1][1ex]{\tikz\draw (0,0) circle (#1);}
\newcommand*\halfcirc[1][1ex]{%\begin{tikzpicture}\draw[fill] (0,0)-- (90:#1) arc (90:270:#1) -- cycle ;\draw (0,0) circle (#1);\end{tikzpicture}}
\newcommand*\fullcirc[1][1ex]{\tikz\fill (0,0) circle (#1);}
使用如下:
\fullcirc
\halfcirc
\emptycirc

参考文献:https://blog.csdn.net/weixin_43846270/article/details/108202031
勾叉
导入引用包和代码:
\usepackage{pifont}       % \ding{xx}
\usepackage{bbding}       % \Checkmark,\XSolid,... (需要和pifont宏包共同使用)
使用如下:
\checkmark
\Checkmark
\CheckmarkBold
\XSolid
\XSolidBold
\XSolidBrush

其它参见的符号参考Xovee老师的文章,详见参考文献。


参考文献:
- https://blog.csdn.net/hyk_1996/article/details/124486173
- https://blog.csdn.net/xovee/article/details/122179352
纸牌
引用代码如下:
$\clubsuit$
$\spadesuit$
$\heartsuit$
$\diamondsuit$

其它常见的符号推荐如下所示的博客。
- https://blog.csdn.net/ying_xu/article/details/51240291
- https://blog.csdn.net/YEN_CSDN/article/details/79966985

参考文献
LaTeX插入参考文献,可以使用BibTex,也可以不使用BibTex。
\begin{thebibliography}{99}
\bibitem{ref1}Zheng L, Wang S, Tian L, et al., Query-adaptive late fusion for image search and person re-identification, Proceedings of the IEEE Conference on Computer Vision and Pattern Recognition, 2015: 1741-1750.
\bibitem{ref2}Arandjelović R, Zisserman A, Three things everyone should know to improve object retrieval, Computer Vision and Pattern Recognition (CVPR), 2012 IEEE Conference on, IEEE, 2012: 2911-2918.
\bibitem{ref3}Lowe D G. Distinctive image features from scale-invariant keypoints, International journal of computer vision, 2004, 60(2): 91-110.
\bibitem{ref4}Philbin J, Chum O, Isard M, et al. Lost in quantization: Improving particular object retrieval in large scale image databases, Computer Vision and Pattern Recognition, 2008. CVPR 2008, IEEE Conference on, IEEE, 2008: 1-8.
\end{thebibliography}
上面列出了5个参考文献,{thebibliography}的选项99指的是参考文献的个数最大为99,可以设置为别的数。在正文中引用参考文献的方法是:\cite{ref1}、\cite{ref1, ref5}。

BibTeX 是一种格式和一个程序,用于协调LaTeX的参考文献处理。

在Texlive中,通常有两种格式的引用参考文献。
(1)第一种方式直接在main.tex文件中撰写,以thebibliography的形式。
\begin{thebibliography}{49}\bibitem{b1} Microsoft, ``What is PowerShell? - PowerShell | Microsoft Docs,'' Website: https://docs.microsoft.com/en-us/powershell/scripting/overview, 2022.\bibitem{b2} D. Hendler, S. Kels, et al., ``AMSI-Based Detection of Malicious PowerShell Code Using Contextual Embeddings,'' in 15th ACM Asia Conference on Computer and Communications Security (AsiaCCS). ACM, 2020, pp. 679-693.\bibitem{b49} M. Ring, D. Schlor, et al., ``Malware detection on windows audit logs using LSTMs,'' Computers \& Security, vol.109, 2021, p. 102389. \end{thebibliography}
(2)第二种方式将参考文献写在myref.bib,以 \bibliography{myref} 的形式添加。
@misc{b1,title = {What is PowerShell? - PowerShell | Microsoft Docs},url = {https://docs.microsoft.com/en-us/powershell/scripting/overview},author = {Microsoft},year = {2022}
}@inproceedings{b2,title={Amsi-based detection of malicious powershell code using contextual embeddings},author={Hendler, Danny and Kels, Shay and Rubin, Amir},booktitle={Proceedings of the 15th ACM Asia Conference on Computer and Communications Security (AsiaCCS)},pages={679--693},year={2020},organization = {ACM}
}@article{b49,title={Malware detection on windows audit logs using LSTMs},author={Ring, Markus and Schl{\"o}r, Daniel and Wunderlich, Sarah and Landes, Dieter and Hotho, Andreas},journal={Computers \& Security},volume={109},pages={102389},year={2021},publisher={Elsevier}
}
参考文献BIB格式可以通过谷歌学术下载。同样,ChatGPT能够修改对应的格式,如百度的文心一言。参考文献格式推荐:
- https://www.jianshu.com/p/f335e75487cb


显示如下图所示:

序号
(1) 无序序列
\begin{itemize}\item Every sentence should make sense.\item There is a lot to be said.\item Eschew the highfalutin.
\end{itemize}

(2) 有序序列
\begin{enumerate}\item Every sentence should make sense.\item There is a lot to be said.\item Eschew the highfalutin.
\end{enumerate}

(3) 自定义序列
\begin{description}\item[Rule 1.] Every sentence should make sense.\item[Rule 2.] There is a lot to be said.\item[Rule 3.] Eschew the highfalutin.
\end{description}

序列同样可以嵌套,代码如下所示:

总结
写到这里,希望这篇文章对您有所帮助,后续也将继续更新内容。
月是故乡明,伟大祖国母亲生日快乐。见过各地山水,最清澈的还是家乡施秉的杉木河;吃过很多酸汤,最正宗的还是家乡黔东南的红酸白酸。难得这两天回老家看看,看到了家乡的发展和变化;看到了自己零几年的读书笔记;看到了小学中学的奖状和证件,值得纪念的是全县中考第一和那两张全国物理和数学竞赛获奖;看到了父亲为自己包好的各类文学书,以及父亲九几年手写的书法和绘画,并刻在自家的桌椅上(图3),父爱母爱伟大。
回首,人生犹如贵州连绵的青山绿水,总是起起伏伏,从小学到初中是上升期;紧接着到高中又直线下降;到大学初学程序又波折起伏;硕士毕业初为老师又缓慢下降;到发改借调又短暂回升;读博又起伏波折,如今又直线下降。然而,家乡的大山总能让我们养成质朴的性格,正如女神总笑我去哪都要背着个电脑,陪伴之余还是要敲敲代码,看看这平凡的世界。脚踏实地,知行合一,见笑见笑,爱你们喔!祝大家双节快乐。


(By:Eastmount 2023-10-06 夜于黔东南 http://blog.csdn.net/eastmount/ )