目录
1.PyQt介绍
2.代码实现
2.1实时调用摄像头
2.2 使用YOLOv5推理
2.3 代码中用到的主要函数
1.PyQt介绍
PyQt是一个用于创建桌面应用程序的Python绑定库,它基于Qt框架。Qt是一个跨平台的C++应用程序开发框架,提供了丰富的图形界面、网络通信、数据库操作等功能。PyQt通过将Qt框架与Python语言结合起来,使得开发者可以使用Python语言来快速、简便地创建功能强大的桌面应用程序。
以下是PyQt的一些主要特点和功能:
-
跨平台支持:PyQt可以在多个主要操作系统(如Windows、Linux和macOS)上运行,实现了跨平台的应用程序开发。这意味着你可以使用相同的代码来创建适用于不同操作系统的应用程序。
-
丰富的GUI库:PyQt提供了包括窗口、对话框、按钮、文本输入框、表格、树形视图、绘图等在内的丰富的图形用户界面组件。这些组件使开发者能够创建出具有吸引力和交互性的用户界面。
-
事件驱动编程:PyQt采用了事件驱动的编程模型。开发者可以通过响应用户的输入、鼠标点击、键盘事件等来触发特定的代码逻辑。这种模型使得应用程序能够高效地处理用户交互。
-
信号与槽机制:PyQt支持Qt的信号与槽机制,这是一种强大的机制,用于在对象之间进行通信和交互。通过信号与槽机制,开发者可以将不同对象的动作、事件等连接起来,实现灵活而高效的编程。
-
数据库集成:PyQt提供了对常见数据库的支持,包括SQLite、MySQL和PostgreSQL等。开发者可以使用PyQt的数据库模块来执行数据库查询、增删改操作,并将数据库与应用程序进行集成。
-
支持多线程:PyQt提供了对多线程的支持,可以在应用程序中处理并发任务,提高程序的响应性能。
2.代码实现
安装PyQt
pip install PyQt2.1实时调用摄像头
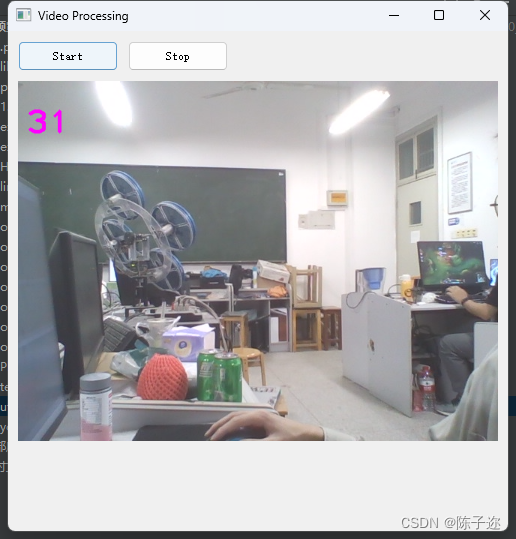
程序中主要包含两个类:VideoProcessingThread和MainWindow。
VideoProcessingThread类是一个继承自QThread的线程类,用于在后台处理视频流。在run方法中,打开摄像头并循环读取视频帧。对每一帧进行处理,包括计算帧率、调整图像大小,并通过信号update_frame发送给主窗口进行更新显示。通过stop方法可以停止线程的运行。
MainWindow类是主窗口类,继承自QMainWindow。在init_ui方法中初始化界面,包括添加开始和停止按钮以及结果显示的标签。start_video_processing方法用于点击开始按钮时创建并启动VideoProcessingThread线程。stop_video_processing方法用于点击停止按钮时停止线程的运行。update_frame方法接收到新的帧后,将其转换为QImage格式,并在标签上进行显示。在关闭窗口时,会调用closeEvent方法停止线程的运行。
在主程序中,创建一个QApplication实例,并实例化MainWindow类作为主窗口。最后调用app.exec_()启动应用程序的事件循环。
import sys
from PyQt5.QtWidgets import QApplication, QMainWindow, QPushButton, QLabel
from PyQt5.QtGui import QImage, QPixmap
from PyQt5.QtCore import QThread, pyqtSignalimport utlis
from ours import *import cv2
import timeclass VideoProcessingThread(QThread):update_frame = pyqtSignal(object)def __init__(self, onnx_path, rtsp_url):super().__init__()self.onnx_path = onnx_pathself.rtsp_url = rtsp_urlself.running = Falsedef run(self):self.running = Truecap= cv2.VideoCapture(0)pTime = 0while True:# n_stamp, img = HIK.read()success, img2 = cap.read()cTime = time.time()fps = 1 / (cTime - pTime)pTime = cTimecv2.putText(img2, str(int(fps)), (10, 70), cv2.FONT_HERSHEY_PLAIN, 3, (255, 0, 255), 3)img2 = cv2.resize(img2,(480,360))# 在窗口中显示目标检测结果# cv2.imshow('result', img2)self.update_frame.emit(img2)# 等待用户按键,如果按下 'q' 键或者 Esc 键,则退出循环c = cv2.waitKey(1) & 0xFFif c == 27 or c == ord('q'):breakcap.release()def stop(self):self.running = Falseclass MainWindow(QMainWindow):def __init__(self, onnx_path, rtsp_url):super().__init__()self.onnx_path = onnx_pathself.rtsp_url = rtsp_urlself.video_thread = Noneself.init_ui()def init_ui(self):self.setWindowTitle('Video Processing')start_button = QPushButton('Start', self)start_button.setGeometry(10, 10, 100, 30)start_button.clicked.connect(self.start_video_processing)stop_button = QPushButton('Stop', self)stop_button.setGeometry(120, 10, 100, 30)stop_button.clicked.connect(self.stop_video_processing)self.result_label = QLabel(self)self.result_label.setGeometry(10, 50, 480, 360)self.setGeometry(100, 100, 500, 500)def start_video_processing(self):if self.video_thread is None or not self.video_thread.isRunning():self.video_thread = VideoProcessingThread(self.onnx_path, self.rtsp_url)self.video_thread.update_frame.connect(self.update_frame)self.video_thread.start()# def stop_video_processing(self):#     if self.video_thread is not None and self.video_thread.isRunning():#         self.video_thread.stop()#         self.video_thread.wait()def stop_video_processing(self):if self.video_thread is not None and self.video_thread.isRunning():self.video_thread.stop()def update_frame(self, frame):# 将cv2格式的帧转换为QImage格式qimg = QImage(frame.data, frame.shape[1], frame.shape[0], QImage.Format_BGR888)pixmap = QPixmap.fromImage(qimg)# 设置到QLabel控件上显示self.result_label.setPixmap(pixmap)def closeEvent(self, event):self.stop_video_processing()event.accept()if __name__ == '__main__':app = QApplication(sys.argv)onnx_path = 'yolov5s.onnx'rtsp_url = 'rtsp://admin:DING09503@192.168.1.64:554/h264/ch1/main/av_stream'main_window = MainWindow(onnx_path, rtsp_url)main_window.show()sys.exit(app.exec_())
代码详解
首先,导入所需的模块:
import sys
from PyQt5.QtWidgets import QApplication, QMainWindow, QPushButton, QLabel
from PyQt5.QtGui import QImage, QPixmap
from PyQt5.QtCore import QThread, pyqtSignal
import cv2
import time
然后定义一个名为VideoProcessingThread的线程类,继承自QThread类。这个类用来处理视频流。
class VideoProcessingThread(QThread):update_frame = pyqtSignal(object)def __init__(self, onnx_path, rtsp_url):super().__init__()self.onnx_path = onnx_pathself.rtsp_url = rtsp_urlself.running = Falsedef run(self):self.running = Truecap= cv2.VideoCapture(0)pTime = 0while True:success, img2 = cap.read()cTime = time.time()fps = 1 / (cTime - pTime)pTime = cTimecv2.putText(img2, str(int(fps)), (10, 70), cv2.FONT_HERSHEY_PLAIN, 3, (255, 0, 255), 3)img2 = cv2.resize(img2,(480,360))self.update_frame.emit(img2)c = cv2.waitKey(1) & 0xFFif c == 27 or c == ord('q'):breakcap.release()def stop(self):self.running = False
在VideoProcessingThread类中,我们定义了一个信号update_frame,它会在每一帧处理完毕后发射。
run方法是线程的主要执行逻辑。在这里,我们打开摄像头并循环读取视频帧。对每一帧进行处理,包括计算帧率、调整图像大小,并通过信号update_frame将图像发送给主窗口进行显示。我们还在窗口上显示了实时的帧率信息。同时,我们还检测按键事件,如果用户按下了'q'键或者Esc键,则退出循环。
stop方法用于停止线程的运行,将running标志设置为False。
接下来,定义一个名为MainWindow的主窗口类,继承自QMainWindow类。
class MainWindow(QMainWindow):def __init__(self, onnx_path, rtsp_url):super().__init__()self.onnx_path = onnx_pathself.rtsp_url = rtsp_urlself.video_thread = Noneself.init_ui()def init_ui(self):self.setWindowTitle('Video Processing')start_button = QPushButton('Start', self)start_button.setGeometry(10, 10, 100, 30)start_button.clicked.connect(self.start_video_processing)stop_button = QPushButton('Stop', self)stop_button.setGeometry(120, 10, 100, 30)stop_button.clicked.connect(self.stop_video_processing)self.result_label = QLabel(self)self.result_label.setGeometry(10, 50, 480, 360)self.setGeometry(100, 100, 500, 500)
在MainWindow类中,我们首先定义了构造函数,接收两个参数onnx_path和rtsp_url,分别表示ONNX模型的路径和视频流的URL。
init_ui方法用于初始化用户界面。我们设置了窗口标题为"Video Processing",创建了开始和停止按钮,并将其与对应的槽函数连接起来。我们还创建了一个标签用于显示视频帧的结果,并设置了标签的位置和尺寸。最后,我们设置了窗口的位置和尺寸。
def start_video_processing(self):if self.video_thread is None or not self.video_thread.isRunning():self.video_thread = VideoProcessingThread(self.onnx_path, self.rtsp_url)self.video_thread.update_frame.connect(self.update_frame)self.video_thread.start()def stop_video_processing(self):if self.video_thread is not None and self.video_thread.isRunning():self.video_thread.stop()
start_video_processing方法在点击开始按钮时被调用。它首先检查线程是否已经存在或者正在运行,如果不是的话,就创建一个新的VideoProcessingThread线程,并将其与update_frame信号连接起来,然后启动线程。
stop_video_processing方法在点击停止按钮时被调用。它检查线程是否存在并且正在运行,如果是的话,就调用线程的stop方法停止线程的运行。
def update_frame(self, frame):qimg = QImage(frame.data, frame.shape[1], frame.shape[0], QImage.Format_BGR888)pixmap = QPixmap.fromImage(qimg)self.result_label.setPixmap(pixmap)def closeEvent(self, event):self.stop_video_processing()event.accept()
update_frame方法用于更新显示的视频帧。它接收到一帧图像后,将其转换为QImage格式,并创建一个QPixmap对象。然后将该QPixmap对象设置到标签上进行显示。
closeEvent方法在窗口关闭时被调用。我们在这里停止视频处理线程,并接受窗口关闭事件。
最后,在主程序中创建一个QApplication实例,并实例化MainWindow类作为主窗口。最后调用app.exec_()启动应用程序的事件循环。
它实现了一个简单的视频处理应用程序,可以通过界面显示摄像头捕获到的实时视频流。你可以根据需要进行修改和扩展。
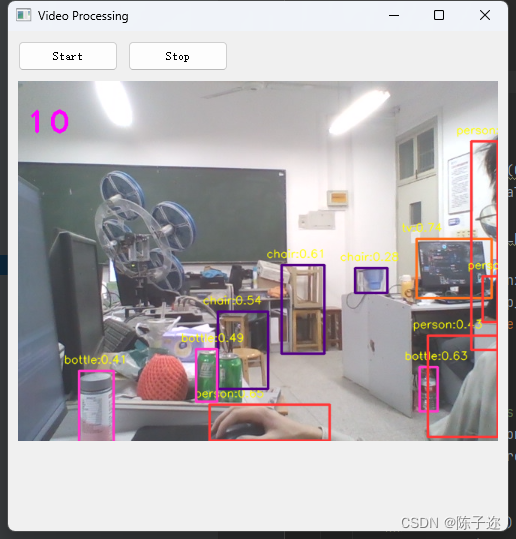
2.2 使用YOLOv5推理
from PyQt5.QtWidgets import QApplication, QMainWindow, QPushButton, QLabel
from PyQt5.QtGui import QImage, QPixmap
from PyQt5.QtCore import QThread, pyqtSignalfrom example1 import *
import utlis
from ours import *import cv2
import timeclass VideoProcessingThread(QThread):update_frame = pyqtSignal(object)def __init__(self, onnx_path, rtsp_url):super().__init__()self.onnx_path = onnx_pathself.rtsp_url = rtsp_urlself.running = Falsedef run(self):self.running = Trueonnx_path = 'yolov5s.onnx'model = Yolov5ONNX(onnx_path)cap= cv2.VideoCapture(0)pTime = 0while True:t0 = time.time()# n_stamp, img = HIK.read()success, img = cap.read()img2, box_coords = model.detect(img)cTime = time.time()fps = 1 / (cTime - pTime)pTime = cTimecv2.putText(img2, str(int(fps)), (10, 70), cv2.FONT_HERSHEY_PLAIN, 3, (255, 0, 255), 3)img2 = cv2.resize(img2,(480,360))# 在窗口中显示目标检测结果# cv2.imshow('result', img2)self.update_frame.emit(img2)# 等待用户按键,如果按下 'q' 键或者 Esc 键,则退出循环c = cv2.waitKey(1) & 0xFFif c == 27 or c == ord('q'):breakHIK.release()def stop(self):self.running = Falseclass MainWindow(QMainWindow):def __init__(self, onnx_path, rtsp_url):super().__init__()self.onnx_path = onnx_pathself.rtsp_url = rtsp_urlself.video_thread = Noneself.init_ui()def init_ui(self):self.setWindowTitle('Video Processing')start_button = QPushButton('Start', self)start_button.setGeometry(10, 10, 100, 30)start_button.clicked.connect(self.start_video_processing)stop_button = QPushButton('Stop', self)stop_button.setGeometry(120, 10, 100, 30)stop_button.clicked.connect(self.stop_video_processing)self.result_label = QLabel(self)self.result_label.setGeometry(10, 50, 480, 360)self.setGeometry(100, 100, 500, 500)def start_video_processing(self):if self.video_thread is None or not self.video_thread.isRunning():self.video_thread = VideoProcessingThread(self.onnx_path, self.rtsp_url)self.video_thread.update_frame.connect(self.update_frame)self.video_thread.start()def stop_video_processing(self):if self.video_thread is not None and self.video_thread.isRunning():self.video_thread.stop()self.video_thread.wait()# def stop_video_processing(self):#     if self.video_thread is not None and self.video_thread.isRunning():#         self.video_thread.stop()def update_frame(self, frame):# 将cv2格式的帧转换为QImage格式qimg = QImage(frame.data, frame.shape[1], frame.shape[0], QImage.Format_BGR888)pixmap = QPixmap.fromImage(qimg)# 设置到QLabel控件上显示self.result_label.setPixmap(pixmap)def closeEvent(self, event):self.stop_video_processing()event.accept()if __name__ == '__main__':app = QApplication(sys.argv)onnx_path = 'yolov5s.onnx'rtsp_url = 'rtsp://admin:DING09503@192.168.1.64:554/h264/ch1/main/av_stream'main_window = MainWindow(onnx_path, rtsp_url)main_window.show()sys.exit(app.exec_())
2.3 代码中用到的主要函数
cv2.VideoCapture: 用于打开视频文件或者设备,返回一个cv2.VideoCapture对象。
-
cap = cv2.VideoCapture(0) -
cv2.cvtColor: 用于将图像从一个颜色空间转换为另一个颜色空间。 -
img_gray = cv2.cvtColor(img, cv2.COLOR_BGR2GRAY) -
cv2.resize: 用于调整图像的大小。 -
img_resized = cv2.resize(img, (width, height)) -
cv2.putText: 用于在图像上绘制文本。 -
cv2.putText(img, text, (x, y), font, size, color, thickness) -
cv2.imshow: 用于在窗口中显示图像。 -
cv2.imshow('image', img) -
cv2.waitKey: 用于等待键盘事件。 -
key = cv2.waitKey(delay) -
cv2.destroyAllWindows: 用于关闭所有窗口。 -
cv2.destroyAllWindows() -
QApplication: 用于创建Qt应用程序对象。 -
app = QApplication(sys.argv) -
QMainWindow: 用于创建Qt主窗口。 -
class MainWindow(QMainWindow):def __init__(self):super().__init__()# ... -
QPushButton: 用于创建Qt按钮对象。 -
start_button = QPushButton('Start', self) -
QLabel: 用于创建Qt标签对象,用于显示图像、文本等内容。 -
self.result_label = QLabel(self) self.result_label.setGeometry(10, 50, 480, 360) -
QThread: 用于创建Qt线程对象。
class VideoProcessingThread(QThread):觉得有用朋友点个赞!
万分感谢





![[MQ]Win平台RocketMQ安装启动](https://img-blog.csdnimg.cn/5283b373baef44b8b00542ddcc27a348.png)
