1. 创建界面测试视图 UITestingBootcampView.swift
import SwiftUI/// 界面测试 ViewModel
class UITestingBootcampViewModel: ObservableObject{let placeholderText: String = "Add name here..."@Published var textFiledText: String = ""@Published var currentUserIsSignedIn: Boolinit(currentUserIsSignedIn: Bool) {self.currentUserIsSignedIn = currentUserIsSignedIn}/// 登录按钮处理,模拟测试func signUpButtonPressed() {guard !textFiledText.isEmpty else { return }currentUserIsSignedIn = true}
}/// 界面测试
struct UITestingBootcampView: View {@StateObject private var viewModel: UITestingBootcampViewModelinit(currentUserIsSignedIn: Bool) {//"_" 下划线表示: 正在引用状态对象  wrappedValue: 表示包装值_viewModel = StateObject(wrappedValue: UITestingBootcampViewModel(currentUserIsSignedIn: currentUserIsSignedIn))print("description: " + currentUserIsSignedIn.description)}var body: some View {ZStack {LinearGradient(gradient: Gradient(colors: [Color.blue, Color.black]),startPoint: .topLeading,endPoint: .bottomTrailing).ignoresSafeArea()ZStack {if viewModel.currentUserIsSignedIn {SignedInHomeView().frame(maxWidth:.infinity, maxHeight: .infinity).transition(.move(edge: .trailing))}if !viewModel.currentUserIsSignedIn{signUpLayer.frame(maxWidth:.infinity, maxHeight: .infinity).transition(.move(edge: .leading))}}}}
}/// 扩展 View
extension UITestingBootcampView{// 登录布局private var signUpLayer: some View{VStack {TextField(viewModel.placeholderText, text: $viewModel.textFiledText).font(.headline).padding().frame(height: 55).background(Color.white).cornerRadius(10).accessibilityIdentifier("SignUpTextField")Button {withAnimation(.spring()) {viewModel.signUpButtonPressed()}} label: {Text("Sign Up").font(.headline).padding().frame(maxWidth: .infinity).foregroundColor(.white).background(Color.accentColor).cornerRadius(10)}.accessibilityIdentifier("SignUpButton")}.padding()}
}/// 登录入主页
struct SignedInHomeView: View{@State private var showAlert: Bool = falsevar body: some View{NavigationView {VStack(spacing: 20) {Button {showAlert.toggle()} label: {Text("Show welcome alert!").font(.headline).padding().frame(maxWidth: .infinity).foregroundColor(.white).background(Color.red).cornerRadius(10)}.accessibilityIdentifier("ShowAlertButton").alert(isPresented: $showAlert) {return Alert(title: Text("Welcome to the app!"))}NavigationLink(destination: Text("Destination")) {Text("Navigate").font(.headline).padding().frame(maxWidth: .infinity).foregroundColor(.white).background(Color.blue).cornerRadius(10)}.accessibilityIdentifier("NavigationLinkToDestination")}.padding().navigationTitle("Welcome")}}
}struct UITestingBootcampView_Previews: PreviewProvider {static var previews: some View {UITestingBootcampView(currentUserIsSignedIn: true)}
}
2. 测试类及自动操作效果图
2.1 添加界面测试类
添加方法与单元测试类添加方法一样,注意的是 Test 栏下 选择 UI Testing Bundle。
创建界面测试文件 UITestingBootcampView_UITests.swift
import XCTest// 《Testing Swift》 测试书籍
// 书籍网址: https://www.hackingwithswift.com/store/testing-swift
// Naming Structure: test_UnitOfWork_StateUnderTest_ExpectedBehavior -  结构体命名: 测试_工作单元_测试状态_预期的行为
// Naming Structure: test_[struct]_[ui component]_[expected result] - 测试_[结构体]_[界面 组件]_[预期结果 预期值]
// Testing Structure: Given, When, Then - 测试结构: 给定,什么时候,然后final class UITestingBootcampView_UITests: XCTestCase {let app = XCUIApplication()override func setUpWithError() throws {continueAfterFailure = false//app.launchArguments = ["-UITest_startSignedIn"]//app.launchEnvironment = ["-UITest_startSignedIn2" : "true"]app.launch()}override func tearDownWithError() throws {}/// 测试_界面测试视图_注册按钮_不能登录func test_UITestingBootcampView_signUpButton_shouldNotSignIn(){// GivensignUpAndSignIn(shouldTypeOnKeyboard: false)// Whenlet navBar = app.navigationBars["Welcome"]// Then 断言导航栏不存在XCTAssertFalse(navBar.exists)}/// 测试_界面测试视图_注册按钮_能登录func test_UITestingBootcampView_signUpButton_shouldSignIn(){// GivensignUpAndSignIn(shouldTypeOnKeyboard: true)// Whenlet navBar = app.navigationBars["Welcome"]// Then 断言导航栏存在XCTAssertTrue(navBar.exists)}/// 测试_登录到主页_显示警告按钮_能显示警告弹框func test_SignedInHomeView_showAlertButton_shouldDisplayAlert(){// GivensignUpAndSignIn(shouldTypeOnKeyboard: true)// WhentapAlertButton(shouldDismissAlert: false)// Then// 查找第一个警告框let alert = app.alerts.firstMatch// 警告框是否存在XCTAssertTrue(alert.exists)}/// 测试_登录到主页_显示警告按钮_能显示并关闭警告弹框func test_SignedInHomeView_showAlertButton_shouldDisplayAndDismissAlert(){// GivensignUpAndSignIn(shouldTypeOnKeyboard: true)// WhentapAlertButton(shouldDismissAlert: true)// Then 断言// sleep(1)// 查找第一个警告框,存不存在let alertExists = app.alerts.firstMatch.waitForExistence(timeout: 5)XCTAssertFalse(alertExists)}/// 测试_登录到主页_导航连接器_能够跳转到func test_SignedInHomeView_navigationLinkToDestination_shouldNavigateToDestination(){// GivensignUpAndSignIn(shouldTypeOnKeyboard: true)// WhentapNavigationLink(shouldDismissDestination: false)//then 断言文本是否存在let destinationText = app.staticTexts["Destination"]XCTAssertTrue(destinationText.exists)}/// 测试_登录到主页_导航连接到目标视图_能显示并关闭警告弹框func test_SignedInHomeView_navigationLinkToDestination_shouldNavigateToDestinationAndGoBack(){// GivensignUpAndSignIn(shouldTypeOnKeyboard: true)// WhentapNavigationLink(shouldDismissDestination: true)//then 断言 Home View 导航栏是否存在let navBar = app.navigationBars["Welcome"]// 导航栏是否存在XCTAssertTrue(navBar.exists)}/// 测试_登录到主页_导航连接到目标视图_能显示并关闭警告弹框
//    func test_SignedInHomeView_navigationLinkToDestination_shouldNavigateToDestinationAndGoBack2(){
//        // Given
//
//        // When
//        tapNavigationLink(shouldDismissDestination: true)
//
//        //then 断言 Home View 导航栏是否存在
//        let navBar = app.navigationBars["Welcome"]
//        // 导航栏是否存在
//        XCTAssertTrue(navBar.exists)
//    }
}// MARK: 也许可能函数
extension UITestingBootcampView_UITests{/// 提取公共部分代码 注册并登录,键盘输入: trur falsefunc signUpAndSignIn(shouldTypeOnKeyboard: Bool){let textfield = app.textFields["SignUpTextField"]textfield.tap()if shouldTypeOnKeyboard {let keyA = app.keys["A"]keyA.tap()let keyA1 = app.keys["a"]keyA1.tap()keyA1.tap()let returnButton = app.buttons["Return"]returnButton.tap()}let signUpButton = app.buttons["SignUpButton"]signUpButton.tap()}/// 提取提示框按钮,是否关闭提示框func tapAlertButton(shouldDismissAlert: Bool){let showAlertButton = app.buttons["ShowAlertButton"]showAlertButton.tap()if shouldDismissAlert{// 查找第一个警告框 中的 OK 按钮let alertOKButton = app.alerts.firstMatch.buttons["OK"]// sleep(1)// 等待至少 5 秒,让 alertOKButton 存在let alertPKButtonExists =  alertOKButton.waitForExistence(timeout: 5)// 断言按钮是否存在XCTAssertTrue(alertPKButtonExists)alertOKButton.tap()}}/// 提取导航连接器 ,是否关闭目标视图func tapNavigationLink(shouldDismissDestination: Bool){// 导航器按钮let navLinkButton = app.buttons["NavigationLinkToDestination"]navLinkButton.tap()if shouldDismissDestination{// 返回按钮let backButton = app.navigationBars.buttons["Welcome"]backButton.tap()}}
}
2.2 点击 test_UITestingBootcampView_signUpButton_shouldNotSignIn 测试方法前 方形运行按钮,得到测试效果,如图:

2.3 如上测试方法 test_SignedInHomeView_showAlertButton_shouldDisplayAlert 效果图:
2.4 其他测试方法操作,如上一致。
3. 从 App 启动类中加载界面测试 View,界面测试时,App 启动类中也需要添加界面测试 View
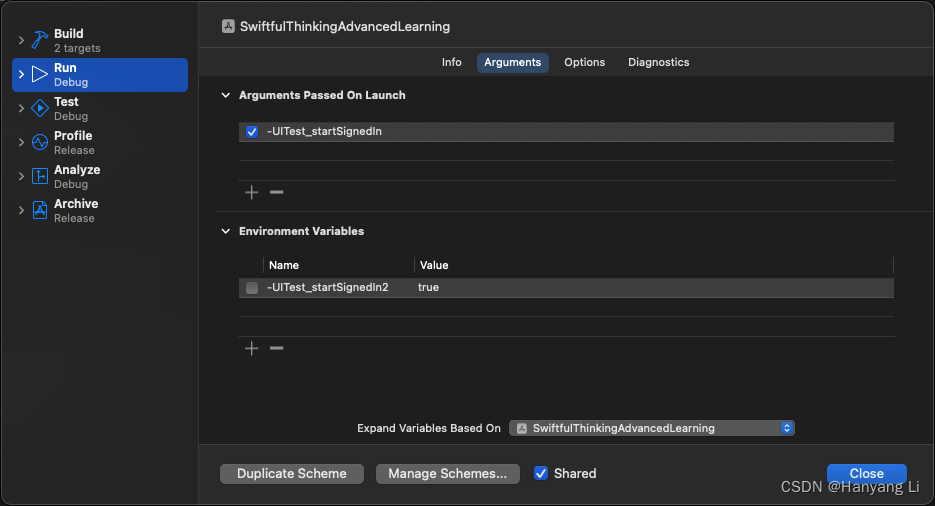
3.1 可配启动参数,菜单栏点击 Product -> Scheme -> Edit Scheme... -> Run 选项卡页添加参数,如图:
3.2 获取配置参数,加载测试界面视图 SwiftfulThinkingAdvancedLearningApp.swift
import SwiftUI@main
struct SwiftfulThinkingAdvancedLearningApp: App {let currentUserIsSignedIn: Boolinit() {// 获取启动参数,判断是否有此字符串: UITestingBootcampView// let userIsSignedIn:Bool = CommandLine.arguments.contains("-UITest_startSignedIn") ? true : falselet userIsSignedIn:Bool = ProcessInfo.processInfo.arguments.contains("-UITest_startSignedIn") ? true : false// 获取环境变量配置值// let value = ProcessInfo.processInfo.environment["-UITest_startSignedIn2"]// let userIsSignedIn:Bool =  value == "true" ? true : falseself.currentUserIsSignedIn = userIsSignedIn//print("USER IS SIGNED IN: \(userIsSignedIn)")//print("USER IS SIGNED IN2: \(value ?? "")")}var body: some Scene {WindowGroup {UITestingBootcampView(currentUserIsSignedIn: self.currentUserIsSignedIn)}}
}