文章目录
- ResNet 论文精读
- 代码实现
- 网络可视化代码
- 拓展知识 ResNets
- 残差的调参
- 残差链接的渊源
- 残差链接有效性的解释
- ResNet 深度
- ResNeXt
- 代码实现
- 能够提点的技巧
- 「Warmup」
- 「Label-smoothing」
- 「Random image cropping and patching」
- 「Knowledge Distiallation」
- 「Cutout」
- 「Random erasing」
- 「Cosine learning rate decay」
- 「Mixup training」
- 「AutoAugment」
- 其他经典的Tricks
ResNet 论文精读
- Deep Residual Learning for Image Recognition
- 深度学习引用量最多的论文
- 写作:问题一摆,简单分析一下,然后举一些文献,再说自己是怎么解决的
- 相关工作:列出来不会影响你的贡献,要说出你的工作和之前工作的区别。
- 这篇论文重点在于残差结构。有助于解决梯度弥散。这里的加号是相加操作不是拼接操作。


- 4 个Stage,每个 Stage 之内没有 feature map 变化,卷积核通道数量也不变,之外卷积核通道数量加倍。把空间维度上的信息转移到通道维度上。下采样利用步长为 2 的卷积核。Stage 间利用了 1 * 1 卷积调节通道数。

- k=3,s=1,p=1 输入输出特征大小一样
- k=3,s=2,p=1 2 倍下采样
- k=3,s=4,p=1 4 倍下采样

代码实现
- 看懂不是目标,自己手敲后才有感觉
- 模型实现很巧妙,GoogLeNet 后开始利用 Stage 的思想,能够容易的对模型进行放缩。
import torch.nn as nn
import torchclass BasicBlock(nn.Module):expansion = 1def __init__(self, in_channel, out_channel, stride=1, downsample=None, **kwargs):super(BasicBlock, self).__init__()self.conv1 = nn.Conv2d(in_channels=in_channel, out_channels=out_channel, kernel_size=3, stride=stride, padding=1, bias=False)self.bn1 = nn.BatchNorm2d(out_channel)self.relu = nn.ReLU()self.conv2 = nn.Conv2d(in_channels=out_channel, out_channels=out_channel, kernel_size=3, stride=1, padding=1, bias=False)self.bn2 = nn.BatchNorm2d(out_channel)self.downsample = downsampledef forward(self, x):identity = xif self.downsample is not None:identity = self.downsample(x)out = self.conv1(x)out = self.bn1(out)out = self.relu(out)out = self.conv2(out)out = self.bn2(out)out += identityout = self.relu(out)return outclass Bottleneck(nn.Module):"""注意:原论文中,在虚线残差结构的主分支上,第一个1x1卷积层的步距是2,第二个3x3卷积层步距是1。但在pytorch官方实现过程中是第一个1x1卷积层的步距是1,第二个3x3卷积层步距是2,这么做的好处是能够在top1上提升大概0.5%的准确率。可参考Resnet v1.5 https://ngc.nvidia.com/catalog/model-scripts/nvidia:resnet_50_v1_5_for_pytorch"""expansion = 4def __init__(self, in_channel, out_channel, stride=1, downsample=None,groups=1, width_per_group=64):super(Bottleneck, self).__init__()width = int(out_channel * (width_per_group / 64.)) * groupsself.conv1 = nn.Conv2d(in_channels=in_channel, out_channels=width,  kernel_size=1, stride=1, bias=False)  # squeeze channelsself.bn1 = nn.BatchNorm2d(width)# -----------------------------------------self.conv2 = nn.Conv2d(in_channels=width, out_channels=width, groups=groups, kernel_size=3, stride=stride, bias=False, padding=1)self.bn2 = nn.BatchNorm2d(width)# -----------------------------------------self.conv3 = nn.Conv2d(in_channels=width, out_channels=out_channel*self.expansion, kernel_size=1, stride=1, bias=False)  # unsqueeze channelsself.bn3 = nn.BatchNorm2d(out_channel*self.expansion)self.relu = nn.ReLU(inplace=True)self.downsample = downsampledef forward(self, x):identity = xif self.downsample is not None:identity = self.downsample(x)out = self.conv1(x)out = self.bn1(out)out = self.relu(out)out = self.conv2(out)out = self.bn2(out)out = self.relu(out)out = self.conv3(out)out = self.bn3(out)out += identityout = self.relu(out)return outclass ResNet(nn.Module):def __init__(self,block,blocks_num,num_classes=1000,include_top=True,groups=1,width_per_group=64):super(ResNet, self).__init__()self.include_top = include_topself.in_channel = 64self.groups = groupsself.width_per_group = width_per_groupself.conv1 = nn.Conv2d(3, self.in_channel, kernel_size=7, stride=2,  padding=3, bias=False)self.bn1 = nn.BatchNorm2d(self.in_channel)self.relu = nn.ReLU(inplace=True)self.maxpool = nn.MaxPool2d(kernel_size=3, stride=2, padding=1)self.layer1 = self._make_layer(block, 64, blocks_num[0])self.layer2 = self._make_layer(block, 128, blocks_num[1], stride=2)self.layer3 = self._make_layer(block, 256, blocks_num[2], stride=2)self.layer4 = self._make_layer(block, 512, blocks_num[3], stride=2)if self.include_top:self.avgpool = nn.AdaptiveAvgPool2d((1, 1))  # output size = (1, 1)self.fc = nn.Linear(512 * block.expansion, num_classes)for m in self.modules():if isinstance(m, nn.Conv2d):nn.init.kaiming_normal_(m.weight, mode='fan_out', nonlinearity='relu')def _make_layer(self, block, channel, block_num, stride=1):downsample = Noneif stride != 1 or self.in_channel != channel * block.expansion:downsample = nn.Sequential(nn.Conv2d(self.in_channel, channel * block.expansion, kernel_size=1, stride=stride, bias=False),nn.BatchNorm2d(channel * block.expansion))layers = []layers.append(block(self.in_channel,channel,downsample=downsample,stride=stride,groups=self.groups,width_per_group=self.width_per_group))self.in_channel = channel * block.expansionfor _ in range(1, block_num):layers.append(block(self.in_channel,channel,groups=self.groups,width_per_group=self.width_per_group))return nn.Sequential(*layers)def forward(self, x):x = self.conv1(x)x = self.bn1(x)x = self.relu(x)x = self.maxpool(x)x = self.layer1(x)x = self.layer2(x)x = self.layer3(x)x = self.layer4(x)if self.include_top:x = self.avgpool(x)x = torch.flatten(x, 1)x = self.fc(x)return x# # resnet34  pre-train parameters https://download.pytorch.org/models/resnet34-333f7ec4.pth
# def resnet_samll(num_classes=1000, include_top=True):#     return ResNet(BasicBlock, [3, 4, 6, 3], num_classes=num_classes, include_top=include_top)# # resnet50  pre-train parameters https://download.pytorch.org/models/resnet50-19c8e357.pth
# def resnet(num_classes=1000, include_top=True):
#     return ResNet(Bottleneck, [3, 4, 6, 3], num_classes=num_classes, include_top=include_top)# # resnet101 pre-train parameters https://download.pytorch.org/models/resnet101-5d3b4d8f.pth
# def resnet_big(num_classes=1000, include_top=True):
#     return ResNet(Bottleneck, [3, 4, 23, 3], num_classes=num_classes, include_top=include_top)# # resneXt pre-train parameters https://download.pytorch.org/models/resnext50_32x4d-7cdf4587.pth
# def resnext(num_classes=1000, include_top=True):
#     groups = 32
#     width_per_group = 4
#     return ResNet(Bottleneck, [3, 4, 6, 3],
#                   num_classes=num_classes,
#                   include_top=include_top,
#                   groups=groups,
#                   width_per_group=width_per_group)# # resneXt_big pre-train parameters https://download.pytorch.org/models/resnext101_32x8d-8ba56ff5.pth
# def resnext_big(num_classes=1000, include_top=True):
#     groups = 32
#     width_per_group = 8
#     return ResNet(Bottleneck, [3, 4, 23, 3],
#                   num_classes=num_classes,
#                   include_top=include_top,
#                   groups=groups,
#                   width_per_group=width_per_group)def resnet34(num_classes=1000, include_top=True):# https://download.pytorch.org/models/resnet34-333f7ec4.pthreturn ResNet(BasicBlock, [3, 4, 6, 3], num_classes=num_classes, include_top=include_top)def resnet50(num_classes=1000, include_top=True):# https://download.pytorch.org/models/resnet50-19c8e357.pthreturn ResNet(Bottleneck, [3, 4, 6, 3], num_classes=num_classes, include_top=include_top)def resnet101(num_classes=1000, include_top=True):# https://download.pytorch.org/models/resnet101-5d3b4d8f.pthreturn ResNet(Bottleneck, [3, 4, 23, 3], num_classes=num_classes, include_top=include_top)def resnext50_32x4d(num_classes=1000, include_top=True):# https://download.pytorch.org/models/resnext50_32x4d-7cdf4587.pthgroups = 32width_per_group = 4return ResNet(Bottleneck, [3, 4, 6, 3],num_classes=num_classes,include_top=include_top,groups=groups,width_per_group=width_per_group)def resnext101_32x8d(num_classes=1000, include_top=True):# https://download.pytorch.org/models/resnext101_32x8d-8ba56ff5.pthgroups = 32width_per_group = 8return ResNet(Bottleneck, [3, 4, 23, 3],num_classes=num_classes,include_top=include_top,groups=groups,width_per_group=width_per_group)
网络可视化代码
import torch.nn as nn
import torch
import torch
import matplotlib.pyplot as plt
import numpy as np
from PIL import Image
from torchvision import transformsclass AlexNet(nn.Module):def __init__(self, num_classes=5, init_weights=False):super().__init__()self.features = nn.Sequential(nn.Conv2d(3, 96, kernel_size=11, stride=4, padding=2),  # input[3, 224, 224]  output[96, 55, 55]nn.ReLU(inplace=True),nn.MaxPool2d(kernel_size=3, stride=2),                  # output[96, 27, 27]nn.Conv2d(96, 256, kernel_size=5, padding=2),           # output[256, 27, 27]nn.ReLU(inplace=True),nn.MaxPool2d(kernel_size=3, stride=2),                  # output[256, 13, 13]nn.Conv2d(256, 384, kernel_size=3, padding=1),          # output[384, 13, 13]nn.ReLU(inplace=True),nn.Conv2d(384, 384, kernel_size=3, padding=1),          # output[384, 13, 13]nn.ReLU(inplace=True),nn.Conv2d(384, 256, kernel_size=3, padding=1),          # output[256, 13, 13]nn.ReLU(inplace=True),nn.MaxPool2d(kernel_size=3, stride=2),                  # output[256, 6, 6])self.classifier = nn.Sequential(nn.Dropout(p=0.5),nn.Linear(256 * 6 * 6, 4096),nn.ReLU(inplace=True),nn.Dropout(p=0.5),nn.Linear(4096, 4096),nn.ReLU(inplace=True),nn.Linear(4096, num_classes),)if init_weights:self._initialize_weights()def forward(self, x):outputs = []for name, module in self.features.named_children():x = module(x)if name in ["0"]:outputs.append(x)return outputsdef _initialize_weights(self):for m in self.modules():if isinstance(m, nn.Conv2d):nn.init.kaiming_normal_(m.weight, mode='fan_out', nonlinearity='relu')if m.bias is not None:nn.init.constant_(m.bias, 0)elif isinstance(m, nn.Linear):nn.init.normal_(m.weight, 0, 0.01)nn.init.constant_(m.bias, 0)data_transform = transforms.Compose([transforms.Resize((224, 224)),transforms.ToTensor(),transforms.Normalize((0.5, 0.5, 0.5), (0.5, 0.5, 0.5))])# create model
model = AlexNet(num_classes=5)
# load model weights
model_weight_path = "/Users/jiangxiyu/根目录/深度学习/Deep-Learning-Image-Classification-Models-Based-CNN-or-Attention/results/weights/alexnet/AlexNet.pth"
model.load_state_dict(torch.load(model_weight_path))
print(model)# load image
img = Image.open("/Users/jiangxiyu/根目录/深度学习/flower/train/daisy/5547758_eea9edfd54_n.jpg")
# [N, C, H, W]
img = data_transform(img)
# expand batch dimension
img = torch.unsqueeze(img, dim=0)# forward
out_put = model(img)
for feature_map in out_put:# [N, C, H, W] -> [C, H, W]im = np.squeeze(feature_map.detach().numpy())# [C, H, W] -> [H, W, C]im = np.transpose(im, [1, 2, 0])# show top 12 feature mapsplt.figure()for i in range(12):ax = plt.subplot(3, 4, i+1)# [H, W, C]plt.imshow(im[:, :, i], cmap='gray')plt.show()plt.savefig("./AelxNet_vis.jpg")
拓展知识 ResNets
残差的调参
- 把 BN 和激活函数调前精度更高

残差链接的渊源
- 其实残差连接可以看成一种特殊的跳跃连接,早在15年的时候,还有一篇Highway Networks使用了类似的结构,在旁路中设置了可训练参数。
残差链接有效性的解释
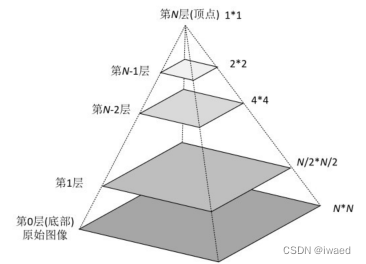
- 把残差网络展开,相当与集成(ensemble)了多个神经网络,这是一种典型的集成学习的思想(ensemble learning),如下图示:

ResNet 深度
- GoogLeNet V3 准则:要尽可能在网络的浅层提取更多的信息
y = b ⋅ H ( x ) + x y = b \cdot H(x) + x y=b⋅H(x)+x

ResNeXt
- 基本不改变模型复杂度或降低复杂度,同时减少了超参数,计算量减半,使用分组卷积。
- g==c:xception 深度可分离卷积
- g==1:普通卷积

- 论文中 cardinality 就是 group
- 三种分组卷积效果差不多,选择最简单的第三种

- 好处:即有残差结构(便于训练),又对特征层进行了 concat(对特征多角度理解)
代码实现
- 起码要敲 7,8 遍,不要眼高手低
- 同上文的 ResNet 代码,实现在里面
能够提点的技巧
- trick(技巧):以结果为导向
「Warmup」
* 在刚开始训练的时候先使用一个较小的学习率,训练一些epoches或iterations,等模型稳定时再修改为预先设置的学习率进行训练。 提 1 个点
- 「Linear scaling learning rate」
- 在论文中针对比较大的batch size而提出的一种方法。使用相同的epoch时,大batch size训练的模型与小batch size训练的模型相比,验证准确率会减小。大batch size训练的模型可以增大学习率来加快收敛。具体做法很简单,比如ResNet原论文[1]中,batch size为256时选择的学习率是0.1,当我们把batchsize变为一个较大的数b时,学习率应该变为0.1 × b/256。
「Label-smoothing」
* 在分类问题中,我们的最后一层一般是全连接层,然后对应标签的one-hot编码,即把对应类别的值编码为1,其他为0。这种编码方式和通过降低交叉熵损失来调整参数的方式结合起来,会有一些问题。这种方式会鼓励模型对不同类别的输出分数差异非常大,或者说,模型过分相信它的判断。但是,对于一个由多人标注的数据集,不同人标注的准则可能不同,每个人的标注也可能会有一些错误。模型对标签的过分相信会导致过拟合。标签平滑(Label-smoothing regularization,LSR)是应对该问题的有效方法之一,它的具体思想是降低我们对于标签的信任,例如我们可以将损失的目标值从1稍微降到0.9,或者将从0稍微升到0.1。标签平滑最早在inception-v2[4]中被提出。
「Random image cropping and patching」
* (RICAP)方法随剪四个图片的中部分,然后把它们拼接为一个图片,同时混合这四个
「Knowledge Distiallation」
* 知识蒸馏(Knowledge Distilling)是模型压缩的一种方法,是指利用已经训练完成的一个较复杂的Teacher模型,指导一个较轻量的Student模型训练,从而在减小模型大小和参数量的同时,尽量保持Teacher模型的准确率。模型复杂度如下图所示,很明显左边的老师模型的参数量远大于右边的学生模型,那么在部署上线时,只需要部署学生模型则可,这样就需要更少的显存,同时计算更快,一举两得。
* 给定输入,假定 p 是真正的概率分布,z 和 r 分别是学生模型和教师模型最后一个全连接层的输出。之前我们会用交叉熵损失l(p.softmax(z))来度量p和z之间的差异,这里的蒸馏损失同样用交叉熵。所以,使用知识蒸馏方法总的损失函数是
*  T越高,softmax的output probability distribution越趋于平滑,其分布的熵越大,负标签携带的信息会被相对地放大,模型训练将更加关注负标签。
l ( p , softmax ( z ) ) + T 2 ⋅ l ( softmax ( r / T ) , softmax ( z / T ) ) l(p, \text{softmax}(z)) + T^2 \cdot l(\text{softmax}(r/T),\text{softmax}(z/T)) l(p,softmax(z))+T2⋅l(softmax(r/T),softmax(z/T))

「Cutout」
* Cutout是一种新的正则化方法。原理是在训练时随机把图片的一部分减掉,这样能提高模型的鲁棒性。它的来源是计算机视觉任务中经常遇到的物体遮挡问题。通过cutout生成一些类似被遮挡的物体,不仅可以让模型在遇到遮挡问题时表现更好,还能让模型在做决定时更多地考虑环境(context)。
「Random erasing」
* Random erasing其实和cutout非常类似,也是一种模拟物体遮挡情况的数据增强方法。区别在于,cutout是把图片中随机抽中的矩形区域的像素值置为0,相当于裁剪掉,random erasing是用随机数或者数据集中像素的平均值替换原来的像素值。而且,cutout每次裁剪掉的区域大小是固定的,Random erasing替换掉的区域大小是随机的。
「Cosine learning rate decay」
* 在warmup之后的训练过程中,学习率不断衰减是一个提高精度的好方法。其中有step decay和cosine decay等,前者是随着epoch增大学习率不断减去一个小的数,后者是让学习率随着训练过程曲线下降。

「Mixup training」
* Mixup是一种新的数据增强的方法。Mixup training,就是每次取出2张图片,然后将它们线性组合,得到新的图片,以此来作为新的训练样本,进行网络的训练,如下公式,其中x代表图像数据,y代表标签,则得到的新的xhat,yhat。
x = λ ⋅ x i + ( 1 − λ ) ⋅ x j x= \lambda \cdot x_{\text{i}} + (1 - \lambda) \cdot x_j x=λ⋅xi+(1−λ)⋅xj y = λ ⋅ y i + ( 1 − λ ) ⋅ y j y= \lambda \cdot y_{\text{i}} + (1 - \lambda) \cdot y_j y=λ⋅yi+(1−λ)⋅yj
* Mixup方法主要增强了训练样本之间的线性表达,增强网络的泛化能力,不过mixup方法需要较长的时间才能收敛得比较好。
「AutoAugment」
* 数据增强在图像分类问题上有很重要的作用,但是增强的方法有很多,并非一股脑地用上所有的方法就是最好的。那么,如何选择最佳的数据增强方法呢?AutoAugment就是一种搜索适合当前问题的数据增强方法的方法。该方法创建一个数据增强策略的搜索空间,利用搜索算法选取适合特定数据集的数据增强策略。此外,从一个数据集中学到的策略能够很好地迁移到其它相似的数据集上。
其他经典的Tricks
* Dropout
* L1/L2正则
* Batch Normalization
* Early stopping
* Random cropping
* Mirroring
* Rotation
* Color shifting
* Xavier init
- acc = 1 data + 3 model + 2 training(超参数)