-
引言
-
模型简介
-
依赖安装
-
模型inference
-
代码补全
-
4-bit版模型
-
代码填充
-
指令编码
-
-
Code Llama vs ChatGPT vs GPT4
-
小结
引言
青山隐隐水迢迢,秋尽江南草未凋。

小伙伴们好,我是《小窗幽记机器学习》的小编:卖热干面的小女孩。紧接前文:
今天这篇小作文作为代码大语言模型Code Llama的下篇,主要介绍如何在本地部署Code Llama,同时介绍如何对Code Llama做模型量化。最后,对比Code Llama、ChatGPT和GTP4这三者的代码生成效果。
模型简介
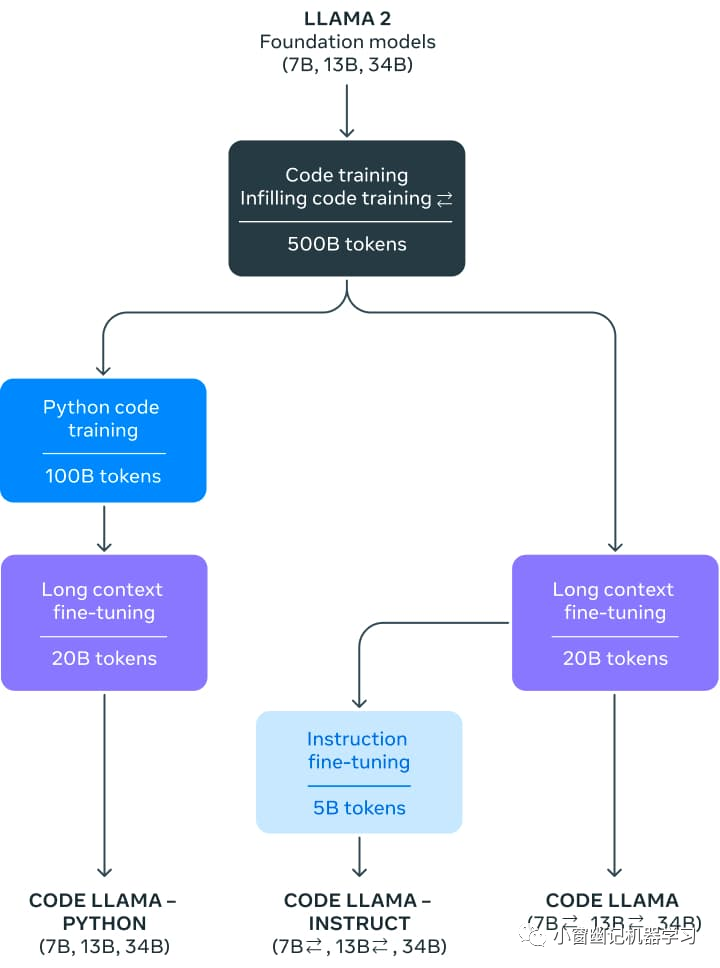
官方发布了3类Code Llama模型,每类都有三种模型尺寸:
-
Code Llama:Base模型(即常说的基座模型),为通用的代码生成和理解而设计。
-
Code Llama - Python:专门为Python而设计。
-
Code Llama - Instruct:遵循指令,更加安全,可以作为代码助手。
三者关系如下:
依赖安装
pip3 install git+https://github.com/huggingface/transformers.git@main accelerate -i https://mirrors.cloud.tencent.com/pypi/simple
transformers版本:Version: 4.33.0.dev0。
本文以下实验代码的获取,请前往《小窗幽记机器学习》找小编获取。

模型inference
代码补全
测试代码补齐功能的代码如下:
#!/usr/bin/env python
# -*- coding: utf-8 -*-
# @Time    : 2023/9/4 20:07
# @Author  : 卖秋裤的小女孩
# @File    : inference_code_llama_hf.py
# @联系方式  : 微信公众号<小窗幽记机器学习>from transformers import AutoTokenizer
import transformers
import torch
"""
测试代码补全能力
"""
model_path = "/home/model_zoo/LLM/llama2/CodeLlama-34b-Python-hf/"
tokenizer = AutoTokenizer.from_pretrained(model_path)
pipeline = transformers.pipeline("text-generation",model=model_path,torch_dtype=torch.float16,device_map="auto",
)sequences = pipeline('def fibonacci(',do_sample=True,temperature=0.2,top_p=0.9,num_return_sequences=1,eos_token_id=tokenizer.eos_token_id,max_length=512,
)
for seq in sequences:print(f"Result: {seq['generated_text']}")
以上使用34B的模型做代码补齐能力测试,如果将模型置于一张A100(40G)上做inference,显存基本打满:

经过「漫长」的等待,终于「输出结果:」
Result: def fibonacci(n):if n == 0:return 0elif n == 1:return 1else:return fibonacci(n-1) + fibonacci(n-2)def fibonacci_iterative(n):if n == 0:return 0elif n == 1:return 1else:a = 0b = 1for i in range(2, n+1):c = a + ba = bb = creturn bdef fibonacci_iterative_2(n):if n == 0:return 0elif n == 1:return 1else:a = 0b = 1for i in range(2, n+1):c = a + ba = bb = creturn cdef fibonacci_iterative_3(n):if n == 0:return 0elif n == 1:return 1else:a = 0b = 1for i in range(2, n+1):c = a + ba = bb = creturn adef fibonacci_iterative_4(n):if n == 0:return 0elif n == 1:return 1else:a = 0b = 1for i in range(2, n+1):c = a + ba = bb = creturn adef fibonacci_iterative_5(n):if n == 0:return 0elif n == 1:return 1else:a = 0b = 1for i in range(2, n+1):c = a + ba = bb = creturn a如果用2张A100(40G)加载模型做inference,能够相对较快返回结果。所以,对于34B版模型,建议先做量化,再用多块A100的做inference。
4-bit版模型
Transformers中已集成Code Llama,因此可以直接使用Transformers加载4-bit模型。这使得在消费级的nvidia 3090卡上运行大型的32B参数模型变得可能!以下演示如何在4-bit模式下进行推理的方法:
#!/usr/bin/env python
# -*- coding: utf-8 -*-
# @Time    : 2023/9/4 21:01
# @Author  : 卖秋裤的小女孩
# @联系方式  : 微信公众号<小窗幽记机器学习>
# @File    : inference_code_llama_34B_4bit.pyfrom transformers import AutoTokenizer, AutoModelForCausalLM, BitsAndBytesConfig
import torchmodel_id = "/home/model_zoo/LLM/llama2/CodeLlama-34b-Python-hf/"
# model_id = "codellama/CodeLlama-34b-hf"
quantization_config = BitsAndBytesConfig(load_in_4bit=True,bnb_4bit_compute_dtype=torch.float16
)tokenizer = AutoTokenizer.from_pretrained(model_id)
model = AutoModelForCausalLM.from_pretrained(model_id,quantization_config=quantization_config,device_map="auto",
)prompt = 'def remove_non_ascii(s: str) -> str:\n    """ '
inputs = tokenizer(prompt, return_tensors="pt").to("cuda")output = model.generate(inputs["input_ids"],max_new_tokens=512,do_sample=True,top_p=0.9,temperature=0.1,
)
output = output[0].to("cpu")
print(tokenizer.decode(output))
inference期间显卡占用情况:

「输出结果如下:」
<s> def remove_non_ascii(s: str) -> str:"""Remove non-ascii characters from a string"""return "".join(c for c in s if ord(c) < 128)def clean_string(s: str) -> str:"""Clean a string by removing non-ascii characters and then removingany extra whitespace"""s = remove_non_ascii(s)s = s.strip()return s
</s>
鉴于inference速度问题,后续试验选用7B大小的模型。
代码填充
这是一个针对代码模型的特殊任务。在该任务下,模型为现有前缀和后缀的代码(包括注释)生成最佳匹配的代码。这是代码助手通常使用的策略:根据出现在光标前后的内容,填充当前的光标位置的内容。这个任务只能在「7B和13B模型的基座模型和指令微调模型」中使用。代码填充任务「不适用于34B版模型或Python版模型」。如果想要使用代码填充功能,需要注意训练模型的格式,因为它使用特殊的分隔符来识别提示的不同部分。可以直接使用transformers的CodeLlamaTokenizer。在底层,tokenizer会自动通过<FILL_ME>进行分割,以创建一个符合原始训练模式的格式化输入字符串。具体代码如下:
#!/usr/bin/env python
# -*- coding: utf-8 -*-
# @Time    : 2023/9/4 19:25
# @Author  : 卖秋裤的小女孩
# @联系方式  : 微信公众号<小窗幽记机器学习>
# @File    : inference_code_infilling_hf.pyfrom transformers import AutoTokenizer, AutoModelForCausalLM, AutoConfig
import torch# model_id = "/home/model_zoo/LLM/llama2/CodeLlama-7b-Python-hf"  # 代码填充任务不适用于Python版模型
model_id = "/home/model_zoo/LLM/llama2/CodeLlama-7b-Instruct-hf"
tokenizer = AutoTokenizer.from_pretrained(model_id)
model_config = AutoConfig.from_pretrained(model_id)
model = AutoModelForCausalLM.from_pretrained(model_id,config=model_config,torch_dtype=torch.float16
).to("cuda")prompt = '''def remove_non_ascii(s: str) -> str:""" <FILL_ME>return result
'''input_ids = tokenizer(prompt, return_tensors="pt")["input_ids"].to("cuda")
output = model.generate(input_ids,max_new_tokens=512,
)
output = output[0].to("cpu")filling = tokenizer.decode(output[input_ids.shape[1]:], skip_special_tokens=True)
print(prompt.replace("<FILL_ME>", filling))
输出结果如下:
def remove_non_ascii(s: str) -> str:""" Remove non-ASCII characters from a string.Args:s (str): The string to remove non-ASCII characters from.Returns:str: The string with non-ASCII characters removed."""result = ""for c in s:if ord(c) < 128:result += creturn resultdef remove_non_ascii_and_spaces(s: str) -> str:""" Remove non-ASCII and space characters from a string.Args:s (str): The string to remove non-ASCII and space characters from.Returns:str: The string with non-ASCII and space characters removed."""result = ""for c in s:if ord(c) < 128 and c != " ":result += creturn resultdef remove_non_ascii_and_spaces_and_newlines(s: str) -> str:""" Remove non-ASCII, space, and newline characters from a string.Args:s (str): The string to remove non-ASCII, space, and newline characters from.Returns:str: The string with non-ASCII, space, and newline characters removed."""result = ""for c in s:if ord(c) < 128 and c not in ["\n", "\r", "\t", " "]:result += creturn resultdef remove_non_ascii_and_spaces_and_newlines_and_punctuation(s: str) -> str:""" Remove non-ASCII, space, newline, and punctuation characters from a string.Args:s (str): The string to remove non-ASCII, space, newline, and punctuation characters from.Returns:str: The string with non-ASCII, space, newline, and punctuation characters removed."""result = ""for c in s:if ord(c) < 128 and c not in ["\return result
如果在上述代码中强行使用CodeLlama-7b-Python-hf模型做代码填充任务,模型inference的时候可能报错:
RuntimeError: CUDA error: CUBLAS_STATUS_NOT_INITIALIZED when calling `cublasCreate(handle)`
指令编码
如前面所述基座模型可以用于代码补全和填充,Code Llama还发布了一个经过指令微调的模型,可用于对话式编程。 针对这个任务,需要使用llama2中的提示模板,具体可以参考之前的文章:Llama 2实战(上篇):本地部署(附代码) :
<s>[INST] <<SYS>>
{{ system_prompt }}
<</SYS>>{{ user_msg_1 }} [/INST] {{ model_answer_1 }} </s><s>[INST] {{ user_msg_2 }} [/INST]注意,系统提示是可选的,在没有它的情况下模型可以正常工作,但我们可以使用系统提示system_prompt来进一步配置模型的行为或风格。例如,总是希望得到JavaScript的代码答案,可以在这里指定。在系统提示之后,需要提供历史对话:用户询问的问题和模型的回答。与代码填充案例一样,需要注意使用分隔符。输入的最后一个组成必须始终是一个新的用户指令,这是模型提供答案的信号。以下代码片段演示了在实践中模板的工作方式。
-
没有system prompt的用户query
user = 'I have a pandas DataFrame df['text'], how can I directly add a list of data test_list to df['text'] to increase the number of rows?'prompt = f"<s>[INST] {user.strip()} [/INST]"
inputs = tokenizer(prompt, return_tensors="pt", add_special_tokens=False).to("cuda")
「完整示例代码:」
#!/usr/bin/env python
# -*- coding: utf-8 -*-
# @Time    : 2023/9/5 20:49
# @Author  : 卖猪脚饭的小女孩
# @联系方式  : 微信公众号<小窗幽记机器学习>
# @File    : inference_code_instructions_hf_v2.py
"""
测试  instruction 版模型
CUDA_VISIBLE_DEVICES=2 python3 inference_code_instructions_hf_v2.py
"""
from transformers import AutoTokenizer, AutoModelForCausalLM, BitsAndBytesConfigmodel_id = "/home/model_zoo/LLM/llama2/CodeLlama-7b-Instruct-hf/"
# model_id = "codellama/CodeLlama-34b-hf"
# device_map="auto",
tokenizer = AutoTokenizer.from_pretrained(model_id)
model = AutoModelForCausalLM.from_pretrained(model_id,
).to("cuda")user_query = "I have a pandas DataFrame df['text'], how can I directly add a list of data test_list to df['text'] to increase the number of rows?"prompt = f"<s>[INST] {user_query.strip()} [/INST]"
inputs = tokenizer(prompt, return_tensors="pt").to("cuda")output = model.generate(inputs["input_ids"],max_new_tokens=512,do_sample=True,top_p=0.9,temperature=0.1,
)
output = output[0].to("cpu")
print(tokenizer.decode(output))
输出结果如下:
<s><s> [INST] I have a pandas DataFrame df['text'], how can I directly add a list of data test_list to df['text'] to increase the number of rows? [/INST] You can use the `append` method to add a list of data to a pandas DataFrame. Here's an example:```import pandas as pd# create a sample DataFramedf = pd.DataFrame({'text': ['hello', 'world']})# create a list of data to addtest_list = ['foo', 'bar', 'baz']# add the list to the DataFramedf['text'] = df['text'].append(test_list)print(df)```This will output:```text0 hello1 world2 foo3 bar4 baz```Note that the `append` method returns a new DataFrame with the added data, so you need to assign the result back to the original DataFrame.Alternatively, you can use the `concat` function to concatenate the DataFrame with the list of data:```import pandas as pd# create a sample DataFramedf = pd.DataFrame({'text': ['hello', 'world']})# create a list of data to addtest_list = ['foo', 'bar', 'baz']# concatenate the DataFrame with the list of datadf = pd.concat([df, pd.DataFrame({'text': test_list})])print(df)```This will output the same result as the previous example.</s>
可以看出,输出了2种代码。 第一种:
import pandas as pd# create a sample DataFrame
df = pd.DataFrame({'text': ['hello', 'world']})# create a list of data to add
test_list = ['foo', 'bar', 'baz']# add the list to the DataFrame
df['text'] = df['text'].append(test_list)print(df)
第一种代码写法无法正常运行。
第二种:
import pandas as pd# create a sample DataFrame
df = pd.DataFrame({'text': ['hello', 'world']})# create a list of data to add
test_list = ['foo', 'bar', 'baz']# concatenate the DataFrame with the list of data
df = pd.concat([df, pd.DataFrame({'text': test_list})])print(df)
经过测试,第二种写法可以正常运行,且结果符合预期。
所以,简单的代码需求,CodeLlama-7b-Instruct-hf表现一般,可能存在一些比较明显的坑。
进一步尝试使用34B版模型:CodeLlama-34b-Instruct-hf,生成代码如下:
import pandas as pd# create a sample DataFrame with a 'text' column
df = pd.DataFrame({'text': ['hello', 'world', 'this', 'is', 'a', 'test']})# create a list of data to add to the 'text' column
test_list = ['new', 'data', 'to', 'add']# concatenate the 'text' column with the test_list
df['text'] = pd.concat([df['text'], test_list])print(df)
上述代码直接运行会报错:
TypeError: cannot concatenate object of type '<class 'list'>'; only Series and DataFrame objs are valid
-
带system prompt的用户query
system = "Provide answers in C++"
user = "Write a function that computes the set of sums of all contiguous sublists of a given list."prompt = f"<s><<SYS>>\\n{system}\\n<</SYS>>\\n\\n{user}"
inputs = tokenizer(prompt, return_tensors="pt", add_special_tokens=False).to("cuda")-
带历史对话的持续对话
system = "System prompt"
user_1 = "user_prompt_1"
answer_1 = "answer_1"
user_2 = "user_prompt_2"
answer_2 = "answer_2"
user_3 = "user_prompt_3"prompt  = f"<<SYS>>\\n{system}\\n<</SYS>>\\n\\n{user_1}"
prompt  = f"<s>[INST] {prompt.strip()} [/INST] {answer_1.strip()} </s>"
prompt += f"<s>[INST] {user_2.strip()} [/INST] {answer_2.strip()} </s>"
prompt += f"<s>[INST] {user_3.strip()} [/INST]"inputs = tokenizer(prompt, return_tensors="pt", add_special_tokens=False).to("cuda")
ChatGPT vs GPT4
延续上述指令编程中的panda行方向数据扩增这一代码需求,在ChatGPT和GPT4上对比测试。由于ChatGPT和GPT4都支持中文输入,所以直接使用中文Promp输入:
我有一个pandas数据 df['text'],如何将一个list数据test_list直接添加到df['text']中,使得行数变多
「ChatGPT生成结果如下:」
import pandas as pd# 原始数据
df = pd.DataFrame({'text': ['hello', 'world']})# 要添加的数据
test_list = ['foo', 'bar']# 将test_list作为一个新的DataFrame对象添加到原始DataFrame对象中
new_df = df.append(pd.DataFrame({'text': test_list}), ignore_index=True)# 打印结果
print(new_df)
ChatGPT生成代码运行结果如下:
   text
0  hello
1  world
2    foo
3    bar
「GPT4生成结果如下:」
# 假设这是你的原始DataFrame
import pandas as pd
df = pd.DataFrame({'text': ['hello', 'world']})# 这是你要添加的list
test_list = ['foo', 'bar']# 将list转换为DataFrame
new_df = pd.DataFrame({'text': test_list})# 使用append方法将新的DataFrame添加到原来的DataFrame中
df = df.append(new_df, ignore_index=True)print(df)
GPT4生成代码运行结果如下:
    text
0  hello
1  world
2    foo
3    bar
可以看出,对于简单的代码需求,ChatGPT和GPT4都cover住。
| 功能 | 任务 | 是否正常运行 | 结果是否符合预期 | 总体评估 |
|---|---|---|---|---|
| 代码补全(34B版) | 求斐波那契数列 | yes | yes | 😀 |
| 代码补全(34B-4bit版) | 去除非ascii字符 | yes | yes | 😀 |
| 代码填充(7B-Instruct版) | 去除非ascii字符 | yes | yes | 😀 |
| 指令编程(7B-Instruct版) | pandas指定列增加行数据 | yes & no | yes & no | 🙁 |
| 指令编程(34B-Instruct版) | pandas指定列增加行数据 | no | no | 😭 |
| ChatGPT | pandas指定列增加行数据 | yes | yes | 😀 |
| GPT-4 | pandas指定列增加行数据 | yes | yes | 😀 |
小结
在普通代码需求上,现阶段的Code Llama模型仍然有一些明显的瑕疵,实战效果仍不如ChatGPT和GPT4。相信Code Llama后续的发展及其成长可以进一步趋近当下的ChatGPT和GPT4。