文章目录
- 概要
- 首先看看junit和testng的区别
- 实践篇
- 摸拟业务逻辑代码
- 简单对象
- 数据层摸拟类
- 业务逻辑层摸拟类
- 后台任务摸拟类
- 基于spring+mock+junit
- 基于spring+mock+testng
- 示例的差异点
- junit与testng的主要变动不大,有以下几个点需要注意
- 注解部分
- 在before,after中
- testng多出按配置执行功能
- 附上关于mock 新旧写法改进
- 小结
概要
本文作者之前写单元测试都是使用junit
场景有以下三种场景
仅junit
spring+junit
mock+spring+junit
本文会用第三种场景写简单的实例列出junit和testng的代码相关说明
并会将涉及的修改点一一说明
目的帮助大家了解testng及具体的切换方式
首先看看junit和testng的区别
JUnit和TestNG是两种流行的Java测试框架,用于测试Java应用程序中的代码。它们具有以下区别:
-
组织方式:JUnit使用Annotations来标注测试方法,而TestNG使用XML文件来组织测试。
-
支持的测试类型:JUnit 4支持单元测试,而TestNG支持功能测试、集成测试和端到端测试。
-
并发测试:TestNG支持并发测试,可以在同一时间运行多个测试用例,而JUnit不支持并发测试。
-
数据提供者:TestNG支持数据提供者,可以在不同参数上运行相同的测试用例,而JUnit不支持数据提供者。
-
测试套件:TestNG支持测试套件,可以组织不同的测试用例,而JUnit不支持测试套件。
-
依赖测试:TestNG支持依赖测试,可以在一组测试之前运行必需的测试,而JUnit不支持依赖测试。
实践篇
摸拟业务逻辑代码
场景,有三层以上代码层次的业务场景,需要摸拟最底层数据层代码
简单对象
package com.riso.junit;/*** DemoEntity* @author jie01.zhu* date 2023/10/29*/
public class DemoEntity implements java.io.Serializable {private long id;private String name;public long getId() {return id;}public void setId(long id) {this.id = id;}public String getName() {return name;}public void setName(String name) {this.name = name;}@Overridepublic String toString() {return "DemoEntity{" + "id=" + id + ", name='" + name + '\'' + '}';}}
数据层摸拟类
package com.riso.junit;import org.springframework.stereotype.Component;/*** DemoDaoImpl* @author jie01.zhu* date 2023/10/29*/
@Component
public class DemoDaoImpl {public int insert(DemoEntity demoEntity) {System.out.println("dao.insert:" + demoEntity.toString());return 1;}
}
业务逻辑层摸拟类
package com.riso.junit;import org.springframework.stereotype.Service;import javax.annotation.Resource;/*** DemoServiceImpl* @author jie01.zhu* date 2023/10/29*/
@Service
public class DemoServiceImpl {@ResourceDemoDaoImpl demoDao;public int insert(DemoEntity demoEntity) {System.out.println("service.insert:" + demoEntity.toString());return demoDao.insert(demoEntity);}}
后台任务摸拟类
package com.riso.junit;import org.springframework.stereotype.Component;/*** DemoTaskImpl* @author jie01.zhu* date 2023/10/29*/
@Component
public class DemoTaskImpl {DemoServiceImpl demoService;public int insert(DemoEntity demoEntity) {System.out.println("task.insert:" + demoEntity.toString());return demoService.insert(demoEntity);}
}
基于spring+mock+junit
maven依赖
<!-- test --><dependency><groupId>junit</groupId><artifactId>junit</artifactId><scope>test</scope></dependency><dependency><groupId>org.springframework</groupId><artifactId>spring-test</artifactId><scope>test</scope></dependency><dependency><groupId>org.mockito</groupId><artifactId>mockito-core</artifactId><version>3.12.4</version><scope>test</scope></dependency>
package com.riso.junit.test;import com.riso.junit.DemoDaoImpl;
import com.riso.junit.DemoEntity;
import com.riso.junit.DemoServiceImpl;
import com.riso.junit.DemoTaskImpl;
import org.junit.Assert;
import org.junit.Test;
import org.junit.runner.RunWith;
import org.mockito.InjectMocks;
import org.mockito.Mock;
import org.mockito.Mockito;
import org.springframework.test.context.ContextConfiguration;
import org.springframework.test.context.junit4.SpringJUnit4ClassRunner;import javax.annotation.Resource;/***  junit test* @author jie01.zhu* date 2023/10/29*/
@RunWith(SpringJUnit4ClassRunner.class)
@ContextConfiguration(locations = {"classpath:applicationContext.xml"}, inheritLocations = true)
public class Test1 {/*** 测试入口类*/@Resource@InjectMocksDemoTaskImpl demoTask;/*** mock的类的中间传递类*/@Resource@InjectMocksDemoServiceImpl demoService;/*** 被mock的类*/@MockDemoDaoImpl demoDao;@Testpublic void test1() {// 初始化mock环境MockitoAnnotations.openMocks(this);DemoEntity demoEntity = new DemoEntity();demoEntity.setId(1L);demoEntity.setName("name1");Mockito.doReturn(0).when(demoDao).insert(Mockito.any());int result = demoTask.insert(demoEntity);Assert.assertEquals(result, 0);}
}
基于spring+mock+testng
有二个测试类,测试参数不同,主要体现在单元测试外,控制二个测试类,按并发场景做简单的集成测试
maven依赖
<dependency><groupId>org.testng</groupId><artifactId>testng</artifactId><version>6.14.3</version><scope>test</scope></dependency><dependency><groupId>org.springframework.boot</groupId><artifactId>spring-boot-test</artifactId><version>2.4.13</version><scope>test</scope></dependency><dependency><groupId>org.springframework</groupId><artifactId>spring-test</artifactId><scope>test</scope></dependency><dependency><groupId>org.mockito</groupId><artifactId>mockito-core</artifactId><version>3.12.4</version><scope>test</scope></dependency>
package com.riso.testng.test;import com.riso.testng.ContextConfig;
import com.riso.testng.DemoDaoImpl;
import com.riso.testng.DemoEntity;
import com.riso.testng.DemoTaskImpl;
import org.mockito.Mockito;
import org.springframework.boot.test.context.SpringBootTest;
import org.springframework.boot.test.mock.mockito.MockitoTestExecutionListener;
import org.springframework.boot.test.mock.mockito.SpyBean;
import org.springframework.test.context.TestExecutionListeners;
import org.springframework.test.context.testng.AbstractTestNGSpringContextTests;
import org.testng.Assert;
import org.testng.annotations.Test;import javax.annotation.Resource;/***  junit test* @author jie01.zhu* date 2023/10/29*/
@SpringBootTest(classes = {ContextConfig.class})
@TestExecutionListeners(listeners = MockitoTestExecutionListener.class)
public class Test1 extends AbstractTestNGSpringContextTests {/*** 测试入口类*/@ResourceDemoTaskImpl demoTask;/*** 被mock的类 选用spy方式  默认使用原生逻辑,仅mock的方法才被mock*/@SpyBeanDemoDaoImpl demoDao;@Testpublic void test1() {// 初始化mock环境MockitoAnnotations.openMocks(this);DemoEntity demoEntity = new DemoEntity();demoEntity.setId(1L);demoEntity.setName("name1");Mockito.doReturn(0).when(demoDao).insert(Mockito.any());int result = demoTask.insert(demoEntity);Assert.assertEquals(result, 0);}
}package com.riso.testng.test;import com.riso.testng.ContextConfig;
import com.riso.testng.DemoDaoImpl;
import com.riso.testng.DemoEntity;
import com.riso.testng.DemoTaskImpl;
import org.mockito.Mockito;
import org.springframework.boot.test.context.SpringBootTest;
import org.springframework.boot.test.mock.mockito.MockitoTestExecutionListener;
import org.springframework.boot.test.mock.mockito.SpyBean;
import org.springframework.test.context.TestExecutionListeners;
import org.springframework.test.context.testng.AbstractTestNGSpringContextTests;
import org.testng.Assert;
import org.testng.annotations.Test;import javax.annotation.Resource;/***  junit test* @author jie01.zhu* date 2023/10/29*/
@SpringBootTest(classes = {ContextConfig.class})
@TestExecutionListeners(listeners = MockitoTestExecutionListener.class)
public class Test2 extends AbstractTestNGSpringContextTests {/*** 测试入口类*/@ResourceDemoTaskImpl demoTask;/*** 被mock的类 选用spy方式  默认使用原生逻辑,仅mock的方法才被mock*/@SpyBeanDemoDaoImpl demoDao;@Testpublic void test2() {// 初始化mock环境MockitoAnnotations.openMocks(this);DemoEntity demoEntity = new DemoEntity();demoEntity.setId(2L);demoEntity.setName("name2");Mockito.doReturn(2).when(demoDao).insert(Mockito.any());int result = demoTask.insert(demoEntity);Assert.assertEquals(result, 2);}
}
testNg的 配置文件,也是执行入口
<!DOCTYPE suite SYSTEM "http://testng.org/testng-1.0.dtd" >
<suite name="test" parallel="tests" thread-count="2"><test name="test1" group-by-instances="true"><classes><class name="com.riso.testng.test.Test1"/></classes></test><test name="test2" group-by-instances="true"><classes><class name="com.riso.testng.test.Test2"></class></classes></test>
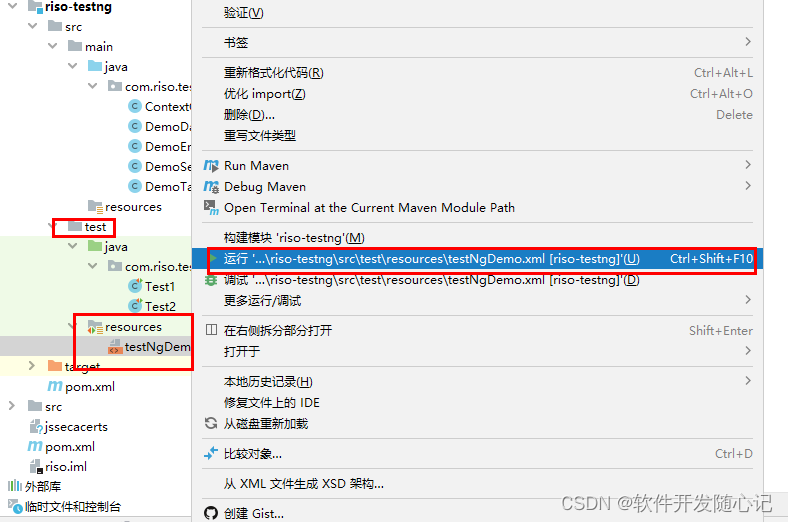
</suite>运行方式如下:
示例的差异点
junit与testng的主要变动不大,有以下几个点需要注意
注解部分
junit此处注解
@RunWith(SpringJUnit4ClassRunner.class)
testng不再使用此注解
需要继承 org.springframework.test.context.testng.AbstractTestNGSpringContextTests
在before,after中
testng完全兼容,但会多出Suite ,它代替xml配置中,单元测试类之上的生命周期
testng多出按配置执行功能
首先testng的单元测试可以与junit一样,单独运行
在这个基础上,也能通过testng xml按配置运行,可以见上面的例子
附上关于mock 新旧写法改进
以前要摸拟调用对象的跨二层以上类时,需要通过InjectMocks 做为中间传递,才能成功mock掉二层以上的类
换成spyBean后,不需要再使用InjectMocks ,会自动从注入中找到
这个小插曲也是我自己对以前mock的修正,一并附上
小结
通过以上说明,及示例
testng是完全兼容junit的,且改动很小
注解,断言都是直接兼容的(只需要更换导入的包路径既可)
当然,我不是为了使用而使用,一切都要建立上有需求的基础上
junit对我来讲,已经满足不了我的需求,
为了能够编写集成测试,同时复用已有的单元测试,我选择了testng
希望以上分享,能够对读者有用.
朱杰
2023-10-29


![[红蓝攻防]MDOG(全新UI重制版)为Xss跨站而生,数据共享,表单劫持,URL重定向](https://img-blog.csdnimg.cn/img_convert/45cc431e7fe803aa19a203a4ac5bf7fb.jpeg)