文章目录
- 前言
- 一、PyQt 简介
- 二、PyQt 与 Qt 的蒙娜丽莎
- 三、PyQt 布局管理器
- 3.1、简介
- 3.2、项目实战
- 3.2.0、添加伸缩项 layout.addStretch:控制布局中组件之间的间距。
- 3.2.1、垂直布局管理器 QVBoxLayout:控件按照从上到下的顺序排列
- 3.2.2、水平布局管理器 QHBoxLayout:控件按照从左到右的顺序排列
- 3.2.3、网格布局管理器 QGridLayout:指定每个控件所在的行和列
- 3.2.4、表单布局管理器 QFormLayout:将标签和输入字段对齐,通常用于创建表单式的用户界面。
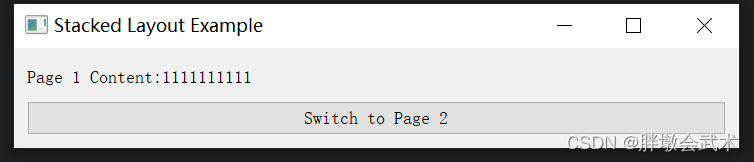
- 3.2.5、堆叠布局管理器 QStackedLayout:在一个窗口中管理多个窗口且只显示一个窗口(如:选项卡界面)
- 四、PyQt 常用组件
- 4.1、简介
- 4.2、项目实战
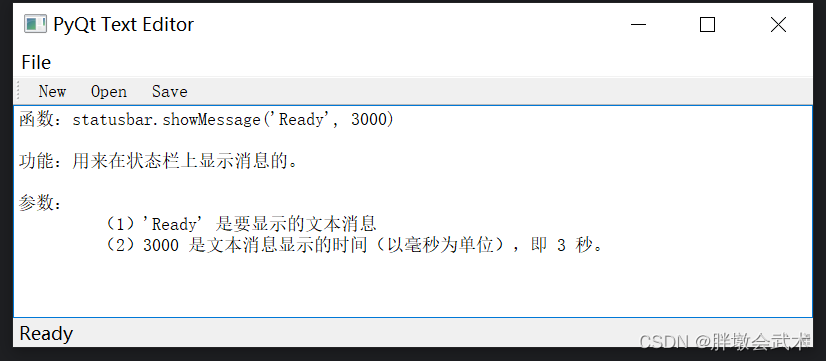
- 【菜单类 - 组件】菜单+菜单栏+工具栏+状态栏 QMenuBar + QMenu + QToolBar + QStatusBar
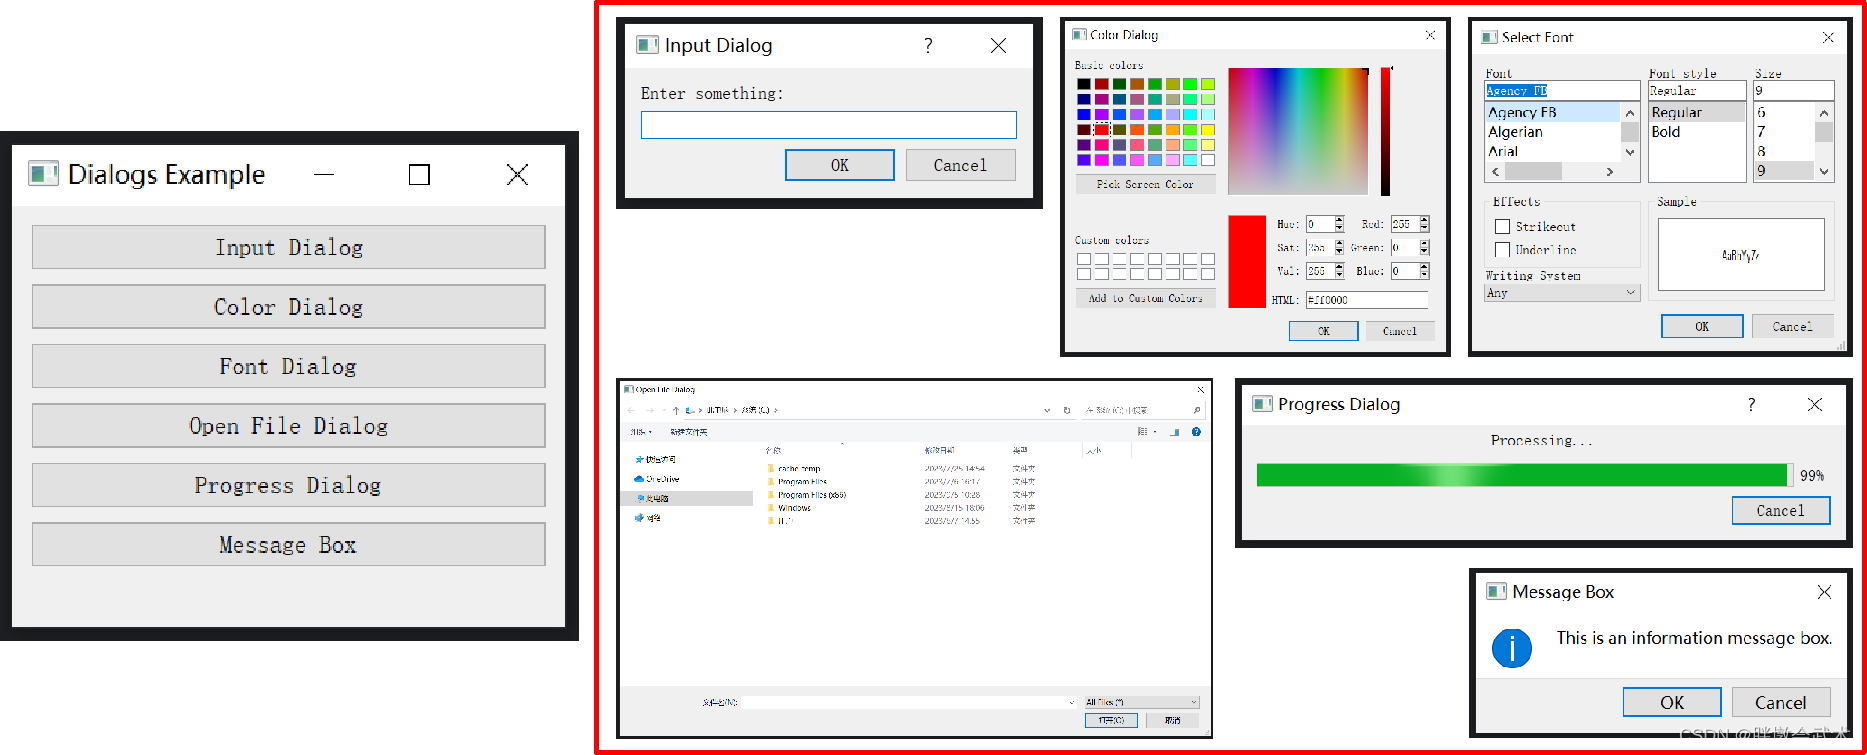
- 【对话框类 - 组件】输入对话框+颜色对话框+字体对话框+文件选择对话框+进度对话框+消息对话框:QInputDialog + QColorDialog + QFontDialog + QFileDialog + QProgressDialog + QMessageBox
- 4.2.0、调整组件的尺寸:setFixedSize + setFixedWidth + setFixedHeight
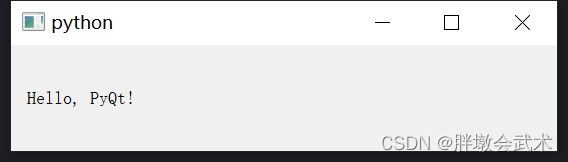
- 4.2.1、显示文本 QLabel:Hello, PyQt!
- 4.2.2、按钮 QPushButton:用户登录界面(账号与密码)
- 4.2.3、文本框 QLineEdit + QTextEdit(单行 + 多行)
- 4.2.4、校验器 QRegExpValidator :用于限制用户在 QLineEdit 中输入的文本(英文 / 数字)
- 4.2.5、校验器 QIntValidator + QDoubleValidator(整数 + 浮点数):用于限制用户在 QLineEdit 中输入的文本必须为数字。
- 4.2.6、输入框 QSpinBox + QDoubleSpinBox(整数 + 浮点数):支持上下按钮调节
- 4.2.7、滑动条 QSlider:获取滑动条点击前后的值
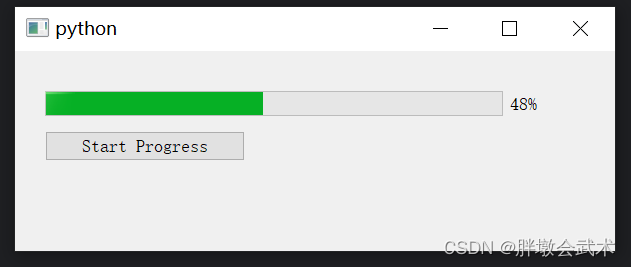
- 4.2.8、进度条 QProgressBar:创建一个进度条窗口(0~100%)
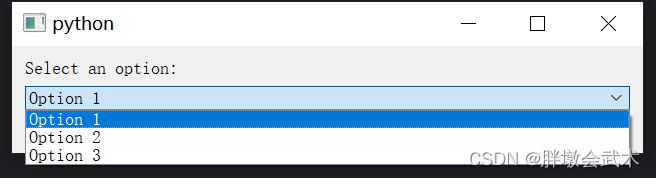
- 4.2.9、下拉框 QComboBox:创建一个下拉框并添加选项
- 4.2.10、复选框 Check Box:获取勾选状态
- 4.2.11、单选按钮 QRadioButton:获取勾选状态
- 4.2.12、打印日志 QTextEdit:获取当前时间 + 设置文本颜色
- 4.2.13、消息提示框 QMessageBox:四种类型提示框(信息 / 询问 / 警告 / 错误)
- 4.2.14、选项卡界面 QTabWidget
- 4.2.14.1、在一个窗口中显示多个页面
- 4.2.14.2、在主界面中,显示其他.py界面类文件
- 4.2.14.3、在主界面中,显示其他.py界面类文件,并进行数据交互
- 4.2.15、调用其他.py文件,并进行数据交互
- 测试文件.py
- 方法一:subprocess(subprocess.run)
- 方法二:QProcess(process.start)
- 4.2.16、在当前虚拟环境下,调用其他虚拟环境下的.py文件
- 4.2.17、在当前虚拟环境下,调用其他虚拟环境下的.py文件,并传递参数
PyQt界面开发(全)
前言
下述几篇文章大致浏览过一遍,个人觉得还不错,感兴趣可以收藏,以查漏补缺。
PyQt5保姆级教程(从入门到精通)
Python 小白从零开始(汇总篇)
PyQt5快速上手(基础知识)
PyQt5 快速入门(bilibili视频教程)
博主的这篇文章是根据在开发过程中整理而得,只保留了技术本身。由于ui转py的形式相对繁琐,故本人的使用习惯是直接通过代码自定义组件的形式进行界面自定义及优化。详解每个基础组件,偏向实战。
一、PyQt 简介
PyQt官网首页:https://www.riverbankcomputing.com/software/pyqt/
通过 pip 安装 PyQt:pip install pyqt5
PyQt定义
(1)是Python编程语言的一个GUI(图形用户界面)工具包,它允许开发人员使用Python语言创建桌面应用程序。PyQt提供了许多用于创建丰富多样的用户界面的类和功能,以及用于处理用户输入和交互的工具。
(2)是基于Qt库的Python封装,Qt是一个流行的C++框架,用于开发跨平台的应用程序。
PyQt版本
提供了与Qt应用程序框架的Python绑定。每个版本的PyQt都是为不同的Qt版本而设计的。 目前PyQt只支持两个版本:
- PyQt6:仅支持Python 3.6及更高版本,仅支持 Qt6 版本。(1)模块名称变更:在PyQt6中,模块名称进行了更改,以更好地与标准Qt模块名称匹配。例如,QtWidgets模块在PyQt6中被称为QtWidgets,而不是PyQt5.QtWidgets。(2)新特性:PyQt6引入了一些新特性,改进了现有功能,以适应Qt6的变化。这包括新的信号和槽语法等。
不再支持Qt4:与PyQt5不同,PyQt6不再支持Qt4。- PyQt5:仅支持Python 2.7和Python 3.x,仅支持 Qt5 版本。但Python 2在2020年已不再得到官方支持。(
广泛使用)PyQt5是最广泛使用的版本,许多应用程序和项目都在使用它。- PyQt4:主要支持Python 2.x,仅支持 Qt4 版本。尽管它也有一个用于Python 3的版本,但相对较少使用。(
已经过时)不再得到官方支持,因此不建议在新项目中使用它。
二、PyQt 与 Qt 的蒙娜丽莎
Qt 和 PyQt 是用于创建图形用户界面(GUI)的工具包,它们提供了丰富的类和功能,可以用于开发跨平台的桌面应用程序。
Qt(跨平台的C++应用程序开发框架):
(1)Qt是由挪威公司Trolltech(现在是Qt公司的一部分)开发。它最初是为了解决C++开发人员在不同平台上编写重复代码的问题而设计的。
(2)支持多种操作系统(跨平台):Windows、macOS、Linux、iOS、Android等,因此可以实现跨平台的开发和部署。
(3) 用户交互和事件:Qt是一个面向对象的框架,使用信号和槽机制来处理用户交互和事件。
PyQt(Qt的Python绑定,使用Python语言调用和使用Qt框架的功能):
(1)PyQt由Riverbank Computing公司开发和维护。
(2)支持多种操作系统(跨平台):因为PyQt是基于Qt的,并且可以在各种操作系统上运行。
(3)用户交互和事件:PyQt使用Qt的信号和槽机制来处理用户交互和事件,同时也支持Python的语法和特性。备注:PyQt同时支持Qt Designer(图形界面设计器),开发者可以通过Qt Designer可视化设计界面,然后将其转换为Python代码。
Qt和PyQt的区别:
- 编程语言:Qt是C++编写,而PyQt是Qt的Python编写。
- 开发体验:PyQt相对于Qt更容易上手,Python代码通常比C++代码更简洁和易读。
- 性能差异:由于Qt是用C++编写的,其性能可能比PyQt稍微好一些。然而,对于大多数应用程序而言,性能差异并不明显,而开发效率更重要。
- 应用领域:由于Qt和PyQt都是用于GUI开发的,因此它们在各种应用领域中都有广泛的应用,包括桌面应用程序、嵌入式系统、游戏开发、数据可视化等。
- 生态系统:Qt拥有广泛的C++社区和生态系统,可以找到更多的第三方库和资源。相比之下,PyQt稍逊一筹。
三、PyQt 布局管理器
3.1、简介
布局管理器的定义(Layout):在图形用户界面中,根据窗口的大小自动管理和调整组件(Widget)的位置和大小,而无需手动设置(但也可以同时设置),可以自适应不同大小的屏幕和窗口大小。
布局管理器的优点
- 自动适应窗口大小:不需要手动调整每个控件的位置和大小,布局管理器会自动处理。
- 动态调整:当窗口大小改变时,布局管理器会自动调整控件的位置和大小,以适应新的窗口尺寸。
- 简化代码:使用布局管理器可以减少手动布局代码,使代码更清晰、简洁。
- 跨平台兼容:布局管理器可以确保界面在不同操作系统和不同屏幕尺寸下表现一致。
布局管理器的种类
- 盒子布局管理器
QBoxLayout:无法单独使用,其是QVBoxLayout和QHBoxLayout的基类,具体用法参考垂直和水平布局管理器。- 垂直布局管理器
QVBoxLayout:将控件从上到下垂直地排列在一列中。- 水平布局管理器
QHBoxLayout:将控件从左到右水平地排列在一行中。- 网格布局管理器
QGridLayout:将控件指定顺序排列在一个网格中。如:在同一行中的多个组件,可以指定一个组件分布在指定的列位置(3 3 3)变换为(33 3)。- 表单布局管理器
QFormLayout:将多对标签和输入控件配对且对齐。通常用于创建表单式的用户界面。- 堆叠布局管理器
QStackedLayout:管理多个窗口部件,但在任何给定时刻只显示其中一个的布局管理器,可以通过切换显示不同的控件。如:选项卡界面。
使用方法:在PyQt中,将控件添加到布局管理器中,然后将布局管理器设置为窗口或部件的主要布局,即可实现自动布局。
"""
(1)管理子组件
(2)将子组件给到主组件
(3)窗口显示主组件
"""layout = QVBoxLayout()  				# 创建一个垂直布局管理器对象(用于管理垂直排列的子组件)
layout.addWidget(container_widget)  	# 将名为container_widget的组件添加到垂直布局中central_widget = QWidget()  			# 创建一个QWidget对象(用作主窗口的中央组件)
central_widget.setLayout(layout)  		# 将垂直布局设置为central_widget的布局管理器,使垂直布局成为central_widget的主要布局
self.setCentralWidget(central_widget)  	# 将central_widget设置为主窗口(通常是QMainWindow)的中央组件,以便显示在窗口中
3.2、项目实战
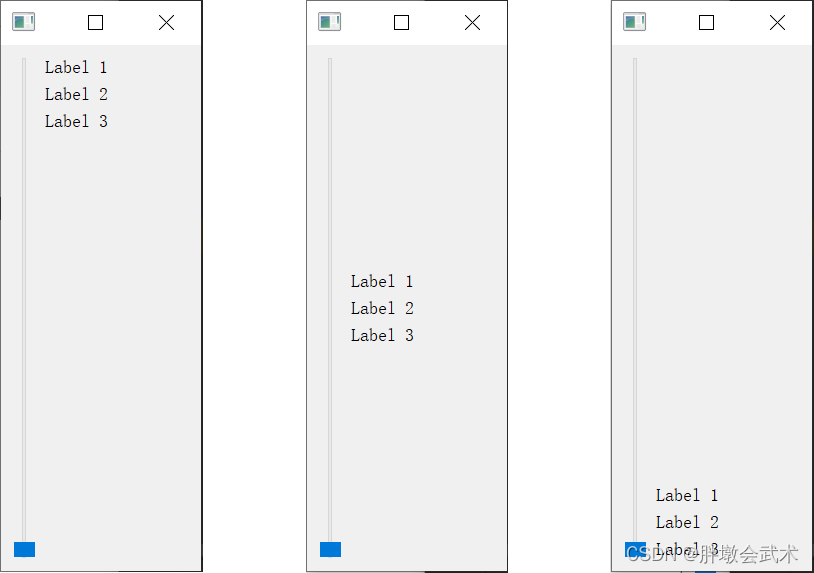
3.2.0、添加伸缩项 layout.addStretch:控制布局中组件之间的间距。
import sys
from PyQt5.QtWidgets import QApplication, QMainWindow, QVBoxLayout, QHBoxLayout, QPushButton, QLabel, QWidget, QSliderclass MainWindow(QMainWindow):def __init__(self):super().__init__()VBox_layout = QVBoxLayout()HBox_Layout = QHBoxLayout()# 添加组件到布局slider = QSlider()slider.setFixedHeight(500)label1 = QLabel("Label 1")label2 = QLabel("Label 2")label3 = QLabel("Label 3")# (1)若在组件之前添加伸缩项,组件跟在伸缩项的后面,从而实现将组件布局到底部VBox_layout.addStretch(8)HBox_Layout.addWidget(slider)VBox_layout.addWidget(label1)VBox_layout.addWidget(label2)VBox_layout.addWidget(label3)HBox_Layout.addLayout(VBox_layout)VBox_layout.addStretch(1)# (2)若在组件之后添加伸缩项,组件被伸缩项顶在前面,从而实现将组件布局到顶部# (3)若在组件之前及之后分别添加伸缩项:将组件布局到中间central_widget = QWidget()central_widget.setLayout(HBox_Layout)self.setCentralWidget(central_widget)if __name__ == "__main__":app = QApplication(sys.argv)window = MainWindow()window.show()sys.exit(app.exec_())"""##########################################################################
函数简介:在布局中创建一个弹性空间,用于调整布局中各个组件的间距,以实现更好的分布和对齐效果。
函数说明:layout.addStretch()
输入参数:伸缩项的权重为0(默认),这意味着它不会占用任何额外的空间。伸缩项的权重为1(常用),将会根据权重在布局中占据一部分空间,从而将其他组件推向布局的边缘。备注:若为其余数字,则权重值越大,伸缩空间越大。
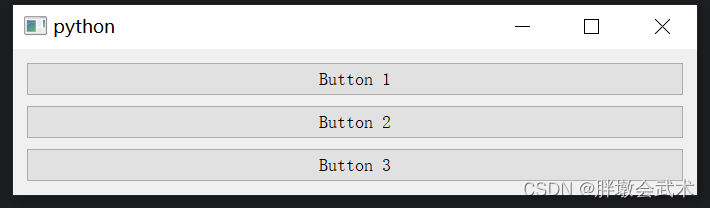
##########################################################################"""3.2.1、垂直布局管理器 QVBoxLayout:控件按照从上到下的顺序排列
import sys
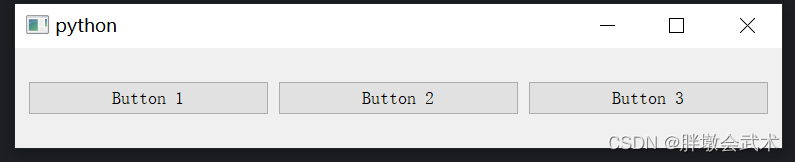
from PyQt5.QtWidgets import QApplication, QMainWindow, QVBoxLayout, QWidget, QPushButtonclass MainWindow(QMainWindow):def __init__(self):super().__init__()# 创建一个中心窗口central_widget = QWidget()# 创建一个垂直布局vbox = QVBoxLayout()# 创建并添加按钮到布局button1 = QPushButton("Button 1")button2 = QPushButton("Button 2")button3 = QPushButton("Button 3")vbox.addWidget(button1)vbox.addWidget(button2)vbox.addWidget(button3)# 将布局应用于中心窗口central_widget.setLayout(vbox)self.setCentralWidget(central_widget)if __name__ == "__main__":app = QApplication(sys.argv)window = MainWindow()window.show()sys.exit(app.exec_())3.2.2、水平布局管理器 QHBoxLayout:控件按照从左到右的顺序排列
import sys
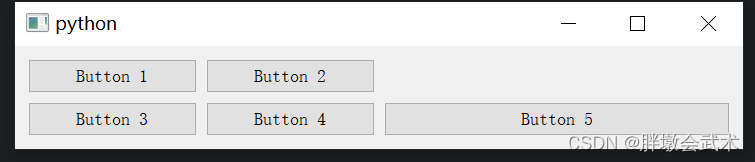
from PyQt5.QtWidgets import QApplication, QMainWindow, QWidget, QHBoxLayout, QPushButtonclass MainWindow(QMainWindow):def __init__(self):super().__init__()# 创建一个中心窗口central_widget = QWidget()# 创建一个水平布局hbox = QHBoxLayout()# 创建两个按钮并添加到水平布局中button1 = QPushButton("Button 1")button2 = QPushButton("Button 2")button3 = QPushButton("Button 3")hbox.addWidget(button1)hbox.addWidget(button2)hbox.addWidget(button3)# 将水平布局应用于中心窗口central_widget.setLayout(hbox)self.setCentralWidget(central_widget)if __name__ == "__main__":app = QApplication(sys.argv)window = MainWindow()window.show()sys.exit(app.exec_())3.2.3、网格布局管理器 QGridLayout:指定每个控件所在的行和列
import sys
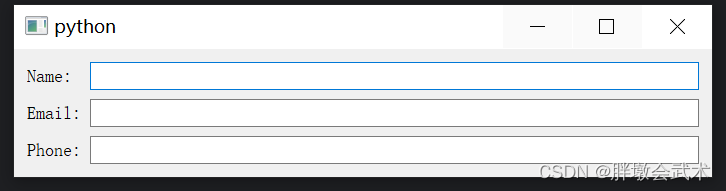
from PyQt5.QtWidgets import QApplication, QMainWindow, QWidget, QGridLayout, QPushButtonclass MainWindow(QMainWindow):def __init__(self):super().__init__()central_widget = QWidget()self.setCentralWidget(central_widget)grid_layout = QGridLayout()central_widget.setLayout(grid_layout)# 创建并添加多个按钮到网格布局button1 = QPushButton("Button 1")button2 = QPushButton("Button 2")button3 = QPushButton("Button 3")button4 = QPushButton("Button 4")button5 = QPushButton("Button 5")grid_layout.addWidget(button1, 0, 0) # 第一行第一列grid_layout.addWidget(button2, 0, 1) # 第一行第二列grid_layout.addWidget(button3, 1, 0) # 第二行第一列grid_layout.addWidget(button4, 1, 1) # 第二行第二列grid_layout.addWidget(button5, 1, 2, 1, 2) # 第二行的第三和第四列if __name__ == "__main__":app = QApplication(sys.argv)window = MainWindow()window.show()sys.exit(app.exec_())3.2.4、表单布局管理器 QFormLayout:将标签和输入字段对齐,通常用于创建表单式的用户界面。
import sys
from PyQt5.QtWidgets import QApplication, QMainWindow, QWidget, QFormLayout, QLineEdit, QLabelclass MainWindow(QMainWindow):def __init__(self):super().__init__()# 创建一个中心窗口central_widget = QWidget()# 创建一个QFormLayoutform_layout = QFormLayout()# 创建标签和相应的文本输入框,并将它们添加到QFormLayoutlabel1 = QLabel("Name:")name_input = QLineEdit()form_layout.addRow(label1, name_input)label2 = QLabel("Email:")email_input = QLineEdit()form_layout.addRow(label2, email_input)label3 = QLabel("Phone:")phone_input = QLineEdit()form_layout.addRow(label3, phone_input)# 将QFormLayout应用于中心窗口central_widget.setLayout(form_layout)self.setCentralWidget(central_widget)if __name__ == "__main__":app = QApplication(sys.argv)window = MainWindow()window.show()sys.exit(app.exec_())
3.2.5、堆叠布局管理器 QStackedLayout:在一个窗口中管理多个窗口且只显示一个窗口(如:选项卡界面)

import sys
from PyQt5.QtWidgets import QApplication, QMainWindow, QWidget, QPushButton, QLabel, QVBoxLayout, QStackedLayoutclass MainWindow(QMainWindow):def __init__(self):super().__init__()self.setWindowTitle("Stacked Layout Example")# 创建两个页面的内容self.page1 = self.create_page("Page 1 Content", "Switch to Page 2")self.page2 = self.create_page("Page 2 Content", "Switch to Page 1")# 创建一个堆叠布局管理器self.stacked_layout = QStackedLayout()# 将页面添加到堆叠布局self.stacked_layout.addWidget(self.page1)self.stacked_layout.addWidget(self.page2)# 创建一个主窗口部件并将堆叠布局设置为其布局central_widget = QWidget()central_widget.setLayout(self.stacked_layout)self.setCentralWidget(central_widget)def create_page(self, content_text, switch_button_text):page = QWidget()layout = QVBoxLayout()content_label = QLabel(content_text)switch_button = QPushButton(switch_button_text)switch_button.clicked.connect(self.switch_page)layout.addWidget(content_label)layout.addWidget(switch_button)page.setLayout(layout)return pagedef switch_page(self):# 切换页面current_index = self.stacked_layout.currentIndex()next_index = (current_index + 1) % 2  # 切换到下一页(循环切换)self.stacked_layout.setCurrentIndex(next_index)if __name__ == "__main__":app = QApplication(sys.argv)window = MainWindow()window.show()sys.exit(app.exec_())
四、PyQt 常用组件
4.1、简介
PyQt提供了丰富的组件(也称为控件或部件),用于构建图形用户界面。
| 组件(Widget) | 简介 | |
|---|---|---|
| 窗口组件 | QWidget | 所有用户界面对象的基类,用于创建窗口和部件。 |
| QMainWindow | 主窗口的类,通常用作应用程序的主界面。 | |
| 基础组件 | QLabel | 显示文本或图像。 |
| QLineEdit | 输入单行文本。 | |
| QTextEdit | 输入多行文本。 | |
| QSpinBox | (数字)整数输入框。 | |
| QDoubleSpinBox | (数字)浮点数输入框。 | |
| QPushButton | 按钮。 | |
| QRadioButton | 单选按钮。在多个选项中进行单选。 | |
| QCheckBox | 复选框。在多个选项中进行多选。 | |
| QSlider | 滑动条。 | |
| QTabWidget | 选项卡界面。 | |
| QComboBox | 下拉列表框。 | |
| 对话框类 - 组件 | QDialog | 自定义对话框 |
| QInputDialog | 获取用户输入对话框 | |
| QFontDialog | 字体对话框。 | |
| QColorDialog | 颜色对话框。 | |
| QProgressDialog | 进度对话框。 | |
| QFileDialog | 打开文件/文件夹对话框。 | |
| QMessageBox | 消息提示框。 | |
| 菜单类 - 组件 | QMenu | 菜单。 |
| QMenuBar | 菜单栏。 | |
| QToolBar | 工具栏。 | |
| QStatusBar | 状态栏。 | |
| QProgressBar | 进度条。 | |
| 绘图类 - 组件 | QGraphicsScene | 管理2D图形项的场景。 |
| QGraphicsView | 显示二维图形和图像。 | |
| QGraphicsItem | 在QGraphicsScene中显示图形项。 | |
| QTableView | 显示表格数据。 | |
| QTreeWidget | 显示树形数据。 | |
| QListWidget | 显示列表数据。 | |
| QCalendarWidget | 显示日历。 | |
| QDockWidget | 创建可停靠的面板。 | |
| QSplitter | 在界面中创建可调整大小的分割区域。 | |
| QScrollArea | 显示超过容器尺寸的内容,并支持滚动查看。 |
4.2、项目实战
【菜单类 - 组件】菜单+菜单栏+工具栏+状态栏 QMenuBar + QMenu + QToolBar + QStatusBar
QAction用于表示用户界面上的动作或操作。它通常与菜单、工具栏和快捷键等用户界面元素一起使用,以便用户可以执行各种操作。
import sys
from PyQt5.QtWidgets import QApplication, QMainWindow, QMenu, QMenuBar, QToolBar, QStatusBar, QAction, QTextEdit, QFileDialogclass MyWindow(QMainWindow):def __init__(self):super().__init__()#################################################### 创建菜单栏menubar = self.menuBar()# 创建文件菜单file_menu = menubar.addMenu('File')# 创建文件菜单项new_action = QAction('New', self)open_action = QAction('Open', self)save_action = QAction('Save', self)exit_action = QAction('Exit', self)# 添加文件菜单项到文件菜单file_menu.addAction(new_action)file_menu.addAction(open_action)file_menu.addAction(save_action)file_menu.addSeparator()  # 分隔线file_menu.addAction(exit_action)# 连接菜单项和工具按钮的槽函数new_action.triggered.connect(self.newFile)open_action.triggered.connect(self.openFile)save_action.triggered.connect(self.saveFile)exit_action.triggered.connect(self.exitApp)#################################################### 创建工具栏toolbar = self.addToolBar('Toolbar')# 在工具栏中添加工具按钮new_button = toolbar.addAction('New')       # 清空(当前)文本编辑框open_button = toolbar.addAction('Open')     # 打开txt文本并添加到文本编辑框save_button = toolbar.addAction('Save')     # 保存文本编辑框到txt文本# 连接菜单项和工具按钮的槽函数new_button.triggered.connect(self.newFile)open_button.triggered.connect(self.openFile)save_button.triggered.connect(self.saveFile)#################################################### 创建状态栏statusbar = self.statusBar()# 在状态栏中显示消息: 'Ready' 是要显示的文本消息,30000 是消息显示的时间(以毫秒为单位),即30秒。statusbar.showMessage('Ready', 30000)#################################################### 创建文本编辑框self.text_edit = QTextEdit(self)self.setCentralWidget(self.text_edit)  # 将文本编辑框设置为主窗口的中心组件def newFile(self):self.text_edit.clear()  # 清空文本编辑框def openFile(self):try:# 打开文件对话框,选择txt文件并读取内容,然后显示在文本编辑框中file_dialog = QFileDialog(self)file_path, _ = file_dialog.getOpenFileName()if file_path:with open(file_path, 'r', encoding='utf-8') as file:file_contents = file.read()self.text_edit.setPlainText(file_contents)except Exception as e:# 处理异常,例如显示错误消息print(f"Error opening file: {str(e)}")def saveFile(self):try:# 保存文件对话框,将文本编辑框中的内容保存到txt文件中file_dialog = QFileDialog(self)file_path, _ = file_dialog.getSaveFileName()if file_path:with open(file_path, 'w') as file:file_contents = self.text_edit.toPlainText()file.write(file_contents)except Exception as e:# 处理异常,例如显示错误消息print(f"Error saving file: {str(e)}")def exitApp(self):self.close()if __name__ == '__main__':app = QApplication(sys.argv)window = MyWindow()window.setWindowTitle('PyQt Text Editor')window.setGeometry(100, 100, 800, 300)window.show()sys.exit(app.exec_())
【对话框类 - 组件】输入对话框+颜色对话框+字体对话框+文件选择对话框+进度对话框+消息对话框:QInputDialog + QColorDialog + QFontDialog + QFileDialog + QProgressDialog + QMessageBox
import sys
from PyQt5.QtWidgets import QApplication, QMainWindow, QVBoxLayout, QWidget, QPushButton, QLabel, QInputDialog, QColorDialog, QFontDialog, QFileDialog, QProgressDialog, QMessageBox
from PyQt5.QtCore import Qt
from PyQt5.QtGui import QColorclass MainWindow(QMainWindow):def __init__(self):super().__init__()self.initUI()def initUI(self):self.setWindowTitle("Dialogs Example")self.setGeometry(100, 100, 400, 300)layout = QVBoxLayout()# 显示输入对话框按钮input_btn = QPushButton("Input Dialog")input_btn.clicked.connect(self.show_input_dialog)layout.addWidget(input_btn)# 颜色对话框按钮color_btn = QPushButton("Color Dialog")color_btn.clicked.connect(self.show_color_dialog)layout.addWidget(color_btn)# 字体对话框按钮font_btn = QPushButton("Font Dialog")font_btn.clicked.connect(self.show_font_dialog)layout.addWidget(font_btn)# 打开文件对话框按钮open_file_btn = QPushButton("Open File Dialog")open_file_btn.clicked.connect(self.show_file_dialog)layout.addWidget(open_file_btn)# 进度对话框按钮progress_btn = QPushButton("Progress Dialog")progress_btn.clicked.connect(self.show_progress_dialog)layout.addWidget(progress_btn)# 消息框按钮message_btn = QPushButton("Message Box")message_btn.clicked.connect(self.show_message_box)layout.addWidget(message_btn)# 标签用于显示结果self.result_label = QLabel()layout.addWidget(self.result_label)central_widget = QWidget()central_widget.setLayout(layout)self.setCentralWidget(central_widget)def show_input_dialog(self):text, ok = QInputDialog.getText(self, "Input Dialog", "Enter something:")if ok and text:self.result_label.setText(f"Input: {text}")else:self.result_label.setText("Input Dialog Canceled")def show_color_dialog(self):color = QColorDialog.getColor(QColor(255, 0, 0), self, "Color Dialog")if color.isValid():self.result_label.setStyleSheet(f"background-color: {color.name()}")self.result_label.setText(f"Selected Color: {color.name()}")def show_font_dialog(self):font, ok = QFontDialog.getFont(self)if ok:self.result_label.setFont(font)self.result_label.setText(f"Selected Font: {font.family()}, {font.pointSize()}pt")def show_file_dialog(self):file_name, _ = QFileDialog.getOpenFileName(self, "Open File Dialog", "", "All Files (*);;Text Files (*.txt)")if file_name:self.result_label.setText(f"Selected File: {file_name}")def show_progress_dialog(self):progress_dialog = QProgressDialog("Processing...", "Cancel", 0, 100, self)progress_dialog.setWindowModality(Qt.WindowModal)progress_dialog.setWindowTitle("Progress Dialog")for i in range(100):progress_dialog.setValue(i)if progress_dialog.wasCanceled():breakself.result_label.setText("Progress Dialog Completed")def show_message_box(self):msg_box = QMessageBox()msg_box.setIcon(QMessageBox.Information)msg_box.setWindowTitle("Message Box")msg_box.setText("This is an information message box.")msg_box.setStandardButtons(QMessageBox.Ok | QMessageBox.Cancel)result = msg_box.exec_()if result == QMessageBox.Ok:self.result_label.setText("Message Box: Ok button clicked")else:self.result_label.setText("Message Box: Cancel button clicked")if __name__ == "__main__":app = QApplication(sys.argv)window = MainWindow()window.show()sys.exit(app.exec_())
4.2.0、调整组件的尺寸:setFixedSize + setFixedWidth + setFixedHeight
self.button.setFixedSize(100, 35)  	# 设置组件的尺寸
self.button.setFixedWidth(35)		# 设置组件的宽度
self.button.setFixedHeight(100)		# 设置组件的高度self.checkbox.stateChanged.connect(self.function_checkbutton)      	# 使用connect方法将(复选框)信号连接到槽
self.slider.valueChanged.connect(self.function_slider)        	 	# 使用connect方法将(滑动条)信号连接到槽
self.LineEdit.returnPressed.connect(self.function_LineEdit)       	# 使用connect方法将(输入框)信号连接到槽
self.button.clicked.connect(self.function_button)  					# 使用connect方法将(按钮)信号连接到槽
4.2.1、显示文本 QLabel:Hello, PyQt!
from PyQt5.QtWidgets import QApplication, QWidget, QLabel, QVBoxLayoutapp = QApplication([]) # 创建应用程序对象window = QWidget() # 创建窗口对象
layout = QVBoxLayout() # 创建布局对象(垂直布局管理器)
label = QLabel('Hello, PyQt!') # 创建标签对象
layout.addWidget(label) # 将标签添加到布局中window.setLayout(layout) # 将布局设置给窗口
window.show() # 显示窗口
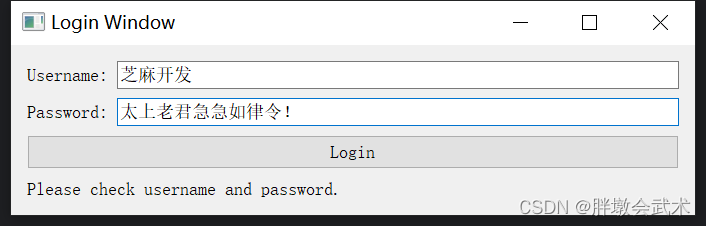
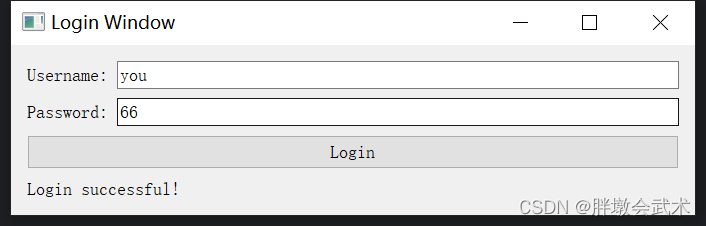
app.exec_() # 运行应用程序4.2.2、按钮 QPushButton:用户登录界面(账号与密码)
import sys
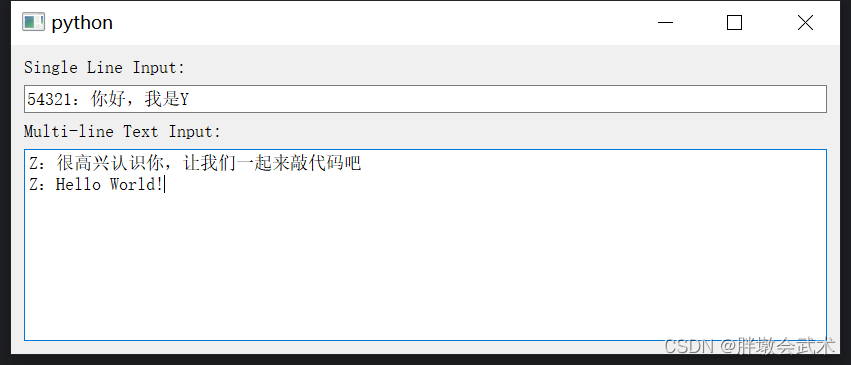
from PyQt5.QtWidgets import QApplication, QWidget, QLabel, QLineEdit, QPushButton, QVBoxLayout, QHBoxLayoutclass LoginWindow(QWidget):def __init__(self):super().__init__()self.setWindowTitle("Login Window")# 创建控件self.username_label = QLabel("Username:")self.username_edit = QLineEdit()self.password_label = QLabel("Password:")self.password_edit = QLineEdit()self.login_button = QPushButton("Login")self.login_button.clicked.connect(self.login) # 连接按钮点击事件到槽函数self.result_label = QLabel("")# 将容器部件添加到主布局中layout = QVBoxLayout() # 垂直布局管理器self.username_layout = QHBoxLayout() # 水平布局管理器self.username_layout.addWidget(self.username_label) # 将文本框添加到水平布局管理器中self.username_layout.addWidget(self.username_edit) # 将按钮添加到水平布局管理器中layout.addLayout(self.username_layout) # layout.addLayoutself.password_layout = QHBoxLayout() # 水平布局管理器self.password_layout.addWidget(self.password_label) # 将文本框添加到水平布局管理器中self.password_layout.addWidget(self.password_edit) # 将按钮添加到水平布局管理器中layout.addLayout(self.password_layout) # layout.addLayout# 将登录按钮和结果标签添加到垂直布局中layout.addWidget(self.login_button) # layout.addWidgetlayout.addWidget(self.result_label) # layout.addWidget# 设置窗口的主布局self.setLayout(layout)def login(self):username = self.username_edit.text()password = self.password_edit.text()# 在这里可以编写登录验证逻辑,这里只是简单地判断用户名和密码是否为空if username == 'you' and password == '66':self.result_label.setText("Login successful!")else:self.result_label.setText("Please check username and password.")if __name__ == "__main__":app = QApplication(sys.argv)window = LoginWindow()window.show()sys.exit(app.exec_())4.2.3、文本框 QLineEdit + QTextEdit(单行 + 多行)
import sys
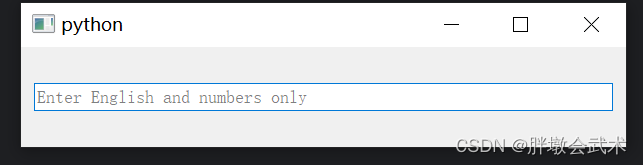
from PyQt5.QtWidgets import QApplication, QMainWindow, QVBoxLayout, QWidget, QLabel, QLineEdit, QTextEditclass MainWindow(QMainWindow):def __init__(self):super().__init__()layout = QVBoxLayout()# QLineEdit 示例self.line_edit = QLineEdit(self)layout.addWidget(QLabel("Single Line Input:"))layout.addWidget(self.line_edit)# QTextEdit 示例self.text_edit = QTextEdit(self)layout.addWidget(QLabel("Multi-line Text Input:"))layout.addWidget(self.text_edit)central_widget = QWidget()central_widget.setLayout(layout)self.setCentralWidget(central_widget)# 连接槽函数self.line_edit.textChanged.connect(self.show_line_edit_text)self.text_edit.textChanged.connect(self.show_text_edit_text)def show_line_edit_text(self, text):print("Line Edit Text:", text)def show_text_edit_text(self):text = self.text_edit.toPlainText() # 获取 QTextEdit 的文本print("Text Edit Text:", text)if __name__ == "__main__":app = QApplication(sys.argv)window = MainWindow()window.show()sys.exit(app.exec_())4.2.4、校验器 QRegExpValidator :用于限制用户在 QLineEdit 中输入的文本(英文 / 数字)
import sys
from PyQt5.QtWidgets import QApplication, QMainWindow, QVBoxLayout, QWidget, QLineEdit
from PyQt5.QtCore import QRegExp
from PyQt5.QtGui import QRegExpValidatorclass MainWindow(QMainWindow):def __init__(self):super().__init__()layout = QVBoxLayout()self.line_edit = QLineEdit(self)self.line_edit.setPlaceholderText("Enter English and numbers only")# english_only = QRegExp("[a-zA-Z]+")  # 创建一个正则表达式,用于匹配只包含英文字符的文本# numbers_only = QRegExp("[0-9]+")  # 创建一个正则表达式,用于匹配只包含数字的文本regex = QRegExp("[A-Za-z0-9]+")  # 创建一个正则表达式,只允许输入英文和数字validator = QRegExpValidator(regex)self.line_edit.setValidator(validator)layout.addWidget(self.line_edit)central_widget = QWidget()central_widget.setLayout(layout)self.setCentralWidget(central_widget)if __name__ == "__main__":app = QApplication(sys.argv)window = MainWindow()window.show()sys.exit(app.exec_())"""
函数功能:QRegExp 类是 Qt 中用于处理正则表达式的类。
函数说明:QRegExp(pattern: str, caseSensitivity: Qt.CaseSensitivity = Qt.CaseSensitive, syntax: QRegExp.PatternSyntax = QRegExp.RegExp)
输入参数:pattern             构造一个 QRegExp 对象,使用给定的正则表达式 pattern。caseSensitivity     指定是否区分大小写,默认为区分大小写。syntax              指定正则表达式的语法,默认为正则表达式语法。
""""""
函数功能:QRegExpValidator 类是 Qt 中用于输入验证的工具之一。它允许您使用正则表达式来限制用户在 QLineEdit 等控件中输入的文本。
函数说明:QRegExpValidator(regexp: QRegExp, parent: QObject = None)
输入参数:regexp              构造一个 QRegExpValidator 对象,使用给定的正则表达式 regexp 进行验证。parent              用于设置对象的父级。
"""
4.2.5、校验器 QIntValidator + QDoubleValidator(整数 + 浮点数):用于限制用户在 QLineEdit 中输入的文本必须为数字。

import sys
from PyQt5.QtWidgets import QApplication, QMainWindow, QVBoxLayout, QHBoxLayout, QWidget, QLabel, QLineEdit
from PyQt5.QtGui import QIntValidator, QDoubleValidatorclass MainWindow(QMainWindow):def __init__(self):super().__init__()int_label = QLabel("Enter an int between [0, 100]:")int_label.setFixedWidth(350)  # 设置固定的宽度int_validator = QIntValidator(0, 100)       # 创建QIntValidator,设置范围:[0, 100]int_lineedit = QLineEdit()                  # 创建一个 QLineEdit 控件int_lineedit.setValidator(int_validator)    # 设置校验器# 将校验器应用到QLineEdit控件中,用于限制用户只能输入 0 到 100 之间的整数。double_label = QLabel("Enter an double between [0.0, 100.0]:")double_label.setFixedWidth(350)  # 设置固定的宽度double_validator = QDoubleValidator(0.0, 100.0, 2)       # 创建QDoubleValidator,设置范围:[0.0, 100.0],保留两位小数double_lineedit = QLineEdit()                         # 创建一个 QLineEdit 控件double_lineedit.setValidator(double_validator)           # 设置校验器# 将校验器应用到QDoubleValidator控件中,用于限制用户只能输入 0.0 到 100.0 之间的浮点数。# 布局管理器V_layout = QVBoxLayout()H1_layout = QHBoxLayout()H2_layout = QHBoxLayout()H1_layout.addWidget(int_label)H1_layout.addWidget(int_lineedit)H2_layout.addWidget(double_label)H2_layout.addWidget(double_lineedit)V_layout.addLayout(H1_layout)V_layout.addLayout(H2_layout)# 将布局应用于主窗口的中心区域central_widget = QWidget()central_widget.setLayout(V_layout)self.setCentralWidget(central_widget)if __name__ == "__main__":app = QApplication(sys.argv)window = MainWindow()window.show()sys.exit(app.exec_())"""##########################################################################
from PyQt5.QtGui import QIntValidator函数简介:在输入框中,限制用户输入的内容必须是符合一定范围的整数。
函数说明:QIntValidator(bottom, top, parent=None)
输入参数:bottom:         校验的最小值。top:            校验的最大值。parent:         可选,父对象。属性:   bottom():               获取校验的最小值。top():                  获取校验的最大值。
方法:   setBottom(bottom):      设置校验的最小值。setTop(top):            设置校验的最大值。
##########################################################################""""""##########################################################################
from PyQt5.QtGui import QDoubleValidator函数简介:在输入框中,限制用户输入的内容必须是符合一定范围的整数。
函数说明:QDoubleValidator(bottom, top, decimals, parent=None)
输入参数:bottom:         浮点数的最小值,用户输入的浮点数不能小于该值。top:            浮点数的最大值,用户输入的浮点数不能大于该值。decimals:       小数位数,表示允许的小数点后的位数。parent:         可选参数,父级 QObject。方法:   bottom():                       返回校验器设置的最小值。top():                          返回校验器设置的最大值。decimals():                     返回校验器设置的小数位数。setBottom(bottom: float):       设置校验器的最小值。setTop(top: float):             设置校验器的最大值。setDecimals(decimals: int):     设置校验器的小数位数。
##########################################################################"""
4.2.6、输入框 QSpinBox + QDoubleSpinBox(整数 + 浮点数):支持上下按钮调节

import sys
from PyQt5.QtWidgets import QApplication, QMainWindow, QVBoxLayout, QHBoxLayout, QWidget, QSpinBox, QDoubleSpinBox, QLabelclass MainWindow(QMainWindow):def __init__(self):super().__init__()# 使用 QSpinBox 限制整数范围QSpinBox_label = QLabel("int input:")int_spinbox = QSpinBox()int_spinbox.setRange(0, 100)  # 限制范围:[0, 100]# 使用 QDoubleSpinBox 限制浮点数范围QDoubleSpinBox_label = QLabel("double input:")double_spinbox = QDoubleSpinBox()double_spinbox.setRange(0.0, 100.0)  	# 限制范围:[0.0, 100.0]double_spinbox.setDecimals(2)  			# 保留2位小数# 布局管理器V_layout = QVBoxLayout()  	# 垂直布局H1_layout = QHBoxLayout()  	# 水平布局H2_layout = QHBoxLayout()  	# 水平布局H1_layout.addWidget(QSpinBox_label)H1_layout.addWidget(int_spinbox)V_layout.addLayout(H1_layout)H2_layout.addWidget(QDoubleSpinBox_label)H2_layout.addWidget(double_spinbox)V_layout.addLayout(H2_layout)# 将布局应用于主窗口的中心区域central_widget = QWidget()central_widget.setLayout(V_layout)self.setCentralWidget(central_widget)if __name__ == "__main__":app = QApplication(sys.argv)window = MainWindow()window.show()sys.exit(app.exec_())
4.2.7、滑动条 QSlider:获取滑动条点击前后的值
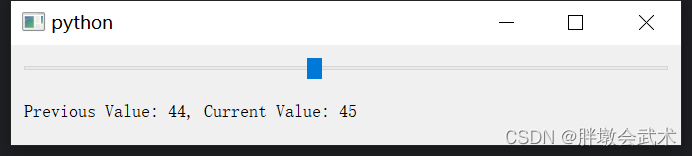
from PyQt5.QtWidgets import QApplication, QMainWindow, QVBoxLayout, QWidget, QSlider, QLabel
from PyQt5.QtCore import Qtclass MainWindow(QMainWindow):def __init__(self):super().__init__()layout = QVBoxLayout()self.slider = QSlider()self.slider.setOrientation(Qt.Horizontal)self.slider.setRange(0, 100)layout.addWidget(self.slider)self.label = QLabel("Previous Value: 0, Current Value: 0")layout.addWidget(self.label)self.previous_value = 0self.slider.valueChanged.connect(self.slider_value_changed)central_widget = QWidget()central_widget.setLayout(layout)self.setCentralWidget(central_widget)def slider_value_changed(self, new_value):self.label.setText(f"Previous Value: {self.previous_value}, Current Value: {new_value}")self.previous_value = self.slider.value()  # self.slider.value():获取的是点击slider之后的值,而不是当前slider显示的值if __name__ == "__main__":app = QApplication([])window = MainWindow()window.show()app.exec_()
4.2.8、进度条 QProgressBar:创建一个进度条窗口(0~100%)
import sys
from PyQt5.QtWidgets import QApplication, QMainWindow, QPushButton, QProgressBar
from PyQt5.QtCore import QTimerclass MainWindow(QMainWindow):def __init__(self):super().__init__()# 设置窗口的几何属性self.setGeometry(100, 100, 600, 200)# 创建一个进度条并设置其几何属性self.progress_bar = QProgressBar(self)self.progress_bar.setGeometry(30, 40, 500, 25)# 创建一个 "Start Progress" 按钮start_button = QPushButton('Start Progress', self)# 连接按钮的点击事件到 startProgress 函数start_button.clicked.connect(self.startProgress)# 设置按钮的固定宽度和位置start_button.setFixedWidth(200)start_button.move(30, 80)def startProgress(self):# 初始化进度为0self.progress = 0# 创建一个定时器self.timer = QTimer(self)# 连接定时器的超时事件到 updateProgress 函数self.timer.timeout.connect(self.updateProgress)# 每0.1秒触发一次定时器self.timer.start(100)def updateProgress(self):# 增加进度self.progress += 1# 设置进度条的值self.progress_bar.setValue(self.progress)# 当进度达到100%时,停止定时器if self.progress >= 100:self.timer.stop()if __name__ == '__main__':app = QApplication(sys.argv)window = MainWindow()window.show()sys.exit(app.exec_())
4.2.9、下拉框 QComboBox:创建一个下拉框并添加选项
import sys
from PyQt5.QtWidgets import QApplication, QMainWindow, QVBoxLayout, QWidget, QLabel, QComboBoxclass MainWindow(QMainWindow):def __init__(self):super().__init__()layout = QVBoxLayout()label = QLabel("Select an option:")layout.addWidget(label)combo_box = QComboBox()combo_box.addItem("Option 1")combo_box.addItem("Option 2")combo_box.addItem("Option 3")combo_box.currentIndexChanged.connect(self.selection_changed)  # 连接选项变更事件layout.addWidget(combo_box)self.result_label = QLabel("", self)layout.addWidget(self.result_label)central_widget = QWidget()central_widget.setLayout(layout)self.setCentralWidget(central_widget)def selection_changed(self, index):selected_option = self.sender().currentText()self.result_label.setText(f"Selected: {selected_option}")if __name__ == "__main__":app = QApplication(sys.argv)window = MainWindow()window.show()sys.exit(app.exec_())
4.2.10、复选框 Check Box:获取勾选状态
获取复选框状态:
self.checkbox.stateChanged.connect()
通过复选框的 checkState() 方法可以获取其当前的状态值:0、1 或 2。分别表示未选中、选中和部分选中(半选中)的状态。
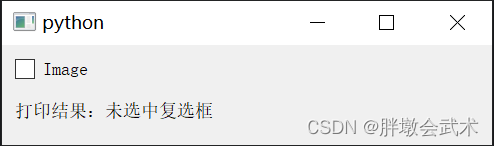
from PyQt5.QtWidgets import QApplication, QMainWindow, QVBoxLayout, QWidget, QCheckBox, QLabelclass MainWindow(QMainWindow):def __init__(self):super().__init__()layout = QVBoxLayout()self.checkbox = QCheckBox("Image", self)self.checkbox.setChecked(True) # 默认选中复选框self.checkbox.stateChanged.connect(self.invert_load_image)self.label = QLabel("") # 创建一个用于显示图像名称的QLabellayout.addWidget(self.checkbox)layout.addWidget(self.label)central_widget = QWidget()central_widget.setLayout(layout)self.setCentralWidget(central_widget)def invert_load_image(self, state):if state == 2: # 部分选中状态self.label.setText("选中复选框")elif state == 0: # 未选中状态self.label.setText("未选中复选框")# 连接到加载图像的槽函数self.load_image()def load_image(self):# 加载图像的相关操作print("加载图像...")if __name__ == "__main__":app = QApplication([])window = MainWindow()window.show()app.exec_()获取复选框状态:
self.checkbox.isChecked()
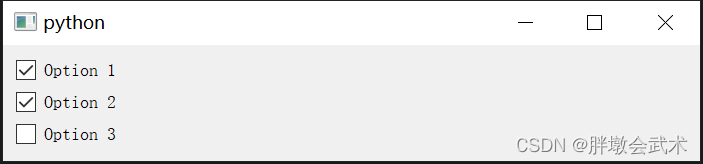
from PyQt5.QtWidgets import QApplication, QMainWindow, QVBoxLayout, QWidget, QCheckBoxclass MainWindow(QMainWindow):def __init__(self):super().__init__()layout = QVBoxLayout()# 创建多个复选框self.checkbox1 = QCheckBox("Option 1", self)self.checkbox2 = QCheckBox("Option 2", self)self.checkbox3 = QCheckBox("Option 3", self)layout.addWidget(self.checkbox1)layout.addWidget(self.checkbox2)layout.addWidget(self.checkbox3)central_widget = QWidget()central_widget.setLayout(layout)self.setCentralWidget(central_widget)# 连接按钮的点击信号到槽函数self.checkbox1.clicked.connect(self.show_states)self.checkbox2.clicked.connect(self.show_states)self.checkbox3.clicked.connect(self.show_states)def show_states(self):# 获取每个复选框的状态并显示state1 = self.checkbox1.isChecked()state2 = self.checkbox2.isChecked()state3 = self.checkbox3.isChecked()print("Option 1 is checked:", state1)print("Option 2 is checked:", state2)print("Option 3 is checked:", state3)if __name__ == "__main__":app = QApplication([])window = MainWindow()window.show()app.exec_()4.2.11、单选按钮 QRadioButton:获取勾选状态

import sys
from PyQt5.QtWidgets import QApplication, QMainWindow, QVBoxLayout, QHBoxLayout, QWidget, QRadioButton, QLabel, QButtonGroupclass MainWindow(QMainWindow):def __init__(self):super().__init__()layout = QVBoxLayout()# 新建单选按钮。在多个选项中进行单选。self.group_radio_buttons = []self.group_label = []group_options = ["Option1", "Option2", "Option3"]  # 单选按钮名称group_label_options = ["signal", "double", "double"]  # 初始化标签值self.group_button_group = QButtonGroup()for index, option in enumerate(group_options):hbox = QHBoxLayout()radio_button = QRadioButton(option)  # 添加单选按钮radio_button.setFixedWidth(150)  # 设置宽度label = QLabel(group_label_options[index])  # 添加标签self.group_radio_buttons.append(radio_button)  # 保存三个radio按钮self.group_label.append(label)  # 保存三个label标签self.group_button_group.addButton(radio_button, index)# 添加布局hbox.addWidget(radio_button)hbox.addWidget(label)layout.addLayout(hbox)# if option == "Option1":  # 设置 "YZ" 默认选中#     radio_button.setChecked(True)self.group_button_group.buttonClicked.connect(self.update_result_label)# 新建结果打印标签self.result_label = QLabel("Selected:", self)layout.addWidget(self.result_label)central_widget = QWidget()central_widget.setLayout(layout)self.setCentralWidget(central_widget)def update_result_label(self):selected_option = Nonefor index, button in enumerate(self.group_radio_buttons):if button.isChecked():selected_option = button.text()breakif selected_option is not None:self.result_label.setText(f"Selected: {selected_option}")else:self.result_label.setText("No option selected")if selected_option == "Option1":self.group_label[0].setText(str(1))else:self.group_label[0].setText("")if selected_option == "Option2":self.group_label[1].setText(str(2))else:self.group_label[1].setText("")if selected_option == "Option3":self.group_label[2].setText(str(3))else:self.group_label[2].setText("")if __name__ == "__main__":app = QApplication(sys.argv)window = MainWindow()window.show()sys.exit(app.exec_())
只给part_brain添加文本框;且只有选择part_brain时,文本框状=True。
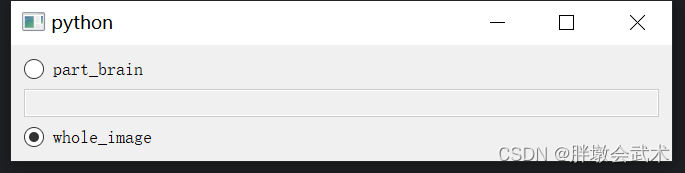
import sys
from PyQt5.QtWidgets import QApplication, QMainWindow, QVBoxLayout, QWidget, QRadioButton, QLineEdit, QButtonGroupclass MainWindow(QMainWindow):def __init__(self):super().__init__()layout = QVBoxLayout()self.group_radio_buttons = []self.group_line = []group_options = ["part_brain", "whole_image"]self.group_button_group = QButtonGroup()for index, option in enumerate(group_options):radio_button = QRadioButton(option)self.group_radio_buttons.append(radio_button)self.group_button_group.addButton(radio_button, index)layout.addWidget(radio_button)if option == "part_brain":line_edit = QLineEdit(self)self.group_line.append(line_edit)line_edit.setEnabled(False)  # 只有 "part_brain" 被选中时启用文本框layout.addWidget(line_edit)if option == "whole_image":radio_button.setChecked(True)self.group_button_group.buttonClicked.connect(self.update_line_edit_status)central_widget = QWidget()central_widget.setLayout(layout)self.setCentralWidget(central_widget)def update_line_edit_status(self):for index, button in enumerate(self.group_radio_buttons):if button.isChecked():if index < len(self.group_line):self.group_line[index].setEnabled(True)else:for line_edit in self.group_line:line_edit.setEnabled(False)if __name__ == "__main__":app = QApplication(sys.argv)window = MainWindow()window.show()sys.exit(app.exec_())
4.2.12、打印日志 QTextEdit:获取当前时间 + 设置文本颜色
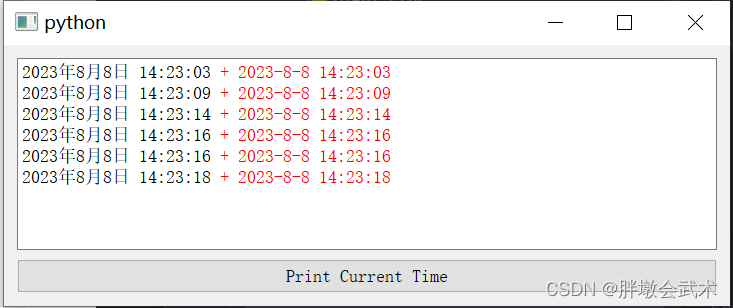
from PyQt5.QtWidgets import QApplication, QTextEdit, QVBoxLayout, QPushButton, QMainWindow, QWidget
from PyQt5.QtCore import Qt, QDateTimeclass MainWindow(QMainWindow):def __init__(self):super().__init__()layout = QVBoxLayout()self.log_text_edit = QTextEdit()layout.addWidget(self.log_text_edit)self.button = QPushButton("Print Current Time")self.button.clicked.connect(self.print_current_time)layout.addWidget(self.button)widget = QWidget()widget.setLayout(layout)self.setCentralWidget(widget)def print_current_time(self):current_time1 = QDateTime.currentDateTime().toString(Qt.DefaultLocaleLongDate)  # 指定默认格式current_time2 = QDateTime.currentDateTime().toString("yyyy-M-d hh:mm:ss")  # 指定日期格式message = current_time1 + r'<font color="red"> + {}</font>'.format(current_time2)self.log_text_edit.append(message)if __name__ == '__main__':app = QApplication([])window = MainWindow()window.show()app.exec()
from datetime import datetimecurrent_time = datetime.now() # 获取当前时间
formatted_time = current_time.strftime("%Y-%m-%d %H:%M:%S")
print("Time:", formatted_time) # 打印格式化后的时间
# Time: 2023-08-08 14:25:29
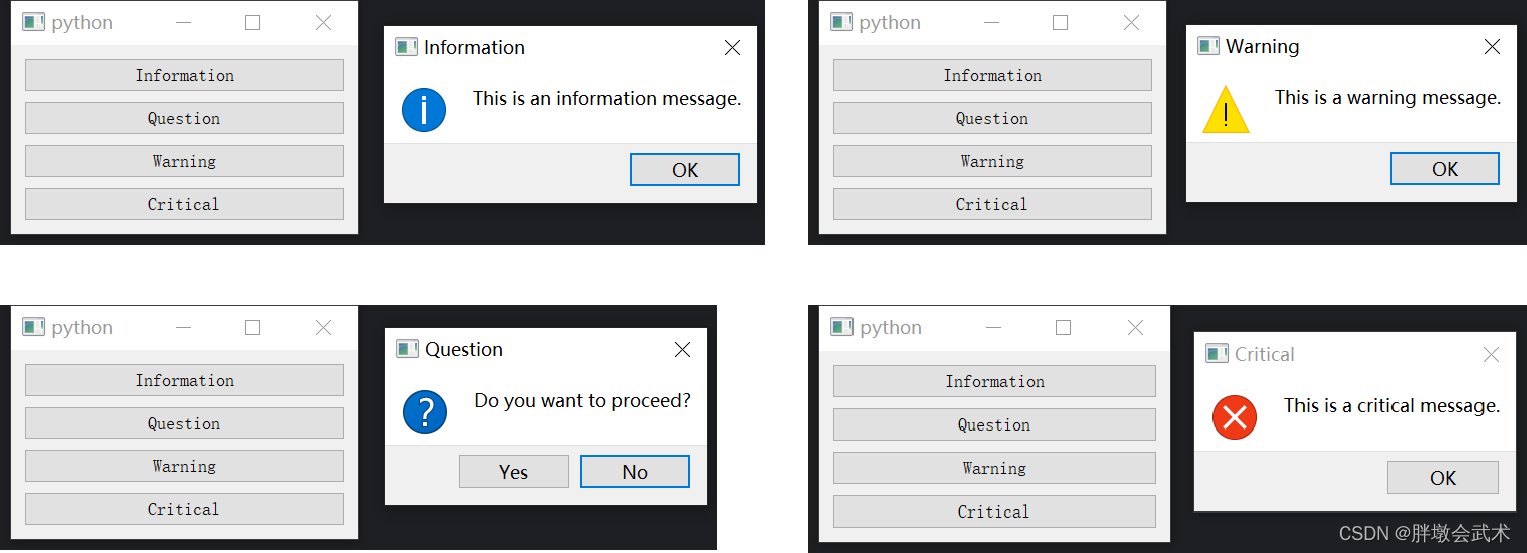
4.2.13、消息提示框 QMessageBox:四种类型提示框(信息 / 询问 / 警告 / 错误)
import sys
from PyQt5.QtWidgets import QApplication, QMainWindow, QPushButton, QVBoxLayout, QWidget, QMessageBoxclass MainWindow(QMainWindow):def __init__(self):super().__init__()central_widget = QWidget(self)self.setCentralWidget(central_widget)layout = QVBoxLayout(central_widget)info_button = QPushButton("Information")info_button.clicked.connect(self.show_information)layout.addWidget(info_button)question_button = QPushButton("Question")question_button.clicked.connect(self.show_question)layout.addWidget(question_button)warning_button = QPushButton("Warning")warning_button.clicked.connect(self.show_warning)layout.addWidget(warning_button)critical_button = QPushButton("Critical")critical_button.clicked.connect(self.show_critical)layout.addWidget(critical_button)def show_information(self):QMessageBox.information(self, "Information", "This is an information message.", QMessageBox.Ok, QMessageBox.Ok)def show_question(self):result = QMessageBox.question(self, "Question", "Do you want to proceed?", QMessageBox.Yes | QMessageBox.No, QMessageBox.No)if result == QMessageBox.Yes:print("User clicked Yes")else:print("User clicked No")def show_warning(self):QMessageBox.warning(self, "Warning", "This is a warning message.", QMessageBox.Ok, QMessageBox.Ok)def show_critical(self):QMessageBox.critical(self, "Critical", "This is a critical message.", QMessageBox.Ok, QMessageBox.Ok)if __name__ == "__main__":app = QApplication(sys.argv)window = MainWindow()window.show()sys.exit(app.exec_())"""##########################################################################
from PyQt5.QtWidgets import QMessageBox函数简介:用于显示消息框、询问框、警告框等用户交互提示框的类。
函数说明:信息消息框        QMessageBox.information(parent, title, message, buttons, defaultButton)询问消息框        QMessageBox.question(parent, title, message, buttons, defaultButton)警告消息框        QMessageBox.warning(parent, title, message, buttons, defaultButton)严重错误消息框     QMessageBox.critical(parent, title, message, buttons, defaultButton)
输入参数:parent:         可选参数,父级窗口。title:          消息框的标题。message:        消息框中显示的消息文本。buttons:        消息框中显示的按钮类型,如 QMessageBox.Yes、QMessageBox.No 等。defaultButton:  可选参数,指定默认按钮。
##########################################################################"""4.2.14、选项卡界面 QTabWidget
4.2.14.1、在一个窗口中显示多个页面
Tab控件:可以在一个窗口中显示多个页面,每个页面对应一个选项卡,用户可以通过点击选项卡来切换不同的页面。
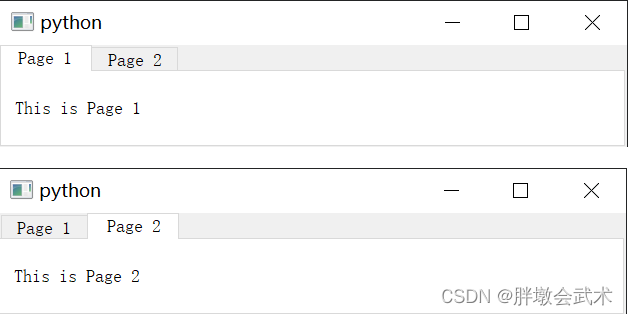
from PyQt5.QtWidgets import QApplication, QMainWindow, QTabWidget, QWidget, QVBoxLayout, QLabelclass MyWindow(QMainWindow):def __init__(self):super().__init__()# 创建Tab控件self.tab_widget = QTabWidget()self.setCentralWidget(self.tab_widget)# 创建页面并添加到Tab控件中self.page1 = QWidget()self.page2 = QWidget()self.tab_widget.addTab(self.page1, "Page 1")self.tab_widget.addTab(self.page2, "Page 2")# 设置页面的布局和内容layout1 = QVBoxLayout()layout1.addWidget(QLabel("This is Page 1"))self.page1.setLayout(layout1)layout2 = QVBoxLayout()layout2.addWidget(QLabel("This is Page 2"))self.page2.setLayout(layout2)if __name__ == "__main__":app = QApplication([])window = MyWindow()window.show()app.exec_()4.2.14.2、在主界面中,显示其他.py界面类文件
实现选项卡自动显示不同界面,可以在主界面的初始化过程中创建并添加不同的界面类实例,并根据选项卡的切换来显示相应的界面。

# main.pyimport sys
from PyQt5.QtWidgets import QApplication, QMainWindow, QTabWidget, QVBoxLayout, QWidget, QPushButton
from other_file import OtherWindow  # 导入其他文件中的界面类class MainWindow(QMainWindow):def __init__(self):super().__init__()self.setWindowTitle("Main Window")self.setGeometry(200, 200, 300, 200)# 创建一个QTabWidget控件self.tab_widget = QTabWidget(self)self.setCentralWidget(self.tab_widget)# 创建页面1和页面2self.page1 = QWidget()self.page2 = OtherWindow()  # 调用其他文件中的界面类# 将页面1和页面2添加到QTabWidget控件中self.tab_widget.addTab(self.page1, "Page 1")self.tab_widget.addTab(self.page2, "Page 2")if __name__ == "__main__":app = QApplication(sys.argv)main_window = MainWindow()main_window.show()sys.exit(app.exec_())
# other_file.pyimport sys
from PyQt5.QtWidgets import QApplication, QWidget, QLabel, QVBoxLayout, QHBoxLayout, QPushButton, QFileDialogclass OtherWindow(QWidget):def __init__(self):super().__init__()# (1)QVBoxLayout垂直界面layout = QVBoxLayout()# (2)QHBoxLayout水平界面button_layout = QHBoxLayout()# (3)新建按钮self.button = QPushButton("load:", self) # 创建"Load Image"按钮,self.button.clicked.connect(self.load_image) # 使用connect方法将信号连接到槽button_layout.addWidget(self.button) # 将load_button添加到button_layout布局中# (4)新建标签self.label = QLabel("") # 创建一个用于显示图像名称的QLabelbutton_layout.addWidget(self.label) # 将image_name_label添加到button_layout布局中# (5)水平界面添加到垂直界面layout.addLayout(button_layout) # 将button_layout布局添加到主布局中self.setLayout(layout) # 设置窗口的主布局def load_image(self):self.folder_path = QFileDialog.getExistingDirectory(self, 'Select Folder', './')if self.folder_path:print('Selected Folder:', self.folder_path)self.label.setText(self.folder_path)if __name__ == '__main__':app = QApplication(sys.argv)window = OtherWindow()window.show()sys.exit(app.exec_())4.2.14.3、在主界面中,显示其他.py界面类文件,并进行数据交互
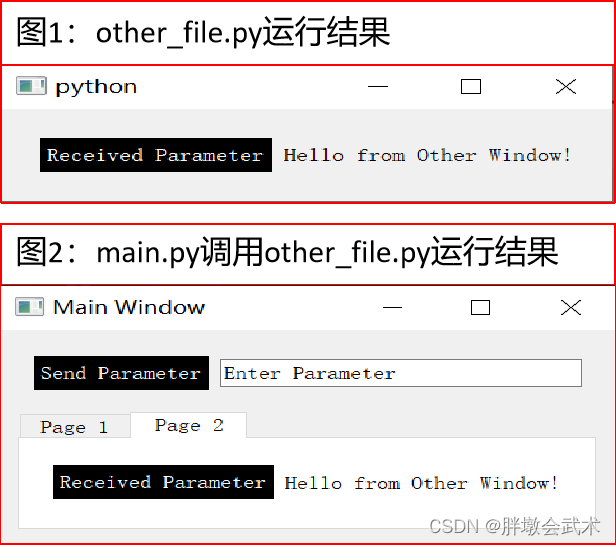
# main.pyimport sys
from PyQt5.QtWidgets import QApplication, QMainWindow, QTabWidget, QVBoxLayout, QWidget, QLineEdit, QPushButton, QHBoxLayout
from other_file import OtherWindowclass MainWindow(QMainWindow):def __init__(self):super().__init__()self.setWindowTitle("Main Window")self.setGeometry(200, 200, 300, 200)###################################################################### 创建一个容器部件,用于放置按钮和文本框self.button_layout = QHBoxLayout()  # 水平布局管理器self.send_button = QPushButton("Send Parameter", self)  # 新建按钮,并设置初始参数self.send_button.clicked.connect(self.send_parameter)  # 使用connect方法将信号连接到槽self.send_button.setStyleSheet("background-color: black; color: white;")  # 设置按钮的背景和字体颜色self.input_line_edit = QLineEdit("Enter Parameter", self)  # 新建文本框,并设置初始参数self.button_layout.addWidget(self.send_button)  # 将按钮添加到水平布局管理器中self.button_layout.addWidget(self.input_line_edit)  # 将文本框添加到水平布局管理器中###################################################################### 创建一个QTabWidget控件self.tab_widget = QTabWidget(self)self.setCentralWidget(self.tab_widget)# 创建页面1和页面2self.page1 = QWidget()self.other_window = OtherWindow()  # 调用其他文件中的界面类# 将页面1和页面2添加到QTabWidget控件中self.tab_widget.addTab(self.page1, "Page 1")self.tab_widget.addTab(self.other_window, "Page 2")###################################################################### 将容器部件添加到主布局中layout = QVBoxLayout()  # 垂直布局管理器layout.addLayout(self.button_layout)layout.addWidget(self.tab_widget)central_widget = QWidget()central_widget.setLayout(layout)self.setCentralWidget(central_widget)def send_parameter(self):parameter = self.input_line_edit.text()self.other_window.receive_parameter(parameter)  # 调用其他界面类other_window中的函数receive_parameterif __name__ == "__main__":app = QApplication(sys.argv)window = MainWindow()window.show()sys.exit(app.exec_())
# other_file.pyfrom PyQt5.QtWidgets import QApplication, QWidget, QVBoxLayout, QHBoxLayout, QPushButton, QLabel
import sysclass OtherWindow(QWidget):def __init__(self):super().__init__()layout = QVBoxLayout()button_layout = QHBoxLayout() # 水平布局管理器self.Received_button = QPushButton("Received Parameter", self) # 新建按钮,并设置初始参数self.Received_button.setStyleSheet("background-color: black; color: white;") # 设置按钮的背景和字体颜色self.label = QLabel("Hello from Other Window!")button_layout.addWidget(self.Received_button)button_layout.addWidget(self.label)layout.addLayout(button_layout)self.setLayout(layout)def receive_parameter(self, parameter):self.label.setText(f"{parameter}")if __name__ == "__main__":app = QApplication(sys.argv)window = OtherWindow()window.show()sys.exit(app.exec_())4.2.15、调用其他.py文件,并进行数据交互
共有两种方法:
- (1)
QProcess(process.start):需要依赖Qt库。实现与外部应用程序的交互、启动和管理等功能,更加灵活。适用于更复杂的交互和进程管理。 - (2)
subprocess(subprocess.run):Python标准库提供的方法,更加简单方便。适用于在Python脚本中执行外部命令或脚本,并获取其结果。
测试文件.py
# other_file.py# 在这里进行运算或其他处理
result = 42
# 将结果打印到控制台
print(result)
print("result =", result + 1)
print("result" + " + " + "result")
方法一:subprocess(subprocess.run)
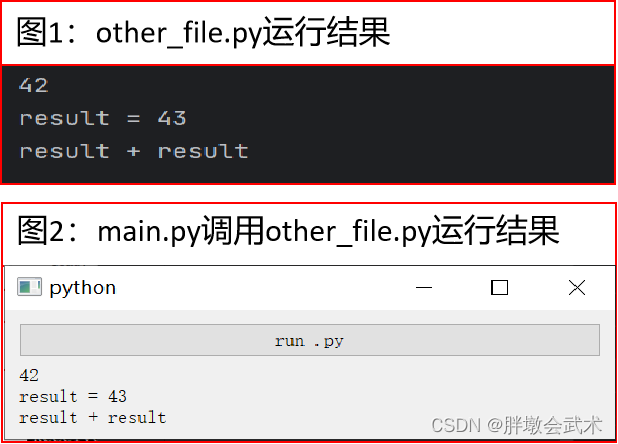
# main.pyimport sys
import subprocessfrom PyQt5.QtWidgets import QApplication, QMainWindow, QVBoxLayout, QWidget, QPushButton, QLabelclass MainWindow(QMainWindow):def __init__(self):super().__init__()layout = QVBoxLayout()self.run_button = QPushButton("run .py")self.run_button.clicked.connect(self.run)self.run_label = QLabel("", self)layout.addWidget(self.run_button)layout.addWidget(self.run_label)central_widget = QWidget()central_widget.setLayout(layout)self.setCentralWidget(central_widget)def run(self):try:########################################################## 注意:若不确定other_file.py是否调用成功,可以使用绝对路径。#########################################################result = subprocess.run(["python", "other_file.py"], capture_output=True, text=True, check=True)output = result.stdout.strip()  # 获取输出结果并去除首尾空格self.run_label.setText(output)except subprocess.CalledProcessError as e:# 如果出现错误,可以在这里进行处理self.run_label.setText(str(e))if __name__ == "__main__":app = QApplication(sys.argv)window = MainWindow()window.show()sys.exit(app.exec_())"""##########################################################################
import subprocess函数简介:Python标准库subprocess模块中的一个函数,用于运行一个子进程并等待其完成。可以执行系统命令或其他可执行文件,并可以通过参数来控制进程的行为和交互。
函数说明:subprocess.run(args, *, stdin=None, input=None, stdout=None, stderr=None, shell=False, cwd=None, timeout=None, check=False, encoding=None, errors=None, text=None, env=None, universal_newlines=None, start_new_session=False)
输入参数:args: 要运行的命令或可执行文件,以列表或字符串形式传递。如果shell=True,可以传递一个字符串,使用Shell运行命令。stdin: 用于传递子进程的标准输入的文件对象。input: 用于传递子进程的标准输入的字节或字符串数据。stdout: 用于接收子进程的标准输出的文件对象。stderr: 用于接收子进程的标准错误输出的文件对象。shell: 是否在Shell中运行命令。如果为True,可以使用通配符等Shell特性。cwd: 子进程的当前工作目录。timeout: 等待子进程完成的超时时间,如果子进程在此时间内未完成,将会被终止。check: 是否检查返回代码。如果为True,如果子进程返回的代码非零,将会引发CalledProcessError异常。encoding: 用于解码子进程输出的编码。errors: 用于处理解码错误的策略。text: 是否使用文本模式传递数据,相当于同时设置universal_newlines和encoding。env: 用于指定子进程的环境变量。universal_newlines: 是否使用通用换行符模式,相当于同时设置stdin、stdout和stderr的text参数。start_new_session: 是否在新的会话(session)中启动子进程。
输出参数:返回一个CompletedProcess对象,它包含有关子进程执行的信息,如返回代码、标准输出、标准错误等。
##########################################################################"""
方法二:QProcess(process.start)
# main.pyimport sys
from PyQt5.QtWidgets import QApplication, QMainWindow, QVBoxLayout, QWidget, QPushButton, QLabel
from PyQt5.QtCore import QProcessclass MainWindow(QMainWindow):def __init__(self):super().__init__()layout = QVBoxLayout()self.run_button = QPushButton("run .py")self.run_button.clicked.connect(self.run)self.run_label = QLabel("", self)layout.addWidget(self.run_button)layout.addWidget(self.run_label)central_widget = QWidget()central_widget.setLayout(layout)self.setCentralWidget(central_widget)def run(self):# 清空结果标签self.run_label.setText("")########################################################## (1)启动进程执行外部脚本process = QProcess()python_script = r'other_file.py'  # 注意:若不确定other_file.py是否调用成功,可以使用绝对路径。para1 = str(9)  # (1)传递参数只能是字符串(2)与外部脚本完成交互。process.start("python", [python_script, para1])process.waitForFinished(-1)  # 用于等待进程执行完成。传入参数-1表示无限等待# (2)进程的退出代码:(1)0表示进程成功执行完成;(2)非零值表示出现错误。exit_code = process.exitCode()if exit_code == 0:self.run_label.setText("调用【成功】,退出代码:{}".format(exit_code))else:self.run_label.setText("调用【失败】,退出代码:{}".format(exit_code))if __name__ == "__main__":app = QApplication(sys.argv)window = MainWindow()window.show()sys.exit(app.exec_())"""######################################################################################
# 函数介绍:QProcess 是 Qt 框架中用于创建和管理外部进程的类。它允许你启动外部应用程序,并与其进行通信。
# 常见方法:
#       (1)启动外部进程:         使用start()方法启动一个外部进程
#       (2)与进程通信:           使用write()方法向进程的标准输入写入数据,并使用readAllStandardOutput()和readAllStandardError()方法读取进程的标准输出和标准错误输出。
#       (2)等待进程执行完成:     使用waitForFinished()方法来等待进程执行完成
#       (3)获取进程退出代码:     使用exitCode()方法可以获取进程的退出代码
#       (4)支持信号与槽机制:     使用readyReadStandardOutput()信号在进程有标准输出可读时发出
#       (5)中断进程:            使用terminate()方法尝试终止进程的执行。不一定会立即停止进程,具体行为取决于操作系统和进程本身。
#
#               process = QProcess()
#               process.start("python", ["script.py", "arg1", "arg2"])
#               if process.waitForFinished():
#                   print("Process finished")
#               exit_code = process.exitCode()
#               if exit_code == 0:
#                   print("调用成功")
#               else:
#                   print("调用失败,退出代码:", exit_code)
#
#               process.write(b"input data")
#               output = process.readAllStandardOutput()
#               error_output = process.readAllStandardError()
#               process.readyReadStandardOutput.connect(handle_output)
#               process.terminate()
######################################################################################""""""######################################################################################
# 函数介绍:waitForFinished 是 QProcess 类的一个成员函数。用于阻塞当前线程,直到关联的进程完成执行为止。
# 函数说明:bool QProcess.waitForFinished(int msecs = 30000)
# 输入参数:     msecs:等待的时间(以毫秒为单位)。默认值是 30000 毫秒(30 秒)。如果设置为 -1,表示无限等待。
# 输出参数:     如果进程在给定的时间内完成执行,则返回 True,否则返回 False。
#
# (1)主要用于等待 QProcess 执行外部程序的过程完成。程序会阻塞当前线程,阻塞在当前行,直到被调用的进程执行完毕。
# (2)如果进程执行的时间很长,这会导致界面冻结,因为界面线程会被阻塞。
# (3)如果你需要在界面上显示进度或状态,或者想要允许用户继续操作界面,而不阻塞界面线程,可以考虑使用多线程、异步编程等技术,以避免界面的冻结。
######################################################################################"""4.2.16、在当前虚拟环境下,调用其他虚拟环境下的.py文件
import subprocessvirtual_env_name = "tensorflow36"  							# (1)指定要激活的虚拟环境名称
cmd_activate_env = f"conda activate {virtual_env_name}"  	# (2)构建激活虚拟环境的命令script_path = r"other_file.py"  							# (3)指定.py文件路径
cmd_script_file = f"python {script_path}"  					# (4)构建激活调用py文件的命令# (5)组合两个命令并在子进程中执行
combined_cmd = f"{cmd_activate_env} && {cmd_script_file}"# (6)使用subprocess执行命令
try:subprocess.run(combined_cmd, shell=True, check=True)
except subprocess.CalledProcessError as e:print(f"Error: {e}")4.2.17、在当前虚拟环境下,调用其他虚拟环境下的.py文件,并传递参数
import subprocess
import osvirtual_env_name = "tensorflow36"                           # (1)指定要激活的虚拟环境名称
cmd_activate_env = f"conda activate {virtual_env_name}"     # (2)构建激活虚拟环境的命令script_path = r"C:\Users\Administrator\Desktop\py\deeplearning.py"  # (3)指定.py文件路径
path = os.getcwd() + 'image.tif'             # (4)指定.py文件的参数# (4)构建激活调用.py文件的命令,包括传递 image_path 参数
cmd_script_file = f"python {script_path} --image_path {path}"
# (5)组合两个命令并在子进程中执行
combined_cmd = f"{cmd_activate_env} &&{cmd_script_file}"
# (6)使用subprocess执行命令
try:subprocess.run(combined_cmd, shell=True, check=True)
except subprocess.CalledProcessError as e:print(f"Error: {e}")"""
######################################################################
import argparse                             # 导入argparse模块if __name__ == "__main__":parser = argparse.ArgumentParser()      # 创建解析对象parser.add_argument('--image_path')     # 添加命令行参数和选项args = parser.parse_args()              # 解析添加的参数image_path = args.image_path            # 获取添加的参数
######################################################################
"""