!特别声明!:这篇文章只是单纯用来应对面试,并不能用来当作深度解析的文章来看。本人才疏学浅,文章也可能有不对的地方,望指正。
此源码分析使用的是Java11
基本使用流程:
String resource = "mybatis-config.xml";
InputStream inputStream = Resources.getResourceAsStream(resource);SqlSessionFactory sqlSessionFactory = new SqlSessionFactoryBuilder().build(inputStream);SqlSession sqlSession = sqlSessionFactory.openSession();UserMapper mapper = sqlSession.getMapper(UserMapper.class);User userById = mapper.getUserById(1);
我们在使用 mybatis时,基本使用用法如上所示
我们一步一步的来看
String resource = "mybatis-config.xml";
InputStream inputStream = Resources.getResourceAsStream(resource);
这一步,不做细讲,就是简单的将我们的xml配置文件转化为输入流对象。
第一步
SqlSessionFactory sqlSessionFactory = new SqlSessionFactoryBuilder().build(inputStream);
这一步,我们调用了 SqlSessionFactoryBuilder对象的build()方法。进入源码分析
1.1 SqlSessionFactoryBuilder对象的build()方法源码分析

我们首先进入 第一条语句的源码
XMLConfigBuilder parser = new XMLConfigBuilder(inputStream, environment, properties);
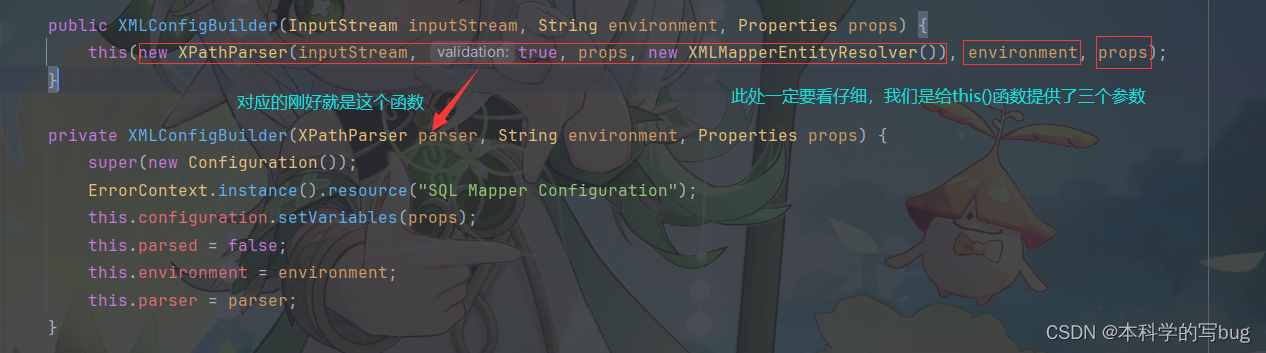
1.2 XMLConfigBuilder()函数源码分析
private XMLConfigBuilder(XPathParser parser, String environment, Properties props) {super(new Configuration());ErrorContext.instance().resource("SQL Mapper Configuration");this.configuration.setVariables(props);this.parsed = false;this.environment = environment;this.parser = parser;}
这个函数大致作用就是 构建了一个Configuration对象,然后给XMLConfigBuilder对象的属性赋值
(注意:Configuration对象类似于单例模式,就是整个Mybatis中只有一个Configuration对象。,这个对象很重要)
XMLConfigBuilder parser = new XMLConfigBuilder(inputStream, environment, properties);
这条语句就到这里结束,就是创建了 一个 XMLConfigBuilder 类的实例,并给属性赋值,同时创建了一个 Configuration对象
接着我们分析第二条语句
return build(parser.parse());
里面先是 调用了 第一条语句创建的对象的parse()方法,我们进入源码进行分析
1.3 parser.parse()源码分析
public Configuration parse() {if (parsed) {throw new BuilderException("Each XMLConfigBuilder can only be used once.");}parsed = true;parseConfiguration(parser.evalNode("/configuration"));return configuration;}
parseConfiguration(parser.evalNode("/configuration"));
我们可以看到其实整个 parse()函数就调用了这一个方法。
我们给parseConfiguration()提供的参数是一个 Xnode对象,对应的是我们配置文件中的一级标签 <configuration>。我们的配置文件大概构造如下:
<?xml version="1.0" encoding="UTF-8" ?>
<!DOCTYPE configurationPUBLIC "-//mybatis.org//DTD Config 3.0//EN""http://mybatis.org/dtd/mybatis-3-config.dtd">
<!--核心配置文件-->
<configuration>......<environments default="development">......</environments><mappers>......</mappers>
</configuration>
我们继续进入源码
1.4 parseConfiguration()源码分析
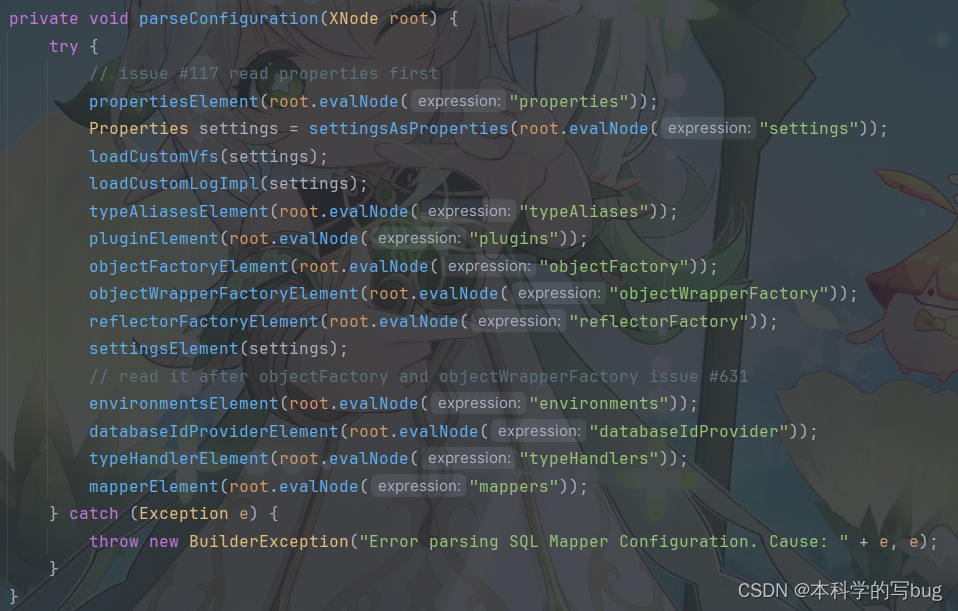
我们可以看到,我们提供的 root 参数就是 <configuration>的节点对象。然后这个parseConfiguration()函数对 配置文件中 <configuration>标签下的二级标签进行了一些操作,进行了哪些操作呢?我们随便进入一个源码进行查看,此处以 <properties>标签为例,我们进入propertiesElement()函数的源码
1.5 propertiesElement()源码分析
<properties resource="db.properties"><property name="username" value="root"/><property name="password" value="111111"/></properties>
xml文件中的一种用法,此处仅为了方便理解下面的代码
private void propertiesElement(XNode context) throws Exception {if (context != null) {//此处创建了一个 Properties 类的对象。//我们知道 在 mybatis的配置文件中,可以通过 <properties>文件引入别的文件:例如数据库Properties defaults = context.getChildrenAsProperties();//我们看一下 context对象有没有这两种属性String resource = context.getStringAttribute("resource");String url = context.getStringAttribute("url");//全都为 null 说明没有引入别的文件if (resource != null && url != null) {throw new BuilderException("The properties element cannot specify both a URL and a resource based property file reference. Please specify one or the other.");}//否则的话,把引入的文件的内容 交给 defaults 对象 (大致这样理解就行)if (resource != null) {defaults.putAll(Resources.getResourceAsProperties(resource));} else if (url != null) {defaults.putAll(Resources.getUrlAsProperties(url));}//我们在解析创建XMLConfigBuilder对象的时候创建了 一个 configuration对象Properties vars = configuration.getVariables();//看看 configu中是否已经存在别的引文的文件//如果有,把内容也交给 defaults 对象if (vars != null) {defaults.putAll(vars);}//用 defaults 再去更新 parse和configuration对象中的对应属性parser.setVariables(defaults);configuration.setVariables(defaults);}}
总的来说propertiesElement()函数的工作就是 解析配置文件中的<properties>标签的信息,生成相应的对象,更新 configuration对象的相应属性。
那么其他的函数操作应该作用基本相似,解析相应的标签的内容,将内容赋值给 configuration对象的对应属性。
别的标签的具体实现我们就不再深入去看了,但是有一个我们还是需要去看 <mapper>标签。
这个标签可谓是 配置文件的核心了。
我们去看一下
1.6 mapperElement(XNode parent)源码分析
在看源码前,我们需要知道一件事情
mapper映射的几种方式
<--! 1使用类路径 -->
<mappers><mapper resource="org/mybatis/builder/AuthorMapper.xml"/><mapper resource="org/mybatis/builder/BlogMapper.xml"/><mapper resource="org/mybatis/builder/PostMapper.xml"/>
</mappers>
<--! 2使用绝对url路径 -->
<mappers><mapper url="file:///var/mappers/AuthorMapper.xml"/><mapper url="file:///var/mappers/BlogMapper.xml"/><mapper url="file:///var/mappers/PostMapper.xml"/>
</mappers>
<--! 3使用java类名 -->
<mappers><mapper class="org.mybatis.builder.AuthorMapper"/><mapper class="org.mybatis.builder.BlogMapper"/><mapper class="org.mybatis.builder.PostMapper"/>
</mappers><--! 4自动扫描包下所有映射器 -->
<mappers><package name="org.mybatis.builder"/>
</mappers>
我们紧接着看源码
private void mapperElement(XNode parent) throws Exception {//可以没有 mappers 标签if (parent != null) {// child 就是 mappers 下的 mapper 标签for (XNode child : parent.getChildren()) {//如果有 package 属性,说明 用是是自动扫描if ("package".equals(child.getName())) {String mapperPackage = child.getStringAttribute("name");//把相应的属性值 交给 configuration 对象即可configuration.addMappers(mapperPackage);} else {String resource = child.getStringAttribute("resource");String url = child.getStringAttribute("url");String mapperClass = child.getStringAttribute("class");//<mapper resource="org/mybatis/builder/AuthorMapper.xml"/>if (resource != null && url == null && mapperClass == null) {ErrorContext.instance().resource(resource);InputStream inputStream = Resources.getResourceAsStream(resource);XMLMapperBuilder mapperParser = new XMLMapperBuilder(inputStream, configuration, resource, configuration.getSqlFragments());mapperParser.parse();} else //<mapper url="file:///var/mappers/AuthorMapper.xml"/>if (resource == null && url != null && mapperClass == null) {ErrorContext.instance().resource(url);InputStream inputStream = Resources.getUrlAsStream(url);XMLMapperBuilder mapperParser = new XMLMapperBuilder(inputStream, configuration, url, configuration.getSqlFragments());mapperParser.parse();} else //<mapper class="org.mybatis.builder.PostMapper"/>if (resource == null && url == null && mapperClass != null) {Class<?> mapperInterface = Resources.classForName(mapperClass);configuration.addMapper(mapperInterface);} else { // 都没有就抛出异常throw new BuilderException("A mapper element may only specify a url, resource or class, but not more than one.");}}}}}
其实这个函数也是用来解析<mappers>标签的,不过就是根据不同的映射方式,进行不同的方法解析。至于具体干了什么,此处不去探究(主要是因为我菜,看不懂)
至此 , parse()的作用我们有了一个大致的了解,就是将配置文件中的各种标签的信息都解析到 configuration 对象中, 并且返回configuration对象
public Configuration parse() {if (parsed) {throw new BuilderException("Each XMLConfigBuilder can only be used once.");}parsed = true;parseConfiguration(parser.evalNode("/configuration"));return configuration;}
return build(parser.parse());
这句代码中外层还有一个 build()函数,我们看一下这个函数干啥了。源码就一句
public SqlSessionFactory build(Configuration config) {return new DefaultSqlSessionFactory(config);}
根据 parser.parse()返回的configuration创建一个 DefaultSqlSessionFactory 对象。具体怎么创建的我们不去探究(菜,懂?)
至此。我们的第一大步到此结束
小结:
SqlSessionFactory sqlSessionFactory = new SqlSessionFactoryBuilder().build(inputStream);
这一步,就是解析我们的xml配置文件,并且将解析的内容赋值给 一个 configuration 对象。同时,使用这个 configuration 对象,创建一个 DefaultSqlSessionFactory 对象。
此行代码可以这样理解
SqlSessionFactory sqlSessionFactory = new DefaultSqlSessionFactory();
第二步
SqlSession sqlSession = sqlSessionFactory.openSession();
通过第一步 , 我们知道 sqlSessionFactory这个对象是 DefaultSqlSessionFactory类的实例,所以我们去 DefaultSqlSessionFactory类中去探究一下 openSession()具体做了什么。
2.1 sqlSessionFactory.openSession() 源码分析
//直接调用的是这个
@Overridepublic SqlSession openSession() {return openSessionFromDataSource(configuration.getDefaultExecutorType(), null, false);}
//间接调用这个
private SqlSession openSessionFromDataSource(ExecutorType execType, TransactionIsolationLevel level, boolean autoCommit) {Transaction tx = null;try {//从 configuration 中 获得 environment 标签下的信息//在 mybatis的配置文件中,environment 标签 存放的都是一些数据库的信息final Environment environment = configuration.getEnvironment();//创建一个事务工厂final TransactionFactory transactionFactory = getTransactionFactoryFromEnvironment(environment);//创建一个事务对象,工厂模式tx = transactionFactory.newTransaction(environment.getDataSource(), level, autoCommit);// 创建一个执行器final Executor executor = configuration.newExecutor(tx, execType);//返回 一个 DefaultSqlSession 对象return new DefaultSqlSession(configuration, executor, autoCommit);} catch (Exception e) {closeTransaction(tx); // may have fetched a connection so lets call close()throw ExceptionFactory.wrapException("Error opening session.  Cause: " + e, e);} finally {ErrorContext.instance().reset();}}
源码比较简单,本质就是返回了一个 DefaultSqlSession类的实例对象。
这个对象有两个比较重要的属性(DefaultSqlSession类的源码中就有,直接可以看到的)
private final Configuration configuration;
private final Executor executor;
那么
SqlSession sqlSession = sqlSessionFactory.openSession();
就可以理解为
SqlSession sqlSession = new DefaultSqlSession();
小结:
SqlSession sqlSession = sqlSessionFactory.openSession();
主要工作就是创建一个 DefaultSqlSession实例对象,赋值给 sqlSession。
此处我们稍微看下 executor的构建源码(可跳过)
2.2 configuration.newExecutor(tx, execType)源码解析(可跳过)
public Executor newExecutor(Transaction transaction, ExecutorType executorType) {executorType = executorType == null ? defaultExecutorType : executorType;executorType = executorType == null ? ExecutorType.SIMPLE : executorType;Executor executor;//第一步,确实executor的类型//SIMPLE, REUSE, BATCHif (ExecutorType.BATCH == executorType) {executor = new BatchExecutor(this, transaction);} else if (ExecutorType.REUSE == executorType) {executor = new ReuseExecutor(this, transaction);} else {executor = new SimpleExecutor(this, transaction);}//是否有二级缓存if (cacheEnabled) {executor = new CachingExecutor(executor);}//是否有插件植入executor = (Executor) interceptorChain.pluginAll(executor);return executor;}
大概了解即可,不必深究(我也不会,主打就是一个菜)
第三步
UserMapper mapper = sqlSession.getMapper(UserMapper.class);
我们的 sqlSession是DefaultSqlSession类的实例,我们直接去看 DefaultSqlSession类的getMapper()方法
@Overridepublic <T> T getMapper(Class<T> type) {return configuration.getMapper(type, this);}
他是调用了 configuration对象的getMapper()。我们继续深入
public <T> T getMapper(Class<T> type, SqlSession sqlSession) {return mapperRegistry.getMapper(type, sqlSession);}
configuration对象又调用的 mapperRegistry对象的getMapper()方法。我们继续深入。
3.1 mapperRegistry.getMapper(type, sqlSession)源码分析
public <T> T getMapper(Class<T> type, SqlSession sqlSession) {
//一个 mapper代理工厂final MapperProxyFactory<T> mapperProxyFactory = (MapperProxyFactory<T>) knownMappers.get(type);if (mapperProxyFactory == null) {throw new BindingException("Type " + type + " is not known to the MapperRegistry.");}try {return mapperProxyFactory.newInstance(sqlSession);} catch (Exception e) {throw new BindingException("Error getting mapper instance. Cause: " + e, e);}}
看到Proxy这个单词有没有很熟悉,代理
getMapper()的返回值我们可以大胆猜测是一个代理对象。而这个对象代理的就是 sqlSession
return mapperProxyFactory.newInstance(sqlSession);
至于是不是,我们进入源码分析
3.2 mapperProxyFactory.newInstance(sqlSession) 源码分析
为了区分,我们假设上面的函数为newInstance1,下面的为newInstance2。
直接调用newInstance2,间接调用 newInstance1
//这是间接调用的函数
// newInstance1
protected T newInstance(MapperProxy<T> mapperProxy) {return (T) Proxy.newProxyInstance(mapperInterface.getClassLoader(), new Class[] { mapperInterface }, mapperProxy);}
//  newInstance2
// 这是直接调用的函数public T newInstance(SqlSession sqlSession) {final MapperProxy<T> mapperProxy = new MapperProxy<>(sqlSession, mapperInterface, methodCache);return newInstance(mapperProxy);}
其实,看到这里,我们就可以结束第三步了
UserMapper mapper = sqlSession.getMapper(UserMapper.class);
第三步就是得到了 sqlSession的代理对象。
第四步
User userById = mapper.getUserById(1);
让我们的代理对象去执行函数。实际上是我们的真实对象去执行其对应的函数(动态代理的知识)。
具体实现就在代理对象的 invoke()函数中。
在第三步中,我们源码进行到了这一步。我们获得了代理对象。
//这是间接调用的函数
// newInstance1
protected T newInstance(MapperProxy<T> mapperProxy) {return (T) Proxy.newProxyInstance(mapperInterface.getClassLoader(), new Class[] { mapperInterface }, mapperProxy);}
//  newInstance2
// 这是直接调用的函数public T newInstance(SqlSession sqlSession) {final MapperProxy<T> mapperProxy = new MapperProxy<>(sqlSession, mapperInterface, methodCache);return newInstance(mapperProxy);}
newProxyInstance()的基本形式如下
public static Object newProxyInstance(ClassLoader loader,Class<?>[] interfaces,InvocationHandler h)
我们进行对比一下 newInstance1,可以看出
mapperProxy对象占据了InvocationHandler h对象的位置。那么我们可以大胆猜测,mapperProxy对象的类一定是实现了 InvocationHandler的接口的,并且重写了一个很重要的 invoke()函数
我们进入 new MapperProxy()进行分析。
4.1 new MapperProxy()源码分析
事实证明,我们的猜测完全正确。
public class MapperProxy<T> implements InvocationHandler, Serializable {}
然后我们看一下重写的invoke()方法
@Overridepublic Object invoke(Object proxy, Method method, Object[] args) throws Throwable {try {//一些默认的方法if (Object.class.equals(method.getDeclaringClass())) {return method.invoke(this, args);} else {//自定义的方法(我只是这样理解,至于是不是,我不确定)return cachedInvoker(method).invoke(proxy, method, args, sqlSession);}} catch (Throwable t) {throw ExceptionUtil.unwrapThrowable(t);}}
我们看一下 cachedInvoker(method).invoke()的源码
private MapperMethodInvoker cachedInvoker(Method method) throws Throwable {try {// A workaround for https://bugs.openjdk.java.net/browse/JDK-8161372// It should be removed once the fix is backported to Java 8 or// MyBatis drops Java 8 support. See gh-1929MapperMethodInvoker invoker = methodCache.get(method);if (invoker != null) {return invoker;}return methodCache.computeIfAbsent(method, m -> {if (m.isDefault()) {try {if (privateLookupInMethod == null) {return new DefaultMethodInvoker(getMethodHandleJava8(method));} else {return new DefaultMethodInvoker(getMethodHandleJava9(method));}} catch (IllegalAccessException | InstantiationException | InvocationTargetException| NoSuchMethodException e) {throw new RuntimeException(e);}} else {return new PlainMethodInvoker(new MapperMethod(mapperInterface, method, sqlSession.getConfiguration()));}});} catch (RuntimeException re) {Throwable cause = re.getCause();throw cause == null ? re : cause;}}
是不是看不懂,我也看不懂。但是有一个跟 sqlSession相关的
return new PlainMethodInvoker(new MapperMethod(mapperInterface, method, sqlSession.getConfiguration()));
就是这一句(这只是我找的一个借口)(其实我也不知道为啥用这一句,我们就直接看,别管为啥了,),那我们进入 MapperMethod类的源码看看吧。
private final SqlCommand command;
private final MethodSignature method;public MapperMethod(Class<?> mapperInterface, Method method, Configuration config) {this.command = new SqlCommand(config, mapperInterface, method);this.method = new MethodSignature(config, mapperInterface, method);
}
MapperMethod类中有两个属性,我们分别进入源码看看两个对象中存放的是什么。
4.2 new SqlCommand()源码分析
public static class SqlCommand {//两个属性private final String name; // sql对应的namespace+id private final SqlCommandType type; // sql 语句的类型。public SqlCommand(Configuration configuration, Class<?> mapperInterface, Method method) {//代理对象执行的方法名 final String methodName = method.getName();final Class<?> declaringClass = method.getDeclaringClass();//我们先去这个函数看看具体做了什么。//源码在下面一点点MappedStatement ms = resolveMappedStatement(mapperInterface, methodName, declaringClass,configuration);if (ms == null) {if (method.getAnnotation(Flush.class) != null) {name = null;type = SqlCommandType.FLUSH;} else {throw new BindingException("Invalid bound statement (not found): "+ mapperInterface.getName() + "." + methodName);}} else {//获得 sql标签的 id 和 sql 标签的类型(select 啥啥的)。name = ms.getId();type = ms.getSqlCommandType();if (type == SqlCommandType.UNKNOWN) {throw new BindingException("Unknown execution method for: " + name);}}}
private MappedStatement resolveMappedStatement(Class<?> mapperInterface, String methodName,Class<?> declaringClass, Configuration configuration) {//这就是经常提到的 namespace+id 可以唯一确定一个 sql 语句//这个方法就是 将 namespace+id 作为一个 key 去获得一个 ,appedStatement对象// Map<String, MappedStatement> mappedStatements; 这是configuration对象中的一个属性 String statementId = mapperInterface.getName() + "." + methodName;if (configuration.hasStatement(statementId)) {return configuration.getMappedStatement(statementId);} else if (mapperInterface.equals(declaringClass)) {return null;}//这个我看不懂for (Class<?> superInterface : mapperInterface.getInterfaces()) {if (declaringClass.isAssignableFrom(superInterface)) {MappedStatement ms = resolveMappedStatement(superInterface, methodName,declaringClass, configuration);if (ms != null) {return ms;}}}return null;}
}
看不懂没关系,只要记住 command中存放的是 sql 语句的 id 以及 类型即可。
new MethodSignature 的源码我们就不看了,method对象存放的是sql语句的返回值类型以及参数
我们赶紧回到 MapperMethod类的源码来,不要过多去纠结 SqlCommand类和 MethodSignature的源码了。我们知道里面主要有啥就行了。
private final SqlCommand command;
private final MethodSignature method;public MapperMethod(Class<?> mapperInterface, Method method, Configuration config) {this.command = new SqlCommand(config, mapperInterface, method);this.method = new MethodSignature(config, mapperInterface, method);
}
此处先停止。我们先回到 MapperProxy的invoke()方法。我们必须要明白,我们第四步是要搞清楚到底是执行了哪个方法
@Overridepublic Object invoke(Object proxy, Method method, Object[] args) throws Throwable {try {//一些默认的方法if (Object.class.equals(method.getDeclaringClass())) {return method.invoke(this, args);} else {//自定义的方法(我只是这样理解,至于是不是,我不确定)return cachedInvoker(method).invoke(proxy, method, args, sqlSession);}} catch (Throwable t) {throw ExceptionUtil.unwrapThrowable(t);}}
cachedInvoker(method)是一个方法的返回对象。
return new PlainMethodInvoker(new MapperMethod(mapperInterface, method, sqlSession.getConfiguration()));
这个方法的返回对象是 PlainMethodInvoker 类型的
那么
return cachedInvoker(method).invoke(proxy, method, args, sqlSession);
//就相当于
return new PlainMethodInvoker().invoke(proxy, method, args, sqlSession);
//就相当于最终我们返回的是 PlainMethodInvoker 对象的 invoke()函数的返回值我们进入PlainMethodInvoker类的源码去看一下
4.3 PlainMethodInvoker类源码分析
private static class PlainMethodInvoker implements MapperMethodInvoker {private final MapperMethod mapperMethod;public PlainMethodInvoker(MapperMethod mapperMethod) {super();this.mapperMethod = mapperMethod;}@Overridepublic Object invoke(Object proxy, Method method, Object[] args, SqlSession sqlSession) throws Throwable {return mapperMethod.execute(sqlSession, args);}}
看看我们发现了什么
@Overridepublic Object invoke(Object proxy, Method method, Object[] args, SqlSession sqlSession) throws Throwable {return mapperMethod.execute(sqlSession, args);}
最终返回的结果居然是 mapperMethod.execute()函数的返回值。
我们进入 mapperMethod.execute()源码中看看~
4.4 mapperMethod.execute()源码分析
public Object execute(SqlSession sqlSession, Object[] args) {Object result;//根据 comman的type属性,确实我们的sql类型switch (command.getType()) {case INSERT: {Object param = method.convertArgsToSqlCommandParam(args);result = rowCountResult(sqlSession.insert(command.getName(), param));break;}case UPDATE: {Object param = method.convertArgsToSqlCommandParam(args);result = rowCountResult(sqlSession.update(command.getName(), param));break;}case DELETE: {Object param = method.convertArgsToSqlCommandParam(args);result = rowCountResult(sqlSession.delete(command.getName(), param));break;}case SELECT:if (method.returnsVoid() && method.hasResultHandler()) {executeWithResultHandler(sqlSession, args);result = null;} else if (method.returnsMany()) {result = executeForMany(sqlSession, args);} else if (method.returnsMap()) {result = executeForMap(sqlSession, args);} else if (method.returnsCursor()) {result = executeForCursor(sqlSession, args);} else {Object param = method.convertArgsToSqlCommandParam(args);result = sqlSession.selectOne(command.getName(), param);if (method.returnsOptional()&& (result == null || !method.getReturnType().equals(result.getClass()))) {result = Optional.ofNullable(result);}}break;case FLUSH:result = sqlSession.flushStatements();break;default:throw new BindingException("Unknown execution method for: " + command.getName());}if (result == null && method.getReturnType().isPrimitive() && !method.returnsVoid()) {throw new BindingException("Mapper method '" + command.getName()+ " attempted to return null from a method with a primitive return type (" + method.getReturnType() + ").");}return result;}
我你们可以在上面源码中看到很多这样的代码!
result = rowCountResult(sqlSession.insert(command.getName(), param));
我们发现 我们 的返回结果又变成了 sqlSession执行相应函数的返回结果。还记的我们前面提到的吗? sqlSession是 DefaultSqlSession类的实例。我们去DefaultSqlSession类中去找这些方法!!
以 sqlSession.update(command.getName(), param)为例
进入源码分析
4.5 sqlSession.update(command.getName(), param)源码分析
@Overridepublic int update(String statement, Object parameter) {try {dirty = true;MappedStatement ms = configuration.getMappedStatement(statement);return executor.update(ms, wrapCollection(parameter));} catch (Exception e) {throw ExceptionFactory.wrapException("Error updating database. Cause: " + e, e);} finally {ErrorContext.instance().reset();}}
我们发现 sqlSession.update()的本质是交给 exectuor 去执行。至于执行器怎么去执行的,我们就不再探究了!(我不会)。到此第四步其实已经执行完了。可能有点乱,我们来小结一下。
小结:
User userById = mapper.getUserById(1);
我们知道, mapper.getUserById(1)回去执行对应 mapper.xml文件中对应的sql语句。第四步的原理解析实际上就是解析二者是怎么匹配的。
我们知道 代理对象执行方法时,其实执行的是 invoke() 方法。
@Overridepublic Object invoke(Object proxy, Method method, Object[] args) throws Throwable {try {//一些默认的方法if (Object.class.equals(method.getDeclaringClass())) {return method.invoke(this, args);} else {//自定义的方法(我只是这样理解,至于是不是,我不确定)return cachedInvoker(method).invoke(proxy, method, args, sqlSession);}} catch (Throwable t) {throw ExceptionUtil.unwrapThrowable(t);}}
下面我们用个流程图去说明,就不再看源码了。
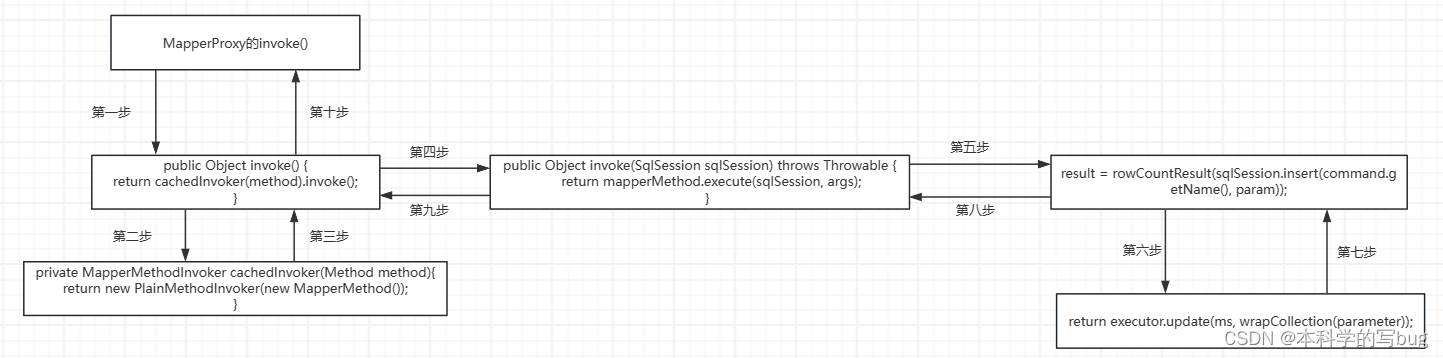
简单概括! 代理对象调用方法的过程底层是 :通过 mapperMethod对象的属性(command和method) ,匹配 sqlSession对象应该执行的函数。 同时 sqlSession将具体的实现交给 执行器 executor去执行。
这一步的口述我也很难用文字去表述清楚。大家多看几遍应该能理解。
分析就到这里啦,exectuor的底层就不再分析了,我也不会。
至于 mappedStatement 是从哪来的 大家可以看一下这篇文章 点击这里