转载请注明出处:小锋学长生活大爆炸[xfxuezhang.cn]
Github:https://github.com/1061700625/small_tools_v2
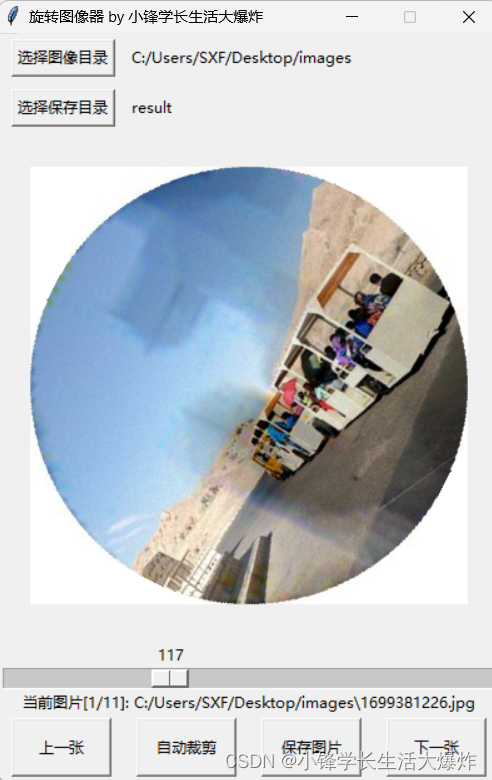
之前做了一个下载百度的旋转图片验证码的工具(多进程下载百度旋转验证码图片-制作数据集),那么拿到了图片数据,就需要手动校正调整来制作数据集,所以出了这个工具。
效果演示:
源码:(双击调试信息输出栏有惊喜)
import tkinter as tk
from tkinter import filedialog
from PIL import Image, ImageTk
import os
import pyperclip
import cv2
import numpy as npdef img_crop_process(img):try:img_cv = np.array(img.convert('L'))img_blur = cv2.GaussianBlur(img_cv, (9, 9), 2)circles = cv2.HoughCircles(img_blur, cv2.HOUGH_GRADIENT, dp=1, minDist=20,param1=100, param2=40, minRadius=0, maxRadius=0)if circles is not None:circles = np.uint16(np.around(circles))max_circle = max(circles[0, :], key=lambda x: x[2])  # Select the largest circle by radiusx, y, r = max_circleleft = max(x - r, 0)right = min(x + r, img_cv.shape[1])top = max(y - r, 0)bottom = min(y + r, img_cv.shape[0])# Load the original image in colorcropped_color_img = img.crop((left, top, right, bottom))mask = np.zeros_like(cropped_color_img)cv2.circle(mask, (r, r), r, (255, 255, 255), -1)cropped_color_img_with_white_bg = np.where(mask == (255, 255, 255), cropped_color_img, (255, 255, 255))final_img = Image.fromarray(np.uint8(cropped_color_img_with_white_bg))return final_imgexcept Exception:return imgclass ImageRotatorApp(tk.Tk):def __init__(self):super().__init__()self.title("旋转图像器 by 小锋学长生活大爆炸")self.resizable(False, False)width = 400height = 600self.geometry(f'{width}x{height}')# 计算屏幕中心坐标screen_width = self.winfo_screenwidth()  screen_height = self.winfo_screenheight()x = (screen_width/2) - (width/2)y = (screen_height/2) - (height/2)# 设置窗口中心坐标self.geometry('{}x{}+{}+{}'.format(width, height, int(x), int(y)))# Initialize source and result directoriesself.source_directory = 'images'self.result_directory = 'result'self.original_image = Noneself.rotate_value = 0# Frame for source directory selection and displayself.source_frame = tk.Frame(self)self.source_frame.pack(fill='x')self.select_source_button = tk.Button(self.source_frame, text="选择图像目录", command=self.select_source_directory)self.select_source_button.pack(side='left', padx=10, pady=5)self.source_directory_label = tk.Label(self.source_frame, text=self.source_directory)self.source_directory_label.pack(side='left')# Frame for result directory selection and displayself.result_frame = tk.Frame(self)self.result_frame.pack(fill='x')self.select_result_button = tk.Button(self.result_frame, text="选择保存目录", command=self.select_result_directory)self.select_result_button.pack(side='left', padx=10, pady=5)self.result_directory_label = tk.Label(self.result_frame, text=self.result_directory)self.result_directory_label.pack(side='left')# Image display frameself.img_display = tk.Label(self, width=400, height=400)self.img_display.pack(expand=True, fill='both')# Slider for rotationself.rotation_slider = tk.Scale(self, from_=0, to=360, length=400, orient="horizontal", command=self.rotate_image)self.rotation_slider.pack(fill='x')self.button_frame = tk.Frame(self)self.button_frame.pack(side='bottom', fill='x')self.prev_button = tk.Button(self.button_frame, text="上一张", command=self.load_prev_image)self.prev_button.config(height=2, width=10)  self.prev_button.pack(expand=True, fill='x', side='left', padx=10, pady=5)self.crop_button = tk.Button(self.button_frame, text="自动裁剪", command=self.crop_image)self.crop_button.config(height=2, width=10)  # Make the button largerself.crop_button.pack(expand=True, fill='x', side='left', padx=10, pady=5)# Button to save the imageself.save_button = tk.Button(self.button_frame, text="保存图片", command=self.save_image)self.save_button.config(height=2, width=10)  # Make the button largerself.save_button.pack(expand=True, fill='x', side='left', padx=10, pady=5)# Next image button self.next_button = tk.Button(self.button_frame, text="下一张", command=self.load_next_image) self.next_button.config(height=2, width=10)  # Make the button largerself.next_button.pack(expand=True, fill='x', side='left', padx=10, pady=5)# 信息显示标签  self.info_label = tk.Label(self, text='')self.info_label.config(height=1, width=400, anchor='w', wraplength=0)self.info_label.pack(side='bottom', fill='x')self.info_label.bind('<Double-Button-1>', self.copy_info_label)# Update the display with the first image from the source directoryself.load_first_image_from_source()def show_debug_msg(self, msg):self.info_label.config(text=msg)def copy_info_label(self, event):pyperclip.copy(self.info_label['text'])self.show_debug_msg(">> 双击成功,该内容已复制到剪切板 <<")def select_source_directory(self):directory = filedialog.askdirectory()if directory:  # Update the directory only if a choice was madeself.source_directory = directoryself.source_directory_label.config(text=self.source_directory)self.load_first_image_from_source()def select_result_directory(self):directory = filedialog.askdirectory()if directory:  # Update the directory only if a choice was madeself.result_directory = directoryself.result_directory_label.config(text=self.result_directory)def load_next_image(self):if self.original_image:img_files = [f for f in os.listdir(self.source_directory) if f.endswith(('.png', '.jpg', '.jpeg'))]curr_idx = img_files.index(self.img_name)next_idx = curr_idx + 1 if curr_idx < len(img_files) - 1 else 0next_img_name = img_files[next_idx]self.original_image = Image.open(os.path.join(self.source_directory, next_img_name))self.show_debug_msg(f"当前图片[{next_idx+1}/{len(img_files)}]: {os.path.join(self.source_directory, next_img_name)}")self.image = self.original_imageself.img_name = next_img_nameself.rotation_slider.set(0)self.update_image_display()def load_prev_image(self):if self.original_image:img_files = [f for f in os.listdir(self.source_directory) if f.endswith(('.png', '.jpg', '.jpeg'))]curr_idx = img_files.index(self.img_name)prev_idx = curr_idx - 1 if curr_idx > 0 else len(img_files) - 1prev_img_name = img_files[prev_idx]self.original_image = Image.open(os.path.join(self.source_directory, prev_img_name))self.show_debug_msg(f"当前图片[{prev_idx+1}/{len(img_files)}]: {os.path.join(self.source_directory, prev_img_name)}")self.image = self.original_imageself.img_name = prev_img_nameself.rotation_slider.set(0)self.update_image_display()def load_first_image_from_source(self):try:img_lists = [f for f in os.listdir(self.source_directory) if f.endswith(('.png', '.jpg', '.jpeg'))]self.img_name = img_lists[0] if img_lists else Noneif self.img_name:self.original_image = Image.open(os.path.join(self.source_directory, self.img_name))self.image = self.original_imageself.show_debug_msg(f"当前图片[{1}/{len(img_lists)}]: {os.path.join(self.source_directory, self.img_name)}")else:self.original_image = Noneself.image = Noneself.update_image_display()except FileNotFoundError:self.original_image = Noneself.image = Noneself.img_display.config(image='')self.show_debug_msg(f"'{self.source_directory}'路径下没有图片.")def rotate_image(self, value):if self.original_image:angle = int(value)self.rotate_value = angleself.image = self.original_image.rotate(-angle, resample=Image.Resampling.BILINEAR, fillcolor=(255, 255, 255))self.update_image_display()def crop_image(self):if self.original_image:self.original_image = img_crop_process(self.original_image)self.rotation_slider.set(0)self.update_image_display(self.original_image)def update_image_display(self, src_img=None):src_img = src_img or self.imageif src_img:# 缩放图片image_w, image_h = src_img.sizeif image_w > 400 or image_h > 400: src_img.thumbnail((400,400))self.tk_image = ImageTk.PhotoImage(src_img)self.img_display.config(image=self.tk_image)else:self.img_display.config(image='')def save_image(self):if self.image:# Save the rotated image to the selected result directorysave_path = os.path.join(self.result_directory, self.img_name.split('.')[0] + f'_{self.rotate_value}.' + self.img_name.split('.')[1])self.image.save(save_path)self.show_debug_msg(f"图片保存成功: {save_path}")else:self.show_debug_msg("没有图片要保存.")# Create the 'images' and 'result' directories if they don't exist
os.makedirs('images', exist_ok=True)
os.makedirs('result', exist_ok=True)# Run the app
app = ImageRotatorApp()
app.mainloop()