如果我们在执行自动化测试的时候,希望能在失败的时候保存现场,方便事后分析。 对于UI自动化,我们希望截图在测试报告中。 对于api自动化,我们希望截取出错的log在测试报告中。 我开始自己蛮干,写了两个出错截图的方法。
def save_screenshot():'''页面截屏保存截图:return:'''file_name = IMG_PATH + "\\{}.png".format(time.strftime("%Y%m%d%H%M%S", time.localtime()))d.screenshot(file_name)with open(file_name, mode='rb') as f:file = f.read()allure.attach(file, allure.attachment_type.PNG)出错截图,我写了一个装饰器
def fail_screenshot(func):'''失败页面截屏保存截图:return:'''def wrapper(*args, **kwargs):try:func(*args, **kwargs)except:file_name = FAIL_IMG_PATH + "\\{}_{}.png".format(func.__name__,time.strftime("%Y%m%d%H%M%S", time.localtime()))d.screenshot(file_name)# with open(file_name, mode='rb') as f:# file = f.read()# allure.attach(file, allure.attachment_type.PNG)return wrapper似乎能达到我的期望,就是太烦了,每次需要调用或者将装饰器写在函数上。 然后我发现allue里面有一个钩子函数。
from _pytest import runner# 对应源码
def pytest_runtest_makereport(item, call):""" return a :py:class:`_pytest.runner.TestReport` objectfor the given :py:class:`pytest.Item` and:py:class:`_pytest.runner.CallInfo`."""
这里item是测试用例,call是测试步骤,具体执行过程如下:
先执行when='setup' 返回setup 的执行结果
然后执行when='call' 返回call 的执行结果
最后执行when='teardown'返回teardown 的执行结果
例如:
# conftest.py
import pytest@pytest.hookimpl(hookwrapper=True, tryfirst=True)
def pytest_runtest_makereport(item, call):print('------------------------------------')# 获取钩子方法的调用结果out = yieldprint('用例执行结果', out)# 3. 从钩子方法的调用结果中获取测试报告report = out.get_result()print('测试报告:%s' % report)print('步骤:%s' % report.when)print('nodeid:%s' % report.nodeid)print('description:%s' % str(item.function.__doc__))print(('运行结果: %s' % report.outcome))
运行用例的过程会经历三个阶段:setup-call-teardown,每个阶段都会返回的 Result 对象和 TestReport 对象,以及对象属性。
如果setup执行失败了,setup的执行结果的failed,后面的call用例和teardown都不会执行了。
如果setup正常执行,但是测试用例call失败了。那么此时运行的结果就是failed。
如果setup正常执行,测试用例call正常执行,teardown失败了,这种情况,最终统计的结果:1 passed, 1 error in 0.16 seconds
只获取call的时候,我们在写用例的时候,如果保证setup和teardown不报错情况,只关注测试用例本身的运行结果,前面的 pytest_runtest_makereport 钩子方法执行了三次。
可以加个判断:if report.when == "call"
import pytest
from _pytest import runner
'''
# 对应源码
def pytest_runtest_makereport(item, call):""" return a :py:class:`_pytest.runner.TestReport` objectfor the given :py:class:`pytest.Item` and:py:class:`_pytest.runner.CallInfo`."""
'''@pytest.hookimpl(hookwrapper=True, tryfirst=True)
def pytest_runtest_makereport(item, call):print('------------------------------------')# 获取钩子方法的调用结果out = yield# print('用例执行结果', out)# 3. 从钩子方法的调用结果中获取测试报告report = out.get_result()if report.when == "call":print('测试报告:%s' % report)print('步骤:%s' % report.when)print('nodeid:%s' % report.nodeid)print('description:%s' % str(item.function.__doc__))print(('运行结果: %s' % report.outcome))@pytest.fixture(scope="session", autouse=True)
def fix_a():print("setup 前置操作")yieldprint("teardown 后置操作")
allure报告集成错误截图 需要使用conftest.py文件,conftest.py需要存在在测试目录中,文件名不能变更,可以根据模块创建层级嵌套。
具体参照pytest的官方文档
@pytest.hookimpl(tryfirst=True, hookwrapper=True)
def pytest_runtest_makereport(item, call):'''hook pytest失败:param item::param call::return:'''# execute all other hooks to obtain the report objectoutcome = yieldrep = outcome.get_result()# we only look at actual failing test calls, not setup/teardownif rep.when == "call" and rep.failed:mode = "a" if os.path.exists("failures") else "w"with open("failures", mode) as f:# let's also access a fixture for the fun of itif "tmpdir" in item.fixturenames:extra = " (%s)" % item.funcargs["tmpdir"]else:extra = ""f.write(rep.nodeid + extra + "\n")# pic_info = adb_screen_shot()with allure.step('添加失败截图...'):allure.attach(driver.get_screenshot_as_png(), "失败截图", allure.attachment_type.PNG)
好了,我们可以用在我们自己的项目里面来了。 我们可以在conftest.py里面定义:
import pytest
from selenium import webdriver
import os
import allure_driver = None@pytest.hookimpl(tryfirst=True, hookwrapper=True)
def pytest_runtest_makereport(item, call):'''获取每个用例状态的钩子函数:param item::param call::return:'''# 获取钩子方法的调用结果outcome = yieldrep = outcome.get_result()# 仅仅获取用例call 执行结果是失败的情况, 不包含 setup/teardownif rep.when == "call" and rep.failed:mode = "a" if os.path.exists("failures") else "w"with open("failures", mode) as f:# let's also access a fixture for the fun of itif "tmpdir" in item.fixturenames:extra = " (%s)" % item.funcargs["tmpdir"]else:extra = ""f.write(rep.nodeid + extra + "\n")# 添加allure报告截图if hasattr(_driver, "get_screenshot_as_png"):with allure.step('添加失败截图...'):allure.attach(_driver.get_screenshot_as_png(), "失败截图", allure.attachment_type.PNG)@pytest.fixture(scope='session')
def browser():global _driverif _driver is None:_driver =webdriver.Chrome()yield _driverprint("1111111111")_driver.quit()
然后写一个测试用例,如在某度上搜一个关键词。
@allure.feature('self study')
class TestLesson():@allure.story('user course page')@allure.description('be course')def test_be_ge_course(self,browser):url = 'http://www.baidu.com'browser.get(url)time.sleep(2)browser.find_element_by_id('kw').send_keys("python")with allure.step('查找元素...'):browser.find_element_by_id('su').click()time.sleep(2)assert browser.title == 'python'
这是一个失败的用例,所以执行错误会截图。
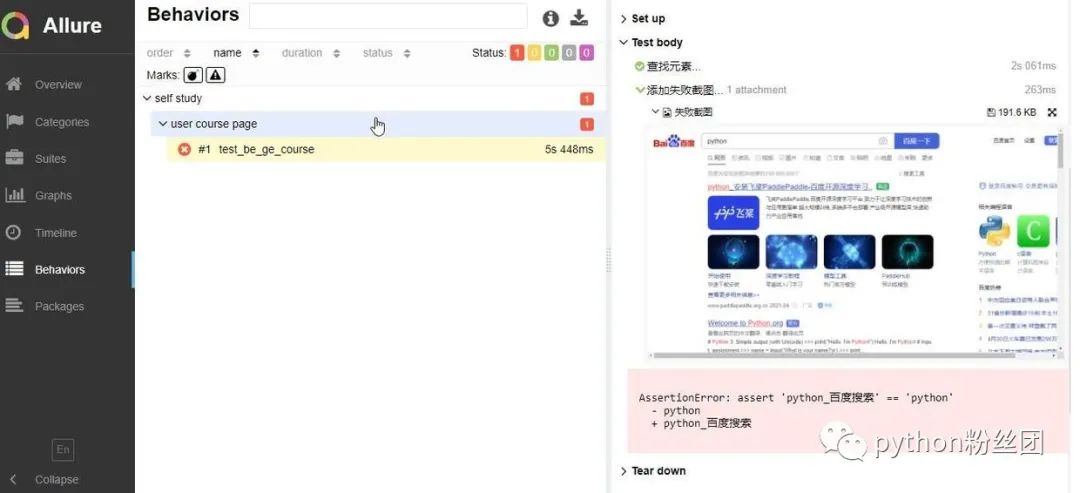
这样你的报告就看起来高大上了。 截图还可以直接用allure.attach allure.attach(挺有用的) 作用:allure报告还支持显示许多不同类型的附件,可以补充测试结果;自己想输出啥就输出啥,挺好的
语法:allure.attach(body, name, attachment_type, extension) 参数列表
body:要显示的内容(附件)
name:附件名字
attachment_type:附件类型,是 allure.attachment_type 里面的其中一种
extension:附件的扩展名(比较少用)
allure.attach.file(source, name, attachment_type, extension) source:文件路径,相当于传一个文件
其他参数和上面的一致:
TEXT = ("text/plain", "txt")CSV = ("text/csv", "csv")TSV = ("text/tab-separated-values", "tsv")URI_LIST = ("text/uri-list", "uri")HTML = ("text/html", "html")XML = ("application/xml", "xml")JSON = ("application/json", "json")YAML = ("application/yaml", "yaml")PCAP = ("application/vnd.tcpdump.pcap", "pcap")PNG = ("image/png", "png")JPG = ("image/jpg", "jpg")SVG = ("image/svg-xml", "svg")GIF = ("image/gif", "gif")BMP = ("image/bmp", "bmp")TIFF = ("image/tiff", "tiff")MP4 = ("video/mp4", "mp4")OGG = ("video/ogg", "ogg")WEBM = ("video/webm", "webm")PDF = ("application/pdf", "pdf")根据需要,在报告里将更多的信息展现出来。 这周末啥也没干,主要就搞明白了这个。
最后感谢每一个认真阅读我文章的人,礼尚往来总是要有的,虽然不是什么很值钱的东西,如果你用得到的话可以直接拿走:
这些资料,对于【软件测试】的朋友来说应该是最全面最完整的备战仓库,这个仓库也陪伴上万个测试工程师们走过最艰难的路程,希望也能帮助到你!


