组件自定义事件+全局事件总线+消息订阅与发布+TodoList案例——编辑+过度与动画
- 1 组件自定义事件
- 1.1 绑定
- 1.2 解绑
- 1.3 总结
- 1.4 TodoList案例——自定义事件
- 2 全局事件总线
- 2.1 理解
- 2.2 步骤
- 2.3 TodoList案例——事件总线
- 3 消息订阅与发布
- 3.1 理解
- 3.2 TodoList案例——消息的订阅与发布
- 4 TodoList案例——编辑
- 4.1 $nextTick
- 4.2 代码
- 5 过度与动画
- 5.1 理解
- 5.2 TodoList案例——动画
1 组件自定义事件
- 区别于JS中的内置事件(如:click、keyup等)用于html中的元素,自定义事件用于组件。
1.1 绑定
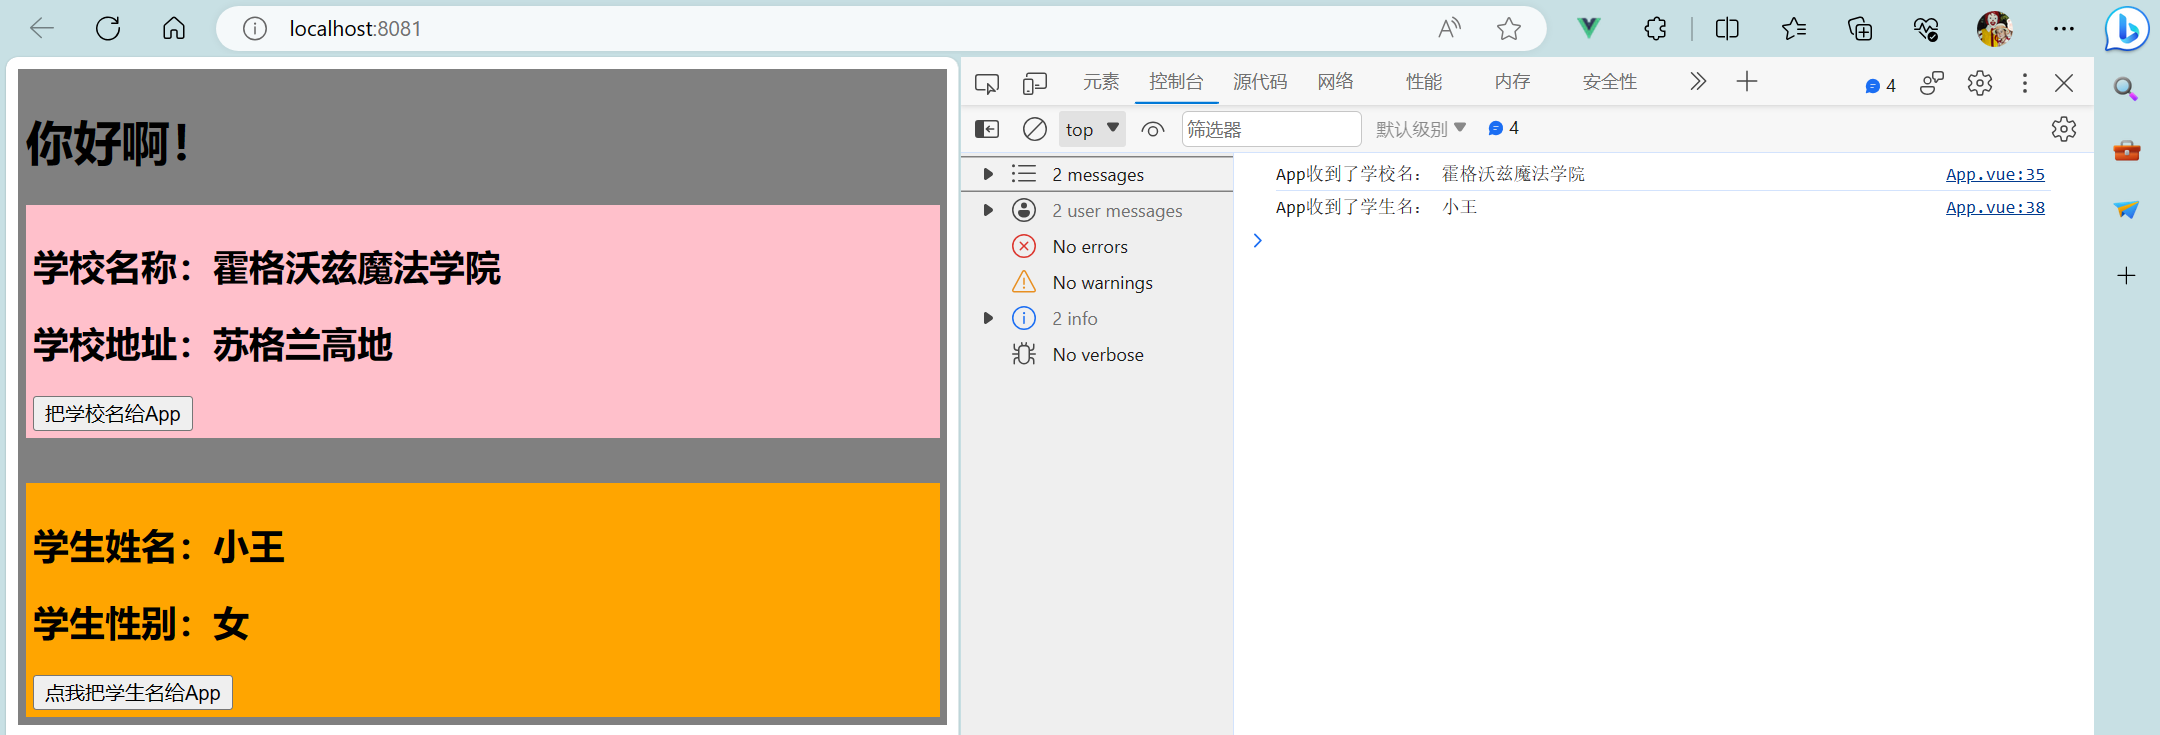
- App.vue:
<template><div class="app"><h1>{{msg}}</h1><!-- 通过父组件给子组件传递函数类型的props实现:子给父传递数据 --><School :getSchoolName="getSchoolName"/><!-- 通过父组件给子组件绑定一个自定义事件实现:子给父传递数据(第一种写法,使用@或v-on) --><Student v-on:atguigu="getStudentName"/> <!-- 由于v-on在Student组件标签上,所以是给Student组件的实例对象vc身上绑定了一个事件atguigu,如果有人触发了此事件,那么getStudentName函数将会被调用 --><!-- 若要让按钮只能触发一次 --><!-- <Student v-on:atguigu.once="getStudentName"/> --><!-- 通过父组件给子组件绑定一个自定义事件实现:子给父传递数据(第二种写法,使用ref) --><!-- <Student ref="student"/> --></div>
</template><script>// 引入Student组件import Student from './components/Student.vue' // 引入School组件import School from './components/School.vue'export default {name:'App',components:{School, Student},data() {return {msg:"你好啊!"}},methods: {getSchoolName(name) {console.log('App收到了学校名:',name);},getStudentName(name) {console.log('App收到了学生名:',name);}/* getStudentName(name,...params) {console.log('App收到了学生名:',name,params); // params收集剩余参数} */},// 用于第二种写法ref// mounted() {// 绑定自定义事件// this.$refs.student是Student组件的实例对象// this.$refs.student.$on('atguigu',this.getStudentName)// 绑定自定义事件且让他等三秒钟返回/* setTimeout(()=>{this.$refs.student.$on('atguigu',this.getStudentName)},3000) */// 绑定自定义事件且让按钮只能触发一次// this.$refs.student.$once('atguigu',this.getStudentName)// }}
</script><style scoped>.app {background-color: gray;padding: 5px;}
</style>
- School.vue:
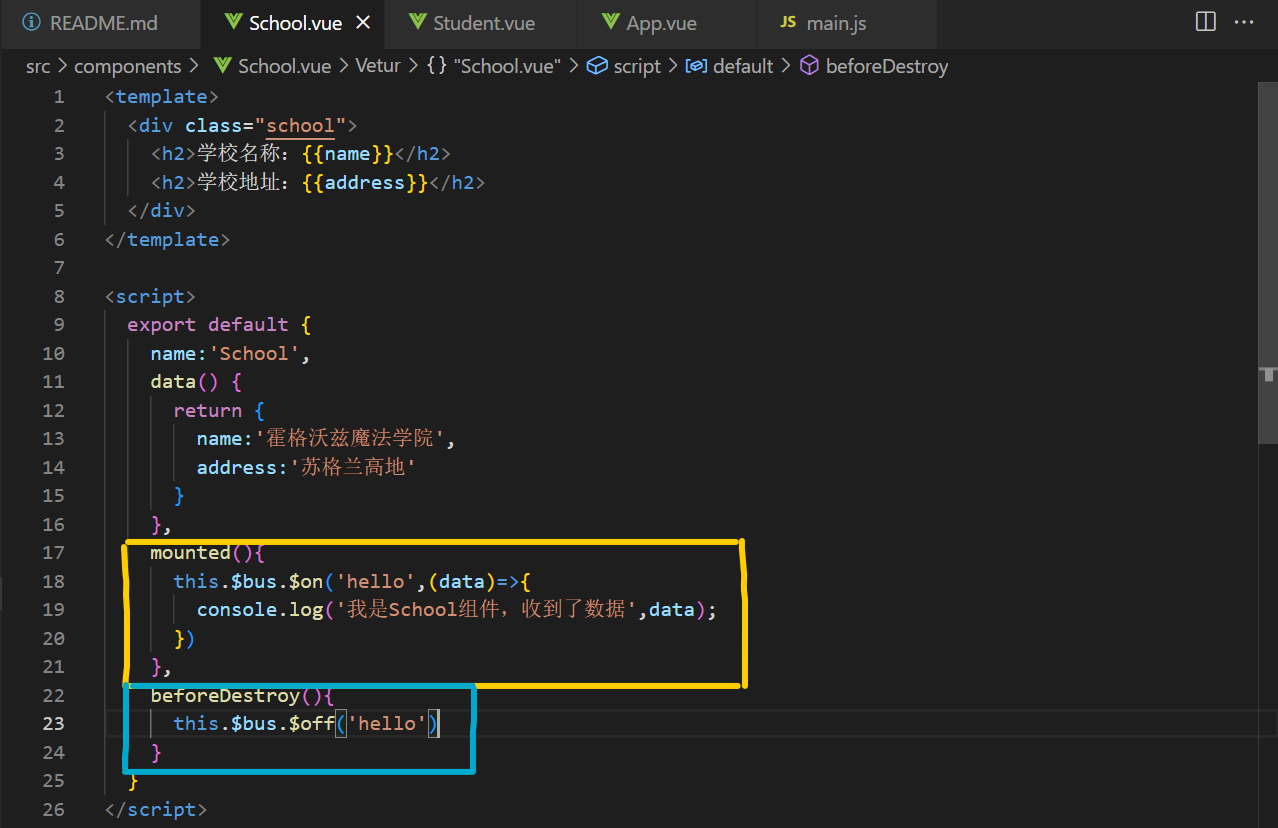
<template><div class="school"><h2>学校名称:{{name}}</h2><h2>学校地址:{{address}}</h2><button @click="sendSchoolName">把学校名给App</button></div>
</template><script>export default {name:'School',props:['getSchoolName'],data() {return {name:'霍格沃兹魔法学院',address:'苏格兰高地'}},methods: {sendSchoolName() {this.getSchoolName(this.name)}}}
</script><style scoped>.school {background-color: pink;padding: 5px;}
</style>
- Student.vue:
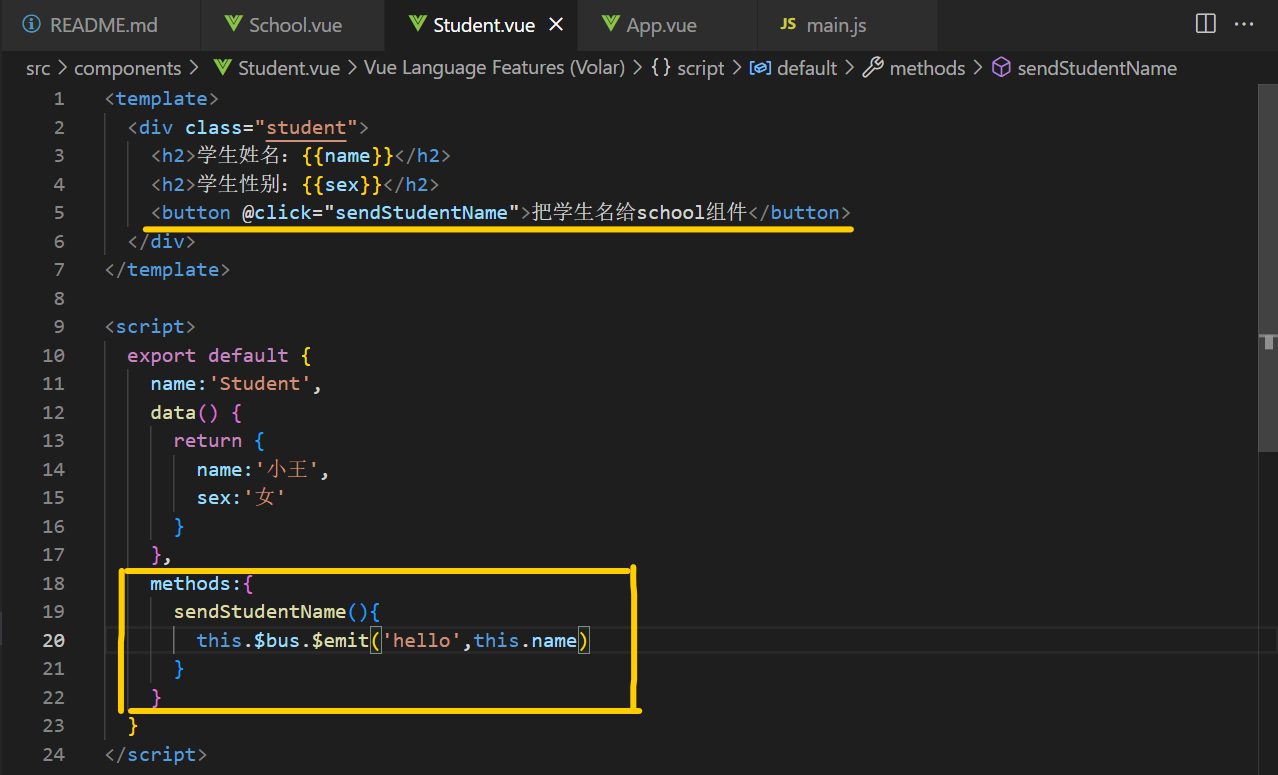
<template><div class="student"><h2>学生姓名:{{name}}</h2><h2>学生性别:{{sex}}</h2><button @click="sendStudentName">点我把学生名给App</button></div>
</template><script>export default {name:'Student',data() {return {name:'小王',sex:'女'}},methods: {sendStudentName() {// 触发Student组件实例身上的atguigu事件this.$emit('atguigu',this.name)// this.$emit('atguigu',this.name,666,888,900)}}}
</script><style scoped>.student{background-color: orange;padding: 5px;margin-top: 30px;}
</style>
1.2 解绑
- App.vue:
<template><div class="app"><h1>{{msg}}</h1><!-- 通过父组件给子组件传递函数类型的props实现:子给父传递数据 --><School :getSchoolName="getSchoolName"/><!-- 通过父组件给子组件绑定一个自定义事件实现:子给父传递数据(第一种写法,使用@或v-on) --><!-- <Student v-on:atguigu="getStudentName"/> 由于v-on在Student组件标签上,所以是给Student组件的实例对象vc身上绑定了一个事件atguigu,如果有人触发了此事件,那么getStudentName函数将会被调用 --><Student v-on:atguigu="getStudentName" @demo="m1"/><!-- 若要让按钮只能触发一次 --><!-- <Student v-on:atguigu.once="getStudentName"/> --><!-- 通过父组件给子组件绑定一个自定义事件实现:子给父传递数据(第二种写法,使用ref) --><!-- <Student ref="student"/> --></div>
</template><script>// 引入Student组件import Student from './components/Student.vue' // 引入School组件import School from './components/School.vue'export default {name:'App',components:{School, Student},data() {return {msg:"你好啊!"}},methods: {getSchoolName(name) {console.log('App收到了学校名:',name);},getStudentName(name) {console.log('App收到了学生名:',name);},/* getStudentName(name,...params) {console.log('App收到了学生名:',name,params); // params收集剩余参数} */m1() {console.log("demo事件被触发了");}},// 用于第二种写法ref// mounted() {// 绑定自定义事件// this.$refs.student是Student组件的实例对象// this.$refs.student.$on('atguigu',this.getStudentName)// 绑定自定义事件且让他等三秒钟返回/* setTimeout(()=>{this.$refs.student.$on('atguigu',this.getStudentName)},3000) */// 绑定自定义事件且让按钮只能触发一次// this.$refs.student.$once('atguigu',this.getStudentName)// }}
</script><style scoped>.app {background-color: gray;padding: 5px;}
</style>
- Student.vue:
<template><div class="student"><h2>学生姓名:{{name}}</h2><h2>学生性别:{{sex}}</h2><button @click="sendStudentName">点我把学生名给App</button><button @click="unbind">解绑atguigu事件</button></div>
</template><script>export default {name:'Student',data() {return {name:'小王',sex:'女'}},methods: {sendStudentName() {// 触发Student组件实例身上的atguigu事件this.$emit('atguigu',this.name)// this.$emit('atguigu',this.name,666,888,900)// this.$emit('demo')},unbind() {this.$off('atguigu') // 只适用于解绑一个自定义事件// this.$off(['atguigu','demo']) // 解绑多个自定义事件// this.$off() // 解绑所有的自定义事件}}}
</script><style scoped>.student{background-color: orange;padding: 5px;margin-top: 30px;}
</style>
1.3 总结
- 一种组件间通信的方式,适用于:子组件 —> 父组件
- 使用场景:A是父组件,B是子组件,B想给A传数据,那么就要在A中给B绑定自定义事件(事件的回调在A中)。
- 绑定自定义事件:
1> 第一种方式,在父组件中:<Demo @atguigu="test"/>或<Demo v-on:atguigu="test"/>
2> 第二种方式,在父组件中:

3> 若想让自定义事件只能触发一次,可以使用once修饰符,或$once方法。 - 触发自定义事件:
this.$emit('atguigu',数据) - 解绑自定义事件:
1>this.$off('atguigu'):只适用于解绑一个自定义事件
2>this.$off(['atguigu','demo']):解绑多个自定义事件
3>this.$off():解绑所有的自定义事件 - 注意:通过
this.$refs.xxx.$on('atguigu',回调)绑定自定义事件时,回调要么配置在methods中,要么用箭头函数,否则this指向会出问题! - 组件上也可以绑定原生DOM事件,需要使用
native修饰符。 - App.vue:
<template><div class="app"><h1>{{msg}},学生姓名是:{{studentName}}</h1><!-- 通过父组件给子组件传递函数类型的props实现:子给父传递数据 --><School :getSchoolName="getSchoolName"/><!-- 通过父组件给子组件绑定一个自定义事件实现:子给父传递数据(第一种写法,使用@或v-on) --><!-- <Student v-on:atguigu="getStudentName"/> 由于v-on在Student组件标签上,所以是给Student组件的实例对象vc身上绑定了一个事件atguigu,如果有人触发了此事件,那么getStudentName函数将会被调用 --><Student v-on:atguigu="getStudentName" @demo="m1"/><!-- 若要让按钮只能触发一次 --><!-- <Student v-on:atguigu.once="getStudentName"/> --><!-- 通过父组件给子组件绑定一个自定义事件实现:子给父传递数据(第二种写法,使用ref) --><!-- <Student ref="student"/> --><!-- 组件上也可以绑定原生DOM事件 需要使用native修饰符 --><!-- <Student ref="student" @click.native="show"/> --></div>
</template><script>// 引入Student组件import Student from './components/Student.vue' // 引入School组件import School from './components/School.vue'export default {name:'App',components:{School, Student},data() {return {msg:"你好啊!",studentName:''}},methods: {getSchoolName(name) {console.log('App收到了学校名:',name);},// 要么配置在methods中getStudentName(name) {console.log('App收到了学生名:',name);this.studentName = name},/* getStudentName(name,...params) {console.log('App收到了学生名:',name,params); // params收集剩余参数} */m1() {console.log("demo事件被触发了");},/* show() {alert(123)} */},// 用于第二种写法ref// mounted() {// 绑定自定义事件// this.$refs.student是Student组件的实例对象// this.$refs.student.$on('atguigu',this.getStudentName)// 要么用箭头函数/* this.$refs.student.$on('atguigu',(name,...params)=>{console.log('App收到了学生名:',name,params);console.log(this)this.studentName = name}) */// 绑定自定义事件且让他等三秒钟返回/* setTimeout(()=>{this.$refs.student.$on('atguigu',this.getStudentName)},3000) */// 绑定自定义事件且让按钮只能触发一次// this.$refs.student.$once('atguigu',this.getStudentName)// }}
</script><style scoped>.app {background-color: gray;padding: 5px;}
</style>
1.4 TodoList案例——自定义事件
- App.vue:
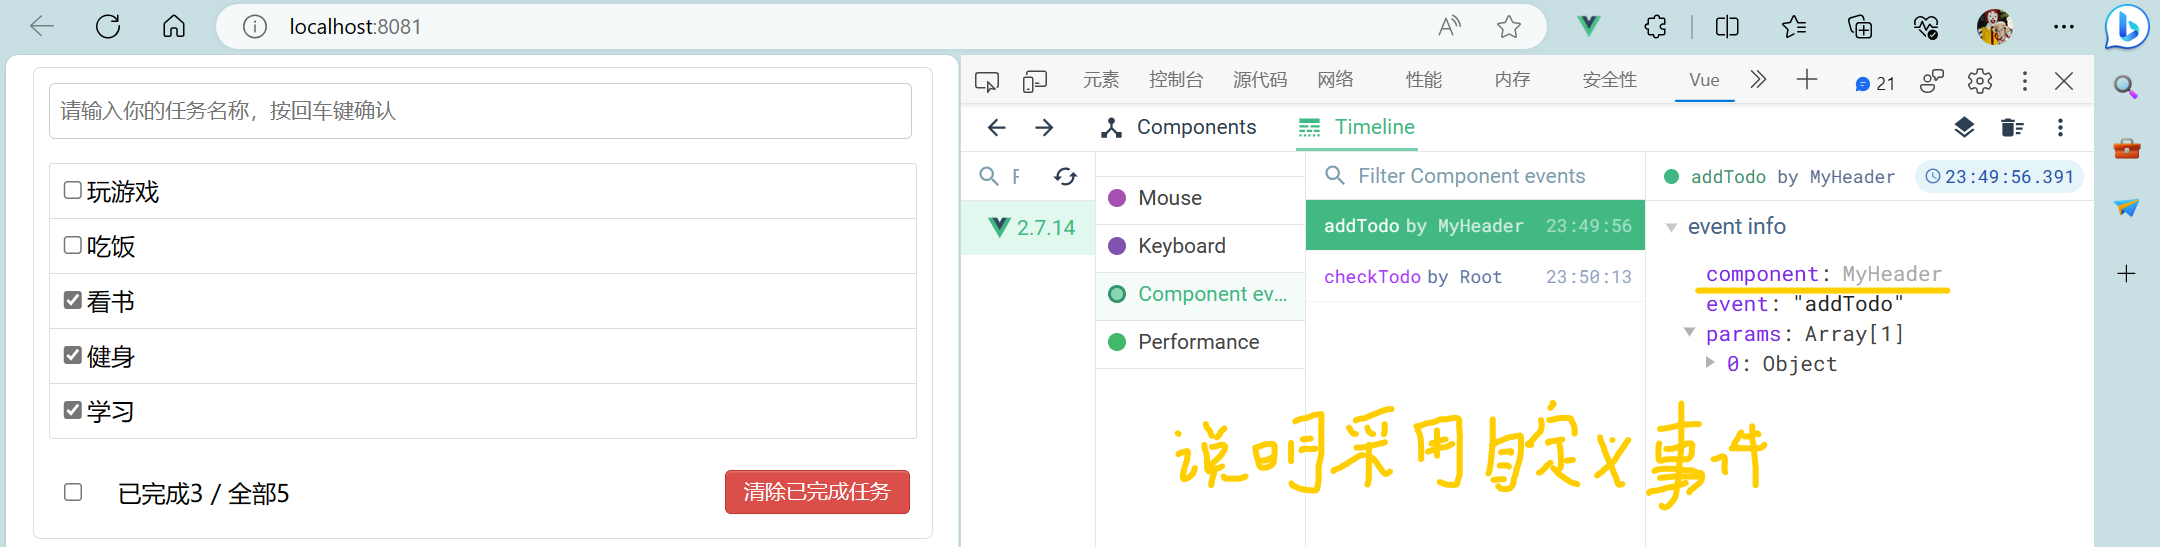
<template><div id="root"><div class="todo-container"><div class="todo-wrap"><!-- <MyHeader :addTodo="addTodo"/> --><!-- 采用自定义事件方法改为: --><MyHeader @addTodo="addTodo"/><MyList :todos="todos" :checkTodo="checkTodo" :deleteTodo="deleteTodo"/> <!--传递数据--><!-- <MyFooter :todos="todos" :checkAllTodo="checkAllTodo" :clearAllTodo="clearAllTodo"/> --><!-- 采用自定义事件方法改为: --><MyFooter :todos="todos" @checkAllTodo="checkAllTodo" @clearAllTodo="clearAllTodo"/></div></div></div>
</template><script>import MyHeader from './components/MyHeader.vue'import MyList from './components/MyList.vue'import MyFooter from './components/MyFooter.vue'export default {name:'App',components:{ MyHeader,MyList,MyFooter},data() {return {todos:JSON.parse(localStorage.getItem('todos')) || []}},methods:{// 添加一个todoaddTodo(todoObj) {// console.log('我是App组件,我收到了数据:',x);this.todos.unshift(todoObj)},// 勾选or取消勾选一个todocheckTodo(id) {this.todos.forEach((todo)=>{if(todo.id === id) todo.done = !todo.done})},// 删除一个tododeleteTodo(id) {this.todos = this.todos.filter((todo)=>{return todo.id !== id})},// 全选or取消全选checkAllTodo(done) {this.todos.forEach((todo)=>{todo.done = done})},// 清除所有已经完成的todoclearAllTodo() {this.todos = this.todos.filter((todo)=>{return !todo.done})}},watch: {todos: {// 深度监视deep:true,handler(value) {localStorage.setItem('todos',JSON.stringify(value))}}}}
</script><style>/*base*/body {background: #fff;}.btn {display: inline-block;padding: 4px 12px;margin-bottom: 5px;margin-left: 285px;font-size: 14px;line-height: 20px;text-align: center;vertical-align: middle;cursor: pointer;box-shadow: inset 0 1px 0 rgba(255, 255, 255, 0.2), 0 1px 2px rgba(0, 0, 0, 0.05);border-radius: 4px;}.btn-danger {color: #fff;background-color: #da4f49;border: 1px solid #bd362f;}.btn-danger:hover {color: #fff;background-color: #bd362f;}.btn:focus {outline: none;}.todo-container {width: 600px;margin: 0 auto;}.todo-container .todo-wrap {padding: 10px;border: 1px solid #ddd;border-radius: 5px;}
</style>
- MyHeader.vue:
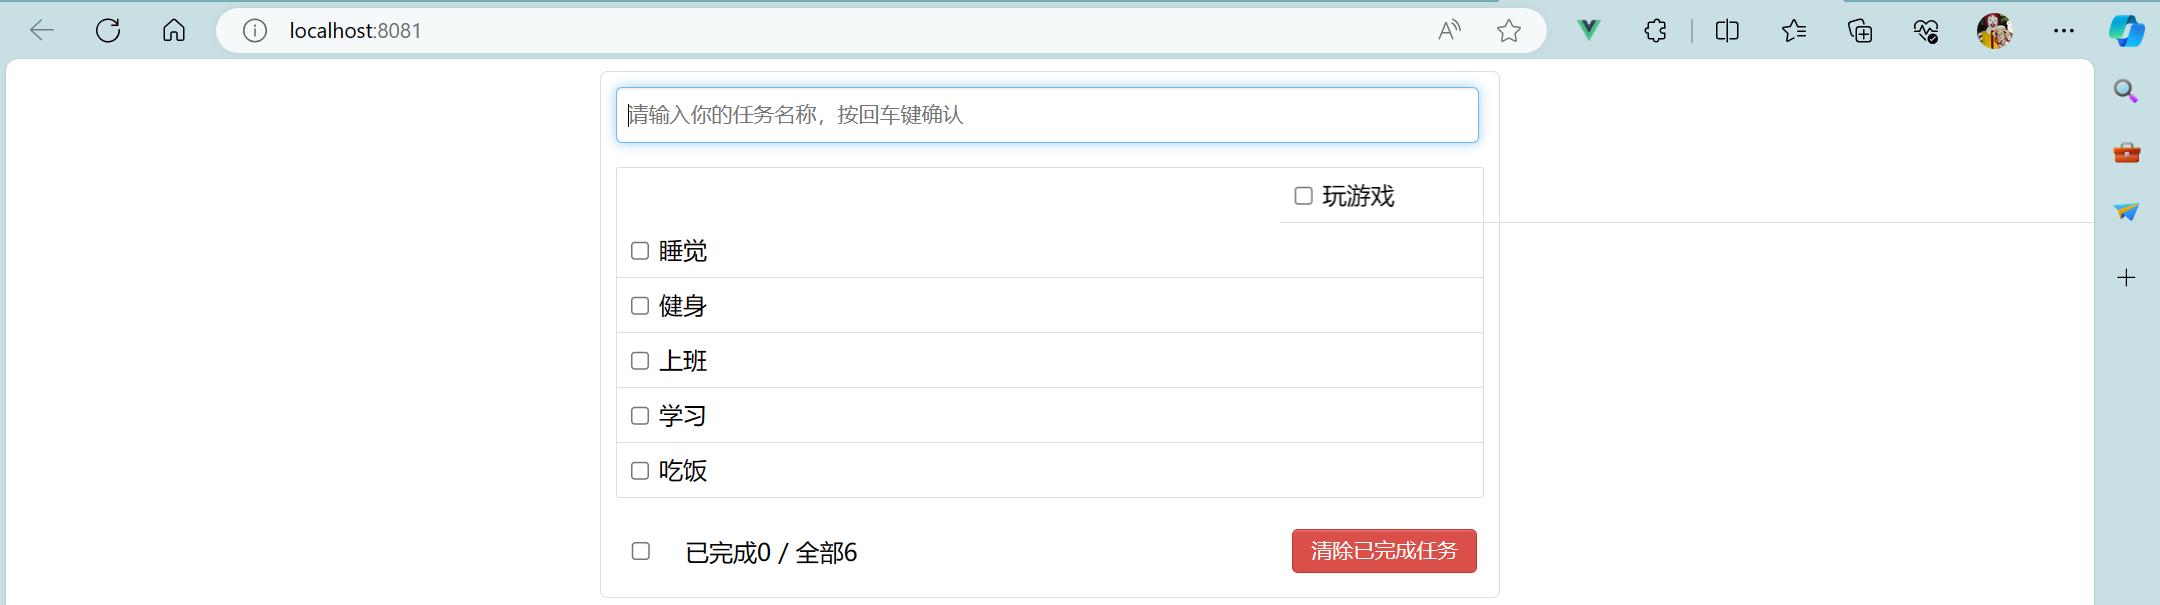
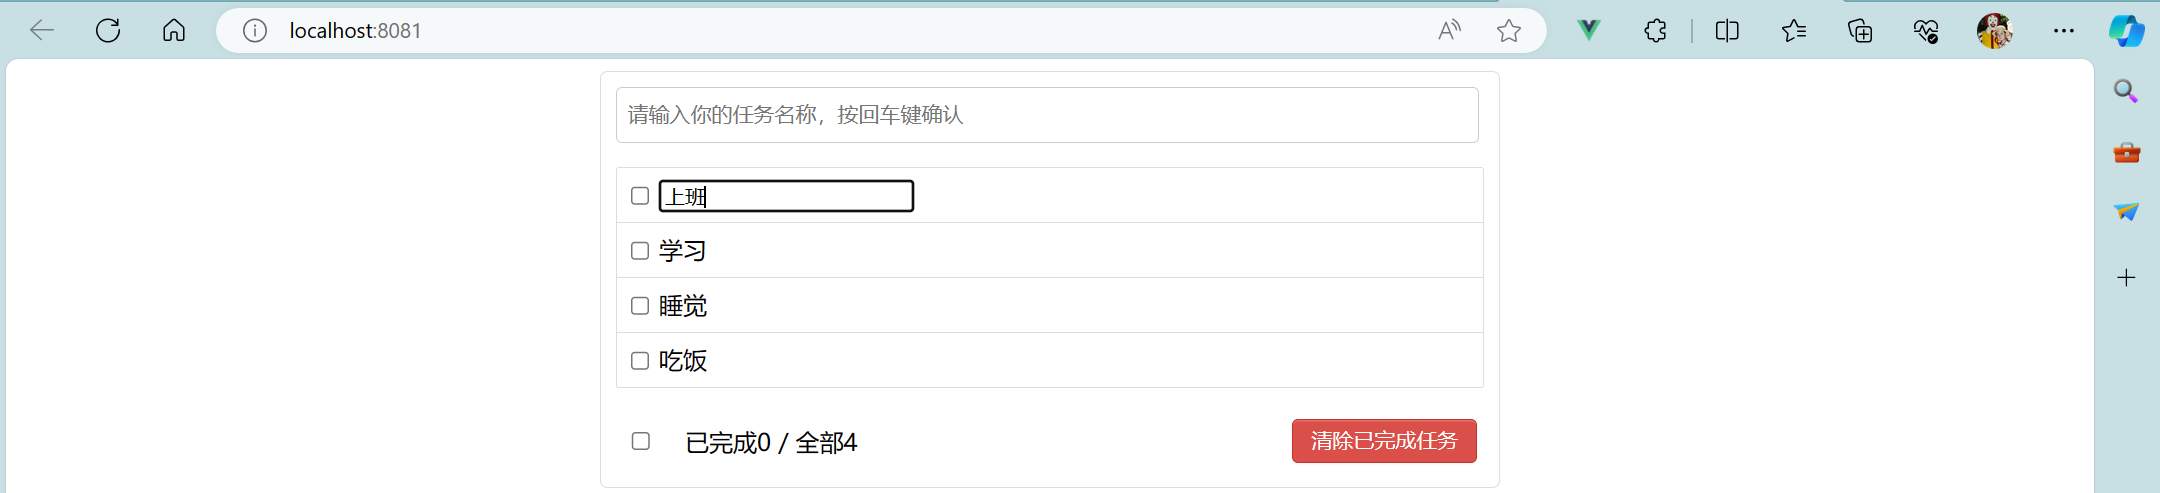
<template><div class="todo-header"><input type="text" placeholder="请输入你的任务名称,按回车键确认" v-model="title" @keyup.enter="add"/></div>
</template><script>import {nanoid} from 'nanoid'export default {name:'MyHeader',// 采用自定义事件方法改为:// props:['addTodo'],data() {return{title:''}},methods: {add() {// 校验数据if(!this.title.trim()) return alert('输入不能为空') // 如果输入为空 敲回车就没反应 trim()去掉前后空格// console.log(e.target.value);// 将用户的输入包装成为一个todo对象const todoObj = {id:nanoid(),title:this.title,done:false}// console.log(todoObj)// 通知App组件去添加一个todo对象// this.addTodo(todoObj)// 采用自定义事件方法改为:this.$emit('addTodo',todoObj)// 清空输入this.title = ''}}}
</script><style scoped>/*header*/.todo-header input {width: 560px;height: 28px;font-size: 14px;border: 1px solid #ccc;border-radius: 4px;padding: 4px 7px;}.todo-header input:focus {outline: none;border-color: rgba(82, 168, 236, 0.8);box-shadow: inset 0 1px 1px rgba(0, 0, 0, 0.075), 0 0 8px rgba(82, 168, 236, 0.6);}
</style>
- MyFooter.vue:
<template><div class="todo-footer" v-show="total"><label><!-- <input type="checkbox" :checked="doneTotal === total"/> --><!-- 写法一 --><!-- <input type="checkbox" :checked="isAll" @change="checkAll"/> --><!-- 写法二 --><input type="checkbox" v-model="isAll"/></label><span><!-- <span>已完成{{doneTotal}}</span> / 全部{{todos.length}} --><span>已完成{{doneTotal}}</span> / 全部{{total}}</span><button class="btn btn-danger" @click="clearAll">清除已完成任务</button></div>
</template><script>export default {name:'MyFooter',// props:['todos','checkAllTodo','clearAllTodo'],// 采用自定义事件方法改为:props:['todos'],computed:{total() {return this.todos.length},doneTotal() {/* const x =  this.todos.reduce((pre,current)=>{console.log('@',pre,current)return pre + (current.done ? 1 : 0)},0)console.log('###',x); */// 简写为:return this.todos.reduce((pre,todo)=> pre + (todo.done ? 1 : 0) ,0)},// 写法一/* isAll() {return this.doneTotal === this.total && this.total > 0}, */// 写法二isAll: {get(){return this.doneTotal === this.total && this.total > 0},set(value){// this.checkAllTodo(value)// 采用自定义事件方法改为:this.$emit('checkAllTodo',value)}}},methods: {/* checkAll(e) {// console.log(e.target.checked);this.checkAllTodo(e.target.checked)} */clearAll() {// this.clearAllTodo()// 采用自定义事件方法改为:this.$emit('clearAllTodo')}}}
</script><style scoped>/*footer*/.todo-footer {height: 40px;line-height: 40px;padding-left: 6px;margin-top: 5px;}.todo-footer label {display: inline-block;margin-right: 20px;cursor: pointer; /* 网页浏览时用户鼠标指针的样式或图形形状为一只手 */}
</style>
2 全局事件总线
2.1 理解
- 全局事件总线:一种组件间通信的方式,适用于任意组件间通信。
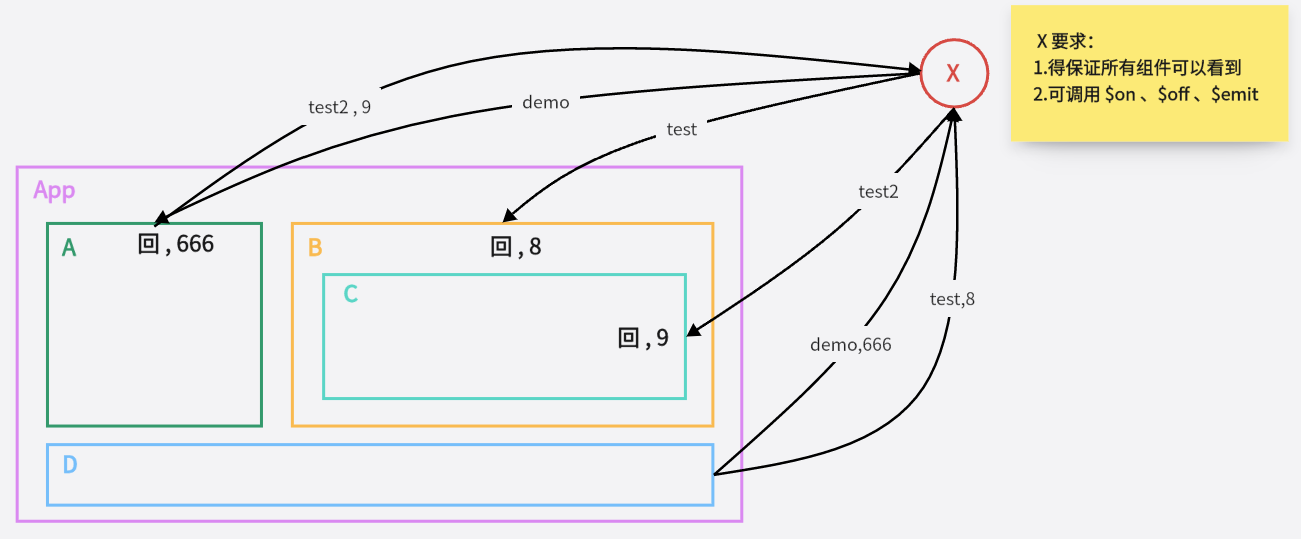
- Vue 原型对象上包含事件处理的方法:
1>$on(eventName, listener): 绑定自定义事件监听
2>$emit(eventName, data): 分发自定义事件
3>$off(eventName): 解绑自定义事件监听
4>$once(eventName, listener): 绑定事件监听, 但只能处理一次 - 所有组件实例对象的原型对象的原型对象就是 Vue 的原型对象。
1> 所有组件对象都能看到 Vue 原型对象上的属性和方法。
2>Vue.prototype.$bus = new Vue(), 所有的组件对象都能看到$bus这个属性对象。
2.2 步骤
- 安装全局事件总线:
- 使用事件总线:
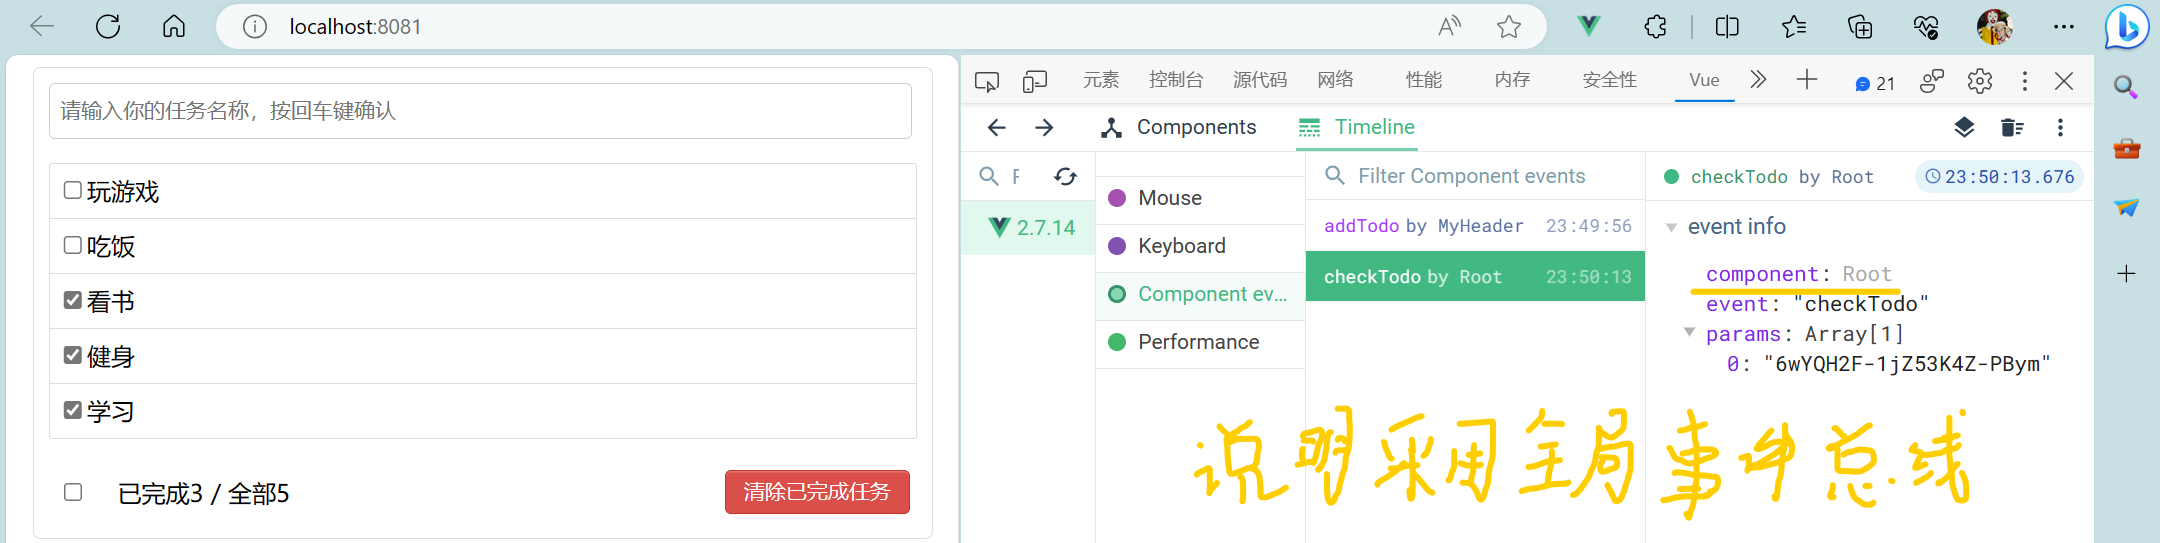
1> 接收数据:A组件想接收数据,则在A组件中给$bus绑定自定义事件,事件的回调留在A组件自身。
最好在beforeDestroy钩子中,用$off去解绑当前组件所用到的事件。
2> 提供数据:
2.3 TodoList案例——事件总线
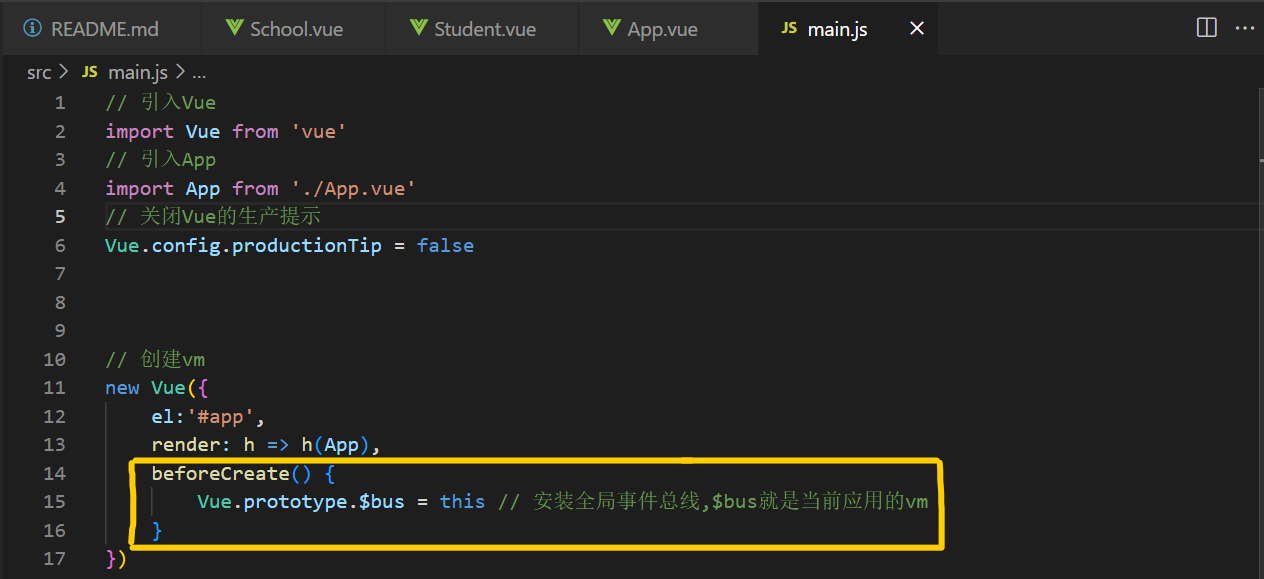
- main.js代码:
// 引入Vue
import Vue from 'vue'
// 引入App
import App from './App.vue'
// 关闭Vue的生产提示
Vue.config.productionTip = false// 创建vm
new Vue({el:'#app',render: h => h(App),beforeCreate(){Vue.prototype.$bus = this}
})
- App.vue代码:
<template><div id="root"><div class="todo-container"><div class="todo-wrap"><!-- <MyHeader :addTodo="addTodo"/> --><!-- 采用自定义事件方法改为: --><MyHeader @addTodo="addTodo"/><!-- <MyList :todos="todos" :checkTodo="checkTodo" :deleteTodo="deleteTodo"/> 传递数据--><!-- 采用全局事件总线方法改为: --><MyList :todos="todos"/><!-- <MyFooter :todos="todos" :checkAllTodo="checkAllTodo" :clearAllTodo="clearAllTodo"/> --><!-- 采用自定义事件方法改为: --><MyFooter :todos="todos" @checkAllTodo="checkAllTodo" @clearAllTodo="clearAllTodo"/></div></div></div>
</template><script>import MyHeader from './components/MyHeader.vue'import MyList from './components/MyList.vue'import MyFooter from './components/MyFooter.vue'export default {name:'App',components:{ MyHeader,MyList,MyFooter},data() {return {todos:JSON.parse(localStorage.getItem('todos')) || []}},methods:{// 添加一个todoaddTodo(todoObj) {// console.log('我是App组件,我收到了数据:',x);this.todos.unshift(todoObj)},// 勾选or取消勾选一个todocheckTodo(id) {this.todos.forEach((todo)=>{if(todo.id === id) todo.done = !todo.done})},// 删除一个tododeleteTodo(id) {this.todos = this.todos.filter((todo)=>{return todo.id !== id})},// 全选or取消全选checkAllTodo(done) {this.todos.forEach((todo)=>{todo.done = done})},// 清除所有已经完成的todoclearAllTodo() {this.todos = this.todos.filter((todo)=>{return !todo.done})}},watch: {todos: {// 深度监视deep:true,handler(value) {localStorage.setItem('todos',JSON.stringify(value))}}},// 采用全局事件总线方法此处添加:mounted(){this.$bus.$on('checkTodo',this.checkTodo)this.$bus.$on('deleteTodo',this.deleteTodo)},beforeDestroy() {this.$bus.$off('checkTodo')this.$bus.$off('deleteTodo')}}
</script><style>/*base*/body {background: #fff;}.btn {display: inline-block;padding: 4px 12px;margin-bottom: 5px;margin-left: 285px;font-size: 14px;line-height: 20px;text-align: center;vertical-align: middle;cursor: pointer;box-shadow: inset 0 1px 0 rgba(255, 255, 255, 0.2), 0 1px 2px rgba(0, 0, 0, 0.05);border-radius: 4px;}.btn-danger {color: #fff;background-color: #da4f49;border: 1px solid #bd362f;}.btn-danger:hover {color: #fff;background-color: #bd362f;}.btn:focus {outline: none;}.todo-container {width: 600px;margin: 0 auto;}.todo-container .todo-wrap {padding: 10px;border: 1px solid #ddd;border-radius: 5px;}
</style>
- MyList.vue代码:
<template><ul class="todo-main"><MyItem v-for="todoObj in todos" :key="todoObj.id" :todo="todoObj" /> <!--遍历数组并且传递数据--> <!--采用全局事件总线方法此处删除了 :checkTodo="checkTodo" 和 :deleteTodo="deleteTodo"--></ul>
</template><script>import MyItem from './MyItem.vue'export default {name:'MyList',components: {MyItem},// props:['todos','checkTodo','deleteTodo'] // 接收数据// 采用全局事件总线方法改为:props:['todos']}
</script><style scoped>/*main*/.todo-main {margin-left: 0px;border: 1px solid #ddd;border-radius: 2px;padding: 0px;}.todo-empty {height: 40px;line-height: 40px;border: 1px solid #ddd;border-radius: 2px;padding-left: 5px;margin-top: 10px;}
</style>
- MyItem代码:
<template><li><label><!-- 写法一 --><!-- <input type="checkbox" :checked="todo.done" @click="handleCheck(todo.id)"/>  :checked="true" 给input指定一个checked选项,如为true,拥有checked,如为false,则没有checked--><!-- 写法二 --><input type="checkbox" :checked="todo.done" @change="handleCheck(todo.id)"/><!-- 写法三 此写法直接合并后两项 不用App插件将数据传给MyList再传给MyItem 不推荐此写法 因为props是只读的 不建议修改--><!-- <input type="checkbox" v-model="todo.done"/> --><span>{{todo.title}}</span></label><button class="btn btn-danger" @click="handleDelete(todo.id)">删除</button></li>
</template><script>export default {name:'MyItem',// 声明接收todo对象// props:['todo','checkTodo','deleteTodo'],// 采用全局事件总线方法改为:props:['todo'],methods:{// 勾选or取消勾选handleCheck(id) {// console.log(id);// 通知App组件将对应的todo对象的done值取反// this.checkTodo(id)// 采用全局事件总线方法改为:this.$bus.$emit('checkTodo',id)},// 删除handleDelete(id) {// confirm根据用户的交互 确定布尔值为真还是假if(confirm('确定删除吗?')) {// console.log(id);// this.deleteTodo(id)// 采用全局事件总线方法改为:this.$bus.$emit('deleteTodo',id)}}}}
</script><style scoped>/*item*/li {list-style: none;height: 36px;line-height: 36px;padding: 0 5px;border-bottom: 1px solid #ddd;}li label {float: left;cursor: pointer;}li label li input {vertical-align: middle;margin-right: 6px;position: relative;top: -1px;}li button {float: right;display: none;margin-top: 3px;}li:before {content: initial;}li:last-child {border-bottom: none;}li:hover {background-color: #ddd;}li:hover button {display: block;}
</style>

3 消息订阅与发布
3.1 理解
- 这种方式的思想与全局事件总线很相似,它包含以下操作:
1> 订阅消息 --对应绑定事件监听
2> 发布消息 --对应分发事件
3> 取消消息订阅 --对应解绑事件监听 - 需要引入一个消息订阅与发布的第三方实现库: PubSubJS
- 报纸订阅与发布步骤:
1> 订阅报纸:家庭住址
2> 邮递员送报纸:报纸 - 消息订阅与发布步骤:
1> 订阅消息:消息名
2> 发布消息:消息内容
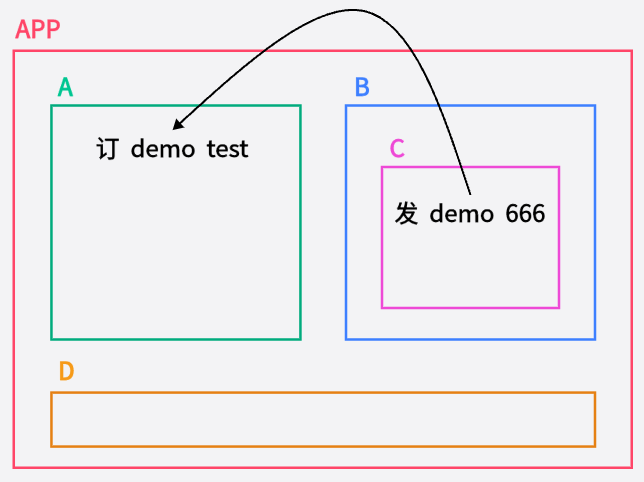
- 一种组件间通信的方式,适用于任意组件间通信。
- 使用步骤:
1> 安装pubsub:npm i pubsub-js
2> 引入:import pubsub from 'pubsub-js'
3> 接收数据(消息的订阅语法):A组件想接收数据,则在A组件中订阅消息,订阅的回调留在A组件自身。
4> 提供数据(消息的发布语法):pubsub.publish('xxx',数据)(第一个形参代表消息名,第二个形参代表传递的数据)
5> 最好在beforeDestroy钩子中,用Pubsub.unsubscribe(pid)去取消订阅。 - main.js代码:
// 引入Vue
import Vue from 'vue'
// 引入App
import App from './App.vue'
// 关闭Vue的生产提示
Vue.config.productionTip = false// 创建vm
new Vue({el:'#app',render: h => h(App),
})
- School.vue代码:
<template><div class="school"><h2>学校名称:{{name}}</h2><h2>学校地址:{{address}}</h2></div>
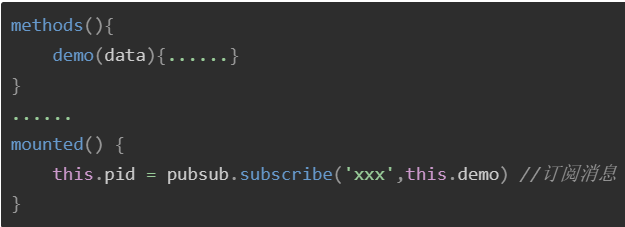
</template><script>import pubsub from 'pubsub-js'export default {name:'School',data() {return {name:'霍格沃兹魔法学院',address:'苏格兰高地'}},methods: {demo(msgName,data){console.log('有人发布了hello消息,hello消息的回调执行了',data)}},mounted(){this.pubId = pubsub.subscribe('hello',this.demo)},beforeDestroy(){pubsub.unsubscribe(this.pubId)}}
</script><style scoped>.school {background-color: pink;padding: 5px;}
</style>
- Student.vue代码:
<template><div class="student"><h2>学生姓名:{{name}}</h2><h2>学生性别:{{sex}}</h2><button @click="sendStudentName">把学生名给school组件</button></div>
</template><script>import pubsub from 'pubsub-js'export default {name:'Student',data() {return {name:'小王',sex:'女'}},methods:{sendStudentName(){pubsub.publish('hello',666)}}}
</script><style scoped>.student{background-color: orange;padding: 5px;margin-top: 30px;}
</style>
3.2 TodoList案例——消息的订阅与发布
- App.vue代码:
<template><div id="root"><div class="todo-container"><div class="todo-wrap"><!-- <MyHeader :addTodo="addTodo"/> --><!-- 采用自定义事件方法改为: --><MyHeader @addTodo="addTodo"/><!-- <MyList :todos="todos" :checkTodo="checkTodo" :deleteTodo="deleteTodo"/> 传递数据--><!-- 采用全局事件总线方法改为: --><MyList :todos="todos"/><!-- <MyFooter :todos="todos" :checkAllTodo="checkAllTodo" :clearAllTodo="clearAllTodo"/> --><!-- 采用自定义事件方法改为: --><MyFooter :todos="todos" @checkAllTodo="checkAllTodo" @clearAllTodo="clearAllTodo"/></div></div></div>
</template><script>// 引入pubsub库import pubsub from 'pubsub-js'import MyHeader from './components/MyHeader.vue'import MyList from './components/MyList.vue'import MyFooter from './components/MyFooter.vue'export default {name:'App',components:{ MyHeader,MyList,MyFooter},data() {return {todos:JSON.parse(localStorage.getItem('todos')) || []}},methods:{// 添加一个todoaddTodo(todoObj) {// console.log('我是App组件,我收到了数据:',x);this.todos.unshift(todoObj)},// 勾选or取消勾选一个todocheckTodo(id) {this.todos.forEach((todo)=>{if(todo.id === id) todo.done = !todo.done})},// 删除一个todo// deleteTodo(msgName,id) {// 用下划线占个位deleteTodo(_,id) {this.todos = this.todos.filter((todo)=>{return todo.id !== id})},// 全选or取消全选checkAllTodo(done) {this.todos.forEach((todo)=>{todo.done = done})},// 清除所有已经完成的todoclearAllTodo() {this.todos = this.todos.filter((todo)=>{return !todo.done})}},watch: {todos: {// 深度监视deep:true,handler(value) {localStorage.setItem('todos',JSON.stringify(value))}}},// 采用全局事件总线方法此处添加:mounted(){this.$bus.$on('checkTodo',this.checkTodo)// this.$bus.$on('deleteTodo',this.deleteTodo) // 采用消息订阅与发布方法此处改为:this.pubId = pubsub.subscribe('deleteTodo',this.deleteTodo)},beforeDestroy() {this.$bus.$off('checkTodo')// this.$bus.$off('deleteTodo')// 采用消息订阅与发布方法此处改为:pubsub.unsubscribe(this.pubId)}}
</script><style>/*base*/body {background: #fff;}.btn {display: inline-block;padding: 4px 12px;margin-bottom: 5px;margin-left: 285px;font-size: 14px;line-height: 20px;text-align: center;vertical-align: middle;cursor: pointer;box-shadow: inset 0 1px 0 rgba(255, 255, 255, 0.2), 0 1px 2px rgba(0, 0, 0, 0.05);border-radius: 4px;}.btn-danger {color: #fff;background-color: #da4f49;border: 1px solid #bd362f;}.btn-danger:hover {color: #fff;background-color: #bd362f;}.btn:focus {outline: none;}.todo-container {width: 600px;margin: 0 auto;}.todo-container .todo-wrap {padding: 10px;border: 1px solid #ddd;border-radius: 5px;}
</style>
- MyItem.vue代码:
<template><li><label><!-- 写法一 --><!-- <input type="checkbox" :checked="todo.done" @click="handleCheck(todo.id)"/>  :checked="true" 给input指定一个checked选项,如为true,拥有checked,如为false,则没有checked--><!-- 写法二 --><input type="checkbox" :checked="todo.done" @change="handleCheck(todo.id)"/><!-- 写法三 此写法直接合并后两项 不用App插件将数据传给MyList再传给MyItem 不推荐此写法 因为props是只读的 不建议修改--><!-- <input type="checkbox" v-model="todo.done"/> --><span>{{todo.title}}</span></label><button class="btn btn-danger" @click="handleDelete(todo.id)">删除</button></li>
</template><script>import pubsub from 'pubsub-js'export default {name:'MyItem',// 声明接收todo对象// props:['todo','checkTodo','deleteTodo'],// 采用全局事件总线方法改为:props:['todo'],methods:{// 勾选or取消勾选handleCheck(id) {// console.log(id);// 通知App组件将对应的todo对象的done值取反// this.checkTodo(id)// 采用全局事件总线方法改为:this.$bus.$emit('checkTodo',id)}, // 删除handleDelete(id) {// confirm根据用户的交互 确定布尔值为真还是假if(confirm('确定删除吗?')) {// console.log(id);// this.deleteTodo(id)// 采用全局事件总线方法改为:// this.$bus.$emit('deleteTodo',id)// 采用消息订阅与发布方法此处改为:pubsub.publish('deleteTodo',id)}}}}
</script><style scoped>/*item*/li {list-style: none;height: 36px;line-height: 36px;padding: 0 5px;border-bottom: 1px solid #ddd;}li label {float: left;cursor: pointer;}li label li input {vertical-align: middle;margin-right: 6px;position: relative;top: -1px;}li button {float: right;display: none;margin-top: 3px;}li:before {content: initial;}li:last-child {border-bottom: none;}li:hover {background-color: #ddd;}li:hover button {display: block;}
</style>
4 TodoList案例——编辑
4.1 $nextTick
- 语法:
this.$nextTick(回调函数) - 作用:在下一次 DOM 更新结束后执行其指定的回调。
- 什么时候用:当改变数据后,要基于更新后的新DOM进行某些操作时,要在nextTick所指定的回调函数中执行。
4.2 代码
- MyItem.vue代码:
<template><li><label><!-- 写法一 --><!-- <input type="checkbox" :checked="todo.done" @click="handleCheck(todo.id)"/>  :checked="true" 给input指定一个checked选项,如为true,拥有checked,如为false,则没有checked--><!-- 写法二 --><input type="checkbox" :checked="todo.done" @change="handleCheck(todo.id)"/><!-- 写法三 此写法直接合并后两项 不用App插件将数据传给MyList再传给MyItem 不推荐此写法 因为props是只读的 不建议修改--><!-- <input type="checkbox" v-model="todo.done"/> --><span v-show="!todo.isEdit">{{todo.title}}</span><input type="text" v-show="todo.isEdit" :value="todo.title" @blur="handleBlur(todo,$event)" ref="inputTitle"></label><button class="btn btn-danger" @click="handleDelete(todo.id)">删除</button><button v-show="!todo.isEdit" class="btn btn-edit" @click="handleEdit(todo)">编辑</button></li>
</template><script>import pubsub from 'pubsub-js'export default {name:'MyItem',// 声明接收todo对象// props:['todo','checkTodo','deleteTodo'],// 采用全局事件总线方法改为:props:['todo'],methods:{// 勾选or取消勾选handleCheck(id) {// console.log(id);// 通知App组件将对应的todo对象的done值取反// this.checkTodo(id)// 采用全局事件总线方法改为:this.$bus.$emit('checkTodo',id)}, // 删除handleDelete(id) {// confirm根据用户的交互 确定布尔值为真还是假if(confirm('确定删除吗?')) {// console.log(id);// this.deleteTodo(id)// 采用全局事件总线方法改为:// this.$bus.$emit('deleteTodo',id)// 采用消息订阅与发布方法此处改为:pubsub.publish('deleteTodo',id)}},// 编辑handleEdit(todo) {// todo.isEdit = true // 此写法可以改值 但没有getter和setter// 利用列表渲染中的vue.set// this.$set(todo,'isEdit',true)// 第一次加上isEdit属性 后面无需再加 因此使用if语句// 如果todo身上有isEdit 直接改 如果todo身上没有isEdit 先添加此属性再赋值if('isEdit' in todo) {todo.isEdit = true} else {this.$set(todo,'isEdit',true)}this.$nextTick(function() {// nextTick指定的回调 会在dom节点更新完毕后执行this.$refs.inputTitle.focus() // 获取焦点}) },// 失去焦点回调(真正执行修改逻辑)handleBlur(todo,e){todo.isEdit = falseif(!e.target.value.trim()) return alert('输入不能为空!') // trim()函数用于删除字符串的头尾空白符this.$bus.$emit('updateTodo',todo.id,e.target.value)}}}
</script><style scoped>/*item*/li {list-style: none;height: 36px;line-height: 36px;padding: 0 5px;border-bottom: 1px solid #ddd;}li label {float: left;cursor: pointer;}li label input {vertical-align: middle;margin-right: 6px;position: relative;top: -1px;}li button {float: right;display: none; margin-top: 3px; margin-left: 5px;}li:before {content: initial;}li:last-child {border-bottom: none;}li:hover {background-color: #ddd;}li:hover button {display: block;}
</style>
- App.vue代码:
<template><div id="root"><div class="todo-container"><div class="todo-wrap"><!-- <MyHeader :addTodo="addTodo"/> --><!-- 采用自定义事件方法改为: --><MyHeader @addTodo="addTodo"/><!-- <MyList :todos="todos" :checkTodo="checkTodo" :deleteTodo="deleteTodo"/> 传递数据--><!-- 采用全局事件总线方法改为: --><MyList :todos="todos"/><!-- <MyFooter :todos="todos" :checkAllTodo="checkAllTodo" :clearAllTodo="clearAllTodo"/> --><!-- 采用自定义事件方法改为: --><MyFooter :todos="todos" @checkAllTodo="checkAllTodo" @clearAllTodo="clearAllTodo"/></div></div></div>
</template><script>// 引入pubsub库import pubsub from 'pubsub-js'import MyHeader from './components/MyHeader.vue'import MyList from './components/MyList.vue'import MyFooter from './components/MyFooter.vue'export default {name:'App',components:{ MyHeader,MyList,MyFooter},data() {return {todos:JSON.parse(localStorage.getItem('todos')) || []}},methods:{// 添加一个todoaddTodo(todoObj) {// console.log('我是App组件,我收到了数据:',x);this.todos.unshift(todoObj)},// 勾选or取消勾选一个todocheckTodo(id) {this.todos.forEach((todo)=>{if(todo.id === id) todo.done = !todo.done})},// 更新一个todoupdateTodo(id,title) {this.todos.forEach((todo)=>{if(todo.id === id) todo.title = title})},// 删除一个todo// deleteTodo(msgName,id) {// 用下划线占个位deleteTodo(_,id) {this.todos = this.todos.filter((todo)=>{return todo.id !== id})},// 全选or取消全选checkAllTodo(done) {this.todos.forEach((todo)=>{todo.done = done})},// 清除所有已经完成的todoclearAllTodo() {this.todos = this.todos.filter((todo)=>{return !todo.done})}},watch: {todos: {// 深度监视deep:true,handler(value) {localStorage.setItem('todos',JSON.stringify(value))}}},// 采用全局事件总线方法此处添加:mounted(){this.$bus.$on('checkTodo',this.checkTodo)this.$bus.$on('updateTodo',this.updateTodo)// this.$bus.$on('deleteTodo',this.deleteTodo) // 采用消息订阅与发布方法此处改为:this.pubId = pubsub.subscribe('deleteTodo',this.deleteTodo)},beforeDestroy() {this.$bus.$off('checkTodo')this.$bus.$off('updateTodo')// this.$bus.$off('deleteTodo')// 采用消息订阅与发布方法此处改为:pubsub.unsubscribe(this.pubId)}}
</script><style>/*base*/body {background: #fff;}.btn {display: inline-block;padding: 4px 12px;margin-bottom: 5px;margin-left: 285px;font-size: 14px;line-height: 20px;text-align: center;vertical-align: middle;cursor: pointer;box-shadow: inset 0 1px 0 rgba(255, 255, 255, 0.2), 0 1px 2px rgba(0, 0, 0, 0.05);border-radius: 4px;}.btn-danger {color: #fff;background-color: #da4f49;border: 1px solid #bd362f;}.btn-edit {color: #fff;background-color: skyblue;border: 1px solid rgb(23, 99, 129);}.btn-danger:hover {color: #fff;background-color: #bd362f;}.btn:focus {outline: none;}.todo-container {width: 600px;margin: 0 auto;}.todo-container .todo-wrap {padding: 10px;border: 1px solid #ddd;border-radius: 5px;}
</style>

5 过度与动画
5.1 理解
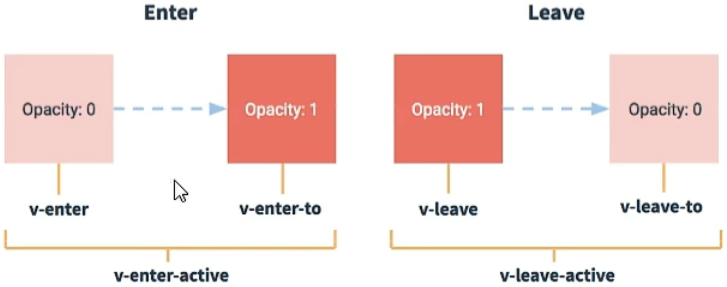
- 作用:在插入、更新或移除 DOM元素时,在合适的时候给元素添加样式类名。
- 图示:
- 写法:
1> 准备好样式:
元素进入的样式:
1. v-enter:进入的起点
2. v-enter-active:进入过程中
3. v-enter-to:进入的终点
元素离开的样式:
1. v-leave:离开的起点
2. v-leave-active:离开过程中
3. v-leave-to:离开的终点
2> 使用<transition>包裹要过度的元素,并配置name属性:

3> 备注:若有多个元素需要过度,则需要使用:<transition-group>,且每个元素都要指定key。 - 代码示例:
1> main.js代码:
// 引入Vue
import Vue from 'vue'
// 引入App
import App from './App.vue'
// 关闭Vue的生产提示
Vue.config.productionTip = false// 创建vm
new Vue({el:'#app',render: h => h(App)
})
2> App.vue代码:
<template><div><Test/><Test2/><Test3/></div>
</template><script>import Test from './components/Test.vue'import Test2 from './components/Test2.vue'import Test3 from './components/Test3.vue'export default {name:'App',components:{Test,Test2,Test3},}
</script>
3> Test.vue代码:
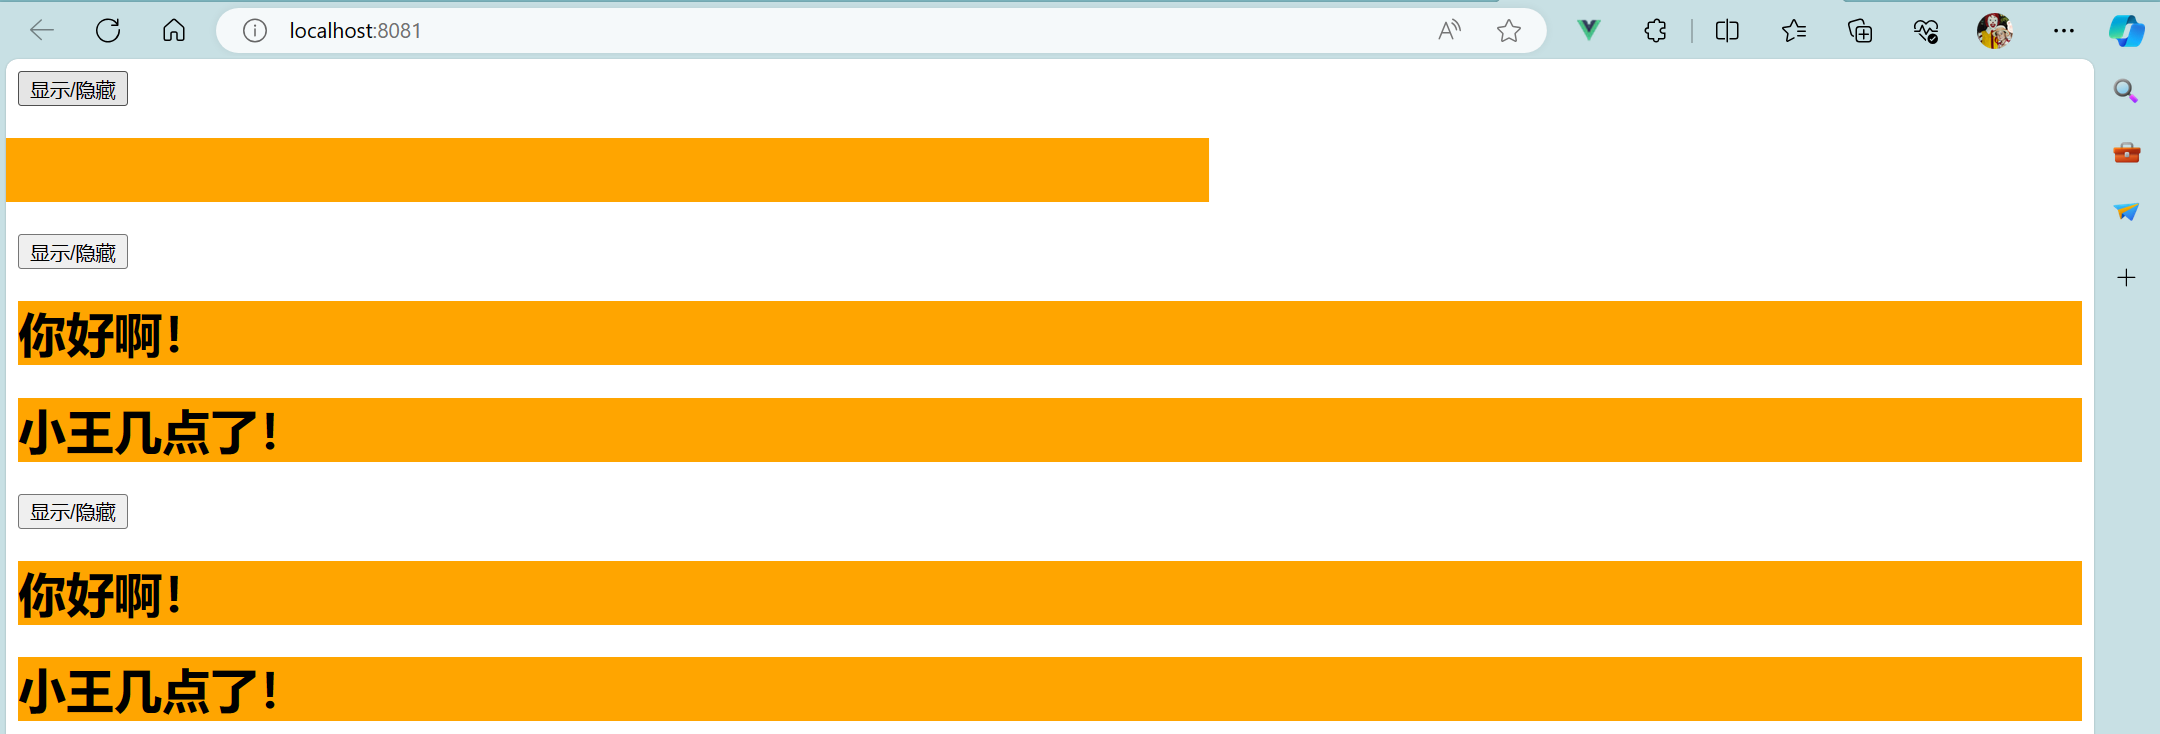
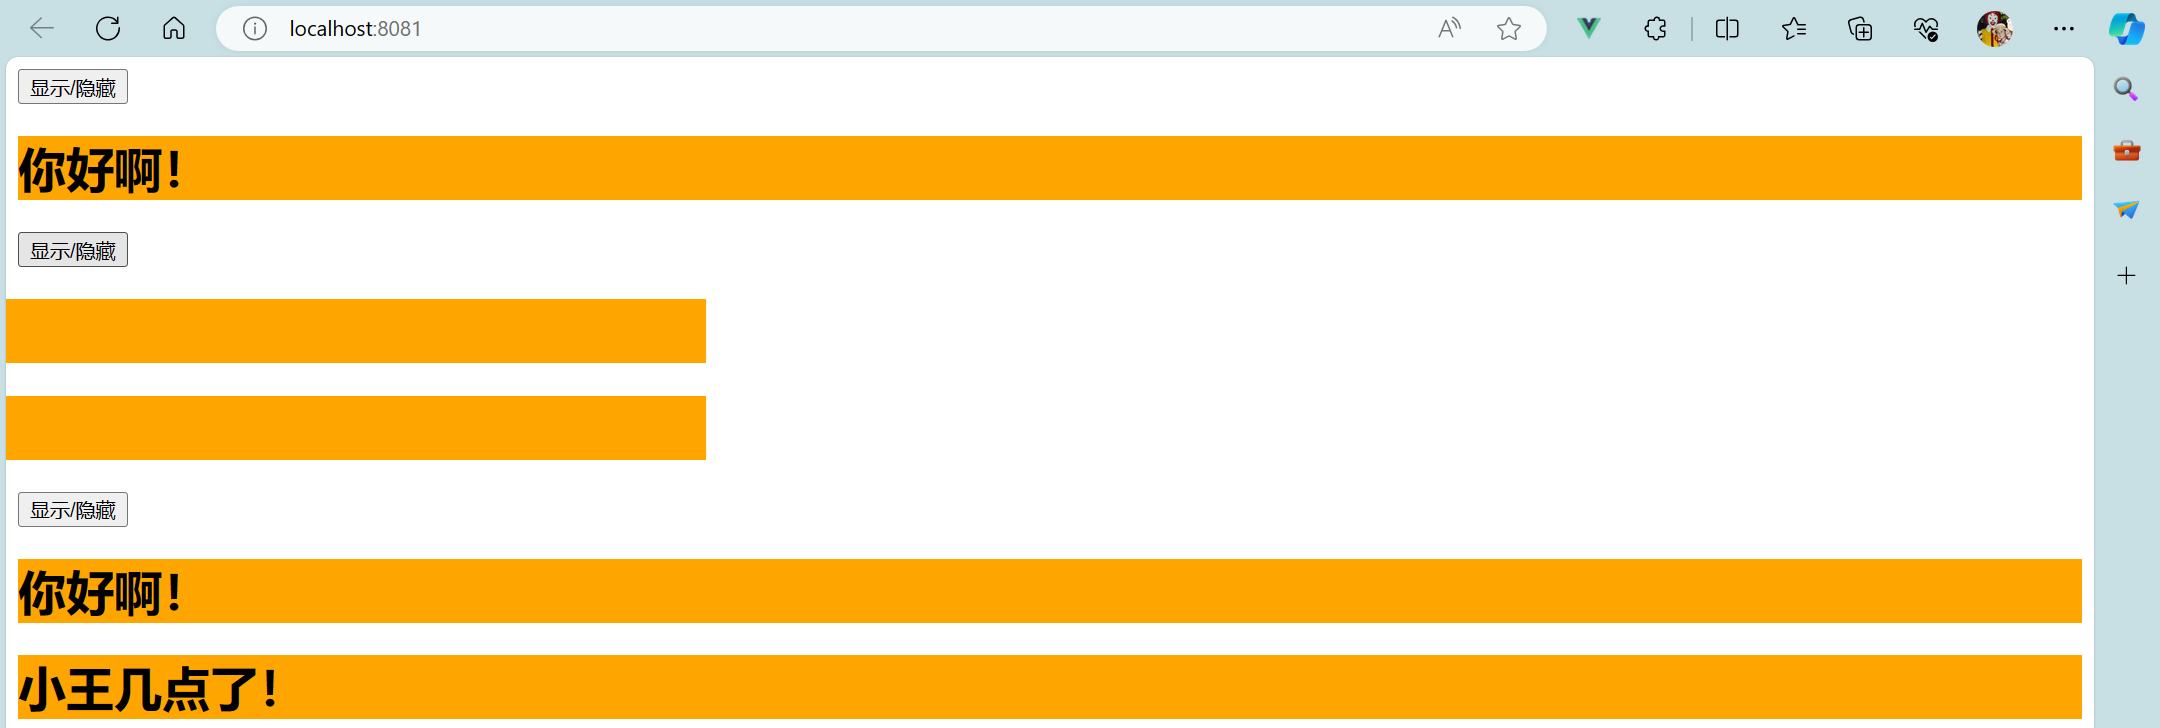
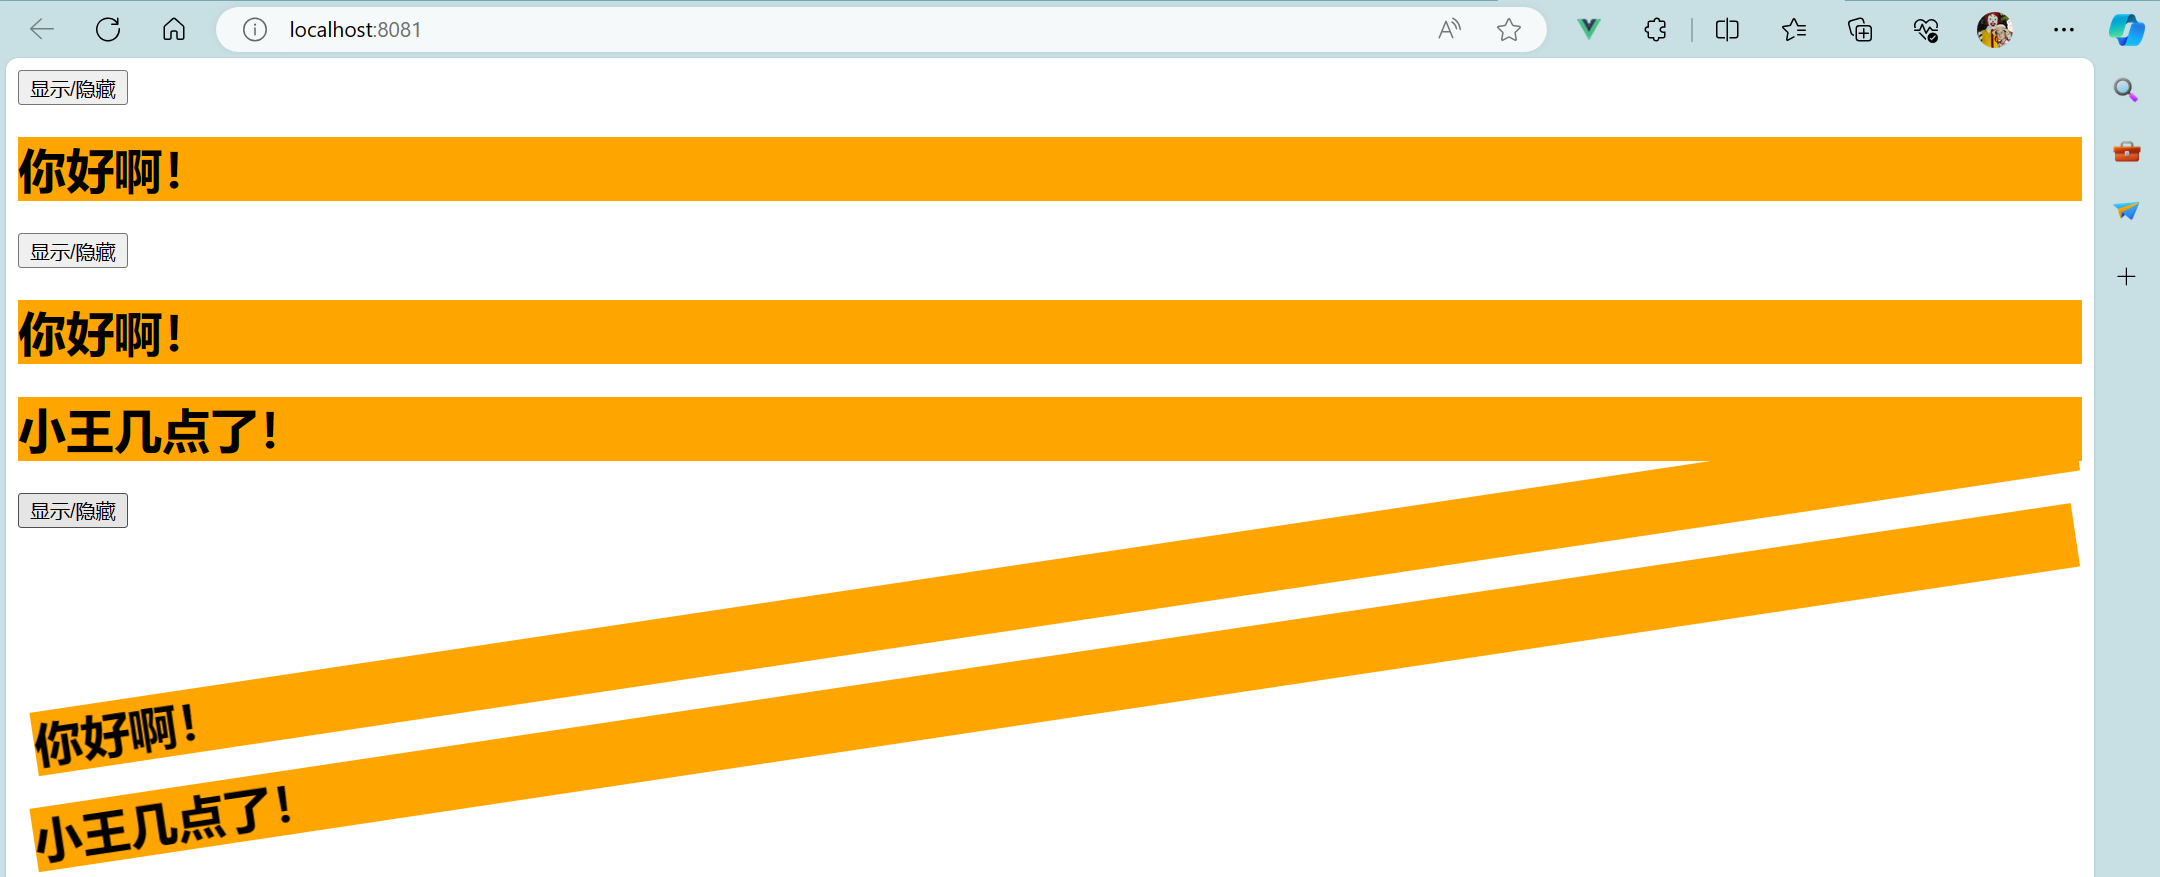
<template><div><button @click="isShow = !isShow">显示/隐藏</button><transition name="hello" :appear="true"> <!-- appear控制h1一上来就滑入 --><h1 v-show="isShow">你好啊!</h1></transition></div>
</template><script>export default {name:'Test',data() {return {isShow:true}}}
</script><style scoped>h1 {background-color: orange;}/* 动画样式 用动画写 *//* 来 */.hello-enter-active {animation: atguigu 1s linear; /* linear 匀速 */}/* 去 */.hello-leave-active {animation: atguigu 1s reverse; /* reverse 反转 */}@keyframes atguigu {from {transform: translateX(-100%);}to {transform: translateX(0);}}
</style>
4> Test2.vue代码:
<template><div><button @click="isShow = !isShow">显示/隐藏</button><!-- 单个元素过度 --><!-- <transition name="hello" :appear="true"> --> <!-- appear控制h1一上来就滑入 --><!-- <h1 v-show="isShow">你好啊!</h1> --><!-- </transition> --><!-- 多个元素过度 --><transition-group name="hello" :appear="true"> <!-- appear控制h1一上来就滑入 --><h1 v-show="isShow" key="1">你好啊!</h1><h1 v-show="isShow" key="2">小王几点了!</h1></transition-group></div>
</template><script>export default {name:'Test',data() {return {isShow:true}}}
</script><style scoped>h1 {background-color: orange;/* transition: 1s linear;  放在下面*/}/* 动画样式 用过度写 *//* 来 *//* 进入的起点、离开的终点 */.hello-enter, .hello-leave-to {transform: translateX(-100%);}/* 进入过程中 */.hello-enter-active, .hello-leave-active {transition: 1s linear;}/* 进入的终点、离开的起点 */.hello-enter-to, .hello-leave {transform: translateX(0);}/* 去 *//* 离开的起点 *//* .hello-leave {transform: translateX(0);} *//* 离开的终点 *//* .hello-leave-to {transform: translateX(-100%);} */</style>
5> Test3.vue代码:
<template><div><button @click="isShow = !isShow">显示/隐藏</button><!-- 多个元素过度 --><transition-group:appear="true" name="animate__animated animate__bounce" enter-active-class="animate__swing"leave-active-class="animate__backOutUp"><h1 v-show="isShow" key="1">你好啊!</h1><h1 v-show="isShow" key="2">小王几点了!</h1></transition-group></div>
</template><script>// 引入第三方库import 'animate.css'export default {name:'Test',data() {return {isShow:true}}}
</script><style scoped>h1 {background-color: orange;}
</style>

5.2 TodoList案例——动画
- 方法一 修改MyItem.vue代码:
<template><transition name="todo" appear="true"><li><label><!-- 写法一 --><!-- <input type="checkbox" :checked="todo.done" @click="handleCheck(todo.id)"/>  :checked="true" 给input指定一个checked选项,如为true,拥有checked,如为false,则没有checked--><!-- 写法二 --><input type="checkbox" :checked="todo.done" @change="handleCheck(todo.id)"/><!-- 写法三 此写法直接合并后两项 不用App插件将数据传给MyList再传给MyItem 不推荐此写法 因为props是只读的 不建议修改--><!-- <input type="checkbox" v-model="todo.done"/> --><span v-show="!todo.isEdit">{{todo.title}}</span><input type="text" v-show="todo.isEdit" :value="todo.title" @blur="handleBlur(todo,$event)" ref="inputTitle"></label><button class="btn btn-danger" @click="handleDelete(todo.id)">删除</button><button v-show="!todo.isEdit" class="btn btn-edit" @click="handleEdit(todo)">编辑</button></li></transition>
</template><script>import pubsub from 'pubsub-js'export default {name:'MyItem',// 声明接收todo对象// props:['todo','checkTodo','deleteTodo'],// 采用全局事件总线方法改为:props:['todo'],methods:{// 勾选or取消勾选handleCheck(id) {// console.log(id);// 通知App组件将对应的todo对象的done值取反// this.checkTodo(id)// 采用全局事件总线方法改为:this.$bus.$emit('checkTodo',id)}, // 删除handleDelete(id) {// confirm根据用户的交互 确定布尔值为真还是假if(confirm('确定删除吗?')) {// console.log(id);// this.deleteTodo(id)// 采用全局事件总线方法改为:// this.$bus.$emit('deleteTodo',id)// 采用消息订阅与发布方法此处改为:pubsub.publish('deleteTodo',id)}},// 编辑handleEdit(todo) {// todo.isEdit = true // 此写法可以改值 但没有getter和setter// 利用列表渲染中的vue.set// this.$set(todo,'isEdit',true)// 第一次加上isEdit属性 后面无需再加 因此使用if语句// 如果todo身上有isEdit 直接改 如果todo身上没有isEdit 先添加此属性再赋值if('isEdit' in todo) {todo.isEdit = true} else {this.$set(todo,'isEdit',true)}this.$nextTick(function() {// nextTick指定的回调 会在dom节点更新完毕后执行this.$refs.inputTitle.focus() // 获取焦点}) },// 失去焦点回调(真正执行修改逻辑)handleBlur(todo,e){todo.isEdit = falseif(!e.target.value.trim()) return alert('输入不能为空!') // trim()函数用于删除字符串的头尾空白符this.$bus.$emit('updateTodo',todo.id,e.target.value)}}}
</script><style scoped>/*item*/li {list-style: none;height: 36px;line-height: 36px;padding: 0 5px;border-bottom: 1px solid #ddd;}li label {float: left;cursor: pointer;}li label input {vertical-align: middle;margin-right: 6px;position: relative;top: -1px;}li button {float: right;display: none; margin-top: 3px; margin-left: 5px;}li:before {content: initial;}li:last-child {border-bottom: none;}li:hover {background-color: #ddd;}li:hover button {display: block;}/* 添加动画效果 */.todo-enter-active {animation: atguigu 0.5s linear;}.todo-leave-active {animation: atguigu 0.5s linear reverse;}@keyframes atguigu {from {transform: translateX(100%);}to {transform: translateX(0);}}
</style>
- 方法二 修改MyList.vue代码:
<template><ul class="todo-main"><transition-group><MyItem v-for="todoObj in todos" :key="todoObj.id" :todo="todoObj" /></transition-group></ul>
</template><script>import MyItem from './MyItem.vue'export default {name:'MyList',components: {MyItem},// props:['todos','checkTodo','deleteTodo'] // 接收数据// 采用全局事件总线方法改为:props:['todos']}
</script><style scoped>/*main*/.todo-main {margin-left: 0px;border: 1px solid #ddd;border-radius: 2px;padding: 0px;}.todo-empty {height: 40px;line-height: 40px;border: 1px solid #ddd;border-radius: 2px;padding-left: 5px;margin-top: 10px;}/* 添加动画效果 */.todo-enter-active {animation: atguigu 0.5s linear;}.todo-leave-active {animation: atguigu 0.5s linear reverse;}@keyframes atguigu {from {transform: translateX(100%);}to {transform: translateX(0);}}
</style>