- 修改/etc/sysctl.conf添加如下内容:
Vim /etc/sysctl.con
| net.ipv4.ip_forward=1 net.ipv4.ip_nonlocal_bind=1 net.ipv4.conf.all.rp_filter=0 net.ipv4.conf.default.rp_filter=0 net.bridge.bridge-nf-call-arptables = 0 net.bridge.bridge-nf-call-ip6tables = 0 net.bridge.bridge-nf-call-iptables = 0 net.ipv4.tcp_syncookies=1 net.ipv4.ip_local_port_range=1024 65535 net.ipv4.tcp_fin_timeout=30 net.ipv4.tcp_timestamps=1 net.ipv4.tcp_tw_recycle=0 net.ipv4.tcp_tw_reuse=1 net.ipv4.tcp_max_tw_buckets=262144 net.ipv4.tcp_max_orphans=3276800 net.ipv4.tcp_max_syn_backlog=819200 net.ipv4.tcp_keepalive_intvl=30 net.ipv4.tcp_keepalive_probes=3 net.ipv4.tcp_keepalive_time=1200 net.ipv4.udp_mem=945000000 9150000000 9270000000 net.ipv4.udp_rmem_min=409600 net.ipv4.udp_wmem_min=409600 net.netfilter.nf_conntrack_tcp_timeout_established=600 net.netfilter.nf_conntrack_max=655350 net.core.netdev_max_backlog=500000 net.core.somaxconn=65535 net.core.rmem_default=83886080 net.core.wmem_default=83886080 net.core.rmem_max=167772160 net.core.wmem_max=167772160 net.ipv4.tcp_mem=94500000 915000000 927000000 net.ipv4.tcp_rmem=4096 87380 16777216 net.ipv4.tcp_wmem=4096 16384 16777216 net.ipv4.tcp_thin_dupack=1 net.ipv4.tcp_thin_linear_timeouts=1 net.unix.max_dgram_qlen=3000 kernel.panic=1 kernel.core_pattern=core_%e kernel.sysrq=0 kernel.msgmax=65535 kernel.msgmnb=65535 kernel.shmmax=30923764530 kernel.shmall=7549746 kernel.watchdog_thresh = 30 vm.panic_on_oom=1 vm.min_free_kbytes=1048576 vm.swappiness=20 fs.inotify.max_user_watches=8192000 fs.aio-max-nr=1048576 fs.file-max=1048575 kernel.hung_task_panic = 0 kernel.hung_task_timeout_secs = 600 |
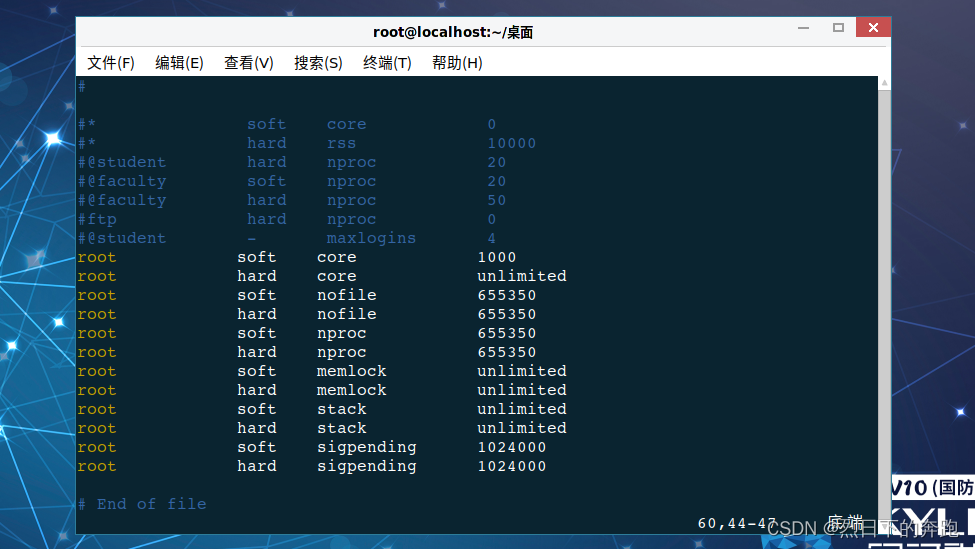
二、修改系统资源配置文件 /etc/security/limits.conf 文件添加如下内容:
| root soft core 1000 root hard core unlimited root soft nofile 655350 root hard nofile 655350 root soft nproc 655350 root hard nproc 655350 root soft memlock unlimited root hard memlock unlimited root soft stack unlimited root hard stack unlimited root soft sigpending 1024000 root hard sigpending 1024000 |

- 修改cpu工作模式,需要调整到高性能模式
- 执行xx.sh脚本 开启高性能模式 ,脚本内容如下:
Sh ./xx.sh
| for i in `cat /proc/cpuinfo |grep process | awk '{print $3}'` do echo performance > /sys/devices/system/cpu/cpu$i/cpufreq/scaling_governor done |
2.执行xxx.sh 脚本 调整CPU状态,脚本内容如下
Sh ./xxx.sh
| #!/bin/bash i=0 j=1 CPU_NUM=`cat /proc/cpuinfo |grep MHz |wc -l` while [ $i -lt $CPU_NUM ] do j=1 while [ $j -lt 4 ] do echo 1 > /sys/devices/system/cpu/cpu$i/cpuidle/state$j/disable j=`expr $j + 1` done i=`expr $i + 1` done |
- 如果是万兆网卡会需要安装网卡驱动 以下以Intel 82599芯片网卡类型演示安装网卡驱动
- inter官网下载网卡驱动源码包。此处用到的网卡驱动包版本为ixgbe-5.3.7
- 解压缩驱动包
tar xf ixgbe-5.3.7.tar.gz
- 进入解压之后的目录里的src目录
cd ixgbe-5.3.7/src
- 编译安装
make && make install
- 重新生成initramfs文件
| cp /boot/initramfs-$(uname -r).img /boot/initramfs-$(uname -r).img_bak dracut /boot/initramfs-$(uname -r).img $(uname -r) --force |
- 重新加载 ixgbe 模块
rmmod ixgbe
Modprobe ixgbe
加载完之后可以通过 ethtool -i xxx (网卡名) 命令查看驱动是否安装成功

- 重启网卡服务
systemctl restart network
- 修改网卡缓冲区以及网卡多队列
ethtool -G ens106 rx 4096 tx 4096
ethtool -L ens106 combined 1
ens106 具体的某块网卡名,一般我们会给当前所有的网卡缓冲区和队列都统一修改,使用以下命令即可:
| for i in `ifconfig |grep RUNNING |grep -v lo|grep -v bond |awk -F : '{print $1}'`;do ethtool -G $i rx 4096 tx 4096; ethtool -L $i combined 1; done |
- 绑核方法说明:
taskset -c 12(此处为cpu号) ./xxxx (此处为需要绑核的脚本或命令)
例如:
taskset -c 16 ./udptest
- 组播需要用到的交换机配置

- 已有的组播测试结果记录
浪潮服务器:
硬件环境:服务器:NF5280M5 cpu型号:Inter Xeon Gold 6154@3.10Ghz 网卡芯片:82599
系统环境为:Kylin-4.0.2-server-sp2-18072308.ZJ2-x86_64-2018-07-20
内核版本为:3.10.0-862
经过调优后:稳定性测试100小时可以跑到4.1G流量丢包率在10的负7次方以下
极限测试10分钟可以跑到7.1G流量不丢包

华为服务器:
硬件环境:服务器:2288Hv5 cpu型号:Inter Xeon Gold 6154@3.10Ghz 网卡芯片:82599
系统环境为:Kylin-4.0.2-server-sp2-18072308.ZJ2-x86_64-2018-07-20
内核版本为:3.10.0-862
经过调优后:稳定性测试100小时可以跑到4.1G流量丢包率在10的负7次方以下
极限测试10分钟可以跑到8.0G流量不丢包


