手动导出
直接使用脚本
import torch
from mmdet.apis import init_detector, inference_detectorconfig_file = './configs/yolo/yolov3_mobilenetv2_8xb24-ms-416-300e_coco.py'
checkpoint_file = 'yolov3_mobilenetv2_mstrain-416_300e_coco_20210718_010823-f68a07b3.pth'
model = init_detector(config_file, checkpoint_file, device='cpu')  # or device='cuda:0'
torch.onnx.export(model, (torch.zeros(1, 3, 416, 416),), "out.onnx", opset_version=11)
导出的onnx结构如下:
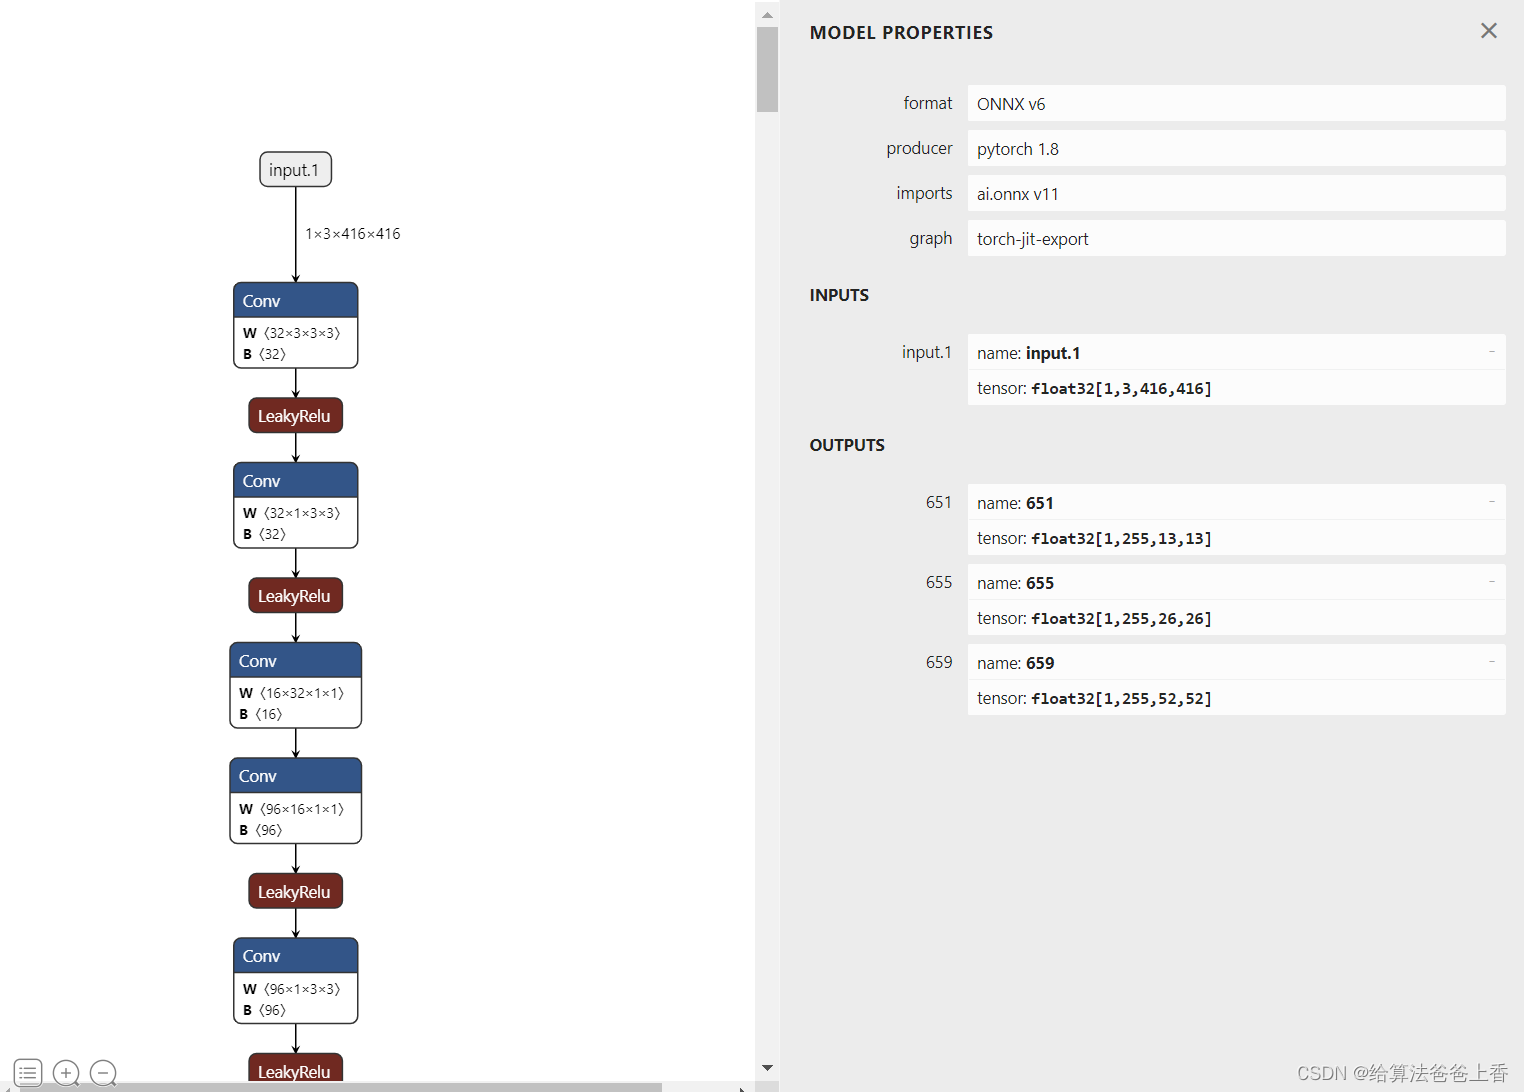
输出是包含三个不同层级检测头的输出。若需要合并检测结果,需要修改脚本如下:
import torch
from itertools import repeat
from mmdet.apis import init_detector, inference_detectorconfig_file = './configs/yolo/yolov3_mobilenetv2_8xb24-ms-416-300e_coco.py'
checkpoint_file = 'yolov3_mobilenetv2_mstrain-416_300e_coco_20210718_010823-f68a07b3.pth'
model = init_detector(config_file, checkpoint_file, device='cpu')  # or device='cuda:0'class YOLOV3(torch.nn.Module):def __init__(self):super().__init__()self.model = init_detector(config_file, checkpoint_file, device='cpu')self.class_num = 80self.base_sizes = [[(116, 90), (156, 198), (373, 326)], [(30, 61), (62, 45), (59, 119)], [(10, 13), (16, 30), (33, 23)]]self.stride = [32, 16, 8]self.strides = [tuple(repeat(x, 2)) for x in self.stride]self.centers = [(x[0] / 2., x[1] / 2.) for x in self.strides]self.base_anchors=self.gen_base_anchors()def gen_base_anchors(self):multi_level_base_anchors = []for i, base_sizes_per_level in enumerate(self.base_sizes):center = self.centers[i]x_center, y_center = centerbase_anchors = []for base_size in base_sizes_per_level:w, h = base_sizebase_anchor = torch.Tensor([x_center - 0.5 * w, y_center - 0.5 * h, x_center + 0.5 * w, y_center + 0.5 * h])base_anchors.append(base_anchor)base_anchors = torch.stack(base_anchors, dim=0)multi_level_base_anchors.append(base_anchors)return multi_level_base_anchorsdef _meshgrid(self, x, y):xx = x.repeat(y.shape[0])yy = y.view(-1, 1).repeat(1, x.shape[0]).view(-1)return xx, yydef grid_priors(self, featmap_sizes):multi_level_anchors = []for i in range(len(featmap_sizes)):base_anchors = self.base_anchors[i]feat_h, feat_w = featmap_sizes[i]stride_w, stride_h = self.strides[i]shift_x = torch.arange(0, feat_w) * stride_wshift_y = torch.arange(0, feat_h) * stride_hshift_xx, shift_yy = self._meshgrid(shift_x, shift_y)shifts = torch.stack([shift_xx, shift_yy, shift_xx, shift_yy], dim=-1)anchors = base_anchors[None, :, :] + shifts[:, None, :]anchors = anchors.view(-1, 4)           multi_level_anchors.append(anchors)return multi_level_anchorsdef decode(self, bboxes, pred_bboxes, stride):xy_centers = (bboxes[..., :2] + bboxes[..., 2:]) * 0.5 + (pred_bboxes[..., :2] - 0.5) * stridewhs = (bboxes[..., 2:] - bboxes[..., :2]) * 0.5 * pred_bboxes[..., 2:].exp()decoded_bboxes = torch.stack((xy_centers[..., 0] - whs[..., 0], xy_centers[..., 1] - whs[..., 1], xy_centers[..., 0] + whs[..., 0], xy_centers[..., 1] + whs[..., 1]), dim=-1)return decoded_bboxesdef forward(self, x):x = self.model.backbone(x)x = self.model.neck(x)pred_maps = self.model.bbox_head(x)flatten_preds = []flatten_strides = []for pred, stride in zip(pred_maps[0], self.stride):pred = pred.permute(0, 2, 3, 1).reshape(1, -1, 5+self.class_num)pred[..., :2] = pred[..., :2].sigmoid()flatten_preds.append(pred)flatten_strides.append(pred.new_tensor(stride).expand(pred.size(1)))flatten_preds = torch.cat(flatten_preds, dim=1)flatten_bbox_preds = flatten_preds[..., :4]  flatten_objectness = flatten_preds[..., 4].sigmoid()flatten_preds[..., 4] = flatten_objectnessflatten_cls_scores = flatten_preds[..., 5:].sigmoid()flatten_preds[..., 5:] = flatten_cls_scoresfeatmap_sizes = [pred_map.shape[-2:] for pred_map in pred_maps[0]]mlvl_anchors = self.grid_priors(featmap_sizes)flatten_anchors = torch.cat(mlvl_anchors)flatten_strides = torch.cat(flatten_strides)flatten_bboxes = self.decode(flatten_anchors, flatten_bbox_preds, flatten_strides.unsqueeze(-1))flatten_preds[..., :4] = flatten_bboxesreturn flatten_predsmodel = YOLOV3().eval()
input = torch.zeros(1, 3, 416, 416, device='cpu')
torch.onnx.export(model, input, "out.onnx", opset_version=11)
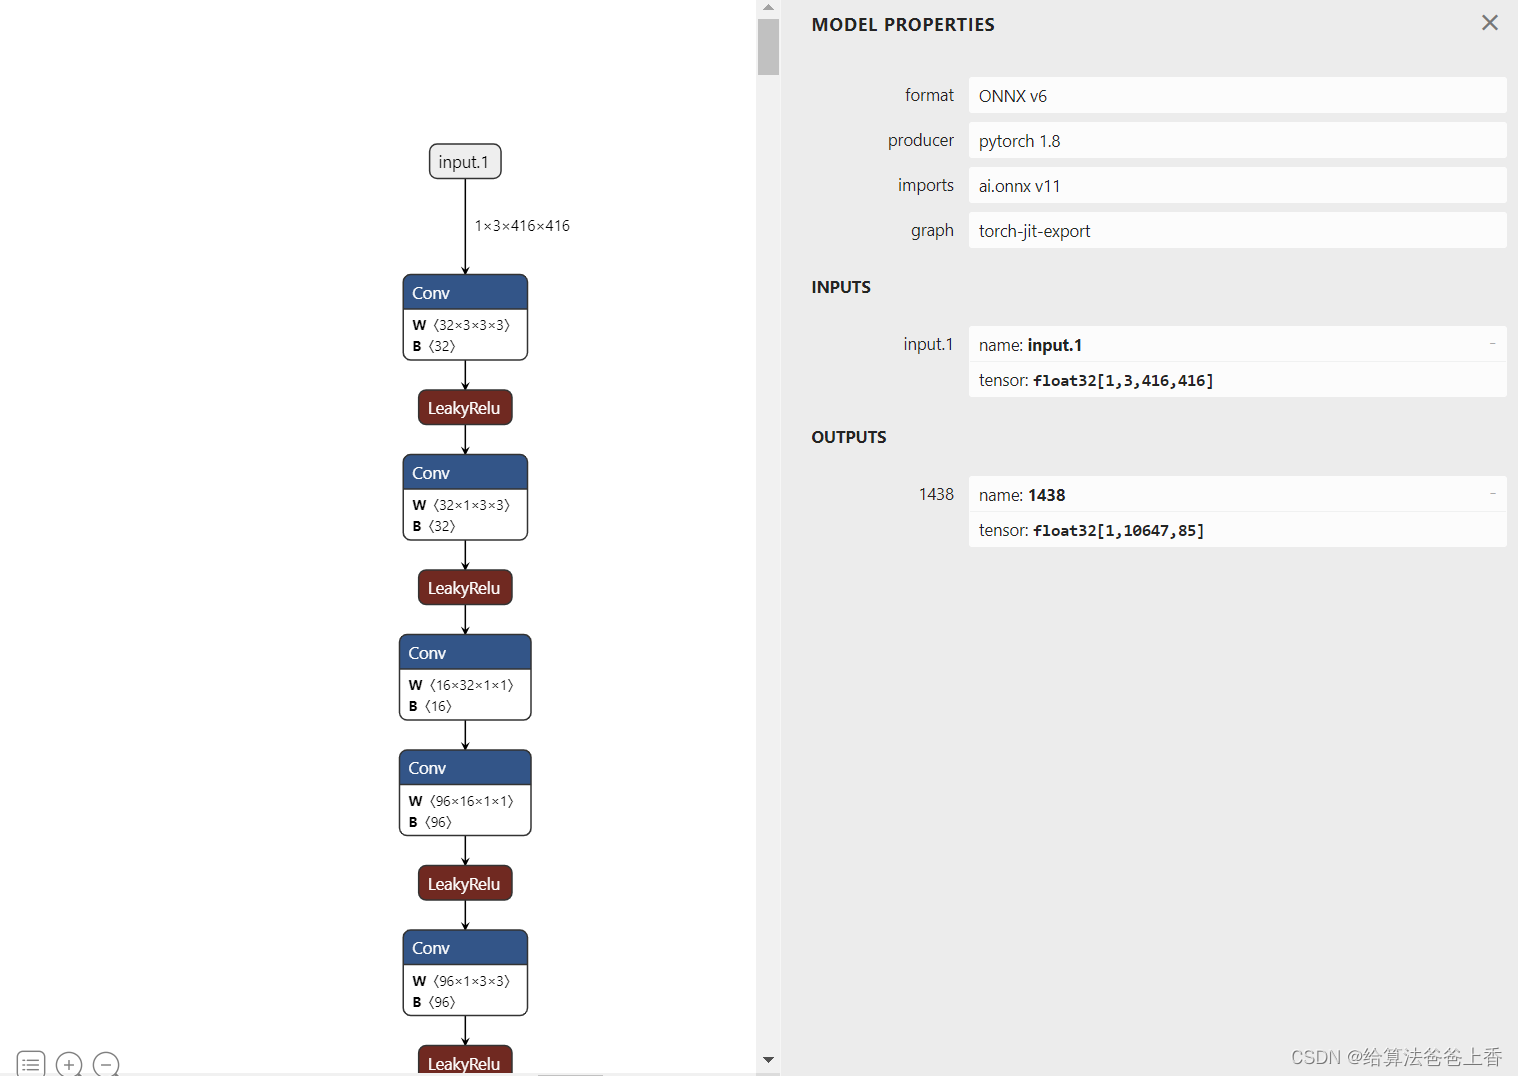
导出的onnx结构如下:
使用onnxruntime推理:
import cv2
import numpy as np
import onnxruntimeCLASSES = ['person', 'bicycle', 'car', 'motorcycle', 'airplane', 'bus', 'train', 'truck', 'boat', 'traffic light','fire hydrant', 'stop sign', 'parking meter', 'bench', 'bird', 'cat', 'dog', 'horse', 'sheep', 'cow','elephant', 'bear', 'zebra', 'giraffe', 'backpack', 'umbrella', 'handbag', 'tie', 'suitcase', 'frisbee','skis', 'snowboard', 'sports ball', 'kite', 'baseball bat', 'baseball glove', 'skateboard', 'surfboard','tennis racket', 'bottle', 'wine glass', 'cup', 'fork', 'knife', 'spoon', 'bowl', 'banana', 'apple','sandwich', 'orange', 'broccoli', 'carrot', 'hot dog', 'pizza', 'donut', 'cake', 'chair', 'couch','potted plant', 'bed', 'dining table', 'toilet', 'tv', 'laptop', 'mouse', 'remote', 'keyboard', 'cell phone','microwave', 'oven', 'toaster', 'sink', 'refrigerator', 'book', 'clock', 'vase', 'scissors', 'teddy bear','hair drier', 'toothbrush'] #coco80类别use_letterbox = True
input_shape = (416,416)      class YOLOV3():def __init__(self, onnxpath):self.onnx_session = onnxruntime.InferenceSession(onnxpath,providers=['CPUExecutionProvider'])self.input_name = self.get_input_name()self.output_name = self.get_output_name()#-------------------------------------------------------#   获取输入输出的名字#-------------------------------------------------------def get_input_name(self):input_name = []for node in self.onnx_session.get_inputs():input_name.append(node.name)return input_namedef get_output_name(self):output_name = []for node in self.onnx_session.get_outputs():output_name.append(node.name)return output_name#-------------------------------------------------------#   输入图像#-------------------------------------------------------def get_input_feed(self, img_tensor):input_feed = {}for name in self.input_name:input_feed[name]=img_tensorreturn input_feed#-------------------------------------------------------#   1.cv2读取图像并resize#	2.图像转BGR2RGB和HWC2CHW#	3.图像归一化#	4.图像增加维度#	5.onnx_session 推理#-------------------------------------------------------def inference(self, img):     if use_letterbox:or_img = letterbox(img, input_shape)else:or_img = cv2.resize(img, input_shape)img = or_img[:,:,::-1].transpose(2,0,1)  #BGR2RGB和HWC2CHWimg = img.astype(dtype=np.float32)img[0,:] = (img[0,:] - 123.675) / 58.395   img[1,:] = (img[1,:] - 116.28) / 57.12img[2,:] = (img[2,:] - 103.53) / 57.375img = np.expand_dims(img,axis=0)input_feed = self.get_input_feed(img)pred = self.onnx_session.run(None, input_feed)return pred, or_img#dets:  array [x,6] 6个值分别为x1,y1,x2,y2,score,class
#thresh: 阈值
def nms(dets, thresh):x1 = dets[:, 0]y1 = dets[:, 1]x2 = dets[:, 2]y2 = dets[:, 3]#-------------------------------------------------------#   计算框的面积#	置信度从大到小排序#-------------------------------------------------------areas = (y2 - y1 + 1) * (x2 - x1 + 1)scores = dets[:, 4]keep = []index = scores.argsort()[::-1] while index.size > 0:i = index[0]keep.append(i)#-------------------------------------------------------#   计算相交面积#	1.相交#	2.不相交#-------------------------------------------------------x11 = np.maximum(x1[i], x1[index[1:]]) y11 = np.maximum(y1[i], y1[index[1:]])x22 = np.minimum(x2[i], x2[index[1:]])y22 = np.minimum(y2[i], y2[index[1:]])w = np.maximum(0, x22 - x11 + 1)                              h = np.maximum(0, y22 - y11 + 1) overlaps = w * h#-------------------------------------------------------#   计算该框与其它框的IOU,去除掉重复的框,即IOU值大的框#	IOU小于thresh的框保留下来#-------------------------------------------------------ious = overlaps / (areas[i] + areas[index[1:]] - overlaps)idx = np.where(ious <= thresh)[0]index = index[idx + 1]return keepdef xywh2xyxy(x):# [x, y, w, h] to [x1, y1, x2, y2]y = np.copy(x)y[:, 0] = x[:, 0] - x[:, 2] / 2y[:, 1] = x[:, 1] - x[:, 3] / 2y[:, 2] = x[:, 0] + x[:, 2] / 2y[:, 3] = x[:, 1] + x[:, 3] / 2return ydef filter_box(org_box, conf_thres, iou_thres): #过滤掉无用的框#-------------------------------------------------------#   删除为1的维度#	删除置信度小于conf_thres的BOX#-------------------------------------------------------org_box = np.squeeze(org_box)conf = org_box[..., 4] > conf_thresbox = org_box[conf == True]#-------------------------------------------------------#	通过argmax获取置信度最大的类别#-------------------------------------------------------cls_cinf = box[..., 5:]cls = []for i in range(len(cls_cinf)):cls.append(int(np.argmax(cls_cinf[i])))all_cls = list(set(cls))    #-------------------------------------------------------#   分别对每个类别进行过滤#	1.将第6列元素替换为类别下标#	2.xywh2xyxy 坐标转换#	3.经过非极大抑制后输出的BOX下标#	4.利用下标取出非极大抑制后的BOX#-------------------------------------------------------output = []for i in range(len(all_cls)):curr_cls = all_cls[i]curr_cls_box = []curr_out_box = []for j in range(len(cls)):if cls[j] == curr_cls:box[j][4] *= cls_cinf[j][curr_cls]box[j][5] = curr_clscurr_cls_box.append(box[j][:6])curr_cls_box = np.array(curr_cls_box)curr_out_box = nms(curr_cls_box,iou_thres)for k in curr_out_box:output.append(curr_cls_box[k])output = np.array(output)return outputdef letterbox(im, new_shape=(416, 416), color=(114, 114, 114)):# Resize and pad image while meeting stride-multiple constraintsshape = im.shape[:2]  # current shape [height, width]# Scale ratio (new / old)r = min(new_shape[0] / shape[0], new_shape[1] / shape[1])# Compute paddingnew_unpad = int(round(shape[1] * r)), int(round(shape[0] * r))    dw, dh = (new_shape[1] - new_unpad[0])/2, (new_shape[0] - new_unpad[1])/2  # wh padding top, bottom = int(round(dh - 0.1)), int(round(dh + 0.1))left, right = int(round(dw - 0.1)), int(round(dw + 0.1))if shape[::-1] != new_unpad:  # resizeim = cv2.resize(im, new_unpad, interpolation=cv2.INTER_LINEAR)im = cv2.copyMakeBorder(im, top, bottom, left, right, cv2.BORDER_CONSTANT, value=color)  # add borderreturn imdef scale_boxes(input_shape, boxes, shape):# Rescale boxes (xyxy) from input_shape to shapegain = min(input_shape[0] / shape[0], input_shape[1] / shape[1])  # gain  = old / newpad = (input_shape[1] - shape[1] * gain) / 2, (input_shape[0] - shape[0] * gain) / 2  # wh paddingboxes[..., [0, 2]] -= pad[0]  # x paddingboxes[..., [1, 3]] -= pad[1]  # y paddingboxes[..., :4] /= gainboxes[..., [0, 2]] = boxes[..., [0, 2]].clip(0, shape[1])  # x1, x2boxes[..., [1, 3]] = boxes[..., [1, 3]].clip(0, shape[0])  # y1, y2return boxesdef draw(image, box_data):box_data = scale_boxes(input_shape, box_data, image.shape)boxes = box_data[...,:4].astype(np.int32) scores = box_data[...,4]classes = box_data[...,5].astype(np.int32)for box, score, cl in zip(boxes, scores, classes):top, left, right, bottom = boxprint('class: {}, score: {}, coordinate: [{}, {}, {}, {}]'.format(CLASSES[cl], score, top, left, right, bottom))cv2.rectangle(image, (top, left), (right, bottom), (255, 0, 0), 1)cv2.putText(image, '{0} {1:.2f}'.format(CLASSES[cl], score), (top, left), cv2.FONT_HERSHEY_SIMPLEX, 0.6, (0, 0, 255), 1)if __name__=="__main__":model = YOLOV3('yolov3.onnx')img = cv2.imread('bus.jpg')output, _ = model.inference(img)outbox = filter_box(output,0.5,0.5)draw(img,outbox)cv2.imwrite('res.jpg',img)
使用mmdeploy导出
安装mmdeploy的话,可以通过下面脚本导出onnx模型。
from mmdeploy.apis import torch2onnx
from mmdeploy.backend.sdk.export_info import export2SDKimg = 'demo.JPEG'
work_dir = './work_dir/onnx/yolov3'
save_file = './end2end.onnx'
deploy_cfg = 'mmdeploy/configs/mmdet/detection/detection_onnxruntime_dynamic.py'
model_cfg = 'mmdetection/configs/yolo/yolov3_mobilenetv2_8xb24-ms-416-300e_coco.py'
model_checkpoint = 'checkpoints/yolov3_mobilenetv2_mstrain-416_300e_coco_20210718_010823-f68a07b3.pth'
device = 'cpu'# 1. convert model to onnx
torch2onnx(img, work_dir, save_file, deploy_cfg, model_cfg, model_checkpoint, device)# 2. extract pipeline info for sdk use (dump-info)
export2SDK(deploy_cfg, model_cfg, work_dir, pth=model_checkpoint, device=device)
onnx模型的结构如下:
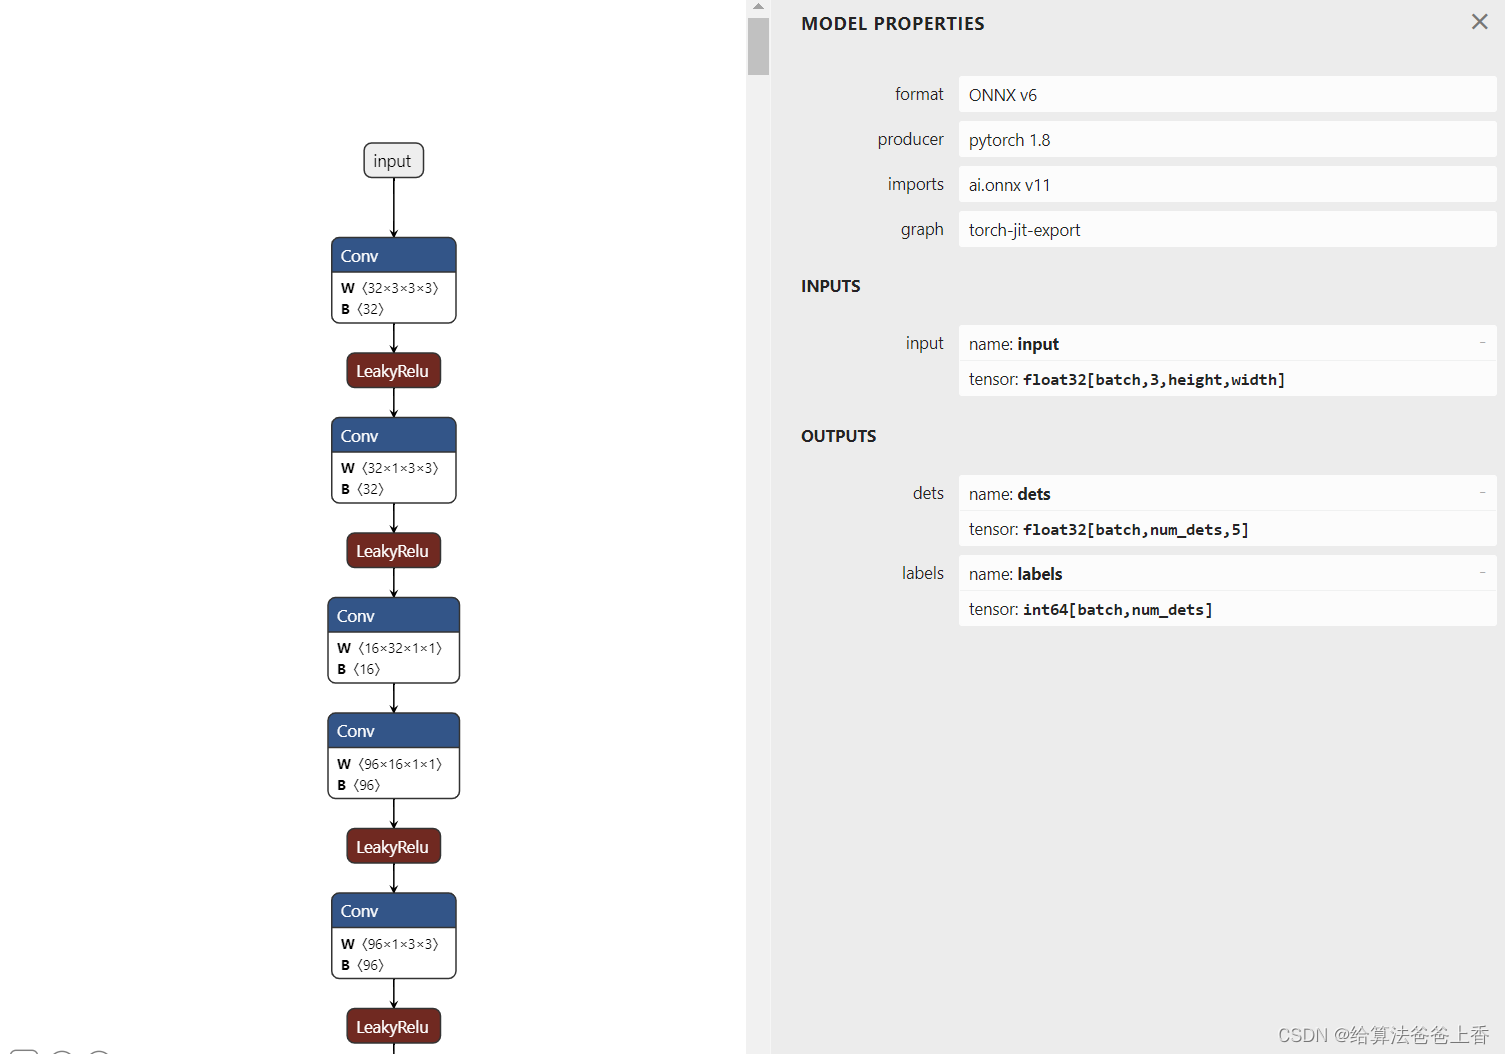
使用onnxruntime推理:
import cv2
import numpy as np
import onnxruntimeCLASSES = ['person', 'bicycle', 'car', 'motorcycle', 'airplane', 'bus', 'train', 'truck', 'boat', 'traffic light','fire hydrant', 'stop sign', 'parking meter', 'bench', 'bird', 'cat', 'dog', 'horse', 'sheep', 'cow','elephant', 'bear', 'zebra', 'giraffe', 'backpack', 'umbrella', 'handbag', 'tie', 'suitcase', 'frisbee','skis', 'snowboard', 'sports ball', 'kite', 'baseball bat', 'baseball glove', 'skateboard', 'surfboard','tennis racket', 'bottle', 'wine glass', 'cup', 'fork', 'knife', 'spoon', 'bowl', 'banana', 'apple','sandwich', 'orange', 'broccoli', 'carrot', 'hot dog', 'pizza', 'donut', 'cake', 'chair', 'couch','potted plant', 'bed', 'dining table', 'toilet', 'tv', 'laptop', 'mouse', 'remote', 'keyboard', 'cell phone','microwave', 'oven', 'toaster', 'sink', 'refrigerator', 'book', 'clock', 'vase', 'scissors', 'teddy bear','hair drier', 'toothbrush'] #coco80类别use_letterbox = True
input_shape = (416,416)      class YOLOV3():def __init__(self, onnxpath):self.onnx_session = onnxruntime.InferenceSession(onnxpath,providers=['CPUExecutionProvider'])self.input_name = self.get_input_name()self.output_name = self.get_output_name()#-------------------------------------------------------#   获取输入输出的名字#-------------------------------------------------------def get_input_name(self):input_name = []for node in self.onnx_session.get_inputs():input_name.append(node.name)return input_namedef get_output_name(self):output_name = []for node in self.onnx_session.get_outputs():output_name.append(node.name)return output_name#-------------------------------------------------------#   输入图像#-------------------------------------------------------def get_input_feed(self, img_tensor):input_feed = {}for name in self.input_name:input_feed[name]=img_tensorreturn input_feed#-------------------------------------------------------#   1.cv2读取图像并resize#	2.图像转BGR2RGB和HWC2CHW#	3.图像归一化#	4.图像增加维度#	5.onnx_session 推理#-------------------------------------------------------def inference(self, img):     if use_letterbox:or_img = letterbox(img, input_shape)else:or_img = cv2.resize(img, input_shape)img = or_img[:,:,::-1].transpose(2,0,1)  #BGR2RGB和HWC2CHWimg = img.astype(dtype=np.float32)img[0,:] = (img[0,:] - 123.675) / 58.395   img[1,:] = (img[1,:] - 116.28) / 57.12img[2,:] = (img[2,:] - 103.53) / 57.375img = np.expand_dims(img,axis=0)input_feed = self.get_input_feed(img)pred = self.onnx_session.run(None, input_feed)return pred, or_imgdef filter_box(org_box, conf_thres): #删除置信度小于conf_thres的BOXflag = org_box[0][..., 4] > conf_thresbox = org_box[0][flag == True] cls = org_box[1][flag == True].reshape(-1, 1) output = np.concatenate((box, cls), axis=1)  return outputdef letterbox(im, new_shape=(416, 416), color=(114, 114, 114)):# Resize and pad image while meeting stride-multiple constraintsshape = im.shape[:2]  # current shape [height, width]# Scale ratio (new / old)r = min(new_shape[0] / shape[0], new_shape[1] / shape[1])# Compute paddingnew_unpad = int(round(shape[1] * r)), int(round(shape[0] * r))    dw, dh = (new_shape[1] - new_unpad[0])/2, (new_shape[0] - new_unpad[1])/2  # wh padding top, bottom = int(round(dh - 0.1)), int(round(dh + 0.1))left, right = int(round(dw - 0.1)), int(round(dw + 0.1))if shape[::-1] != new_unpad:  # resizeim = cv2.resize(im, new_unpad, interpolation=cv2.INTER_LINEAR)im = cv2.copyMakeBorder(im, top, bottom, left, right, cv2.BORDER_CONSTANT, value=color)  # add borderreturn imdef scale_boxes(input_shape, boxes, shape):# Rescale boxes (xyxy) from input_shape to shapegain = min(input_shape[0] / shape[0], input_shape[1] / shape[1])  # gain  = old / newpad = (input_shape[1] - shape[1] * gain) / 2, (input_shape[0] - shape[0] * gain) / 2  # wh paddingboxes[..., [0, 2]] -= pad[0]  # x paddingboxes[..., [1, 3]] -= pad[1]  # y paddingboxes[..., :4] /= gainboxes[..., [0, 2]] = boxes[..., [0, 2]].clip(0, shape[1])  # x1, x2boxes[..., [1, 3]] = boxes[..., [1, 3]].clip(0, shape[0])  # y1, y2return boxesdef draw(image,box_data):box_data = scale_boxes(input_shape, box_data, image.shape)boxes = box_data[...,:4].astype(np.int32) scores = box_data[...,4]classes = box_data[...,5].astype(np.int32)for box, score, cl in zip(boxes, scores, classes):top, left, right, bottom = boxprint('class: {}, score: {}, coordinate: [{}, {}, {}, {}]'.format(CLASSES[cl], score, top, left, right, bottom))cv2.rectangle(image, (top, left), (right, bottom), (255, 0, 0), 1)cv2.putText(image, '{0} {1:.2f}'.format(CLASSES[cl], score), (top, left), cv2.FONT_HERSHEY_SIMPLEX, 0.6, (0, 0, 255), 1)if __name__=="__main__":model = YOLOV3('../work_dir/onnx/yolov3/end2end.onnx')img = cv2.imread('bus.jpg')output, _ = model.inference(img)outbox = filter_box(output,0.5,0.5)draw(img,outbox)cv2.imwrite('res.jpg',img)
使用mmdeploy推理:
from mmdeploy.apis import inference_modelmodel_cfg = 'mmdetection/configs/yolo/yolov3_mobilenetv2_8xb24-ms-416-300e_coco.py'
deploy_cfg = 'mmdeploy/configs/mmdet/detection/detection_onnxruntime_dynamic.py'
img = 'mmdetection/demo/demo.jpg'
backend_files = ['work_dir/onnx/yolov3/end2end.onnx']
device = 'cpu'result = inference_model(model_cfg, deploy_cfg, backend_files, img, device)
print(result)
或者
from mmdeploy_runtime import Detector
import cv2# 读取图片
img = cv2.imread('mmdetection/demo/demo.jpg')# 创建检测器
detector = Detector(model_path='work_dir/onnx/yolov3', device_name='cpu')
# detector = Detector(model_path='work_dir/onnx/yolox', device_name='cpu')
# detector = Detector(model_path='work_dir/trt/yolox', device_name='cuda')
# 执行推理
bboxes, labels, _ = detector(img)
# 使用阈值过滤推理结果,并绘制到原图中
indices = [i for i in range(len(bboxes))]
for index, bbox, label_id in zip(indices, bboxes, labels):[left, top, right, bottom], score = bbox[0:4].astype(int),  bbox[4]if score < 0.3:continuecv2.rectangle(img, (left, top), (right, bottom), (0, 255, 0))
cv2.imwrite('output_detection.png', img)