目录
- 引言
- 核心代码
- 基本表达
- 绘制曲线
- 使用QEasingCurve
- 完整代码
引言
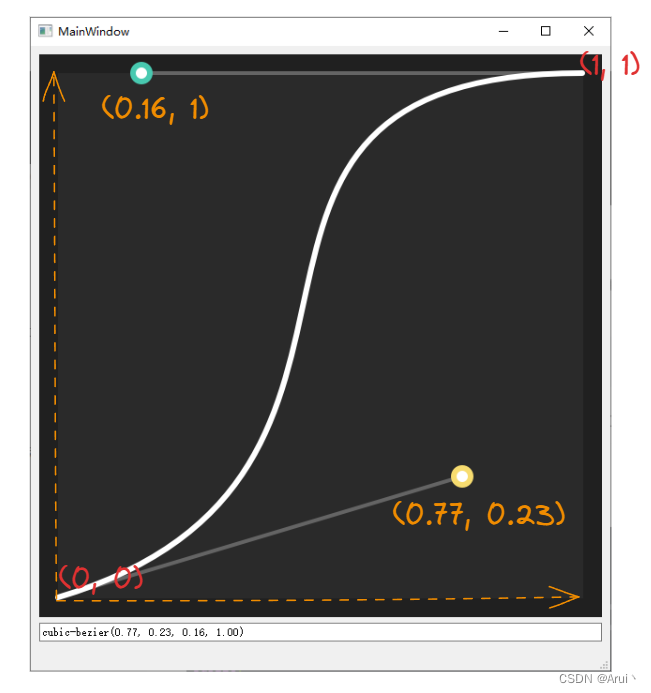
贝塞尔曲线客户端开发中常见的过渡效果,如界面的淡入淡出、数值变化、颜色变化等等。为了能够更深的了解地理解贝塞尔曲线,本文通过Demo将贝塞尔曲线绘制出来,如下所示:

核心代码
基本表达
一般来说贝塞尔曲线由起止点以及c1、c2点构成,如上图中,黄色为c1点,绿色为c2点,通过调整c1、c2点去调整整个曲线的变化快慢。
cubic-bezier(.42,0,.58,1)
而这两个点这么怎么去表达呢,如上所示,可以拆分为c1坐标(0.42,0)和c2坐标(0.58,1),而这个坐标则是一个相对坐标,范围是从(0,0)到(1,1),如下图所示:
绘制曲线
void QPainterPath::cubicTo(const QPointF &c1, const QPointF &c2, const QPointF &endPoint)
Adds a cubic Bezier curve between the current position and the given endPoint using the control points specified by c1, and c2.
After the curve is added, the current position is updated to be at the end point of the curve.
绘制可以通过QPainterPath::cubicTo完成,需要注意的是其中使用的是这个绘制界面的绝对坐标,而不是相对坐标,因此需要增加两个转换函数方便后续的编码。
首先是百分比坐标转换为实际坐标:
QPoint CubicBezierWidget::PercentToPosition(const QPointF &percent)
{return valid_rect_.bottomLeft() + QPoint(valid_rect_.width() * percent.x(), -valid_rect_.height() * percent.y());
}
再者就是将实际坐标转换为百分比坐标:
QPointF CubicBezierWidget::PositionToPercent(const QPoint &position)
{double x_percent = position.x() - valid_rect_.bottomLeft().x();x_percent = x_percent / valid_rect_.width();double y_percent = valid_rect_.bottomLeft().y() - position.y();y_percent = y_percent / valid_rect_.height();return QPointF(x_percent, y_percent);
}
最后则是起止点以及c1、c2组装起来
// 关键数据QPointF start_point = valid_rect_.bottomLeft();QPointF end_point = valid_rect_.topRight();QPoint c1_point = PercentToPosition(c1_);QPoint c2_point = PercentToPosition(c2_);QPainterPath path;path.moveTo(start_point);path.cubicTo(c1_point, c2_point, end_point);
使用QEasingCurve
QEasingCurve是Qt核心库的曲线函数,可以使用其作为动画函数的变化曲线,这也是贝塞尔曲线最多的应用场景,通过QAbstractAnimation::setEasingCurve设置。此处为了展示,从曲线中采样10个点,通过函数QEasingCurve::valueForProgress获取对应的y值进行绘制,如下所示:
QEasingCurve easing_curve(QEasingCurve::BezierSpline);easing_curve.addCubicBezierSegment(QPointF(0.42, 0.0), QPointF(0.58, 1.0), QPointF(1.0, 1.0));QPainterPath path_bezier;int count = 10;for(int i=0; i <= count; i++){double progress = (double)i / count;QPointF target_point(PercentToPosition(QPointF(progress, easing_curve.valueForProgress(progress))));if(i){path_bezier.lineTo(target_point);}else{path_bezier.moveTo(target_point);}}pen.setColor(QColor(241, 148, 138));painter.save();painter.setPen(pen);painter.setBrush(Qt::NoBrush);painter.drawPath(path_bezier);painter.restore();
完整代码
class CubicBezierWidget : public QWidget
{Q_OBJECTQ_PROPERTY(QPointF c1 READ c1 WRITE setC1 NOTIFY c1Changed FINAL)Q_PROPERTY(QPointF c2 READ c2 WRITE setC2 NOTIFY c2Changed FINAL)public:explicit CubicBezierWidget(QWidget *parent = nullptr);enum MouseState {MouseNormal = 0,MouseActivatedC1,MouseActivatedC2,};public:QPointF c1() const;void setC1(QPointF c1);QPointF c2() const;void setC2(QPointF c2);signals:void c1Changed();void c2Changed();protected:void paintEvent(QPaintEvent *event) override;void resizeEvent(QResizeEvent *event) override;void mousePressEvent(QMouseEvent *event) override;void mouseReleaseEvent(QMouseEvent *event) override;void mouseMoveEvent(QMouseEvent *event) override;private:QPoint PercentToPosition(const QPointF &percent);QPointF PositionToPercent(const QPoint &position);MouseState StateByPosition(const QPoint &position);private slots:void toUpdate();private:int space_ = 20;int radius_ = 12;int inner_radius_ = 6;// 百分比QPointF c1_;QPointF c2_;QRect valid_rect_;// 鼠标标志MouseState mouse_type_ = MouseNormal;
};
#include <QDebug>
#include <QPainter>
#include <QPainterPath>
#include <QPaintEvent>
#include <QEasingCurve>CubicBezierWidget::CubicBezierWidget(QWidget *parent): QWidget{parent}
{connect(this, &CubicBezierWidget::c1Changed, this, &CubicBezierWidget::toUpdate);connect(this, &CubicBezierWidget::c2Changed, this, &CubicBezierWidget::toUpdate);
}void CubicBezierWidget::paintEvent(QPaintEvent *event)
{// 关键数据QPointF start_point = valid_rect_.bottomLeft();QPointF end_point = valid_rect_.topRight();QPoint c1_point = PercentToPosition(c1_);QPoint c2_point = PercentToPosition(c2_);QPainterPath path;path.moveTo(start_point);path.cubicTo(c1_point, c2_point, end_point);// 初始化画笔QPainter painter(this);painter.setRenderHint(QPainter::Antialiasing);painter.setPen(Qt::NoPen);painter.setBrush(Qt::NoBrush);// 背景painter.save();painter.setBrush(QColor(32, 32, 32));painter.drawRect(event->rect());painter.setBrush(QColor(42, 42, 42));painter.drawRect(valid_rect_);painter.restore();QPen pen;pen.setCapStyle(Qt::RoundCap);pen.setWidth(4);pen.setColor(QColor(100, 100, 100));// 连接线painter.save();painter.setPen(pen);painter.drawLine(start_point, c1_point);painter.drawLine(end_point, c2_point);painter.restore();pen.setWidth(6);pen.setColor("white");// 曲线painter.save();painter.setPen(pen);painter.drawPath(path);painter.restore();// 操作圆c1painter.save();painter.setBrush(QColor(247, 220, 111));painter.drawEllipse(c1_point, radius_, radius_);painter.setBrush(Qt::white);painter.drawEllipse(c1_point, inner_radius_, inner_radius_);painter.restore();// 操作圆c2painter.save();painter.setBrush(QColor(72, 201, 176));painter.drawEllipse(c2_point, radius_, radius_);painter.setBrush(Qt::white);painter.drawEllipse(c2_point, inner_radius_, inner_radius_);painter.restore();
}void CubicBezierWidget::resizeEvent(QResizeEvent *event)
{valid_rect_ = rect().adjusted(space_, space_, -space_, -space_);// 还原setC1(QPointF(0, 0));setC2(QPointF(1, 1));
}void CubicBezierWidget::mousePressEvent(QMouseEvent *event)
{mouse_type_ = StateByPosition(event->pos());
}void CubicBezierWidget::mouseReleaseEvent(QMouseEvent *event)
{mouse_type_ = MouseNormal;
}void CubicBezierWidget::mouseMoveEvent(QMouseEvent *event)
{if(mouse_type_ == MouseActivatedC1){QPointF percent = PositionToPercent(event->pos());setC1(percent);}else if(mouse_type_ == MouseActivatedC2){QPointF percent = PositionToPercent(event->pos());setC2(percent);}
}QPoint CubicBezierWidget::PercentToPosition(const QPointF &percent)
{return valid_rect_.bottomLeft() + QPoint(valid_rect_.width() * percent.x(), -valid_rect_.height() * percent.y());
}QPointF CubicBezierWidget::PositionToPercent(const QPoint &position)
{double x_percent = position.x() - valid_rect_.bottomLeft().x();x_percent = x_percent / valid_rect_.width();double y_percent = valid_rect_.bottomLeft().y() - position.y();y_percent = y_percent / valid_rect_.height();return QPointF(x_percent, y_percent);
}CubicBezierWidget::MouseState CubicBezierWidget::StateByPosition(const QPoint &position)
{QPoint c2_position = PercentToPosition(c2_);QRect c2_rect(c2_position.x() - radius_, c2_position.y() - radius_, 2 * radius_, 2* radius_);if(c2_rect.contains(position)){return MouseActivatedC2;}QPoint c1_position = PercentToPosition(c1_);QRect c1_rect(c1_position.x() - radius_, c1_position.y() - radius_, 2 * radius_, 2* radius_);if(c1_rect.contains(position)){return MouseActivatedC1;}return MouseNormal;
}void CubicBezierWidget::toUpdate()
{update();
}QPointF CubicBezierWidget::c1() const
{return c1_;
}void CubicBezierWidget::setC1(QPointF c1)
{c1.setX(qBound(0.0, c1.x(), 1.0));c1.setY(qBound(0.0, c1.y(), 1.0));if (c1_ == c1)return;c1_ = c1;emit c1Changed();
}QPointF CubicBezierWidget::c2() const
{return c2_;
}void CubicBezierWidget::setC2(QPointF c2)
{c2.setX(qBound(0.0, c2.x(), 1.0));c2.setY(qBound(0.0, c2.y(), 1.0));if (c2_ == c2)return;c2_ = c2;emit c2Changed();
}