【Spring Boot】035-Spring Boot 整合 MyBatis Plus
【Spring Boot】010-Spring Boot整合Mybatis
https://blog.csdn.net/qq_29689343/article/details/108621835
文章目录
- 【Spring Boot】035-Spring Boot 整合 MyBatis Plus
- 一、MyBatis Plus 概述
- 1、简介
- 2、特性
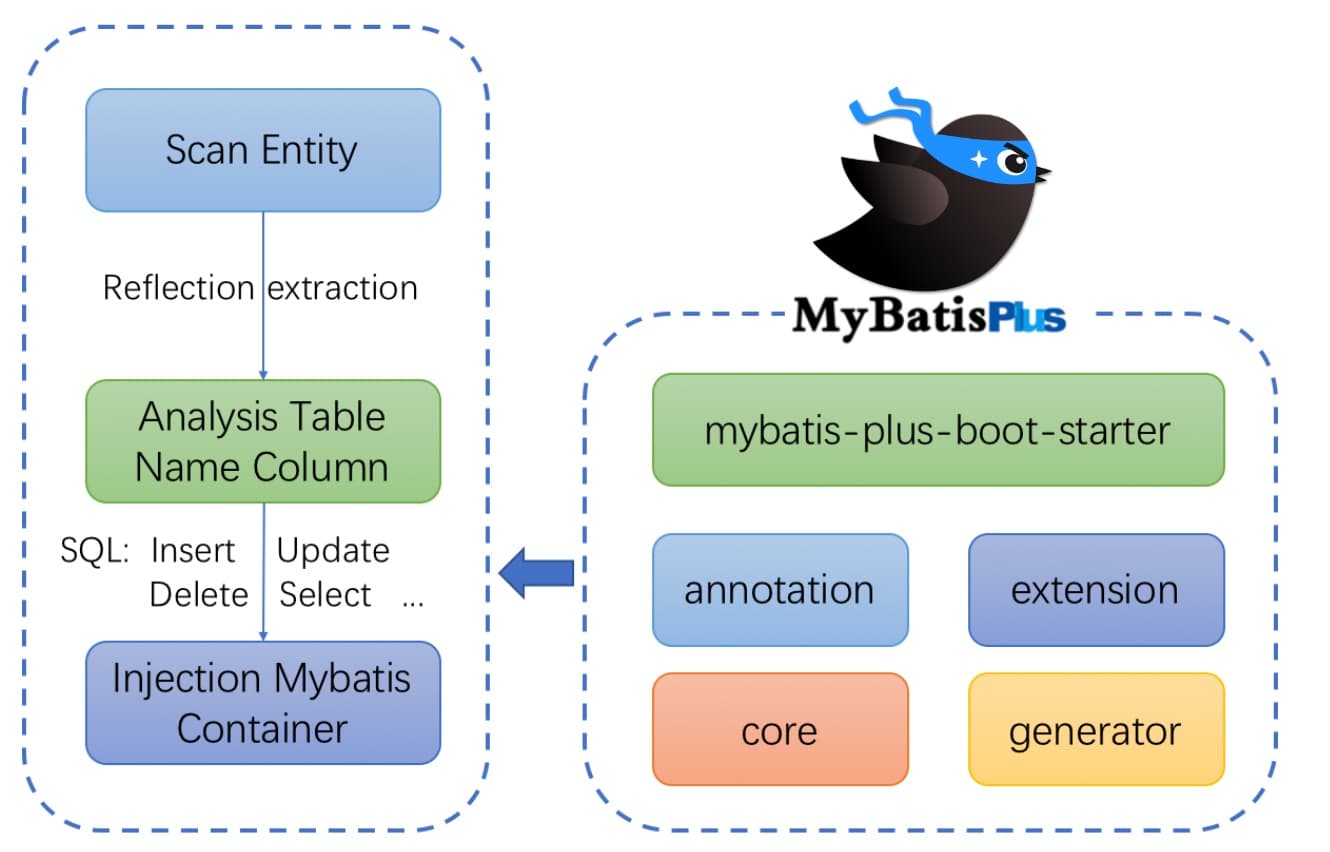
- 3、结构图
- 4、相关资料
- 二、Spring Boot 整合 MyBatis Plus
- 1、引入依赖
- 核心依赖
- 完整 pom.xml 文件
- 2、数据源配置
- 3、演示数据
- 建表语句
- 示例数据
- 4、基础代码和配置
- 实体类
- Mapper 接口
- StudentMapper.xml
- 启动类上配置 mapper 扫描路径
- 测试类
- 运行结果
- 代码结构截图
- 三、MyBatis Plus 核心特性使用
- 1、CRUD基础接口
- insert 型接口
- delete 型接口
- update 型接口
- select 型接口
- 2、Wrapper 机制
- 基本使用
- lambda 式使用
- 投影查询
- 聚合查询
- 3、主键策略与ID生成器
- 4、逻辑删除
- application.yaml 中配置
- 在实体类的 deleted 属性上标记 @TableLogic 注解
- 数据表中加上 deleted 字段
- 删除测试
- 逻辑删除结果
- 5、乐观锁插件
- 第一步:注册乐观锁插件
- 第二步:实体类添加 `@Version` 注解
- 6、分页插件
- 第一步:添加分页插件
- 第二步:使用分页模型
一、MyBatis Plus 概述
1、简介
MyBatis Plus 为简化开发而生!
MyBatis Plus(简称 MyBatis-Plus 或 MP)是 MyBatis 的增强工具包,它在 MyBatis 的基础上提供了很多便捷的功能,简化了开发过程。
只做增强,不做改变、效率至上,功能丰富。
2、特性
- CRUD 操作的增强支持: MyBatis Plus 提供了更简单、更便捷的方式进行 CRUD 操作,减少了开发者的工作量。
- 条件构造器: MyBatis Plus 引入了条件构造器,可以通过简单的链式调用来构建复杂的查询条件,避免了手写 SQL 语句的繁琐。
- 代码生成器: MyBatis Plus 提供了代码生成器,可以根据数据库表自动生成对应的实体类、Mapper 接口以及 XML 文件,提高了开发效率。
- 分页插件: MyBatis Plus 集成了分页插件,可以方便地进行分页查询,支持多种数据库的分页方式。
- 性能优化: MyBatis Plus 对 MyBatis 进行了一些性能上的优化,提高了系统的运行效率。
- 通用 Mapper: MyBatis Plus 提供了通用 Mapper 的功能,可以通过继承 BaseMapper 接口来实现通用的 CRUD 操作,减少了编码量。
- 自动填充: MyBatis Plus 支持自动填充功能,可以在插入和更新操作时自动填充指定的字段,如创建时间、更新时间等。
3、结构图
4、相关资料
官网:https://baomidou.com/
github:https://github.com/baomidou/mybatis-plus
二、Spring Boot 整合 MyBatis Plus
1、引入依赖
核心依赖
<!-- MySQL -->
<dependency><groupId>com.mysql</groupId><artifactId>mysql-connector-j</artifactId><scope>runtime</scope>
</dependency><!-- MyBatis-Plus -->
<dependency><groupId>com.baomidou</groupId><artifactId>mybatis-plus-boot-starter</artifactId><version>3.5.3.2</version>
</dependency>
完整 pom.xml 文件
<?xml version="1.0" encoding="UTF-8"?>
<project xmlns="http://maven.apache.org/POM/4.0.0" xmlns:xsi="http://www.w3.org/2001/XMLSchema-instance"xsi:schemaLocation="http://maven.apache.org/POM/4.0.0 https://maven.apache.org/xsd/maven-4.0.0.xsd"><modelVersion>4.0.0</modelVersion><parent><groupId>org.springframework.boot</groupId><artifactId>spring-boot-starter-parent</artifactId><version>2.7.17</version><relativePath/> <!-- lookup parent from repository --></parent><groupId>com.zibo</groupId><artifactId>study-mp</artifactId><version>0.0.1-SNAPSHOT</version><name>study-mp</name><description>study-mp</description><properties><java.version>1.8</java.version></properties><dependencies><dependency><groupId>org.springframework.boot</groupId><artifactId>spring-boot-starter</artifactId></dependency><dependency><groupId>org.springframework.boot</groupId><artifactId>spring-boot-starter-test</artifactId><scope>test</scope></dependency><!-- MySQL --><dependency><groupId>com.mysql</groupId><artifactId>mysql-connector-j</artifactId><scope>runtime</scope></dependency><!-- MyBatis-Plus --><dependency><groupId>com.baomidou</groupId><artifactId>mybatis-plus-boot-starter</artifactId><version>3.5.3.2</version></dependency><!-- lombok --><dependency><groupId>org.projectlombok</groupId><artifactId>lombok</artifactId><optional>true</optional></dependency></dependencies><build><plugins><plugin><groupId>org.springframework.boot</groupId><artifactId>spring-boot-maven-plugin</artifactId><configuration><image><builder>paketobuildpacks/builder-jammy-base:latest</builder></image><excludes><exclude><groupId>org.projectlombok</groupId><artifactId>lombok</artifactId></exclude></excludes></configuration></plugin></plugins></build></project>
2、数据源配置
spring:datasource:driver-class-name: com.mysql.cj.jdbc.Driverurl: jdbc:mysql://localhost:3306/study?useUnicode=true&characterEncoding=utf8&zeroDateTimeBehavior=convertToNull&useSSL=true&serverTimezone=GMT%2B8username: rootpassword: 123456
3、演示数据
建表语句
CREATE TABLE `student` (`id` int unsigned NOT NULL AUTO_INCREMENT COMMENT 'ID',`name` varchar(50) CHARACTER SET utf8mb4 COLLATE utf8mb4_general_ci NOT NULL COMMENT '名字',`age` int unsigned NOT NULL COMMENT '年龄',PRIMARY KEY (`id`),UNIQUE KEY `name` (`name`)
) ENGINE=InnoDB AUTO_INCREMENT=8 DEFAULT CHARSET=utf8mb4 COLLATE=utf8mb4_general_ci COMMENT='学生';
示例数据
INSERT INTO `study`.`student`(`id`, `name`, `age`) VALUES (1, '訾博', 27);
INSERT INTO `study`.`student`(`id`, `name`, `age`) VALUES (2, 'zibo', 25);
INSERT INTO `study`.`student`(`id`, `name`, `age`) VALUES (3, 'zb', 23);
4、基础代码和配置
实体类
MyBatisPlus 拥有非常优秀的单表 CRUD 基础能力,而这个能力需要在实体类上做一些改动。通过标注 @TableName 注解,相当于告诉 MyBatisPlus 当前这个 Student 类要映射到 student 表(默认表名策略是驼峰转下划线);通过给 id 属性标注 @TableId 注解,并声明 ID 类型为 auto ,相当于适配 MySQL 中的自增主键。其他属性与数据库中映射均一致,就不再需要添加新注解了。
package com.zibo.studymp.entity;import com.baomidou.mybatisplus.annotation.IdType;
import com.baomidou.mybatisplus.annotation.TableId;
import com.baomidou.mybatisplus.annotation.TableName;
import lombok.Data;@Data
@TableName("student")
public class Student {@TableId(type = IdType.AUTO)private Integer id;private String name;private Integer age;
}
Mapper 接口
MyBatisPlus 的单表 CRUD 能力来自一个内置的基础接口 BaseMapper ,通过继承 BaseMapper 并注明实体类的泛型类型,即可拥有单表的 CRUD 能力。
package com.zibo.studymp.mapper;import com.baomidou.mybatisplus.core.mapper.BaseMapper;
import com.zibo.studymp.entity.Student;public interface StudentMapper extends BaseMapper<Student> {Student getByName(String name);}
StudentMapper.xml
<?xml version="1.0" encoding="UTF-8" ?>
<!DOCTYPE mapper PUBLIC "-//mybatis.org//DTD Mapper 3.0//EN""http://mybatis.org/dtd/mybatis-3-mapper.dtd"><mapper namespace="com.zibo.studymp.mapper.StudentMapper"><select id="getByName" resultType="com.zibo.studymp.entity.Student">SELECT *FROM `student`WHERE `name` = #{name}</select></mapper>
启动类上配置 mapper 扫描路径
@MapperScan({“com.zibo.**.mapper”})
package com.zibo.studymp;import org.mybatis.spring.annotation.MapperScan;
import org.springframework.boot.SpringApplication;
import org.springframework.boot.autoconfigure.SpringBootApplication;@SpringBootApplication
@MapperScan({"com.zibo.**.mapper"})
public class StudyMpApplication {public static void main(String[] args) {SpringApplication.run(StudyMpApplication.class, args);}}
测试类
package com.zibo.studymp;import com.zibo.studymp.entity.Student;
import com.zibo.studymp.mapper.StudentMapper;
import org.junit.jupiter.api.Test;
import org.springframework.beans.factory.annotation.Autowired;
import org.springframework.boot.test.context.SpringBootTest;@SpringBootTest
class StudyMpApplicationTests {@Autowiredprivate StudentMapper studentMapper;@Testvoid contextLoads() {Student student = studentMapper.selectById(1);System.out.println(student);System.out.println("==================================");student = studentMapper.getByName("zibo");System.out.println(student);}}
运行结果
Student(id=1, name=訾博, age=27)
==================================
Student(id=2, name=zibo, age=25)
代码结构截图

三、MyBatis Plus 核心特性使用
1、CRUD基础接口
MyBatisPlus 提供的重要基础能力,就是替我们开发者实现了基本的单表 CRUD 操作,我们在编写具体的业务模块时,单表的 CRUD 可以完全不需要编写了,仅需要继承 BaseMapper 接口,该 Mapper 接口就可以自动拥有单表 CRUD 的能力。
insert 型接口
// 插入一条记录
int insert(T entity);
delete 型接口
// 根据 entity 条件,删除记录
int delete(@Param(Constants.WRAPPER) Wrapper<T> wrapper);
// 删除(根据ID 批量删除)
int deleteBatchIds(@Param(Constants.COLLECTION) Collection<? extends Serializable> idList);
// 根据 ID 删除
int deleteById(Serializable id);
// 根据 columnMap 条件,删除记录
int deleteByMap(@Param(Constants.COLUMN_MAP) Map<String, Object> columnMap);
update 型接口
// 根据 whereWrapper 条件,更新记录
int update(@Param(Constants.ENTITY) T updateEntity, @Param(Constants.WRAPPER) Wrapper<T> whereWrapper);
// 根据 ID 修改
int updateById(@Param(Constants.ENTITY) T entity);
select 型接口
// 根据 ID 查询
T selectById(Serializable id);
// 根据 entity 条件,查询一条记录
T selectOne(@Param(Constants.WRAPPER) Wrapper<T> queryWrapper);// 查询(根据ID 批量查询)
List<T> selectBatchIds(@Param(Constants.COLLECTION) Collection<? extends Serializable> idList);
// 根据 entity 条件,查询全部记录
List<T> selectList(@Param(Constants.WRAPPER) Wrapper<T> queryWrapper);
// 查询(根据 columnMap 条件)
List<T> selectByMap(@Param(Constants.COLUMN_MAP) Map<String, Object> columnMap);
// 根据 Wrapper 条件,查询全部记录
List<Map<String, Object>> selectMaps(@Param(Constants.WRAPPER) Wrapper<T> queryWrapper);
// 根据 Wrapper 条件,查询全部记录。注意: 只返回第一个字段的值
List<Object> selectObjs(@Param(Constants.WRAPPER) Wrapper<T> queryWrapper);// 根据 entity 条件,查询全部记录(并翻页)
IPage<T> selectPage(IPage<T> page, @Param(Constants.WRAPPER) Wrapper<T> queryWrapper);
// 根据 Wrapper 条件,查询全部记录(并翻页)
IPage<Map<String, Object>> selectMapsPage(IPage<T> page, @Param(Constants.WRAPPER) Wrapper<T> queryWrapper);
// 根据 Wrapper 条件,查询总记录数
Integer selectCount(@Param(Constants.WRAPPER) Wrapper<T> queryWrapper);
2、Wrapper 机制
Wrapper 是 MyBatisPlus 编程式查询、修改数据的重要特性,这种特性类似于 Hibernate 中的 Criteria 机制(也就是 QBC 查询)。MyBatis 提供的 Wrapper 机制拥有对单表查询的灵活条件构造、投影查询、聚合查询等能力。下面通过几个简单示例来了解 Wrapper 的使用。
基本使用
@Testvoid test01() {// wrapper 基本使用QueryWrapper<Student> wrapper = new QueryWrapper<>();wrapper.eq("name", "zibo");Student student = studentMapper.selectOne(wrapper);System.out.println(student);}
lambda 式使用
为了更容易维护可能变化的实体模型类属性,MyBatisPlus 提供了 LambdaWrapper ,使用这种类型的 Wrapper 将属性的字符串变量改为 Lambda 表达式,以此实现代码的高可维护性。
@Testvoid test02() {// lambda 式使用LambdaQueryWrapper<Student> wrapper = new LambdaQueryWrapper<>();wrapper.eq(Student::getName, "zibo");Student student = studentMapper.selectOne(wrapper);System.out.println(student);// lambda 式使用:链式调用String name = "訾博";student = studentMapper.selectOne(new LambdaQueryWrapper<Student>().eq(StringUtils.isNotBlank(name), Student::getName, name));System.out.println(student);}
投影查询
如果一个表的列特别多,而我们只需要查其中几列数据时,投影查询就显得非常重要了,通过指定需要查询的列,来达到节省数据库流量带宽的目的。
测试代码
@Testvoid test03() {// 投影查询LambdaQueryWrapper<Student> wrapper = new LambdaQueryWrapper<>();wrapper.eq(Student::getName, "zibo");wrapper.select(Student::getName, Student::getAge);Student student = studentMapper.selectOne(wrapper);System.out.println(student);}
查询结果
Student(id=null, name=zibo, age=25)
聚合查询
对于单表查询来讲,聚合查询也是一个常见的查询场景。虽然 MyBatisPlus 没有对几种聚合函数提供 API 的定义,不过我们可以传入 SQL 片段来曲线实现聚合查询。
测试代码
@Testvoid test04() {// 聚合查询QueryWrapper<Student> wrapper = new QueryWrapper<>();wrapper.select("max(age) as age");Student student = studentMapper.selectOne(wrapper);System.out.println(student);}
执行结果
Student(id=null, name=null, age=27)
3、主键策略与ID生成器
MyBatisPlus 考虑到我们在项目开发中可能会用到的几种主键类型,它给予了一些基础实现和配置:
- AUTO :数据库主键自增
- ASSIGN_ID :雪花算法 ID
- ASSIGN_UUID :不带短横线的 uuid
- INPUT :程序手动设置的 id (或配合序列填充,Oracle 、SQLServer 等使用)
- NONE :逻辑主键,数据库表中没有定义主键
默认情况下,MyBatisPlus 使用的主键策略是使用了雪花算法的 ASSIGN_ID 策略。
4、逻辑删除
下面简单了解 MyBatisPlus 中的两个简单实用的特性。
逻辑删除是代替 delete 物理删除的一种更适合项目开发的数据删除机制,它通过设置一个特殊的标志位,将需要删除的数据设置为“不可见”,并在每次查询数据时只查询标志位数据值为“可见”的数据,这样的设计即是逻辑删除。MyBatisPlus 使用逻辑删除非常简单,只需要两步即可。
application.yaml 中配置
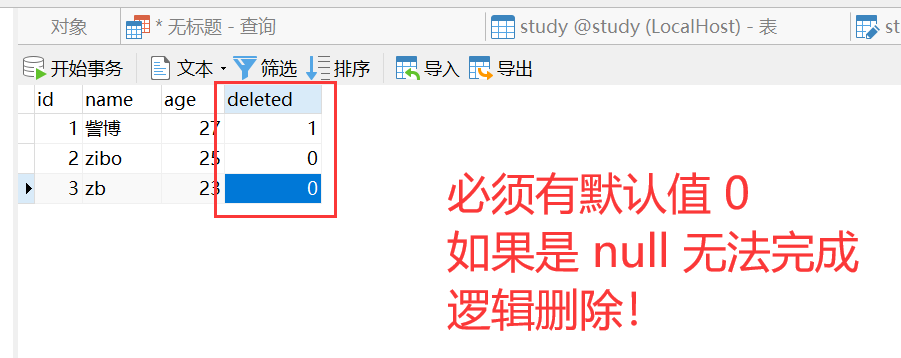
mybatis-plus:global-config:db-config:logic-delete-field: deletedlogic-delete-value: 1logic-not-delete-value: 0
在实体类的 deleted 属性上标记 @TableLogic 注解
package com.zibo.studymp.entity;import com.baomidou.mybatisplus.annotation.IdType;
import com.baomidou.mybatisplus.annotation.TableId;
import com.baomidou.mybatisplus.annotation.TableLogic;
import com.baomidou.mybatisplus.annotation.TableName;
import lombok.Data;@Data
@TableName("student")
public class Student {@TableId(type = IdType.AUTO)private Integer id;private String name;private Integer age;@TableLogicprivate Integer deleted;
}
数据表中加上 deleted 字段

删除测试
@Testvoid deleteTest() {// 删除int result = studentMapper.deleteById(1);System.out.println(result);}
逻辑删除结果
5、乐观锁插件
乐观锁是高并发下控制的手段,它假设多用户并发的事务在处理时不会彼此互相影响,各事务能够在不产生锁的情况下处理各自影响的那部分数据。换句话说,乐观锁希望一条即将被更新的数据,没有被其他人操作过。
乐观锁的实现方式如下:
- 给数据添加 version 属性
- 当查询数据时,把 version 数据一并带出
- 更新数据时,将查询的 version 数据值一并传入
- 执行 update / delete 语句时,额外在 where 条件中添加 version = ? 语句
- 如果 version 数据与数据库中的不一致,则更新 / 删除失败
MyBatisPlus 中实现的乐观锁机制是通过插件实现。使用乐观锁需要以下两个步骤:
第一步:注册乐观锁插件
@Configuration(proxyBeanMethods = false)
public class MyBatisPlusConfiguration {@Beanpublic MybatisPlusInterceptor mybatisPlusInterceptor() {MybatisPlusInterceptor interceptor = new MybatisPlusInterceptor();// 添加乐观锁插件interceptor.addInnerInterceptor(new OptimisticLockerInnerInterceptor());return interceptor;}
}
第二步:实体类添加 @Version 注解
package com.zibo.studymp.entity;import com.baomidou.mybatisplus.annotation.IdType;
import com.baomidou.mybatisplus.annotation.TableId;
import com.baomidou.mybatisplus.annotation.TableLogic;
import com.baomidou.mybatisplus.annotation.TableName;
import com.baomidou.mybatisplus.annotation.Version;
import lombok.Data;@Data
@TableName("student")
public class Student {@TableId(type = IdType.AUTO)private Integer id;private String name;private Integer age;@TableLogicprivate Integer deleted;@Versionprivate Integer version;
}
以此法编写完毕后,在 student 表的单表数据操作时,乐观锁就会介入处理。
需要注意的是,MyBatisPlus 支持的乐观锁,可以对以下的数据类型予以支持:
- int long
- Integer Long
- Date Timestamp LocalDateTime
6、分页插件
分页查询是项目开发中非常常见的业务场景,对于 MyBatis 的分页插件而言可能之前比较常见的是 PageHelper ,MyBatisPlus 已经考虑到了分页查询的场景,它提供了一个专门用于分页的插件,通过简单的配置就可以使用分页的特性。
第一步:添加分页插件
@Bean
public MybatisPlusInterceptor mybatisPlusInterceptor() {MybatisPlusInterceptor interceptor = new MybatisPlusInterceptor();// 添加乐观锁插件interceptor.addInnerInterceptor(new OptimisticLockerInnerInterceptor());// 添加分页插件interceptor.addInnerInterceptor(new PaginationInnerInterceptor(new MySqlDialect()));return interceptor;
}
第二步:使用分页模型
在进行分页查询时,需要传入 IPage 对象,并返回 IPage 模型或 List 集合。以下是几个示例。
/*** 使用IPage作为入参和返回值* @param query* @return*/IPage<Student> page(IPage<Student> query);/*** 使用集合作为返回值* @param query* @return*/List<Student> pageList(IPage<Student> query);/*** 使用IPage和其他参数共同作为入参* @param page* @param params* @return*/IPage<Student> pageParams(@Param("page") IPage<Student> page, @Param("params") Map<String, Object> params);