前言
本文为博主的vue实战小项目系列中的第三篇,很适合后端或者才入门的小伙伴看,一个前端项目从0到1的保姆级教学。前面的内容:
【vue实战项目】通用管理系统:登录页-CSDN博客
【vue实战项目】通用管理系统:封装token操作和网络请求-CSDN博客
【vue实战项目】通用管理系统:api封装、404页-CSDN博客
本文将讲解实现整个项目的重点:首页的搭建,包含菜单、菜单的路由转跳、面包屑导航等内容。

目录
1.搭架子
2.布局
编辑
3.Header
5.Menu
5.1.页面
5.2.路由
5.2.1自定义菜单内容
5.2.2.开启路由功能
6.面包屑导航
1.搭架子
先来看一下主页的样子:
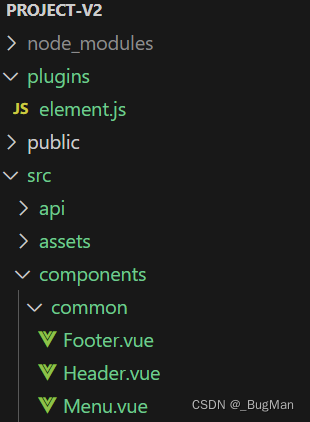
 主页的结构:头部+中间+底部,也就是由header、menu、footer三个组件组成。由于这三个组件是很多页面都要用到的公共组件,所以在components下面建一个common用来放这些公共组件。然后分别建三个组件的架子,先建三个空白的架子吧,后面一点点往这三个组件里填内容。
先把这三个组件写出来,先写三个空白的架子即可,后面再慢慢填充:
header:
<template><div>footer</div>
</template><script>
export default{data(){return {}}
}
</script>
<style lang="less" scoped></style>
footer:
<template><div>footer</div>
</template><script>
export default{data(){return {}}
}
</script>
<style lang="less" scoped></style>
menu:
<template><div>menu</div>
</template><script>
export default{data(){return {}}
}
</script>
<style lang="less" scoped></style>
在helloworld组件里面引入一下,看看能不能正常引入:
<template><div class="helloworld"><Header></Header><Menu/><Footer/></div>
</template><script>
import Footer from './common/Footer.vue'
import Header from './common/Header.vue'
import Menu from './common/Menu.vue'
export default {components:{Footer,Menu,Header},data(){return{}}
}
</script>
能正常引入的话,页面上会显示几个组件的内容:

然后基于原来的HelloWorld改成Home页面:
<template><div class="home"><Header></Header><Menu/><Footer/></div>
</template><script>
import Footer from './common/Footer.vue'
import Header from './common/Header.vue'
import Menu from './common/Menu.vue'
export default {components:{Footer,Menu,Header},data(){return{}}
}
</script><style lang="less">
.home{width: 100%;height: 100%;
}
</style>
2.布局
准备好三个组件后,接下来就是对Home进行布局,既然用了UI框架,直接用elementUI提供的布局即可,在其官网上有:

选一个,改一改,然后调整一下样式:
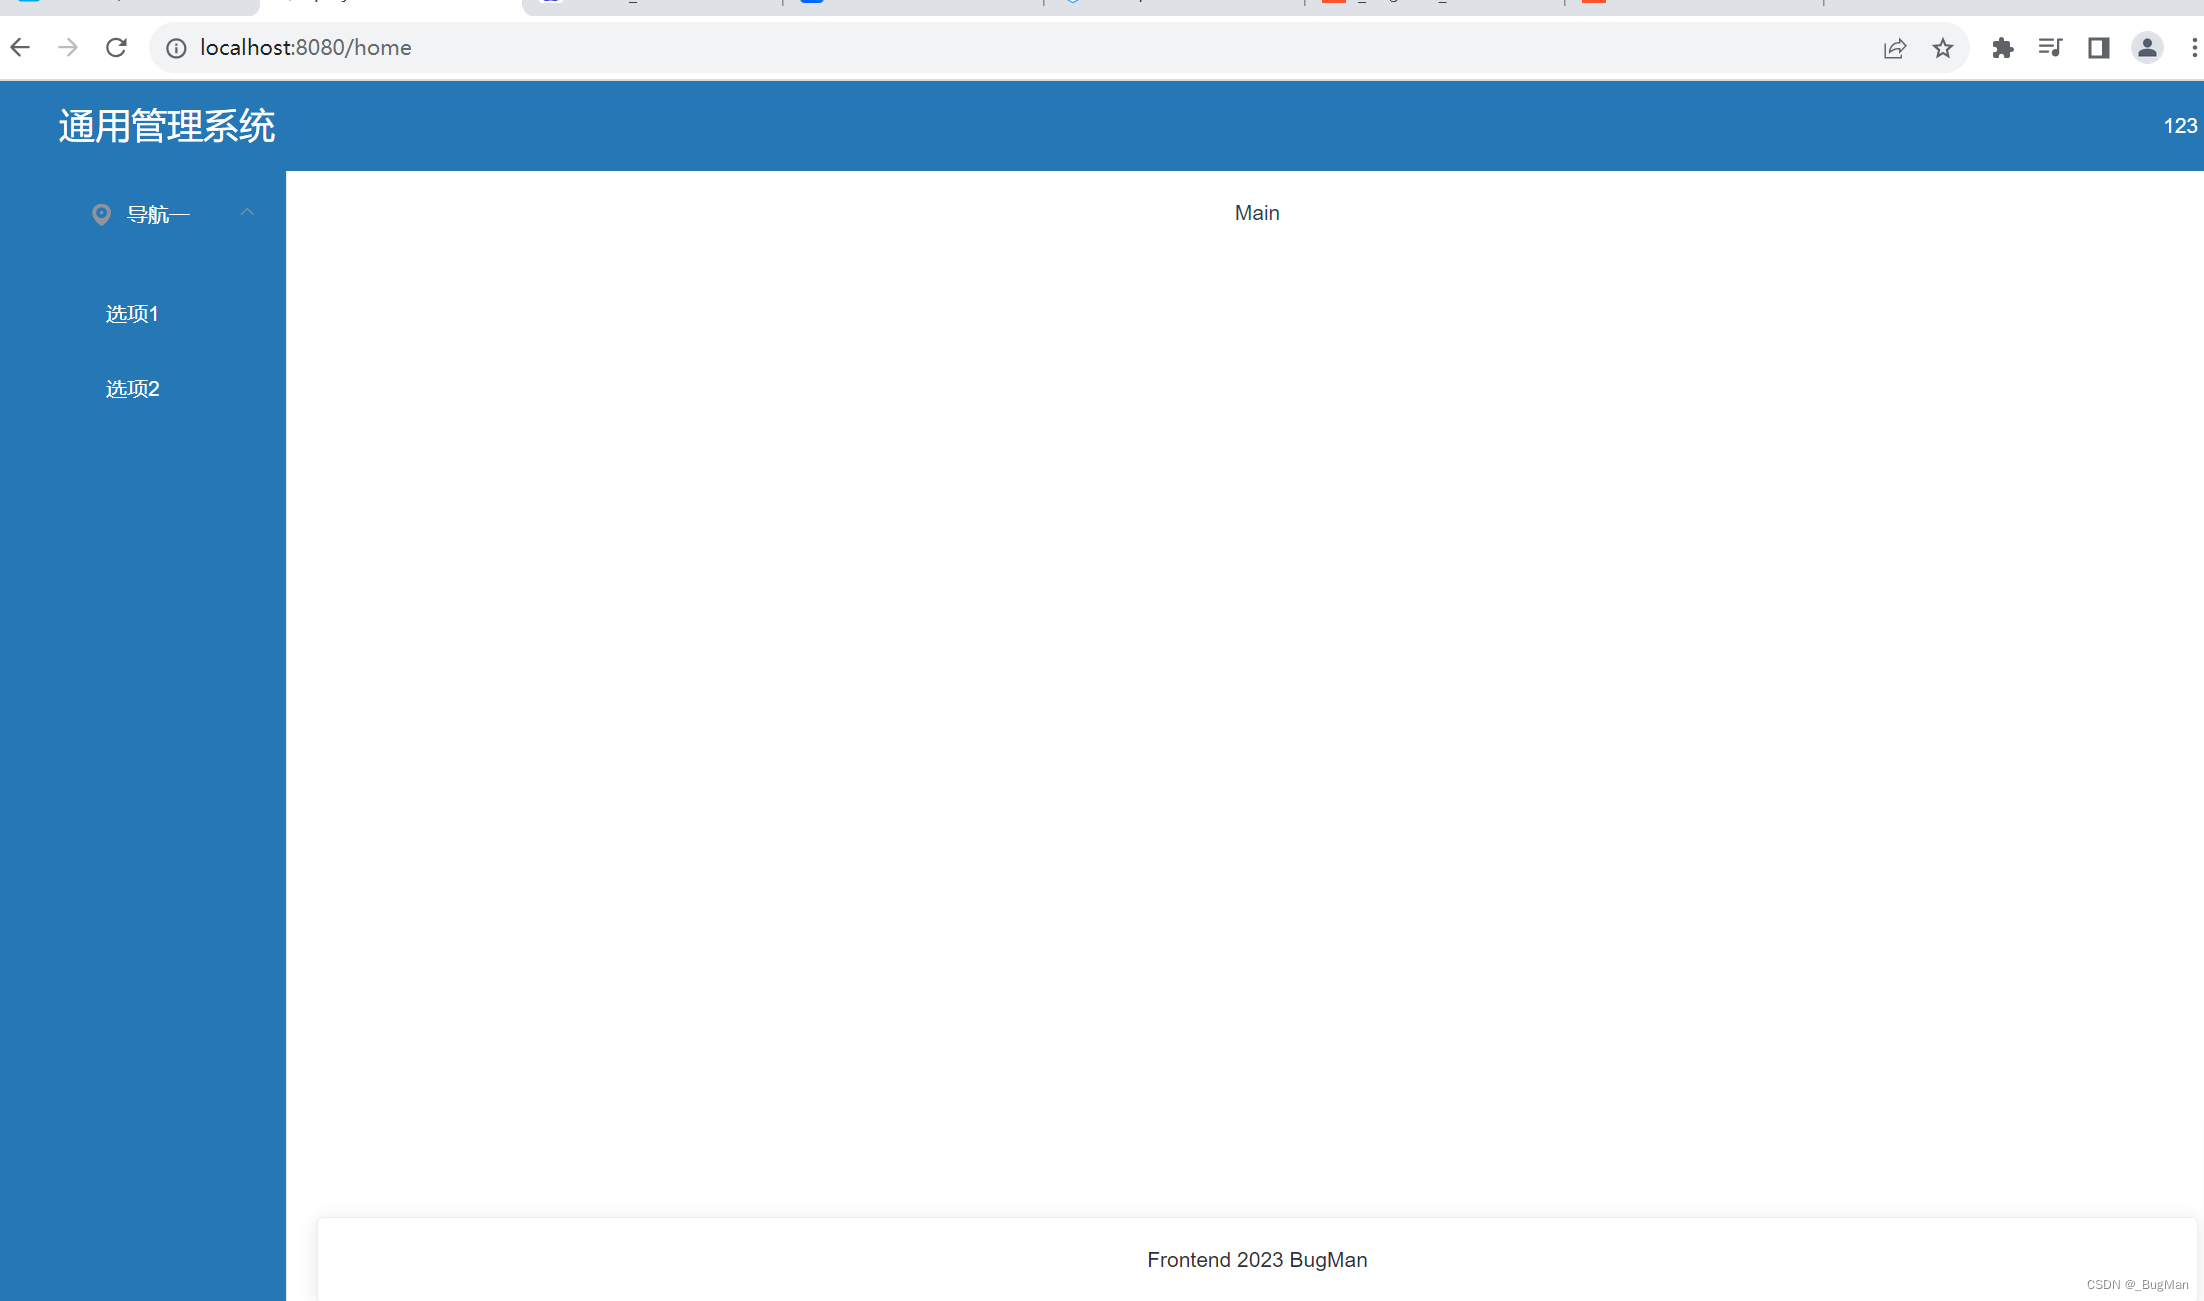
<template><div class="home"><Header/><el-container class="content"><Menu/><el-container><el-main>Main</el-main><el-footer><Footer/></el-footer></el-container></el-container></div>
</template><script>
import Footer from './common/Footer.vue'
import Header from './common/Header.vue'
import Menu from './common/Menu.vue'
export default {components:{Footer,Menu,Header},data(){return{}}
}
</script><style lang="less">
.home{width: 100%;height: 100%;.content{position: absolute;width: 100%;top: 60px;bottom: 0;}
}
</style>

3.Header
接下来需要调整一下header,根据上面的效果图可以看到,header上面要显示系统的名字和登录用户的用户名。系统名称直接写死,用户名可以用到我们之前封装的setToken.js去取登陆后我们放在缓存中的username作为用户名来显示。
<template><div><el-header><div class="title">通用管理系统</div><div>{{name}}</div></el-header></div>
</template><script>
import {getToken} from '@/utils/setToken.js'
export default{data(){return {name:''}},created(){this.name=getToken('username')}
}
</script>
<style lang="less" scoped></style>
系统名称要在最左边,用户名要在最右边,所以调整一下样式:
<template><div class="header"><el-header><div class="title">通用管理系统</div><div>{{name}}</div></el-header></div>
</template><script>
import {getToken} from '@/utils/setToken.js'
export default{data(){return {name:''}},created(){this.name=getToken('username')}
}
</script>
<style lang="less" scoped>.header{.el-header{background: #2578b5;color: #fff;line-height: 60px;display: flex;justify-content: space-between;.title{width:200px;font-size: 24px;}}}
</style>
这样Header就处理好了。
4.Footer
footer比较简单,用一个el-card来包裹,加上一些文字内容就可以了。
<template><div class="footer"><el-card>Frontend 2023 BugMan</el-card></div>
</template><script>
export default{data(){return {}}
}
</script>
<style lang="less" scoped></style>
5.Menu
5.1.页面
菜单组件elementUI也提供了:

去找一个,然后调整一下即可:
<template><div class="menu"><el-aside width="200px"><el-col :span="12"><h5>自定义颜色</h5><el-menudefault-active="2"class="el-menu-vertical-demo"@open="handleOpen"@close="handleClose"background-color="#545c64"text-color="#fff"active-text-color="#ffd04b"><el-submenu index="1"><template slot="title"><i class="el-icon-location"></i><span>导航一</span></template><el-menu-item-group><template slot="title">分组一</template><el-menu-item index="1-1">选项1</el-menu-item><el-menu-item index="1-2">选项2</el-menu-item></el-menu-item-group><el-menu-item-group title="分组2"><el-menu-item index="1-3">选项3</el-menu-item></el-menu-item-group><el-submenu index="1-4"><template slot="title">选项4</template><el-menu-item index="1-4-1">选项1</el-menu-item></el-submenu></el-submenu><el-menu-item index="2"><i class="el-icon-menu"></i><span slot="title">导航二</span></el-menu-item><el-menu-item index="3" disabled><i class="el-icon-document"></i><span slot="title">导航三</span></el-menu-item><el-menu-item index="4"><i class="el-icon-setting"></i><span slot="title">导航四</span></el-menu-item></el-menu></el-col></el-aside></div>
</template><script>
export default {data() {return {};},methods: {handleOpen(key, keyPath) {console.log(key, keyPath);},handleClose(key, keyPath) {console.log(key, keyPath);},},
};
</script>
<style lang="less" scoped></style>
看一下效果图,会发现菜单虽然是引进去了,但是样式很奇怪,所以接下来要做的就是调整菜单样式。

有左右和上下的滑动条说明高度和宽度不够,将高度拉到100%,宽度调宽一点即可。背景色不和谐,需要手动调整一下背景色。具体的样式调整后整个menu组件内容如下:
<template><div class="menu"><el-aside width="200px"><el-menudefault-active="2"class="el-menu-vertical-demo"@open="handleOpen"@close="handleClose"background-color="#2578b5"text-color="#fff"active-text-color="#ffd04b"><el-submenu index="1"><template slot="title"><i class="el-icon-location"></i><span>导航一</span></template><el-menu-item-group><template slot="title">分组一</template><el-menu-item index="1-1">选项1</el-menu-item><el-menu-item index="1-2">选项2</el-menu-item></el-menu-item-group><el-menu-item-group title="分组2"><el-menu-item index="1-3">选项3</el-menu-item></el-menu-item-group><el-submenu index="1-4"><template slot="title">选项4</template><el-menu-item index="1-4-1">选项1</el-menu-item></el-submenu></el-submenu><el-menu-item index="2"><i class="el-icon-menu"></i><span slot="title">导航二</span></el-menu-item><el-menu-item index="3" disabled><i class="el-icon-document"></i><span slot="title">导航三</span></el-menu-item><el-menu-item index="4"><i class="el-icon-setting"></i><span slot="title">导航四</span></el-menu-item></el-menu></el-aside></div>
</template><script>
export default {data() {return {};},methods: {handleOpen(key, keyPath) {console.log(key, keyPath);},handleClose(key, keyPath) {console.log(key, keyPath);},},
};
</script>
<style lang="less" scoped>
.menu{.el-aside{height: 100%;.el-menu{height:100%;}.el-submenu .el-menu-item{min-width: 0;}}
}
</style>
调整后的效果:

我们其实用不到那么多一级菜单,只保留一个导航一即可,并且其实我们也不需要elementUI自带的示例里面给出的handleOpen和handleClose方法,所以这里再整理一下页面,最终的内容和效果如下:
<template><div class="menu"><el-aside width="200px"><el-menudefault-active="2"class="el-menu-vertical-demo"background-color="#2578b5"text-color="#fff"active-text-color="#ffd04b"><el-submenu index="1"><template slot="title"><i class="el-icon-location"></i><span>导航一</span></template><el-menu-item-group><el-menu-item index="1-1">选项1</el-menu-item><el-menu-item index="1-2">选项2</el-menu-item></el-menu-item-group></el-submenu></el-menu></el-aside></div>
</template><script>
export default {data() {return {};},
};
</script>
<style lang="less" scoped>
.menu{.el-aside{height: 100%;.el-menu{height:100%;}.el-submenu .el-menu-item{min-width: 0;}}
}
</style>
最终调整后的效果:
5.2.路由
5.2.1自定义菜单内容
菜单最核心的内容自然是点某一项转跳到某一个组件上去。接下来我们要完成的就是菜单的路由转跳。
首先改写一下路由文件:
import Vue from 'vue'
import Router from 'vue-router'Vue.use(Router)export default new Router({routes:[{path:'/',redirect:'/login',component: ()=>import('@/components/Login')},{path:'/login',name:'Login',component: ()=>import('@/components/Login')},{path:'/home',name:'学生管理',iconClass:'fa fa-users',//默认转跳到学生管理页redirect:'/home/student',component: ()=>import('@/components/Home'),children:[{path:'/home/student',name:'学生列表',iconClass:'fa fa-list',component: ()=>import('@/components/students/StudentList'),},{path:'/home/info',name:'信息列表',iconClass:'fa fa-list-alt',component: ()=>import('@/components/students/InfoList'),},{path:'/home/info',name:'信息管理',iconClass:'fa fa-list-alt',component: ()=>import('@/components/students/InfoLists'),},{path:'/home/work',name:'作业列表',iconClass:'fa fa-list-ul',component: ()=>import('@/components/students/WorkList'),},{path:'/home/info',name:'作业管理',iconClass:'fa fa-list',component: ()=>import('@/components/students/WorkMent'),}]},{path:'/home/dataview',name:'数据分析',iconClass:'fa fa-bar-chart',component: ()=>import('@/components/Home'),children:[{path:'/home/dataview',name:'数据概览',iconClass:'fa fa-list',component: ()=>import('@/components/dataAnalysis/DataView'),},{path:'/home/mapview',name:'地图概览',iconClass:'fa fa-line-chart',component: ()=>import('@/components/dataAnalysis/DataView'),},{path:'/home/travel',name:'旅游地图',iconClass:'fa fa-line-chart',component: ()=>import('@/components/dataAnalysis/ScoreMap'),},{path:'/home/score',name:'分数地图',iconClass:'fa fa-line-chart',component: ()=>import('@/components/dataAnalysis/TravelMap'),}]},{path:'/users',name:'用户中心',iconClass:'fa fa-user',component: ()=>import('@/components/Home'),children:[{path:'/home/user',name:'用户概览',iconClass:'fa fa-list',component: ()=>import('@/components/users/User'),}]},{path:'*',name:'NotFound',component:()=>import('@/components/NotFound')}],mode:'history'
})
在menu中打印一下看能不能取到配置好的index.js的内容:
<script>
export default {data() {return {menus:[]};},created(){console.log(this.$router.options.routes);}
};
</script>
可以看到是有数据的,有数据那就很好办了:

去遍历菜单把数据取出来,绑定到菜单栏上去即可:
<template><div class="menu"><el-aside width="200px"><el-menudefault-active="2"class="el-menu-vertical-demo"background-color="#2578b5"text-color="#fff"active-text-color="#ffd04b"><template v-for="(item,index) in  menus"><el-submenu :index="index + ''" :key="index"><template slot="title"><i class="el-icon-location"></i><span>{{item.name}}</span></template><el-menu-item-group><el-menu-item index="1-1">选项1</el-menu-item><el-menu-item index="1-2">选项2</el-menu-item></el-menu-item-group></el-submenu></template></el-menu></el-aside></div>
</template><script>
export default {data() {return {menus:[]};},created(){console.log(this.$router.options.routes);this.menus=[...this.$router.options.routes]}
};
</script>
<style lang="less" scoped>
.menu{.el-aside{height: 100%;.el-menu{height:100%;}.el-submenu .el-menu-item{min-width: 0;}}
}
</style>
可以看到已经取到我们配置的导航菜单了:

会发现还有一个问题,Login、用户中心、404页并不是我们想展示出来的,这里需要给菜单项加上一个是否隐藏的属性,在遍历时去判断该属性从而决定是不是要显示:
import Vue from 'vue'
import Router from 'vue-router'Vue.use(Router)export default new Router({routes:[{path:'/',redirect:'/login',hidden:true,component: ()=>import('@/components/Login')},{path:'/login',name:'Login',hidden:true,component: ()=>import('@/components/Login')},{path:'/home',name:'学生管理',iconClass:'fa fa-users',//默认转跳到学生管理页redirect:'/home/student',component: ()=>import('@/components/Home'),children:[{path:'/home/student',name:'学生列表',iconClass:'fa fa-list',component: ()=>import('@/components/students/StudentList'),},{path:'/home/info',name:'信息列表',iconClass:'fa fa-list-alt',component: ()=>import('@/components/students/InfoList'),},{path:'/home/info',name:'信息管理',iconClass:'fa fa-list-alt',component: ()=>import('@/components/students/InfoLists'),},{path:'/home/work',name:'作业列表',iconClass:'fa fa-list-ul',component: ()=>import('@/components/students/WorkList'),},{path:'/home/info',name:'作业管理',iconClass:'fa fa-list',component: ()=>import('@/components/students/WorkMent'),}]},{path:'/home/dataview',name:'数据分析',iconClass:'fa fa-bar-chart',component: ()=>import('@/components/Home'),children:[{path:'/home/dataview',name:'数据概览',iconClass:'fa fa-list',component: ()=>import('@/components/dataAnalysis/DataView'),},{path:'/home/mapview',name:'地图概览',iconClass:'fa fa-line-chart',component: ()=>import('@/components/dataAnalysis/DataView'),},{path:'/home/travel',name:'旅游地图',iconClass:'fa fa-line-chart',component: ()=>import('@/components/dataAnalysis/ScoreMap'),},{path:'/home/score',name:'分数地图',iconClass:'fa fa-line-chart',component: ()=>import('@/components/dataAnalysis/TravelMap'),}]},{path:'/users',name:'用户中心',iconClass:'fa fa-user',component: ()=>import('@/components/Home'),children:[{path:'/home/user',name:'用户概览',iconClass:'fa fa-list',component: ()=>import('@/components/users/User'),}]},{path:'*',name:'NotFound',hidden:true,component:()=>import('@/components/NotFound')}],mode:'history'
})
<template><div class="menu"><el-aside width="200px"><el-menudefault-active="2"class="el-menu-vertical-demo"background-color="#2578b5"text-color="#fff"active-text-color="#ffd04b"><template v-for="(item,index) in menus"><el-submenu :index="index + ''" :key="index" v-if="!item.hidden"><template slot="title"><i class="el-icon-location"></i><span>{{item.name}}</span></template><el-menu-item-group><el-menu-item index="1-1">选项1</el-menu-item><el-menu-item index="1-2">选项2</el-menu-item></el-menu-item-group></el-submenu></template></el-menu></el-aside></div>
</template><script>
export default {data() {return {menus:[]};},created(){console.log(this.$router.options.routes);this.menus=[...this.$router.options.routes]}
};
</script>
<style lang="less" scoped>
.menu{.el-aside{height: 100%;.el-menu{height:100%;}.el-submenu .el-menu-item{min-width: 0;}}
}
</style>效果:
把二级菜单一起调整出来:
<template><div class="menu"><el-aside width="200px"><el-menudefault-active="2"class="el-menu-vertical-demo"background-color="#2578b5"text-color="#fff"active-text-color="#ffd04b"><template v-for="(item,index) in  menus"><el-submenu :index="index + ''" :key="index" v-if="!item.hidden"><template slot="title"><i :class="item.iconClass"></i><span>{{item.name}}</span></template><el-menu-item-group v-for="(child,index) in item.children" :key="index"><el-menu-item :index="child.path"><i :class="child.iconClass">{{child.name}}</i></el-menu-item></el-menu-item-group></el-submenu></template></el-menu></el-aside></div>
</template><script>
export default {data() {return {menus:[]};},created(){console.log(this.$router.options.routes);this.menus=[...this.$router.options.routes]}
};
</script>
<style lang="less" scoped>
.menu{.el-aside{height: 100%;.el-menu{height:100%;.fa{margin-right: 10px;}}.el-submenu .el-menu-item{min-width: 0;}}
}
</style>
5.2.2.开启路由功能
先给meun组件上的elementUI的导航栏开启路由功能,这样点击导航栏,路径才会对应转跳:
<el-menurouterdefault-active="2"class="el-menu-vertical-demo"background-color="#2578b5"text-color="#fff"active-text-color="#ffd04b">然后在home上给出路由出口:
<template><div class="home"><Header/><el-container class="content"><Menu/><el-container><el-main><router-view></router-view></el-main><el-footer><Footer/></el-footer></el-container></el-container></div>
</template>
可以看到路由可以正常工作了:
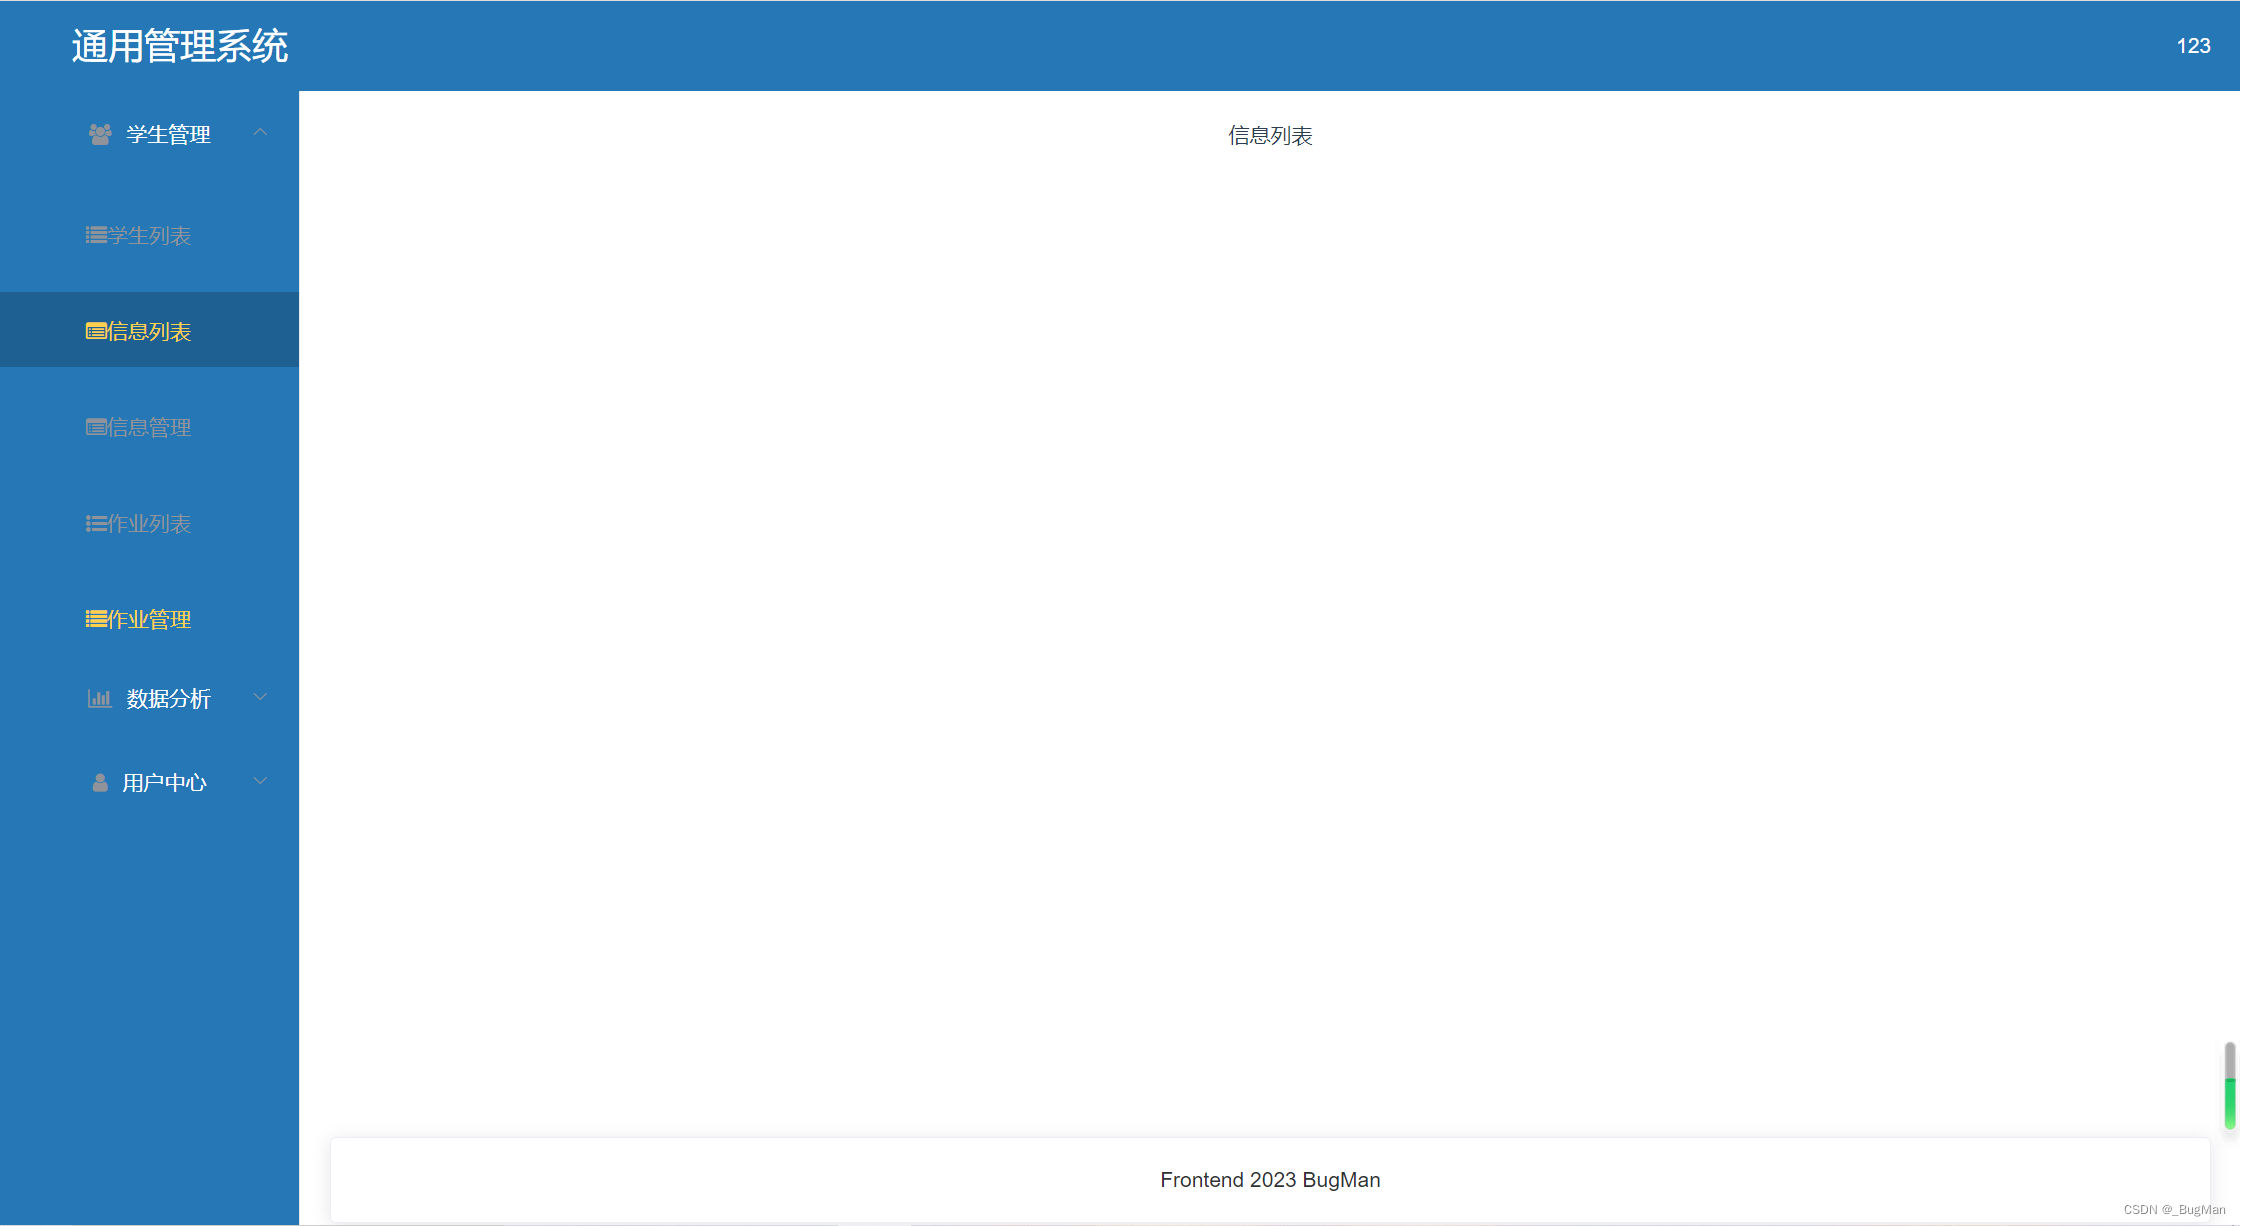
6.面包屑导航
整个首页的架子已经搭好了,也完成了菜单的转跳,但是还差个细节就是面包屑导航栏:

去elementUI官网上找一个面包屑的导航组件:
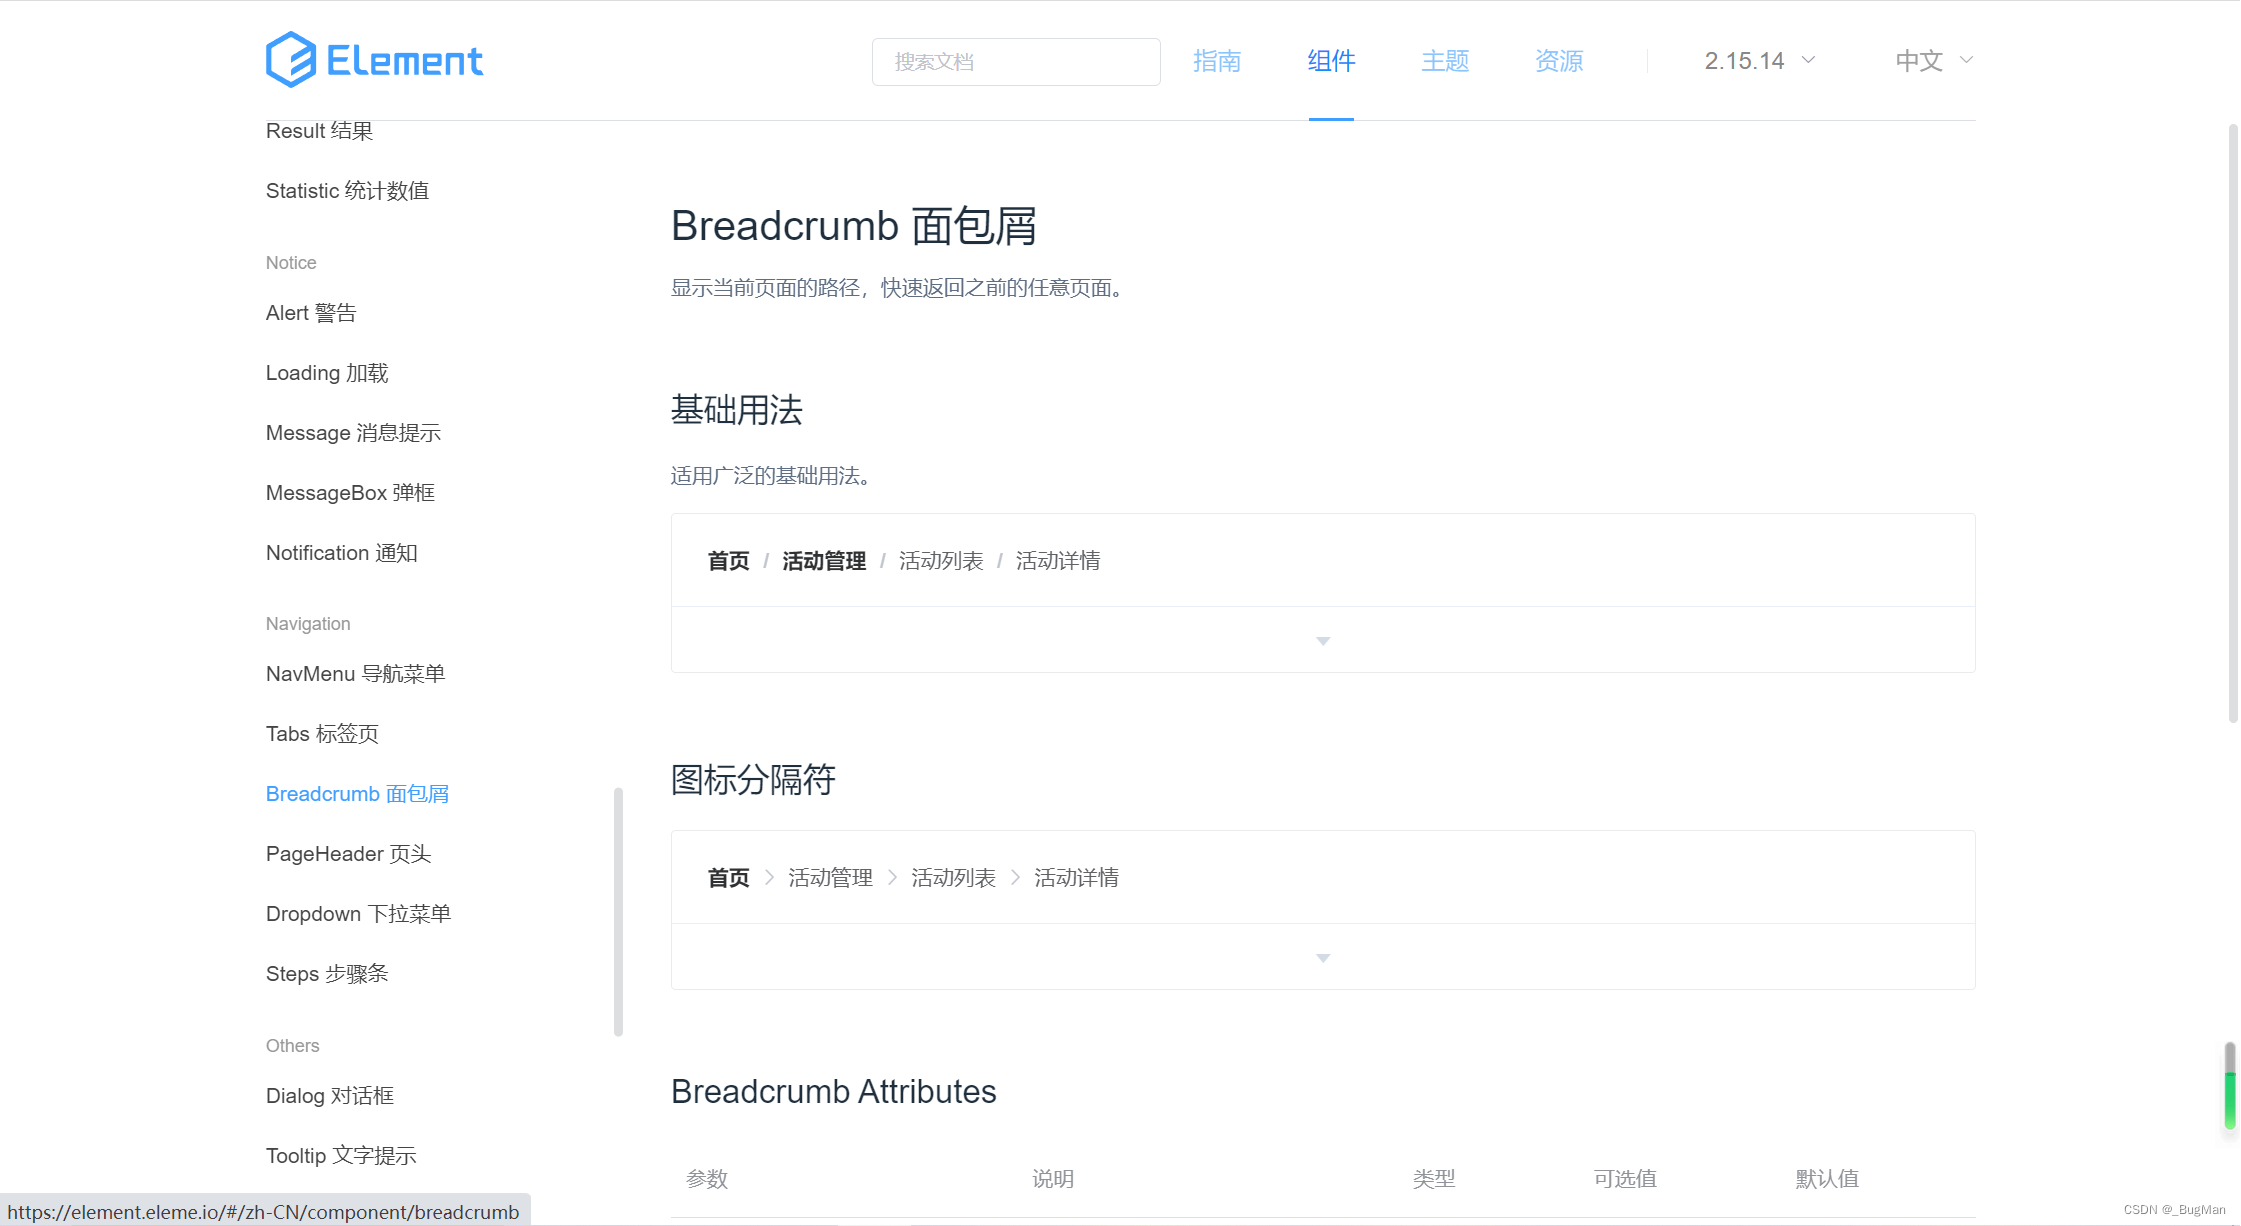
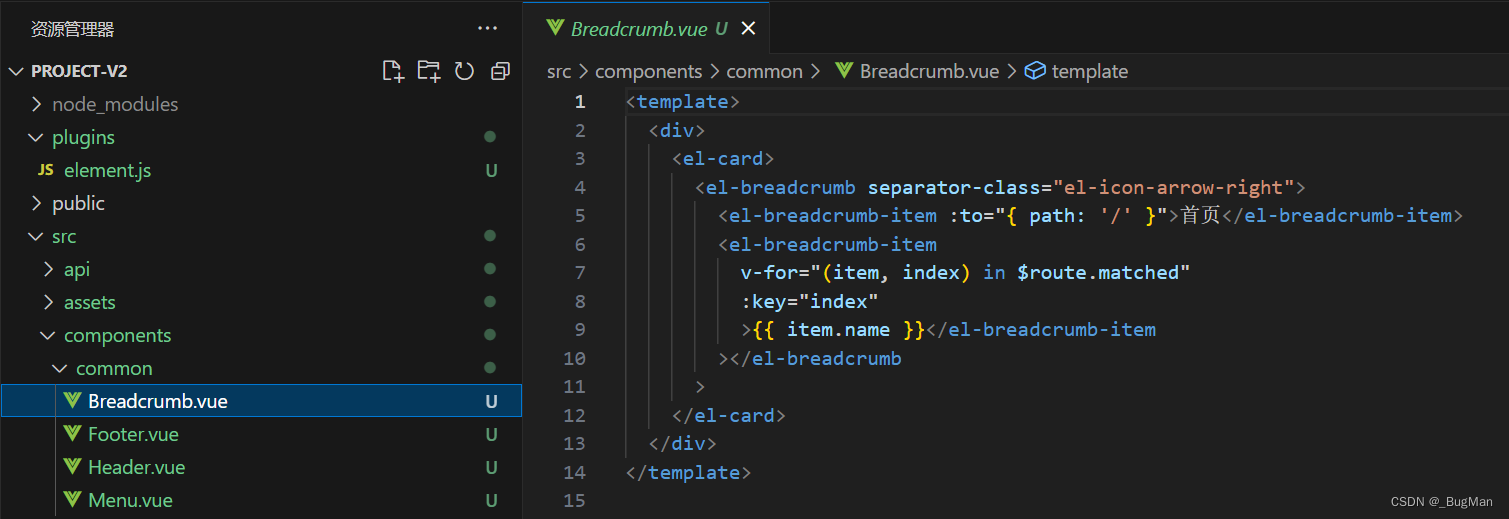
在common下面新建一个面包屑组件,调整一下官网上扣下来的内容,使得其可以取到我们真实菜单的内容:
Home里面引入使用一下即可:
<template><div class="home"><Header/><el-container class="content"><Menu/><el-container><el-main><Breadcrumb/><router-view></router-view></el-main><el-footer><Footer/></el-footer></el-container></el-container></div>
</template><script>
import Footer from './common/Footer.vue'
import Header from './common/Header.vue'
import Menu from './common/Menu.vue'
import Breadcrumb from './common/Breadcrumb.vue'
export default {components:{Footer,Menu,Header,Breadcrumb},data(){return{}}
}
</script><style lang="less">
.home{width: 100%;height: 100%;.content{position: absolute;width: 100%;top: 60px;bottom: 0;}
}
</style>