前言:需要做一个类似于淘宝商品页面的瀑布流展示
结构分析:

ps:图片来源
思路分析:
该瀑布流主要还是基于UICollectionView进行展示,只是在cell展示的UICollectionViewFlowLayout需要进行相应调整和自定义,所以需要自己创建一个FlowLayout,该FlowLayout是基于UICollectionViewFlowLayout实现的,所以该FlowLayout的初始化调用流程于系统没有区别,只需遵循WaterfallMutiSectionDelegate代理。
1.初始化:
let layout = ZUPowerShopProductLayout()
layout.delegate = self
myCollectionView = UICollectionView(frame: .zero, collectionViewLayout: layout)
2.Cell代理:
1.必须实现的代理方法
/// collectionItem高度
func heightForRowAtIndexPath(collectionView collection: UICollectionView, layout: ZUPowerShopProductLayout, indexPath: IndexPath, itemWidth: CGFloat) -> CGFloat
2.可选择的代理方法
/// 每个section 列数(默认2列)
@objc optional func columnNumber(collectionView collection: UICollectionView, layout: ZUPowerShopProductLayout, section: Int) -> Int/// header高度(默认为0)
@objc optional func referenceSizeForHeader(collectionView collection: UICollectionView, layout: ZUPowerShopProductLayout, section: Int) -> CGSize/// footer高度(默认为0)
@objc optional func referenceSizeForFooter(collectionView collection: UICollectionView, layout: ZUPowerShopProductLayout, section: Int) -> CGSize/// 每个section 边距(默认为0)
@objc optional func insetForSection(collectionView collection: UICollectionView, layout: ZUPowerShopProductLayout, section: Int) -> UIEdgeInsets/// 每个section item上下间距(默认为0)
@objc optional func lineSpacing(collectionView collection: UICollectionView, layout: ZUPowerShopProductLayout, section: Int) -> CGFloat/// 每个section item左右间距(默认为0)
@objc optional func interitemSpacing(collectionView collection: UICollectionView, layout: ZUPowerShopProductLayout, section: Int) -> CGFloat/// section头部header与上个section尾部footer间距(默认为0)
@objc optional func spacingWithLastSection(collectionView collection: UICollectionView, layout: ZUPowerShopProductLayout, section: Int) -> CGFloat
3.自定义的FlowLayout文件
import UIKit@objc protocol WaterfallMutiSectionDelegate: NSObjectProtocol {// 必选delegate实现/// collectionItem高度func heightForRowAtIndexPath(collectionView collection: UICollectionView, layout: WaterfallMutiSectionFlowLayout, indexPath: IndexPath, itemWidth: CGFloat) -> CGFloat// 可选delegate实现/// 每个section 列数(默认2列)@objc optional func columnNumber(collectionView collection: UICollectionView, layout: WaterfallMutiSectionFlowLayout, section: Int) -> Int/// header高度(默认为0)@objc optional func referenceSizeForHeader(collectionView collection: UICollectionView, layout: WaterfallMutiSectionFlowLayout, section: Int) -> CGSize/// footer高度(默认为0)@objc optional func referenceSizeForFooter(collectionView collection: UICollectionView, layout: WaterfallMutiSectionFlowLayout, section: Int) -> CGSize/// 每个section 边距(默认为0)@objc optional func insetForSection(collectionView collection: UICollectionView, layout: WaterfallMutiSectionFlowLayout, section: Int) -> UIEdgeInsets/// 每个section item上下间距(默认为0)@objc optional func lineSpacing(collectionView collection: UICollectionView, layout: WaterfallMutiSectionFlowLayout, section: Int) -> CGFloat/// 每个section item左右间距(默认为0)@objc optional func interitemSpacing(collectionView collection: UICollectionView, layout: WaterfallMutiSectionFlowLayout, section: Int) -> CGFloat/// section头部header与上个section尾部footer间距(默认为0)@objc optional func spacingWithLastSection(collectionView collection: UICollectionView, layout: WaterfallMutiSectionFlowLayout, section: Int) -> CGFloat
}class WaterfallMutiSectionFlowLayout: UICollectionViewFlowLayout {weak var delegate: WaterfallMutiSectionDelegate?private var sectionInsets: UIEdgeInsets = .zeroprivate var columnCount: Int = 2private var lineSpacing: CGFloat = 0private var interitemSpacing: CGFloat = 0private var headerSize: CGSize = .zeroprivate var footerSize: CGSize = .zero//存放attribute的数组private var attrsArray: [UICollectionViewLayoutAttributes] = []//存放每个section中各个列的最后一个高度private var columnHeights: [CGFloat] = []//collectionView的Content的高度private var contentHeight: CGFloat = 0//记录上个section高度最高一列的高度private var lastContentHeight: CGFloat = 0//每个section的header与上个section的footer距离private var spacingWithLastSection: CGFloat = 0override func prepare() {super.prepare()self.contentHeight = 0self.lastContentHeight = 0self.spacingWithLastSection = 0self.lineSpacing = 0self.sectionInsets = .zeroself.headerSize = .zeroself.footerSize = .zeroself.columnHeights.removeAll()self.attrsArray.removeAll()let sectionCount = self.collectionView!.numberOfSections// 遍历sectionfor idx in 0..<sectionCount {let indexPath = IndexPath(item: 0, section: idx)if let columnCount = self.delegate?.columnNumber?(collectionView: self.collectionView!, layout: self, section: indexPath.section) {self.columnCount = columnCount}if let inset = self.delegate?.insetForSection?(collectionView: self.collectionView!, layout: self, section: indexPath.section) {self.sectionInsets = inset}if let spacingLastSection = self.delegate?.spacingWithLastSection?(collectionView: self.collectionView!, layout: self, section: indexPath.section) {self.spacingWithLastSection = spacingLastSection}// 生成headerlet itemCount = self.collectionView!.numberOfItems(inSection: idx)let headerAttri = self.layoutAttributesForSupplementaryView(ofKind: UICollectionView.elementKindSectionHeader, at: indexPath)if let header = headerAttri {self.attrsArray.append(header)self.columnHeights.removeAll()}self.lastContentHeight = self.contentHeight// 初始化区 y值for _ in 0..<self.columnCount {self.columnHeights.append(self.contentHeight)}// 多少个itemfor item in 0..<itemCount {let indexPat = IndexPath(item: item, section: idx)let attri = self.layoutAttributesForItem(at: indexPat)if let attri = attri {self.attrsArray.append(attri)}}// 初始化footerlet footerAttri = self.layoutAttributesForSupplementaryView(ofKind: UICollectionView.elementKindSectionFooter, at: indexPath)if let footer = footerAttri {self.attrsArray.append(footer)}}}override func layoutAttributesForElements(in rect: CGRect) -> [UICollectionViewLayoutAttributes]? {return self.attrsArray}override func layoutAttributesForItem(at indexPath: IndexPath) -> UICollectionViewLayoutAttributes? {if let column = self.delegate?.columnNumber?(collectionView: self.collectionView!, layout: self, section: indexPath.section) {self.columnCount = column}if let lineSpacing = self.delegate?.lineSpacing?(collectionView: self.collectionView!, layout: self, section: indexPath.section) {self.lineSpacing = lineSpacing}if let interitem = self.delegate?.interitemSpacing?(collectionView: self.collectionView!, layout: self, section: indexPath.section) {self.interitemSpacing = interitem}let attri = UICollectionViewLayoutAttributes(forCellWith: indexPath)let weight = self.collectionView!.frame.size.widthlet itemSpacing = CGFloat(self.columnCount - 1) * self.interitemSpacinglet allWeight = weight - self.sectionInsets.left - self.sectionInsets.right - itemSpacinglet cellWeight = allWeight / CGFloat(self.columnCount)let cellHeight: CGFloat = (self.delegate?.heightForRowAtIndexPath(collectionView: self.collectionView!, layout: self, indexPath: indexPath, itemWidth: cellWeight))!var tmpMinColumn = 0var minColumnHeight = self.columnHeights[0]for i in 0..<self.columnCount {let columnH = self.columnHeights[i]if minColumnHeight > columnH {minColumnHeight = columnHtmpMinColumn = i}}let cellX = self.sectionInsets.left + CGFloat(tmpMinColumn) * (cellWeight + self.interitemSpacing)var cellY: CGFloat = 0cellY = minColumnHeightif cellY != self.lastContentHeight {cellY += self.lineSpacing}if self.contentHeight < minColumnHeight {self.contentHeight = minColumnHeight}attri.frame = CGRect(x: cellX, y: cellY, width: cellWeight, height: cellHeight)self.columnHeights[tmpMinColumn] = attri.frame.maxY//取最大的for i in 0..<self.columnHeights.count {if self.contentHeight < self.columnHeights[i] {self.contentHeight = self.columnHeights[i]}}return attri}override func layoutAttributesForSupplementaryView(ofKind elementKind: String, at indexPath: IndexPath) -> UICollectionViewLayoutAttributes? {let attri = UICollectionViewLayoutAttributes(forSupplementaryViewOfKind: elementKind, with: indexPath)if elementKind == UICollectionView.elementKindSectionHeader {if let headerSize = self.delegate?.referenceSizeForHeader?(collectionView: self.collectionView!, layout: self, section: indexPath.section) {self.headerSize = headerSize}self.contentHeight += self.spacingWithLastSectionattri.frame = CGRect(x: 0, y: self.contentHeight, width: self.headerSize.width, height: self.headerSize.height)self.contentHeight += self.headerSize.heightself.contentHeight += self.sectionInsets.top} else if elementKind == UICollectionView.elementKindSectionFooter {if let footerSize = self.delegate?.referenceSizeForFooter?(collectionView: self.collectionView!, layout: self, section: indexPath.section) {self.footerSize = footerSize}self.contentHeight += self.sectionInsets.bottomattri.frame = CGRect(x: 0, y: self.contentHeight, width: self.footerSize.width, height: self.footerSize.height)self.contentHeight += self.footerSize.height}return attri}override var collectionViewContentSize: CGSize {return CGSize(width: self.collectionView!.frame.size.width, height: self.contentHeight)}
}
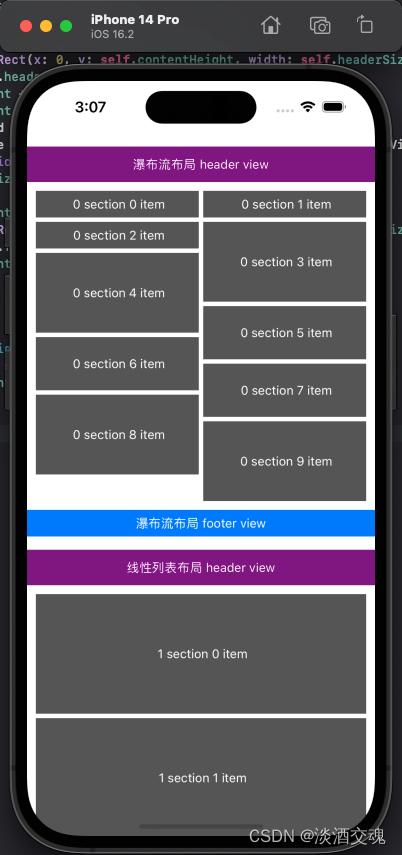
实现效果图
该文章参考借鉴了iOS 多section瀑布流实现(swift)文章,由此篇文章内容受益匪浅!
借鉴文章作者的github demo:https://github.com/RoganZheng/WaterfallMultiSectionFlowLayout,如果该demo对你有帮助的话,记得帮这位作者star一下
如果该文章对你有所帮助的话,可以点赞、收藏并关注一下!后续会持续更新更多技术内容


![[node] Node.js的Web 模块](https://img-blog.csdnimg.cn/999f27a1616742569128568e8d1f3b4a.png)


![读书笔记-《数据结构与算法》-摘要4[插入排序]](https://img-blog.csdnimg.cn/direct/859a1551d530481b9cf6925c653d6793.gif)