文章目录
- 一、池化层
- 1.理论知识
- 2.代码
- 二、LeNet
- 1.理论知识
- 2.代码实现
- 【相关总结】
- nn.MaxPool2d()
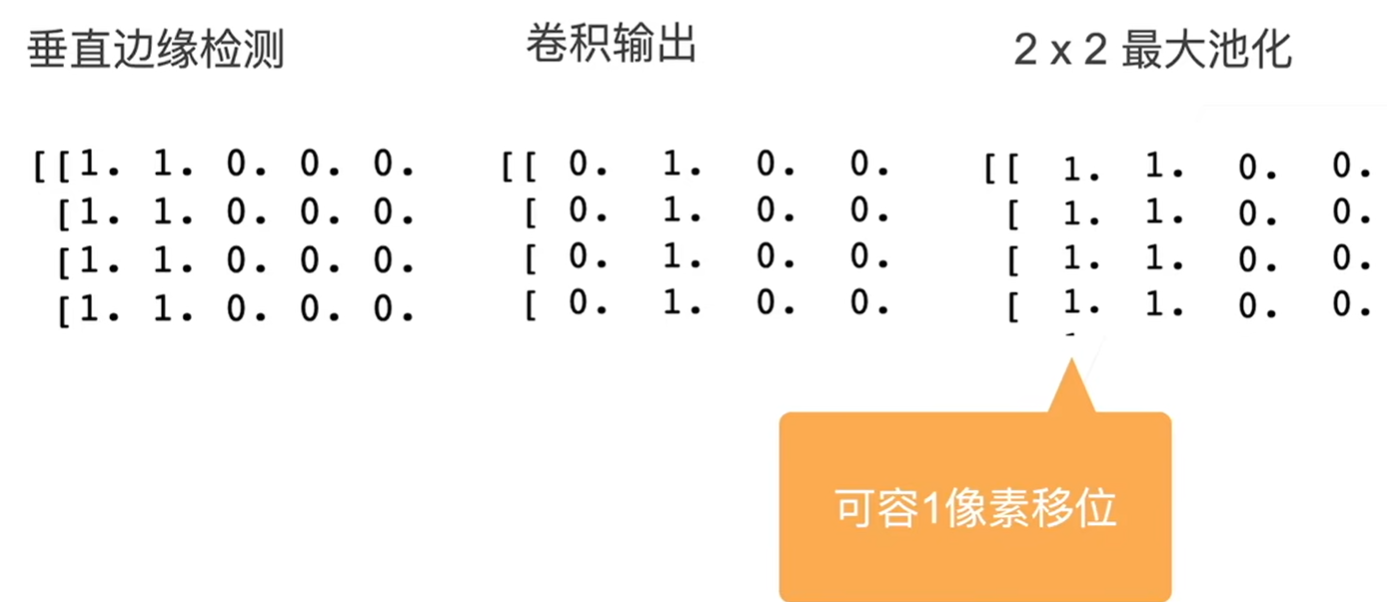
卷积层对位置比较敏感
一、池化层
1.理论知识
二维最大池化
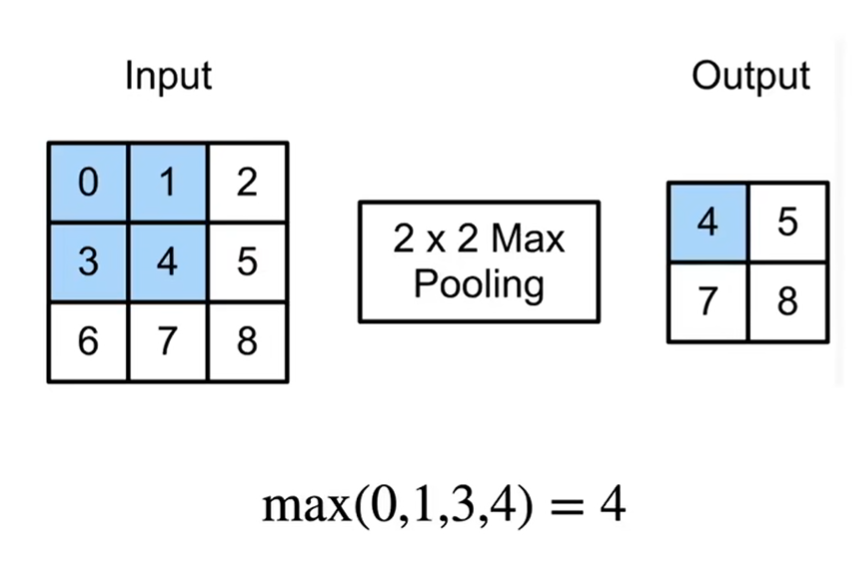
填充、步幅和多个通道
- 池化层与卷积层类似,都具有填充和步幅
- 没有可学习的参数
- 在每个输入通道应用池化层以获得相应的输出通道
- 输出通道数=输入通道数
平均池化层
- 最大池化层:每个窗口中最强的模式信号
- 平均池化层:将最大池化层中的“最大”操作替换为“平均”
2.代码
实现池化层的正向传播
import torch
from torch import nn
from d2l import torch as d2ldef pool2d(X, pool_size, mode='max'):p_h, p_w = pool_sizeY = torch.zeros((X.shape[0] - p_h + 1, X.shape[1] - p_w + 1))for i in range(Y.shape[0]):for j in range(Y.shape[1]):if mode == 'max':Y[i, j] = X[i:i + p_h, j:j+p_w].max()elif mode == 'avg':Y[i, j] = X[i:i + p_h, j:j + p_w].mean()return Y
# 验证二维最大池化层的输出
X = torch.tensor([[0.0, 1.0, 2.0], [3.0, 4.0, 5.0], [6.0, 7.0, 8.0]])
pool2d(X, (2,2))
# print(Y)
tensor([[4., 5.],
[7., 8.]])
# 验证平均池化层
pool2d(X,(2,2),'avg')
tensor([[2., 3.],
[5., 6.]])
X = torch.arange(16, dtype=torch.float32).reshape((1,1,4,4))
# X# 深度学习框架中的步幅与池化窗口的大小相同
pool2d = nn.MaxPool2d(3)
pool2d(X)
tensor([[[[10.]]]])
# 手动指定步幅和填充
pool2d = nn.MaxPool2d(3, padding=1, stride=2)
pool2d(X)
tensor([[[[ 5., 7.],
[13., 15.]]]])
# 设定一个任意大小的矩形池化窗口
pool2d = nn.MaxPool2d((2,3), padding=(1,1), stride=(2,3))
pool2d(X)
tensor([[[[ 1., 3.],
[ 9., 11.],
[13., 15.]]]])
X = torch.cat((X, X + 1), 1)
# Y2 = torch.stack((X,X+1))
# print(Y)
# print(Y2)
X
tensor([[[[ 0., 1., 2., 3.],
[ 4., 5., 6., 7.],
[ 8., 9., 10., 11.],
[12., 13., 14., 15.]],
[[ 1., 2., 3., 4.],
[ 5., 6., 7., 8.],
[ 9., 10., 11., 12.],
[13., 14., 15., 16.]]]])
# print(X.shape)
pool2d = nn.MaxPool2d(3, padding=1, stride=2)
pool2d(X)
tensor([[[[ 5., 7.],
[13., 15.]],
[[ 6., 8.],
[14., 16.]]]])
二、LeNet
1.理论知识

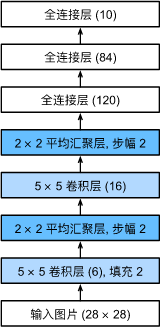
LeNet-5的典型结构:
- 输入层:输入图像大小为32*32
- 第一层:卷积核大小为5*5,输出通道数为6
- 第二层:大小为2*2的平均池化层,步幅为2
- 第三层:卷积核大小为5,输出通道为16
- 第四层:大小为2*2的平均池化层,步幅为2
- 第五层:120个神经元的全连接层
- 第六层:84个神经元的全连接层
- 输出层:10个神经元,对应于10个类别
2.代码实现
LeNet由两个部分组成:卷积编码器和全连接层密集块
import torch
from torch import nn
from d2l import torch as d2lclass Reshape(torch.nn.Module):def forward(self, x):return x.view(-1, 1, 28, 28)net = torch.nn.Sequential(Reshape(), nn.Conv2d(1, 6, kernel_size=5, padding=2), nn.Sigmoid(),nn.AvgPool2d(2, stride=2),nn.Conv2d(6, 16, kernel_size=5), nn.Sigmoid(),nn.AvgPool2d(kernel_size=2, stride=2), nn.Flatten(),nn.Linear(16 * 5 * 5, 120), nn.Sigmoid(),nn.Linear(120, 84), nn.Sigmoid(),nn.Linear(84, 10)
)
# print(net)
检查模型
X = torch.rand(size=(1, 1, 28, 28), dtype=torch.float32)
for layer in net:X = layer(X)print(layer.__class__.__name__,'output shape:\t', X.shape)
Reshape output shape:	 torch.Size([1, 1, 28, 28])
Conv2d output shape:	 torch.Size([1, 6, 28, 28])
Sigmoid output shape:	 torch.Size([1, 6, 28, 28])
AvgPool2d output shape:	 torch.Size([1, 6, 14, 14])
Conv2d output shape:	 torch.Size([1, 16, 10, 10])
Sigmoid output shape:	 torch.Size([1, 16, 10, 10])
AvgPool2d output shape:	 torch.Size([1, 16, 5, 5])
Flatten output shape:	 torch.Size([1, 400])
Linear output shape:	 torch.Size([1, 120])
Sigmoid output shape:	 torch.Size([1, 120])
Linear output shape:	 torch.Size([1, 84])
Sigmoid output shape:	 torch.Size([1, 84])
Linear output shape:	 torch.Size([1, 10])
LeNet在Fashion-MNIST数据集上的表现
batch_size = 256
train_iter, test_iter = d2l.load_data_fashion_mnist(batch_size=batch_size)
train_iter.num_workers = 0
test_iter.num_workers = 0
对evaluate_accuracy函数进行改进
def evaluate_accuracy_gpu(net, data_iter, device=None):"""使用GPU计算模型在数据集上的精度"""if isinstance(net, torch.nn.Module):net.eval()if not device:device = next(iter(net.parameters())).devicemetric = d2l.Accumulator(2)for X, y in data_iter:if isinstance(X,list):X = [x.to(device) for x in X]else:X = X.to(device)y = y.to(device)
#       将当前批次的正确预测数量和总样本数metric.add(d2l.accuracy(net(X), y), y.numel())return metric[0] / metric[1]
为了使用GPU,我们还需要修改
def train_ch6(net, train_iter, test_iter, num_epochs, lr, device):"""用GPU训练模型"""
#   初始化神经网络的权重def init_weights(m):if type(m) == nn.Linear or type(m) == nn.Conv2d:nn.init.xavier_uniform_(m.weight)net.apply(init_weights)print('training on', device)net.to(device)optimizer = torch.optim.SGD(net.parameters(), lr=lr)loss = nn.CrossEntropyLoss()animator = d2l.Animator(xlabel='epoch', xlim=[1,num_epochs],legend=['train loss', 'train acc', 'test acc'])timer, num_batches = d2l.Timer(), len(train_iter)for epoch in range(num_epochs):
#       训练损失之和,训练准确率之和,样本数metric = d2l.Accumulator(3)
#     将神经网络设置为训练模式net.train()for i, (X, y) in enumerate(train_iter):timer.start()optimizer.zero_grad()X, y = X.to(device), y.to(device)y_hat = net(X)l = loss(y_hat, y)l.backward()optimizer.step()with torch.no_grad():metric.add(l * X.shape[0], d2l.accuracy(y_hat, y), X.shape[0])timer.stop()
#           计算平均训练损失和平均训练准确率train_l = metric[0] / metric[2]train_acc = metric[1] / metric[2]
#         控制输出频率,确保训练信息在每个 epoch的五分之一处和最后一个迭代时被输出if(i+1) % (num_batches // 5) == 0 or i == num_batches - 1:animator.add(epoch + (i + 1) / num_batches,(train_l, train_acc, None))
#       在测试数据集上评估模型的准确率  test_acc = evaluate_accuracy_gpu(net, test_iter)animator.add(epoch + 1, (None, None, test_acc))print(f'loss {train_l:.3f}, train acc {train_acc:.3f}, 'f'test acc {test_acc:.3f}')print(f'{metric[2] * num_epochs / timer.sum():.1f} examples/sec 'f'on {str(device)}')
# 训练和评估LeNet-5模型
torch.cuda.set_device(0)
lr, num_epochs = 0.9, 10
train_ch6(net, train_iter, test_iter, num_epochs, lr, d2l.try_gpu())
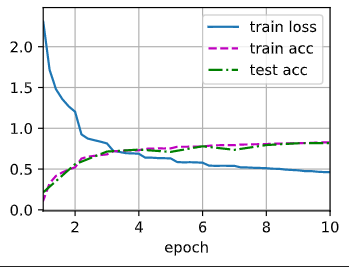
loss 0.461, train acc 0.827, test acc 0.818
23915.6 examples/sec on cuda:0
【相关总结】
nn.MaxPool2d()
torch.nn.MaxPool2d(kernel_size, [stride=None, padding=0, dilation=1, return_indices=False, ceil_mode=False])
- kernel_size:池化窗口大小,当为一个整数时,表示为一个方形,否则需要输入一个包含长宽的元组。
- stride:窗口移动的步长,!!!默认是kernel_size
import torch
import torch.nn as nn# 定义一个最大池化层,窗口大小为 3x3
max_pool_layer = nn.MaxPool2d(3)# 创建一个输入张量(假设是一张图像)
input_data = torch.rand(1, 1, 5, 5)  # (batch_size, channels, height, width)# 使用最大池化层进行池化操作
output_data = max_pool_layer(input_data)print("Input data:")
print(input_data)print("\nOutput data after max pooling:")
print(output_data)
Input data:
tensor([[[[0.0636, 0.8813, 0.3543, 0.8072, 0.7034],
[0.0906, 0.2161, 0.3276, 0.7605, 0.5871],
[0.3102, 0.9458, 0.7694, 0.7519, 0.5355],
[0.0510, 0.6437, 0.4188, 0.0824, 0.0427],
[0.5253, 0.1354, 0.7783, 0.6787, 0.4483]]]])
Output data after max pooling:
tensor([[[[0.9458]]]])
