Java经典框架之Spring
Java 是第一大编程语言和开发平台。它有助于企业降低成本、缩短开发周期、推动创新以及改善应用服务。如今全球有数百万开发人员运行着超过 51 亿个 Java 虚拟机,Java 仍是企业和开发人员的首选开发平台。
课程内容的介绍
1. Spring简介
2. Spring IoC
3. Spring AOP
4. Spring事务管理
一、Spring简介
1. Spring概览
官网地址 : http://www.spring.io
简化Java开发的。Spring不仅只是一个框架,Spring已经成为了一种生态。(与其说是Java开发,不如说是Spring开发)
一个Java应用层程序,是由许多个类组成的,这些类之间必然存在依赖关系,当项目越来越大,依赖关系越来越复杂,需要一个专业的框架来处理类之间的依赖关系,为了解决这个问题,SUN公司推出了EJB(重量级)专门用来解决类的依赖问题。
Spring(Spring Framework) 是一个开源框架,最早由Rod Johnson创建,并在《Expert One-on-One:J2EE Design and Development》这本著作中进行了介绍。Spring是为了解决企业级应用开发的复杂性而创建的,使用Spring可以让简单的JavaBean实现之前只有EJB才能完成的事情。但Spring不仅仅局限于服务器端开发,任何Java应用都能在简单性、可测试性和松耦合等方面从Spring中获益。
bean的各种名称……虽然Spring用bean或者JavaBean来表示应用组件,但并不意味着Spring组件必须要遵循JavaBean规范。一个Spring组件可以是任何形式的POJO(POJO(Plain Ordinary Java Object)简单的Java对象,实际就是普通JavaBeans,是为了避免和EJB混淆所创造的简称)。
Spring 可以做非常多的事情。但归根结底,支撑Spring的仅仅是少许的基本理念,所有的理念都可以追溯到Spring最根本的使命上:简化Java开发。这是一个郑重的承诺。许多框架都声称在某些方面做了简化,但Spring的目标是致力于全方位的简化Java开发。这势必引出更多的解释,Spring是如何简化Java开发的?
为了降低Java开发的复杂性,Spring采取了以下4种关键策略:
基于POJO的轻量级和最小侵入式编程;
通过控制反转和依赖注入以及面向接口实现松耦合;
基于切面和惯例进行声明式编程;
通过切面和模板减少样板式代码。
2.环境准备
2.1 jar包下载
官网jar下载地址:https://repo.spring.io/libs-release-local/org/springframework/spring/


将下载的dist压缩包解压缩:
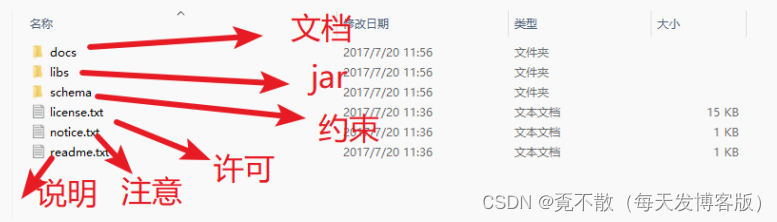

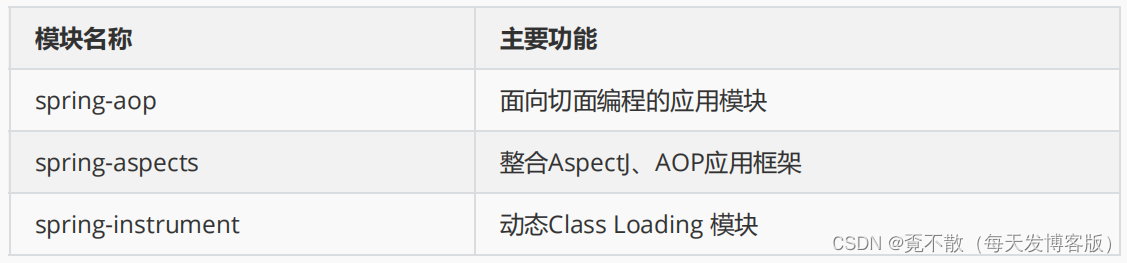
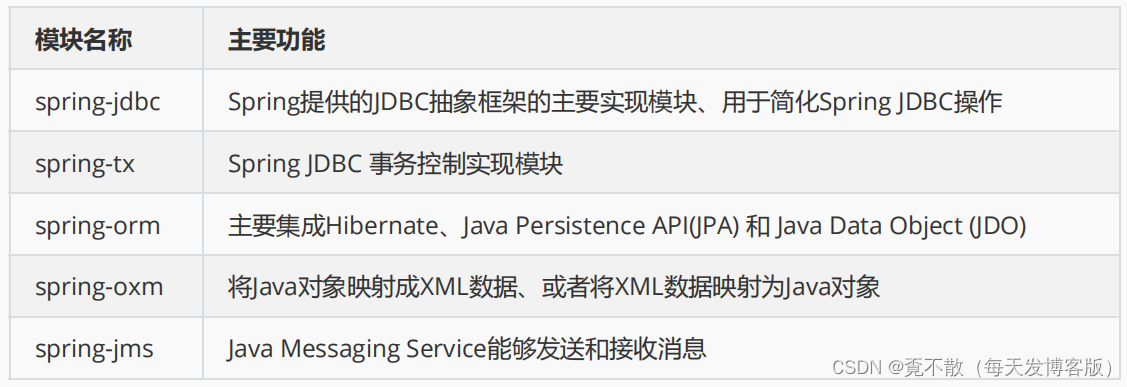
2.2 相关核心的模块说明
Spring核心模块

Spring切面编程模块
Spring之数据访问和集成模块
Spring值Web模块

Spring测试和通信报文模块

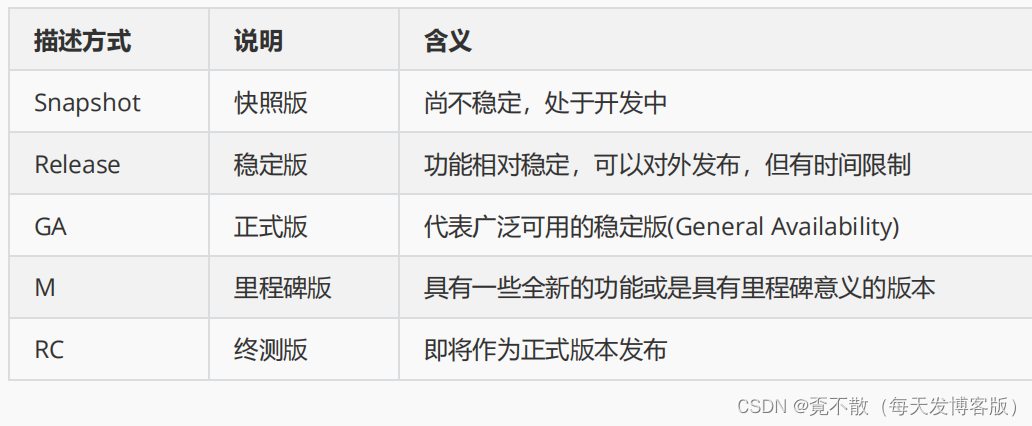
3.常见版本号说明
软件版本号:2.0.2.RELEASE --》X.Y.Z.RELEASE

常见的版本号

Spring版本命名规则
4. Spring的结构图
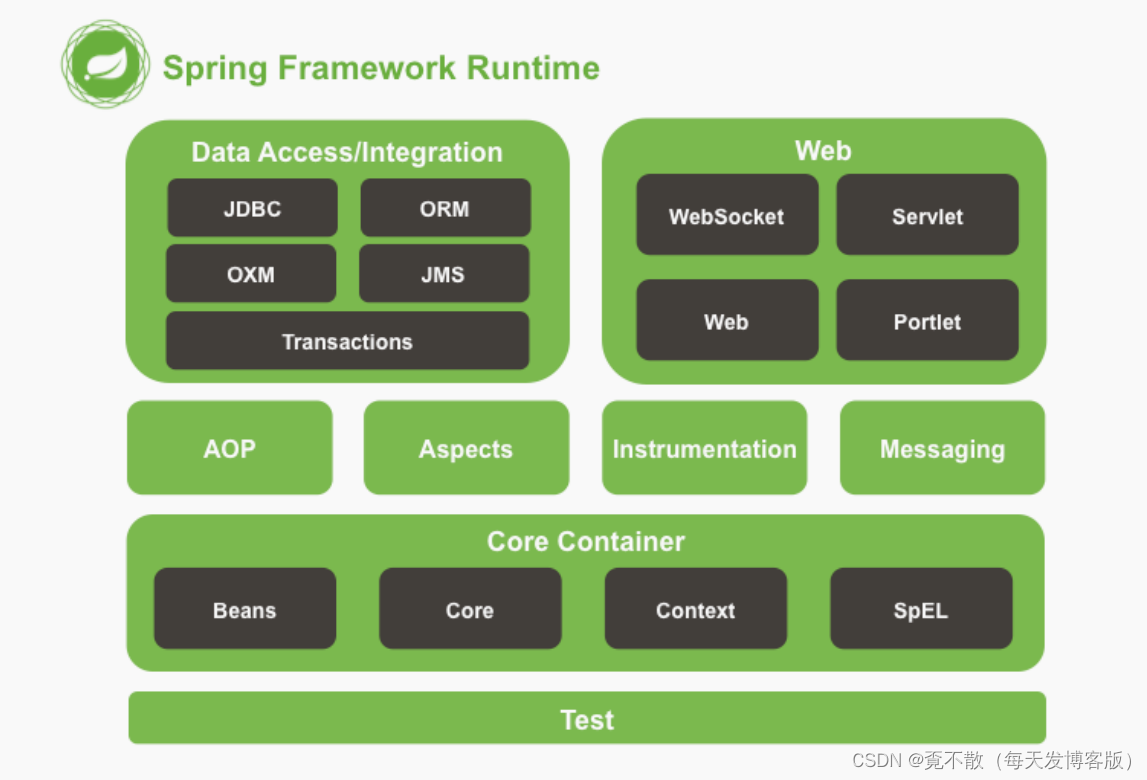
各个模块之间的相互依赖关系图

二、Spring IoC
1.IoC的概念
1. IoC控制反转(IoC,Inversion of Control),
是一个概念,是一种思想。控制反转就是对对象控制权的转移,从程序代码本身反转到了外部容器。把对象的创建、初始化、销毁等工作交给spring容器来做。由spring容器控制对象的生命周期。
2. DI依赖注入:Dependency Injection。
依赖注入 DI 是指程序运行过程中,若需要调用另一个对象协助时,无须在代码中创建被调用者,而是依赖于外部容器,由外部容器创建后传递给程序。依赖注入是目前最优秀的解耦方式。依赖注入让Spring的Bean之间以配置文件的方式组织在一起,而不是以硬编码的方式耦合在一起的。
3. IoC与DI的关系
IoC是一个概念,是一种思想,其实现方式多种多样。当前比较流行的实现方式之一是DI。
SpringIoC 类似于 包子铺, 对象就是包子。
IoC:控制反转,本质就是将对象new的过程交给了Spring容器去处理。
2.IoC基于XML配置的实现方式
2.1 基本实现步骤
演示第一个SpringIoC案例。
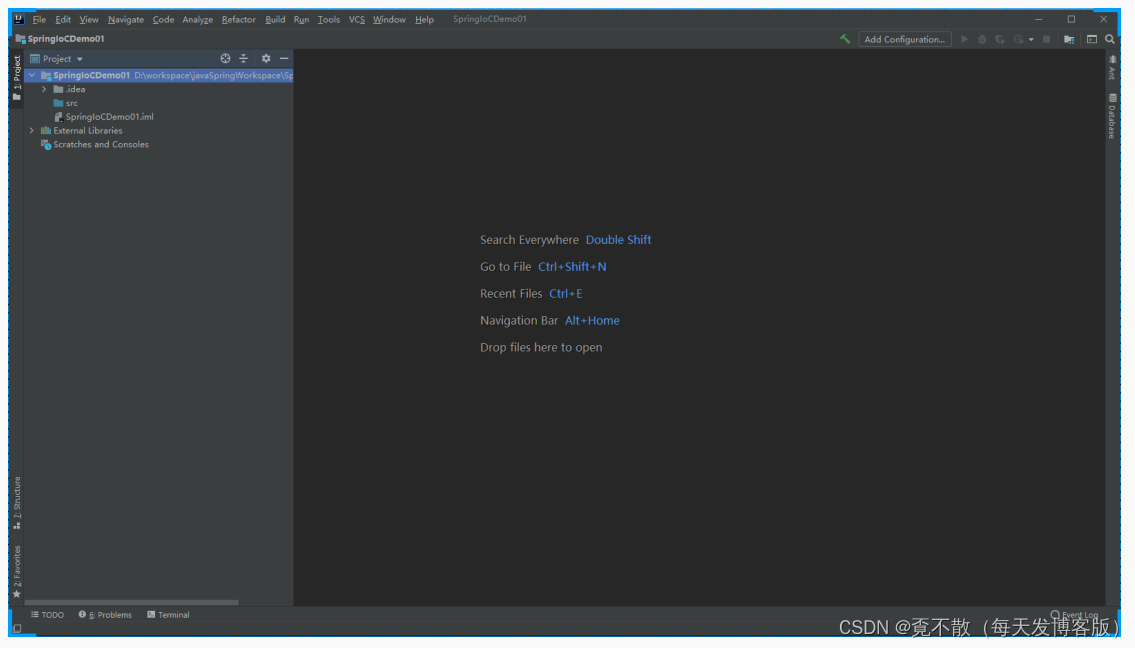
2.1.1 创建一个普通的Java项目
2.1.2 导入相关的Spring依赖
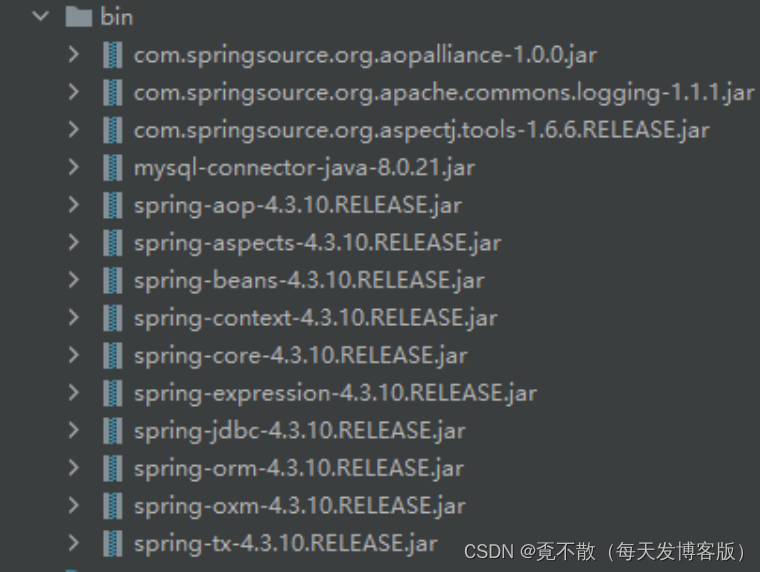
在项目根目录下创建一个bin文件夹

将我们需要使用到的相关的jar拷贝到bin目录下。

将bin目录设置为Library目录

2.1.3 创建Spring配置文件
在src目录下创建一个applicationContext.xml文件。
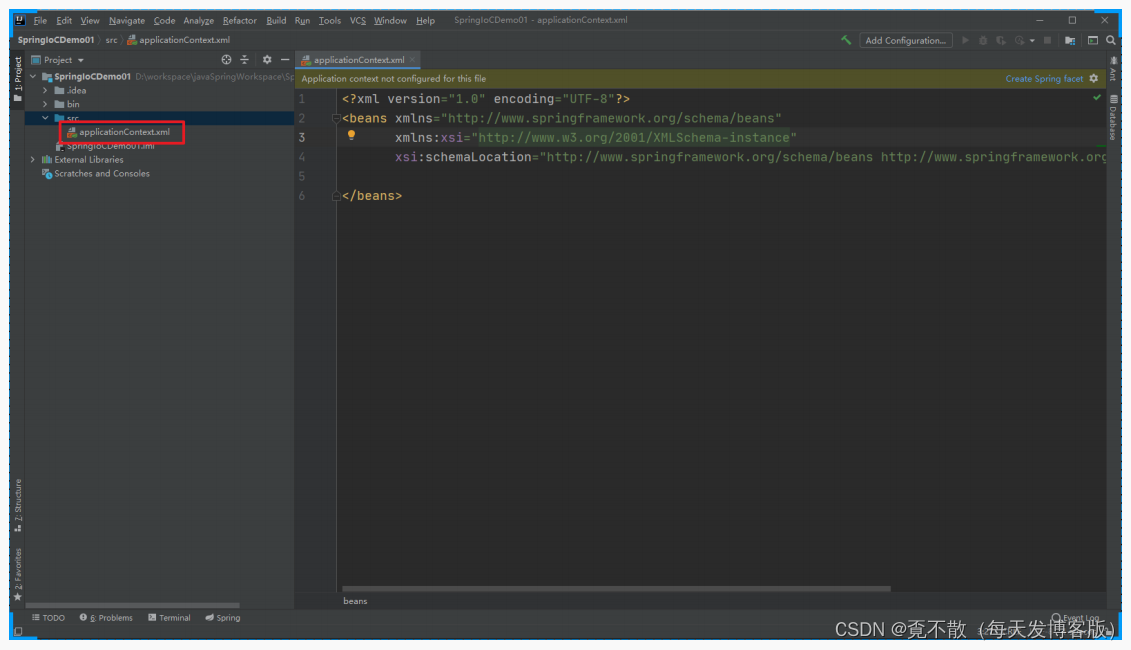
配置文件中的内容
<?xml version="1.0" encoding="UTF-8"?>
<beans xmlns="http://www.springframework.org/schema/beans"xmlns:xsi="http://www.w3.org/2001/XMLSchema-instance"xsi:schemaLocation="http://www.springframework.org/schema/beans
http://www.springframework.org/schema/beans/spring-beans.xsd">
</beans>
2.1.4 添加对应的Java类型
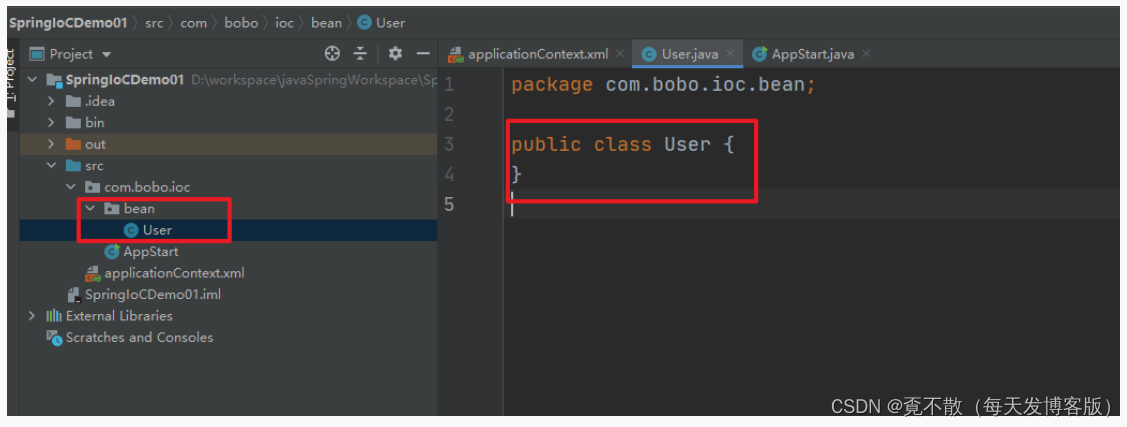
2.1.5 配置文件中注册Bean
将User在配置文件中通过bean标签注册。
<?xml version="1.0" encoding="UTF-8"?>
<beans xmlns="http://www.springframework.org/schema/beans"xmlns:xsi="http://www.w3.org/2001/XMLSchema-instance"xsi:schemaLocation="http://www.springframework.org/schema/beans
http://www.springframework.org/schema/beans/spring-beans.xsd"><!-- 通过Bean标签将User实例添加到IoC容器中去 --><bean class="com.bobo.ioc.bean.User" name="user"/>
</beans>
2.1.6 Java代码实现
/**
* 通过IoC的方式获取User对象
* @return
*/
public static User getUserForIoC(){// IoC的初始化操作ApplicationContext ac = new ClassPathXmlApplicationContext("applicationContext.xml");// 从容器中获取User对象User user = (User)ac.getBean("user");return user;
}
注意第一次启动抛 ClassNotFoundException异常,因为缺少logging依赖,导入即可。

再去执行即可

2.2 getBean方法
我们从IoC容器中获取对应的对象是通过getBean方法实现的,默认是调用的无参构造方法,如果不存在该方法就会抛出如下异常。

<?xml version="1.0" encoding="UTF-8"?>
<beans xmlns="http://www.springframework.org/schema/beans"xmlns:xsi="http://www.w3.org/2001/XMLSchema-instance"xsi:schemaLocation="http://www.springframework.org/schema/beans
http://www.springframework.org/schema/beans/spring-beans.xsd"><!-- 通过Bean标签将User实例添加到IoC容器中去 --><bean class="com.bobo.ioc.bean.User" name="user"/><bean class="com.bobo.ioc.bean.Student" name="stu" id="stuId" />
</beans>
根据name获取
// 可以通过bean 的name值获取
Student stu = (Student) ac.getBean("stu");
根据id获取
Student stu = (Student) ac.getBean("stuId"); 根据class获取
Student stu = ac.getBean(Student.class); 如果我们根据类型去容器中获取对象,如果该类型在容器中有多个实例,那么会抛出异常信息。
<?xml version="1.0" encoding="UTF-8"?>
<beans xmlns="http://www.springframework.org/schema/beans"xmlns:xsi="http://www.w3.org/2001/XMLSchema-instance"xsi:schemaLocation="http://www.springframework.org/schema/beans
http://www.springframework.org/schema/beans/spring-beans.xsd"><!-- 通过Bean标签将User实例添加到IoC容器中去 --><bean class="com.bobo.ioc.bean.User" name="user"/><bean class="com.bobo.ioc.bean.Student" name="stu" id="stuId" /><bean class="com.bobo.ioc.bean.Student" />
</beans>
那么这时我们可以通过组合的方式来查找。
组合的方式查找
Student stu = ac.getBean("stuId", Student.class);2.3 id和name的区别
id="stuId1,stuId2,stuId3"
表示bean有一个名字,就这个名字就叫stuId1,stuId2,stuId3
name="stu1,stu2,stu3"
表示bean有多个名字,分别是 stu1、stu2以及 stu3
2.4 BeanFactory和ApplicationContext的区别
通过类图结构我们能够发现BeanFactory是ApplicationContext接口的一个父接口,ApplicationContext接口定义的功能肯定要比BeanFactory接口定义的功能要强大。

public static void main(String[] args) {// 创建IoC容器对象的时候就会初始化容器中管理的所有的BeanApplicationContext ac = new ClassPathXmlApplicationContext("applicationContext.xml");System.out.println("-----------");// 去IoC容器中查找满足条件的对象System.out.println(ac.getBean("stu1", Student.class));// 创建IoC容器对象,BeanFactory仅仅只会加载解析配置文件,并不会创建具体的实例对象System.out.println("*************************");BeanFactory bf = new XmlBeanFactory(newClassPathResource("applicationContext.xml"));System.out.println("------------");// 去容器中根据条件获取对象,如果对象没有实例化那么就会创建该对象System.out.println(bf.getBean("stu1",Student.class));
}
2.5 IoC对象工厂注入
2.5.1 静态工厂注入
通过工厂类的静态方法获取对应的实例对象。
package com.bobo.ioc.factory;import com.bobo.ioc.bean.User;/*** User 工厂类*/
public class UserFactory {/*** 创建User对象* 方法必须是static修饰* @return*/public static User getInstance(){return new User();}
}
配置文件信息:
<?xml version="1.0" encoding="UTF-8"?>
<beans xmlns="http://www.springframework.org/schema/beans"xmlns:xsi="http://www.w3.org/2001/XMLSchema-instance"xsi:schemaLocation="http://www.springframework.org/schema/beans
http://www.springframework.org/schema/beans/spring-beans.xsd"><!-- 静态工厂配置 --><bean class="com.bobo.ioc.factory.UserFactory" factory-method="getInstance"
id="user666" />
</beans>
2.5.2 动态工厂注入
通过工厂类的普通方法获取实例对象。
package com.bobo.ioc.factory;import com.bobo.ioc.bean.User;/*** 动态工厂*/
public class UserDynamicFactory {public User getInstance(){return new User();}
}
配置文件信息
<?xml version="1.0" encoding="UTF-8"?>
<beans xmlns="http://www.springframework.org/schema/beans"xmlns:xsi="http://www.w3.org/2001/XMLSchema-instance"xsi:schemaLocation="http://www.springframework.org/schema/beans
http://www.springframework.org/schema/beans/spring-beans.xsd"><!-- 注册动态工厂Bean --><bean class="com.bobo.ioc.factory.UserDynamicFactory" id="userDynamicFactory" /><!-- 从工厂对象获取User对象 --><bean id="user" factory-bean="userDynamicFactory" factory-method="getInstance" />
</beans>
3. 基于配置方式的属性注入
属性注入:如何给对象中的属性设值。
3.1 构造注入
通过构造方法实现属性的注入,第一步需要添加对应的有参构造方法,第二步在配置文件中添加对应的配置信息。

配置文件中配置
<?xml version="1.0" encoding="UTF-8"?>
<beans xmlns="http://www.springframework.org/schema/beans"xmlns:xsi="http://www.w3.org/2001/XMLSchema-instance"xsi:schemaLocation="http://www.springframework.org/schema/beans
http://www.springframework.org/schema/beans/spring-beans.xsd"><bean class="com.bobo.ioc.bean.User" ><constructor-arg name="id" value="666"/><constructor-arg name="userName" value="bobo"/><constructor-arg name="gender" value="男" /></bean>
</beans>
配置的简化方式: c 名称空间。

还可以通过参数的下标来传值。

3.2 设值注入
设值注入:就是通过Bean对象的setter和getter方法来设置或获取对象的属性信息,这样一来有参构造方法就不是必须的了。

配置文件信息
<?xml version="1.0" encoding="UTF-8"?>
<beans xmlns="http://www.springframework.org/schema/beans"xmlns:xsi="http://www.w3.org/2001/XMLSchema-instance"xsi:schemaLocation="http://www.springframework.org/schema/beans
http://www.springframework.org/schema/beans/spring-beans.xsd"><bean class="com.bobo.ioc.bean.Student" ><!-- 设值注入 --><property name="id" value="456"/><property name="className" value="K1D" /><property name="stuName" value="bobo" /></bean>
</beans>
简化配置:p名称空间

3.3 对象注入
如果初始化的属性的类型是自定义的对象,那么注入的时候可以通过 ref 属性来从IoC容器中获取合适的对象注入。
package com.bobo.ioc.bean;public class Cat {// 昵称private String nickName;// 颜色private String color;public String getNickName() {return nickName;}public void setNickName(String nickName) {this.nickName = nickName;}public String getColor() {return color;}public void setColor(String color) {this.color = color;}@Overridepublic String toString() {return "Cat{" +"nickName='" + nickName + '\'' +", color='" + color + '\'' +'}';}
}
package com.bobo.ioc.bean;import java.util.List;
import java.util.Map;
import java.util.Properties;public class UserBean {// 编号private Integer id;// 拥有的对象private Cat cat;// List集合private List<String> games;// 数组private Cat[] cats;// Map集合private Map<String,Object> scores;// Properties对象private Properties properties;public List<String> getGames() {return games;}public Map<String, Object> getScores() {return scores;}public void setScores(Map<String, Object> scores) {this.scores = scores;}public Properties getProperties() {return properties;}public void setProperties(Properties properties) {this.properties = properties;}public void setGames(List<String> games) {this.games = games;}public Cat[] getCats() {return cats;}public void setCats(Cat[] cats) {this.cats = cats;}public Integer getId() {return id;}public void setId(Integer id) {this.id = id;}public Cat getCat() {return cat;}public void setCat(Cat cat) {this.cat = cat;}@Overridepublic String toString() {return "UserBean{" +"id=" + id +", cat=" + cat +'}';}
}
注入的方式
<?xml version="1.0" encoding="UTF-8"?>
<beans xmlns="http://www.springframework.org/schema/beans"xmlns:xsi="http://www.w3.org/2001/XMLSchema-instance"xmlns:p="http://www.springframework.org/schema/p"xsi:schemaLocation="http://www.springframework.org/schema/beans http://www.springframework.org/schema/beans/spring-beans.xsd"><!-- 注册一个Cat对象 --><!--<bean class="com.bobo.ioc.bean.Cat" id="cat"p:color="黑色" p:nickName="花花" /><bean class="com.bobo.ioc.bean.UserBean" ><!– 设值注入 –><property name="id" value="666"/><property name="cat" ref="cat"/></bean>--><!-- 等价的写法 --><bean class="com.bobo.ioc.bean.UserBean" ><!-- 设值注入 --><property name="id" value="666"/><property name="cat" ><bean class="com.bobo.ioc.bean.Cat"p:color="黑色" p:nickName="花花" /></property></bean>
</beans>
3.4 数组和集合注入

配置文件中的信息
<bean class="com.bobo.ioc.bean.UserBean" ><!-- 设值注入 --><property name="id" value="666"/><property name="cat" ><bean class="com.bobo.ioc.bean.Cat"p:color="黑色" p:nickName="花花" /></property><!-- List 类型的注入 --><property name="games" ><list><value>LOL</value><value>DNF</value><value>WZRY</value></list></property><!-- 数组 类型的注入 --><property name="cats"><array><bean class="com.bobo.ioc.bean.Cat" p:color="灰色1" p:nickName="小白"/><bean class="com.bobo.ioc.bean.Cat" p:color="灰色2" p:nickName="小黑"/><bean class="com.bobo.ioc.bean.Cat" p:color="灰色3" p:nickName="大毛"/></array></property>
</bean>
3.5 Map和Properties类型注入
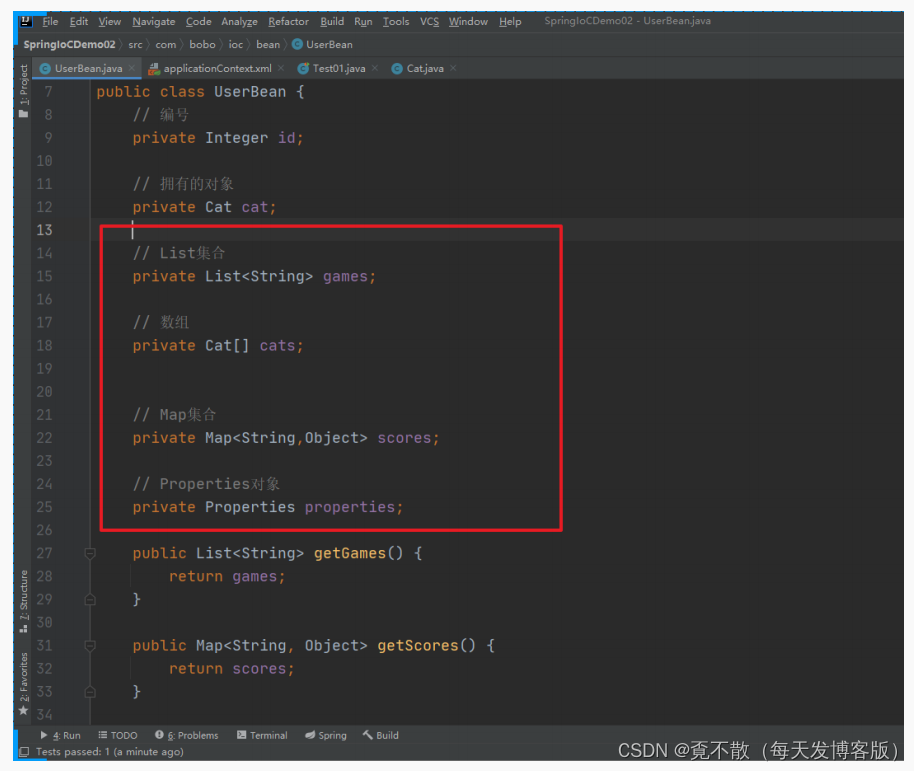
配置文件信息
<property name="scores"><!-- Map 类型注入 --><map ><description>用户成绩信息</description><entry key="英语" value="100"></entry><entry key="数学" value="98"/></map>
</property><property name="properties" ><!-- Properties 类型注入 --><props><prop key="username">zhangsan</prop><prop key="password">123456</prop></props>
</property>
</bean>
4.综合小案例
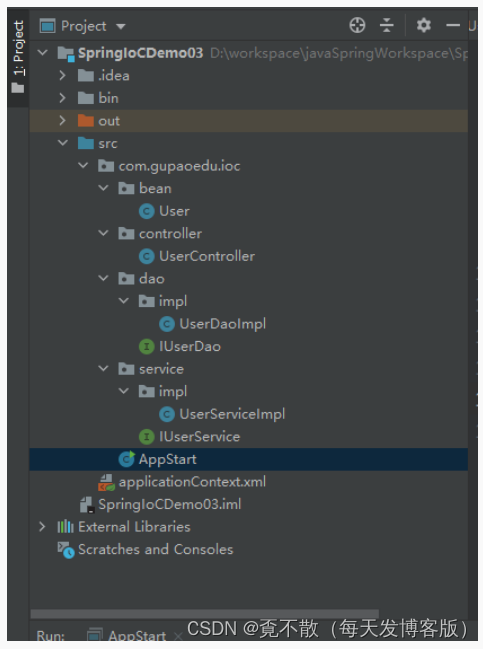
将我们原来三层架构的案例改造为IoC实现的案例。

4.1 UserBean
package com.gupaoedu.ioc.bean;public class User {private  Integer id;private String userName;public Integer getId() {return id;}public void setId(Integer id) {this.id = id;}public String getUserName() {return userName;}public void setUserName(String userName) {this.userName = userName;}@Overridepublic String toString() {return "User{" +"id=" + id +", userName='" + userName + '\'' +'}';}
}
4.2 持久层
接口
package com.gupaoedu.ioc.dao;import com.gupaoedu.ioc.bean.User;/*** User的Dao*/
public interface IUserDao {/*** 获取User对象* @return*/User getUser();
}
实现
package com.gupaoedu.ioc.dao.impl;import com.gupaoedu.ioc.bean.User;
import com.gupaoedu.ioc.dao.IUserDao;public class UserDaoImpl implements IUserDao {@Overridepublic User getUser() {User user = new User();user.setId(666);user.setUserName("波波");System.out.println("持久层...");return user;}
}
4.3 业务层
接口
package com.gupaoedu.ioc.service;import com.gupaoedu.ioc.bean.User;/*** User Service*/
public interface IUserService {/*** 获取User对象* @return*/User getUser();
}
实现
package com.gupaoedu.ioc.service.impl;import com.gupaoedu.ioc.bean.User;
import com.gupaoedu.ioc.dao.IUserDao;
import com.gupaoedu.ioc.dao.impl.UserDaoImpl;
import com.gupaoedu.ioc.service.IUserService;/*** User 的Service实现*/
public class UserServiceImpl implements IUserService {// 通过设值注入的方式做赋值  需要提供对应的setter方法private IUserDao dao ;@Overridepublic User getUser() {System.out.println("业务逻辑层....");return dao.getUser();}/*** 设值注入必须要提供的方法* @param dao*/public void setDao(IUserDao dao) {this.dao = dao;}
}
4.4 控制层
接收和响应请求
package com.gupaoedu.ioc.controller;import com.gupaoedu.ioc.bean.User;
import com.gupaoedu.ioc.service.IUserService;/*** 控制层*/
public class UserController {private IUserService service;public User queryUser(){System.out.println("控制层...");return service.getUser();}public void setService(IUserService service) {this.service = service;}
}
4.5 配置文件
<?xml version="1.0" encoding="UTF-8"?>
<beans xmlns="http://www.springframework.org/schema/beans"xmlns:xsi="http://www.w3.org/2001/XMLSchema-instance"xsi:schemaLocation="http://www.springframework.org/schema/beans http://www.springframework.org/schema/beans/spring-beans.xsd"><!-- 将 控制层  业务层  持久层 的三个实例添加到IoC容器中 --><bean class="com.gupaoedu.ioc.dao.impl.UserDaoImpl" id="userDao"></bean><bean class="com.gupaoedu.ioc.service.impl.UserServiceImpl" id="userService" ><!-- 设值注入IUserDao实例 --><property name="dao" ref="userDao"/></bean><bean class="com.gupaoedu.ioc.controller.UserController" id="userController" ><!-- 设值注入 IUserService实例 --><property name="service" ref="userService" /></bean>
</beans>
4.6 测试代码
package com.gupaoedu.ioc;import com.gupaoedu.ioc.controller.UserController;
import org.springframework.context.ApplicationContext;
import org.springframework.context.support.ClassPathXmlApplicationContext;public class AppStart {public static void main(String[] args) {ApplicationContext ac = new ClassPathXmlApplicationContext("applicationContext.xml");// 从IoC容器中获取UserController实例UserController u = ac.getBean(UserController.class);System.out.println(u.queryUser());}
}
输出结果

最后整体的目录结构
5.基于注解的形式
配置文件的实现方式在bean对象比较多的情况下,配置文件会越来越复杂,这时我们可以通过扫描加注解的方式来简化我们的操作。
5.1 添加AOP支持依赖
基于注解的方式需要用到AOP的支持,所以我们需要添加AOP的依赖。

5.2 添加扫描
通过context标签的component-scan属性指定我们的扫描路径。
<?xml version="1.0" encoding="UTF-8"?>
<beans xmlns="http://www.springframework.org/schema/beans"xmlns:xsi="http://www.w3.org/2001/XMLSchema-instance"xmlns:context="http://www.springframework.org/schema/context"xsi:schemaLocation="http://www.springframework.org/schema/beanshttp://www.springframework.org/schema/beans/spring-beans.xsdhttp://www.springframework.org/schema/contexthttp://www.springframework.org/schema/context/spring-context-4.3.xsd"><!--<bean class="com.gupaoedu.ioc.bean.UserBean" />--><!-- 添加扫码路径 --><context:component-scan base-package="com.gupaoedu.ioc.bean" />
</beans>
5.3 @Component注解
/**
* @Component 被该注解标识的Java会被SpringIoC容器加载
*/
@Componentpublic class UserBean {
}
6. @Resource和@Autowired
在注解的场景下依赖注入我们可以通过 @Resource和@Autowired实现,他们的区别是@Resource 默认是根据name属性来查找的,而@Autowired注解默认是根据类型查找的,@Autowired需要和 @Qualifier配合实现基于name的查找。
package com.gupaoedu.ioc.bean;import org.springframework.beans.factory.annotation.Autowired;
import org.springframework.beans.factory.annotation.Qualifier;
import org.springframework.stereotype.Component;import javax.annotation.Resource;/*** @Component 被该注解标识的Java会被SpringIoC容器加载*/
@Component
public class UserBean {// 从IoC容器中获取一个Cat实例//@Resource(name = "cat")// 默认是根据类型查找的@Autowired@Qualifier("a111")private Cat cat;public Cat getCat() {return cat;}public void setCat(Cat cat) {this.cat = cat;}}
7.注入的注解

设置特殊的扫描条件
<?xml version="1.0" encoding="UTF-8"?>
<beans xmlns="http://www.springframework.org/schema/beans"xmlns:xsi="http://www.w3.org/2001/XMLSchema-instance"xmlns:context="http://www.springframework.org/schema/context"xsi:schemaLocation="http://www.springframework.org/schema/beanshttp://www.springframework.org/schema/beans/spring-beans.xsdhttp://www.springframework.org/schema/contexthttp://www.springframework.org/schema/context/spring-context-4.3.xsd"><!-- 添加扫码 --><!--<context:component-scan base-package="com.gupaoedu.ioc.controller">
</context:component-scan><context:component-scan base-package="com.gupaoedu.ioc.service.impl">
</context:component-scan><context:component-scan base-package="com.gupaoedu.ioc.dao.impl">
</context:component-scan>--><!--<context:component-scan base-package="com.gupaoedu.ioc.*" >
</context:component-scan>--><!-- 不使用 @Component @Controller @Service @Repository 特殊声明使用@Controller--><context:component-scan base-package="com.gupaoedu.ioc.controller" usedefault filters="false"><!-- 包含哪个注解 --><context:include-filter type="annotation"expression="org.springframework.stereotype.Controller"/></context:component-scan><!-- 使用 @Component @Controller @Service @Repository 但是要排除掉Controller --><context:component-scan base-package="com.gupaoedu.ioc.service.impl,com.gupaoedu.ioc.dao.impl" use-default-filters="true"><context:exclude-filter type="annotation" expression="org.springframework.stereotype.Controller"/></context:component-scan>
</beans>
在配置文件使用的基础上添加的有注解的使用方式,大大的简化了纯配置文件使用的方式。
8.Java配置类
在Spring3.x之后开始支持Java配置类的形式,从而舍弃配置文件的方式。
8.1 基本的使用
Java配置文件需要通过@Configuration注解标注,需要加载的实例需要通过@Bean注解标注。
/**
* Java配置类
* 被@Configuration注解标注的Java类就是一个配置类
* 作用和 applicationContext.xml 是一样的
*/@Configuration
public class JavaConfig {/*** 被@Bean注解修饰的方法 等价于* <bean class="com.bobo.ioc.bean.UserBean" name='getUserBean'><bean/>* 默认的name为方法的名称* @return*/@Bean("abc")public UserBean getUserBean(){return new UserBean();}
}
通过Java配置类的方式使用的话对应的加载类要更换为 AnnotationConfigApplicationContext。
public class AppStart {public static void main(String[] args) {// 基于Java配置类的 IoC初始化ApplicationContext ac = new AnnotationConfigApplicationContext(JavaConfig.class);// 获取实例UserBean user = ac.getBean("abc", UserBean.class);System.out.println(user);}
}
8.2 @ComponentScan注解
基于Java配置类的实现方式中要结合@Component注解使用的话,添加扫描我们需要通过@ComponentScan或者@ComponentScans注解要实现。
package com.bobo.ioc.config;import com.bobo.ioc.bean.DataSource;
import com.bobo.ioc.bean.UserBean;
import org.springframework.context.annotation.*;/*** Java配置类*   被@Configuration注解标注的Java类就是一个配置类*   作用和 applicationContext.xml 是一样的*/
@Configuration
// 设置扫描
//@ComponentScan(basePackages = {"com.bobo.ioc.bean"})
@ComponentScans(@ComponentScan(basePackages = "com.bobo.ioc.bean"))
public class JavaConfig {/*** 被@Bean注解修饰的方法 等价于* <bean class="com.bobo.ioc.bean.UserBean" name='getUserBean'><bean/>* 默认的name为方法的名称* @return*/@Bean("abc")public UserBean getUserBean(){UserBean user = new UserBean();return user;}
}
复杂结构
@Configuration
@ComponentScans({@ComponentScan(basePackages = {"com.gupaoedu.ioc.controller"},useDefaultFilters = false,includeFilters = {@ComponentScan.Filter(value ={Controller.class})}), @ComponentScan(basePackages = {"com.gupaoedu.ioc.service.impl","com.gupaoedu.ioc.dao.impl"},useDefaultFilters = true,excludeFilters = {@ComponentScan.Filter(value = Controller.class)})
})
public class JavaConfig {
}
8.3 @Conditional注解
我们可以通过@Conditional注解控制Bean对象的载入。
package com.bobo.ioc.config;import org.springframework.context.annotation.Condition;
import org.springframework.context.annotation.ConditionContext;
import org.springframework.core.type.AnnotatedTypeMetadata;public class ConditionOnClass implements Condition {/**** @param conditionContext* @param annotatedTypeMetadata* @return*    true 表示条件成立*    false 表示条件不成立*/@Overridepublic boolean matches(ConditionContext conditionContext, AnnotatedTypeMetadata annotatedTypeMetadata) {try {Class<?> aClass = conditionContext.getClassLoader().loadClass("com.bobo.ioc.bean.Person");if(aClass != null){return true;}} catch (ClassNotFoundException e) {e.printStackTrace();}return false;}
}
使用
/*** 被@Bean注解修饰的方法 等价于* <bean class="com.bobo.ioc.bean.UserBean" name='getUserBean'><bean/>* 默认的name为方法的名称* @return*/@Bean("abc")@Conditional(ConditionOnClass.class) // 条件注解 决定是否将UserBean添加到IoC容器中public UserBean getUserBean(){UserBean user = new UserBean();return user;}
8.4 @Profile注解
在实际开发环境中,我们的项目会经历各种不同的环境(开发环境,测试环境,生产环境)
package com.bobo.ioc.bean;/*** 数据源对象*/
public class DataSource {private String url;private String userName;private String password;public DataSource(String url, String userName, String password) {this.url = url;this.userName = userName;this.password = password;}@Overridepublic String toString() {return "DataSource{" +"url='" + url + '\'' +", userName='" + userName + '\'' +", password='" + password + '\'' +'}';}public String getUrl() {return url;}public void setUrl(String url) {this.url = url;}public String getUserName() {return userName;}public void setUserName(String userName) {this.userName = userName;}public String getPassword() {return password;}public void setPassword(String password) {this.password = password;}
}
@Profile注解使用
/*** 开发环境的数据源* @return*/@Bean("ds")@Profile("dev")public DataSource devDataSource(){return new DataSource("http://dev1:8888/","admin","123456");}/*** 生产环境的数据源* @return*/@Bean("ds")@Profile("pro")public DataSource proDataSource(){return new DataSource("http://pro1:8888/","root","123456");} 启动容器设置环境信息。
package com.bobo.ioc;import com.bobo.ioc.bean.StudentBean;
import com.bobo.ioc.bean.UserBean;
import com.bobo.ioc.config.JavaConfig;
import org.springframework.context.ApplicationContext;
import org.springframework.context.annotation.AnnotationConfigApplicationContext;public class AppStart {public static void main(String[] args) {/*// 基于Java配置类的 IoC初始化ApplicationContext ac = new AnnotationConfigApplicationContext(JavaConfig.class);// 获取实例UserBean user = ac.getBean("abc", UserBean.class);System.out.println(user);System.out.println(ac.getBean(StudentBean.class));*/AnnotationConfigApplicationContext ac = new AnnotationConfigApplicationContext();// 设置对应的环境信息ac.getEnvironment().setActiveProfiles("pro");ac.register(JavaConfig.class);ac.refresh();System.out.println(ac.getBean("ds"));}
}
9.Bean的作用域
配置文件
<?xml version="1.0" encoding="UTF-8"?>
<beans xmlns="http://www.springframework.org/schema/beans"xmlns:xsi="http://www.w3.org/2001/XMLSchema-instance"xsi:schemaLocation="http://www.springframework.org/schema/beans
http://www.springframework.org/schema/beans/spring-beans.xsd"><!--scope:默认是 singleton 单例模式,每次获取的都是同一个对象prototype 每次从容器中获取的都是一个新的对象-->
<bean class="com.bobo.ioc.bean.UserBean" scope="prototype"/>
</beans>
Java配置类
@Configurationpublic class JavaConfig {@Bean@Scope(value = "prototype")//@Scope("singleton")public UserBean userBean(){return new UserBean();}
}
作业:有自己的语言描述什么是IoC(控制反转)
三、Spring AOP
AOP:面向切面编程
OOP:面向对象编程
AOP是OOP的一个有效补充
1.代理模式
AOP本身是基于动态代理模式实现的,所以掌握代理模式是我们学好AOP的一个重要的前提条件。

1.1 静态代理模式
若代理类在程序运行前就已经存在,那么这种代理方式被成为静态代理 ,这种情况下的代理类通常都是我们在Java代码中定义的。 通常情况下, 静态代理中的代理类和目标类会实现同一接口或是派生自相同的父类。
1.1.1 创建公共接口
/**
* 代理模式中的 公共接口
*/
public interface SomeService {String doSome(String msg);
}
1.1.2 目标对象
/**
* 代理模式中的 目标对象
*/
public class SomeServiceImpl implements SomeService {@Overridepublic String doSome(String msg) {System.out.println("目标对象执行了..." + msg);return "hello:" + msg;}
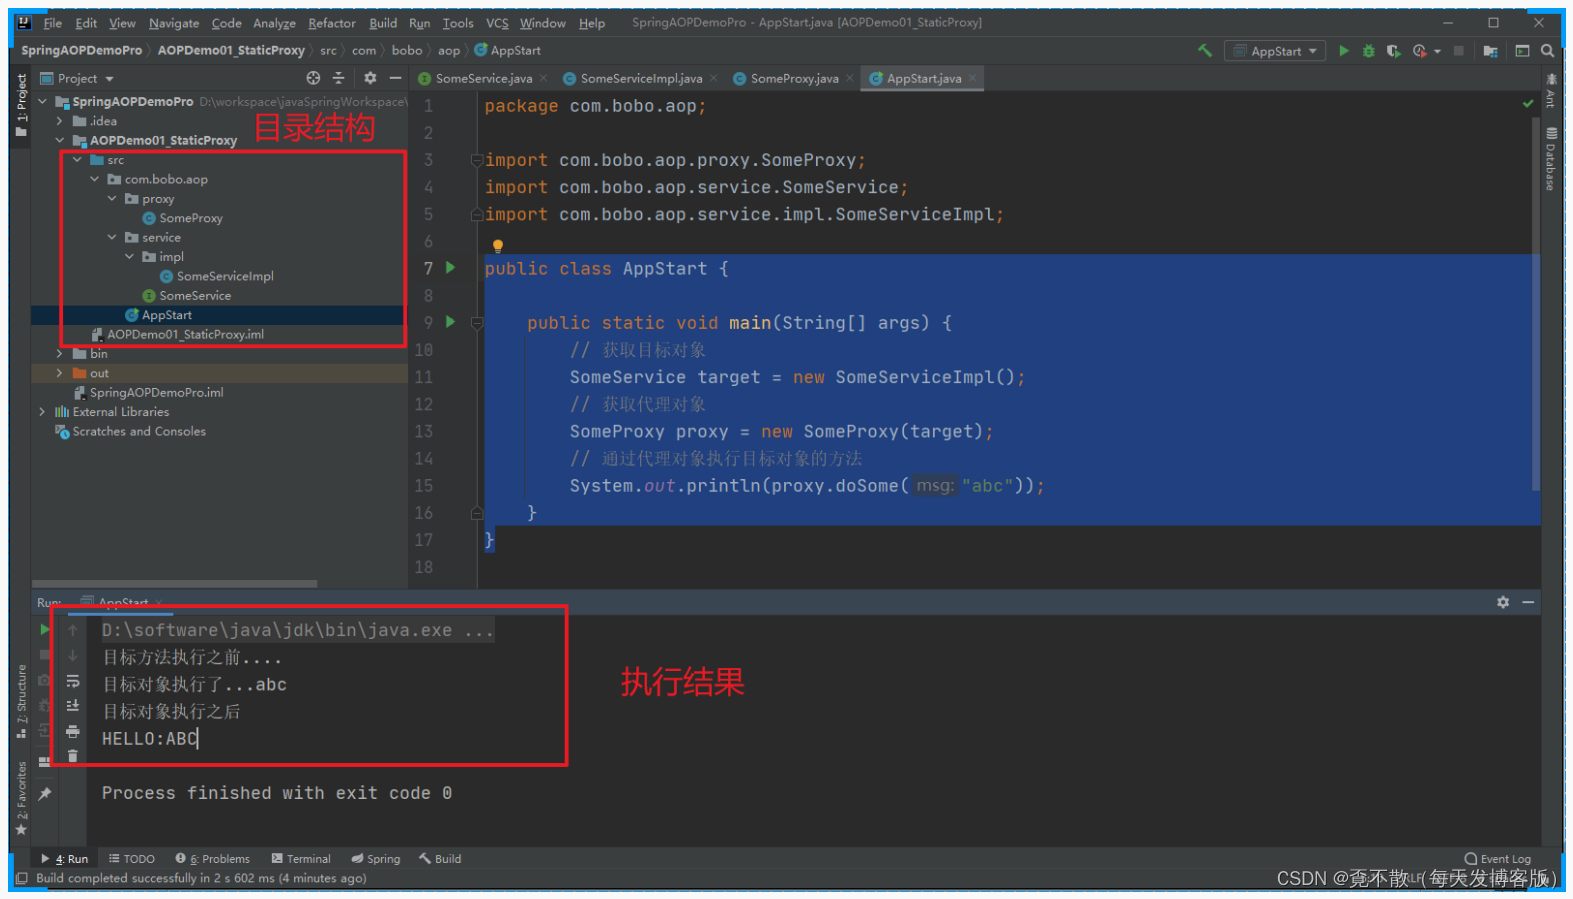
}1.1.3 创建代理对象
package com.bobo.aop.proxy;import com.bobo.aop.service.SomeService;/*** 静态代理类*/
public class SomeProxy implements SomeService {private SomeService target;public SomeProxy(SomeService target) {this.target = target;}/*** 代理对象实际执行的方法* @param msg* @return*/@Overridepublic String doSome(String msg) {System.out.println("目标方法执行之前....");// 让目标对象来执行核心业务String res = target.doSome(msg);System.out.println("目标对象执行之后");return res.toUpperCase();}
}
1.1.4 测试
package com.bobo.aop;import com.bobo.aop.proxy.SomeProxy;
import com.bobo.aop.service.SomeService;
import com.bobo.aop.service.impl.SomeServiceImpl;public class AppStart {public static void main(String[] args) {// 获取目标对象SomeService target = new SomeServiceImpl();// 获取代理对象SomeProxy proxy = new SomeProxy(target);// 通过代理对象执行目标对象的方法System.out.println(proxy.doSome("abc"));}
}
1.2 动态代理
代理类在程序运行时创建的代理方式被成为动态代理。 也就是说,这种情况下,代理类并不是在Java代码中定义的,而是在运行时根据我们在Java代码中的“指示”动态生成的。

1.2.1 动态代理模式之JDK代理
声明接口
package com.bobo.aop.service;/*** 代理模式中的 公共接口*/
public interface SomeService {String doSome(String msg);
}
创建目标类
package com.bobo.aop.service.impl;import com.bobo.aop.service.SomeService;/*** 代理模式中的 目标对象*/
public class SomeServiceImpl implements SomeService {@Overridepublic String doSome(String msg) {System.out.println("目标对象执行了..." + msg);return "hello:" + msg;}
}
实现代理
package com.bobo.aop;import com.bobo.aop.service.SomeService;
import com.bobo.aop.service.impl.SomeServiceImpl;import java.lang.reflect.InvocationHandler;
import java.lang.reflect.Method;
import java.lang.reflect.Proxy;public class AppStart {public static void main(String[] args) {// 获取目标对象SomeService target = new SomeServiceImpl();// 获取基于JDK的代理对象SomeService proxy = (SomeService) Proxy.newProxyInstance(target.getClass().getClassLoader() // 获取一个类加载器, target.getClass().getInterfaces() // 获取目标对象实现的所有的接口, new InvocationHandler() { // 获取一个InvocationHandler实例/*** 代理对象执行的方法*     会在该方法中调用目标对象的方法* @param proxy* @param method* @param args* @return* @throws Throwable*/@Overridepublic Object invoke(Object proxy, Method method, Object[] args) throws Throwable {System.out.println("目标对象执行之前...");// 目标对象方法的执行Object res = method.invoke(target, args[0]);System.out.println("目标对象执行之后...");return res;}});// 调用代理对象中的相关方法System.out.println(proxy.doSome("123456"));}
}

1.2.3动态代理模式之CGLIB代理
如果目标对象没有实现任何的接口,那么我们是使用不了JDK代理模式的,这时我们只能通过CGLIB代理来实现。CGLIB的实现本质是继承。
创建目标对象
/**
* 目标对象
* 目标对象没有实现任何的接口
*/
public class SomeServiceImpl {public String doSome(String msg){System.out.println("目标对象执行了..." + msg);return "hello:" + msg;}
}
创建CGLIB工厂
package com.bobo.aop.proxy;import com.bobo.aop.service.impl.SomeServiceImpl;
import net.sf.cglib.proxy.Enhancer;
import net.sf.cglib.proxy.MethodInterceptor;
import net.sf.cglib.proxy.MethodProxy;import java.lang.reflect.Method;/*** CGLIB工厂*/
public class CglibProxy implements MethodInterceptor {// 声明目标对象private SomeServiceImpl target;public CglibProxy(SomeServiceImpl target) {this.target = target;}/*** 对外提供用来创建代理对象的方法* @return*/public SomeServiceImpl createProxy(){// 创建增强器Enhancer enhancer = new Enhancer();// 指定父类enhancer.setSuperclass(SomeServiceImpl.class);// 指定回调接口对象enhancer.setCallback(this);// 返回创建的cglib代理对象return (SomeServiceImpl) enhancer.create();}/*** 和之前的JDK动态代理中的invoke方法类似* @param o* @param method* @param objects* @param methodProxy* @return* @throws Throwable*/@Overridepublic Object intercept(Object o, Method method, Object[] objects, MethodProxy methodProxy) throws Throwable {System.out.println("目标对象执行之前...");// 目标对象方法的执行Object res = method.invoke(target, objects[0]);System.out.println("目标对象执行之后...");return res;}
}
代码运行
package com.bobo.aop;import com.bobo.aop.proxy.CglibProxy;
import com.bobo.aop.service.impl.SomeServiceImpl;public class AppStart {public static void main(String[] args) {// 获取目标对象SomeServiceImpl target = new SomeServiceImpl();// 获取CGLIB代理对象SomeServiceImpl proxy = new CglibProxy(target).createProxy();// 执行方法System.out.println(proxy.doSome("abcd"));}
}

2. AOP概念
AOP(Aspect Oriented Programming),即面向切面编程,可以说是OOP(Object Oriented
Programming,面向对象编程)的补充和完善。
面向切面是面向对象中的一种方式而已。在代码执行过程中,动态嵌入其他代码,叫做面向切面编程。常见的使用场景:
Authentication 权限
Caching 缓存
Context passing 内容传递
Error handling 错误处理
Lazy loading 懒加载
Debugging 调试
logging, tracing, profiling and monitoring 记录跟踪 优化 校准
Performance optimization 性能优化
Persistence 持久化
Resource pooling 资源池
Synchronization 同步
Transactions 事务
....
面向切面编程的几个核心概念
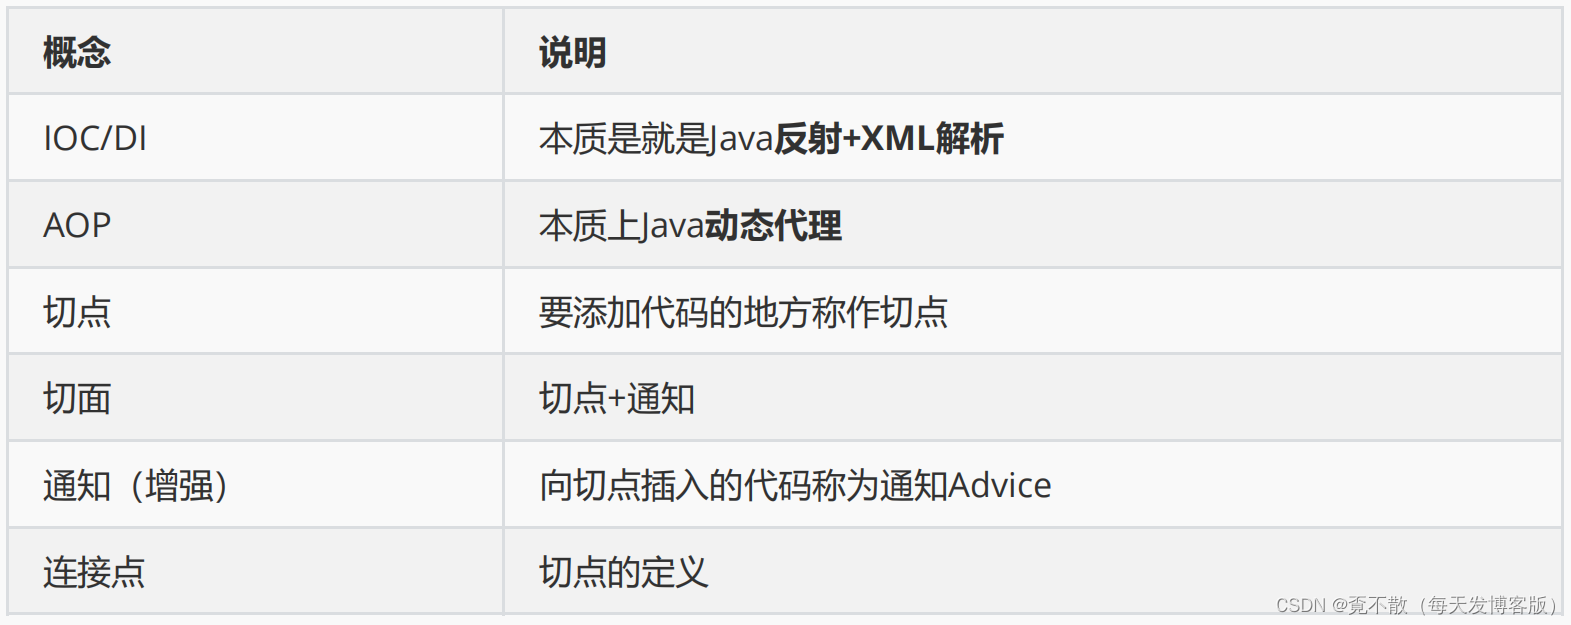
面向切面编程,就是将交叉业务逻辑封装成切面,利用AOP的功能将切面织入到主业务逻辑中。所谓交叉业务逻辑是指,通用的、与主业务逻辑无关的代码,如安全检查、事务、日志等。若不使用AOP,则会出现代码纠缠,即交叉业务逻辑与主业务逻辑混合在一起。这样,会使主业务逻辑变的混杂不清。
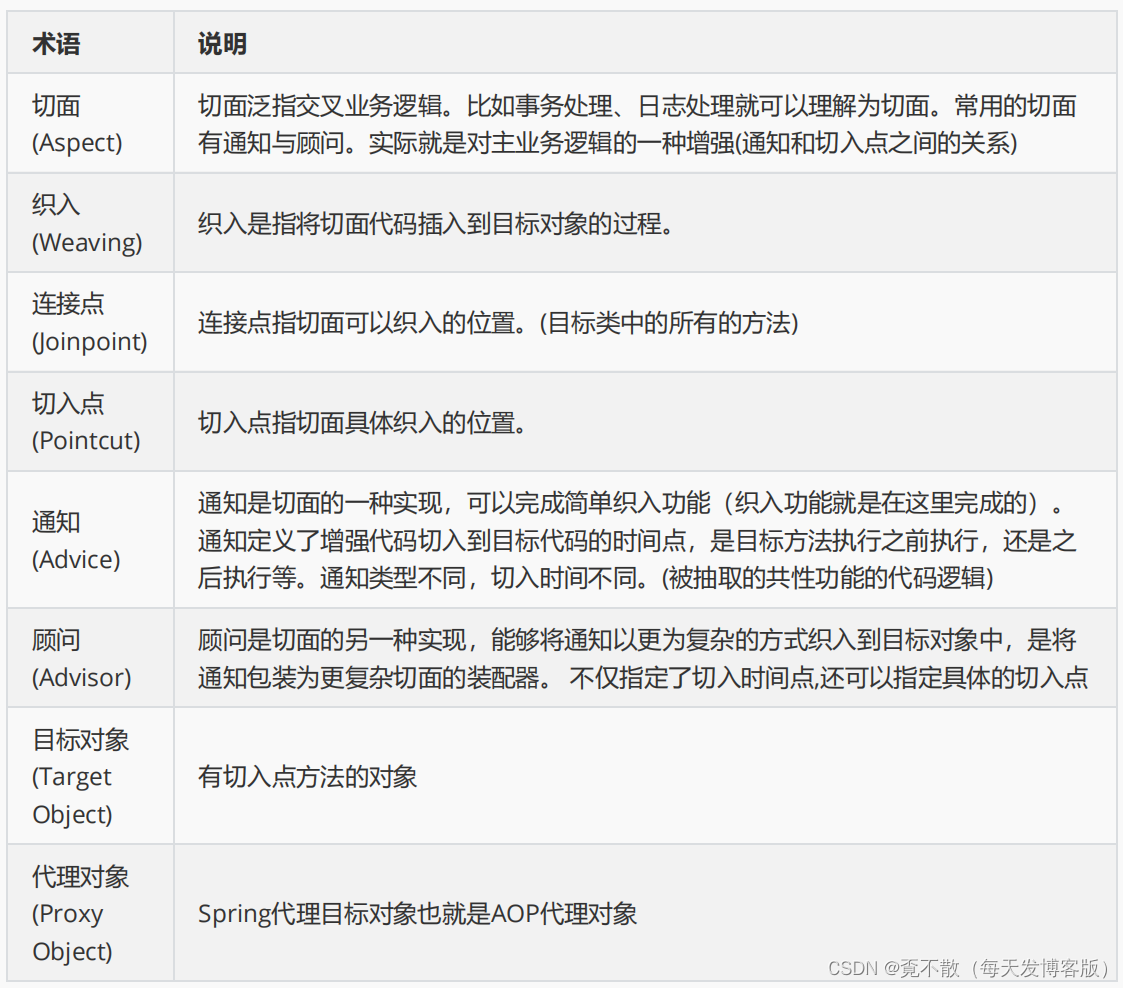
AOP术语介绍


3.AOP的具体实现
3.1 环境准备
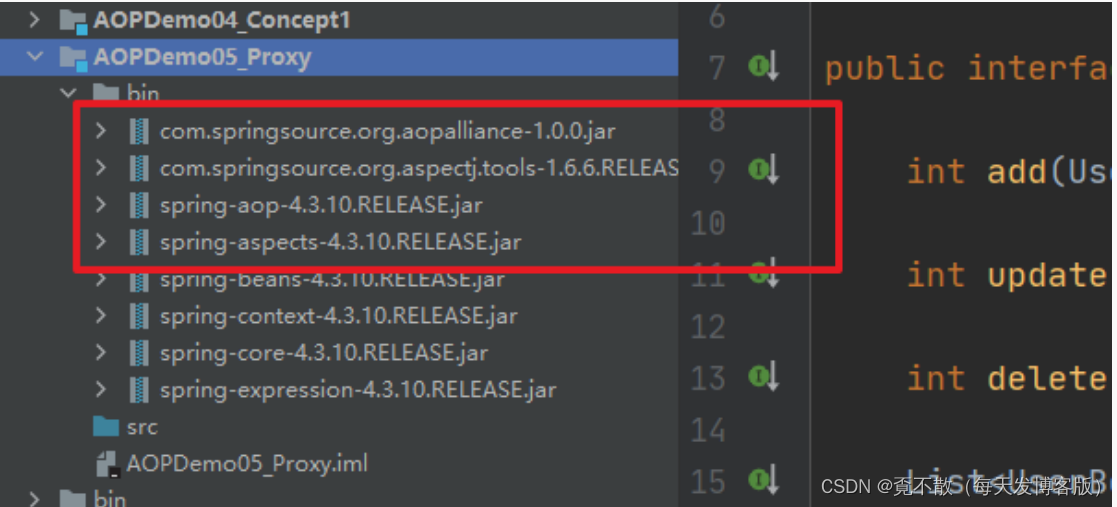
在Spring中我们要使用AOP的话需要添加对应的依赖。
3.2 基于纯代理的AOP
基于纯代理方式实现的AOP中具有的几种通知类型。

3.2.1 前置通知
创建接口
package com.bobo.aop.service;/*** 公共接口*/
public interface SomeService {String doSome(String msg);void say();
}
创建实现类
package com.bobo.aop.service.impl;import com.bobo.aop.service.SomeService;/*** 目标对象*/
public class SomeServiceImpl implements SomeService {@Overridepublic String doSome(String msg) {System.out.println("目标对象doSome执行了..." + msg);return "Hello:" + msg;}@Overridepublic void say() {System.out.println("目标对象say执行了..." + 1/0 );}
}
创建前置通知类
package com.bobo.aop.advice;import org.springframework.aop.MethodBeforeAdvice;import java.lang.reflect.Method;
import java.util.Arrays;/*** 前置通知类*/
public class MyMethodBeforeAdvice implements MethodBeforeAdvice {/*** 前置通知  抽取的公共代码* @param method 目标对象的方法* @param objects 目标对象的参数列表* @param o 目标对象* @throws Throwable*/@Overridepublic void before(Method method, Object[] objects, Object o) throws Throwable {System.out.println(method);System.out.println(Arrays.toString(objects));System.out.println(o);System.out.println("前置通知执行了.....");}
}
配置文件
<?xml version="1.0" encoding="UTF-8"?>
<beans xmlns="http://www.springframework.org/schema/beans"xmlns:xsi="http://www.w3.org/2001/XMLSchema-instance"xmlns:context="http://www.springframework.org/schema/context"xmlns:aop="http://www.springframework.org/schema/aop"xsi:schemaLocation="http://www.springframework.org/schema/beanshttp://www.springframework.org/schema/beans/spring-beans.xsdhttp://www.springframework.org/schema/contexthttp://www.springframework.org/schema/context/spring-context.xsdhttp://www.springframework.org/schema/aophttp://www.springframework.org/schema/aop/spring-aop.xsd"><!-- 注册目标类 --><bean class="com.bobo.aop.service.impl.SomeServiceImpl" id="someService">
</bean><!-- 注册通知类 --><bean class="com.bobo.aop.advice.MyMethodBeforeAdvice" id="beforeAdvice">
</bean><!-- 创建对应的代理类 --><bean class="org.springframework.aop.framework.ProxyFactoryBean" id="proxyFactoryBean"><!-- 指定目标对象 --><property name="target" ref="someService"/><!-- 指定目标对象实现的所有接口 --><property name="interfaces" value="com.bobo.aop.service.SomeService"/><!-- 指定切面 将通知和切入点关联 --><property name="interceptorNames"><list><value>beforeAdvice</value></list></property>
</bean>
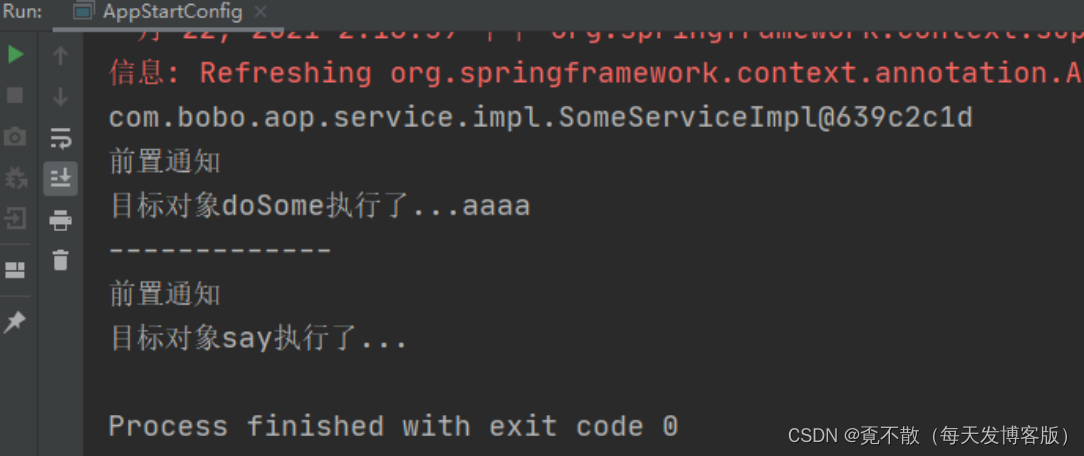
</beans> 测试操作
package com.bobo.aop;import com.bobo.aop.service.SomeService;
import org.springframework.context.ApplicationContext;
import org.springframework.context.support.ClassPathXmlApplicationContext;public class AppStart {public static void main(String[] args) {ApplicationContext ac = new ClassPathXmlApplicationContext("applicationContext.xml");SomeService some = ac.getBean("proxyFactoryBean",SomeService.class);System.out.println(some);System.out.println("************");String obj = some.doSome("aaa");System.out.println(obj);System.out.println("----------");some.say();}
}

3.2.2 后置通知
在目标方法执行之后执行的通知。
创建后置通知类
package com.bobo.aop.advice;import org.springframework.aop.AfterReturningAdvice;import java.lang.reflect.Method;/*** 后置通知类*/
public class MyAfterReturningAdvice implements AfterReturningAdvice {/*** 后置通知方法* @param returnValue* @param method* @param args* @param target* @throws Throwable*/@Overridepublic void afterReturning(Object returnValue, Method method, Object[] args, Object target) throws Throwable {System.out.println("后置方法执行了。。。" + returnValue );}
}
修改配置文件
<?xml version="1.0" encoding="UTF-8"?>
<beans xmlns="http://www.springframework.org/schema/beans"xmlns:xsi="http://www.w3.org/2001/XMLSchema-instance"xmlns:context="http://www.springframework.org/schema/context"xmlns:aop="http://www.springframework.org/schema/aop"xsi:schemaLocation="http://www.springframework.org/schema/beanshttp://www.springframework.org/schema/beans/spring-beans.xsdhttp://www.springframework.org/schema/contexthttp://www.springframework.org/schema/context/spring-context.xsdhttp://www.springframework.org/schema/aophttp://www.springframework.org/schema/aop/spring-aop.xsd"><!-- 注册目标类 --><bean class="com.bobo.aop.service.impl.SomeServiceImpl" id="someService"></bean><!-- 注册通知类 --><!-- 前置通知 --><bean class="com.bobo.aop.advice.MyMethodBeforeAdvice" id="beforeAdvice"></bean><!-- 后置通知 --><bean class="com.bobo.aop.advice.MyAfterReturningAdvice" id="afterReturningAdvice"/><bean class="org.springframework.aop.framework.ProxyFactoryBean" id="proxyFactoryBean"><!-- 指定目标对象 --><property name="target" ref="someService"/><!-- 指定目标对象实现的所有接口 --><property name="interfaces" value="com.bobo.aop.service.SomeService"/><!-- 指定切面 将通知和切入点关联 --><property name="interceptorNames"><list><!--<value>beforeAdvice</value><value>afterReturningAdvice</value>--><!--<value>methodInterceptor</value>--><value>throwsAdvice</value></list></property></bean></beans>
测试

3.2.3 环绕通知
环绕通知就是在切入点方法之前前后都会织入的方式,而且环绕通知相比于前置通知和后置通知来说可以修改返回结果。
创建通知类
package com.bobo.aop.advice;import org.aopalliance.intercept.MethodInterceptor;
import org.aopalliance.intercept.MethodInvocation;/*** 环绕通知类*/
public class MyMethodInterceptor implements MethodInterceptor {/*** 环绕通知*    可以修改返回结果* @param invocation* @return* @throws Throwable*/@Overridepublic Object invoke(MethodInvocation invocation) throws Throwable {System.out.println("目标对象执行之前....");Object obj = invocation.proceed(); // 目标对象的调用System.out.println("目标对象执行之后....");if(obj != null && obj instanceof  String){return ((String) obj).toUpperCase();}return obj;}
}
修改配置文件
<?xml version="1.0" encoding="UTF-8"?>
<beans xmlns="http://www.springframework.org/schema/beans"xmlns:xsi="http://www.w3.org/2001/XMLSchema-instance"xmlns:context="http://www.springframework.org/schema/context"xmlns:aop="http://www.springframework.org/schema/aop"xsi:schemaLocation="http://www.springframework.org/schema/beanshttp://www.springframework.org/schema/beans/spring-beans.xsdhttp://www.springframework.org/schema/contexthttp://www.springframework.org/schema/context/spring-context.xsdhttp://www.springframework.org/schema/aophttp://www.springframework.org/schema/aop/spring-aop.xsd"><!-- 注册目标类 --><bean class="com.bobo.aop.service.impl.SomeServiceImpl" id="someService"></bean><!-- 注册通知类 --><!-- 前置通知 --><bean class="com.bobo.aop.advice.MyMethodBeforeAdvice" id="beforeAdvice"></bean><!-- 后置通知 --><bean class="com.bobo.aop.advice.MyAfterReturningAdvice" id="afterReturningAdvice"/><!-- 环绕通知 --><bean class="com.bobo.aop.advice.MyMethodInterceptor" id="methodInterceptor"/><!-- 创建对应的代理类 --><bean class="org.springframework.aop.framework.ProxyFactoryBean" id="proxyFactoryBean"><!-- 指定目标对象 --><property name="target" ref="someService"/><!-- 指定目标对象实现的所有接口 --><property name="interfaces" value="com.bobo.aop.service.SomeService"/><!-- 指定切面 将通知和切入点关联 --><property name="interceptorNames"><list><!--<value>beforeAdvice</value><value>afterReturningAdvice</value>--><!--<value>methodInterceptor</value>--><value>throwsAdvice</value></list></property></bean></beans>
测试

3.2.4 异常通知
当切入点方法执行抛异常的时候会触发的通知类型。
创建通知类
package com.bobo.aop.advice;import org.springframework.aop.ThrowsAdvice;/*** 异常通知类*/
public class MyThrowsAdvice implements ThrowsAdvice {/*** 异常通知* @param ex*/public void afterThrowing(Exception ex){System.out.println("异常通知执行了..." + ex.getStackTrace());}
}
修改配置文件
<?xml version="1.0" encoding="UTF-8"?>
<beans xmlns="http://www.springframework.org/schema/beans"xmlns:xsi="http://www.w3.org/2001/XMLSchema-instance"xmlns:context="http://www.springframework.org/schema/context"xmlns:aop="http://www.springframework.org/schema/aop"xsi:schemaLocation="http://www.springframework.org/schema/beanshttp://www.springframework.org/schema/beans/spring-beans.xsdhttp://www.springframework.org/schema/contexthttp://www.springframework.org/schema/context/spring-context.xsdhttp://www.springframework.org/schema/aophttp://www.springframework.org/schema/aop/spring-aop.xsd"><!-- 注册目标类 --><bean class="com.bobo.aop.service.impl.SomeServiceImpl" id="someService"></bean><!-- 注册通知类 --><!-- 前置通知 --><bean class="com.bobo.aop.advice.MyMethodBeforeAdvice" id="beforeAdvice"></bean><!-- 后置通知 --><bean class="com.bobo.aop.advice.MyAfterReturningAdvice" id="afterReturningAdvice"/><!-- 环绕通知 --><bean class="com.bobo.aop.advice.MyMethodInterceptor" id="methodInterceptor"/><!-- 异常通知 --><bean class="com.bobo.aop.advice.MyThrowsAdvice" id="throwsAdvice"/><!-- 创建对应的代理类 --><bean class="org.springframework.aop.framework.ProxyFactoryBean" id="proxyFactoryBean"><!-- 指定目标对象 --><property name="target" ref="someService"/><!-- 指定目标对象实现的所有接口 --><property name="interfaces" value="com.bobo.aop.service.SomeService"/><!-- 指定切面 将通知和切入点关联 --><property name="interceptorNames"><list><!--<value>beforeAdvice</value><value>afterReturningAdvice</value>--><!--<value>methodInterceptor</value>--><value>throwsAdvice</value></list></property></bean></beans>
添加异常信息

测试

3.3 基于AspectJ的AOP
对于AOP这种编程思想,很多框架都进行了实现。Spring就是其中之一,可以完成面向切面编程。然而,AspectJ也实现了AOP的功能,且其实现方式更为简捷,使用更为方便,而且还支持注解式开发。所以,Spring又将AspectJ的对于AOP的实现也引入到了自己的框架中。在Spring中使用AOP开发时,一般使用AspectJ的实现方式。
ActJ中的通知类型

AspectJ的切入点表达式
execution([modifiers-pattern] 访问权限类型ret-type-pattern 返回值类型[declaring-type-pattern] 全限定性类名name-pattern(param-pattern) 方法名(参数名)[throws-pattern] 抛出异常类型
)
切入点表达式要匹配的对象就是目标方法的方法名。所以,execution表达式中明显就是方法的签名。注意,表达式中加 [ ] 的部分表示可省略部分,各部分间用空格分开。在其中可以使用以下符号。

举例:

3.3.1 基于注解的实现
3.3.1.1 前置通知
创建对应的接口和实现
package com.bobo.aop.service;/*** 公共接口*/
public interface SomeService {String doSome(String msg);void say();
}
package com.bobo.aop.service.impl;import com.bobo.aop.service.SomeService;/*** 目标对象*/
public class SomeServiceImpl implements SomeService {@Overridepublic String doSome(String msg) {System.out.println("目标对象doSome执行了..." + msg);return "Hello:" + msg;}@Overridepublic void say() {System.out.println("目标对象say执行了..."  + 1 / 0);}
}
创建对应的切面类
/*** 切面类*   @Aspect 该注解标注的 Java类就是一个切面类*/
@Aspect
public class MyAspect {/*** 前置通知*   通过切入点表达式来使 通知和切入点关联*///@Before(value = "execution(* com.bobo.aop.service.*.*(..))")public void beforeMethod(){System.out.println("前置通知");}
}
配置文件
<?xml version="1.0" encoding="UTF-8"?>
<beans xmlns="http://www.springframework.org/schema/beans"xmlns:xsi="http://www.w3.org/2001/XMLSchema-instance"xmlns:context="http://www.springframework.org/schema/context"xmlns:aop="http://www.springframework.org/schema/aop"xsi:schemaLocation="http://www.springframework.org/schema/beanshttp://www.springframework.org/schema/beans/spring-beans.xsdhttp://www.springframework.org/schema/contexthttp://www.springframework.org/schema/context/spring-context.xsdhttp://www.springframework.org/schema/aophttp://www.springframework.org/schema/aop/spring-aop.xsd"><!-- 注册目标类 --><bean class="com.bobo.aop.service.impl.SomeServiceImpl" id="someService"/><!-- 注册切面类 --><bean class="com.bobo.aop.aspect.MyAspect" id="myAspect"/><!-- 注册自动代理 --><aop:aspectj-autoproxy/>
</beans>
也可以使用Java配置类的方式
package com.bobo.aop.config;import com.bobo.aop.aspect.MyAspect;
import com.bobo.aop.service.SomeService;
import com.bobo.aop.service.impl.SomeServiceImpl;
import org.aspectj.lang.annotation.Aspect;
import org.aspectj.lang.annotation.Before;
import org.springframework.context.annotation.Bean;
import org.springframework.context.annotation.Configuration;
import org.springframework.context.annotation.EnableAspectJAutoProxy;@Configuration
@EnableAspectJAutoProxy
public class JavaConfig {@Beanpublic SomeService someService(){return new SomeServiceImpl();}@Beanpublic MyAspect myAspect(){return new MyAspect();}
}
测试
package com.bobo.aop;import com.bobo.aop.service.SomeService;
import org.springframework.context.ApplicationContext;
import org.springframework.context.support.ClassPathXmlApplicationContext;public class AppStart {public static void main(String[] args) {ApplicationContext ac = new ClassPathXmlApplicationContext("applicationContext.xml");SomeService service = ac.getBean(SomeService.class);System.out.println(service);service.doSome("aaaa");System.out.println("-------------");service.say();}
}
3.3.1.2 后置通知
在前面的基础上我们只需要在切面类中添加对应的后置通知即可。
/*** 切面类*   @Aspect 该注解标注的 Java类就是一个切面类*/
@Aspect
public class MyAspect {/*** 前置通知*   通过切入点表达式来使 通知和切入点关联*///@Before(value = "execution(* com.bobo.aop.service.*.*(..))")public void beforeMethod(){System.out.println("前置通知");}/*** 后置通知*///@AfterReturning(value = "execution(* com.bobo.aop.service.*.*(..))",returning = "msg")public void afterReturningMethod(Object msg){System.out.println("后置通知..." + msg);}}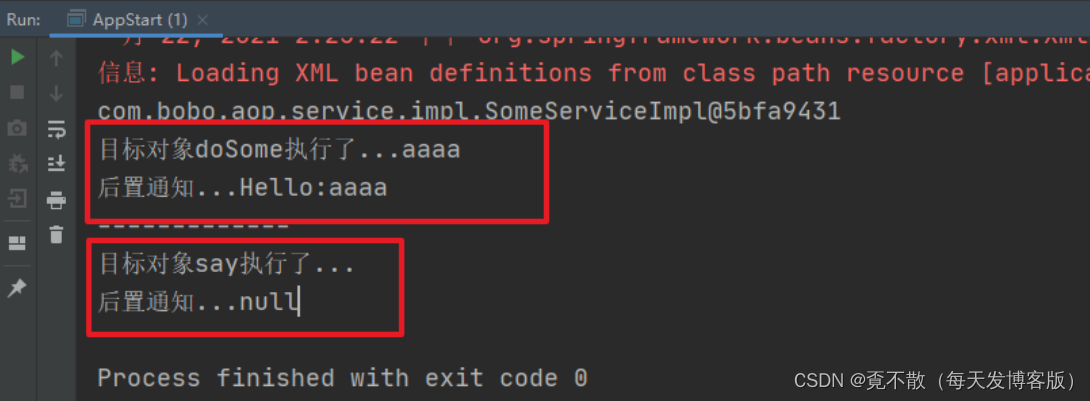
3.3.1.3 环绕通知
切面类中添加对应的环绕通知,通过切入点表达式和切入点关联。
/*** 环绕通知* @return*///@Around(value = "execution(* com.bobo.aop.service.*.*(..))")public Object aroundMethod(ProceedingJoinPoint pjp){System.out.println("执行之前...");// 执行目标对象的方法Object proceed = null;try {proceed = pjp.proceed();} catch (Throwable throwable) {throwable.printStackTrace();}System.out.println("执行之后...");return proceed;}
3.3.1.4 异常通知
/*** 异常通知* @param ex*/@AfterThrowing(value = "execution(* com.bobo.aop.service.*.*(..))",throwing = "ex")public void throwsMethod(Exception ex){System.out.println("异常通知..." + ex);}

3.3.1.5 最终通知
/*** 最终通知* 只要切入点方法执行了,那么最终通知一定会执行* 我们可以用来做一些资源回收等操作*/@After(value = "execution(* com.bobo.aop.service.*.*(..))")public void afterMethod(){System.out.println("最终通知...");}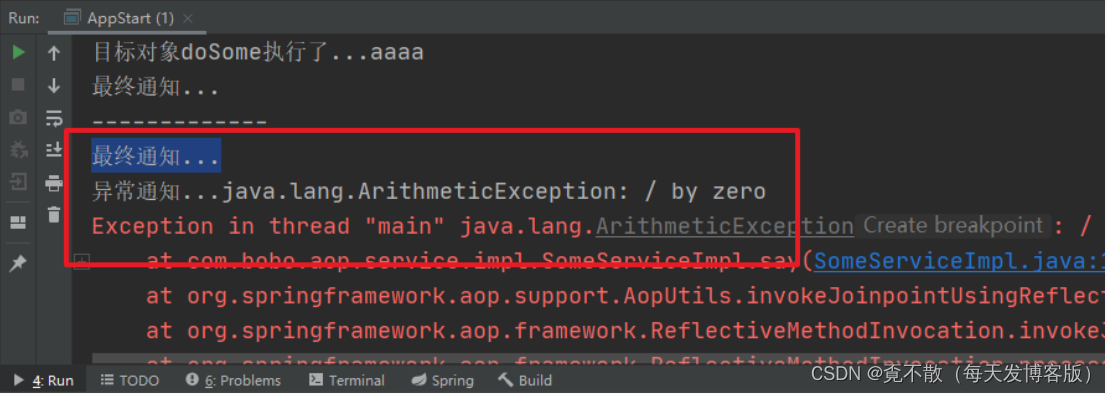
3.3.2 基于配置文件的实现
在前一个案例基础上我们来实现。
3.3.2.1 前置通知
切面类
package com.bobo.aop.aspect;import org.aspectj.lang.ProceedingJoinPoint;
import org.aspectj.lang.annotation.After;
import org.aspectj.lang.annotation.AfterThrowing;
import org.aspectj.lang.annotation.Aspect;/*** 切面类*   @Aspect 该注解标注的 Java类就是一个切面类*/public class MyAspect {/*** 前置通知*   通过切入点表达式来使 通知和切入点关联*/public void beforeMethod(){System.out.println("前置通知");}/*** 后置通知*/public void afterReturningMethod(Object msg){System.out.println("后置通知..." + msg);}/*** 环绕通知* @return*/public Object aroundMethod(ProceedingJoinPoint pjp){System.out.println("执行之前...");// 执行目标对象的方法Object proceed = null;try {proceed = pjp.proceed();} catch (Throwable throwable) {throwable.printStackTrace();}System.out.println("执行之后...");return proceed;}/*** 异常通知* @param ex*/public void throwsMethod(Exception ex){System.out.println("异常通知..." + ex);}/*** 最终通知*    只要切入点方法执行了,那么最终通知一定会执行*    我们可以用来做一些资源回收等操作*/public void afterMethod(){System.out.println("最终通知...");}
}
配置文件
<?xml version="1.0" encoding="UTF-8"?>
<beans xmlns="http://www.springframework.org/schema/beans"xmlns:xsi="http://www.w3.org/2001/XMLSchema-instance"xmlns:context="http://www.springframework.org/schema/context"xmlns:aop="http://www.springframework.org/schema/aop"xsi:schemaLocation="http://www.springframework.org/schema/beanshttp://www.springframework.org/schema/beans/spring-beans.xsdhttp://www.springframework.org/schema/contexthttp://www.springframework.org/schema/context/spring-context.xsdhttp://www.springframework.org/schema/aophttp://www.springframework.org/schema/aop/spring-aop.xsd"><!-- 注册目标类 --><bean class="com.bobo.aop.service.impl.SomeServiceImpl" id="someService"/><!--  注册切面类 --><bean class="com.bobo.aop.aspect.MyAspect" id="myAspect"/><!-- AspectJ AOP 配置 --><aop:config><!--<aop:pointcut id="" expression=""/>--><!-- 配置切面类 --><aop:aspect ref="myAspect"><!-- 通知和切入点关联  用到切入点表达式 --><!--<aop:before method="beforeMethod" pointcut="execution(* com.bobo.aop.service.*.*(..))"/>--></aop:aspect></aop:config>
</beans>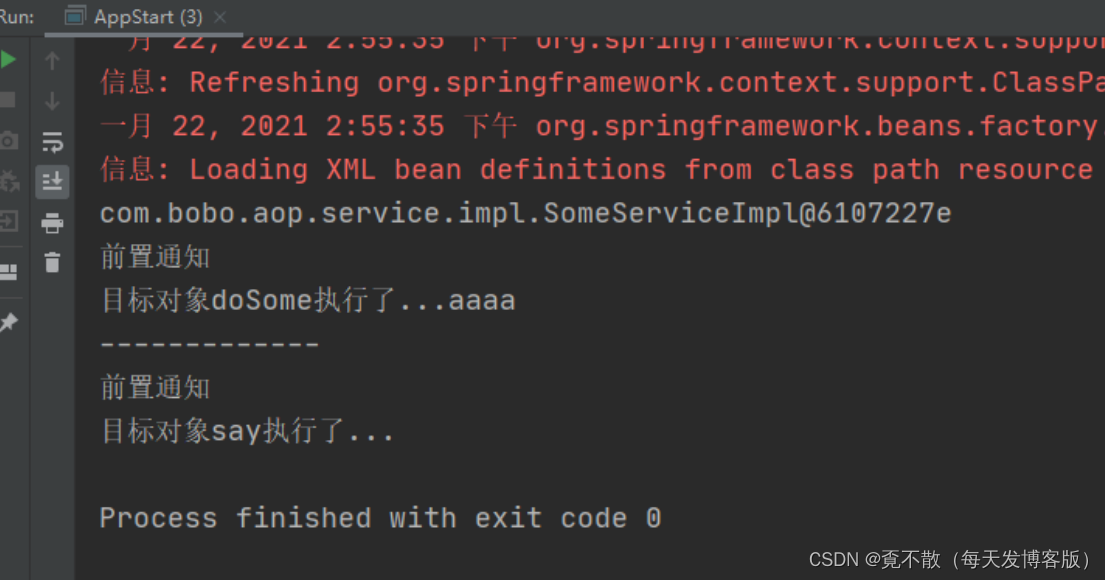
3.3.2.2 后置通知
<?xml version="1.0" encoding="UTF-8"?>
<beans xmlns="http://www.springframework.org/schema/beans"xmlns:xsi="http://www.w3.org/2001/XMLSchema-instance"xmlns:context="http://www.springframework.org/schema/context"xmlns:aop="http://www.springframework.org/schema/aop"xsi:schemaLocation="http://www.springframework.org/schema/beanshttp://www.springframework.org/schema/beans/spring-beans.xsdhttp://www.springframework.org/schema/contexthttp://www.springframework.org/schema/context/spring-context.xsdhttp://www.springframework.org/schema/aophttp://www.springframework.org/schema/aop/spring-aop.xsd"><!-- 注册目标类 --><bean class="com.bobo.aop.service.impl.SomeServiceImpl" id="someService"/><!--  注册切面类 --><bean class="com.bobo.aop.aspect.MyAspect" id="myAspect"/><!-- AspectJ AOP 配置 --><aop:config><!--<aop:pointcut id="" expression=""/>--><!-- 配置切面类 --><aop:aspect ref="myAspect"><!-- 通知和切入点关联  用到切入点表达式 --><!--<aop:before method="beforeMethod" pointcut="execution(* com.bobo.aop.service.*.*(..))"/>--><!-- 配置后置通知 --><!--<aop:after-returning method="afterReturningMethod" returning="msg" pointcut="execution(* com.bobo.aop.service.*.*(..))" />--></aop:aspect></aop:config>
</beans>
3.3.2.3 环绕通知
<?xml version="1.0" encoding="UTF-8"?>
<beans xmlns="http://www.springframework.org/schema/beans"xmlns:xsi="http://www.w3.org/2001/XMLSchema-instance"xmlns:context="http://www.springframework.org/schema/context"xmlns:aop="http://www.springframework.org/schema/aop"xsi:schemaLocation="http://www.springframework.org/schema/beanshttp://www.springframework.org/schema/beans/spring-beans.xsdhttp://www.springframework.org/schema/contexthttp://www.springframework.org/schema/context/spring-context.xsdhttp://www.springframework.org/schema/aophttp://www.springframework.org/schema/aop/spring-aop.xsd"><!-- 注册目标类 --><bean class="com.bobo.aop.service.impl.SomeServiceImpl" id="someService"/><!--  注册切面类 --><bean class="com.bobo.aop.aspect.MyAspect" id="myAspect"/><!-- AspectJ AOP 配置 --><aop:config><!--<aop:pointcut id="" expression=""/>--><!-- 配置切面类 --><aop:aspect ref="myAspect"><!-- 通知和切入点关联  用到切入点表达式 --><!--<aop:before method="beforeMethod" pointcut="execution(* com.bobo.aop.service.*.*(..))"/>--><!-- 配置后置通知 --><!--<aop:after-returning method="afterReturningMethod" returning="msg" pointcut="execution(* com.bobo.aop.service.*.*(..))" />--><!--<aop:around method="aroundMethod" pointcut="execution(* com.bobo.aop.service.*.*(..))" />--></aop:aspect></aop:config>
</beans>
3.3.2.4 异常通知
<?xml version="1.0" encoding="UTF-8"?>
<beans xmlns="http://www.springframework.org/schema/beans"xmlns:xsi="http://www.w3.org/2001/XMLSchema-instance"xmlns:context="http://www.springframework.org/schema/context"xmlns:aop="http://www.springframework.org/schema/aop"xsi:schemaLocation="http://www.springframework.org/schema/beanshttp://www.springframework.org/schema/beans/spring-beans.xsdhttp://www.springframework.org/schema/contexthttp://www.springframework.org/schema/context/spring-context.xsdhttp://www.springframework.org/schema/aophttp://www.springframework.org/schema/aop/spring-aop.xsd"><!-- 注册目标类 --><bean class="com.bobo.aop.service.impl.SomeServiceImpl" id="someService"/><!--  注册切面类 --><bean class="com.bobo.aop.aspect.MyAspect" id="myAspect"/><!-- AspectJ AOP 配置 --><aop:config><!--<aop:pointcut id="" expression=""/>--><!-- 配置切面类 --><aop:aspect ref="myAspect"><!-- 通知和切入点关联  用到切入点表达式 --><!--<aop:before method="beforeMethod" pointcut="execution(* com.bobo.aop.service.*.*(..))"/>--><!-- 配置后置通知 --><!--<aop:after-returning method="afterReturningMethod" returning="msg" pointcut="execution(* com.bobo.aop.service.*.*(..))" />--><!--<aop:around method="aroundMethod" pointcut="execution(* com.bobo.aop.service.*.*(..))" />--><aop:after-throwing method="throwsMethod" throwing="ex" pointcut="execution(* com.bobo.aop.service.*.*(..))" /></aop:aspect></aop:config>
</beans>
3.3.2.5 最终通知
<?xml version="1.0" encoding="UTF-8"?>
<beans xmlns="http://www.springframework.org/schema/beans"xmlns:xsi="http://www.w3.org/2001/XMLSchema-instance"xmlns:context="http://www.springframework.org/schema/context"xmlns:aop="http://www.springframework.org/schema/aop"xsi:schemaLocation="http://www.springframework.org/schema/beanshttp://www.springframework.org/schema/beans/spring-beans.xsdhttp://www.springframework.org/schema/contexthttp://www.springframework.org/schema/context/spring-context.xsdhttp://www.springframework.org/schema/aophttp://www.springframework.org/schema/aop/spring-aop.xsd"><!-- 注册目标类 --><bean class="com.bobo.aop.service.impl.SomeServiceImpl" id="someService"/><!--  注册切面类 --><bean class="com.bobo.aop.aspect.MyAspect" id="myAspect"/><!-- AspectJ AOP 配置 --><aop:config><!--<aop:pointcut id="" expression=""/>--><!-- 配置切面类 --><aop:aspect ref="myAspect"><!-- 通知和切入点关联  用到切入点表达式 --><!--<aop:before method="beforeMethod" pointcut="execution(* com.bobo.aop.service.*.*(..))"/>--><!-- 配置后置通知 --><!--<aop:after-returning method="afterReturningMethod" returning="msg" pointcut="execution(* com.bobo.aop.service.*.*(..))" />--><!--<aop:around method="aroundMethod" pointcut="execution(* com.bobo.aop.service.*.*(..))" />--><aop:after-throwing method="throwsMethod" throwing="ex" pointcut="execution(* com.bobo.aop.service.*.*(..))" /><aop:after method="afterMethod" pointcut="execution(* com.bobo.aop.service.*.*(..))" /></aop:aspect></aop:config>
</beans>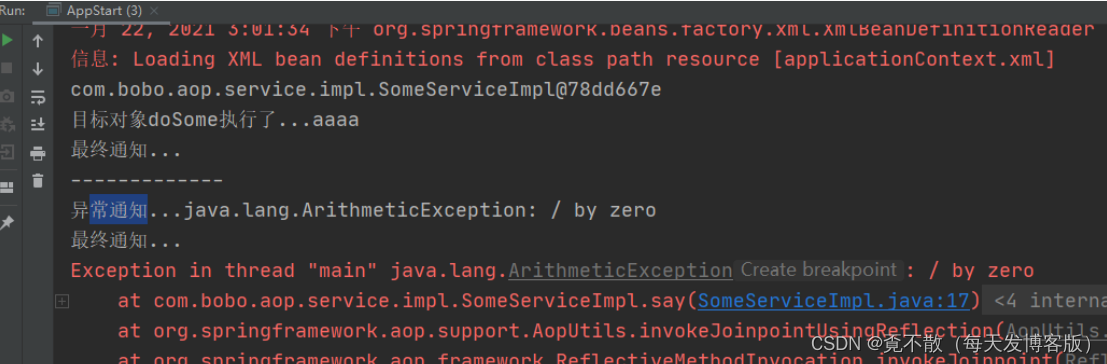
四、Spring事务管理
1.JdbcTemplate
简化Jdbc操作的步骤、模板化数据库操作。
1.1 基本操作
导入相关的依赖
配置JdbcTemplate
在配置文件中配置JdbcTemplate相关的信息
<?xml version="1.0" encoding="UTF-8"?>
<beans xmlns="http://www.springframework.org/schema/beans"xmlns:xsi="http://www.w3.org/2001/XMLSchema-instance"xmlns:context="http://www.springframework.org/schema/context"xmlns:tx="http://www.springframework.org/schema/tx"xmlns:aop="http://www.springframework.org/schema/aop"xsi:schemaLocation="http://www.springframework.org/schema/beanshttp://www.springframework.org/schema/beans/spring-beans.xsdhttp://www.springframework.org/schema/contexthttp://www.springframework.org/schema/context/spring-context.xsdhttp://www.springframework.org/schema/txhttp://www.springframework.org/schema/tx/spring-tx.xsdhttp://www.springframework.org/schema/aophttp://www.springframework.org/schema/aop/spring-aop.xsd"><context:component-scan base-package="com.bobo.aop.dao.impl,com.bobo.aop.service.impl"/><!-- 注册一个DataSource --><bean class="org.springframework.jdbc.datasource.DriverManagerDataSource" id="dataSource"><!-- 设置注入相关的数据库信息 --><property name="driverClassName" value="com.mysql.cj.jdbc.Driver"/><property name="url" value="jdbc:mysql://localhost:3306/shop?serverTimezone=GMT%2B8&useUnicode=true&characterEncoding=utf-8" /><property name="username" value="root"/><property name="password" value="123456"/></bean><!-- 注册一个JdbcTemplate对象 --><bean class="org.springframework.jdbc.core.JdbcTemplate" id="jdbcTemplate"><!-- 构造注入关联数据源 --><constructor-arg name="dataSource" ref="dataSource"/></bean>
</beans> 数据库操作
package com.bobo.aop.dao.impl;import com.bobo.aop.bean.User;
import com.bobo.aop.dao.IUserDao;
import org.springframework.beans.factory.annotation.Autowired;
import org.springframework.jdbc.core.BeanPropertyRowMapper;
import org.springframework.jdbc.core.JdbcTemplate;
import org.springframework.stereotype.Repository;import java.sql.ResultSet;
import java.sql.SQLException;
import java.util.List;@Repository
public class UserDaoImpl implements IUserDao {@Autowiredprivate JdbcTemplate jdbcTemplate;private String sql;@Overridepublic int addUser(User user) {sql = "insert into t_user(username,address,gender)values(?,?,?)";return jdbcTemplate.update(sql,user.getUsername(),user.getAddress(),user.getGender());}@Overridepublic int deleteUserById(Integer id) {sql = "delete from t_user where id = ?";return jdbcTemplate.update(sql,id);}@Overridepublic int updateUser(User user) {sql = "update t_user set username=?,address=?,gender=? where id = ?";return jdbcTemplate.update(sql,user.getUsername(),user.getAddress(),user.getGender(),user.getId());}@Overridepublic List<User> queryList() {sql = "select * from t_user";return jdbcTemplate.query(sql,new BeanPropertyRowMapper<User>(){/*** 每获取一行记录就会回调一次本方法* @param rs* @param rowNumber* @return* @throws SQLException*/@Overridepublic User mapRow(ResultSet rs, int rowNumber) throws SQLException {// 我们自己将查询出来的这行记录转换为我们期望的Java对象User user = new User();user.setId(rs.getInt("id"));user.setUsername(rs.getString("username"));user.setAddress(rs.getString("address"));user.setGender(rs.getString("gender"));return user;}});}@Overridepublic User queryUserById(Integer id) {sql = "select * from t_user where id = ?";Integer[] ids = {id};List<User> lists = jdbcTemplate.query(sql, ids, new BeanPropertyRowMapper<User>() {@Overridepublic User mapRow(ResultSet rs, int rowNumber) throws SQLException {// 我们自己将查询出来的这行记录转换为我们期望的Java对象User user = new User();user.setId(rs.getInt("id"));user.setUsername(rs.getString("username"));user.setAddress(rs.getString("address"));user.setGender(rs.getString("gender"));return user;}});if(lists != null && lists.size() == 1){return lists.get(0);}return null;}
}
2.Spring的事务管理
2.1 事务相关概念介绍
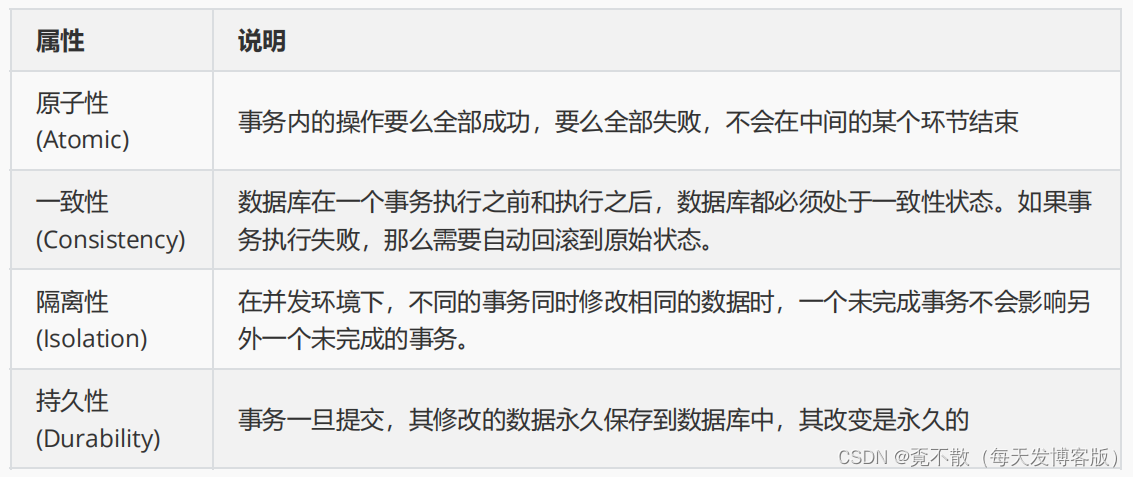
数据库事务(Database Transaction) ,是指作为单个逻辑工作单元执行的一系列操作,要么完全地执行,要么完全地不执行。 事务处理可以确保除非事务性单元内的所有操作都成功完成,否则不会永久更新面向数据的资源。通过将一组相关操作组合为一个要么全部成功要么全部失败的单元,可以简化错误恢复并使应用程序更加可靠。一个逻辑工作单元要成为事务,必须满足所谓的ACID(原子性、一致性、隔离性和持久性)属性。事务是数据库运行中的逻辑工作单位,由DBMS中的事务管理子系统负责事务的处理。

2.2 事务案例准备
准备一个产生非事务管理的问题案例
Dao中提供正常的数据库操作方法
package com.bobo.aop.dao.impl;import com.bobo.aop.bean.User;
import com.bobo.aop.dao.IUserDao;
import org.springframework.beans.factory.annotation.Autowired;
import org.springframework.jdbc.core.BeanPropertyRowMapper;
import org.springframework.jdbc.core.JdbcTemplate;
import org.springframework.stereotype.Repository;import java.sql.ResultSet;
import java.sql.SQLException;
import java.util.List;@Repository
public class UserDaoImpl implements IUserDao {@Autowiredprivate JdbcTemplate jdbcTemplate;private String sql;@Overridepublic int addUser(User user) {sql = "insert into t_user(username,address,gender)values(?,?,?)";return jdbcTemplate.update(sql,user.getUsername(),user.getAddress(),user.getGender());}@Overridepublic int deleteUserById(Integer id) {sql = "delete from t_user where id = ?";return jdbcTemplate.update(sql,id);}@Overridepublic int updateUser(User user) {sql = "update t_user set username=?,address=?,gender=? where id = ?";return jdbcTemplate.update(sql,user.getUsername(),user.getAddress(),user.getGender(),user.getId());}@Overridepublic List<User> queryList() {sql = "select * from t_user";return jdbcTemplate.query(sql,new BeanPropertyRowMapper<User>(){/*** 每获取一行记录就会回调一次本方法* @param rs* @param rowNumber* @return* @throws SQLException*/@Overridepublic User mapRow(ResultSet rs, int rowNumber) throws SQLException {// 我们自己将查询出来的这行记录转换为我们期望的Java对象User user = new User();user.setId(rs.getInt("id"));user.setUsername(rs.getString("username"));user.setAddress(rs.getString("address"));user.setGender(rs.getString("gender"));return user;}});}@Overridepublic User queryUserById(Integer id) {sql = "select * from t_user where id = ?";Integer[] ids = {id};List<User> lists = jdbcTemplate.query(sql, ids, new BeanPropertyRowMapper<User>() {@Overridepublic User mapRow(ResultSet rs, int rowNumber) throws SQLException {// 我们自己将查询出来的这行记录转换为我们期望的Java对象User user = new User();user.setId(rs.getInt("id"));user.setUsername(rs.getString("username"));user.setAddress(rs.getString("address"));user.setGender(rs.getString("gender"));return user;}});if(lists != null && lists.size() == 1){return lists.get(0);}return null;}
}
然后在service中我们提供复杂的业务处理方法,
package com.bobo.aop.service.impl;import com.bobo.aop.bean.User;
import com.bobo.aop.dao.IUserDao;
import com.bobo.aop.service.IUserService;
import org.springframework.beans.factory.annotation.Autowired;
import org.springframework.context.ApplicationContext;
import org.springframework.context.support.ClassPathXmlApplicationContext;
import org.springframework.stereotype.Service;
import org.springframework.transaction.annotation.Isolation;
import org.springframework.transaction.annotation.Propagation;
import org.springframework.transaction.annotation.Transactional;@Service
public class UserServiceImpl implements IUserService {@Autowiredprivate IUserDao dao;/*** @Transactional 表示开启事务* @return*/@Transactional(propagation = Propagation.REQUIRED,isolation = Isolation.DEFAULT)@Overridepublic int fun1() {// 添加数据User user = new User();user.setUsername("王五256");user.setAddress("长沙256");user.setGender("男");// 添加用户信息dao.addUser(user);user.setId(5);// 更新用户信息dao.updateUser(user);return 0;}
}
就会出现一个成功了一个没有成功的问题。
2.3 Spring事务处理之配置文件方式
<?xml version="1.0" encoding="UTF-8"?>
<beans xmlns="http://www.springframework.org/schema/beans"xmlns:xsi="http://www.w3.org/2001/XMLSchema-instance"xmlns:context="http://www.springframework.org/schema/context"xmlns:tx="http://www.springframework.org/schema/tx"xmlns:aop="http://www.springframework.org/schema/aop"xsi:schemaLocation="http://www.springframework.org/schema/beanshttp://www.springframework.org/schema/beans/spring-beans.xsdhttp://www.springframework.org/schema/contexthttp://www.springframework.org/schema/context/spring-context.xsdhttp://www.springframework.org/schema/txhttp://www.springframework.org/schema/tx/spring-tx.xsdhttp://www.springframework.org/schema/aophttp://www.springframework.org/schema/aop/spring-aop.xsd"><context:component-scan base-package="com.bobo.aop.dao.impl,com.bobo.aop.service.impl"/><!-- 注册一个DataSource --><bean class="org.springframework.jdbc.datasource.DriverManagerDataSource" id="dataSource"><!-- 设置注入相关的数据库信息 --><property name="driverClassName" value="com.mysql.cj.jdbc.Driver"/><property name="url" value="jdbc:mysql://localhost:3306/shop?serverTimezone=GMT%2B8&useUnicode=true&characterEncoding=utf-8" /><property name="username" value="root"/><property name="password" value="123456"/></bean><!-- 注册一个JdbcTemplate对象 --><bean class="org.springframework.jdbc.core.JdbcTemplate" id="jdbcTemplate"><!-- 构造注入关联数据源 --><constructor-arg name="dataSource" ref="dataSource"/></bean><!--Spring中使用XML配置事务有三大步骤1、创建事务管理器2、配置事务方法3、配置AOP--><bean class="org.springframework.jdbc.datasource.DataSourceTransactionManager" id="transactionManager"><!-- 管理数据源 --><property name="dataSource" ref="dataSource"/></bean><tx:advice id="interceptor" transaction-manager="transactionManager"><tx:attributes><tx:method name="fun*" propagation="REQUIRED" isolation="DEFAULT"/></tx:attributes></tx:advice><!-- 配置AOP --><aop:config><aop:pointcut id="tx" expression="execution(* com.bobo.aop.service.impl.*.*(..))"/><aop:advisor advice-ref="interceptor" pointcut-ref="tx"/></aop:config>
</beans>2.4 Spring事务处理之注解
上面的方式相对比较繁琐,我们可以通过注解的方式来简化
开启事务注解的使用
<?xml version="1.0" encoding="UTF-8"?>
<beans xmlns="http://www.springframework.org/schema/beans"xmlns:xsi="http://www.w3.org/2001/XMLSchema-instance"xmlns:context="http://www.springframework.org/schema/context"xmlns:tx="http://www.springframework.org/schema/tx"xmlns:aop="http://www.springframework.org/schema/aop"xsi:schemaLocation="http://www.springframework.org/schema/beanshttp://www.springframework.org/schema/beans/spring-beans.xsdhttp://www.springframework.org/schema/contexthttp://www.springframework.org/schema/context/spring-context.xsdhttp://www.springframework.org/schema/txhttp://www.springframework.org/schema/tx/spring-tx.xsdhttp://www.springframework.org/schema/aophttp://www.springframework.org/schema/aop/spring-aop.xsd"><context:component-scan base-package="com.bobo.aop.dao.impl,com.bobo.aop.service.impl"/><!-- 注册一个DataSource --><bean class="org.springframework.jdbc.datasource.DriverManagerDataSource" id="dataSource"><!-- 设置注入相关的数据库信息 --><property name="driverClassName" value="com.mysql.cj.jdbc.Driver"/><property name="url" value="jdbc:mysql://localhost:3306/shop?serverTimezone=GMT%2B8&useUnicode=true&characterEncoding=utf-8" /><property name="username" value="root"/><property name="password" value="123456"/></bean><!-- 注册一个JdbcTemplate对象 --><bean class="org.springframework.jdbc.core.JdbcTemplate" id="jdbcTemplate"><!-- 构造注入关联数据源 --><constructor-arg name="dataSource" ref="dataSource"/></bean><!--Spring中使用XML配置事务有三大步骤1、创建事务管理器2、配置事务方法3、配置AOP--><bean class="org.springframework.jdbc.datasource.DataSourceTransactionManager" id="transactionManager"><!-- 管理数据源 --><property name="dataSource" ref="dataSource"/></bean><tx:advice id="interceptor" transaction-manager="transactionManager"><tx:attributes><tx:method name="fun*" propagation="REQUIRED" isolation="DEFAULT"/></tx:attributes></tx:advice><!-- 配置AOP --><aop:config><aop:pointcut id="tx" expression="execution(* com.bobo.aop.service.impl.*.*(..))"/><aop:advisor advice-ref="interceptor" pointcut-ref="tx"/></aop:config><!-- 基于注解的方式实现<tx:annotation-driven transaction-manager="transactionManager" />-->
</beans> 在需要被事务管理的方法的头部添加 @Transcational 即可。

3.事务的传播属性
Spring中的7个事务传播行为:

举例说明
案例代码
ServiceA
ServiceA {void methodA() {ServiceB.methodB();}
}
12345
ServiceB
ServiceB {void methodB() {}
}
1234
1.PROPAGATION_REQUIRED
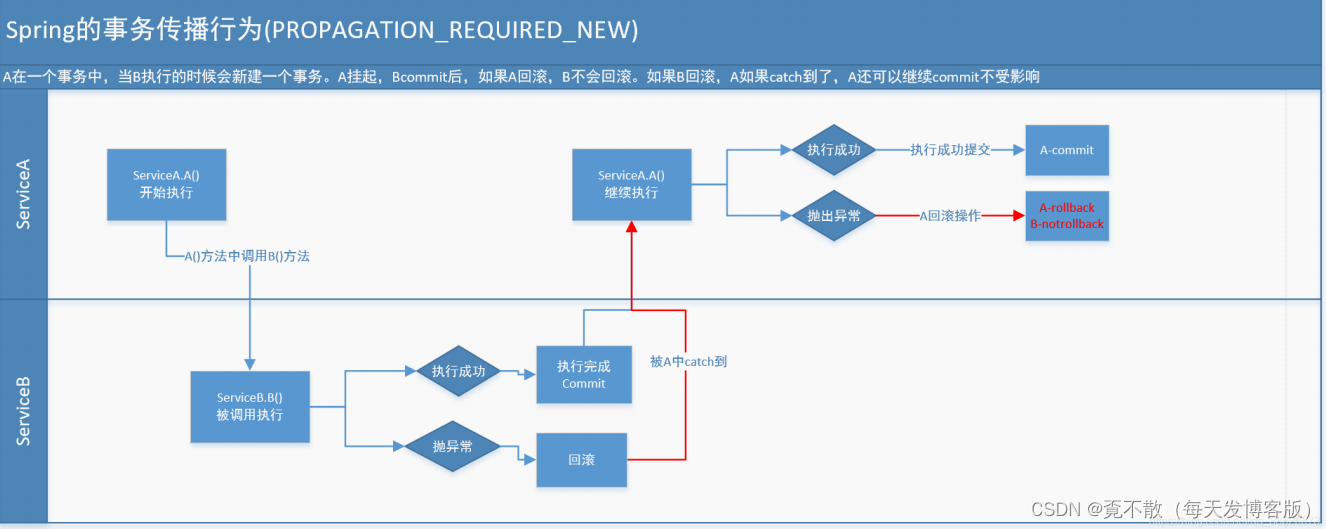
假如当前正要运行的事务不在另外一个事务里,那么就起一个新的事务。比方说,ServiceB.methodB的事务级别定义PROPAGATION_REQUIRED, 那么因为执行ServiceA.methodA的时候,ServiceA.methodA已经起了事务。这时调用ServiceB.methodB,ServiceB.methodB看到自己已经执行在ServiceA.methodA的事务内部。就不再起新的事务。而假如ServiceA.methodA执行的时候发现自己没有在事务中,他就会为自己分配一个事务。这样,在ServiceA.methodA或者在ServiceB.methodB内的不论什么地方出现异常。事务都会被回滚。即使ServiceB.methodB的事务已经被提交,可是ServiceA.methodA在接下来fail要回滚,ServiceB.methodB也要回滚。

2.PROPAGATION_SUPPORTS
假设当前在事务中。即以事务的形式执行。假设当前不在一个事务中,那么就以非事务的形式执行。
3.PROPAGATION_MANDATORY
必须在一个事务中执行。也就是说,他仅仅能被一个父事务调用。否则,他就要抛出异常。
4.PROPAGATION_REQUIRES_NEW
这个就比较绕口了。 比方我们设计ServiceA.methodA的事务级别为PROPAGATION_REQUIRED,ServiceB.methodB的事务级别为PROPAGATION_REQUIRES_NEW。那么当运行到ServiceB.methodB 的时候,ServiceA.methodA所在的事务就会挂起。ServiceB.methodB会起一个新的事务。等待ServiceB.methodB的事务完毕以后,他才继续运行。
他与PROPAGATION_REQUIRED 的事务差别在于事务的回滚程度了。由于ServiceB.methodB是新起一个事务,那么就是存在两个不同的事务。假设ServiceB.methodB已经提交,那么ServiceA.methodA失败回滚。ServiceB.methodB是不会回滚的。假设ServiceB.methodB失败回滚,假设他抛出的异常被ServiceA.methodA捕获,ServiceA.methodA事务仍然可能提交。
5.PROPAGATION_NOT_SUPPORTED
当前不支持事务。比方ServiceA.methodA的事务级别是PROPAGATION_REQUIRED 。而ServiceB.methodB的事务级别是PROPAGATION_NOT_SUPPORTED ,那么当执行到ServiceB.methodB时。ServiceA.methodA的事务挂起。而他以非事务的状态执行完,再继续ServiceA.methodA的事务。
6.PROPAGATION_NEVER
不能在事务中执行。
如果ServiceA.methodA的事务级别是PROPAGATION_REQUIRED。 而ServiceB.methodB的事务级别是PROPAGATION_NEVER ,那么ServiceB.methodB就要抛出异常了。
7.PROPAGATION_NESTED
如果当前存在事务,则在嵌套事务内执行。如果当前没有事务,则执行与PROPAGATION_REQUIRED类似的操作。
Spring中事务的配置
配置文件的方式
<tx:advice id="txAdvice" transaction-manager="txManager"><tx:attributes><!--设置所有匹配的方法,然后设置传播级别和事务隔离--><tx:method name="save*" propagation="REQUIRED" /><tx:method name="add*" propagation="REQUIRED" /><tx:method name="create*" propagation="REQUIRED" /><tx:method name="insert*" propagation="REQUIRED" /><tx:method name="update*" propagation="REQUIRED" /><tx:method name="merge*" propagation="REQUIRED" /><tx:method name="del*" propagation="REQUIRED" /><tx:method name="remove*" propagation="REQUIRED" /><tx:method name="put*" propagation="REQUIRED" /><tx:method name="get*" propagation="SUPPORTS" read-only="true" /><tx:method name="count*" propagation="SUPPORTS" read-only="true" /><tx:method name="find*" propagation="SUPPORTS" read-only="true" /><tx:method name="list*" propagation="SUPPORTS" read-only="true" /><tx:method name="*" propagation="SUPPORTS" read-only="true" /></tx:attributes>
</tx:advice>
12345678910111213141516171819
注解的方式
<!--开启注解的方式-->
<tx:annotation-driven transaction-manager="transactioManager" />
12
@Transactional(propagation=Propagation.REQUIRED)
如果有事务,那么加入事务,没有的话新建一个(默认情况下)。
@Transactional(propagation=Propagation.NOT_SUPPORTED)
容器不为这个方法开启事务。
@Transactional(propagation=Propagation.REQUIRES_NEW)
不管是否存在事务,都创建一个新的事务,原来的挂起,新的执行完毕,继续执行老的事务。
@Transactional(propagation=Propagation.MANDATORY)
必须在一个已有的事务中执行,否则抛出异常。
@Transactional(propagation=Propagation.NEVER)
必须在一个没有的事务中执行,否则抛出异常(与Propagation.MANDATORY相反)。
@Transactional(propagation=Propagation.SUPPORTS)
如果其他bean调用这个方法,在其他bean中声明事务,那就用事务。如果其他bean没有声明事务,那就不用事务。
4.事务的隔离级别
事务隔离级别指的是一个事务对数据的修改与另一个并行的事务的隔离程度,当多个事务同时访问相同数据时,如果没有采取必要的隔离机制,就可能发生以下问题:

Spring支持的隔离级别


再必须强调一遍,不是事务隔离级别设置得越高越好,事务隔离级别设置得越高,意味着势必要花手段去加锁用以保证事务的正确性,那么效率就要降低,因此实际开发中往往要在效率和并发正确性之间做一个取舍,一般情况下会设置为READ_COMMITED,此时避免了脏读,并发性也还不错,之后再通过一些别的手段去解决不可重复读和幻读的问题就好了。
Spring设置事务隔离级别
配置文件的方式
<tx:advice id="advice" transaction-manager="transactionManager"><tx:attributes><tx:method name="fun*" propagation="REQUIRED" isolation="DEFAULT"/></tx:attributes>
</tx:advice>
12345
注解的方式
@Transactional(isolation=Isolation.DEFAULT)
public void fun(){dao.add();dao.udpate();
}
12345
小结
Spring建议的是使用DEFAULT,就是数据库本身的隔离级别,配置好数据库本身的隔离级别,无论在哪个框架中读写数据都不用操心了。而且万一Spring没有把这几种隔离级别实现的很完善,出了问题就麻烦了。