C#与php自定义数据流传输
- 介绍
- 一、客户端与服务器数据传输流程图
- 客户端发送数据给服务器:
- 服务器返回数据给客户端:
- 二、自定义数据流
- C#版本数据流
- PHP版本数据流
- 三、数据传输测试
- 1.在Unity中创建一个C#脚本NetWorkManager.cs
- 2.服务器www目录创建StreamTest.php脚本代码如下:
- 结果如下:
- 这里需要注意一个问题,自定义数据类写入过程和读取过程顺序必须一致,否则无法获取数据。
- PHP中的pack与unpack的方法将数据转换为二进制的方法最好了解下。
介绍
如果不了解Unity与web如何通讯的可以看我之前的文章。
无论传输什么类型的数据,如int、float、string等,他们都被保存在文本中,接下来我们从字符串中解析这些数据。
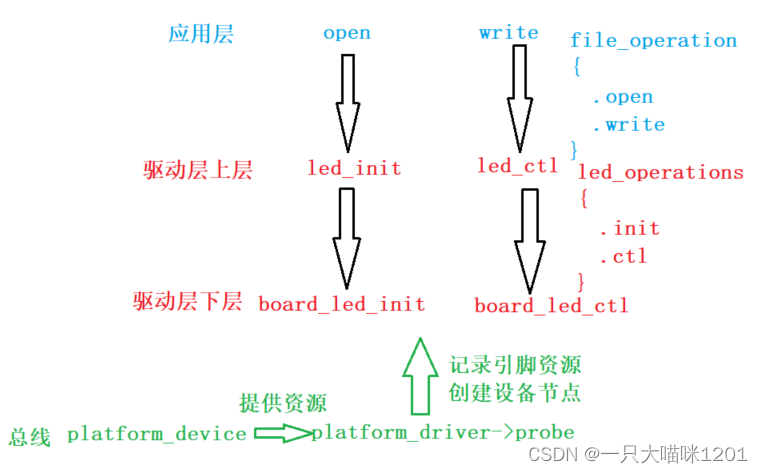
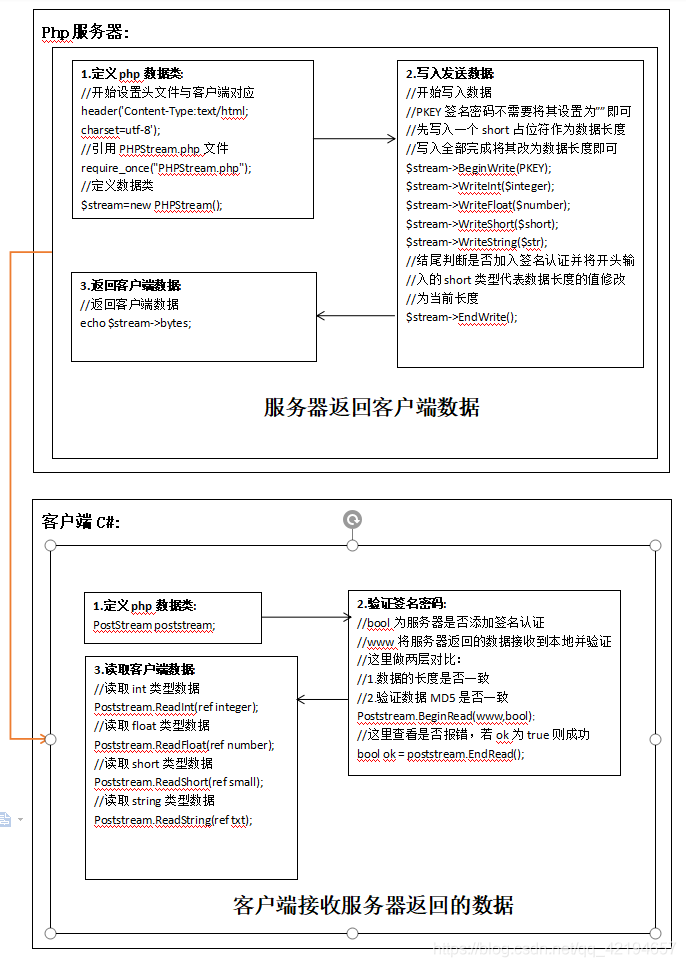
一、客户端与服务器数据传输流程图
客户端发送数据给服务器:
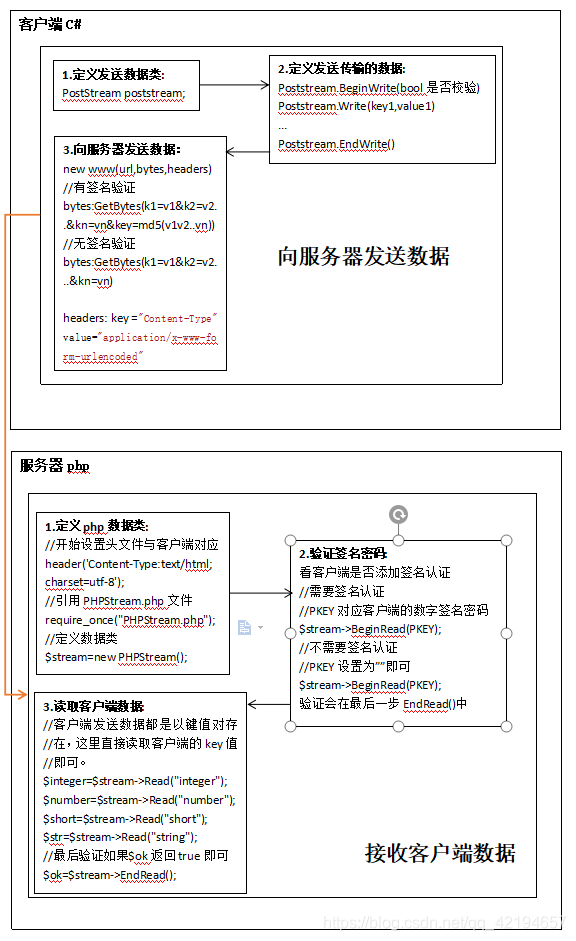
服务器返回数据给客户端:
二、自定义数据流
C#版本数据流
我们要创建一个C#版本的数据流类,它的主要功能是将各种不同类型的数据压入一个单独的字符创中,或将从服务器读回的字节数组解析成响应的数据,这里要清楚不同类型数据所占字节长度,如32位int即占用4个字节,短整型short占2个字节等,代码如下:
using System.Collections;
using System.Collections.Generic;
using System.Text;
using UnityEngine;public class PostStream {public Dictionary<string,string> Headers = new Dictionary<string, string>();const int HASHSIZE = 16;        //末尾16个字节保存md5数字签名const int BYTE_LEN = 1;         //byte占一个字节const int SHORT16_LEN = 2;      //short占2个字节const int INT32_LEN = 4;        //int占4个字节const int FLOAT_LEN = 4;        //float占4个字节private int m_index = 0;public int Length{get{return m_index;}}//秘密密码,用于数字签名private string m_secretKey = "123456";//存储Post信息private string[,] m_field;/// <summary>/// 最大传输数量/// </summary>private const int MAX_POST = 128;/// <summary>/// 单位Post信息所存储的信息量/// </summary>private const int PAIR = 2;/// <summary>/// 信息头索引/// </summary>private const int HEAD = 0;/// <summary>/// 信息内容索引/// </summary>private const int CONTENT = 1;/// <summary>/// 收到的字节数组/// </summary>private byte[] m_bytes = null;public byte[] BYTES { get { return m_bytes; } }/// <summary>/// 发送的字符串/// </summary>private string m_content = "";/// <summary>/// 读取是否出现错误/// </summary>private bool m_errorRead = false;/// <summary>/// 是否进行数字签名/// </summary>private bool m_sum = true;/// <summary>/// 构造函数初始化/// </summary>public PostStream(){Headers = new Dictionary<string,string>();m_index = 0;m_bytes = null;m_content = "";m_errorRead = false;}//这个类的第一部分是将不同类型的数据按POST格式压入到m_content字符串和二位字符串数组m_field中。m_content中的数据时实际发送的数据,m_field中的数据用于MD5数字签名。#region 写入数据/// <summary>/// 开始压数据,issum参数用来标识是否进行MD5数字签名/// </summary>public void BeginWrite(bool issum){m_index = 0;m_sum = issum;m_field = new string[MAX_POST, PAIR];Headers.Add("Content-Type", "application/x-www-form-urlencoded");}/// <summary>/// head表示POST的名字,content是实际的数据内容/// </summary>/// <param name="head"></param>/// <param name="content"></param>public void Write(string head, string content){if (m_index >= MAX_POST) return;m_field[m_index, HEAD] = head;m_field[m_index, CONTENT] = content;m_index++;if (m_content.Length == 0)m_content += (head + "=" + content);elsem_content += ("&" + head + "=" + content);Debug.LogError(m_content);}/// <summary>/// 使用MD5对字符串进行数字签名/// </summary>public void EndWrite(){if (m_sum){string hasstring = "";for (int i = 0; i < MAX_POST; i++)hasstring += m_field[i, CONTENT];hasstring += m_secretKey; //数据: content1content2...m_secretKeyDebug.LogError("hasstring=" + hasstring);m_content += "&key=" + Md5Sum(hasstring);//数据: head1=content1&head2=content2...&key=(hasstring的MD5值)Debug.LogError("m_content=" + m_content);}m_bytes = Encoding.UTF8.GetBytes(m_content);}#endregion//第二部分是读取从服务器返回的数据。从服务器返回的数据时一个单独的字节数组,我们将这个数组解析为相应的数据,这个过程用到了最多的是BitConverter函数,它可以将相应长度的字节转为对应的数据#region 读取数据/// <summary>/// 读取数据/// </summary>/// <param name="www"></param>/// <param name="issum"></param>/// <returns></returns>public bool BeginRead(WWW www,bool issum){m_bytes = www.bytes;m_content = www.text;m_sum = issum;//错误if (m_bytes == null){m_errorRead = true;return false;}//读取前2个字节,获得字符串长度short length = 0;this.ReadShort(ref length);//服务器这里做了处理,在写入数据时先写入一个short类型的数据代表数据长度if (length != m_bytes.Length){m_index = length;m_errorRead = true;return false;}//比较本地与服务器数字签名是否一致if (m_sum){byte[] localhash = GetLocalHash(m_bytes, m_secretKey);byte[] hashbytes = GetCurrentHash(m_bytes);if (!ByteEquals(localhash,hashbytes)){m_errorRead = true;return false;}}return true;}/// <summary>/// 忽略一个字节/// </summary>public void IgnoreByte(){if (m_errorRead) return;m_index += BYTE_LEN;}/// <summary>/// 读取一个字节/// </summary>public void ReadByte(ref byte bts){if (m_errorRead) return;bts = m_bytes[m_index];m_index += BYTE_LEN;}/// <summary>/// 读取一个short/// </summary>/// <param name="number"></param>public void ReadShort(ref short number){if (m_errorRead) return;number = System.BitConverter.ToInt16(m_bytes,m_index);m_index += SHORT16_LEN;}/// <summary>/// 读取一个int/// </summary>public void ReadInt(ref int number){if (m_errorRead) return;number = System.BitConverter.ToInt32(m_bytes,m_index);m_index += INT32_LEN;}/// <summary>/// 读取一个float/// </summary>public void ReadFloat(ref float number){if (m_errorRead) return;number = System.BitConverter.ToSingle(m_bytes, m_index);m_index += FLOAT_LEN;}/// <summary>/// 读取一个字符串/// </summary>public void ReadString(ref string str){if (m_errorRead) return;short num = 0;ReadShort(ref num);str = Encoding.UTF8.GetString(m_bytes,m_index,(int)num);m_index += num;}/// <summary>/// 读取一个bytes数组/// </summary>/// <param name="bytes"></param>public void ReadBytes(ref byte[] bytes){if (m_errorRead) return;short len = 0;ReadShort(ref len);//字节流bytes = new byte[len];for (int i = m_index; i < m_index + len; i++){bytes[i - m_index] = m_bytes[i];}m_index += len;}/// <summary>/// 结束读取/// </summary>/// <returns></returns>public bool EndRead(){if (m_errorRead) return false;else return true;}#endregion/// <summary>/// 去掉服务器返回的数字签名,使用本地秘钥重新计算数字签名/// </summary>/// <returns></returns>public static byte[] GetLocalHash(byte[] bytes,string key){//hash bytesbyte[] hashbytes = null;int n = bytes.Length - HASHSIZE;if (n < 0) return hashbytes;//获得key的bytesbyte[] keybytes = System.Text.ASCIIEncoding.ASCII.GetBytes(key);//创建用于hash的bytesbyte[] getbytes = new byte[n + keybytes.Length];for (int i = 0; i < n; i++){getbytes[i] = bytes[i];}keybytes.CopyTo(getbytes,n);System.Security.Cryptography.MD5 md5;md5 = System.Security.Cryptography.MD5CryptoServiceProvider.Create();return md5.ComputeHash(getbytes);}/// <summary>/// 获得从服务器返回的数字签名/// </summary>/// <param name="bytes"></param>/// <returns></returns>public static byte[] GetCurrentHash(byte[] bytes){byte[] hashbytes = null;if (bytes.Length < HASHSIZE) return hashbytes;hashbytes = new byte[HASHSIZE];for (int i = bytes.Length - HASHSIZE; i < bytes.Length; i++){hashbytes[i - (bytes.Length - HASHSIZE)] = bytes[i];}return hashbytes;}#region 比较两个bytes数组是否相等/// <summary>/// 比较两个bytes数组是否相等/// </summary>/// <param name="a"></param>/// <param name="b"></param>/// <returns></returns>public static bool ByteEquals(byte[] a,byte[] b){if (a == null || b == null || a.Length != b.Length) return false;for (int i = 0; i < a.Length; i++){if (a[i] != b[i]) return false;}return true;}#endregion#region 取字符串md5值/// <summary>/// md5值/// </summary>/// <param name="strToEncrypt">//数据: head1content1head2content2...m_secretKey</param>/// <returns></returns>public static string Md5Sum(string strToEncrypt){byte[] bs = UTF8Encoding.UTF8.GetBytes(strToEncrypt);System.Security.Cryptography.MD5 md5;md5 = System.Security.Cryptography.MD5CryptoServiceProvider.Create();byte[] hashBytes = md5.ComputeHash(bs);string hashString = "";for (int i = 0; i < hashBytes.Length; i++){hashString += System.Convert.ToString(hashBytes[i], 16).PadLeft(2,'0');}return hashString.PadLeft(32,'0');}#endregion
}
PHP版本数据流
PHP版本的代码与C#版本如出一辙,只是换成了PHP的语法:
<?php
//PHPStream.php
define("BYTE",1);
define("SHORT",2);
define("INT",4);
define("FLOAT",4);
define("HASHSIZE",16);
define("PKEY",123456);class PHPStream
{private $Key = "";public $bytes = "";public $Content = "";public $index = 0;public $ErrorRead = false;//开始写数据function  BeginWrite( $Key ){$this->index=0;$this->bytes="";$this->Content="";$this->ErrorRead=false;//total bytes length$this->WriteShort(0);//服务器这里在发送数据的时候会先去写入一个short,代表数据长度if ( strlen($Key) ){$this->Key=$Key;}}//写一个bytefunction WriteByte( $byte ){//$this->bytes.=pack('c',$byte);$this->bytes.=$byte;$this->index+=BYTE;}//写一个shortfunction WriteShort( $number ){$this->bytes.=pack("v",$number);$this->index+=SHORT;}//写一个32位intfunction WriteInt( $number ){$this->bytes.=pack("V",$number);$this->index+=INT;}//写一个floatfunction WriteFLOAT( $number ){$this->bytes.=pack("f",$number);$this->index+=FLOAT;}//写一个字符串function WriteString( $str ){$len=strlen($str);$this->WriteShort($len);$this->bytes.=$str;$this->index+=$len;}//写一组bytefunction WriteBytes( $bytes ){$len=strlen($bytes);$this->WriteShort($len);$this->bytes.=$bytes;$this->index+=$len;}function EndWrite(){//数字签名if ( strlen($this->Key)>0 ){$len=$this->index+HASHSIZE;$str=pack("v",$len);//猜测这里的bytes内部对应是0-1 2-3 4-5 6-7//猜测内部为键值对 $str[0] = $str[1]$this->bytes[0]=$str[0];//猜测为key值$this->bytes[1]=$str[1];//猜测为key值对应的value//获取md5值$hashbytes=md5($this->bytes.$this->Key,true);$this->bytes.=$hashbytes;}else {$str=pack("v",$this->index);$this->bytes[0]=$str[0];$this->bytes[1]=$str[1];}}//开始读入数据function BeginRead( $Key ){$this->index=0;$this->bytes="";$this->Content="";$this->ErrorRead=false;if ( strlen($Key)>0 )//strlen检测字符串长度{$this->Key=$Key;}}//读取POST信息function Read( $head ){if( isset($_POST[$head]) ){$this->Content.=$_POST[$head];return $_POST[$head];}else{$this->ErrorRead=true;}}//结束读取function EndRead(){if ($this->ErrorRead) return false;if (strlen($this->Key)<1) return true;//如果不需要签名验证则将原本的PKEY改为空字符串//取得数字签名$hashkey="";if ( isset($_POST["key"]) ) $hashkey=$_POST["key"];else {$this->ErrorRead=true;return false;}//重新计算数字签名$localhash=md5($this->Content.$this->Key);//比较数字签名if (strcmp($hashkey,$localhash)==0) return true;//strcmp检测两个字符串是否一致else{$this->ErrorRead=true;return false;}}
}
?>
三、数据传输测试
1.在Unity中创建一个C#脚本NetWorkManager.cs
在脚本中创建一个WWW实例,分别发送int、float、short和string类型的数据至服务器,服务器收到后再将这些数据返回给Unity,下面是C#代码:
using System.Collections;
using System.Collections.Generic;
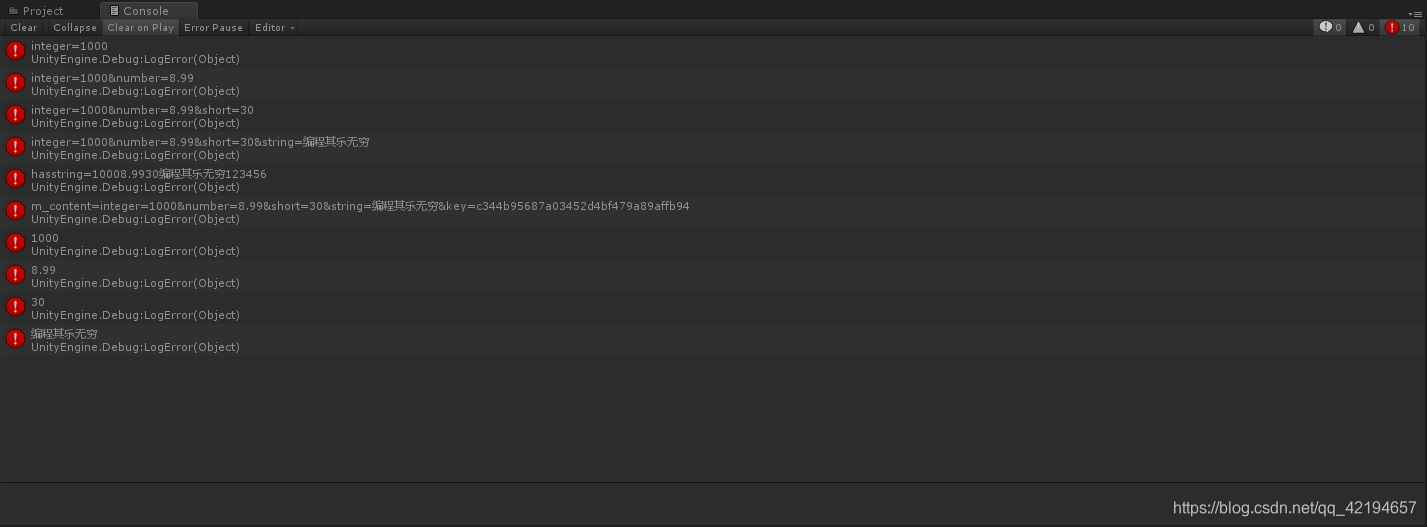
using UnityEngine;public class NetworkManager : MonoBehaviour {public const string URL = "http://192.168.1.5:8088/StreamTest.php";private void Start(){StartCoroutine(Test());}IEnumerator Test(){PostStream poststream = new PostStream();int integer = 1000;float number = 8.99f;short small = 30;string txt = "编程其乐无穷";//开始写入数据并指定需要签名认证poststream.BeginWrite(true);//写入数据Content: integer=1000poststream.Write("integer",integer.ToString());//写入数据Content: integer=1000&number=8.99poststream.Write("number",number.ToString());//写入数据Content: integer=1000&number=8.99&short=30poststream.Write("short",small.ToString());//写入数据Content: integer=1000&number=8.99&short=30&string=编程其乐无穷poststream.Write("string",txt);//1.最终签名认证的数据Content: integer=1000&number=8.99&short=30&string=编程其乐无穷&key=c344b95687a03452d4bf479a89affb94 //解释: c344b95687a03452d4bf479a89affb94为“10008.9930编程其乐无穷123456”字符串的MD5值 //123456为用于签名的密码 其组成是由写入的数组+密码组成//2.最终非签名认证的数据Content: integer=1000&number=8.99&short=30&string=编程其乐无穷poststream.EndWrite();//服务器Post请求WWW www = new WWW(URL,poststream.BYTES,poststream.Headers);yield return www;//无错误if (www.error != null){Debug.LogError(www.error);}else//读取返回值{poststream = new PostStream();poststream.BeginRead(www, true);poststream.ReadInt(ref integer);poststream.ReadFloat(ref number);poststream.ReadShort(ref small);poststream.ReadString(ref txt);bool ok = poststream.EndRead();if (ok){Debug.LogError(integer);Debug.LogError(number);Debug.LogError(small);Debug.LogError(txt);}else{Debug.LogError("error");}}}
}2.服务器www目录创建StreamTest.php脚本代码如下:
<?php
//StreamTest.php
header('Content-Type:text/html; charset=utf-8');
require_once("PHPStream.php");//引用PHPStream.php文件//read
$stream=new PHPStream();
$stream->BeginRead(PKEY);//与客户端对应的数字签名密码
$integer=$stream->Read("integer");//从传入的数据中找到Key值为integer的Value
$number=$stream->Read("number");//从传入的数据中找到Key值为number的Value
$short=$stream->Read("short");//从传入的数据中找到Key值为short的Value
$str=$stream->Read("string");//从传入的数据中找到Key值为string的Value
$ok=$stream->EndRead();if ($ok)
{//开始写入一个short: bytes=pack("v",0)//开始的index: index = 0+2$stream->BeginWrite(PKEY);//写入一个Int: bytes=pack("v",0)+pack("V",$integer)//当前index: index = 0 + 2 + 4$stream->WriteInt($integer);//写入一个Float: bytes=pack("v",0)+pack("V",$integer)+pack("f",$number)//当前index: index = 0 + 2 + 4 + 4$stream->WriteFloat($number);//写入一个Float: bytes=pack("v",0)+pack("V",$integer)+pack("f",$number)+pack("v",$short)//当前index: index = 0 + 2 + 4 + 4 + 2$stream->WriteShort($short);//写入一个String: bytes=pack("v",0)+pack("V",$integer)+pack("f",$number)+pack("v",$short)+[pack("v",strlen($str))+$str]//当前index: index = 0 + 2 + 4 + 4 + 2 + (2 + strlen($str))$stream->WriteString($str);//带有签名bytes 末尾加md5(bytes=pack("v",0)+pack("V",$integer)+pack("f",$number)+pack("v",$short)+[pack("v",strlen($str))+$str]) (无签名则不加)//带有签名index: index = 0 + 2 + 4 + 4 + 2 + (2 + strlen($str)) + 16 (无签名就去掉+16)$stream->EndWrite();echo $stream->bytes;
}
else
{echo "error";
}
?>
结果如下: