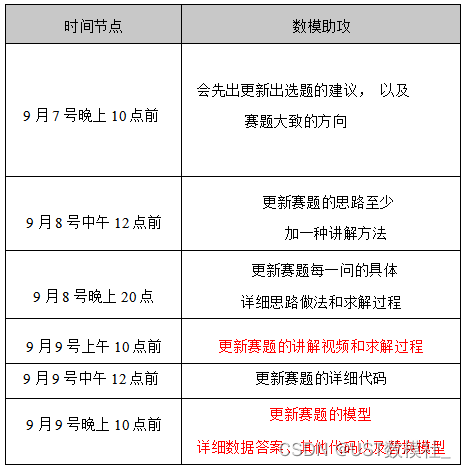
C++ 调用lua
基础调用
再来温习一下
myName = “beauty girl”
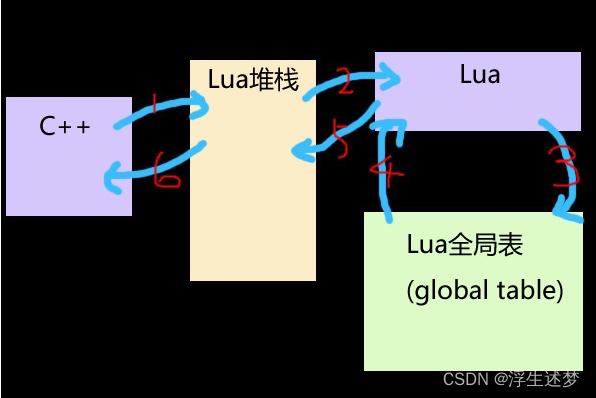
- C++想要获取myName的值,根据规则,它需要把myName压入栈中,这样lua就能看到;
- lua从堆栈中获取myName的值,此时栈顶为空;
- lua拿着myName去全局表中查找与之对应的字符串;
- 全局表找到,并返回"beauty girl";
- lua把"beauty girl"压入栈中;
- C++从栈中获取"beauty girl"
用代码来实现
//创建一个statelua_State *L = luaL_newstate();// 重置栈顶索引 为了确认让栈顶的索引置为0 置0之后,我们入栈的第一个元素的索引就是1lua_settop(L, 0);// 把myName放入栈中,然后lua去全局表中查找,找到对应的字段,再放回栈中lua_getglobal(L, "myName");// 判断栈顶的值的类型是否为String, 返回非0值代表成功int isstr = lua_isstring(L, 1);//获取栈顶的值const char* str = lua_tostring(L, 1);lua_close(L);
C++获取Lua的table
helloTable = {name = “xxx”, sex = “man”}
和上面一样,要获取就先把helloTable放到栈顶,让Lua知道C++要获取这个值
//创建一个statelua_State *L = luaL_newstate();// 重置栈顶索引 为了确认让栈顶的索引置为0 置0之后,我们入栈的第一个元素的索引就是1lua_settop(L, 0);//获取helloTable的值 这个时候栈底 是 helloTablelua_getglobal(L, "helloTable");//我们想要获取table中name的值,那么就把name压入栈//这个时候栈中是 name,helloTable,其中name是栈顶lua_pushstring(L, "name");//lua api提供了一个获取table的函数 lua_gettable//该函数会从栈顶取得一个值,然后根据这个值去table中寻找对应的值,最后把找到的值放到栈顶 第二个参数是指table变量所在栈中的位置lua_gettable(L, -2); // -1永远是栈顶,那么helloTable就是-2,这里也可以用1//lua_gettable 会把值放到 栈顶 const char* sName = lua_tostring(pL, -1);
C++调用Lua函数
function helloAdd(num1, num2)return (num1 + num2)
end
这里有个新的函数 lua_call
第一个参数表示函数的参数个数,第二个参数表示函数返回值个数
Lua会先去堆栈取出参数,然后再取出函数对象,开始执行函数
//创建一个statelua_State *L = luaL_newstate();// 重置栈顶索引 为了确认让栈顶的索引置为0 置0之后,我们入栈的第一个元素的索引就是1lua_settop(L, 0);//把helloAdd函数对象放到栈中lua_getglobal(L, "helloAdd");//把函数所需要的参数入栈 lua_pushnumber(L, 10);lua_pushnumber(L, 5);//调用lua_calllua_call(L, 2, 1);int iResult = lua_tonumber(L, -1);
C++调用Lua table的函数
lua中table有两种函数
mytable={}
function mytable.StaticFunc()print("mytable.StaticFunc called.")
end
function mytable:Func()print("mytable:Func self:", self)
end
其中StaticFunc可以理解成table的静态函数,Func为table的成员函数
 // 调用mytable表的静态函数
lua_getglobal(L, "mytable"); // 将名为mytable的全局table变量的值压栈
lua_pushstring(L, "StaticFunc"); // 将函数名为StaticFunc压栈
lua_gettable(L, -2); // 从索引为-2处的表中,读取key(在栈顶处)为StaticFunc的函数名  读取成功后,将key出栈,并将读取到的函数名入栈
lua_call(L, 0, 0); // 执行完后将StaticFunc弹出栈  注: 第一个0表示参数个数为0,第二个0表示无返回值// 调用mytable表的成员函数  采用新方法获取函数名
lua_getfield(L, -1, "Func");// 从索引为-1处的表中,读取key为Func的函数名  成功后将读取到的函数名入栈
lua_pushvalue(L, -2); // 将索引为-2处的表复制一份并压入栈顶
lua_call(L, 1, 0); // 执行完后将Func弹出栈  注: 1表示参数个数,即self指针,为当前table,第二个0表示无返回值
唯一不同的是lua_call的时候,需要注意第二个的值,成员函数默认需要传递self。
这里获取的时候,用到了函数lua_getfield
函数原型如下
void lua_getfield (lua_State *L, int index, const char *k);
Pushes onto the stack the value t[k], where t is the value at the given valid index. As in Lua, this function may trigger a metamethod for the “index” event
大概意思,将t[k]压入堆栈,t由参数index指定在栈中的位置
Lua 调用C++
Lua调用C++ 函数
大概的步骤如下:
- 将C++的函数包装成Lua环境认可的Lua_CFunction格式
- 将包装好的函数注册到Lua环境中
- 像使用普通Lua函数那样使用注册函数
简单的C++函数
int add(int a,int b)
{return a+b;
}
包装C++函数
int add(lua_state *L)
{int a = lua_tonumber(-1);int b = lua_tonumber(-2);int sum = a+b;// 将返回值压入栈中lua_pushnumber(L,sum);// 返回返回值个数return 1;
}
- Lua脚本里会调用add(lua_state *L)
- 调用add(lua_state *L)函数的时候,会反过来进行之前的C++调用lua
- Lua调用add(lua_state *L)函数之后,有一个返回值,需要压入栈中
- 最后return表示有多少个返回值,Lua支持多个返回值
最关键的一步,需要注册C++的函数,Lua才能调用
lua_register(L, "add", add);
Lua调用C++类
这里有两种方式,一个是用luaL_newlib方式
luaL_newlib方式
大概步骤如下:
- 新建创建对象函数,调用lua_newuserdata,创建一个对象指针,指向new出来的新的对象。
- 新建成员方法,调用lua_touserdata,得到从lua中传入的对象指针,调用成员方法。
- 调用luaL_newlib,将需要封装的C++函数放入到一个lua表中压入栈里。
- 将自定义模块,注册到Lua环境中。
- 在lua中,会首先调用创建对象函数,获得Student对象指针。通过Student对象指针,调用成员方法
Student.h
#pragma once#include <iostream>
#include <string>
using namespace std;class Student
{
public://构造/析构函数Student();~Student();//get/set函数string get_name();void set_name(string name);unsigned get_age();void set_age(unsigned age);//打印函数void print();private:string _name;unsigned _age;
};
Student.cpp
#include "Student.h"
using namespace std;Student::Student():_name("Empty"),_age(0)
{cout << "Student Constructor" << endl;
}Student::~Student()
{cout << "Student Destructor" << endl;
}string Student::get_name()
{return _name;
}void Student::set_name(string name)
{_name = name;
}unsigned Student::get_age()
{return _age;
}void Student::set_age(unsigned age)
{_age = age;
}void Student::print()
{cout << "name :" << _name << " age : " << _age << endl;
}
StudentRegFunc.h
#pragma once#include "Student.h"
extern "C" {
#include "lua.h"
#include "lualib.h"
#include "lauxlib.h"
}//------定义相关的全局函数------
//创建对象
int lua_create_new_student(lua_State* L);//get/set函数
int lua_get_name(lua_State* L);
int lua_set_name(lua_State* L);
int lua_get_age(lua_State* L);
int lua_set_age(lua_State* L);//打印函数
int lua_print(lua_State* L);//------注册全局函数供Lua使用------
static const luaL_Reg lua_reg_student_funcs[] = {{ "create", lua_create_new_student },{ "get_name", lua_get_name },{ "set_name", lua_set_name },{ "get_age", lua_get_age },{ "set_age", lua_set_age },{ "print", lua_print },{ NULL, NULL },
};int luaopen_student_libs(lua_State* L);
StudentRegFunc.cpp
#include "StudentRegFunc.h"int lua_create_new_student(lua_State* L)
{//创建一个对象指针放到stack里,返回给Lua中使用Student** s = (Student**)lua_newuserdata(L, sizeof(Student*));*s = new Student();return 1;
}int lua_get_name(lua_State* L)
{//得到第一个传入的对象参数(在stack最底部)Student** s = (Student**)lua_touserdata(L, 1);luaL_argcheck(L, s != NULL, 1, "invalid user data");//清空stacklua_settop(L, 0);//将数据放入stack中,供Lua使用lua_pushstring(L, (*s)->get_name().c_str());return 1;
}int lua_set_name(lua_State* L)
{//得到第一个传入的对象参数Student** s = (Student**)lua_touserdata(L, 1);luaL_argcheck(L, s != NULL, 1, "invalid user data");luaL_checktype(L, -1, LUA_TSTRING);std::string name = lua_tostring(L, -1);(*s)->set_name(name);return 0;
}int lua_get_age(lua_State* L)
{Student** s = (Student**)lua_touserdata(L, 1);luaL_argcheck(L, s != NULL, 1, "invalid user data");lua_pushinteger(L, (*s)->get_age());return 1;
}int lua_set_age(lua_State* L)
{Student** s = (Student**)lua_touserdata(L, 1);luaL_argcheck(L, s != NULL, 1, "invalid user data");luaL_checktype(L, -1, LUA_TNUMBER);(*s)->set_age((unsigned)lua_tointeger(L, -1));return 0;
}int lua_print(lua_State* L)
{Student** s = (Student**)lua_touserdata(L, 1);luaL_argcheck(L, s != NULL, 1, "invalid user data");(*s)->print();return 0;
}int luaopen_student_libs(lua_State* L)
{// 创建一张新的表,并把列表的函数注册进去luaL_newlib(L, lua_reg_student_funcs);return 1;
}
main.cpp
#include <iostream>
using namespace std;extern "C" {
#include "lua.h"
#include "lualib.h"
#include "lauxlib.h"
}#include "Student.h"
#include "StudentRegFunc.h"static const luaL_Reg lua_reg_libs[] = {{ "base", luaopen_base }, //系统模块{ "Student", luaopen_student_libs}, //模块名字Student,注册函数luaopen_student_libs{ NULL, NULL }
};int main(int argc, char* argv[])
{if (lua_State* L = luaL_newstate()) {//注册让lua使用的库const luaL_Reg* lua_reg = lua_reg_libs;for (; lua_reg->func; ++lua_reg) {luaL_requiref(L, lua_reg->name, lua_reg->func, 1);lua_pop(L, 1);}//加载脚本,如果出错,则打印错误if (luaL_dofile(L, "lua4.lua")) {cout << lua_tostring(L, -1) << endl;}lua_close(L);}else {cout << "luaL_newstate error !" << endl;}system("pause");return 0;
}
tolua
第二种方式是tolua,也就是tolua++
在cocos2dx中,基本都是用这种方式
//.h
class CMD_Data : public cocos2d::Ref
{
public:CMD_Data(unsigned short nlength);virtual ~CMD_Data();
public:void setMainCmdAndSubCmd(const unsigned short mainCmd, const unsigned short subCmd);unsigned short getMainCmd();unsigned short getSubCmd();
public:static CMD_Data *create(const int nLenth);//...
}//.cppvoid CMD_Data::setMainCmdAndSubCmd(const unsigned short mainCmd, const unsigned short  subCmd)
{m_wMainCmd = mainCmd;m_wSubCmd = subCmd;
}CMD_Data * CMD_Data::create(const int nLenth)
{CMD_Data * pData = new(std::nothrow) CMD_Data(nLenth);if (pData){//pData->autorelease();return pData;}CC_SAFE_DELETE(pData);return nullptr;
}unsigned short CMD_Data::getMainCmd()
{return m_wMainCmd;
}unsigned short CMD_Data::getSubCmd()
{return m_wSubCmd;
}
注册
.h
#pragma once
#include "base/ccConfig.h"
#ifdef __cplusplus
extern "C" {
#endif
#include "tolua++.h"
#ifdef __cplusplus
}
#endif
int register_all_Cmd_Data();
.cpp
int register_all_Cmd_Data()
{auto engine = LuaEngine::getInstance();ScriptEngineManager::getInstance()->setScriptEngine(engine);lua_State* tolua_S = engine->getLuaStack()->getLuaState();tolua_usertype(tolua_S, "CMD_Data");tolua_cclass(tolua_S, "CMD_Data", "CMD_Data", "cc.Node", nullptr);tolua_beginmodule(tolua_S, "CMD_Data");tolua_function(tolua_S, "create", tolua_Cmd_Data_create);tolua_function(tolua_S, "setCmdInfo", tolua_Cmd_Data_setMainCmdAndSubCmd);tolua_function(tolua_S, "getMainCmd", tolua_Cmd_Data_getMainCmd);tolua_function(tolua_S, "getSubCmd", tolua_Cmd_Data_getSubCmd);tolua_function(tolua_S, "getBufferLength", tolua_Cmd_Data_getBufferLength);tolua_function(tolua_S, "getCurIndex", tolua_Cmd_Data_getCurIndex);tolua_function(tolua_S, "setSendMessageLength", tolua_Cmd_Data_setSendMessageLength);tolua_endmodule(tolua_S);std::string typeName = typeid(CMD_Data).name();g_luaType[typeName] = "CMD_Data";g_typeCast["CMD_Data"] = "CMD_Data";return 1;
}int tolua_Cmd_Data_create(lua_State* tolua_S)
{int argc = lua_gettop(tolua_S);CMD_Data *data = nullptr;if (argc == 2){int nLength = lua_tointeger(tolua_S, 2);data = CMD_Data::create(nLength);}else{CCLOG("error CMD_Data create");}int nID = (data) ? data->_ID : -1;int *pLuaID = (data) ? &data->_luaID : nullptr;toluafix_pushusertype_ccobject(tolua_S, nID, pLuaID, (void*)data, "Cmd_Data");return 1;
}int tolua_Cmd_Data_setMainCmdAndSubCmd(lua_State* tolua_S)
{CMD_Data *cobj = (CMD_Data*)tolua_tousertype(tolua_S, 1, nullptr);if (cobj){int argc = lua_gettop(tolua_S);if (argc == 3){unsigned short mainCmd = (unsigned short)lua_tointeger(tolua_S, 2);unsigned short subCmd = (unsigned short)lua_tointeger(tolua_S, 3);cobj->setMainCmdAndSubCmd(mainCmd, subCmd);}}return 0;
}int tolua_Cmd_Data_getMainCmd(lua_State* tolua_S)
{CMD_Data *cobj = (CMD_Data*)tolua_tousertype(tolua_S, 1, nullptr);if (cobj){lua_pushinteger(tolua_S, cobj->getMainCmd());return 1;}return 0;
}int tolua_Cmd_Data_getSubCmd(lua_State* tolua_S)
{CMD_Data *cobj = (CMD_Data*)tolua_tousertype(tolua_S, 1, nullptr);if (cobj){lua_pushinteger(tolua_S, cobj->getSubCmd());return 1;}return 0;
}
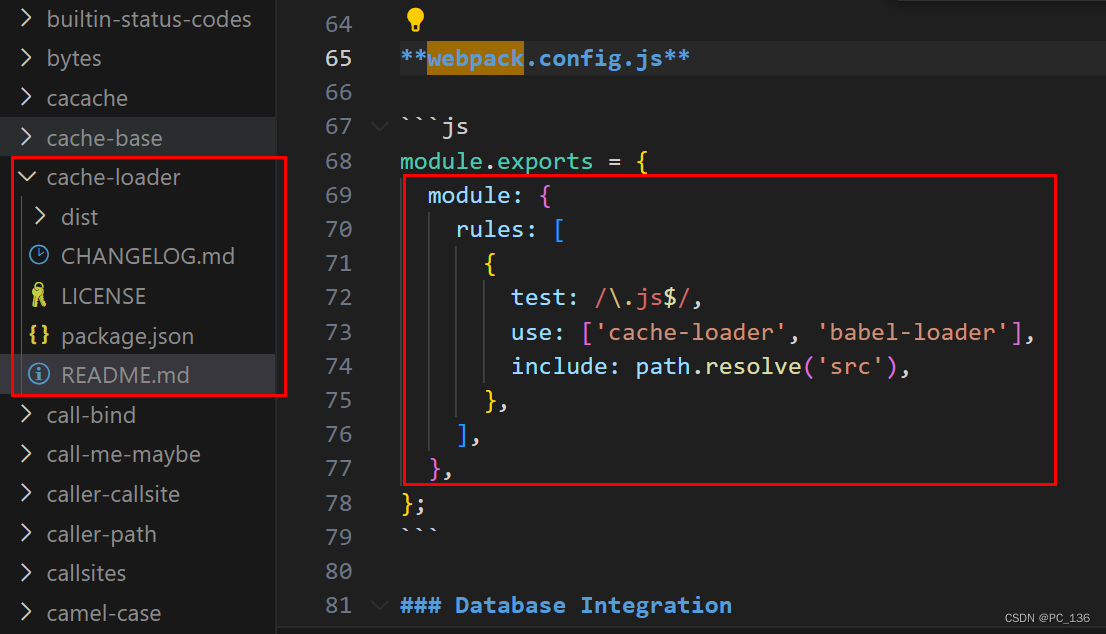
cocos2dx 生成工具
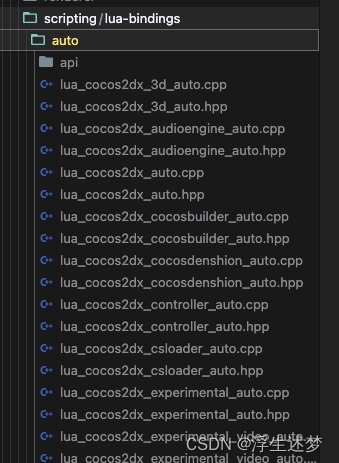
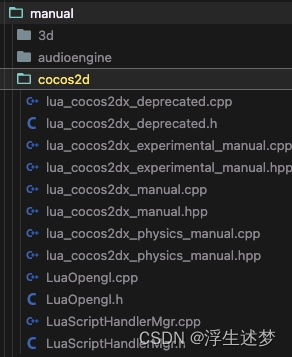
方便的是,cocos2dx提供了一套转换的工具。
在cocos2dx引擎目录下有个tools的目录,里面有tolua的文件夹。
它里面的大概结构如下
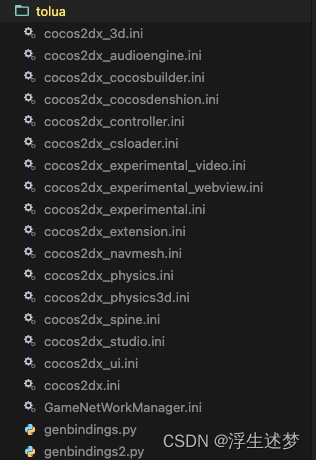
可以看得出来,cocos2dx本身的类都是用这个方法去实现的。
随便打开一个ini文件
[cocos2dx_ui]
# the prefix to be added to the generated functions. You might or might not use this in your own
# templates
prefix = cocos2dx_ui# create a target namespace (in javascript, this would create some code like the equiv. to `ns = ns || {}`)
# all classes will be embedded in that namespace
target_namespace = ccui# the native namespace in which this module locates, this parameter is used for avoid conflict of the same class name in different modules, as "cocos2d::Label" <-> "cocos2d::ui::Label".
cpp_namespace = cocos2d::uiandroid_headers = -I%(androidndkdir)s/platforms/android-14/arch-arm/usr/include -I%(androidndkdir)s/sources/cxx-stl/gnu-libstdc++/%(gnu_libstdc_version)s/libs/armeabi-v7a/include -I%(androidndkdir)s/sources/cxx-stl/gnu-libstdc++/%(gnu_libstdc_version)s/include
android_flags = -D_SIZE_T_DEFINED_ clang_headers = -I%(clangllvmdir)s/%(clang_lib_version)s/clang/%(clang_version)s/include
clang_flags = -nostdinc -x c++ -std=c++11 -U __SSE__cocos_headers = -I%(cocosdir)s/cocos -I%(cocosdir)s/cocos/editor-support -I%(cocosdir)s/cocos/platform/androidcocos_flags = -DANDROIDcxxgenerator_headers = # extra arguments for clang
extra_arguments = %(android_headers)s %(clang_headers)s %(cxxgenerator_headers)s %(cocos_headers)s %(android_flags)s %(clang_flags)s %(cocos_flags)s %(extra_flags)s # what headers to parse
headers = %(cocosdir)s/cocos/ui/CocosGUI.h# what classes to produce code for. You can use regular expressions here. When testing the regular
# expression, it will be enclosed in "^$", like this: "^Menu*$".
classes = Helper Widget Layout Button CheckBox ImageView Text TextAtlas TextBMFont LoadingBar Slider TextField ScrollView ListView PageView LayoutParameter LinearLayoutParameter RelativeLayoutParameter Rich.* HBox VBox RelativeBox Scale9Sprite EditBox LayoutComponent AbstractCheckButton RadioButton RadioButtonGroup TabControl TabHeader# what should we skip? in the format ClassName::[function function]
# ClassName is a regular expression, but will be used like this: "^ClassName$" functions are also
# regular expressions, they will not be surrounded by "^$". If you want to skip a whole class, just
# add a single "*" as functions. See bellow for several examples. A special class name is "*", which
# will apply to all class names. This is a convenience wildcard to be able to skip similar named
# functions from all classes.skip = *::[^visit$ copyWith.* onEnter.* onExit.* ^description$ getObjectType .*HSV onTouch.* onAcc.* onKey.* onRegisterTouchListener ccTouch.* (g|s)etDelegate],Widget::[addTouchEventListener addClickEventListener addCCSEventListener],LayoutParameter::[(s|g)etMargin],RichText::[setTagDescription removeTagDescription setOpenUrlHandler]rename_functions = rename_classes =# for all class names, should we remove something when registering in the target VM?
remove_prefix = # classes for which there will be no "parent" lookup
classes_have_no_parents = Helper# base classes which will be skipped when their sub-classes found them.
base_classes_to_skip =# classes that create no constructor
# Set is special and we will use a hand-written constructor
abstract_classes = Helper AbstractCheckButton# Determining whether to use script object(js object) to control the lifecycle of native(cpp) object or the other way around. Supported values are 'yes' or 'no'.
script_control_cpp = no
prefix : 输出的前缀,会连接到tolua类型的函数名之前,例如 int cocos2dx_ui_xxx(lua_State* tolua_S);
target_namespace : 所有生成的类都属于这个表下 例如这个里面的 ccui.xxx
cpp_namespace : C++中的命名空间,自动生成的代码中会加上这个命名空间
android_headers : 这是安卓编译的一些指令,不需要修改,照抄就行
android_flags : 这是安卓编译的一些指令,不需要修改,照抄就行
clang_headers : 这是Clang的编译指令,不需要修改,照抄就行
cocos_flags : 这是Clang的编译指令,不需要修改,照抄就行
cocos_headers: cocos的头文件搜索目录
cocos_flags:照抄
cxxgenerator_headers : 不管
extra_arguments : 所有文件的搜索路径
headers:这是需要解析的头文件 会从这个文件中识别所有include的头文件,并解析其中的类, 可以填多个文件 比如自己的文件的需要引用的头文件
classes:需要生成哪些类的接口,这里支持正则表达式
skip:跳过哪些类和函数,支持正则表达式,可以借鉴cocos的配置文件
rename_functions:重命名函数
rename_classes:重命名类
abstract_classes:哪些类没有创建构造函数,需要手动重写构造函数
script_control_cpp:不管,一般都是no
可以生成自己的一个配置文件。
然后看下同样目录下的genbindings.py文件

需要将自己的ini文件填入进去。
然后运行这个python文件,便会自动生成。
一般如下
手写调用
有人会说,为啥cocos里面还有类似
首先,工具脚本不是万能的,有些无法导出,例如Lambda表达式,例如某些回调函数。
void GameNetWorkManager::resumSocketByIp(const int socketMark, const std::string &serverIp, const int serverPort, const std::function<void(bool)> &callback)
{callback(m_socketManage->resumSocket(socketMark,serverIp,serverPort));
}
比如这个方法。
无法生成,我们就需要手写
int tolua_GameNetWorkManager_resumSocket(lua_State* tolua_S)
{int argc = 0;GameNetWorkManager* cobj = nullptr;bool ok = true;#if COCOS2D_DEBUG >= 1tolua_Error tolua_err;
#endif#if COCOS2D_DEBUG >= 1if (!tolua_isusertype(tolua_S, 1, "GameNetWorkManager", 0, &tolua_err)) goto tolua_lerror;
#endifcobj = (GameNetWorkManager*)tolua_tousertype(tolua_S, 1, 0);#if COCOS2D_DEBUG >= 1if (!cobj){tolua_error(tolua_S, "invalid 'cobj' in function 'tolua_GameNetWorkManager_resumSocket'", nullptr);return 0;}
#endifargc = lua_gettop(tolua_S) - 1;if (argc == 2){int arg1;ok &= luaval_to_int32(tolua_S, 2, (int *)&arg1, "GameNetWorkManager:resumSocket");
#if COCOS2D_DEBUG >= 1if (!toluafix_isfunction(tolua_S, 3, "LUA_FUNCTION", 0, &tolua_err)){goto tolua_lerror;}
#endifint handler = (toluafix_ref_function(tolua_S, 3, 0));if (!ok){tolua_error(tolua_S, "invalid arguments in function 'tolua_GameNetWorkManager_resumSocket'", nullptr);return 0;}cobj->resumSocket(arg1,[=](bool resum){LuaStack* stack = LuaEngine::getInstance()->getLuaStack();stack->pushBoolean(resum);stack->executeFunctionByHandler(handler, 1);stack->clean();return 0;});ScriptHandlerMgr::getInstance()->addCustomHandler((void*)cobj, handler);lua_settop(tolua_S, 1);return 1;}else if (argc == 4){int arg1;std::string arg2;int arg3;ok &= luaval_to_int32(tolua_S, 2, (int *)&arg1, "GameNetWorkManager:resumSocket");ok &= luaval_to_std_string(tolua_S, 3, &arg2, "GameNetWorkManager:resumSocket");ok &= luaval_to_int32(tolua_S, 4, (int *)&arg3, "GameNetWorkManager:resumSocket");
#if COCOS2D_DEBUG >= 1if (!toluafix_isfunction(tolua_S, 5, "LUA_FUNCTION", 0, &tolua_err)){goto tolua_lerror;}
#endifint handler = (toluafix_ref_function(tolua_S, 5, 0));if (!ok){tolua_error(tolua_S, "invalid arguments in function 'tolua_GameNetWorkManager_resumSocket'", nullptr);return 0;}cobj->resumSocketByIp(arg1, arg2, arg3, [=](bool resum){LuaStack* stack = LuaEngine::getInstance()->getLuaStack();stack->pushBoolean(resum);stack->executeFunctionByHandler(handler, 1);stack->clean();return 0;});ScriptHandlerMgr::getInstance()->addCustomHandler((void*)cobj, handler);lua_settop(tolua_S, 1);return 1;}return 0;
#if COCOS2D_DEBUG >= 1tolua_lerror:tolua_error(tolua_S, "#ferror in function 'tolua_GameNetWorkManager_resumSocket'.", &tolua_err);
#endifreturn 0;
}
最后
如果需要深入了解Lua,强烈建议阅读《lua设计与实现》。