1. 模块化
模块化是指将一个大的程序文件,拆分为许多小的文件(模块),然后将小的文件组合起来。
1.1. 优点
(1)防止命名冲突
(2)代码复用
(3)高维护性
(4)模块化规范产品
1.2. ES6之前本身没有模块化,社区衍生出模块化产品
CommonJS ===> NodeJS、Browserify
AMD ===> RequireJS
CMD ===> SeaJS
1.2.1. 语法
模块功能主要有两个命令构成 export 、import
export 命令用于规定模块对外的接口
import 命令用于输入其他模块提供的功能
(1)创建page-mode.js文件
export let name = 'zzs';
export const say = () => {console.log('hello');
};
(2)创建page-mode文件
在script标签中写js代码,或者使用src引入js文件时,默认不能使用module形式,即不能使用import导入文件,但是我们可以再script标签上加上type=module属性来改变方式。
<!DOCTYPE html>
<html lang="en"><head><meta charset="UTF-8" /><meta name="viewport" content="width=device-width, initial-scale=1.0" /><title>Document</title></head><body>
<script type="module">import * as my from '../js/page-mode.js';console.log(my);
</script></body>
</html>
或者
<!DOCTYPE html>
<html lang="en"><head><meta charset="UTF-8" /><meta name="viewport" content="width=device-width, initial-scale=1.0" /><title>Document</title></head><body>
<script type="module"  src="../js/page-my.js">import * as my from '../js/page-mode.js';console.log(my);
</script></body>
</html>
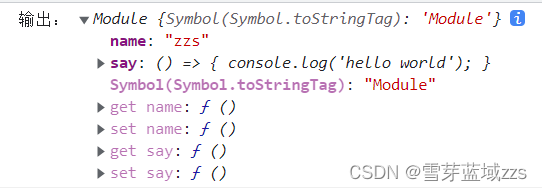
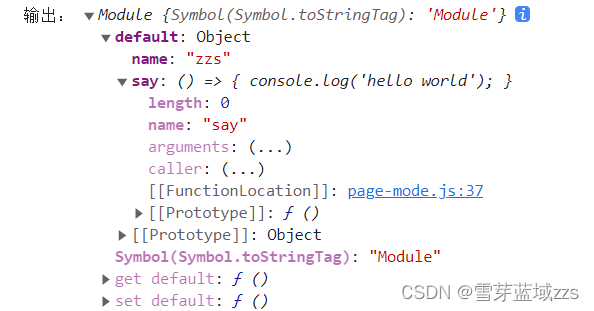
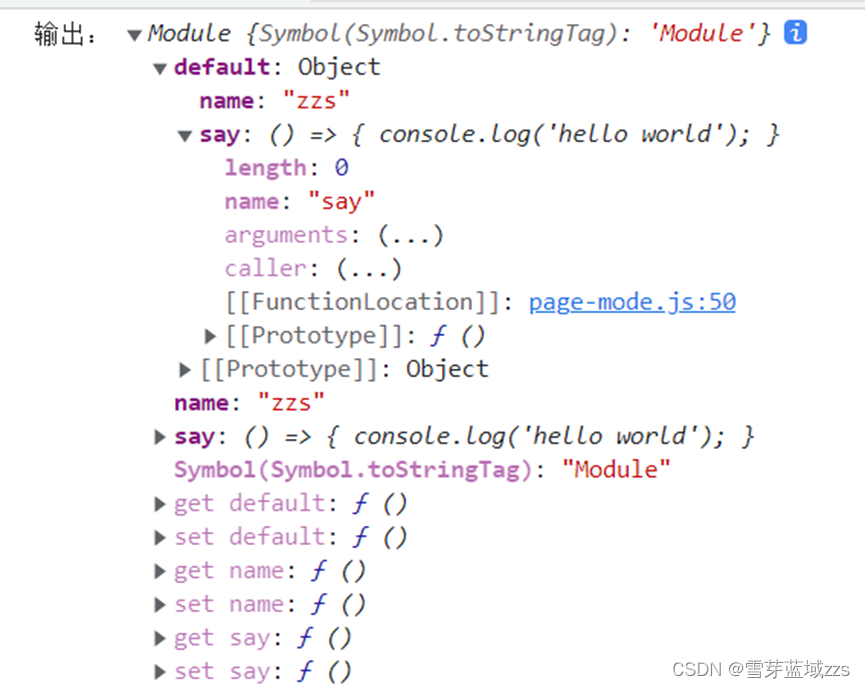
(3)结果: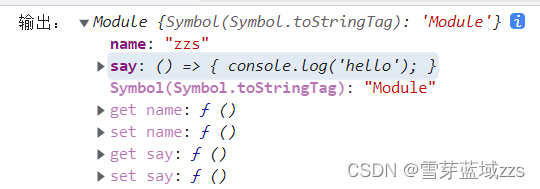
1.3. export
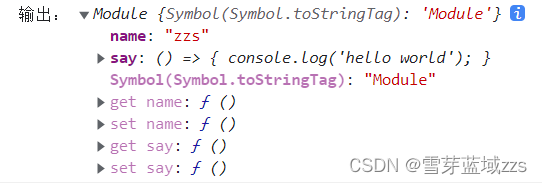
1.3.1. 分别暴露
export let name = 'zzs';
export const say = () => {console.log('hello world');
};
1.3.2. 统一暴露
let name = 'zzs';
const say = () => {console.log('hello world');
};
export { name, say };
1.3.3. 默认暴露
export default {name: 'zzs',say: () => {console.log('hello world');}
};
1.3.4. 混合
let name = 'zzs';
const say = () => {console.log('hello world');
};
export { name, say };export default {name: 'zzs',say: () => {console.log('hello world');}
};
1.4. import
通用方式 import * as 别名 from 路径
import * as my from '../js/page-mode.js';
1.4.1. 默认暴露需要使用 as 别名
import { default as df, name, say } from './page-mode.js';console.log(df);console.log(name);
1.4.2. 简便形式(只针对默认暴露)
import m1 from './page-mode.js';
2. js公共方法封装方式
2.1. 全局函数
function greet(name) {console.log("Hello, " + name + "!");
}
greet("Alice"); // 调用全局函数
2.2. 对象字面量
var utils = {add: function(a, b) {return a + b;},subtract: function(a, b) {return a - b;}
};
console.log(utils.add(5, 3)); // 调用对象字面量中的方法
2.3. 命名空间
var myApp = {};
myApp.utils = {multiply: function(a, b) {return a * b;},divide: function(a, b) {return a / b;}
};
console.log(myApp.utils.multiply(4, 2)); // 调用命名空间下的方法
2.4. 模块化(使用 ES6 的模块化语法)
export function square(x) {return x * x;
}
export function cube(x) {return x * x * x;
}
// main.js
import { square, cube } from './math.js';
console.log(square(5)); // 调用模块中的方法
2.5.上述四种有什么区别
(1)全局函数:定义一个全局函数,可以在任何地方直接调用。这种方式最为简单,但是容易导致命名冲突,影响代码的可维护性
(2)对象字面量:使用对象字面量(或称“JSON”)来封装公共方法,可以将多个方法组织在同一个对象中,便于管理和调用。这种方式相对于全局函数更为可维护,但是仍然存在命名冲突的问题
(3)命名空间:使用命名空间来避免命名冲突。将所有相关的方法都放在同一个命名空间下,可以有效地减少全局变量的数量
(4)模块化:使用模块化的方式来封装公共方法,可以将代码划分为多个模块,每个模块都有自己的作用域,可以避免命名冲突
2.6.JavaScript公共工具函数
// 命名空间封装法
var ACutils = {}
ACutils.verify = {/** 验证手机号是否合格* true--说明合格*/verifyPhoneNumber: function (phoneStr) {let myreg = /^[1][3,4,5,7,8,9][0-9]{9}$/if (!myreg.test(phoneStr)) {return false} else {return true}},/** 验证身份证号是否合格* true--说明合格*/verifyIdCard: function (idCardStr) {let idcardReg =/^[1-9]\d{7}((0\d)|(1[0-2]))(([0|1|2]\d)|3[0-1])\d{3}$|^[1-9]\d{5}[1-9]\d{3}((0\d)|(1[0-2]))(([0|1|2]\d)|3[0-1])\d{3}([0-9]|X)$/if (idcardReg.test(idCardStr)) {return true} else {return false}},/** 验证邮箱是否合格* true--说明合格*/verifyEmail: function (isEmailStr) {let isEmailReg = /^[a-zA-Z0-9_-]+@[a-zA-Z0-9_-]+(\.[a-zA-Z0-9_-]+)+$/if (isEmailReg.test(isEmailStr)) {return true} else {return false}},/** 验证密码格式是否符合规范* 密码由大小写字母 数字组成*/verifyPassword: function (password) {const reg = /^(?=.*[a-z])(?=.*[A-Z])(?=.*\d)[a-zA-Z\d]+$/return reg.test(password)},/** 验证用户名格式是否符合规范 规避敏感字* 可以由大小写字母 数字 汉字组成* sensitiveWords 是敏感字数组*/verifyUsername: function (username, sensitiveWords) {const reg = /^[a-zA-Z0-9\u4e00-\u9fa5]+$/if (!reg.test(username)) {return false}for (let i = 0; i < sensitiveWords.length; i++) {if (username.includes(sensitiveWords[i])) {return false}}return true},/**手机号码中间4位隐藏花号(*)显示* @param mobile 要处理的点好,字符串*/hideMiddlePhone: function (mobile) {return mobile.replace(/^(\d{3})\d{4}(\d{4})$/, '$1****$2')}
}
ACutils.number = {/** 数字四舍五入(保留n位小数)* @param number 要处理的数字* @param n 保留位数*/roundNumber: function (number, n) {n = n ? parseInt(n) : 0if (n <= 0) return Math.round(number)number = Math.round(number * Math.pow(10, n)) / Math.pow(10, n)return number}
}
ACutils.string = {/** 去除字符串空格* @param str 要处理的字符串* @param type 1:所有空格 2:前后空格 3:前空格 4:后空格*/removeStrSpaces: function (str, type) {switch (type) {case 1:return str.replace(/\s+/g, '')case 2:return str.replace(/(^\s*)|(\s*$)/g, '')case 3:return str.replace(/(^\s*)/g, '')case 4:return str.replace(/(\s*$)/g, '')default:return str}}
}
ACutils.dom = {/** 滚动到页面顶部**/scrollToTop: function () {const height = document.documentElement.scrollTop || document.body.scrollTopif (height > 0) {window.requestAnimationFrame(scrollToTop)window.scrollTo(0, height - height / 8)}}
}
ACutils.array = {/** 数组去重**/removeDuplicates: function (arr) {let uniqueArr = []for (let i = 0; i < arr.length; i++) {if (uniqueArr.indexOf(arr[i]) === -1) {uniqueArr.push(arr[i])}}return uniqueArr},/** 多维数组扁平化**/flattenArray: function (arr) {let flattened = []let _this = thisfor (let i = 0; i < arr.length; i++) {if (Array.isArray(arr[i])) {flattened = flattened.concat(_this.flattenArray(arr[i]))} else {flattened.push(arr[i])}}return flattened}
}
ACutils.obj = {/** 引用类型深拷贝* 没有返回null*/deepCopy: function (obj) {let _this = thisif (obj === null || typeof obj !== 'object') {return obj}let copy = Array.isArray(obj) ? [] : {}for (let key in obj) {if (obj.hasOwnProperty(key)) {copy[key] = _this.deepCopy(obj[key])}}return copy},/** 将数组对象中的某一项属性提取出来,以数组展示* @param data 数组对象* @param propertyName 需要提取的属性*/extractProperty: function (data, propertyName) {var propertyValues = []for (var i = 0; i < data.length; i++) {propertyValues.push(data[i][propertyName])}return propertyValues},/** 将多个一维数组合并为数组对象* @param keys 包含属性键名的数组* @param propertyName 多个一维数组* @return 返回数组对象,如果空缺地方显示undefined*/mergeArraysToObject: function (keys, ...arrays) {const length = Math.max(...arrays.map((arr) => arr.length))const result = []for (let i = 0; i < length; i++) {const obj = {}for (let j = 0; j < keys.length; j++) {obj[keys[j]] = arrays[j][i]}result.push(obj)}return result},/** 根据数组对象的 number 类型属性进行排序* @property  排序的 number 类型属性名* @sortOrder 排序顺序,可选参数,默认为 'asc'(升序),可以设置为 'desc'(降序)*/sortByNumberProperty: function (arr, property, sortOrder = 'asc') {if (sortOrder === 'asc') {arr.sort((a, b) => a[property] - b[property])} else if (sortOrder === 'desc') {arr.sort((a, b) => b[property] - a[property])}return arr},/** 根据对象的日期属性进行排序* @property  排序的 number 类型属性名* @sortOrder 排序顺序,可选参数,默认为 'asc'(升序),可以设置为 'desc'(降序)*/sortByDateProperty: function (arr, property, sortOrder = 'asc') {if (sortOrder === 'asc') {arr.sort((a, b) => new Date(a[property]) - new Date(b[property]))} else if (sortOrder === 'desc') {arr.sort((a, b) => new Date(b[property]) - new Date(a[property]))}return arr}
}
ACutils.time = {/**获取当前时间,并根据传参“yy-mm-dd HH:MM:SS” 来确定返回时间格式* @param format 返回时间格式*/getCurrentTime: function (format) {let currentDate = new Date()let year = currentDate.getFullYear()let month = (currentDate.getMonth() + 1).toString().padStart(2, '0')let day = currentDate.getDate().toString().padStart(2, '0')let hours = currentDate.getHours().toString().padStart(2, '0')let minutes = currentDate.getMinutes().toString().padStart(2, '0')let seconds = currentDate.getSeconds().toString().padStart(2, '0')let formattedTime = format.replace('yy', year).replace('mm', month).replace('dd', day).replace('HH', hours).replace('MM', minutes).replace('SS', seconds)return formattedTime},/**传入时间戳,并根据传参“yy-mm-dd HH:MM:SS 来确定返回时间格式* @param timestamp 时间戳* @param format 返回时间格式*/formatTimestamp: function (timestamp, format) {let date = new Date(timestamp)let year = date.getFullYear()let month = (date.getMonth() + 1).toString().padStart(2, '0')let day = date.getDate().toString().padStart(2, '0')let hours = date.getHours().toString().padStart(2, '0')let minutes = date.getMinutes().toString().padStart(2, '0')let seconds = date.getSeconds().toString().padStart(2, '0')let formattedTime = format.replace('yy', year).replace('mm', month).replace('dd', day).replace('HH', hours).replace('MM', minutes).replace('SS', seconds)return formattedTime},/** 传入出生年月,返回年龄、并精准到月份**/computeAge_Month: function (birthDate) {let today = new Date()let birth = new Date(birthDate)let age = today.getFullYear() - birth.getFullYear()let monthDiff = today.getMonth() - birth.getMonth()if (monthDiff < 0 ||(monthDiff === 0 && today.getDate() < birth.getDate())) {age--monthDiff = 12 - birth.getMonth() + today.getMonth()}let accurateAge = {years: age,months: monthDiff}return accurateAge},/*** 计算未来某一时间现在距的剩余时间**/formatRemainTime: function (endTime) {var startDate = new Date()var endDate = new Date(endTime)var t = endDate.getTime() - startDate.getTime()var d = 0,h = 0,m = 0,s = 0if (t >= 0) {d = Math.floor(t / 1000 / 3600 / 24)h = Math.floor((t / 1000 / 60 / 60) % 24)m = Math.floor((t / 1000 / 60) % 60)s = Math.floor((t / 1000) % 60)}return d + '天 ' + h + '小时 ' + m + '分钟 ' + s + '秒'}
}
ACutils.url = {/** 获取url参数中的参数* @param url 要处理的字符串,../index.html?projId=xx&deviceId=xxx* 没有返回null*/parseUrlParams: function (url) {let params = {}let urlParts = url.split('?')if (urlParts.length > 1) {let query = urlParts[1]let pairs = query.split('&')pairs.forEach(function (pair) {let keyValue = pair.split('=')let key = decodeURIComponent(keyValue[0])let value = decodeURIComponent(keyValue[1] || '')params[key] = value})}return params}
}
ACutils.ui = {/** 弹窗提示框  水平垂直居中提示*/showAlert: function (message, backgroundColor, textColor) {var alertBox = document.createElement('div')alertBox.textContent = messagealertBox.style.position = 'fixed'alertBox.style.top = '50%'alertBox.style.left = '50%'alertBox.style.transform = 'translate(-50%, -50%)'alertBox.style.padding = '10px 20px'alertBox.style.borderRadius = '5px'alertBox.style.opacity = 0alertBox.style.transition = 'opacity 0.3s ease-in-out'alertBox.style.backgroundColor = backgroundColoralertBox.style.color = textColordocument.body.appendChild(alertBox)setTimeout(function () {alertBox.style.opacity = 1}, 10)setTimeout(function () {alertBox.style.opacity = 0setTimeout(function () {alertBox.parentNode.removeChild(alertBox)}, 300)}, 2000)},/** 确认框  水平垂直居中提示* callback执行的函数,传递true与false*/showConfirm: function (message, backgroundColor, textColor, callback) {let confirmBox = document.createElement('div')confirmBox.className = 'confirm-box'confirmBox.style.backgroundColor = backgroundColorconfirmBox.style.color = textColorconfirmBox.style.position = 'fixed'confirmBox.style.top = '50%'confirmBox.style.left = '50%'confirmBox.style.transform = 'translate(-50%, -50%)'confirmBox.style.padding = '10px 20px'confirmBox.style.borderRadius = '5px'confirmBox.style.opacity = 0confirmBox.style.transition = 'opacity 0.3s ease-in-out'let messageElement = document.createElement('p')messageElement.textContent = messageconfirmBox.appendChild(messageElement)let confirmDiv = document.createElement('div')confirmDiv.style.display = 'flex'confirmDiv.style.justifyContent = 'space-around'let confirmButton = document.createElement('button')confirmButton.textContent = '确认'confirmButton.style.border = `1px solid ${textColor}`confirmButton.style.cursor = 'pointer'confirmButton.onclick = function () {hideConfirm(confirmBox)if (typeof callback === 'function') {callback(true)}}confirmDiv.appendChild(confirmButton)let cancelButton = document.createElement('button')cancelButton.textContent = '取消'cancelButton.style.border = `1px solid ${textColor}`cancelButton.style.cursor = 'pointer'cancelButton.onclick = function () {hideConfirm(confirmBox)if (typeof callback === 'function') {callback(false)}}confirmDiv.appendChild(cancelButton)confirmBox.appendChild(confirmDiv)document.body.appendChild(confirmBox)setTimeout(function () {confirmBox.style.opacity = 1}, 10)function hideConfirm(confirmBox) {confirmBox.style.opacity = 0setTimeout(function () {confirmBox.parentNode.removeChild(confirmBox)}, 300)}}
}
3. 前端包常用包管理工具
npm 是 Node.js 官方提供的包管理工具,也是前端开发中最常用的包管理工具之一
cnpm 是对 npm 的一个淘宝镜像,旨在提供更快速、稳定的国内访问速度
nvm 是一个用于管理多个 Node.js 版本的工具。它允许开发人员在同一台计算机上安装和切换不同版本的 Node.js
4. 上传到npm中
4.1. 编写公共函数代码
确保公共函数已经封装好,并且在本地能够正常使用
4.2. 创建 npm 账号
如果你还没有 npm 账号,需要先在 https://www.npmjs.com 上注册一个账号
4.3. 初始化 npm 项目
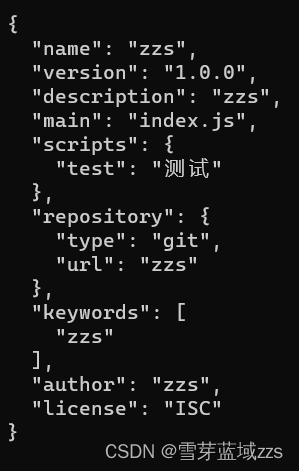
在命令行中进入你的项目目录,运行以下命令来初始化 npm 项目:
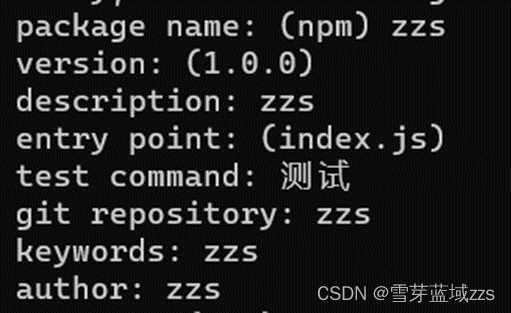
npm init

package name: 包名,你的包要发布的名称,通常是小写字母,不含空格。如果不想改变包名,直接按回车键即可
version: 初始版本号
description: 描述
entry point: 入口文件,该包的主文件名,即其他开发者通过 require 引入时加载的文件,默认为 index.js
test command: 测试命令,用于运行测试脚本的命令,没有回车就好
git repository: Git 仓库地址,没有回车就好
keywords: 关键词,用于描述该包的一些关键词,方便其他开发者搜索和发现你的包
author: 作者,你的名字或者你的公司名称
license: 许可证,授权许可证,标明你的包使用的开源许可证,回车就好
4.3. 编写 README 文件
编写一个清晰明了的 README 文件,描述你的函数是做什么的,如何安装和使用。README 文件通常以 Markdown 格式编写。
4.3. 发布到 npm
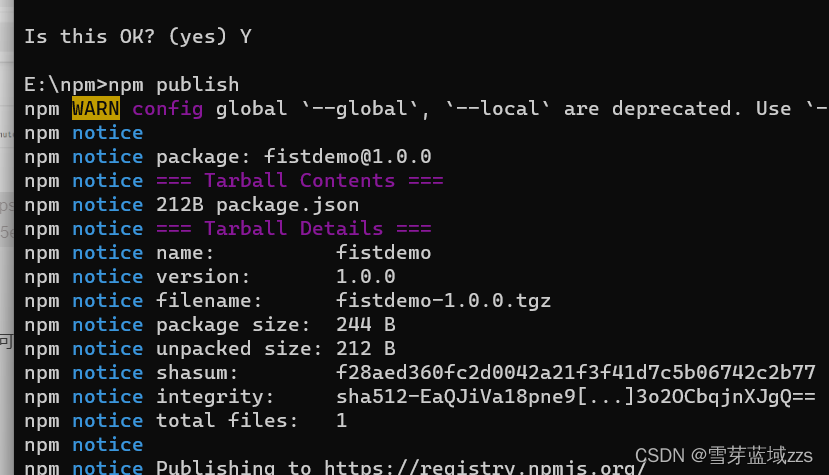
npm login  // 如果之前没有登录过
npm publish
4.3.1. 遇到的问题
npm ERR! 403 403 Forbidden - PUT https://registry.npmmirror.com/-/user/org.couchdb.user:ac_from_hu_nan - [FORBIDDEN] Public registration is not allowedCjs>npm login
原因:是因为用的淘宝镜像,切换到官方的就行
解决:运行
npm config set registry https://registry.npmjs.org/
发布成功

4.4. 下载自己的包
在目录中运行npm i xxx即可


4.5. 更新自己的包
npm login
npm publish
每次修改后,记得更新 package.json 中的版本号,否则 npm publish 命令会失败

