文章目录
- 前言
- 一、bean 定义的注册:
- 1.1 启动类开启feign 接口:
- 1.2 feign 接口的扫描:
- 二、feign bean 的生成:
- 2.1.FeignContext bean :
- 2.2.FeignClientFactoryBean 实例生成:
- 2.2.1 this.feign(context) feign 客户端的配置:
- 2.2.2 configureFeign 对当前feign客户端进行配置:
- 2.2.3 target 方法代理对象的生成:
- 总结
前言
我们知道SpringCloud-OpenFeign 是通过jdk 的动态代理为接口生成代理对象,从而由代理对象完成请求的访问,下面具体看下在Spring 中 是如何完成对接口的代理的;
一、bean 定义的注册:
1.1 启动类开启feign 接口:
通常在启动类中我们需要添加 @EnableFeignClients 注解来开启feign 接口的扫描;
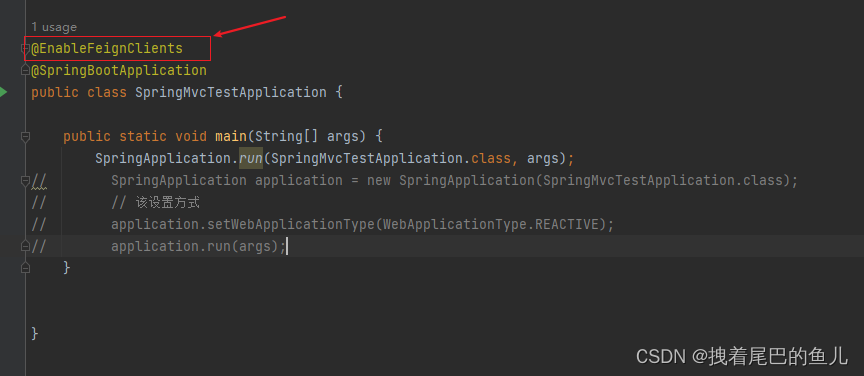
在 EnableFeignClients 注解中定义了一些属性可供我们进行设置:
@Retention(RetentionPolicy.RUNTIME)
@Target({ElementType.TYPE})
@Documented
@Import({FeignClientsRegistrar.class})
public @interface EnableFeignClients {String[] value() default {};String[] basePackages() default {};Class<?>[] basePackageClasses() default {};Class<?>[] defaultConfiguration() default {};Class<?>[] clients() default {};
}- value(),basePackages(),basePackageClasses() 定义扫描的包或者路径,如果我们不在@EnableFeignClients 则默认扫描启动类所在包及其子包;
- defaultConfiguration() feign 客户端的 默认配置类,指定一个或多个配置类,以便为所有 @FeignClient 接口提供一些默认配置。这些配置可能包括编码器、解码器、拦截器等。
- clients 直接指定一组 Feign 客户端接口类,而不通过包扫描来查找。通常用于精确控制哪些接口需要被注册为 Feign 客户端。
1.2 feign 接口的扫描:
在EnableFeignClients 类中 通过import 导入的FeignClientsRegistrar 完成了feign 接口的扫描:
class FeignClientsRegistrar implements ImportBeanDefinitionRegistrar, ResourceLoaderAware, EnvironmentAware {}
FeignClientsRegistrar 实现了 ImportBeanDefinitionRegistrar 接口,意味着它可以向spring 容器中注册 bean 定义,从而在spring 创建一些bean 的时候就可以根据bean 定义来生成相应的bean;
public void registerBeanDefinitions(AnnotationMetadata metadata, BeanDefinitionRegistry registry) {// 注册 EnableFeignClients  中设置的 defaultConfiguration 注册 bean  定义this.registerDefaultConfiguration(metadata, registry);// 根据路径扫描 得到被 FeignClient 注解修饰的接口类,注册每个 FeignClient 中定义的 configuration//  然后为每个FeignClient  注册bean 定义this.registerFeignClients(metadata, registry);
}
1) EnableFeignClients 中defaultConfiguration 定义:
rivate void registerDefaultConfiguration(AnnotationMetadata metadata, BeanDefinitionRegistry registry) {Map<String, Object> defaultAttrs = metadata.getAnnotationAttributes(EnableFeignClients.class.getName(), true);if (defaultAttrs != null && defaultAttrs.containsKey("defaultConfiguration")) {// 如果 设置了defaultConfiguration   String name;if (metadata.hasEnclosingClass()) {name = "default." + metadata.getEnclosingClassName();} else {name = "default." + metadata.getClassName();}// 最终生成defaultConfiguration  的bean bean 名称为// default.被@EnableFeignClients 注解修饰类全路径.FeignClientSpecificationthis.registerClientConfiguration(registry, name, defaultAttrs.get("defaultConfiguration"));}}
private void registerClientConfiguration(BeanDefinitionRegistry registry, Object name, Object configuration) {BeanDefinitionBuilder builder = BeanDefinitionBuilder.genericBeanDefinition(FeignClientSpecification.class);builder.addConstructorArgValue(name);builder.addConstructorArgValue(configuration);registry.registerBeanDefinition(name + "." + FeignClientSpecification.class.getSimpleName(), builder.getBeanDefinition());
}
2 ) FeignClient 接口bean 定义:
通过在 EnableFeignClients 定义的路基进行扫描 ,过滤出来被@FeignClient 修饰的类
public void registerFeignClients(AnnotationMetadata metadata, BeanDefinitionRegistry registry) {LinkedHashSet<BeanDefinition> candidateComponents = new LinkedHashSet();Map<String, Object> attrs = metadata.getAnnotationAttributes(EnableFeignClients.class.getName());Class<?>[] clients = attrs == null ? null : (Class[])((Class[])attrs.get("clients"));if (clients != null && clients.length != 0) {Class[] var12 = clients;int var14 = clients.length;for(int var16 = 0; var16 < var14; ++var16) {Class<?> clazz = var12[var16];candidateComponents.add(new AnnotatedGenericBeanDefinition(clazz));}} else {// 扫描器扫描ClassPathScanningCandidateComponentProvider scanner = this.getScanner();scanner.setResourceLoader(this.resourceLoader);// 扫描 被FeignClient 注解修饰的类scanner.addIncludeFilter(new AnnotationTypeFilter(FeignClient.class));Set<String> basePackages = this.getBasePackages(metadata);Iterator var8 = basePackages.iterator();// 遍历添加到 candidateComponents 集合while(var8.hasNext()) {String basePackage = (String)var8.next();candidateComponents.addAll(scanner.findCandidateComponents(basePackage));}}// 遍历扫描到的类 进行bean 注册的行医Iterator var13 = candidateComponents.iterator();while(var13.hasNext()) {BeanDefinition candidateComponent = (BeanDefinition)var13.next();if (candidateComponent instanceof AnnotatedBeanDefinition) {AnnotatedBeanDefinition beanDefinition = (AnnotatedBeanDefinition)candidateComponent;AnnotationMetadata annotationMetadata = beanDefinition.getMetadata();Assert.isTrue(annotationMetadata.isInterface(), "@FeignClient can only be specified on an interface");Map<String, Object> attributes = annotationMetadata.getAnnotationAttributes(FeignClient.class.getCanonicalName());String name = this.getClientName(attributes);// 注册每个FeignClient 接口定义的 configuration 配置类 this.registerClientConfiguration(registry, name, attributes.get("configuration"));// 注册每个FeignClientthis.registerFeignClient(registry, annotationMetadata, attributes);}}}
registerClientConfiguration 注册每个FeignClient 接口定义的 configuration 配置类 :
private void registerClientConfiguration(BeanDefinitionRegistry registry, Object name, Object configuration) {// BeanDefinitionBuilder  属性设置BeanDefinitionBuilder builder = BeanDefinitionBuilder.genericBeanDefinition(FeignClientSpecification.class);builder.addConstructorArgValue(name);builder.addConstructorArgValue(configuration);// bean 定义注册registry.registerBeanDefinition(name + "." + FeignClientSpecification.class.getSimpleName(), builder.getBeanDefinition());
}
FeignClient feign 接口的bean定义注册:
通过构建FeignClientFactoryBean 对象 进行注册
private void registerFeignClient(BeanDefinitionRegistry registry, AnnotationMetadata annotationMetadata, Map<String, Object> attributes) {String className = annotationMetadata.getClassName();Class clazz = ClassUtils.resolveClassName(className, (ClassLoader)null);ConfigurableBeanFactory beanFactory = registry instanceof ConfigurableBeanFactory ? (ConfigurableBeanFactory)registry : null;String contextId = this.getContextId(beanFactory, attributes);String name = this.getName(attributes);// 构建FeignClientFactoryBean  对象并对其属性进行设置FeignClientFactoryBean factoryBean = new FeignClientFactoryBean();factoryBean.setBeanFactory(beanFactory);factoryBean.setName(name);factoryBean.setContextId(contextId);factoryBean.setType(clazz);factoryBean.setRefreshableClient(this.isClientRefreshEnabled());BeanDefinitionBuilder definition = BeanDefinitionBuilder.genericBeanDefinition(clazz, () -> {// 设置 @FeignClient 设置的url ,path ,decode404,fallback ,fallbackFactory 属性// url  和 path  可以使用类似于 "${xxx} 的占位符,在创建bean 的过程中会对其进行解析factoryBean.setUrl(this.getUrl(beanFactory, attributes));factoryBean.setPath(this.getPath(beanFactory, attributes));factoryBean.setDecode404(Boolean.parseBoolean(String.valueOf(attributes.get("decode404"))));Object fallback = attributes.get("fallback");if (fallback != null) {factoryBean.setFallback(fallback instanceof Class ? (Class)fallback : ClassUtils.resolveClassName(fallback.toString(), (ClassLoader)null));}Object fallbackFactory = attributes.get("fallbackFactory");if (fallbackFactory != null) {factoryBean.setFallbackFactory(fallbackFactory instanceof Class ? (Class)fallbackFactory : ClassUtils.resolveClassName(fallbackFactory.toString(), (ClassLoader)null));}return factoryBean.getObject();});definition.setAutowireMode(2);definition.setLazyInit(true);this.validate(attributes);AbstractBeanDefinition beanDefinition = definition.getBeanDefinition();beanDefinition.setAttribute("factoryBeanObjectType", className);beanDefinition.setAttribute("feignClientsRegistrarFactoryBean", factoryBean);boolean primary = (Boolean)attributes.get("primary");beanDefinition.setPrimary(primary);String[] qualifiers = this.getQualifiers(attributes);if (ObjectUtils.isEmpty(qualifiers)) {qualifiers = new String[]{contextId + "FeignClient"};}BeanDefinitionHolder holder = new BeanDefinitionHolder(beanDefinition, className, qualifiers);BeanDefinitionReaderUtils.registerBeanDefinition(holder, registry);this.registerOptionsBeanDefinition(registry, contextId);
}
至此就完成了 @FeignClient 客户端的扫描以及bean 的定义 ,后续spring 会依照bean 定义去创建bean,因为 FeignClientFactoryBean 实现 了 FactoryBean 所以在创建bean 的时候时,是通过调用其内部的getObject() 获取对象,然后再将bean 对象放入到单例池中;
二、feign bean 的生成:
feign 的生成主要通过FeignClientFactoryBean getObject() 进行:
2.1.FeignContext bean :
FeignContext是Spring Cloud OpenFeign中的一个类,它是一个专门为Feign客户端设置的特定上下文(ApplicationContext的一个子类)。FeignContext的主要作用是允许每个Feign客户端拥有自己独立的应用上下文,这样它们就可以有自己的配置(例如编码器、解码器和拦截器),而不是使用全局的默认配置。
FeignContext 的加载是在 spring.factories FeignAutoConfiguration 类中进行的
org.springframework.boot.autoconfigure.EnableAutoConfiguration=\
org.springframework.cloud.openfeign.hateoas.FeignHalAutoConfiguration,\
org.springframework.cloud.openfeign.FeignAutoConfiguration,\
org.springframework.cloud.openfeign.encoding.FeignAcceptGzipEncodingAutoConfiguration,\
org.springframework.cloud.openfeign.encoding.FeignContentGzipEncodingAutoConfiguration,\
org.springframework.cloud.openfeign.loadbalancer.FeignLoadBalancerAutoConfiguration
@Bean
public FeignContext feignContext() {FeignContext context = new FeignContext();context.setConfigurations(this.configurations);return context;}2.2.FeignClientFactoryBean 实例生成:
FeignClientFactoryBean 通过 getTarget() 方法 创建代理类并进行返回
public Object getObject() {return this.getTarget();
}<T> T getTarget() {// 从容器中获取 FeignContext  的beanFeignContext context = this.beanFactory != null ? (FeignContext)this.beanFactory.getBean(FeignContext.class) : (FeignContext)this.applicationContext.getBean(FeignContext.class);// 创建组装feign 客户端的配置,这里还会为每个客户端创建子容器,保证每个客户端的独立性Feign.Builder builder = this.feign(context);if (!StringUtils.hasText(this.url)) {if (LOG.isInfoEnabled()) {LOG.info("For '" + this.name + "' URL not provided. Will try picking an instance via load-balancing.");}if (!this.name.startsWith("http")) {this.url = "http://" + this.name;} else {this.url = this.name;}this.url = this.url + this.cleanPath();return this.loadBalance(builder, context, new Target.HardCodedTarget(this.type, this.name, this.url));} else {if (StringUtils.hasText(this.url) && !this.url.startsWith("http")) {this.url = "http://" + this.url;}String url = this.url + this.cleanPath();Client client = (Client)this.getOptional(context, Client.class);if (client != null) {if (client instanceof FeignBlockingLoadBalancerClient) {client = ((FeignBlockingLoadBalancerClient)client).getDelegate();}if (client instanceof RetryableFeignBlockingLoadBalancerClient) {client = ((RetryableFeignBlockingLoadBalancerClient)client).getDelegate();}builder.client(client);}this.applyBuildCustomizers(context, builder);//  调用 target 方法完成代理对象的创建Targeter targeter = (Targeter)this.get(context, Targeter.class);return targeter.target(this, builder, context, new Target.HardCodedTarget(this.type, this.name, url));}
}
2.2.1 this.feign(context) feign 客户端的配置:
此方法配置 feign 客户端的 log 日志输出,编解码,使用的协议等;
protected Feign.Builder feign(FeignContext context) {// log 日志实现类的获取FeignLoggerFactory loggerFactory = (FeignLoggerFactory)this.get(context, FeignLoggerFactory.class);Logger logger = loggerFactory.create(this.type);// 链式调用 设置 编解码 ,contract 协议Feign.Builder builder = ((Feign.Builder)this.get(context, Feign.Builder.class)).logger(logger).encoder((Encoder)this.get(context, Encoder.class)).decoder((Decoder)this.get(context, Decoder.class)).contract((Contract)this.get(context, Contract.class));// 设置 系统默认的配置文件,客户端自定义的配置文件this.configureFeign(context, builder);return builder;
}
在对 Feign.Builder 对象链式设置里,如果发现当前feign 客户端还没有创建上下文,会先进行上下文的创建:
protected <T> T get(FeignContext context, Class<T> type) {// 从当前feign 客户端的容器中,获取到对应的 bean  (Feign.Builder,Decoder,Encoder,Contract)T instance = context.getInstance(this.contextId, type);if (instance == null) {throw new IllegalStateException("No bean found of type " + type + " for " + this.contextId);} else {return instance;}
}
getInstance 获取当前feign 客户端容器内的bean:
public <T> T getInstance(String name, Class<T> type) {// 根据当前feign 客户端定义 id 获取当前feign 客户端的容器,这里如果feign 客户端的容器还没创建则会先进行创建AnnotationConfigApplicationContext context = this.getContext(name);try {// 在当前feign 客户端 容器内获取beanreturn context.getBean(type);} catch (NoSuchBeanDefinitionException var5) {return null;}
}
this.getContext 当前客户端容器获取:
protected AnnotationConfigApplicationContext getContext(String name) {if (!this.contexts.containsKey(name)) {// 容器内没有当前客户端的子容器 synchronized(this.contexts) {if (!this.contexts.containsKey(name)) {// createContext 创建子容器 并放入到spring 的大容器中this.contexts.put(name, this.createContext(name));}}}// 返回当前客户端的子容器return (AnnotationConfigApplicationContext)this.contexts.get(name);
}
createContext 客户端子容器的创建:
protected AnnotationConfigApplicationContext createContext(String name) {// 创建一个 context 上下文AnnotationConfigApplicationContext context;if (this.parent != null) {DefaultListableBeanFactory beanFactory = new DefaultListableBeanFactory();if (this.parent instanceof ConfigurableApplicationContext) {beanFactory.setBeanClassLoader(((ConfigurableApplicationContext)this.parent).getBeanFactory().getBeanClassLoader());} else {beanFactory.setBeanClassLoader(this.parent.getClassLoader());}context = new AnnotationConfigApplicationContext(beanFactory);context.setClassLoader(this.parent.getClassLoader());} else {context = new AnnotationConfigApplicationContext();}//  在当前子容器内 注册属于自己的  configuration 配置文件if (this.configurations.containsKey(name)) {Class[] var9 = ((Specification)this.configurations.get(name)).getConfiguration();int var4 = var9.length;for(int var5 = 0; var5 < var4; ++var5) {Class<?> configuration = var9[var5];context.register(new Class[]{configuration});}}Iterator var10 = this.configurations.entrySet().iterator();while(true) {Map.Entry entry;do {if (!var10.hasNext()) {context.register(new Class[]{PropertyPlaceholderAutoConfiguration.class, this.defaultConfigType});context.getEnvironment().getPropertySources().addFirst(new MapPropertySource(this.propertySourceName, Collections.singletonMap(this.propertyName, name)));if (this.parent != null) {// 设置spring 容器  为父容器context.setParent(this.parent);}context.setDisplayName(this.generateDisplayName(name));// 刷新子容器 去创建bean context.refresh();return context;}entry = (Map.Entry)var10.next();} while(!((String)entry.getKey()).startsWith("default."));Class[] var12 = ((Specification)entry.getValue()).getConfiguration();int var13 = var12.length;for(int var7 = 0; var7 < var13; ++var7) {Class<?> configuration = var12[var7];context.register(new Class[]{configuration});}}
}
2.2.2 configureFeign 对当前feign客户端进行配置:
protected void configureFeign(FeignContext context, Feign.Builder builder) {FeignClientProperties properties = this.beanFactory != null ? (FeignClientProperties)this.beanFactory.getBean(FeignClientProperties.class) : (FeignClientProperties)this.applicationContext.getBean(FeignClientProperties.class);FeignClientConfigurer feignClientConfigurer = (FeignClientConfigurer)this.getOptional(context, FeignClientConfigurer.class);this.setInheritParentContext(feignClientConfigurer.inheritParentConfiguration());if (properties != null && this.inheritParentContext) {if (properties.isDefaultToProperties()) {// feign 客户端定义的配置类解析this.configureUsingConfiguration(context, builder);// 系统默认的配置解析this.configureUsingProperties((FeignClientProperties.FeignClientConfiguration)properties.getConfig().get(properties.getDefaultConfig()), builder);// 配置的客户端解析this.configureUsingProperties((FeignClientProperties.FeignClientConfiguration)properties.getConfig().get(this.contextId), builder);} else {this.configureUsingProperties((FeignClientProperties.FeignClientConfiguration)properties.getConfig().get(properties.getDefaultConfig()), builder);this.configureUsingProperties((FeignClientProperties.FeignClientConfiguration)properties.getConfig().get(this.contextId), builder);this.configureUsingConfiguration(context, builder);}} else {this.configureUsingConfiguration(context, builder);}}
这里进行简单的说明:
-
configureUsingConfiguration 解析通过 @FeignClient 配置的configuration 的配置类;
-
configureUsingProperties:解析feign 默认的配置 比如 default 配置:
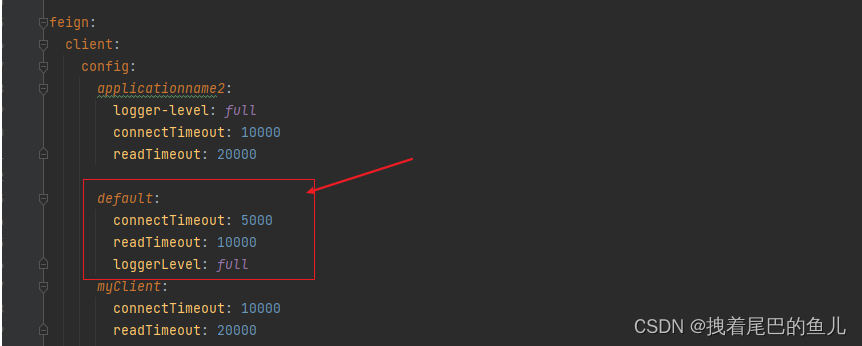
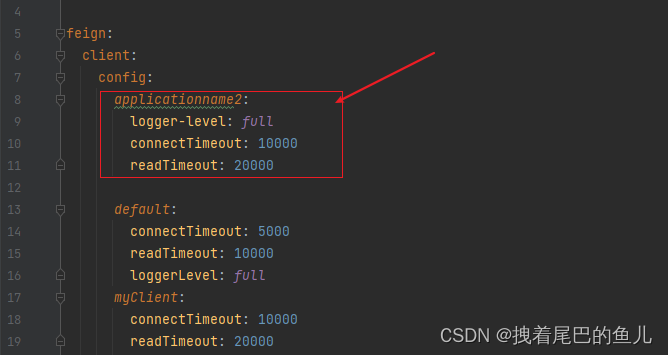
- configureUsingProperties:最后一个解析通过配置文件定义给某个客户端的配置,这里的applicationname2 对应某个@FeignClient 定义的contextId 或者 name

2.2.3 target 方法代理对象的生成:
最终通过Feign 下的 Builder 类中的 target 方法生成代理对象:这里只展示部分代码
public <T> T target(Target<T> target) {return this.build().newInstance(target);
}public Feign build() {super.enrich();SynchronousMethodHandler.Factory synchronousMethodHandlerFactory = new SynchronousMethodHandler.Factory(this.client, this.retryer, this.requestInterceptors, this.responseInterceptor, this.logger, this.logLevel, this.dismiss404, this.closeAfterDecode, this.propagationPolicy, this.forceDecoding);ReflectiveFeign.ParseHandlersByName handlersByName = new ReflectiveFeign.ParseHandlersByName(this.contract, this.options, this.encoder, this.decoder, this.queryMapEncoder, this.errorDecoder, synchronousMethodHandlerFactory);return new ReflectiveFeign(handlersByName, this.invocationHandlerFactory, this.queryMapEncoder);
}
- .build() 方法对代理类的一些属性进行配置 其中SynchronousMethodHandler 在我们需要调用远程服务时会 通过 invoke 方法组装http 请求 并最终发起http 请求访问;
- newInstance(target) 生成代理对象并返回;
总结
OpenFeign 客户端是通过 FeignClientFactoryBean 进行代理对象的生成,每个feign 客户端都会创造属于自己的子容器,并且将自身的配置文件作为bean 进行注册;我们在application.yml 进行的配置会覆盖掉我们在 @FeignClient 的配置;





![elasticsearch[二]-DSL查询语法:全文检索、精准查询(term/range)、地理坐标查询(矩阵、范围)、复合查询(相关性算法)、布尔查询](https://img-blog.csdnimg.cn/img_convert/260b5435f62f0ff7a04038cc594cac72.png)


