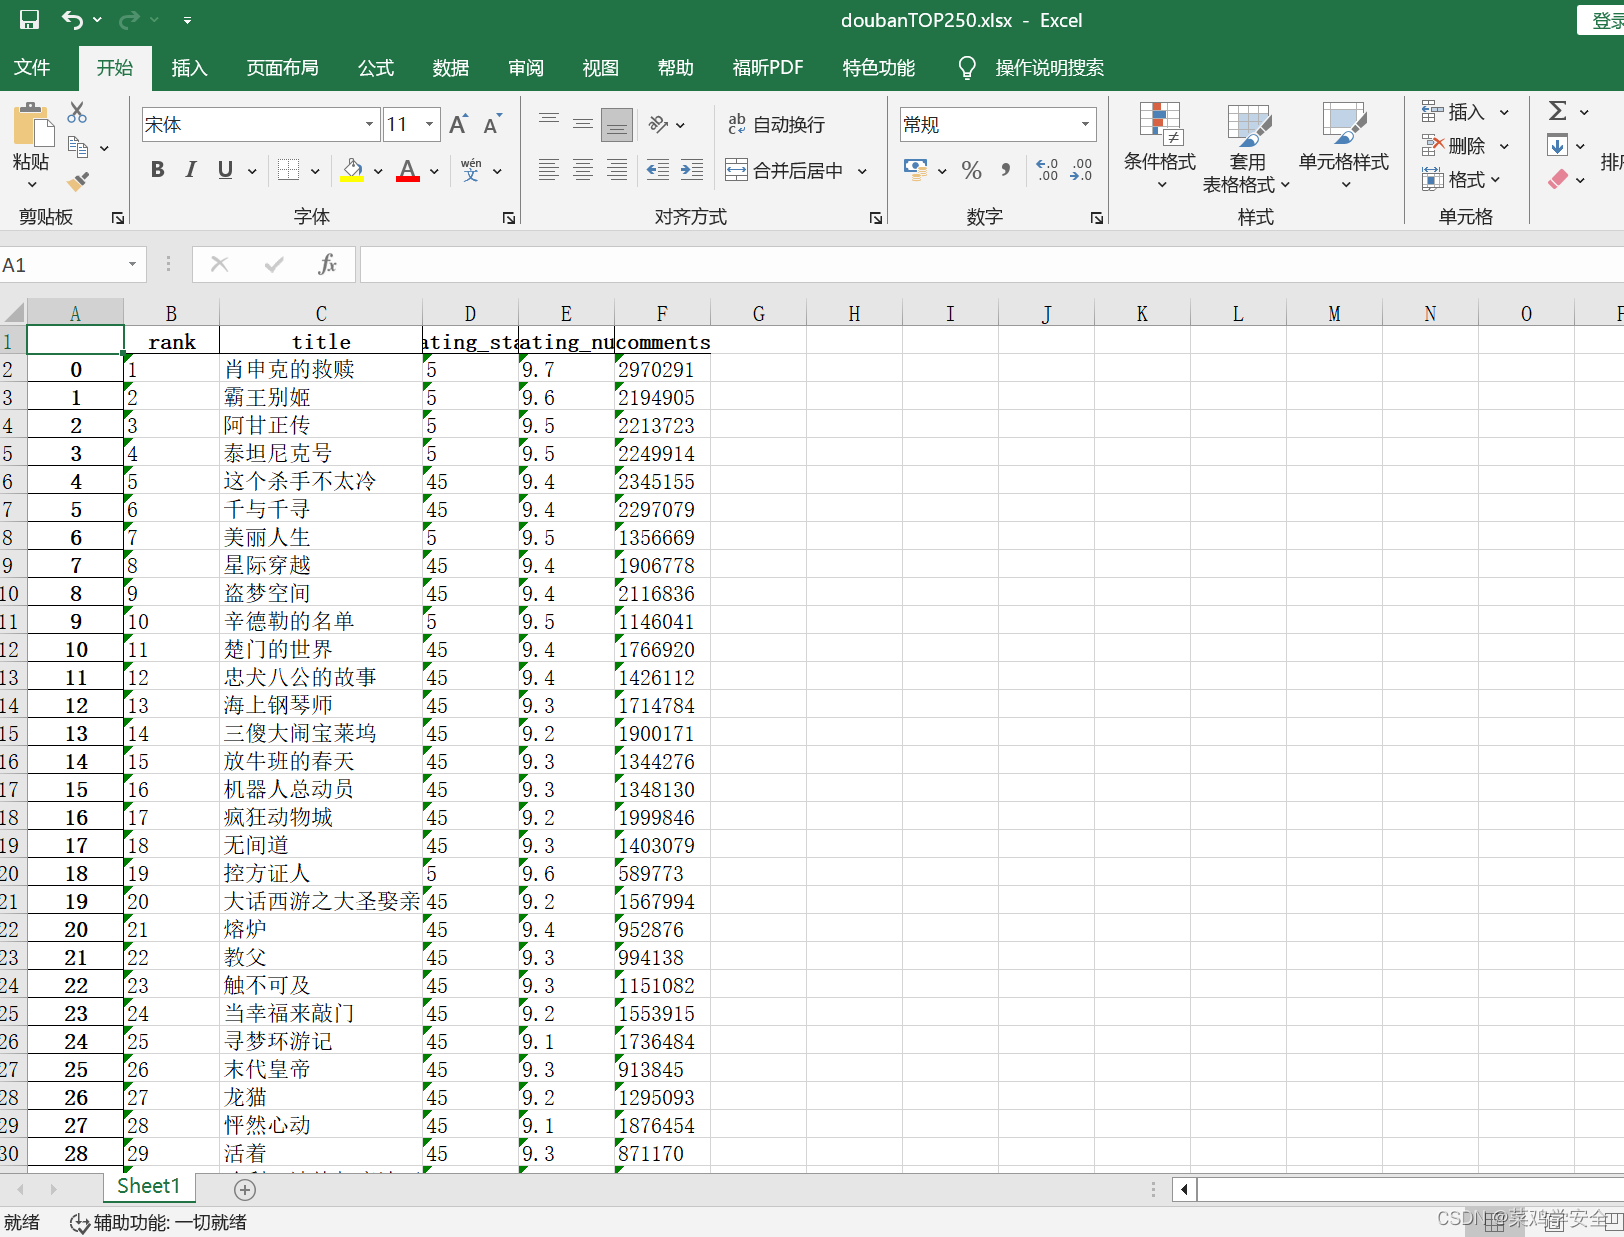
本篇文章首先介绍目标检测任务中的关键评价指标
mAP的概念;然后介绍其在yolo源码和pycocotools工具中的实现方法;最后比较两种mAP的计算方法的不同之处。
目标检测中的评价指标:
mAP概念及其计算方法(yolo源码/pycocotools)
混淆矩阵概念及其计算方法(yolo源码)
本文目录
- 1 概念
- 2 mAP计算(pycocotools)
- 2.1 coco评价指标
- 2.2 coco指标计算
- 2.2.1 数据形式转换(yolo to coco)
- 2.2.2 coco计算类
- 3 mAP计算(yolo源码)
- 4 计算方法对比(pycocotools和yolo源码)
- 4.1 插值方法
- 4.2 面积计算方法(mAP)
1 概念
在分类任务中,多以精确率/查准率(Precision, P)和召回率/查全率(Recall, R)作为类别预测的评价指标,其计算方法如下:
P = T P T P + F P P = {{TP} \over {TP + FP}} P=TP+FPTP
R = T P T P + F N R = {{TP} \over {TP + FN}} R=TP+FNTP
其中TP表示目标被预测为正样本且实际为正样本数量;FP表示预测为正样本但实际为负样本的数量;FN表示预测为负样本但实际为正样本数量,FN+TP为样本总数。
在不同的置信度阈值下,模型对某一类别的预测有多组P和R,平均精度(Average Precison, AP)即P-R曲线所围面积,均值平均精度(mean Average Precison, mAP)为所有类别AP的均值。
目标检测的任务为对目标进行分类与定位,模型的预测结果p为(cls, conf, pos),其中cls为目标的类别,conf为目标属于该类别的置信度,pos为目标的预测边框。在预测结果评价中,使用p和gt(真实结果)边框之间的交集和并集面积之比(Intersection over Union, IoU)衡量结果,其P和R的计算公式如下:
P = T P T P + F P = T P n u m p ( a l l ) P = {{TP} \over {TP + FP}} = {{TP} \over {nump(all)}} P=TP+FPTP=nump(all)TP
R = T P T P + F N = R n u m g t ( a l l ) R = {{TP} \over {TP + FN}} = {{R} \over {numgt(all)}} R=TP+FNTP=numgt(all)R
- TP:
p和gt匹配的数量- IoU > IoU_thres且类别一致
- 同一个
gt至多匹配一个p(若一个gt匹配到多个p,则选择IoU最高的p作为匹配结果) - 同一个
gt至多匹配一个p(若一个p匹配到多个gt,则选择IoU最高的gt作为匹配结果)
- FP:
p未能与gt匹配的数量 - FN:
gt未能与p匹配的数量
假设某目标检测任务中具有两个类别,一共有八张检测图片,其检测结果如图1所示,其中数字表示类别置信度。


根据表1统计结果,计算表中底色为蓝色(class_1)的类别预测AP,根据置信度从大到小对其类别预测结果进行排序,并在不同的类别置信度下计算其P和R,得到的结果如表2所示。

根据表2统计结果,绘制类别1在不同置信度阈值下的P-R曲线,如图2所示,其中每个点最终P值为该点本身及右边点的最大值,计算P-R曲线面积即可得到最终mAP,关于面积在pycocotools和yolo源码中的具体求法见下文。

2 mAP计算(pycocotools)
2.1 coco评价指标
coco的评价指标如图3所示,各个评价指标的意义如下:
Average Precision (AP):即mAPAverage Recall (AR):IoU阈值@0.5:0.95下的所有Recall(不常用)- IoU (@0.5,@0.75,@0.5:0.95):不同的IoU阈值下的结果
- area:预测目标的面积大小
- maxDets:每张图片中的最多预测目标数量

2.2 coco指标计算
pycocotools函数:
- pycocotools.coco.COCO:COCO数据形式(gt)
- pycocotools.coco.COCOeval:指标计算
coco数据形式(json)(
cocoGT):
- image
- id(图片id)
- height(图片高度)
- width(图片宽度)
- categories
- id(类别1)
- id(类别2)
- …
- annotations:
- image_index(当前标签属于的图片id)
- bbox(xmin,ymin,w,h 绝对坐标)
- categoried_id(当前标签属于的类别id)
- area(当前预测边框面积)
- iscrowd(目标检测任务中设为0)
yolo数据数据(txt)(
yoloGt):(class, x, y, w, h)
2.2.1 数据形式转换(yolo to coco)
def convert_to_coco_api(ds):'''实现yolo数据形式(txt)到coco数据形式(json)的转换:param ds: 数据类(yolo源码中形式):return: coco数据类'''coco_ds = COCO() # pycocotools.coco.COCO# labels IDs need to start at 1, not 0ann_id = 1# images: {'id'(图片id): , 'height':, 'width': }# categories: {'id'(类别id): , 'id': , ...}# annotations: {'image_id'(属于图片id): , 'bbox': (xmin, ymin, w, h)绝对坐标, 'categoried_id', 'area(面积)', 'iscrowd': , 'id': 标签id}dataset = {'images': [], 'categories': [], 'annotations': []}categories = set()# 遍历dataset中的每张图像for img_idx in tqdm(range(len(ds)), desc="loading eval info for coco tools."):# targets: [num_obj, 6] , 6 -> (img_index, obj_index, x, y, h, w)targets, shapes = ds.coco_index(img_idx)# 图像字典添加img_dict = {}img_dict['id'] = img_idximg_dict['height'] = shapes[0]img_dict['width'] = shapes[1]dataset['images'].append(img_dict)# 标签字典添加for obj in targets:ann = {}# 当前标签属于的图片idann["image_id"] = img_idx# 将相对坐标转为绝对坐标 (x, y, w, h) -> (xmin, ymin, w, h)# 位置信息boxes = obj[1:]boxes[:2] -= 0.5*boxes[2:]boxes[[0, 2]] *= img_dict["width"]boxes[[1, 3]] *= img_dict["height"]boxes = boxes.tolist()ann["bbox"] = boxes # 当前标签的边框信息(xmin,ymin,w,h)ann["category_id"] = int(obj[0]) # 当前标签属于的类别idcategories.add(int(obj[0]))ann["area"] = boxes[2] * boxes[3] # 当前标签边框面积ann["iscrowd"] = 0ann["id"] = ann_id # 当前标签iddataset["annotations"].append(ann)ann_id += 1dataset['categories'] = [{'id': i} for i in sorted(categories)]# 构造coco数据形式coco_ds.dataset = dataset# ds.anns(标签id:标签信息)# ds.imgToAnns(图片id:标签信息(属于当前图片))# ds.catToImgs(类别id: 标签信息(属于当前类别))# ds.imgs(图片id:图片信息)# ds.cats(类别id:类别)coco_ds.createIndex()return coco_ds
2.2.2 coco计算类
调用pycocotools API实现coco指标计算类(
CocoEvaluator)
- 函数
- update:在模型预测过程中添加模型的预测结果,并将其转换为coco数据形式
- accumulate: 调用COCOeval.accumulate实现每一类别TP/FP计算
- summarize: 调用COCOeval.summarize实现评价指标的计算
class CocoEvaluator(object):def __init__(self, coco_gt, iou_types):assert isinstance(iou_types, (list, tuple))coco_gt = copy.deepcopy(coco_gt) # coco数据(gt)self.coco_gt = coco_gtself.iou_types = iou_types # ['bbox']self.coco_eval = {}for iou_type in iou_types:self.coco_eval[iou_type] = COCOeval(coco_gt, iouType=iou_type)self.img_ids = []self.eval_imgs = {k: [] for k in iou_types}def update(self, predictions):img_ids = list(np.unique(list(predictions.keys())))self.img_ids.extend(img_ids)for iou_type in self.iou_types:results = self.prepare(predictions, iou_type)coco_dt = loadRes(self.coco_gt, results) if results else COCO()coco_eval = self.coco_eval[iou_type]coco_eval.cocoDt = coco_dtcoco_eval.params.imgIds = list(img_ids)img_ids, eval_imgs = evaluate(coco_eval)self.eval_imgs[iou_type].append(eval_imgs)def synchronize_between_processes(self):for iou_type in self.iou_types:self.eval_imgs[iou_type] = np.concatenate(self.eval_imgs[iou_type], 2)create_common_coco_eval(self.coco_eval[iou_type], self.img_ids, self.eval_imgs[iou_type])def accumulate(self):for coco_eval in self.coco_eval.values():coco_eval.accumulate()def summarize(self):for iou_type, coco_eval in self.coco_eval.items():print("IoU metric: {}".format(iou_type))coco_eval.summarize()def prepare(self, predictions, iou_type):if iou_type == "bbox":return self.prepare_for_coco_detection(predictions)elif iou_type == "segm":return self.prepare_for_coco_segmentation(predictions)elif iou_type == "keypoints":return self.prepare_for_coco_keypoint(predictions)else:raise ValueError("Unknown iou type {}".format(iou_type))def prepare_for_coco_detection(self, predictions):coco_results = []for original_id, prediction in predictions.items():if len(prediction) == 0:continueboxes = prediction["boxes"]boxes = convert_to_xywh(boxes).tolist()scores = prediction["scores"].tolist()labels = prediction["labels"].tolist()coco_results.extend([{"image_id": original_id,"category_id": labels[k],"bbox": box,"score": scores[k],}for k, box in enumerate(boxes)])return coco_resultsdef prepare_for_coco_segmentation(self, predictions):coco_results = []for original_id, prediction in predictions.items():if len(prediction) == 0:continuescores = prediction["scores"]labels = prediction["labels"]masks = prediction["masks"]masks = masks > 0.5scores = prediction["scores"].tolist()labels = prediction["labels"].tolist()rles = [mask_util.encode(np.array(mask[0, :, :, np.newaxis], dtype=np.uint8, order="F"))[0]for mask in masks]for rle in rles:rle["counts"] = rle["counts"].decode("utf-8")coco_results.extend([{"image_id": original_id,"category_id": labels[k],"segmentation": rle,"score": scores[k],}for k, rle in enumerate(rles)])return coco_resultsdef prepare_for_coco_keypoint(self, predictions):coco_results = []for original_id, prediction in predictions.items():if len(prediction) == 0:continueboxes = prediction["boxes"]boxes = convert_to_xywh(boxes).tolist()scores = prediction["scores"].tolist()labels = prediction["labels"].tolist()keypoints = prediction["keypoints"]keypoints = keypoints.flatten(start_dim=1).tolist()coco_results.extend([{"image_id": original_id,"category_id": labels[k],'keypoints': keypoint,"score": scores[k],}for k, keypoint in enumerate(keypoints)])return coco_results
3 mAP计算(yolo源码)
基于YOLO源码实现
mAP @0.5:0.95计算(MeanAveragePrecsion)
- 数据形式:
- 预测结果:xmin,ymin,xmax,ymax,conf,class(绝对坐标)
- 真实结果:class,xmin,ymin,xmax,ymax(绝对坐标)
- 函数:
- process_batch:实现预测结果和真实结果的匹配
- calculate_ap_per_class: 计算每一类别的AP值
- compute_pr_area:计算PR曲线的面积
class MeanAveragePrecison:def __init__(self, device="cpu"):'''计算mAP: mAP@0.5; mAP @0.5:0.95; mAP @0.75'''self.iouv = torch.linspace(0.5, 0.95, 10, device=device) # 不同的IoU置信度 @0.5:0.95self.niou = self.iouv.numel() # IoU置信度数量self.stats = [] # 存储预测结果self.device = devicedef process_batch(self, detections, labels):'''预测结果匹配(TP/FP统计):param detections:(array[N,6]) x1,y1,x1,y1,conf,class (原图绝对坐标):param labels:(array[M,5]) class,x1,y1,x2,y2 (原图绝对坐标)'''# 每一个预测结果在不同IoU下的预测结果匹配correct = np.zeros((detections.shape[0], self.niou)).astype(bool)if detections is None:self.stats.append((correct, *torch.zeros((2, 0), device=self.device), labels[:, 0]))else:# 计算标签与所有预测结果之间的IoUiou = box_iou(labels[:, 1:], detections[:, :4])# 计算每一个预测结果可能对应的实际标签correct_class = labels[:, 0:1] == detections[:, 5]for i in range(self.niou): # 在不同IoU置信度下的预测结果匹配结果# 根据IoU置信度和类别对应得到预测结果与实际标签的对应关系x = torch.where((iou >= self.iouv[i]) & correct_class)# 若存在和实际标签相匹配的预测结果if x[0].shape[0]: # x[0]:存在为True的索引(实际结果索引), x[1]当前所有True的索引(预测结果索引)# [label, detect, iou]matches = torch.cat((torch.stack(x, 1), iou[x[0], x[1]][:, None]), 1).cpu().numpy()if x[0].shape[0] > 1: # 存在多个与目标对应的预测结果matches = matches[matches[:, 2].argsort()[::-1]] # 根据IoU从高到低排序 [实际结果索引,预测结果索引,结果IoU]matches = matches[np.unique(matches[:, 1], return_index=True)[1]] # 每一个预测结果保留一个和实际结果的对应matches = matches[np.unique(matches[:, 0], return_index=True)[1]] # 每一个实际结果和一个预测结果对应correct[matches[:, 1].astype(int), i] = True # 表面当前预测结果在当前IoU下实现了目标的预测# 预测结果在不同IoU是否预测正确, 预测置信度, 预测类别, 实际类别self.stats.append((correct, detections[:, 4], detections[:, 5], labels[:, 0]))def calculate_ap_per_class(self, save_dir='.', names=(), eps=1e-16):stats = [torch.cat(x, 0).cpu().numpy() for x in zip(*self.stats)] # to numpy# tp:所有预测结果在不同IoU下的预测结果 [n, 10]# conf: 所有预测结果的置信度# pred_cls: 所有预测结果得到的类别# target_cls: 所有图片上的实际类别tp, conf, pred_cls, target_cls = stats[0], stats[1], stats[2], stats[3]# 根据类别置信度从大到小排序i = np.argsort(-conf) # 根据置信度从大到小排序tp, conf, pred_cls = tp[i], conf[i], pred_cls[i]# 得到所有类别及其对应数量(目标类别数)unique_classes, nt = np.unique(target_cls, return_counts=True)nc = unique_classes.shape[0] # number of classes# ap: 每一个类别在不同IoU置信度下的AP, p:每一个类别的P曲线(不同类别置信度), r:每一个类别的R(不同类别置信度)ap, p, r = np.zeros((nc, tp.shape[1])), np.zeros((nc, 1000)), np.zeros((nc, 1000))for ci, c in enumerate(unique_classes): # 对每一个类别进行P,R计算i = pred_cls == cn_l = nt[ci] # number of labels 该类别的实际数量(正样本数量)n_p = i.sum() # number of predictions 预测结果数量if n_p == 0 or n_l == 0:continue# cumsum:轴向的累加和, 计算当前类别在不同的类别置信度下的P,Rfpc = (1 - tp[i]).cumsum(0) # FP累加和(预测为负样本且实际为负样本)tpc = tp[i].cumsum(0) # TP累加和(预测为正样本且实际为正样本)# 召回率计算(不同的类别置信度下)recall = tpc / (n_l + eps)# 精确率计算(不同的类别置信度下)precision = tpc / (tpc + fpc)# 计算不同类别置信度下的AP(根据P-R曲线计算)for j in range(tp.shape[1]):ap[ci, j], mpre, mrec = self.compute_ap(recall[:, j], precision[:, j])# 所有类别的ap值 @0.5:0.95return apdef compute_ap(self, recall, precision):# 增加初始值(P=1.0 R=0.0) 和 末尾值(P=0.0, R=1.0)mrec = np.concatenate(([0.0], recall, [1.0]))mpre = np.concatenate(([1.0], precision, [0.0]))# Compute the precision envelope np.maximun.accumulate# (返回一个数组,该数组中每个元素都是该位置及之前的元素的最大值)mpre = np.flip(np.maximum.accumulate(np.flip(mpre)))# 计算P-R曲线面积method = 'interp' # methods: 'continuous', 'interp'if method == 'interp': # 插值积分求面积x = np.linspace(0, 1, 101) # 101-point interp (COCO))# 积分(求曲线面积)ap = np.trapz(np.interp(x, mrec, mpre), x)elif method == 'continuous': # 不插值直接求矩阵面积i = np.where(mrec[1:] != mrec[:-1])[0] # points where x axis (recall) changesap = np.sum((mrec[i + 1] - mrec[i]) * mpre[i + 1]) # area under curvereturn ap, mpre, mrec
4 计算方法对比(pycocotools和yolo源码)
yolo源码计算得到的mAP会高于pycocotools计算得到的mAP,其主要表现在得到P-R曲线后的处理过程,如图4所示。

4.1 插值方法
在最终计算得到的mpre(P),mrec(R)中,通过插值的方法得到101个点,在两种计算方法中,所用的插值函数存在不同。
- pycocotools:
np.searchsorted
'''
np.searchsorted(a, v, side='left', sorter=None)-> inds
a:一维数组,当sorter为None时,其必须为升序数组
v:插值数组
side: 'left':a[i-1] < v <= a[i],第一个满足条件的; 'right':a[i-1] <= v < a[i],最后一个满足条件的
inds: 列表,对应v中元素插入a的位置
'''
recThrs = np.linspace(.0, 1.00, 101, endpoint=True)
inds = np.searchsorted(mrec, recThrs, side='left')   # 在横坐标(R)上插值得到新的横坐标
for ri, pi in enumerate(inds):q[ri] = mpre[pi]  # 新的纵坐标
mpre = np.array(q[ri])
- yolo源码:
np.interp
'''
numpy.interp(x, xp, fp, left=None, right=None, period=None)->p
x:计算插值的x坐标
xp:原数据的纵坐标
fp:原数据的横坐标
p:通过估计xp和fp的线性关系,得到插值
'''
recThrs = np.linspace(.0, 1.00, 101)
mpre = np.interp(recThrs, mrec, mpre)
4.2 面积计算方法(mAP)
-
pycocotools:
np.mean(mpre)计算插值点的均值得到结果 -
yolo源码:
np.tapz(mpre,recThrs)计算插值后P-R曲线积分(面积)得到结果