获取数据
import pathlibimport tensorflow as tf# download dataset provided by Anki: https://www.manythings.org/anki/
text_file = tf.keras.utils.get_file(fname="fra-eng.zip",origin="http://storage.googleapis.com/download.tensorflow.org/data/fra-eng.zip",extract=True,
)
# show where the file is located now
text_file = pathlib.Path(text_file).parent / "fra.txt"
print(text_file)
文本规范化
就像所有 NLP 任务一样,您需要在使用文本之前对其进行规范化。法语字母具有重音符号,这些重音将表示为 Unicode 字符,但这种表示形式在 Unicode 中并不是唯一的。因此,您需要将字符串转换为 NFKC(兼容性和组合正常形式)。
接下来,您将对句子进行标记。每个单词都应该是一个单独的标记以及每个标点符号。但是,缩略语中使用的标点符号(例如 don't、va-t-il 或 c'est)不会与单词分开。此外,将所有内容转换为小写,期望这将减少词汇表中不同单词的数量。
规范化和标记化可以更深入,例如子词标记化、词干提取和词形还原。但为了简单起见,你在这个项目中不做这些。
从头开始,规范化文本的代码如下。您将使用 Python 模块 unicodedata 将 Unicode 字符串转换为 NFKC 正常形式。然后,您将使用正则表达式在标点符号周围添加空格。之后,您将用 sentinels [start] 和 [end] .您将在后面的课程中看到哨兵的用途
import pathlib
import pickle
import random
import re
import unicodedataimport tensorflow as tf# download dataset provided by Anki: https://www.manythings.org/anki/
text_file = tf.keras.utils.get_file(fname="fra-eng.zip",origin="http://storage.googleapis.com/download.tensorflow.org/data/fra-eng.zip",extract=True,
)
text_file = pathlib.Path(text_file).parent / "fra.txt"def normalize(line):"""Normalize a line of text and split into two at the tab character"""line = unicodedata.normalize("NFKC", line.strip().lower())line = re.sub(r"^([^ \w])(?!\s)", r"\1 ", line)line = re.sub(r"(\s[^ \w])(?!\s)", r"\1 ", line)line = re.sub(r"(?!\s)([^ \w])$", r" \1", line)line = re.sub(r"(?!\s)([^ \w]\s)", r" \1", line)eng, fra = line.split("\t")fra = "[start] " + fra + " [end]"return eng, fra# normalize each line and separate into English and French
with open(text_file) as fp:text_pairs = [normalize(line) for line in fp]# print some samples
for _ in range(5):print(random.choice(text_pairs))with open("text_pairs.pickle", "wb") as fp:pickle.dump(text_pairs, fp)
结果
('where did you put your key ?', '[start] où est-ce tu as mis ta clé  ?  [end]')
('you missed a spot .', '[start] tu as loupé une tache . [end]')
("i think we're being followed .", '[start] je pense que nous sommes suivis . [end]')
('i bought a cactus .', "[start] j'ai acheté un cactus . [end]")
('i have more than enough .', "[start] j'en ai plus que marre . [end]")
我们将规范化的句子对保存在一个 pickle 文件中,以便我们可以在后续步骤中重用它.
当您将其用于模型时,您希望了解有关此数据集的一些统计数据。特别是,您希望查看每种语言中有多少个不同的标记(单词)以及句子有多长。您可以按如下方式计算这些:
import picklewith open("text_pairs.pickle", "rb") as fp:text_pairs = pickle.load(fp)# count tokens
eng_tokens, fra_tokens = set(), set()
eng_maxlen, fra_maxlen = 0, 0
for eng, fra in text_pairs:eng_tok, fra_tok = eng.split(), fra.split()eng_maxlen = max(eng_maxlen, len(eng_tok))fra_maxlen = max(fra_maxlen, len(fra_tok))eng_tokens.update(eng_tok)fra_tokens.update(fra_tok)
print(f"Total English tokens: {len(eng_tokens)}")
print(f"Total French tokens: {len(fra_tokens)}")
print(f"Max English length: {eng_maxlen}")
print(f"Max French length: {fra_maxlen}")
print(f"{len(text_pairs)} total pairs")
矢量化和创建数据集
您清理了句子,但它们仍然是文本。神经网络只能处理数字。将文本转换为数字的一种方法是通过矢量化。这意味着将文本中的标记转换为整数。因此,带有 n个 标记(单词)的句子将成为n个整数向 量。
您可以构建自己的矢量化器。只需构建每个唯一令牌到唯一整数的映射表即可。使用它时,您可以在表中逐个查找标记,并以向量的形式返回整数。
在 Keras 中,您有 TextVectorization 层可以节省我们构建矢量化器的工作量。它支持填充,即保留整数 0 表示“空”。当您给出一个 m<n 标记句子但希望矢量化器始终返回固定长度 n 的向量时,这很有用。
首先,您需要将句子对拆分为训练集、验证集和测试集,因为它们需要用于模型训练。然后,创建一个 TextVectorization 层并使其仅适应训练集(因为在模型训练完成之前,您不应查看验证或测试数据集)。
import pickle
import randomfrom tensorflow.keras.layers import TextVectorization# Load normalized sentence pairs
with open("text_pairs.pickle", "rb") as fp:text_pairs = pickle.load(fp)# train-test-val split of randomized sentence pairs
random.shuffle(text_pairs)
n_val = int(0.15*len(text_pairs))
n_train = len(text_pairs) - 2*n_val
train_pairs = text_pairs[:n_train]
val_pairs = text_pairs[n_train:n_train+n_val]
test_pairs = text_pairs[n_train+n_val:]# Parameter determined after analyzing the input data
vocab_size_en = 10000
vocab_size_fr = 20000
seq_length = 20# Create vectorizer
eng_vectorizer = TextVectorization(max_tokens=vocab_size_en,standardize=None,split="whitespace",output_mode="int",output_sequence_length=seq_length,
)
fra_vectorizer = TextVectorization(max_tokens=vocab_size_fr,standardize=None,split="whitespace",output_mode="int",output_sequence_length=seq_length + 1
)# train the vectorization layer using training dataset
train_eng_texts = [pair[0] for pair in train_pairs]
train_fra_texts = [pair[1] for pair in train_pairs]
eng_vectorizer.adapt(train_eng_texts)
fra_vectorizer.adapt(train_fra_texts)# save for subsequent steps
with open("vectorize.pickle", "wb") as fp:data = {"train": train_pairs,"val":   val_pairs,"test":  test_pairs,"engvec_config":  eng_vectorizer.get_config(),"engvec_weights": eng_vectorizer.get_weights(),"fravec_config":  fra_vectorizer.get_config(),"fravec_weights": fra_vectorizer.get_weights(),}pickle.dump(data, fp)
请注意, TextVectorization 可以省略对象的参数 max_tokens ,让矢量化器找出它。但是,如果将它们设置为小于总词汇量的值(例如这种情况),则会限制矢量化器仅学习更频繁的单词,并使生僻单词成为词汇表外 (OOV)。这对于跳过价值不大或拼写错误的单词可能很有用。还可以固定矢量化器的输出长度。在上面,我们假设一个句子的标记不应超过 20 个。
下一步是使用矢量化器并创建一个 TensorFlow Dataset 对象。这将有助于您后续步骤来训练我们的模型。
import pickleimport tensorflow as tf
from tensorflow.keras.layers import TextVectorization# load text data and vectorizer weights
with open("vectorize.pickle", "rb") as fp:data = pickle.load(fp)train_pairs = data["train"]
val_pairs = data["val"]
test_pairs = data["test"]   # not usedeng_vectorizer = TextVectorization.from_config(data["engvec_config"])
eng_vectorizer.set_weights(data["engvec_weights"])
fra_vectorizer = TextVectorization.from_config(data["fravec_config"])
fra_vectorizer.set_weights(data["fravec_weights"])# set up Dataset object
def format_dataset(eng, fra):"""Take an English and a French sentence pair, convert into input and target.The input is a dict with keys `encoder_inputs` and `decoder_inputs`, eachis a vector, corresponding to English and French sentences respectively.The target is also vector of the French sentence, advanced by 1 token. Allvector are in the same length.The output will be used for training the transformer model. In the model wewill create, the input tensors are named `encoder_inputs` and `decoder_inputs`which should be matched to the keys in the dictionary for the source part"""eng = eng_vectorizer(eng)fra = fra_vectorizer(fra)source = {"encoder_inputs": eng,"decoder_inputs": fra[:, :-1]}target = fra[:, 1:]return (source, target)def make_dataset(pairs, batch_size=64):"""Create TensorFlow Dataset for the sentence pairs"""# aggregate sentences using zip(*pairs)eng_texts, fra_texts = zip(*pairs)# convert them into list, and then create tensorsdataset = tf.data.Dataset.from_tensor_slices((list(eng_texts), list(fra_texts)))return dataset.shuffle(2048) \.batch(batch_size).map(format_dataset) \.prefetch(16).cache()train_ds = make_dataset(train_pairs)
val_ds = make_dataset(val_pairs)# test the dataset
for inputs, targets in train_ds.take(1):print(f'inputs["encoder_inputs"].shape: {inputs["encoder_inputs"].shape}')print(f'inputs["encoder_inputs"][0]: {inputs["encoder_inputs"][0]}')print(f'inputs["decoder_inputs"].shape: {inputs["decoder_inputs"].shape}')print(f'inputs["decoder_inputs"][0]: {inputs["decoder_inputs"][0]}')print(f"targets.shape: {targets.shape}")print(f"targets[0]: {targets[0]}")
结果
inputs["encoder_inputs"].shape: (64, 20)
inputs["encoder_inputs"][0]: [142   8 263 979   2   0   0   0   0   0   0   0   00   0   0   0   0   0   0]
inputs["decoder_inputs"].shape: (64, 20)
inputs["decoder_inputs"][0]: [   2   15 2496  190    4    3    0    0    0    00    0    0    0    0    0    0    0    0    0]
targets.shape: (64, 20)
targets[0]: [  15 2496  190    4    3    0    0    0    0    0    0    0    0    00    0    0    0    0    0]
位置编码矩阵
当一个句子被矢量化时,你会得到一个整数向量,其中每个整数代表一个单词。这里的整数只是一个标签。我们不能假设两个彼此更接近的整数意味着它们所代表的单词是相关的。
为了理解单词的含义,从而量化两个单词之间的相互关系,您将使用单词嵌入技术。但是要理解上下文,您还需要知道每个单词在句子中的位置。这是通过位置编码完成的。
在论文 Attention Is All You Need 中,位置编码用向量表示每个标记位置。矢量的元素是正弦波的不同相位和频率的值。准确地说,在位置上,位置 k=0,1,⋯,L−1 编码向量(长度 d )为
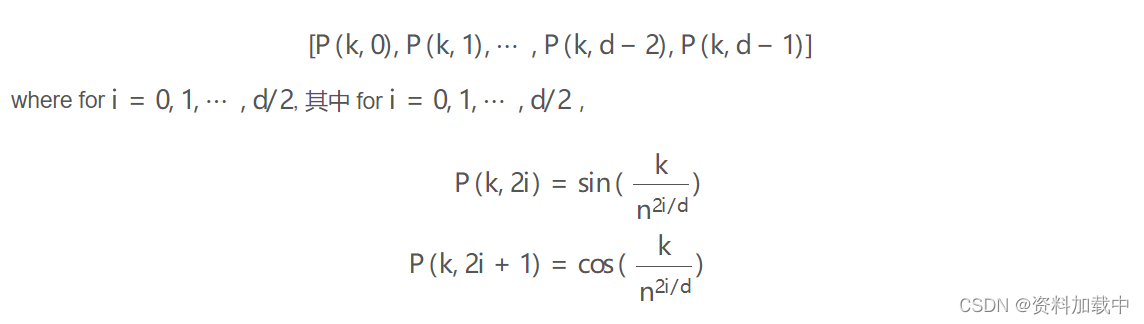
在论文中,他们使用了 n=10000 .
import pickleimport matplotlib.pyplot as plt
import numpy as npdef pos_enc_matrix(L, d, n=10000):"""Create positional encoding matrixArgs:L: Input dimension (length)d: Output dimension (depth), even onlyn: Constant for the sinusoidal functionsReturns:numpy matrix of floats of dimension L-by-d. At element (k,2i) the valueis sin(k/n^(2i/d)) while at element (k,2i+1) the value is cos(k/n^(2i/d))"""assert d % 2 == 0, "Output dimension needs to be an even integer"d2 = d//2P = np.zeros((L, d))k = np.arange(L).reshape(-1, 1)     # L-column vectori = np.arange(d2).reshape(1, -1)    # d-row vectordenom = np.power(n, -i/d2)          # n**(-2*i/d)args = k * denom                    # (L,d) matrixP[:, ::2] = np.sin(args)P[:, 1::2] = np.cos(args)return P# Plot the positional encoding matrix
pos_matrix = pos_enc_matrix(L=2048, d=512)
assert pos_matrix.shape == (2048, 512)
plt.pcolormesh(pos_matrix, cmap='RdBu')
plt.xlabel('Depth')
plt.ylabel('Position')
plt.colorbar()
plt.show()with open("posenc-2048-512.pickle", "wb") as fp:pickle.dump(pos_matrix, fp)
您可以看到,我们创建了一个函数来生成位置编码。我们用 L=2048 及更高版本 d=512 对其进行了测试。输出将是一个 2048×512 矩阵。我们还在热图中绘制编码。这应如下所示。

位置编码层

位置编码层位于转换器模型的入口点。
import numpy as np
import tensorflow as tfdef pos_enc_matrix(L, d, n=10000):"""Create positional encoding matrixArgs:L: Input dimension (length)d: Output dimension (depth), even onlyn: Constant for the sinusoidal functionsReturns:numpy matrix of floats of dimension L-by-d. At element (k,2i) the valueis sin(k/n^(2i/d)) while at element (k,2i+1) the value is cos(k/n^(2i/d))"""assert d % 2 == 0, "Output dimension needs to be an even integer"d2 = d//2P = np.zeros((L, d))k = np.arange(L).reshape(-1, 1)     # L-column vectori = np.arange(d2).reshape(1, -1)    # d-row vectordenom = np.power(n, -i/d2)          # n**(-2*i/d)args = k * denom                    # (L,d) matrixP[:, ::2] = np.sin(args)P[:, 1::2] = np.cos(args)return Pclass PositionalEmbedding(tf.keras.layers.Layer):"""Positional embedding layer. Assume tokenized input, transform intoembedding and returns positional-encoded output."""def __init__(self, sequence_length, vocab_size, embed_dim, **kwargs):"""Args:sequence_length: Input sequence lengthvocab_size: Input vocab size, for setting up embedding matrixembed_dim: Embedding vector size, for setting up embedding matrix"""super().__init__(**kwargs)self.sequence_length = sequence_lengthself.vocab_size = vocab_sizeself.embed_dim = embed_dim     # d_model in paper# token embedding layer: Convert integer token to D-dim float vectorself.token_embeddings = tf.keras.layers.Embedding(input_dim=vocab_size, output_dim=embed_dim, mask_zero=True)# positional embedding layer: a matrix of hard-coded sine valuesmatrix = pos_enc_matrix(sequence_length, embed_dim)self.position_embeddings = tf.constant(matrix, dtype="float32")def call(self, inputs):"""Input tokens convert into embedding vectors then superimposedwith position vectors"""embedded_tokens = self.token_embeddings(inputs)return embedded_tokens + self.position_embeddings# this layer is using an Embedding layer, which can take a mask# see https://www.tensorflow.org/guide/keras/masking_and_padding#passing_mask_tensors_directly_to_layersdef compute_mask(self, *args, **kwargs):return self.token_embeddings.compute_mask(*args, **kwargs)def get_config(self):# to make save and load a model using custom layer possibleconfig = super().get_config()config.update({"sequence_length": self.sequence_length,"vocab_size": self.vocab_size,"embed_dim": self.embed_dim,})return config
该层实际上是将嵌入层与位置编码相结合。嵌入层创建词嵌入,即将向量化句子中的整数标记标签转换为可以承载单词含义的向量。通过嵌入,您可以判断这两个不同单词的含义有多接近。
嵌入输出取决于标记化的输入句子。但是位置编码是一个常数矩阵,因为它只取决于位置。因此,在创建此层时,您可以为其创建一个常量张量。当您在 call() 函数中将嵌入输出添加到位置编码矩阵时,TensorFlow 足够智能,可以匹配维度。
在上层中定义了两个附加函数。该 compute_mask() 函数被传递到嵌入层。这需要它来判断输出的哪些位置被填充。这将由 Keras 在内部使用。该函数被定义为记住该 get_config() 层的所有配置参数。这是 Keras 中的标准做法,以便记住传递给构造函数的所有参数,并在 中 get_config() 返回它们,以便可以保存和加载模型。
Transformer 构建模块
您将看到除了嵌入和位置编码之外,您还有编码器(图的左半部分)和解码器(图的右半部分)。它们有一些相似之处。最值得注意的是,它们在开始时有一个多头注意力块,在结束时有一个前馈块。
如果将每个构建块创建为单独的子模型,然后将它们组合成一个更大的模型,则会更容易。
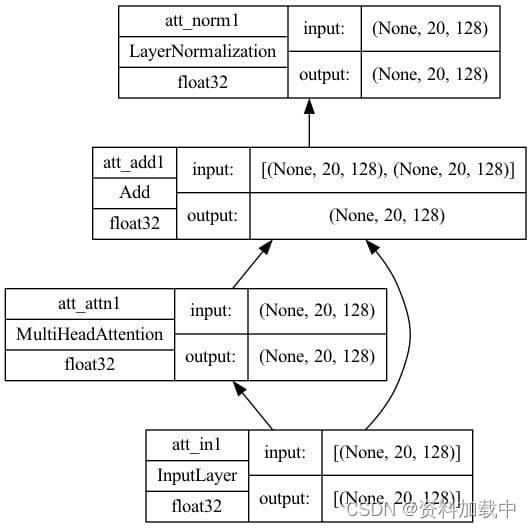
首先,创建自我注意力模型。它位于关系图中编码器和解码器底部的部分。多头注意力层将接受三个输入,即键、值和查询。如果所有三个输入都相同,我们将这种多头注意力层称为自注意力。该子模型将具有一个带有跳过连接的加法和范数层,以规范化注意力层的输出。其实现如下:
import tensorflow as tfdef self_attention(input_shape, prefix="att", mask=False, **kwargs):"""Self-attention layers at transformer encoder and decoder. Assumes itsinput is the output from positional encoding layer.Args:prefix (str): The prefix added to the layer namesmasked (bool): whether to use causal mask. Should be False on encoder andTrue on decoder. When True, a mask will be applied such thateach location only has access to the locations before it."""# create layersinputs = tf.keras.layers.Input(shape=input_shape, dtype='float32',name=f"{prefix}_in1")attention = tf.keras.layers.MultiHeadAttention(name=f"{prefix}_attn1", **kwargs)norm = tf.keras.layers.LayerNormalization(name=f"{prefix}_norm1")add = tf.keras.layers.Add(name=f"{prefix}_add1")# functional API to connect input to outputattout = attention(query=inputs, value=inputs, key=inputs,use_causal_mask=mask)outputs = norm(add([inputs, attout]))# create model and returnmodel = tf.keras.Model(inputs=inputs, outputs=outputs, name=f"{prefix}_att")return modelseq_length = 20
key_dim = 128
num_heads = 8model = self_attention(input_shape=(seq_length, key_dim),num_heads=num_heads, key_dim=key_dim)
tf.keras.utils.plot_model(model, "self-attention.png",show_shapes=True, show_dtype=True, show_layer_names=True,rankdir='BT', show_layer_activations=True)
上面定义的函数对于编码器和解码器都是通用的。解码器将设置将因果掩码应用于输入的选项 mask=True 。
设置一些参数并创建模型。绘制的模型如下所示。
在解码器中,你有一个交叉注意力模型,该模型从自注意力模型和编码器中获取输入。在本例中,值和键是编码器的输出,而查询是自注意力模型的输出。在高层次上,它基于编码器对源句子上下文的理解,并将解码器输入的部分句子作为查询(可以为空),以预测如何完成句子。这是与自我关注模型的唯一区别;因此,代码非常相似:
import tensorflow as tfdef cross_attention(input_shape, context_shape, prefix="att", **kwargs):"""Cross-attention layers at transformer decoder. Assumes itsinput is the output from positional encoding layer at decoderand context is the final output from encoder.Args:prefix (str): The prefix added to the layer names"""# create layerscontext = tf.keras.layers.Input(shape=context_shape, dtype='float32',name=f"{prefix}_ctx2")inputs = tf.keras.layers.Input(shape=input_shape, dtype='float32',name=f"{prefix}_in2")attention = tf.keras.layers.MultiHeadAttention(name=f"{prefix}_attn2", **kwargs)norm = tf.keras.layers.LayerNormalization(name=f"{prefix}_norm2")add = tf.keras.layers.Add(name=f"{prefix}_add2")# functional API to connect input to outputattout = attention(query=inputs, value=context, key=context)outputs = norm(add([attout, inputs]))# create model and returnmodel = tf.keras.Model(inputs=[(context, inputs)], outputs=outputs,name=f"{prefix}_cross")return modelseq_length = 20
key_dim = 128
num_heads = 8model = cross_attention(input_shape=(seq_length, key_dim),context_shape=(seq_length, key_dim),num_heads=num_heads, key_dim=key_dim)
tf.keras.utils.plot_model(model, "cross-attention.png",show_shapes=True, show_dtype=True, show_layer_names=True,rankdir='BT', show_layer_activations=True)
绘制的模型如下所示。请注意,此模型中有两个输入,一个用于上下文,另一个用于自我注意的输入。

最后,编码器和解码器的输出端都有前馈模型。它在 Keras 中作为 Dense 层实现:
import tensorflow as tfdef feed_forward(input_shape, model_dim, ff_dim, dropout=0.1, prefix="ff"):"""Feed-forward layers at transformer encoder and decoder. Assumes itsinput is the output from an attention layer with add & norm, the outputis the output of one encoder or decoder blockArgs:model_dim (int): Output dimension of the feed-forward layer, whichis also the output dimension of the encoder/decoderblockff_dim (int): Internal dimension of the feed-forward layerdropout (float): Dropout rateprefix (str): The prefix added to the layer names"""# create layersinputs = tf.keras.layers.Input(shape=input_shape, dtype='float32',name=f"{prefix}_in3")dense1 = tf.keras.layers.Dense(ff_dim, name=f"{prefix}_ff1", activation="relu")dense2 = tf.keras.layers.Dense(model_dim, name=f"{prefix}_ff2")drop = tf.keras.layers.Dropout(dropout, name=f"{prefix}_drop")add = tf.keras.layers.Add(name=f"{prefix}_add3")# functional API to connect input to outputffout = drop(dense2(dense1(inputs)))norm = tf.keras.layers.LayerNormalization(name=f"{prefix}_norm3")outputs = norm(add([inputs, ffout]))# create model and returnmodel = tf.keras.Model(inputs=inputs, outputs=outputs, name=f"{prefix}_ff")return modelseq_length = 20
key_dim = 128
ff_dim = 512model = feed_forward(input_shape=(seq_length, key_dim),model_dim=key_dim, ff_dim=ff_dim)
tf.keras.utils.plot_model(model, "feedforward.png",show_shapes=True, show_dtype=True, show_layer_names=True,rankdir='BT', show_layer_activations=True)
绘制的模型如下所示。请注意,第一 Dense 层使用 ReLU 激活,第二层没有激活。然后附加一个 dropout 层进行正则化。

Transformer编码器和解码器
编码器是连接到前馈子模型的自注意力子模型。另一方面,解码器是串联的自注意力子模型、交叉注意力子模型和前馈子模型。
因此,一旦将这些子模型作为构建块,制作编码器和解码器就不难了。首先,你有编码器。它非常简单,可以使用 Keras 顺序 API 构建编码器模型。
import tensorflow as tf# the building block functions from Lesson 06
from lesson_06 import self_attention, feed_forwarddef encoder(input_shape, key_dim, ff_dim, dropout=0.1, prefix="enc", **kwargs):"""One encoder unit. The input and output are in the same shape so we candaisy chain multiple encoder units into one larger encoder"""model = tf.keras.models.Sequential([tf.keras.layers.Input(shape=input_shape, dtype='float32', name=f"{prefix}_in0"),self_attention(input_shape, prefix=prefix, key_dim=key_dim, mask=False, **kwargs),feed_forward(input_shape, key_dim, ff_dim, dropout, prefix),], name=prefix)return modelseq_length = 20
key_dim = 128
ff_dim = 512
num_heads = 8model = encoder(input_shape=(seq_length, key_dim), key_dim=key_dim, ff_dim=ff_dim,num_heads=num_heads)
tf.keras.utils.plot_model(model, "encoder.png",show_shapes=True, show_dtype=True, show_layer_names=True,rankdir='BT', show_layer_activations=True)
解码器有点复杂,因为交叉注意力模块也从编码器获取输入;因此,它是一个接受两个输入的模型。它的实现方式如下:
import tensorflow as tf# the three building block functions from Lesson 06
from lesson_06 import self_attention, cross_attention, feed_forwarddef decoder(input_shape, key_dim, ff_dim, dropout=0.1, prefix="dec", **kwargs):"""One decoder unit. The input and output are in the same shape so we candaisy chain multiple decoder units into one larger decoder. The contextvector is also assumed to be the same shape for convenience"""inputs = tf.keras.layers.Input(shape=input_shape, dtype='float32',name=f"{prefix}_in0")context = tf.keras.layers.Input(shape=input_shape, dtype='float32',name=f"{prefix}_ctx0")attmodel = self_attention(input_shape, key_dim=key_dim, mask=True,prefix=prefix, **kwargs)crossmodel = cross_attention(input_shape, input_shape, key_dim=key_dim,prefix=prefix, **kwargs)ffmodel = feed_forward(input_shape, key_dim, ff_dim, dropout, prefix)x = attmodel(inputs)x = crossmodel([(context, x)])output = ffmodel(x)model = tf.keras.Model(inputs=[(inputs, context)], outputs=output, name=prefix)return modelseq_length = 20
key_dim = 128
ff_dim = 512
num_heads = 8model = decoder(input_shape=(seq_length, key_dim), key_dim=key_dim, ff_dim=ff_dim,num_heads=num_heads)
tf.keras.utils.plot_model(model, "decoder.png",show_shapes=True, show_dtype=True, show_layer_names=True,rankdir='BT', show_layer_activations=True)
构建Transformer
变压器有编码器和解码器部件,每个部件不是一个,而是一系列编码器或解码器。这听起来很复杂,但如果你有构建块子模型来隐藏细节,那就不是了。
您会看到编码器和解码器部件只是编码器和解码器模块的链。只有最终编码器模块的输出用作解码器模块的输入。
完整的 transformer 模型可以构建如下:
import tensorflow as tf# the positional embedding layer from Lesson 05
from lesson_05 import PositionalEmbedding
# the building block functions from Lesson 07
from lesson_07 import encoder, decoderdef transformer(num_layers, num_heads, seq_len, key_dim, ff_dim, vocab_size_src,vocab_size_tgt, dropout=0.1, name="transformer"):embed_shape = (seq_len, key_dim)  # output shape of the positional embedding layer# set up layersinput_enc = tf.keras.layers.Input(shape=(seq_len,), dtype="int32",name="encoder_inputs")input_dec = tf.keras.layers.Input(shape=(seq_len,), dtype="int32",name="decoder_inputs")embed_enc = PositionalEmbedding(seq_len, vocab_size_src, key_dim, name="embed_enc")embed_dec = PositionalEmbedding(seq_len, vocab_size_tgt, key_dim, name="embed_dec")encoders = [encoder(input_shape=embed_shape, key_dim=key_dim,ff_dim=ff_dim, dropout=dropout, prefix=f"enc{i}",num_heads=num_heads)for i in range(num_layers)]decoders = [decoder(input_shape=embed_shape, key_dim=key_dim,ff_dim=ff_dim, dropout=dropout, prefix=f"dec{i}",num_heads=num_heads)for i in range(num_layers)]final = tf.keras.layers.Dense(vocab_size_tgt, name="linear")# build outputx1 = embed_enc(input_enc)x2 = embed_dec(input_dec)for layer in encoders:x1 = layer(x1)for layer in decoders:x2 = layer([x2, x1])output = final(x2)# XXX keep this try-except blocktry:del output._keras_maskexcept AttributeError:passmodel = tf.keras.Model(inputs=[input_enc, input_dec], outputs=output, name=name)return modelseq_len = 20
num_layers = 4
num_heads = 8
key_dim = 128
ff_dim = 512
dropout = 0.1
vocab_size_en = 10000
vocab_size_fr = 20000
model = transformer(num_layers, num_heads, seq_len, key_dim, ff_dim,vocab_size_en, vocab_size_fr, dropout)
tf.keras.utils.plot_model(model, "transformer.png",show_shapes=True, show_dtype=True, show_layer_names=True,rankdir='BT', show_layer_activations=True)
准备用于训练的 Transformer 模型
学习率策略
import matplotlib.pyplot as plt
import tensorflow as tfclass CustomSchedule(tf.keras.optimizers.schedules.LearningRateSchedule):"Custom learning rate for Adam optimizer"def __init__(self, key_dim, warmup_steps=4000):super().__init__()self.key_dim = key_dimself.warmup_steps = warmup_stepsself.d = tf.cast(self.key_dim, tf.float32)def __call__(self, step):step = tf.cast(step, dtype=tf.float32)arg1 = tf.math.rsqrt(step)arg2 = step * (self.warmup_steps ** -1.5)return tf.math.rsqrt(self.d) * tf.math.minimum(arg1, arg2)def get_config(self):# to make save and load a model using custom layer possible0config = {"key_dim": self.key_dim,"warmup_steps": self.warmup_steps,}return configkey_dim = 128
lr = CustomSchedule(key_dim)
optimizer = tf.keras.optimizers.Adam(lr, beta_1=0.9, beta_2=0.98, epsilon=1e-9)plt.plot(lr(tf.range(50000, dtype=tf.float32)))
plt.ylabel('Learning Rate')
plt.xlabel('Train Step')
plt.show()
优化器
def masked_loss(label, pred):mask = label != 0loss_object = tf.keras.losses.SparseCategoricalCrossentropy(from_logits=True, reduction='none')loss = loss_object(label, pred)mask = tf.cast(mask, dtype=loss.dtype)loss *= maskloss = tf.reduce_sum(loss)/tf.reduce_sum(mask)return lossdef masked_accuracy(label, pred):pred = tf.argmax(pred, axis=2)label = tf.cast(label, pred.dtype)match = label == predmask = label != 0match = match & maskmatch = tf.cast(match, dtype=tf.float32)mask = tf.cast(mask, dtype=tf.float32)return tf.reduce_sum(match)/tf.reduce_sum(mask)训练Transformer
import matplotlib.pyplot as plt
import tensorflow as tf# the dataset objects from Lesson 03
from lesson_03 import train_ds, val_ds
# the building block functions from Lesson 08
from lesson_08 import transformer
# the learning rate schedule, loss, and accuracy functions from Lesson 09
from lesson_09 import CustomSchedule, masked_loss, masked_accuracy# Create and train the model
seq_len = 20
num_layers = 4
num_heads = 8
key_dim = 128
ff_dim = 512
dropout = 0.1
vocab_size_en = 10000
vocab_size_fr = 20000
model = transformer(num_layers, num_heads, seq_len, key_dim, ff_dim,vocab_size_en, vocab_size_fr, dropout)
lr = CustomSchedule(key_dim)
optimizer = tf.keras.optimizers.Adam(lr, beta_1=0.9, beta_2=0.98, epsilon=1e-9)
model.compile(loss=masked_loss, optimizer=optimizer, metrics=[masked_accuracy])
epochs = 20
history = model.fit(train_ds, epochs=epochs, validation_data=val_ds)# Save the trained model
model.save("eng-fra-transformer.h5")# Plot the loss and accuracy history
fig, axs = plt.subplots(2, figsize=(6, 8), sharex=True)
fig.suptitle('Traininig history')
x = list(range(1, epochs+1))
axs[0].plot(x, history.history["loss"], alpha=0.5, label="loss")
axs[0].plot(x, history.history["val_loss"], alpha=0.5, label="val_loss")
axs[0].set_ylabel("Loss")
axs[0].legend(loc="upper right")
axs[1].plot(x, history.history["masked_accuracy"], alpha=0.5, label="acc")
axs[1].plot(x, history.history["val_masked_accuracy"], alpha=0.5, label="val_acc")
axs[1].set_ylabel("Accuracy")
axs[1].set_xlabel("epoch")
axs[1].legend(loc="lower right")
plt.show()
从 Transformer 模型进行推理
import pickle
import randomimport numpy as np
import tensorflow as tf# the dataset objects from Lesson 03
from lesson_03 import test_pairs, eng_vectorizer, fra_vectorizer
# the positional embedding layer from Lesson 05
from lesson_05 import PositionalEmbedding
# the learning rate schedule, loss, and accuracy functions from Lesson 09
from lesson_09 import CustomSchedule, masked_loss, masked_accuracy# Load the trained model
custom_objects = {"PositionalEmbedding": PositionalEmbedding,"CustomSchedule": CustomSchedule,"masked_loss": masked_loss,"masked_accuracy": masked_accuracy}
with tf.keras.utils.custom_object_scope(custom_objects):model = tf.keras.models.load_model("eng-fra-transformer.h5")# training parameters used
seq_len = 20
vocab_size_en = 10000
vocab_size_fr = 20000def translate(sentence):"""Create the translated sentence"""enc_tokens = eng_vectorizer([sentence])lookup = list(fra_vectorizer.get_vocabulary())start_sentinel, end_sentinel = "[start]", "[end]"output_sentence = [start_sentinel]# generate the translated sentence word by wordfor i in range(seq_len):vector = fra_vectorizer([" ".join(output_sentence)])assert vector.shape == (1, seq_len+1)dec_tokens = vector[:, :-1]assert dec_tokens.shape == (1, seq_len)pred = model([enc_tokens, dec_tokens])assert pred.shape == (1, seq_len, vocab_size_fr)word = lookup[np.argmax(pred[0, i, :])]output_sentence.append(word)if word == end_sentinel:breakreturn output_sentencetest_count = 20
for n in range(test_count):english_sentence, french_sentence = random.choice(test_pairs)translated = translate(english_sentence)print(f"Test {n}:")print(f"{english_sentence}")print(f"== {french_sentence}")print(f"-> {' '.join(translated)}")print()
参考链接
https://machinelearningmastery.com/building-transformer-models-with-attention-crash-course-build-a-neural-machine-translator-in-12-days/