响应式编程历史悠久,早在2005年,Microsoft Cloud Programmability Team 开始探索一种简单的编程模型,以构建大规模的异步和数据密集型互联网服务架构,响应式编程的理念逐步诞生。这本是为了解决服务端系统而提出的理念,最后也逐步也应用到客户端等其他领域,而在Java服务端领域,最著名的两大响应式库就是 RxJava (GitHub - ReactiveX/RxJava: RxJava – Reactive Extensions for the JVM – a library for composing asynchronous and event-based programs using observable sequences for the Java VM.) 和 Project Reactor (GitHub - reactor/reactor-core: Non-Blocking Reactive Foundation for the JVM)。本文的重点不是探究响应式编程的内部实现,而是剖析 Lettuce 如何实现响应式范式。
我们知道,作为三个最流行Redis Java客户端 Jedis、Lettuce 和 Redisson,只有 Jedis 没有实现了响应式接口(Reactive)。我们今天的主角是:Lettuce (GitHub - lettuce-io/lettuce-core: Advanced Java Redis client for thread-safe sync, async, and reactive usage. Supports Cluster, Sentinel, Pipelining, and codecs.)。我们先来看看Lettuce的常规使用方式(或者说命令式编程的使用方式),为了简单起见,我们直接使用Redis单实例来演示(生产上当然都是Redis Cluster或者Redis Sentinel部署模式):
RedisClient client = RedisClient.create("redis://localhost");
StatefulRedisConnection<String, String> connection = client.connect();
RedisStringCommands command = connection.sync();
System.out.println(command.get("key")); // 输出key的值
很显然第4行的 “command.get("key")” 是阻塞的,意味着当前线程必须等着拿到结果才能进行下一步,期间什么事情都做不了。虽然通常来说Redis操作都足够快,但我们需要考虑特殊情况,比如大Key或者网络不佳等场景,一旦慢查出现,当前系统的业务处理线程都将阻塞在这一步,整个系统无法响应新的请求,Reactive响应式编程就可以改善这一局面,更具体的说,响应式编程是为了解决非CPU密集型(例如数据或IO密集型)系统资源消耗问题,它带来的一个好处在于系统能根据业务实际情况来调整资源消耗,并且让系统应对故障时能更具弹性,而它的核心就是“异步事件驱动” + “背压”。背压一改往常订阅者只能被迫“投喂”的尴尬局面,让订阅者也能控制发布者发布元素的顺序。
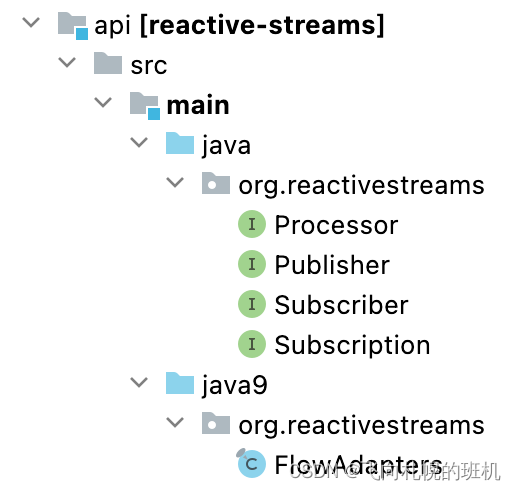
像其他事物一样,响应式编程以及库类从历经坎坷到蓬勃发展好几年之后,Reactive Streams组织(包括Pivotal、Netflix、Typesafe和Lightbend于2013年成立,旨在为异步流处理提供一个通用的API规范)在2014年发布了第一个API规范(Java的可以看GitHub - reactive-streams/reactive-streams-jvm: Reactive Streams Specification for the JVM),当你把这个reactive-streams-jvm clone 下来后关注下api模块,因为里面就4接口加1个类:
之前对响应式模式有过了解的同学肯定觉得它和 观察者模式 很像,但看了上面的接口,会觉得它更像 发布订阅模式,让我们从ChatGPT的描述中再来回顾下这两种模式吧:
观察者模式(Observer Pattern)是一种常见的设计模式,其核心思想是:当一个对象的状态发生改变时,其他依赖于它的对象都会收到通知并自动更新。在观察者模式中,存在一个被观察的对象(Subject),它维护一个列表,用来保存所有观察它的对象(Observer)。当Subject的状态发生改变时,它会自动通知所有的Observer对象,让它们可以及时更新自己的状态。
发布订阅模式(Publish-Subscribe Pattern)也是一种消息传递模式,其核心思想是:在多个对象之间,有一个消息中心(Message Broker)来协调对象之间的通信。在发布订阅模式中,发布者(Publisher)不直接发送消息给订阅者(Subscriber),而是通过消息中心来传递消息。订阅者可以向消息中心注册自己感兴趣的消息类型,并在消息中心有消息发布时,自动收到通知。
目前,我们可以把响应式模式看做本地化的发布订阅模式,但目前主流的响应式库类实现的功能远多于传统的发布订阅框架,例如,其中 “背压” 就是核心中的核心。在响应流API规范中,我们看到了四个接口,即 发布者(Publisher)、订阅者(Subscriber)、订阅关系(Subscription)和 处理者(Processor),处理者就是就是发布者和订阅者的结合体。我们来认真看下这四个接口,便于我们进一步了解响应式的秘密:
public interface Publisher<T> {public void subscribe(Subscriber<? super T> s);
}public interface Subscriber<T> {public void onSubscribe(Subscription s);public void onNext(T t);public void onError(Throwable t);public void onComplete();
}public interface Subscription {public void request(long n);public void cancel();
}public interface Processor<T, R> extends Subscriber<T>, Publisher<R> {
}- 发布者接口Publisher 很简单,就一个订阅方法,传入一个订阅者即可,用于建立订阅关系。
- 订阅者接口Subscriber 稍微复杂点,有四个方法,第一个onSubscribe方法在订阅成功后会被调用,入参是一个订阅关系对象,意味着订阅者能通过订阅关系来主动和发布者通信,记住,这是“背压”机制的关键。第二个方法是onNext,即发布者通过该方法给订阅者“发射”一个元素或事件,而第三个onError方法,是指发布者发射元素有错误时,会通过该方法让订阅者感知。最后的onComplete方法在所有元素都发射完成后被调用。
- 订阅关系接口Subscription 中只有两个方法,即reqeust方法,用于订阅者像发布者请求一定数量的元素,另一个是cancel方法,用于取消订阅关系。而这个request就是“背压”的关键,毕竟订阅者的消费能力只有自己知道。
- 处理者接口Processor 就不多说了,所见即所得。
当然,我们肯定也记得2016年发布的Java9中添加了Flow类来支持响应式流,可以看出Java官方也坐不住了,所以上图 reactive-streams-jvm 中后面加了个java9的目录,其中的 FlowAdapters 类就是用于 响应流API和Java9的Flow类互转。
有人肯定会说,有了 Project Reactor (前面提到的主流的响应式库之一),想把 lettuce-core 从阻塞的命令式编程变成异步的响应式编程还不简单,通过对之前命令式编程代码进行如下改造即可:
RedisClient client = RedisClient.create("redis://localhost");
StatefulRedisConnection<String, String> connection = client.connect();
RedisStringCommands command = connection.sync();
// System.out.println(command.get("key")); // 输出key的值
myReactiveRedisGet(command, "key").subscribe(value -> System.out.println("查询Redis key的结果:" + value)); // 采用Reactive方式输出key的值private static Mono<String> myReactiveRedisGet(RedisStringCommands<String, String> command, String key) {return Mono.just(command.get(key));
}这里我们并没有直接使用阻塞的command.get("key")来获取结果,而是新建了一个myReactiveRedisGet方法,它的返回值是Mono<String>,Mono是project reactor库(后面简称reactor)中的核心类之一,用于发射0个或1个元素的响应式流类,是属于发布者角色,即它是一种Publisher(另一种发射1个或多个元素的是Flux,它也是一种Publisher)。Mono.just方法用于直接发射入参传进来的元素(即command.get(key)),仔细看这行代码,我们会发现Mong.just调用前传入的入参就已经是阻塞的方式获取的结果了,这当然不符合Reactive的预期,所以我们改成了如下代码:
RedisClient client = RedisClient.create("redis://localhost");
StatefulRedisConnection<String, String> connection = client.connect();
RedisStringCommands command = connection.sync();
// System.out.println(command.get("key")); // 输出key的值
myReactiveRedisGet(command, "key").subscribe(value -> System.out.println("查询Redis key的结果:" + value)); // 采用Reactive方式输出key的值private static Mono<String> myReactiveRedisGet(RedisStringCommands<String, String> command, String key) {return Mono.defer(() -> Mono.just(command.get(key)));
}可以看到,我们在Mono.just外用Mono.defer包了一层,defer的入参是一个返回Mono的Supplier,defer用来延迟创建Mono,这也意味着我们会延迟获取结果(command.get(key)),这是响应式编程的另一个重要特征,即有订阅时才生产和发送数据,没订阅的时候啥事也不做,避免消耗,这很环保,千万别小看这一点。那难道用Mono.defer后就相当于Redis操作就变成Reactive了吗?运行上述代码,你会发现所有操作其实都是由一个线程来执行,这意味着一个线程(在有订阅者订阅时)完成了所有事情,这肯定是阻塞的,因为command.get就是妥妥的阻塞方法!!该线程只有等它返回,否则它做不了其他任何事情。幸运的是reactor库给我们提供了异步处理 “发布者发射元素” 和 “订阅者订阅和请求元素个数” 操作的方法,即 publishOn 和 subscribeOn 方法,它们的入参都是一个 Scheduler 类型的对象,而 Scheduler 在 reactor 中是专为运算符提供抽象异步边界的(简单的说就是放到另一个线程去执行)。由于我们的订阅只是一个简单的结果打印,是元素发射过程中才去阻塞访问的Redis,所以我们希望在元素发射过程中异步,于是我们用publishOn方法,代码修改成如下:
RedisClient client = RedisClient.create("redis://localhost");
StatefulRedisConnection<String, String> connection = client.connect();
RedisStringCommands command = connection.sync();
// System.out.println(command.get("key")); // 输出key的值
myReactiveRedisGet(command, "key").subscribe(value -> System.out.println("查询Redis key的结果:" + value)); // 采用Reactive方式输出key的值private static Mono<String> myReactiveRedisGet(RedisStringCommands<String, String> command, Supplier<String> keySupplier) {return Mono.defer(() -> Mono.just(command.get(key))).publishOn(Schedulers.parallel()); // 元素发射的异步执行
}可以看到,我们在myReactiveRedisGet方法中在Mono.defer方法后加了publishOn方法,入参是Schedulers.parallel(),它返回的是个计划线程池(ScheduledThreadPoolExecutor),这样执行后,你会发现command.get确实在另一个线程中执行了,而不是在当前线程。这样就大功告成啦?难道我们就这样通过几行代码完美的实现了Lettuce库访问Redis的响应式化?如果真是这样,那么我们就可以直接给Jedis提交一个PR,宣告Jedis也支持响应式编程了!然而现实是残酷的,虽然我们针对Lettuce的命令式编程的代码通过响应式库reactor进行了多次调整,但仍然掩盖不了一个事实,就是我们调用的始终是阻塞方法command.get,虽然我们掩耳盗铃的将其放在另一个线程异步来执行了,但这个执行它的一部线程始终也需要阻塞的等待应答结果,我们只是没让当前业务线程来等待而已(突然想起之前网上有人说的一句话,复杂度它不会消失,只会转移),一旦请求多起来,Schedulers.parallel()中的线程也会被耗尽成为新的瓶颈点!!我们只考虑了异步,但忽略了最重要一点,那就是事件驱动,你得让一个非阻塞的第三方来通知你操作已经完成了,而不是换一个线程去阻塞等待!!这里,我们可以得出一个结论:仅仅只靠reactor之类的响应式库加持,我们无法真正把一个命令式阻塞操作变成Reactive。
让我们先冷静分析一下,回顾下Lettuce的命令式编程的API,发现有4个关键动作:
- 创建RedisClient对象。
- 创建StatefulRedisConnection连接对象。
- 从连接对象获取Command命令对象。
- 从Command命令对象进行真正的Redis操作。
第1、2两个步骤不会每个Redis操作都执行,一般是初始化好后管理起来(例如Spring容器)重复使用,所以要想Lettuce支持Reactive,只能需要在第3、4步进行扩展。铺垫了这么多,我们来看看 lettuce-core 中使用Reactive响应式编程的demo:
RedisClient client = RedisClient.create("redis://localhost");
StatefulRedisConnection<String, String> connection = client.connect();
RedisStringReactiveCommands<String, String> command = connection.reactive();
Mono<String> get = command.get("key");
get.subscribe(System.out::println); // 控制台输出value
可以看出,相比之前的命令式编程从connection获取的command就开始不同了,这是一个ReactiveCommands对象,然后用该对象来进行Redis操作,同时command.get也不是直接返回结果了,而是一个Mono,最后我们订阅这个发布者(get),将结果值输出到控制台。
我们接下来将解密这背后的原理,Lettuce的阻塞调用方式是从 StatefulRedisConnection 类型的连接中调用sync方法拿到一个Command对象,那么为了支持响应式编程,所以在接口StatefulRedisConnection中新增了reactive方法:
/*** Returns the {@link RedisCommands} API for the current connection. Does not create a new connection.** @return the synchronous API for the underlying connection.*/RedisCommands<K, V> sync(); /*** Returns the {@link RedisReactiveCommands} API for the current connection. Does not create a new connection.** @return the reactive API for the underlying connection.*/RedisReactiveCommands<K, V> reactive();我们可以看到,阻塞Command是 RedisCommands 类型,而Reactive的Commands是 RedisReactiveComands 类型,不看 RedisReactiveComands 类基本都能猜到它和 RedisCommands 之间最大的区别就是它的返回值是一个结果的发布者类型(例如Mono或者Flux)而不直接是结果类型,例如(由于Redis不同的数据结构操作不同,所以RedisCommands和RedisReactiveComands都会有对应每种数据结构更具体的接口类,例如针对字符串数据结构的 RedisStringCommands 和 RedisStringReactiveCommands):
public interface RedisStringCommands<K, V> {/*** Get the value of a key.** @param key the key.* @return V bulk-string-reply the value of {@code key}, or {@code null} when {@code key} does not exist.*/V get(K key);// 其他方法略
}public interface RedisStringReactiveCommands<K, V> {/*** Get the value of a key.** @param key the key.* @return V bulk-string-reply the value of {@code key}, or {@code null} when {@code key} does not exist.*/Mono<V> get(K key);// 其他方法略
}
由于字符串的get操作只返回一个对象,所以Reactive操作用的是Mono<V>而不是Flux<V>。对于Reactive操作而言,抽象类 AbstractRedisReactiveCommands 负责对直接对各个具体数据类型的Command来进行实现(需要注意的是它并不是直接实现RedisReactiveCommands接口),我们还是拿get操作举例,AbstractRedisReactiveCommands的实现如下:
public abstract class AbstractRedisReactiveCommands<K, V> implements RedisAclReactiveCommands<K, V>,RedisHashReactiveCommands<K, V>, RedisKeyReactiveCommands<K, V>, RedisStringReactiveCommands<K, V>,RedisListReactiveCommands<K, V>, RedisSetReactiveCommands<K, V>, RedisSortedSetReactiveCommands<K, V>,RedisScriptingReactiveCommands<K, V>, RedisServerReactiveCommands<K, V>, RedisHLLReactiveCommands<K, V>,BaseRedisReactiveCommands<K, V>, RedisTransactionalReactiveCommands<K, V>, RedisGeoReactiveCommands<K, V>,RedisClusterReactiveCommands<K, V> {@Overridepublic Mono<V> get(K key) {return createMono(() -> commandBuilder.get(key));}public <T> Mono<T> createMono(Supplier<RedisCommand<K, V, T>> commandSupplier) {if (tracingEnabled) {return withTraceContext().flatMap(it -> Mono.from(new RedisPublisher<>(decorate(commandSupplier, it), connection, false, getScheduler().next())));}return Mono.from(new RedisPublisher<>(commandSupplier, connection, false, getScheduler().next()));}// 其他方法略
}
我们可以看到,它直接调用了createMono方法,而且createMono方法的入参是一个 RedisCommand 的Supplier对象,意味着它支持延迟创建RedisCommand,遵循了我们之前说的响应式的特征之一:延迟创建(只有被真正订阅时才产生数据和开销)。需要注意的是,这里的 RedisCommand 和前面说的 RedisCommands、RedisReactiveCommands 是有区别的,RedisCommands、RedisReactiveCommands 用来封装各种数据类型的命令操作,而 RedisCommand 用于封装输出、参数和状态,用于命令执行结果的处理。我们接着看createMono的具体实现,抛开if语句的部分,它通过 RedisPublisher 来构建了一个Mono,采用的是Mono.from,该方法会将一个响应式规范API中的发布者(Publisher接口的实现类)转换成reactor库的Mono来返回,而且你可以发现,createMono方法几乎用所有资源都用来构建 RedisPublisher 对象,包括Command的Supplier、连接、异步执行的线程等。
既然 RedisPublisher 是一个标准的 Publisher,那么它肯定会实现 subscribe 方法,我们来一探究竟:
class RedisPublisher<K, V, T> implements Publisher<T> {private final Supplier<? extends RedisCommand<K, V, T>> commandSupplier;private final AtomicReference<RedisCommand<K, V, T>> ref;private final StatefulConnection<K, V> connection;private final boolean dissolve;private final Executor executor;public RedisPublisher(RedisCommand<K, V, T> staticCommand, StatefulConnection<K, V> connection, boolean dissolve,Executor publishOn) {this(() -> staticCommand, connection, dissolve, publishOn);}public RedisPublisher(Supplier<RedisCommand<K, V, T>> commandSupplier, StatefulConnection<K, V> connection,boolean dissolve, Executor publishOn) {LettuceAssert.notNull(commandSupplier, "CommandSupplier must not be null");LettuceAssert.notNull(connection, "StatefulConnection must not be null");LettuceAssert.notNull(publishOn, "Executor must not be null");this.commandSupplier = commandSupplier;this.connection = connection;this.dissolve = dissolve;this.executor = publishOn;this.ref = new AtomicReference<>(commandSupplier.get());}@Overridepublic void subscribe(Subscriber<? super T> subscriber) {if (this.traceEnabled) {LOG.trace("subscribe: {}@{}", subscriber.getClass().getName(), Objects.hashCode(subscriber));}// Reuse the first command but then discard it.RedisCommand<K, V, T> command = ref.get();if (command != null) {if (!ref.compareAndSet(command, null)) {command = commandSupplier.get();}} else {command = commandSupplier.get();}RedisSubscription<T> redisSubscription = new RedisSubscription<>(connection, command, dissolve, executor);redisSubscription.subscribe(subscriber);}// 其他方法略
}
我们知道标准的 Publisher.subscribe 主要是完成订阅工作,ref 是一个 RedisCommand Supplier 的原子引用,上述代码有段奇怪的逻辑,即获取command的部分,其实主要目的是为了防止单个 command 被重复使用,一旦发现重复使用(即ref.compareAndSet(command, null)为false),则重新使用 RedisCommand Supplier 获得 command。当然,最关键的还是下面的构建 RedisSubscription 对象(即前面Reactive中的订阅关系角色)并调用其subscribe方法,需要注意一点的是,我们是通过传入订阅者subscriber来构建 RedisSubscription,这当然合情合理。
接下来,我们剖析下 RedisSubscription,有人肯定会好奇,订阅关系Subscription理论上有用于请求n个元素的request和取消订阅的cancel方法,为啥还会有发布者Publisher中的subscribe方法?其实这并不是说RedisSubscription也是一个Publisher角色,而是这个方法发是被Publisher的subscribe方法来调用,所以干脆也叫做subscribe。RedisSubscription.subscribe方法实现如下:
/*** Subscription procedure called by a {@link Publisher}** @param subscriber the subscriber, must not be {@code null}.*/void subscribe(Subscriber<? super T> subscriber) {if (subscriber == null) {throw new NullPointerException("Subscriber must not be null");}// UNSUBSCRIBED 状态State state = state();if (traceEnabled) {LOG.trace("{} subscribe: {}@{}", state, subscriber.getClass().getName(), subscriber.hashCode());}// 调用后进入 NO_DEMAND 状态state.subscribe(this, subscriber);}可以看到该方法很简单,就是调用state的subscribe方法。State 是什么?State 是 RedisPublisher 中的一个枚举类型,用来表示 RedisSubscription(其实也是在RedisPublisher中定义)所处的状态,你可以发现,RedisSubscription 作为订阅关系用来表示订阅者Subscriber的订阅状态,而 State 用来表示订阅关系的状态。按照该枚举的定义,State有如下状态:
- UNSUBSCRIBED 初始的未订阅状态,调用其subscribe方法可以进入NO_DEMAND状态。
- NO_DEMAND 没有需求时进入的状态
- DEMAND 有需求时进入的状态
- READING 有数据可以读取时进入的状态
- COMPLETED 完成状态,不会再接受任何事件
部分状态能双向转换(例如 NO_DEMAND 和 DEMAND),最初是UNSUBSCRIBED状态,如代码所示,调用state.subscribe就会由UNSUBSCRIBED变为NO_DEMAND状态,我们看下state.subscribe的代码:
UNSUBSCRIBED {@SuppressWarnings("unchecked")@Overridevoid subscribe(RedisSubscription<?> subscription, Subscriber<?> subscriber) {LettuceAssert.notNull(subscriber, "Subscriber must not be null");if (subscription.changeState(this, NO_DEMAND)) {// 实际创建的是 PublishOnSubscriber 类型subscription.subscriber = RedisSubscriber.create(subscriber, subscription.executor);subscriber.onSubscribe(subscription);} else {throw new IllegalStateException(toString());}}}可以看到,一旦修改成 NO_DEMAND 成功,就会构建订阅者 RedisSubscriber 并绑定到订阅关系RedisSubscription上(后面会用到),最后调用了subscriber的onSubscribe方法(还记得之前聊到的响应式API规范吗?订阅成功后需要调用订阅者的onSubscribe方法),很显然到这里为止我们提到过的两个类 RedisPublisher 和 RedisSubscriber 就是发布者和订阅者的关系。
然后呢?后面貌似也没代码了,我们为啥最后我们能神奇的获取到redis get命令的返回结果呢?其实内部是reactor这个响应式框架在驱动,我们回过头再来看下之前的响应式demo:
RedisStringReactiveCommands<String, String> command = connection.reactive();
Mono<String> get = command.get("key");
get.subscribe(System.out::println); // 控制台输出value
我们知道最后一行我们通过Lambda表达式创建了一个订阅者,对于reactor这个框架而言,实际创建的是 LambdaMonoSubscriber 对象,而这个get当然也是被reactor包装过的Mono,但前面说过创建它的createMono方法实际上内部是从 RedisPublisher 来创建Mono的,所以我们调用的get.subscribe实际上最后会调用RedisPublisher的subscribe方法,这个方法我们前面已经讲解过逻辑了,所以上面的state.subscribe方法很重要的一点是调用了实际订阅者的onSubscribe方法(理论上这个方法应该是reactor框架来驱动调用的,但由于lettuce-core在实现Reactive时是自己构建的发布者-RedisPublisher,所以这个方法得lettuce自己来调用)。而这个订阅者subscriber(这里是LambdaMonoSubscriber对象)的onSubscribe方法中会去调用订阅关系(即RedisSubscription)的request方法:
@Overridepublic final void request(long n) {// 这时的 state 是 NO_DEMAND 状态State state = state();if (traceEnabled) {LOG.trace("{} request: {}", state, n);}state.request(this, n);}这时的state是 NO_DEMAND 状态,request方法实际上是去调用state.request方法,我们看下 NO_DEMAND 的request方法做了什么:
NO_DEMAND {@Overridevoid request(RedisSubscription<?> subscription, long n) {if (Operators.request(RedisSubscription.DEMAND, subscription, n)) {if (subscription.changeState(this, DEMAND)) {try {// 实际上调用的是它的dispatchCommand方法,向Redis发送要执行的命令subscription.checkCommandDispatch();} catch (Exception ex) {subscription.onError(ex);}subscription.checkOnDataAvailable();}subscription.potentiallyReadMore();subscription.state().onDataAvailable(subscription);} else {onError(subscription, Exceptions.nullOrNegativeRequestException(n));}}}可以看到,该方法会将state由 NO_DEMAND 更新成 DEMAND,一旦更新成功,就会调用订阅关系 RedisSubscription 的checkOnDataAvailable方法,该方法最终会调用 RedisChannelHandler 对象的dispatch方法往其 RedisChannelWriter 类型的属性对象channelWriter中写数据,代码如下:
protected <T> RedisCommand<K, V, T> dispatch(RedisCommand<K, V, T> cmd) {return channelWriter.write(cmd);}说明这时候已经开始向Redis发送命令了,接着我们还是回过头来看NO_DEMAND 的request方法,接着调用的是订阅关系 RedisSubscription 的checkOnDataAvailable方法,该方法代码如下:
final Queue<T> data = Operators.newQueue();// 其他代码略void checkOnDataAvailable() {// 如果数据为空,就去请求数据if (data.isEmpty()) {potentiallyReadMore();}// 如果数据不为空,那么通知数据可用if (!data.isEmpty()) {onDataAvailable();}}void potentiallyReadMore() {// getDemand获取的是订阅关系中request中请求的元素数量值,reactor中默认传Long.MAX_VALUEif ((getDemand() + 1) > data.size()) {// 当前state是DEMAND状态,调用readData方法后变成READING状态state().readData(this);}}/*** Called via a listener interface to indicate that reading is possible.*/final void onDataAvailable() {State state = state();state.onDataAvailable(this);}这块代码我们先忽略(笔者发现这段代码逻辑有点问题,详见:Fix the RedisPublisher.RedisSubscription#potentiallyReadMore demand long overflow bug by manzhizhen · Pull Request #2383 · lettuce-io/lettuce-core · GitHub),我们先看NO_DEMAND 的request方法的 “subscription.state().onDataAvailable(subscription);” 这一行,该行才是关键,这时候subscription.state()是DEMAND,所以我们看下DEMAND的onDataAvailable方法:
DEMAND {@Overridevoid onDataAvailable(RedisSubscription<?> subscription) {try {do {if (!read(subscription)) {return;}} while (subscription.hasDemand());} catch (Exception e) {subscription.onError(e);}}private boolean read(RedisSubscription<?> subscription) {State state = subscription.state();// concurrency/entry guardif (state == NO_DEMAND || state == DEMAND) {// 尝试将state变成READING状态,表明我们在读取数据if (!subscription.changeState(state, READING)) {return false;}} else {return false;}// 尝试读取并发射数据subscription.readAndPublish();if (subscription.allDataRead && subscription.data.isEmpty()) {state.onAllDataRead(subscription);return false;}// concurrency/leave guardsubscription.afterRead();if (subscription.allDataRead || !subscription.data.isEmpty()) {return true;}return false;}// 其他代码略}可以看出onDataAvailable方法只要发现订阅关系RedisSubscription一直有需求(subscription.hasDemand())则会一直调用read方法,而read方法中最关键的就是subscription.readAndPublish();方法的调用,我们看看其实现:
/*** Reads and publishes data from the input. Continues until either there is no more demand, or until there is no more* data to be read.*/void readAndPublish() {while (hasDemand()) {T data = read();if (data == null) {return;}DEMAND.decrementAndGet(this);this.subscriber.onNext(data);}}/*** Reads data from the input, if possible.** @return the data that was read or {@code null}*/protected T read() {return data.poll();}可以看出其还是通过data(final Queue<T> data = Operators.newQueue();)来交互的,调用一次readAndPublish方法只尝试从data里面poll一次,如果为null,则直接返回,如果能poll到元素,那么将调用订阅者的onNext方法(这也符合响应流API规范)来发射该数据。
总得有地方往data这个队列中放数据吧?否则上面的代码从data中获取到的永远是null,也不会有机会调用订阅者的onNext方法。Lettuce底层用的是Netty来实现Redis协议的,而且将 CommandHandler 注册到Netty的Pipeline中,CommandHandler监听了读事件,后面会调用 CommandWrapper(前面提到的RedisCommand的实现类,负责处理Redis应答)的complete方法,而complete方法后续又会调用订阅关系RedisSubscription的onNext方法,我们这时候来看看该onNext方法:
@Overridepublic void onNext(T t) {State state = state();if (state == State.COMPLETED) {return;}// 如果data为空,而且当前state处于DEMAND状态(说明还没进入读数据状态),那么直接调用订阅者的onNext来发射数据if (data.isEmpty() && state() == State.DEMAND) {long initial = getDemand();if (initial > 0) {try {DEMAND.decrementAndGet(this);// 直接调用订阅者的onNext来发射数据,此例子中就是我们的System.out.println的Lambda表达式this.subscriber.onNext(t);} catch (Exception e) {onError(e);}return;}}// 如果有data队列中有数据,那么就将数据放进队列,如果放进队列失败,则发射一个错误if (!data.offer(t)) {Subscriber<?> subscriber = this.subscriber;Context context = Context.empty();if (subscriber instanceof CoreSubscriber) {context = ((CoreSubscriber) subscriber).currentContext();}Throwable e = Operators.onOperatorError(this, Exceptions.failWithOverflow(), t, context);onError(e);return;}// 通知数据可用,后续会从data中读取数据onDataAvailable();}这样一切就圆满了,订阅关系RedisSubscription的onNext方法最终被Redis的读事件驱动(CommandHandler),而最终通过data队列或者直接调用订阅者的onNext方法,让订阅者来消费该元素。
让我们简单总结下,Lettuce的Reactive的实现方式就是将Redis数据发送和数据应答事件和Reactive库类(之前用的是RxJava,后面用的是reactor)绑定,从而让Lettuce支持响应式API编程。那这种方式和我们之前直接用 myReactiveRedisGet 方法来包装Lettuce的阻塞执行方法有什么区别?最大的一个区别是我们不用阻塞当前的业务线程,而是让其他线程(这里是Netty的工作线程)来发射元素并执行订阅者的方法(即本例子中的System.out.println的Lambda表达式),这样业务线程可以做其他事情(例如继续处理其他请求),而且重要的是另一点,即使Redis响应慢,也不会占用到Netty的工作线程,有应答时才会需要该工作线程处理。注意,订阅者的方法真的应该由Netty的工作线程来执行吗?这也许并不一定是个好注意,我们期望可以通过publishOn来修改此行为,我们来修改下之前给的Reactive的demo:
RedisClient client = RedisClient.create("redis://localhost");
StatefulRedisConnection<String, String> connection = client.connect();
RedisStringReactiveCommands<String, String> command = connection.reactive();
Mono<String> get = command.get("key");
// get.subscribe(System.out::println); // 控制台输出value
get.publishOn(Schedulers.parallel()).subscribe(System.out::println); // 使用Schedulers.parallel()的线程池来进行控制台输出value
这里我们直接使用的是Schedulers.parallel()线程池。

