目录
一、创建分支
二、切换分支
三、合并分支
四、删除分支
五、合并冲突
六、分支策略
七、bug分支
一、创建分支
# 当前仓库只有 master 一个主分支
# 可通过 git branch 是进行分支管理的命令,可通过不同参数对分支进行查看、创建、删除(base) [root@localhost gitcode]# cat .git/HEAD
ref: refs/heads/master
(base) [root@localhost gitcode]# cat .git/refs/heads/master
84b615bfb313b40010c263cbadc67f24ce1ed1d3
(base) [root@localhost gitcode]# git branch
* master
(base) [root@localhost gitcode]# git branch dev
(base) [root@localhost gitcode]# git branchdev
* master
(base) [root@localhost gitcode]# ls .git/refs/heads/
dev  master
(base) [root@localhost gitcode]# cat .git/refs/heads/*
84b615bfb313b40010c263cbadc67f24ce1ed1d3
84b615bfb313b40010c263cbadc67f24ce1ed1d3
(base) [root@localhost gitcode]# # * 表示当前 HEAD 指向的分支是 master 分支
# git branch 只能查看本地分支,git branch -r 可查看远程分支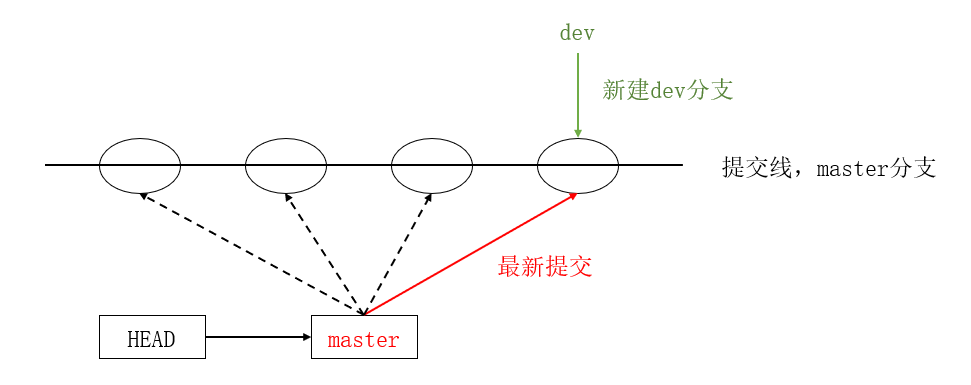
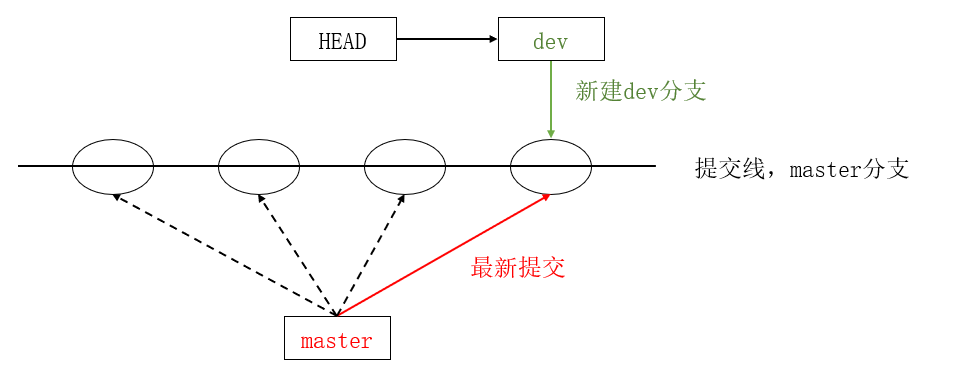
二、切换分支
(base) [root@localhost gitcode]# git checkout dev
切换到分支 'dev'
(base) [root@localhost gitcode]# cat .git/HEAD
ref: refs/heads/dev
(base) [root@localhost gitcode]# git branch
* devmaster
(base) [root@localhost gitcode]#
# 在新分支上修改文件内容(base) [root@localhost gitcode]# vim file1
(base) [root@localhost gitcode]# cat file1
hello git
hello world
add vertion1
add vertion2
write sth. for new branch: dev
(base) [root@localhost gitcode]# git add .
(base) [root@localhost gitcode]# git commit -m "modify file1 for dev"
[dev 088ce6d] modify file1 for dev1 file changed, 1 insertion(+)
(base) [root@localhost gitcode]# git checkout master
切换到分支 'master'
(base) [root@localhost gitcode]# cat file1
hello git
hello world
add vertion1
add vertion2
(base) [root@localhost gitcode]# # 为什么 dev分支 和 master分支 上同一个文件的内容不一样呢?
# 我们可以看到 dev分支和 master分支 上两者指向的提交是不一样的(base) [root@localhost gitcode]# cat .git/refs/heads/dev
088ce6d478daaadbd94870ceebd47bd05bf1b4e1
(base) [root@localhost gitcode]# cat .git/refs/heads/master
84b615bfb313b40010c263cbadc67f24ce1ed1d3
(base) [root@localhost gitcode]# 
三、合并分支
# 先切回到 master分支,再通过 git merge 合并 dev分支(base) [root@localhost gitcode]# git checkout master
切换到分支 'master'
(base) [root@localhost gitcode]# cat file1
hello git
hello world
add vertion1
add vertion2
(base) [root@localhost gitcode]# git merge dev
更新 84b615b..088ce6d
Fast-forwardfile1 | 1 +1 file changed, 1 insertion(+)
(base) [root@localhost gitcode]# cat file1
hello git
hello world
add vertion1
add vertion2
write sth. for new branch: dev
(base) [root@localhost gitcode]# 
Fast-forward代表“快进模式”,也就是直接把master指向dev的当前提交,所以合并速度非常快。
四、删除分支
合并完成后, dev分⽀ 对于我们来说就没⽤了,那么 dev分⽀ 就可以被删除掉,注意如果当前正处于某分⽀下,就不能删除当前分⽀。
(base) [root@localhost gitcode]# git branch
* devmaster
(base) [root@localhost gitcode]# git branch -d dev
error: 无法删除您当前所在的分支 'dev'。
(base) [root@localhost gitcode]# git checkout master
切换到分支 'master'
(base) [root@localhost gitcode]# git branch -d dev
已删除分支 dev(曾为 088ce6d)。
(base) [root@localhost gitcode]# git branch
* master
(base) [root@localhost gitcode]#
因为创建、合并和删除分⽀⾮常快,所以Git⿎励你使⽤分⽀完成某个任务,合并后再删掉分⽀,这和直接在master分⽀上⼯作效果是⼀样的,但过程更安全。
五、合并冲突
在实际分⽀合并的时候,并不是想合并就能合并成功的,有时候可能会遇到代码冲突的问题。
# git checkout -b 可以创建并跳转到新分支
# 分别在 dev1分支 和 master分支上对file1文件修改并提交(base) [root@localhost gitcode]# git checkout -b dev1
切换到一个新分支 'dev1'
(base) [root@localhost gitcode]# git branch
* dev1master
(base) [root@localhost gitcode]# vim file1
(base) [root@localhost gitcode]# cat file1
hello git
hello world
add vertion1
add vertion2
write sth. for new branch: dev1
(base) [root@localhost gitcode]# git add .
(base) [root@localhost gitcode]# git commit -m "modify file1 for dev1"
[dev1 77f1455] modify file1 for dev11 file changed, 1 insertion(+), 1 deletion(-)
(base) [root@localhost gitcode]# git checkout master
切换到分支 'master'
(base) [root@localhost gitcode]# cat file1
hello git
hello world
add vertion1
add vertion2
write sth. for new branch: dev
(base) [root@localhost gitcode]# vim file1
(base) [root@localhost gitcode]# cat file1
hello git
hello world
add vertion1
add vertion2
write sth. for new branch: master
(base) [root@localhost gitcode]# git add .
(base) [root@localhost gitcode]# git commit -m "modify file1 for master"
[master b7534ec] modify file1 for master1 file changed, 1 insertion(+), 1 deletion(-)
(base) [root@localhost gitcode]#
这种情况下,Git只能试图把各⾃的修改合并起来,但这种合并就可能会有冲突,如下所⽰:
(base) [root@localhost gitcode]# git branchdev1
* master
(base) [root@localhost gitcode]# git merge dev1
自动合并 file1
冲突(内容):合并冲突于 file1
自动合并失败,修正冲突然后提交修正的结果。
(base) [root@localhost gitcode]# git status
# 位于分支 master
# 您有尚未合并的路径。
#   (解决冲突并运行 "git commit")
#
# 未合并的路径:
#   (使用 "git add <file>..." 标记解决方案)
#
#       双方修改:     file1
#
修改尚未加入提交(使用 "git add" 和/或 "git commit -a")
(base) [root@localhost gitcode]# cat file1
hello git
hello world
add vertion1
add vertion2
<<<<<<< HEAD
write sth. for new branch: master
=======
write sth. for new branch: dev1
>>>>>>> dev1
(base) [root@localhost gitcode]#
Git会⽤ <<<<<<<,=======,>>>>>>> 来标记出不同分⽀的冲突内容,此时我们必须要⼿动调整冲突代码,并需要再次提交修正后的结果!!
(base) [root@localhost gitcode]# vim file1
(base) [root@localhost gitcode]# cat file1
hello git
hello world
add vertion1
add vertion2
write sth. for new branch: master
write sth. for new branch: dev1
(base) [root@localhost gitcode]# git add .
(base) [root@localhost gitcode]# git commit -m "modify file1 for master and dev1"
[master 0dc19d0] modify file1 for master and dev1
(base) [root@localhost gitcode]# git status
# 位于分支 master
无文件要提交,干净的工作区
(base) [root@localhost gitcode]# 
# 用带参数的 git log 也可以看到分支合并情况(base) [root@localhost gitcode]# git log --graph --pretty=oneline --abbrev-commit
*   0dc19d0 modify file1 for master and dev1
|\
| * 77f1455 modify file1 for dev1
* | b7534ec modify file1 for master
|/
* 088ce6d modify file1 for dev
* 84b615b delete file3
* 0f28717 delete file4
* c31b56a modigy: add vertion2
* 167def0 modify: add vertion1
* 7df1e32 modify: file1
* f2e9210 Add three files
* fc3a350 Add first file
(base) [root@localhost gitcode]#
# 分支使用完最好删除掉(base) [root@localhost gitcode]# git branch -d dev1
已删除分支 dev1(曾为 77f1455)。
(base) [root@localhost gitcode]# git branch
* master
(base) [root@localhost gitcode]# 六、分支策略
通常合并分⽀时,如果可能,Git会采⽤ Fast forward 模式。
在这种 Fast forward 模式下,删除分⽀后,查看分⽀历史时,会丢掉分⽀信息,看不出来最新提交到底是 merge 进来的还是正常提交的。
但在合并冲突部分,我们也看到通过解决冲突问题,会再进⾏⼀次新的提交。
那么这就不是 Fast forward 模式了,这样的好处是,从分⽀历史上就可以看出分⽀信息。
Git ⽀持我们强制禁⽤ Fast forward 模式,那么就会在 merge 时⽣成⼀个新的 commit ,这样,从分⽀历史上就可以看出分⽀信息。
# 新建 dev2分支 并在新分支上修改 file1(base) [root@localhost gitcode]# git checkout -b dev2
切换到一个新分支 'dev2'
(base) [root@localhost gitcode]# vim file1
(base) [root@localhost gitcode]# cat file1
hello git
hello world
add vertion1
add vertion2
write sth. for new branch: master
write sth. for new branch: dev1
write sth. for new branch: dev2
(base) [root@localhost gitcode]# git add .
(base) [root@localhost gitcode]# git commit -m "modify file1 for dev2"
[dev2 13c3c71] modify file1 for dev21 file changed, 1 insertion(+)
(base) [root@localhost gitcode]#
# 使用 git -merge --no-ff 合并分支会提交一个新的 commit(base) [root@localhost gitcode]# git checkout master
切换到分支 'master'
(base) [root@localhost gitcode]# cat file1
hello git
hello world
add vertion1
add vertion2
write sth. for new branch: master
write sth. for new branch: dev1
(base) [root@localhost gitcode]# git merge --no-ff -m "merge with no-ff: dev2" dev2
Merge made by the 'recursive' strategy.file1 | 1 +1 file changed, 1 insertion(+)
(base) [root@localhost gitcode]# cat file1
hello git
hello world
add vertion1
add vertion2
write sth. for new branch: master
write sth. for new branch: dev1
write sth. for new branch: dev2
(base) [root@localhost gitcode]# git log --graph --pretty=oneline --abbrev-commit
* cb70524 merge with no-ff: dev2
|\
| * 13c3c71 modify file1 for dev2
|/
* 0dc19d0 modify file1 for master and dev1
|\
| * 77f1455 modify file1 for dev1
* | b7534ec modify file1 for master
|/
* 088ce6d modify file1 for dev
* 84b615b delete file3
* 0f28717 delete file4
* c31b56a modigy: add vertion2
* 167def0 modify: add vertion1
* 7df1e32 modify: file1
* f2e9210 Add three files
* fc3a350 Add first file
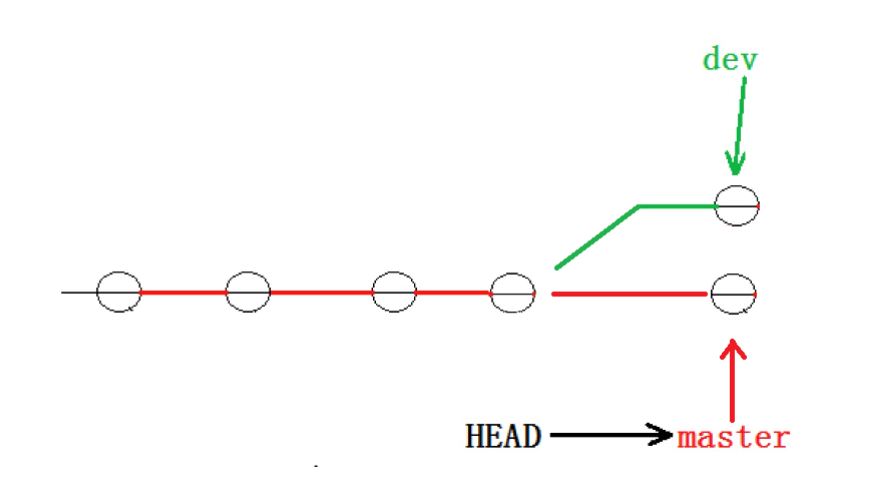
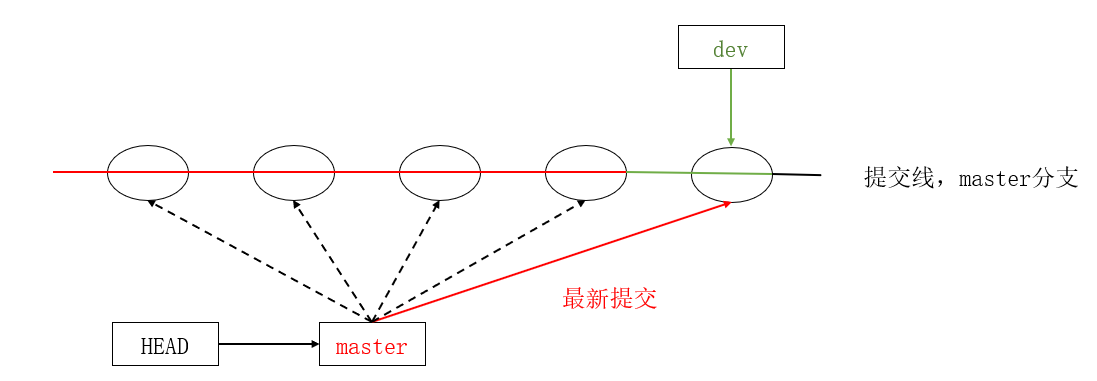
(base) [root@localhost gitcode]# 可以看出,在 --no-ff 模式下,merge后的分支图为:

所以在合并分⽀时,加上 --no-ff 参数就可以⽤普通模式合并,合并后的历史有分⽀,能看出来曾经做过合并,⽽ fast forward 合并就看不出来曾经做过合并。
分支管理原则:
- master分⽀应该是⾮常稳定的,也就是仅⽤来发布新版本,平时不能在上⾯⼲活;
- ⼲活都在dev分⽀上,也就是说,dev分⽀是不稳定的,到某个时候,⽐如1.0版本发布时,再把dev分⽀合并到master上,在master分⽀发布1.0版本;
七、bug分支
假如我们现在正在 dev2 分⽀上进⾏开发,开发到⼀半,突然发现 master 分⽀上⾯有bug,需要解决。在Git中,每个bug都可以通过⼀个新的临时分⽀来修复,修复后,合并分⽀,然后将临时分⽀删除。
可现在 dev2 的代码在⼯作区中开发了⼀半,还⽆法提交,怎么办?
(base) [root@localhost gitcode]# git checkout dev2
切换到分支 'dev2'
(base) [root@localhost gitcode]# vim file1
(base) [root@localhost gitcode]# cat file1
hello git
hello world
add vertion1
add vertion2
write sth. for new branch: master
write sth. for new branch: dev1
write sth. for new branch: dev2
this is a bug ...
(base) [root@localhost gitcode]# git status
# 位于分支 dev2
# 尚未暂存以备提交的变更:
#   (使用 "git add <file>..." 更新要提交的内容)
#   (使用 "git checkout -- <file>..." 丢弃工作区的改动)
#
#       修改:      file1
#
修改尚未加入提交(使用 "git add" 和/或 "git commit -a")
(base) [root@localhost gitcode]#
# Git提供了 git stash 命令可以将当前工作区信息进行储藏
# 被储藏的内容可以在将来的某个时间恢复出来(base) [root@localhost gitcode]# git stash
Saved working directory and index state WIP on dev2: 13c3c71 modify file1 for dev2
HEAD 现在位于 13c3c71 modify file1 for dev2
(base) [root@localhost gitcode]# git status
# 位于分支 dev2
无文件要提交,干净的工作区
(base) [root@localhost gitcode]# # 储藏 dev2 ⼯作区之后,由于我们要基于master分⽀修复bug,
# 所以需要切回 master 分⽀,再新建临时分⽀来修复bug(base) [root@localhost gitcode]# git checkout master
切换到分支 'master'
(base) [root@localhost gitcode]# git checkout -b fix_bug
切换到一个新分支 'fix_bug'
(base) [root@localhost gitcode]# vim file1
(base) [root@localhost gitcode]# cat file1
hello git
hello world
add vertion1
add vertion2
write sth. for new branch: master
write sth. for new branch: dev1
write sth. for new branch: dev2
fix a bug here!
(base) [root@localhost gitcode]# git add .
(base) [root@localhost gitcode]# git commit -m "fix a bug"
[fix_bug 1ec9fbd] fix a bug1 file changed, 1 insertion(+)
(base) [root@localhost gitcode]# # 修复完成后,切换到 master 分⽀,并完成合并,最后删除 fix_bug 分⽀(base) [root@localhost gitcode]# git checkout master
切换到分支 'master'
(base) [root@localhost gitcode]# git merge --no-ff -m "merge fix_bug branch" fix_bug
Merge made by the 'recursive' strategy.file1 | 1 +1 file changed, 1 insertion(+)
(base) [root@localhost gitcode]# cat file1
hello git
hello world
add vertion1
add vertion2
write sth. for new branch: master
write sth. for new branch: dev1
write sth. for new branch: dev2
fix a bug here!
(base) [root@localhost gitcode]# git branch -d fix_bug
已删除分支 fix_bug(曾为 1ec9fbd)。
(base) [root@localhost gitcode]## bug的修复⼯作已经做完了,我们还要继续回到 dev2 分⽀进⾏开发。
# ⼯作区是⼲净的,需要恢复现场
# git stash list 查看工作现场列表
# git stash pop 恢复工作现场(base) [root@localhost gitcode]# git checkout dev2
切换到分支 'dev2'
(base) [root@localhost gitcode]# git status
# 位于分支 dev2
无文件要提交,干净的工作区
(base) [root@localhost gitcode]# git stash list
stash@{0}: WIP on dev2: 13c3c71 modify file1 for dev2
(base) [root@localhost gitcode]# git stash pop
# 位于分支 dev2
# 尚未暂存以备提交的变更:
# (使用 "git add <file>..." 更新要提交的内容)
# (使用 "git checkout -- <file>..." 丢弃工作区的改动)
#
# 修改: file1
#
修改尚未加入提交(使用 "git add" 和/或 "git commit -a")
丢弃了 refs/stash@{0} (f9841933f9d2d3112f4262fc0e5c9f882fea7fd7)
(base) [root@localhost gitcode]# git stash list
(base) [root@localhost gitcode]## 恢复完代码之后我们便可以继续完成开发,开发完成后便可以进⾏提交
# 但是修复bug的内容并没有在dev2中显示(base) [root@localhost gitcode]# cat file1
hello git
hello world
add vertion1
add vertion2
write sth. for new branch: master
write sth. for new branch: dev1
write sth. for new branch: dev2
this is a bug ...
(base) [root@localhost gitcode]# git add .
(base) [root@localhost gitcode]# git commit -m "modify file1 for dev2"
[dev2 030cb5d] modify file1 for dev21 file changed, 1 insertion(+), 1 deletion(-)
(base) [root@localhost gitcode]# 
Master 分⽀⽬前最新的提交,是要领先于新建 dev2 时基于的 master 分⽀的提交的,所以我们
在 dev2 中当然看不⻅修复bug的相关代码。
我们的最终⽬的是要让 master 合并 dev2 分⽀的,那么正常情况下我们切回 master 分⽀直接合
并即可,但这样其实是有⼀定⻛险的。
因为在合并分⽀时可能会有冲突,⽽代码冲突需要我们⼿动解决(在 master 上解决)。我们⽆法保证对于冲突问题可以正确地⼀次性解决掉,因为在实际的项⽬中,代码冲突不只⼀两⾏那么简单,有可能⼏⼗上百⾏,甚⾄更多,解决的过程中难免⼿误出错,导致错误的代码被合并到master 上。

解决这个问题的⼀个好的建议就是:最好在⾃⼰的分⽀上合并下 master ,再让 master 去合并
dev ,这样做的⽬的是有冲突可以在本地分⽀解决并进⾏测试,⽽不影响 master 。


# dev2 合并 master(base) [root@localhost gitcode]# git branch
* dev2master
(base) [root@localhost gitcode]# git merge master
自动合并 file1
冲突(内容):合并冲突于 file1
自动合并失败,修正冲突然后提交修正的结果。
(base) [root@localhost gitcode]#
# 发生冲突,将冲突解决并重新提交(base) [root@localhost gitcode]# cat file1
hello git
hello world
add vertion1
add vertion2
write sth. for new branch: master
write sth. for new branch: dev1
write sth. for new branch: dev2
<<<<<<< HEAD
this is a bug ...
=======
fix a bug here!
>>>>>>> master
(base) [root@localhost gitcode]# vim file1
(base) [root@localhost gitcode]# cat file1
hello git
hello world
add vertion1
add vertion2
write sth. for new branch: master
write sth. for new branch: dev1
write sth. for new branch: dev2
i am coding ... done!
(base) [root@localhost gitcode]# git add .
(base) [root@localhost gitcode]# git commit -m "merge master"
[dev2 9604340] merge master
(base) [root@localhost gitcode]# git status
# 位于分支 dev2
无文件要提交,干净的工作区
(base) [root@localhost gitcode]# # 切回master,合并dev2(base) [root@localhost gitcode]# git checkout master
切换到分支 'master'
(base) [root@localhost gitcode]# git merge dev2
更新 1bcd87b..9604340
Fast-forwardfile1 | 2 +-1 file changed, 1 insertion(+), 1 deletion(-)
(base) [root@localhost gitcode]# git status
# 位于分支 master
无文件要提交,干净的工作区
(base) [root@localhost gitcode]# git branch -d dev2
已删除分支 dev2(曾为 9604340)。
(base) [root@localhost gitcode]#