文章目录
- 前言
- 一、所需环境
- 二、实现思路
- 2.1. 定义了LeNet网络模型结构,并训练了20次
- 2.2 以txt格式导出训练结果(模型的各个层权重偏置等参数)
- 2.3 (可选)以pth格式导出训练结果,以方便后期调试
- 2.4 C++ CUDA要做的事
- 三、C++ CUDA具体实现
- 3.1 新建.cu文件并填好框架
- 3.2 C++实现各网络层
- 3.0 CUDA 编程 核心思路
- 3.1 卷积层Conv1
- 3.2 激活函数ReLu1
- 3.2 池化层MaxPool1
- 3.3 卷积层Conv2
- 3.4 激活函数ReLu2
- 3.5 池化层MaxPool2
- 3.6 全连接层fc1
- 3.7 激活函数ReLu3
- 3.8 全连接层fc2
- 3.9 激活函数ReLu4
- 3.10 全连接层fc3
- 3.11 输出结果
- 3.12 后续改进
- 四、源码
- 4.1 CUDA最终源码
- 总结
前言
最近开始学习CUDA,要写一个小神经网络练练手,鉴于网上资料较少,便自己记录一下过程经验。
本篇文章将介绍如何以MNIST数据集为例,从零开始用C++ CUDA搭建出LeNet神经网络的推理代码过程。注意,本篇教程只是推理的部分,训练部分先用已有的Python代码。
因为用C++实现的训练代码涉及到反向传播等算法,博客讲解起来较复杂,后续有时间再写一篇。
从零开始不代表从零基础开始,建议掌握Python基础、神经网络基础、一丢丢CUDA基础。
一、所需环境
训练代码所需环境:python、pytorch、numpy。(版本够模型训练即可,要求不高)
推理代码所需环境:C++、对应版本的CUDA。(如果有VS 编译器的话,可以直接在安装CUDA的时候,勾选VS依赖包,从而能直接在VS编译器上新建CUDA项目 )
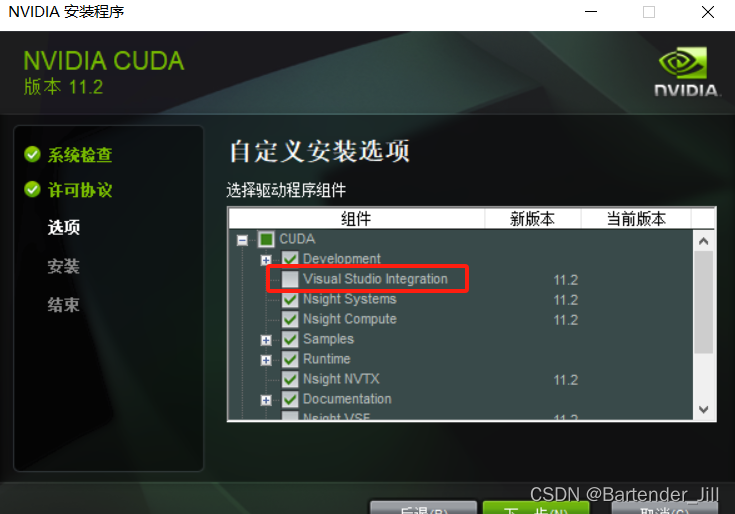
红框部分勾选起来。
如果已经有CUDA环境了但之前没有勾选Visual Studio Integration,可以参考这篇文章。如果嫌配置麻烦也可以卸载CUDA再重新安装。
环境安装过程本文不过多赘述,可以在网上看相关教程根据自己版本进行安装。
二、实现思路
要用C++ CUDA实现LeNet的推理过程(即前向传播),我们需要先知道LeNet的神经网络架构是怎么样的。本篇文章所用的LeNet 训练代码如下:
#Train_LeNet.py'''
Package                  Version
------------------------ ----------
certifi                  2023.7.22
charset-normalizer       3.2.0
cmake                    3.27.4.1
filelock                 3.12.4
idna                     3.4
Jinja2                   3.1.2
lit                      16.0.6
MarkupSafe               2.1.3
mpmath                   1.3.0
networkx                 3.1
numpy                    1.26.0
nvidia-cublas-cu11       11.10.3.66
nvidia-cuda-cupti-cu11   11.7.101
nvidia-cuda-nvrtc-cu11   11.7.99
nvidia-cuda-runtime-cu11 11.7.99
nvidia-cudnn-cu11        8.5.0.96
nvidia-cufft-cu11        10.9.0.58
nvidia-curand-cu11       10.2.10.91
nvidia-cusolver-cu11     11.4.0.1
nvidia-cusparse-cu11     11.7.4.91
nvidia-nccl-cu11         2.14.3
nvidia-nvtx-cu11         11.7.91
Pillow                   10.0.1
pip                      23.2.1
requests                 2.31.0
setuptools               68.0.0
sympy                    1.12
torch                    2.0.1
torchaudio               2.0.2
torchvision              0.15.2
triton                   2.0.0
typing_extensions        4.7.1
urllib3                  2.0.4
wheel                    0.38.4
'''import torch
import torchvision
import torchvision.transforms as transforms
import torch.nn as nn
import torch.optim as optim
import numpy as np
import torch.nn.functional as F
import os# 定义LeNet模型
class LeNet(nn.Module):def __init__(self):super(LeNet, self).__init__()self.conv1 = nn.Conv2d(1, 6, 5)self.pool = nn.MaxPool2d(2, 2)self.conv2 = nn.Conv2d(6, 16, 5)self.fc1 = nn.Linear(16 * 4 * 4, 120)self.fc2 = nn.Linear(120, 84)self.fc3 = nn.Linear(84, 10)def forward(self, x):x = self.pool(F.relu(self.conv1(x)))x = self.pool(F.relu(self.conv2(x)))x = x.view(-1, 16 * 4 * 4)x = F.relu(self.fc1(x))x = F.relu(self.fc2(x))x = self.fc3(x)return xscript_dir = os.path.dirname(__file__)  # 获取脚本所在的目录# 数据预处理
transform = transforms.Compose([transforms.ToTensor()])# 加载数据集
trainset = torchvision.datasets.FashionMNIST(os.path.join(script_dir, '../../data'), download=True, train=True,transform=transform)
testset = torchvision.datasets.FashionMNIST(os.path.join(script_dir, '../../data'), download=True, train=False,transform=transform)trainloader = torch.utils.data.DataLoader(trainset, batch_size=64, shuffle=True)
testloader = torch.utils.data.DataLoader(testset, batch_size=64, shuffle=False)# 创建模型
model = LeNet()
model = model.to('cuda')# 定义损失函数和优化器
criterion = nn.CrossEntropyLoss()
optimizer = optim.SGD(model.parameters(), lr=0.002, momentum=0.9)# 训练模型
for epoch in range(20):print('epoch ', epoch)for inputs, labels in trainloader:inputs, labels = inputs.to('cuda'), labels.to('cuda')optimizer.zero_grad()outputs = model(inputs)loss = criterion(outputs, labels)loss.backward()optimizer.step()# 测试模型的准确率
correct = 0
total = 0
with torch.no_grad():for data in testloader:images, labels = dataimages, labels = images.to('cuda'), labels.to('cuda')outputs = model(images)_, predicted = torch.max(outputs.data, 1)total += labels.size(0)correct += (predicted == labels).sum().item()print(correct / total)# 以txt的方式导出模型参数,也可以自定义导出模型参数的文件格式,这里使用了最简单的方法。
for name, param in model.named_parameters():np.savetxt(os.path.join(script_dir, f'./{name}.txt'), param.detach().cpu().numpy().flatten())#将该模型保存起来,以方便python代码对该模型进行读取调试
torch.save(model, "./model/modeltrain.pth")
简单来讲,训练代码做了以下三件事:
2.1. 定义了LeNet网络模型结构,并训练了20次
由代码可知,LeNet的模型由Conv2d(卷积层)、MaxPool2d(最大池化层)、Linear(线性层)、ReLu(激活函数层)这四个网络层组成:

2.2 以txt格式导出训练结果(模型的各个层权重偏置等参数)
将模型各个层权重参数以txt形式导出,方便C++代码读取。如果你将模型以pth/ckpt等格式进行存储,那C++读取起来有点麻烦。
导出的txt文件如下:
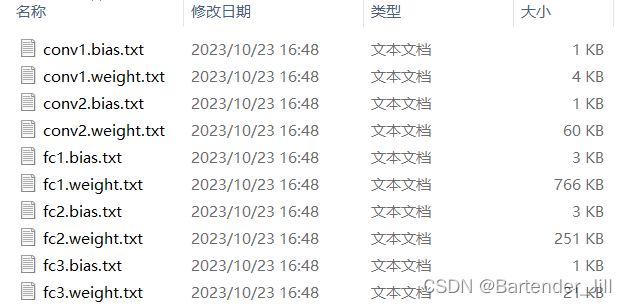
这些txt文件就代表了LeNet训练后的模型结果,如果你们不想训练可以直接下载 提取码:4DEF
2.3 (可选)以pth格式导出训练结果,以方便后期调试
我们已经将训练好的模型以txt形式导出了,为什么要多此一举用pth再次导出呢?
众所周知,凡是涉及到并行的代码,调试起来颇为不方便,用cuda-gdb等方式给你的CUDA代码打断点查变量可以是可以,但对于新手使用起来较麻烦。
除此之外,像LeNet这种多层神经网络,一步错则步步错,调试起来十分棘手。那我们怎么知道自己写的CUDA代码对不对呢?
故本文章提供一个简单的逐层调试方法:
我们不仅要用C++ CUDA实现LeNet的推理,还用Python的PyTorch实现一遍LeNet推理过程。
由于Python实现LeNet推理十分简单,即在原先训练代码上修改几行函数即可实现,不可能有出错情况,故我们可以将Python实现的LeNet推理结果作为参考答案,利用PyTorch提供的hook方法来打印LeNet模型每个层的输出结果,并将自己C++ CUDA每一层的输出进行逐层比较,从而得知自己用CUDA实现的LeNet推理代码是否有问题。
这里本文也提供LeNet的 python推理代码:
#Inference_LeNet.py
import torch
import torchvision
import torchvision.transforms as transforms
import torch.nn as nn
import torch.optim as optim
import numpy as np
import torch.nn.functional as F
import os
import structclass LeNet(nn.Module):def __init__(self):super(LeNet, self).__init__()self.conv1 = nn.Conv2d(1, 6, 5)self.pool = nn.MaxPool2d(2, 2)self.conv2 = nn.Conv2d(6, 16, 5)self.fc1 = nn.Linear(16 * 4 * 4, 120)self.fc2 = nn.Linear(120, 84)self.fc3 = nn.Linear(84, 10)def forward(self, x):x = self.pool(F.relu(self.conv1(x)))x = self.pool(F.relu(self.conv2(x)))x = x.view(-1, 16 * 4 * 4)x = F.relu(self.fc1(x))x = F.relu(self.fc2(x))x = self.fc3(x)return x
script_dir = os.path.dirname(__file__)  # 获取脚本所在的目录# 数据预处理
transform = transforms.Compose([transforms.ToTensor()])# 加载数据集
trainset = torchvision.datasets.FashionMNIST(os.path.join(script_dir, './data'), download=False, train=True, transform=transform)
testset = torchvision.datasets.FashionMNIST(os.path.join(script_dir, './data'), download=False, train=False, transform=transform)trainloader = torch.utils.data.DataLoader(trainset, batch_size=64, shuffle=True)
testloader = torch.utils.data.DataLoader(testset, batch_size=1, shuffle=False)#输出conv1层结果
def conv1_hook1(model,input,output):print("conv1 ", output[0,0,:,:])#输出conv1第1个通道结果print("conv1 ", output[0, 5, :, :])#输出conv1第5个通道结果print("relu: ",F.relu(output[0,0,:,:]))def conv2_hook1(model,input,output):print("relu2: ", F.relu(output[0, 0, :, :]))print("cov2: ",output[0,0,:,:])def relu_hook1(model, input, output):print("relu ", output[0, 5, :, :])  # [0, 0, 0, :]
def maxpool_hook1(model, input, output):try:print("max pool ", output[0, 0, :, :])  # [0, 0, 0, :]except:returndef fc1_hook1(model, input, output):print("fc1 ", output)  # [0, 0, 0, :]print("fc1 ", F.relu(output))  # [0, 0, 0, :]#print("conv1 ",output[0,2,0:10,0:10])#想查看哪层网络输出结果,就取消注释掉哪一层
#model.conv1.register_forward_hook(conv1_hook1) #输出conv1结果
#model.pool.register_forward_hook(maxpool_hook1)
#model.relu.register_forward_hook(maxpool_hook1)
#model.conv2.register_forward_hook(conv2_hook1)
#model.fc2.register_forward_hook(fc1_hook1)model = torch.load("./model/modeltrain.pth")
model.eval()
model = model.to('cuda')model.conv1.register_forward_hook(conv1_hook1)data = iter(testloader)
#print(data)
sum = 0
for i in range(10000):image,label = next(data)image = image.to('cuda')output = model(image)#print(output)pre = 0for i in range(10):if output[0][i] > output[0][pre]:pre = iif pre == label:sum+=1
#算准确率
print(sum/10000)
调试的时候直接注释掉hook函数即可打印相应层的输出结果。
2.4 C++ CUDA要做的事
由于图像数据可以看作是一种矩阵,故神经网络在对各个像素进行卷积、池化等操作的时候,十分适合并行操作,即CUDA可以对所有像素并行卷积得到结果,而不用前面像素卷积完再轮到下一个像素,拖累了速度。
我们要做的,就是用C++ CUDA实现这四个网络层,并为每个层开辟数组以存储txt中的模型各个层参数,并将这些参数从Host移动到Device内存中(即从CPU端移动到显卡端)。再编写运行在Device上的CUDA函数,让CUDA函数能并行调用Device内存中的参数进行卷积等运算,从而提高推理速度,实现CPU串行推理所做不到的事。
三、C++ CUDA具体实现
3.1 新建.cu文件并填好框架
首先需要新建一个.cu文件,我是用VS2022直接新建了CUDA项目。
然后在该.cu文件中填入需要的函数:读取MNIST数据集的图片、读取MNIST数据集的标签、读取上述导出的模型结果txt文件、逐张图片进行推理(我们要实现的内容)。
关于MNIST数据集的下载,建议直接运行上述的LeNet训练代码即可自动下载(Download=True),或者从网上下载后放到对应文件夹(“/…/…/data/FashionMNIST/raw/t10k-images-idx3-ubyte"和”/…/…/data/FashionMNIST/raw/t10k-labels-idx1-ubyte")
为了方便起见,基本框架和所需函数我已提前写好:
//Inference_LeNet.cu
#include <fstream>
#include <iostream>
#include <vector>
#include <chrono>
#include <iomanip>
#include <string>
#include <stdlib.h>
#include "cuda_runtime.h"
#include "device_launch_parameters.h"#ifndef __CUDACC__
#define __CUDACC__
#endif
//#include <device_functions.h>//定义宏函数wbCheck,该函数用于检查Device内存是否分配成功,以避免写过多代码
#define wbCheck(stmt)  do {                                                    \cudaError_t err = stmt;                                               \if (err != cudaSuccess) {                                             \printf( "\n\nFailed to run stmt %d ", __LINE__);                       \printf( "Got CUDA error ...  %s \n\n", cudaGetErrorString(err));    \return -1;                                                        \}                                                                     \} while(0)// 读取MNIST数据集图片,该数据集需自行从网上下载,或直接运行上面的LeNet python训练程序自动下载
std::vector<std::vector<float>> read_mnist_images(const std::string & path) {std::ifstream file(path, std::ios::binary);if (!file) {std::cout << "Cannot open file!" << std::endl;return {};}int magic_number = 0, num_images = 0, num_rows = 0, num_cols = 0;file.read((char*)&magic_number, sizeof(magic_number));file.read((char*)&num_images, sizeof(num_images));file.read((char*)&num_rows, sizeof(num_rows));file.read((char*)&num_cols, sizeof(num_cols));// Reverse Integers (MNIST data is in big endian format)magic_number = ((magic_number & 0xff000000) >> 24) | ((magic_number & 0x00ff0000) >> 8) |((magic_number & 0x0000ff00) << 8) | ((magic_number & 0x000000ff) << 24);num_images = ((num_images & 0xff000000) >> 24) | ((num_images & 0x00ff0000) >> 8) |((num_images & 0x0000ff00) << 8) | ((num_images & 0x000000ff) << 24);num_rows = ((num_rows & 0xff000000) >> 24) | ((num_rows & 0x00ff0000) >> 8) |((num_rows & 0x0000ff00) << 8) | ((num_rows & 0x000000ff) << 24);num_cols = ((num_cols & 0xff000000) >> 24) | ((num_cols & 0x00ff0000) >> 8) |((num_cols & 0x0000ff00) << 8) | ((num_cols & 0x000000ff) << 24);int image_size = num_rows * num_cols;std::vector<std::vector<float>> images(num_images, std::vector<float>(image_size));for (int i = 0; i < num_images; ++i) {for (int j = 0; j < image_size; ++j) {unsigned char pixel = 0;file.read((char*)&pixel, sizeof(pixel));images[i][j] = static_cast<float>(pixel) / 255.0f;}}return images;
}
// loading MNIST Labels
std::vector<int> read_mnist_labels(const std::string & path) {std::ifstream file(path, std::ios::binary);if (!file) {std::cout << "Cannot open file!" << std::endl;return {};}int magic_number = 0, num_items = 0;file.read((char*)&magic_number, sizeof(magic_number));file.read((char*)&num_items, sizeof(num_items));// Reverse Integers (MNIST data is in big endian format)magic_number = ((magic_number & 0xff000000) >> 24) | ((magic_number & 0x00ff0000) >> 8) |((magic_number & 0x0000ff00) << 8) | ((magic_number & 0x000000ff) << 24);num_items = ((num_items & 0xff000000) >> 24) | ((num_items & 0x00ff0000) >> 8) |((num_items & 0x0000ff00) << 8) | ((num_items & 0x000000ff) << 24);std::vector<int> labels(num_items);for (int i = 0; i < num_items; ++i) {unsigned char label = 0;file.read((char*)&label, sizeof(label));labels[i] = static_cast<int>(label);}return labels;
}
// 负责从txt文件中读取参数
std::vector<float> read_param(const std::string & path) {std::ifstream file(path);std::vector<float> params;float param;while (file >> param) {params.push_back(param);}return params;
}int main(int argc, char* argv[]) {std::string dir = argv[1];  //dir from args// cout << dir;//printf("%s", dir.c_str());auto images = read_mnist_images(dir + "/../../data/FashionMNIST/raw/t10k-images-idx3-ubyte");   //input height = input width = 28// loading labelauto labels = read_mnist_labels(dir + "/../../data/FashionMNIST/raw/t10k-labels-idx1-ubyte");// loading param from .txtauto conv1_weight = read_param(dir + "/conv1.weight.txt");auto conv1_bias = read_param(dir + "/conv1.bias.txt");auto conv2_weight = read_param(dir + "/conv2.weight.txt");auto conv2_bias = read_param(dir + "/conv2.bias.txt");auto fc1_weight = read_param(dir + "/fc1.weight.txt");auto fc1_bias = read_param(dir + "/fc1.bias.txt");auto fc2_weight = read_param(dir + "/fc2.weight.txt");auto fc2_bias = read_param(dir + "/fc2.bias.txt");auto fc3_weight = read_param(dir + "/fc3.weight.txt");auto fc3_bias = read_param(dir + "/fc3.bias.txt");int correct_nums = 0, predict_label;// images.size()int index = 0,k=0;auto start = std::chrono::high_resolution_clock::now();for (int t = 0; t < images.size(); t++) {//TODO:在这里实现逐张图片推理}// CUDA 同步cudaDeviceSynchronize();// calculate timeauto end = std::chrono::high_resolution_clock::now();std::chrono::duration<double> diff = end - start;// print resultstd::cout << std::fixed << std::setprecision(4) << diff.count() << ":"<<float(correct_nums)/float(images.size())return 0;
}
3.2 C++实现各网络层
既然框架和基本函数已经有了,那我们就专注于如何用C++ CUDA实现各个网络层即可:
前向推理过程为:输入图像->卷积层1->ReLu层->池化层->卷积层2->ReLu层->池化层->全连接层1->ReLu层->全连接层2->ReLu层->全连接层3->推理结果:
3.0 CUDA 编程 核心思路
假设我们要对6张24x24大小的图像中每个像素值进行加1的操作,传统的串行处理方法显然耗时较大。
那么我们可以调用CUDA函数开辟6个并行块,每个块有着24x24的线程。我们让输入的6x24x24的像素值平摊到这6x24x24个线程,让他们并行处理(读取像素值并加1),再让这6x24x24个线程将结果汇总到同一块内存中,从而得到最终结果。
//伪代码dim3 blocksperGrid(6);	//设置并行块数为6
dim3 threadsperBlock(24, 24); //每个并行块中有(24x24)个线程处理函数 << < blocksperGrid, threadsperBlock >> > (balabalabala);为了效率起见,我们用CUDA时,往往会将二维矩阵转化为一维矩阵(可以参考矩阵向量化/一维化等资料),比如输入6张24x24的图像,我们并不用6个[24][24]的二维矩阵来存储,而是用一个6x24x24=3456的一维矩阵进行存储。
那问题来了,我们如何从一维矩阵中获取原先二维矩阵中对应下标的像素呢?其实进行一点简单的地址换算即可。
每个并行块负责处理一张图片,且每个线程块都有自己的一个ID号,即blockIdx,故每个线程块可以用blockIdx * 0 到 blockIdx * 24 * 24 来获取自己负责的那张图像数据,在本例子中,blockIdx取值为0~5。
每个并行块都可以看成一个24x24的二维矩阵,矩阵里的每个元素即为一个线程,每个线程都有自己的一个二维标识的ID号,即(threadIdx.x,threadIdx.y),利用blockIdx * 24 * 24 + threadIdx.x * 24 + threadIdx.y 则可以获取自己负责处理的像素下标,在本例子中,threadIdx.x和y取值为0~23。
所以我们只要让每个线程执行以下操作:
//伪代码
//每个线程都会调用一次线程函数
__ global ___ 线程函数(float* input_image, float* output_image)
{input_pixel_index = blockIdx * 24 * 24 + threadIdx.x * 24 + threadIdx.y;input_pixel_value = input_image[input_pixel_index];//输出值 = 原像素值+1output_pixel_value = input_pixel_value + 1;	//假设输出的数据也是存在一维的6x24x24矩阵中output_pixel_index = blockIdx * 24 * 24 + threadIdx.x * 24 + threadIdx.y;//存到输出矩阵中output_image[output_pixel_index] = output_pixel_value ;}int main()
{dim3 blocksperGrid(6);	//设置并行块数为6,必须要用dim3设置dim3 threadsperBlock(24, 24); //每个并行块中有(24x24)个线程线程函数<< < blocksperGrid, threadsperBlock >> > (balabalabala);
}//自此,我们就能让每个并行线程根据自己的下标找到自己所负责的待处理像素。
每个线程都会调用同一个线程函数(),但是由于自身的ID号不同,从而读取和处理的像素值也不同,从而达到一函数多用的并行效果,而这也是CUDA编程的核心思路所在。
说白了,写CUDA并行函数就是一个找下标对应关系的过程,只要你找到了每个线程与对应负责的元素下标关系,写起来很简单,原理并不复杂。
3.1 卷积层Conv1
由LeNet模型定义可知,我们从MNIST中读取一张图片后,需要输入到第一个卷积层nn.Conv2d(1, 6, 5)中。
| 卷积层1 | 数据 |
|---|---|
| 输入channels | 1 通道 |
| 输出channels | 6 通道 |
| 核大小 | 5*5 |
| 核数量 | 6 (有几个输出通道就有几个核) |
| 权重参数(weight)数量 | 25*6 (有6个核,每个核是5*5的矩阵,每个矩阵元素代表一个weight) |
| 偏置参数(bias)数量 | 6 (有几个核就有几个偏置) |
由卷积层基本定义可知,其运算过程如下:

矩阵转换成一维是为了方便处理,而要取到一维矩阵中的对应像素值,只要进行上述的下标转换关系即可。
由于MNIST数据集单张图片大小是28x28,而由pytorch官方提供的卷积公式可知,当卷积核大小为5x5时,无padding情况下得到的输出图片大小为24x24:
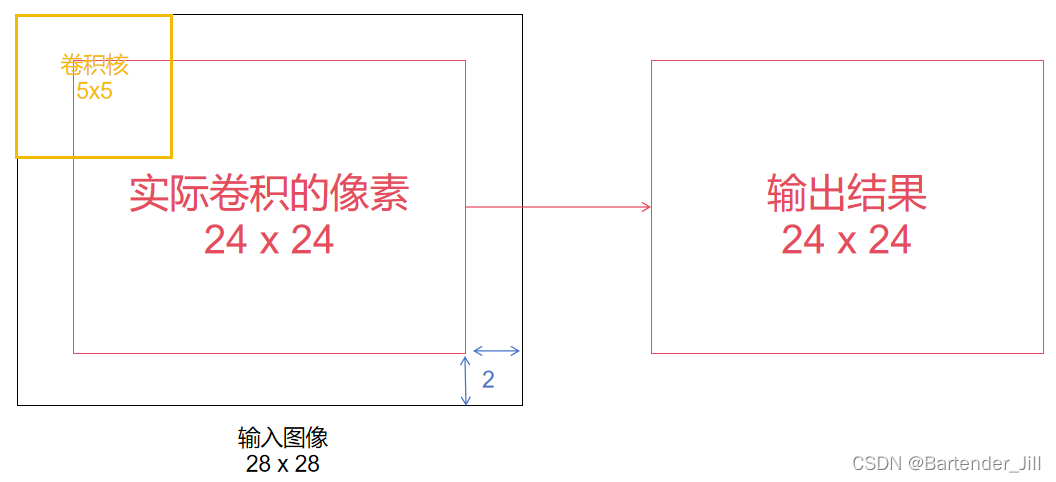
所以我们可以这样理解,不用CUDA的话,C++代码会串行对这24x24个像素逐个进行5x5的卷积操作,十分耗时。
那么就用CUDA开辟24x24个线程,让它们并行执行,每个线程负责自己的5x5卷积操作,这样相当于一次卷积操作的耗时就完成了对图片所有像素的卷积。
总共6个输出通道,故要开辟6x24x24个并行线程(6个并行块,每个块中有24x24个并行线程)。
除此之外:
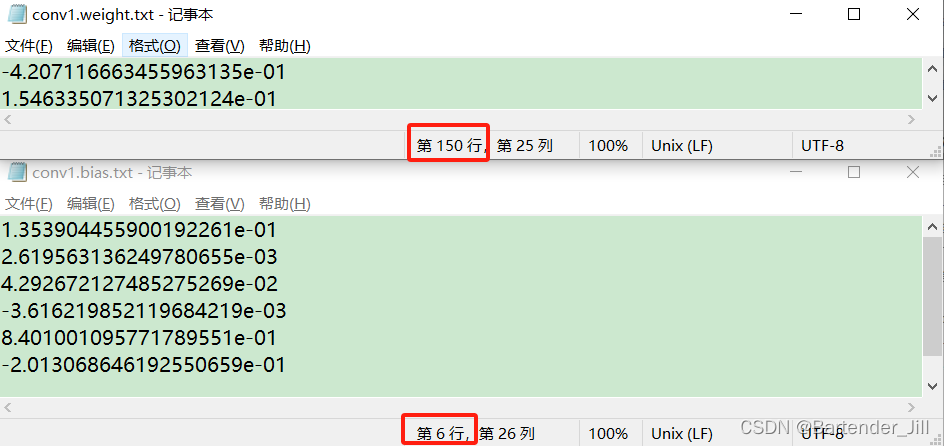
每个卷积核有着25个权重(weight),6个卷积核则有150个权重值;
每个卷积核有着自己的一个偏置(bias),6个卷积核则有6个偏置值;

而我们先前导出的模型结果txt文件中,第一个卷积层的参数conv1.weight.txt以及conv1.bias.txt,刚好有着150个weight以及6个bias数据。
那这就好办了!我们要做的事情就是:
1.读入训练好的150个权重值,赋值到6个卷积核上面。
2.用这6个卷积核分别对输入图片的中央24x24个像素进行卷积,得到6个通道的24x24输出结果。
3.读入训练好的6个偏置值,在对应的自己通道里24x24逐个像素进行相加,相加后即为Conv1层的输出结果。
故我们先定义好以下内容(为了直观起见直接在for循环里定义):
for (int t = 0; t < images.size(); t++) {//TODO:在这里实现逐张图片推理//Conv1int input_height = 28; //MNIST数据集单张图像大小 长=宽=28int kernel_height = 5;int output_height = input_height - kernel_height + 1; //用卷积层公式得到输出的高度int input_channels = 1, output_channels = 6, kernel_channel = 1, kernel_nums = 6;float* device_InputImage; //开辟一个显卡上的内存空间,用于存储输入的图像数据float* device_OutputImage; //开辟一个显卡上的内存空间,用于存储输出的图像数据float* device_kernel_weight; //开辟一个显卡上的内存空间,用于存储卷积层的核的 150 个权重参数float* device_kernel_bias; //开辟一个显卡上的内存空间,用于存储卷积层的核的 6 个偏置参数//用cudaMalloc函数给显卡分配所需内存大小,并用wbCheck检查是否分配成功wbCheck(cudaMemcpy(device_InputImage, &images[t][0], images[t].size() * sizeof(float), cudaMemcpyHostToDevice)); //读入MNIST数据集第t张图片wbCheck(cudaMalloc((void**)&device_InputImage, input_height * input_height * input_channels * sizeof(float)));//28x28x1wbCheck(cudaMalloc((void**)&device_OutputImage, output_height * output_height * output_channels * sizeof(float)));//24x24x6wbCheck(cudaMalloc((void**)&device_kernel_weight, kernel_height * kernel_height * kernel_channel * kernel_nums * sizeof(float)));//5x5x6=150wbCheck(cudaMalloc((void**)&device_kernel_bias, kernel_nums * sizeof(float))); //6//分配完内存后,将txt中的权重值和bias值存储到分配好的空间上。wbCheck(cudaMemcpy(device_kernel_weight, &conv1_weight[0], kernel_height * kernel_height * kernel_nums * sizeof(float), cudaMemcpyHostToDevice)); wbCheck(cudaMemcpy(device_kernel_bias, &conv1_bias[0], kernel_nums * sizeof(float), cudaMemcpyHostToDevice));//分配完内存后,设定你要并行的数量dim3 threadsperBlock(output_height, output_height); //(24,24)dim3 blocksperGrid(6); //总共6个输出通道,故要开辟6x24x24个并行线程(6个并行块,每个块中有24x24个并行线程)//调用并行函数Convlotuion1,该函数会以6x(24x24)个线程进行运算Convolution1 << < blocksperGrid, threadsperBlock >> > (device_InputImage, device_OutputImage, device_kernel_weight, device_kernel_bias, input_height, output_height, kernel_height);}
为了效率起,我们并不将6x5x5的卷积核定义为6个5x5的二维矩阵,而是定义成1个6x5x5的一维矩阵,每个并行块可以用自己的块Id来获取自己通道对应的核参数: blockId * 0 至 blockId * 5 * 5。
在将结果保存到1个一维的6x24x24的输出图像时,每个线程可以根据自己所属的并行块Id以及线程Id来得到要保存的地址下标:blockIdx.x * 24 * 24 + threadIdx.x * 24 + threadIdx.y
blockIdx.x * 24 * 24 代表前面已经存入了多少通道的24 x 24的图像数据,按顺序接下来的位置才是自己这个通道所要存储的。
threadIdx.x * 24 + threadIdx.y则表示自己这个线程负责的像素下标。两者加起来才是实际要在6x24x24中存的位置。
为了上述运算方便,我已经将地址换算关系封装成OFFSET()函数,最终卷积层的线程函数如下:
// 给定二维矩阵中的行和列下标,计算出一维矩阵对应下标的元素。
#define OFFSET(row, col, ld) ((row) * (ld) + (col))	//global是指该函数是用于CUDA并行函数
__global__ void Convolution1(float* input_image, float* output_image, float* kernel_weights, float* kernel_bias, int input_height, int output_height, int kernel_height)
{int input_image_index;	//要处理的输入像素对应下标int kernel_index;		//当前运行到哪个核的哪个下标float value = 0;//由于我们的线程数目设置的是(24,24),故不可能超过边界,这里的if可加可不加。如果设置成(32,32)则需要加if (threadIdx.y < output_height && threadIdx.x < output_height){//进行卷积操作,至于什么blockIdx和threadIdx说白了就是地址换算,看着复杂而已for (int i = 0; i < kernel_height; i++)       for (int j = 0; j < kernel_height; j++) { input_image_index = OFFSET(threadIdx.x+i, threadIdx.y+j, input_height);kernel_index = blockIdx.x * kernel_height * kernel_height + OFFSET(i, j, kernel_height);value += input_image[input_image_index] * kernel_weights[kernel_index];}//将卷积结果存入到输出图像的对应位置中output_image[blockIdx.x * output_height* output_height + threadIdx.x * output_height + threadIdx.y] = value + kernel_bias[blockIdx.x];//确保线程都执行完毕__syncthreads();}
}
每个线程都会执行相同的卷积函数Convolution1(),但由于自身ID号以及所属块ID号不同,使得虽然执行函数相同但执行的像素不同,从而实现一函数多用,6x24x24个线程都能卷积自己所负责的那个像素,最终汇总到output_image中。
3.2 激活函数ReLu1
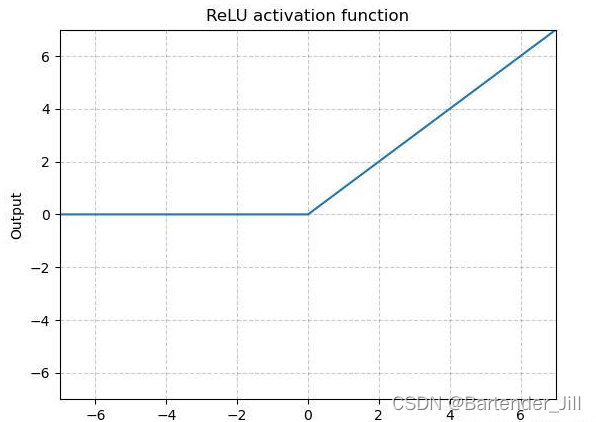
从Conv1层输出的结果需要送入到ReLu层,该实现相对简单。
原理:将输入的图像中小于0的像素值设置为0,其他不变,最后汇总后输出
由于ReLu并不改变输入图像大小,所以输入尺寸就=Conv1的输出尺寸,其余照葫芦画瓢:
for (int t = 0; t < images.size(); t++) {//TODO:在这里实现逐张图片推理//Conv1//.....//Reluint relu_input_height = output_height; //relu input height = conv1 output heightint relu_output_height = relu_input_height;int relu_input_channels = output_channels; //relu input channels = conv1 output channelsfloat* device_relu_Output_image;wbCheck(cudaMalloc((void**)&device_relu_Output_image, relu_input_height * relu_input_height * relu_input_channels * sizeof(float)));ReLu << < blocksperGrid, threadsperBlock >> > (device_OutputImage, device_relu_Output_image, relu_input_height, relu_output_height);}
__global__ void ReLu(float* input_image, float* output_image,int input_height,int output_height) {if (threadIdx.y < output_height && threadIdx.x < output_height){int input_index = blockIdx.x * input_height * input_height + threadIdx.x * input_height + threadIdx.y;if (input_image[input_index] <= 0)output_image[input_index] = 0;elseoutput_image[input_index] = input_image[input_index];__syncthreads();}
}
3.2 池化层MaxPool1
从ReLu出来后,数据进入到nn.MaxPool2d(2, 2)中。
nn.MaxPool2d(2, 2)的第一个参数2是指核大小为2x2,第二个参数是指核移动的步数。
该函数的作用是:找到该像素周围四个像素中的最大值并输出:
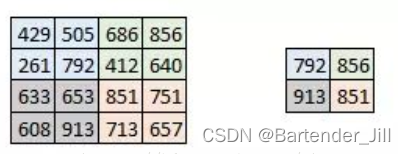
由官方给的公式可得输入图像和输出图像的尺寸关系:
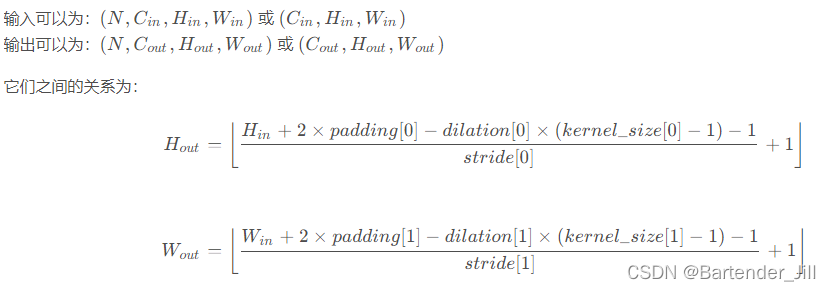
| MaxPool1 | 数据 |
|---|---|
| 输入channels | 6 通道 |
| 输出channels | 6 通道 |
| 输入图像大小 | 24*24 |
| 输出图像大小 | 12*12 |
| 核大小 | 2*2 |
有了输入图像和输出图像的关系(即输入图像为24x24,输出图像为12x12),继续照葫芦画瓢:
for (int t = 0; t < images.size(); t++) {//TODO:在这里实现逐张图片推理//Conv1//ReLu1//..... //Max Pool1int pool1_input_height = relu_output_height;int pool1_output_height = 12;int stride = 2, pool1_kernel_height = 2;int pool1_channels = 6;float* device_pool1_Output_image;wbCheck(cudaMalloc((void**)&device_pool1_Output_image, pool1_output_height * pool1_output_height * pool1_channels * sizeof(float)));dim3 pool1_threadsperBlock(12, 12);//threadsperBlockMaxPool1 << <blocksperGrid, pool1_threadsperBlock >> > (device_relu_Output_image, device_pool1_Output_image, pool1_input_height, pool1_output_height, pool1_kernel_height, stride, pool1_channels);}
//找出周围最大值
__global__ void MaxPool1(float* input_image, float* output_image, int input_height, int output_height, int kernel_height, int stride,int channel) {int input_image_index;int kernel_index;float value = 0;if (threadIdx.y < output_height && threadIdx.x < output_height){for (int i = 0; i < kernel_height; i++)        for (int j = 0; j < kernel_height; j++) {  input_image_index = blockIdx.x*input_height*input_height+ OFFSET(threadIdx.x*stride + i, threadIdx.y*stride + j, input_height);if (input_image[input_image_index] >= value)	//如果当前值更大{value = input_image[input_image_index];}}output_image[blockIdx.x * output_height * output_height + threadIdx.x * output_height + threadIdx.y] = value;__syncthreads();}
}
3.3 卷积层Conv2
与卷积层Conv1同理,变的有输入图像尺寸大小和输出图像尺寸大小(输入12x12输出8x8),输入和输出的通道(输入6通道,输出16通道)。此时conv2weight.txt中有16x5x5个权重值,conv2bias.txt中有16个偏置值
且此时要用CUDA开辟16个并行块,每个并行块有8x8的线程数:
for (int t = 0; t < images.size(); t++) {//TODO:在这里实现逐张图片推理//Conv1//ReLu1//Max Pool1//..... //Conv2int conv2_input_height = pool1_output_height;//12int conv2_kernel_height = 5;int conv2_output_height = conv2_input_height - conv2_kernel_height + 1;//8int conv2_input_channels = 6, conv2_output_channels = 16, conv2_kernel_channel = 6, conv2_kernel_nums = 16;float* device_conv2__OutputImage;float* device_conv2__kernel_weight;float* device_conv2__kernel_bias;wbCheck(cudaMalloc((void**)&device_conv2__OutputImage, conv2_output_height * conv2_output_height * conv2_output_channels * sizeof(float)));wbCheck(cudaMalloc((void**)&device_conv2__kernel_weight, conv2_kernel_height * conv2_kernel_height * conv2_kernel_channel * conv2_kernel_nums * sizeof(float)));//5*5*6*15wbCheck(cudaMalloc((void**)&device_conv2__kernel_bias, conv2_kernel_nums * sizeof(float)));//16//读取权重和偏置wbCheck(cudaMemcpy(device_conv2__kernel_weight, &conv2_weight[0], conv2_kernel_height * conv2_kernel_height * conv2_kernel_channel * conv2_kernel_nums * sizeof(float), cudaMemcpyHostToDevice));wbCheck(cudaMemcpy(device_conv2__kernel_bias, &conv2_bias[0], conv2_kernel_nums * sizeof(float), cudaMemcpyHostToDevice));dim3 conv2_threadsperBlock(conv2_output_height, conv2_output_height); //(8,8)dim3 conv2_blocksperGrid(16);Convolution2 << < conv2_blocksperGrid, conv2_threadsperBlock >> > (device_pool1_Output_image, device_conv2__OutputImage, device_conv2__kernel_weight, device_conv2__kernel_bias, conv2_input_height, conv2_output_height, conv2_kernel_height, conv2_input_channels);}
__global__ void Convolution2(float* input_image, float* output_image, float* kernel_weights, float* kernel_bias, int input_height, int output_height, int kernel_height,int input_channel)
{int input_image_index;int kernel_index;if (threadIdx.y < output_height && threadIdx.x < output_height){int output_index = blockIdx.x * output_height * output_height + threadIdx.x * output_height + threadIdx.y;float value = 0;//进行卷积操作for (int z = 0; z < input_channel; z++) {for (int i = 0; i < kernel_height; i++)        {for (int j = 0; j < kernel_height; j++) {  input_image_index = z * input_height * input_height + OFFSET(threadIdx.x + i, threadIdx.y + j, input_height);kernel_index = (blockIdx.x) * (input_channel) * kernel_height * kernel_height + z * kernel_height * kernel_height + OFFSET(i, j, kernel_height);value += input_image[input_image_index] * kernel_weights[kernel_index];}}}output_image[output_index] = value + kernel_bias[blockIdx.x];}}
3.4 激活函数ReLu2
接下来又进入到ReLu层,与上面的ReLu同理,要改的只有尺寸等数据:
for (int t = 0; t < images.size(); t++) {//TODO:在这里实现逐张图片推理//Conv1//ReLu1//Max Pool1//Conv2//.....//ReLu2int relu2_input_channels = conv2_output_channels;//16int relu2_input_height = conv2_output_height;//8int relu2_output_height = relu2_input_height;//8float* device_relu2_Output_image;wbCheck(cudaMalloc((void**)&device_relu2_Output_image, relu2_output_height * relu2_output_height * relu2_input_channels * sizeof(float)));dim3 relu2_threadsperBlock(conv2_output_height, conv2_output_height); //(8,8)dim3 relu2_blocksperGrid(16);ReLu << <relu2_blocksperGrid, relu2_threadsperBlock >> > (device_conv2__OutputImage, device_relu2_Output_image, relu2_input_height, relu2_output_height);}
ReLu本身函数不变
3.5 池化层MaxPool2
| MaxPool1 | 数据 |
|---|---|
| 输入channels | 16 通道 |
| 输出channels | 16 通道 |
| 输入图像大小 | 8*8 |
| 输出图像大小 | 4*4 |
| 核大小 | 2*2 |
接下来又进入到池化层,与上面的池化层同理,要改的只有尺寸等数据(输入8x8,输出4x4):
for (int t = 0; t < images.size(); t++) {//TODO:在这里实现逐张图片推理//Conv1//ReLu1//Max Pool1//Conv2//ReLu2//.....//Max pool2int pool2_input_height = relu2_output_height;int pool2_output_height = 4;//(pool2_input_height - 1)/2+1 ;int pool2_stride = 2, pool2_kernel_height = 2;int pool2_channels = relu2_input_channels;//16float* device_pool2_Output_image;wbCheck(cudaMalloc((void**)&device_pool2_Output_image, pool2_output_height* pool2_output_height* pool2_channels * sizeof(float)));dim3 pool2_threadsperBlock(pool2_output_height, pool2_output_height);//4dim3 pool2_blocksperGrid(16);MaxPool1 << <pool2_blocksperGrid, pool2_threadsperBlock >> > (device_relu2_Output_image, device_pool2_Output_image, pool2_input_height, pool2_output_height, pool2_kernel_height, pool2_stride, pool2_channels);}
MaxPool本身函数不变
3.6 全连接层fc1
全连接层的作用:输入16x4x4=256的图像,输出1x120的数据。
全连接层可以看作是特殊的卷积层,
| 全连接层fc1 | 数据 |
|---|---|
| 输入channels | 16 通道 |
| 输出channels | 16 通道 |
| 输入图像大小 | 4*4 |
| 输出图像大小 | 1*120 |
| 核大小 | 16*4*4 = 256 |
| 核数量 | 120 |
| 权重参数(weight)数量 | 256*120 = 30720 |
| 偏置参数(bias)数量 | 120 (有几个核就有几个偏置) |
其过程是,将输入矩阵16x4x4中的256个元素,与大小为256的核(这样的核一共有120个)进行对应元素相乘再相加,得到的结果再加上一个bias,从而得到输出的120个元素中的第一个元素值。
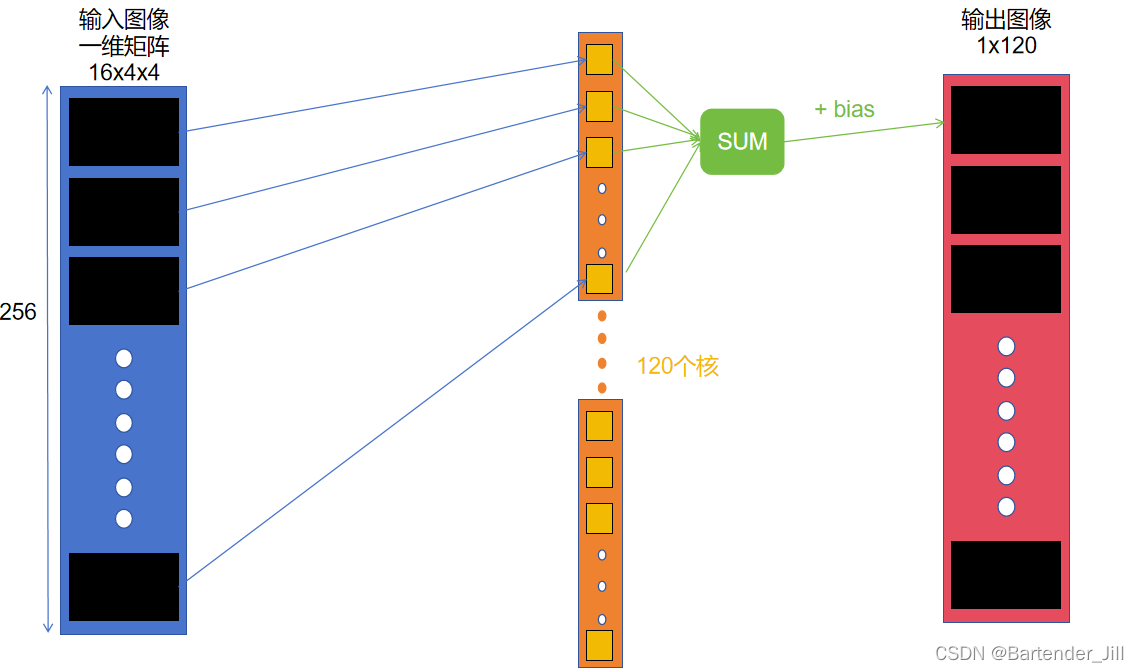
所以我们可以用CUDA开辟120个并行块,每个块再开辟256个线程。其中,每个并行块负责处理一个核,每个线程负责一个元素相乘。
这里为了方便起见,只开辟了120个并行块,每个并行块只有一个线程,该线程就负责一次核的计算:
for (int t = 0; t < images.size(); t++) {//TODO:在这里实现逐张图片推理//Conv1//ReLu1//Max Pool1//Conv2//ReLu2//Max pool2//.....//fc1int fc1_input_channels = pool2_channels;//16int fc1_input_height = pool2_output_height; //4int fc1_output_height = 120;float* device_fc1__kernel_weight;float* device_fc1__kernel_bias;float* device_fc1_Output_image;wbCheck(cudaMalloc((void**)&device_fc1__kernel_weight, fc1_input_height* fc1_input_height* fc1_input_channels* fc1_output_height * sizeof(float)));//4*4*16*120wbCheck(cudaMalloc((void**)&device_fc1__kernel_bias, fc1_output_height * sizeof(float)));//120wbCheck(cudaMalloc((void**)&device_fc1_Output_image, fc1_output_height * sizeof(float)));//120wbCheck(cudaMemcpy(device_fc1__kernel_weight, &fc1_weight[0], fc1_input_height* fc1_input_height* fc1_input_channels* fc1_output_height * sizeof(float), cudaMemcpyHostToDevice));wbCheck(cudaMemcpy(device_fc1__kernel_bias, &fc1_bias[0], fc1_output_height * sizeof(float), cudaMemcpyHostToDevice));dim3 fc1_threadsperBlock(1);//(16)dim3 fc1_blocksperGrid(fc1_output_height);//(120)Fc1_naive << <fc1_blocksperGrid, fc1_threadsperBlock >> > (device_pool2_Output_image, device_fc1_Output_image, device_fc1__kernel_weight, device_fc1__kernel_bias, fc1_input_height, fc1_input_channels);}
__global__ void Fc1_naive(float* input_image, float* output_image, float* fc1_weights, float* fc1_bias, int input_height, int input_channel) {int input_index = 0;int fc1_w_index = 0;//计算一次核操作,即对应元素相乘再相加for (int i = 0; i < 16 * 4 * 4; i++){output_image[blockIdx.x] += input_image[i] * fc1_weights[blockIdx.x*16*4*4 + i];}//最后再加上一次biasoutput_image[blockIdx.x] += fc1_bias[blockIdx.x];
}
3.7 激活函数ReLu3
for (int t = 0; t < images.size(); t++) {//TODO:在这里实现逐张图片推理//Conv1//ReLu1//Max Pool1//Conv2//ReLu2//Max pool2//fc1//.....//relu fc1int relu_fc1_input_channels = 1;//1int relu_fc1_input_height = fc1_output_height;//120int relu_fc1_output_height = relu_fc1_input_height;//120float* device_relu_fc1_Output_image;wbCheck(cudaMalloc((void**)&device_relu_fc1_Output_image, relu_fc1_output_height * sizeof(float)));dim3 relu_fc1_threadsperBlock(1); //(8,8)dim3 relu_fc1_blocksperGrid(relu_fc1_output_height);ReLu_fc1 << <relu_fc1_blocksperGrid, relu_fc1_threadsperBlock >> > (device_fc1_Output_image, device_relu_fc1_Output_image);}
__global__ void ReLu_fc1(float* input_image, float* output_image) {if (input_image[blockIdx.x] <= 0)output_image[blockIdx.x] = 0;elseoutput_image[blockIdx.x] = input_image[blockIdx.x];
}
3.8 全连接层fc2
| 全连接层fc2 | 数据 |
|---|---|
| 输入channels | 1 通道 |
| 输出channels | 1 通道 |
| 输入图像大小 | 1*120 |
| 输出图像大小 | 1*84 |
| 核大小 | 120 |
| 核数量 | 84 |
| 权重参数(weight)数量 | 10080 |
| 偏置参数(bias)数量 | 84 (有几个核就有几个偏置) |
与全连接层fc1同理,只是更改了尺寸:
for (int t = 0; t < images.size(); t++) {//TODO:在这里实现逐张图片推理//Conv1//ReLu1//Max Pool1//Conv2//ReLu2//Max pool2//fc1//relu fc1//.....//fc2int fc2_input_channels = 1;int fc2_input_height = relu_fc1_output_height; //120int fc2_output_height = 84;float* device_fc2__kernel_weight;float* device_fc2__kernel_bias;float* device_fc2_Output_image;wbCheck(cudaMalloc((void**)&device_fc2__kernel_weight, fc2_input_height* fc2_input_channels* fc2_output_height * sizeof(float)));//120*84wbCheck(cudaMalloc((void**)&device_fc2__kernel_bias, fc2_output_height * sizeof(float)));//84wbCheck(cudaMalloc((void**)&device_fc2_Output_image, fc2_output_height * sizeof(float)));//84wbCheck(cudaMemcpy(device_fc2__kernel_weight, &fc2_weight[0], fc2_input_height* fc2_input_channels* fc2_output_height * sizeof(float), cudaMemcpyHostToDevice));wbCheck(cudaMemcpy(device_fc2__kernel_bias, &fc2_bias[0], fc2_output_height * sizeof(float), cudaMemcpyHostToDevice));dim3 fc2_threadsperBlock(1);//(16)dim3 fc2_blocksperGrid(fc2_output_height);//(84)Fc2_naive << <fc2_blocksperGrid, fc2_threadsperBlock >> > (device_relu_fc1_Output_image, device_fc2_Output_image, device_fc2__kernel_weight, device_fc2__kernel_bias, fc2_input_height, fc2_input_channels);}
__global__ void Fc2_naive(float* input_image, float* output_image, float* fc1_weights, float* fc1_bias, int input_height, int input_channel) {int input_index = 0;int fc1_w_index = 0;for (int i = 0; i < 120; i++){output_image[blockIdx.x] += input_image[i] * fc1_weights[blockIdx.x * 120 + i];}output_image[blockIdx.x] += fc1_bias[blockIdx.x];
}
3.9 激活函数ReLu4
与激活函数ReLu3同理,只是更改了尺寸:
for (int t = 0; t < images.size(); t++) {//TODO:在这里实现逐张图片推理//Conv1//ReLu1//Max Pool1//Conv2//ReLu2//Max pool2//fc1//relu fc1//fc2//.....//relu fc2int relu_fc2_input_channels = 1;//1int relu_fc2_input_height = fc2_output_height;//84int relu_fc2_output_height = relu_fc2_input_height;//84float* device_relu_fc2_Output_image;wbCheck(cudaMalloc((void**)&device_relu_fc2_Output_image, relu_fc2_output_height * sizeof(float)));dim3 relu_fc2_threadsperBlock(1); //(1)dim3 relu_fc2_blocksperGrid(relu_fc2_output_height);//84ReLu_fc1 << <relu_fc2_blocksperGrid, relu_fc2_threadsperBlock >> > (device_fc2_Output_image, device_relu_fc2_Output_image);}
3.10 全连接层fc3
| 全连接层fc3 | 数据 |
|---|---|
| 输入channels | 1 通道 |
| 输出channels | 1 通道 |
| 输入图像大小 | 1*84 |
| 输出图像大小 | 1*10 |
| 核大小 | 84 |
| 核数量 | 10 |
| 权重参数(weight)数量 | 84*1*10 = 840 |
| 偏置参数(bias)数量 | 10 (输出图像大小) |
与全连接层fc1同理,只是更改了尺寸:
for (int t = 0; t < images.size(); t++) {//TODO:在这里实现逐张图片推理//Conv1//ReLu1//Max Pool1//Conv2//ReLu2//Max pool2//fc1//relu fc1//fc2//relu fc2//.....//fc3int fc3_input_channels = 1;int fc3_input_height = relu_fc2_output_height; //84int fc3_output_height = 10;float* host_fc3_Output_image;host_fc3_Output_image = (float*)malloc(sizeof(float) * fc3_output_height);float* device_fc3__kernel_weight;float* device_fc3__kernel_bias;float* device_fc3_Output_image;wbCheck(cudaMalloc((void**)&device_fc3__kernel_weight, fc3_input_height* fc3_input_channels* fc3_output_height * sizeof(float)));//120*84wbCheck(cudaMalloc((void**)&device_fc3__kernel_bias, fc3_output_height * sizeof(float)));//84wbCheck(cudaMalloc((void**)&device_fc3_Output_image, fc3_output_height * sizeof(float)));//84wbCheck(cudaMemcpy(device_fc3__kernel_weight, &fc3_weight[0], fc3_input_height* fc3_input_channels* fc3_output_height * sizeof(float), cudaMemcpyHostToDevice));wbCheck(cudaMemcpy(device_fc3__kernel_bias, &fc3_bias[0], fc3_output_height * sizeof(float), cudaMemcpyHostToDevice));dim3 fc3_threadsperBlock(1);//(16)dim3 fc3_blocksperGrid(fc3_output_height);//(84)Fc3_naive << <fc3_blocksperGrid, fc3_threadsperBlock >> > (device_relu_fc2_Output_image, device_fc3_Output_image, device_fc3__kernel_weight, device_fc3__kernel_bias, fc3_input_height, fc3_input_channels);//将输出结果拷贝回Host内存cudaMemcpy(host_fc3_Output_image, device_fc3_Output_image, fc3_output_height * sizeof(float), cudaMemcpyDeviceToHost);}
__global__ void Fc3_naive(float* input_image, float* output_image, float* fc1_weights, float* fc1_bias, int input_height, int input_channel) {int input_index = 0;int fc1_w_index = 0;for (int i = 0; i < 84; i++){output_image[blockIdx.x] += input_image[i] * fc1_weights[blockIdx.x * 84 + i];}output_image[blockIdx.x] += fc1_bias[blockIdx.x];
}
3.11 输出结果
经过上述步骤,我们最终便能得到推理结果,1万张图片推理时间应当是2秒钟以内,准确率应该在80%左右。
除了上述网络层的搭建,我们CUDA实际编程过程也有一些细节需要注意:
- 在逐张图片推理过程中,需要每次都将上一次开辟出来的空间数据清零,不然会导致逐张图片推理后误差越来越大。
- 每次调用完global函数后,应当检查函数是否执行正常(用wbCheck(cudaGetLastError())等函数)。
- 各个网络层的输入/输出尺寸大小等变量其实应该在for循环代码块外定义,以免重复定义浪费时间。
- 在一切结束后记得调用cudaFree()释放内存。
3.12 后续改进
如果有想继续深入了解,并加快程序运行速度者,可以使用:
- 动态并行方法,即开辟1万个线程,每个线程又并行处理处理一张图片,从而避免for循环串行带来的时间开销。
- 使用tiling技术,利用好共享内存,减少重复计算量。
- 了解CUDA bank冲突机制,对内存读写过程进行改善。
四、源码
4.1 CUDA最终源码
#include <fstream>
#include <iostream>
#include <vector>
#include <chrono>
#include <iomanip>
#include <string>
#include <stdlib.h>
#include "cuda_runtime.h"
#include "device_launch_parameters.h"#ifndef __CUDACC__
#define __CUDACC__
#endif
//#include <device_functions.h>#define wbCheck(stmt)  do {                                                    \cudaError_t err = stmt;                                               \if (err != cudaSuccess) {                                             \printf( "\n\nFailed to run stmt %d ", __LINE__);                       \printf( "Got CUDA error ...  %s \n\n", cudaGetErrorString(err));    \return -1;                                                        \}                                                                     \} while(0)// loading MNIST images
std::vector<std::vector<float>> read_mnist_images(const std::string & path) {std::ifstream file(path, std::ios::binary);if (!file) {std::cout << "Cannot open file!" << std::endl;return {};}int magic_number = 0, num_images = 0, num_rows = 0, num_cols = 0;file.read((char*)&magic_number, sizeof(magic_number));file.read((char*)&num_images, sizeof(num_images));file.read((char*)&num_rows, sizeof(num_rows));file.read((char*)&num_cols, sizeof(num_cols));// Reverse Integers (MNIST data is in big endian format)magic_number = ((magic_number & 0xff000000) >> 24) | ((magic_number & 0x00ff0000) >> 8) |((magic_number & 0x0000ff00) << 8) | ((magic_number & 0x000000ff) << 24);num_images = ((num_images & 0xff000000) >> 24) | ((num_images & 0x00ff0000) >> 8) |((num_images & 0x0000ff00) << 8) | ((num_images & 0x000000ff) << 24);num_rows = ((num_rows & 0xff000000) >> 24) | ((num_rows & 0x00ff0000) >> 8) |((num_rows & 0x0000ff00) << 8) | ((num_rows & 0x000000ff) << 24);num_cols = ((num_cols & 0xff000000) >> 24) | ((num_cols & 0x00ff0000) >> 8) |((num_cols & 0x0000ff00) << 8) | ((num_cols & 0x000000ff) << 24);int image_size = num_rows * num_cols;std::vector<std::vector<float>> images(num_images, std::vector<float>(image_size));for (int i = 0; i < num_images; ++i) {for (int j = 0; j < image_size; ++j) {unsigned char pixel = 0;file.read((char*)&pixel, sizeof(pixel));images[i][j] = static_cast<float>(pixel) / 255.0f;}}return images;
}
// loading MNIST Labels
std::vector<int> read_mnist_labels(const std::string & path) {std::ifstream file(path, std::ios::binary);if (!file) {std::cout << "Cannot open file!" << std::endl;return {};}int magic_number = 0, num_items = 0;file.read((char*)&magic_number, sizeof(magic_number));file.read((char*)&num_items, sizeof(num_items));// Reverse Integers (MNIST data is in big endian format)magic_number = ((magic_number & 0xff000000) >> 24) | ((magic_number & 0x00ff0000) >> 8) |((magic_number & 0x0000ff00) << 8) | ((magic_number & 0x000000ff) << 24);num_items = ((num_items & 0xff000000) >> 24) | ((num_items & 0x00ff0000) >> 8) |((num_items & 0x0000ff00) << 8) | ((num_items & 0x000000ff) << 24);std::vector<int> labels(num_items);for (int i = 0; i < num_items; ++i) {unsigned char label = 0;file.read((char*)&label, sizeof(label));labels[i] = static_cast<int>(label);}return labels;
}//读取参数
std::vector<float> read_param(const std::string & path) {std::ifstream file(path);std::vector<float> params;float param;while (file >> param) {params.push_back(param);}return params;
}//用于打印输出,记得要先将Device内存中数据拷贝回Host才能打印
void printVector(float* a)
{printf("\nprintconv1 : \n");for (int i = 0; i < 24; i++){for (int j = 0; j < 24; j++){std::cout << a[0 * 24 * 24 + i * 24 + j] << " ";}std::cout << std::endl;}std::cout << std::endl;
}#define BLOCK_SIZE 32// 24 * 24
#define OFFSET(row, col, ld) ((row) * (ld) + (col))
__global__ void Convolution1(float* input_image, float* output_image, float* kernel_weights, float* kernel_bias, int input_height, int output_height, int kernel_height)
{//printf("in\n\n");int input_image_index;int kernel_index;float value = 0;if (threadIdx.y < output_height && threadIdx.x < output_height){for (int i = 0; i < kernel_height; i++)       for (int j = 0; j < kernel_height; j++) { input_image_index = OFFSET(threadIdx.x+i, threadIdx.y+j, input_height);kernel_index = blockIdx.x * kernel_height * kernel_height + OFFSET(i, j, kernel_height);value += input_image[input_image_index] * kernel_weights[kernel_index];}output_image[blockIdx.x * output_height* output_height + threadIdx.x * output_height + threadIdx.y] = value + kernel_bias[blockIdx.x];__syncthreads();}
}__global__ void ReLu(float* input_image, float* output_image,int input_height,int output_height) {if (threadIdx.y < output_height && threadIdx.x < output_height){int input_index = blockIdx.x * input_height * input_height + threadIdx.x * input_height + threadIdx.y;if (input_image[input_index] <= 0)output_image[input_index] = 0;elseoutput_image[input_index] = input_image[input_index];__syncthreads();}
}__global__ void MaxPool1(float* input_image, float* output_image, int input_height, int output_height, int kernel_height, int stride,int channel) {int input_image_index;int kernel_index;float value = 0;if (threadIdx.y < output_height && threadIdx.x < output_height){for (int i = 0; i < kernel_height; i++)        for (int j = 0; j < kernel_height; j++) {  input_image_index = blockIdx.x*input_height*input_height+ OFFSET(threadIdx.x*stride + i, threadIdx.y*stride + j, input_height);if (input_image[input_image_index] >= value){value = input_image[input_image_index];}}output_image[blockIdx.x * output_height * output_height + threadIdx.x * output_height + threadIdx.y] = value;__syncthreads();}
}__global__ void Convolution2(float* input_image, float* output_image, float* kernel_weights, float* kernel_bias, int input_height, int output_height, int kernel_height,int input_channel)
{int input_image_index;int kernel_index;if (threadIdx.y < output_height && threadIdx.x < output_height){int output_index = blockIdx.x * output_height * output_height + threadIdx.x * output_height + threadIdx.y;float value = 0;for (int z = 0; z < input_channel; z++) {for (int i = 0; i < kernel_height; i++)        {for (int j = 0; j < kernel_height; j++) {  input_image_index = z * input_height * input_height + OFFSET(threadIdx.x + i, threadIdx.y + j, input_height);kernel_index = (blockIdx.x) * (input_channel) * kernel_height * kernel_height + z * kernel_height * kernel_height + OFFSET(i, j, kernel_height);value += input_image[input_image_index] * kernel_weights[kernel_index];}}}output_image[output_index] = value + kernel_bias[blockIdx.x];}}__global__ void Fc1(float* input_image, float* output_image, float* fc1_weights, float* fc1_bias,int input_height,int input_channel) {int ouput_index = blockIdx.x;float value = 0;int input_index = 0;int fc1_weights_index = 0;for (int i = 0; i < input_height; i++) {    //4*4for (int j = 0; j < input_height; j++) {//1*16*4*4fc1_weights_index = blockIdx.x * (input_channel) * input_height * input_height + threadIdx.x * input_height * input_height + OFFSET(i, j, input_height);input_index = threadIdx.x * input_height * input_height + OFFSET(i, j, input_height);value += input_image[input_index] * fc1_weights[fc1_weights_index];}}output_image[blockIdx.x] = output_image[blockIdx.x]+ value;__syncthreads();
}__global__ void Fc1_naive(float* input_image, float* output_image, float* fc1_weights, float* fc1_bias, int input_height, int input_channel) {int input_index = 0;int fc1_w_index = 0;for (int i = 0; i < 16 * 4 * 4; i++){output_image[blockIdx.x] += input_image[i] * fc1_weights[blockIdx.x*16*4*4 + i];}output_image[blockIdx.x] += fc1_bias[blockIdx.x];
}__global__ void ReLu_fc1(float* input_image, float* output_image) {if (input_image[blockIdx.x] <= 0)output_image[blockIdx.x] = 0;elseoutput_image[blockIdx.x] = input_image[blockIdx.x];
}__global__ void Fc2_naive(float* input_image, float* output_image, float* fc1_weights, float* fc1_bias, int input_height, int input_channel) {int input_index = 0;int fc1_w_index = 0;for (int i = 0; i < 120; i++){output_image[blockIdx.x] += input_image[i] * fc1_weights[blockIdx.x * 120 + i];}output_image[blockIdx.x] += fc1_bias[blockIdx.x];
}__global__ void Fc3_naive(float* input_image, float* output_image, float* fc1_weights, float* fc1_bias, int input_height, int input_channel) {int input_index = 0;int fc1_w_index = 0;for (int i = 0; i < 84; i++){output_image[blockIdx.x] += input_image[i] * fc1_weights[blockIdx.x * 84 + i];}output_image[blockIdx.x] += fc1_bias[blockIdx.x];
}int main(int argc, char* argv[]) {std::string dir = argv[1];  //dir from args// cout << dir;//printf("%s", dir.c_str());auto images = read_mnist_images(dir + "/../../data/FashionMNIST/raw/t10k-images-idx3-ubyte");   //input height = input width = 28// loading labelauto labels = read_mnist_labels(dir + "/../../data/FashionMNIST/raw/t10k-labels-idx1-ubyte");// loading param from .txtauto conv1_weight = read_param(dir + "/conv1.weight.txt");auto conv1_bias = read_param(dir + "/conv1.bias.txt");auto conv2_weight = read_param(dir + "/conv2.weight.txt");auto conv2_bias = read_param(dir + "/conv2.bias.txt");auto fc1_weight = read_param(dir + "/fc1.weight.txt");auto fc1_bias = read_param(dir + "/fc1.bias.txt");auto fc2_weight = read_param(dir + "/fc2.weight.txt");auto fc2_bias = read_param(dir + "/fc2.bias.txt");auto fc3_weight = read_param(dir + "/fc3.weight.txt");auto fc3_bias = read_param(dir + "/fc3.bias.txt");//Conv1int input_height = 28;int kernel_height = 5;int output_height = input_height - kernel_height + 1;int input_channels = 1, output_channels = 6, kernel_channel = 1, kernel_nums = 6;float* device_InputImage;float* device_OutputImage;float* device_kernel_weight;float* device_kernel_bias;wbCheck(cudaMalloc((void**)&device_InputImage, input_height * input_height * input_channels * sizeof(float)));wbCheck(cudaMalloc((void**)&device_OutputImage, output_height * output_height * output_channels * sizeof(float)));wbCheck(cudaMalloc((void**)&device_kernel_weight, kernel_height * kernel_height * kernel_channel * kernel_nums * sizeof(float)));wbCheck(cudaMalloc((void**)&device_kernel_bias, kernel_nums * sizeof(float)));wbCheck(cudaMemcpy(device_kernel_weight, &conv1_weight[0], kernel_height * kernel_height * kernel_nums * sizeof(float), cudaMemcpyHostToDevice));wbCheck(cudaMemcpy(device_kernel_bias, &conv1_bias[0], kernel_nums * sizeof(float), cudaMemcpyHostToDevice));dim3 threadsperBlock(output_height, output_height); //(24,24)dim3 blocksperGrid(6);//Reluint relu_input_height = output_height;  //relu input height = conv1 output heightint relu_output_height = relu_input_height;int relu_input_channels = output_channels; //relu input channels = conv1 output channelsfloat* device_relu_Output_image;wbCheck(cudaMalloc((void**)&device_relu_Output_image, relu_input_height * relu_input_height * relu_input_channels * sizeof(float)));//Max Pool1int pool1_input_height = relu_output_height;int pool1_output_height = 12;int stride = 2, pool1_kernel_height = 2;int pool1_channels = 6;float* device_pool1_Output_image;wbCheck(cudaMalloc((void**)&device_pool1_Output_image, pool1_output_height * pool1_output_height * pool1_channels * sizeof(float)));dim3 pool1_threadsperBlock(12, 12);//threadsperBlock//Conv2int conv2_input_height = pool1_output_height;//12int conv2_kernel_height = 5;int conv2_output_height = conv2_input_height - conv2_kernel_height + 1;//8int conv2_input_channels = 6, conv2_output_channels = 16, conv2_kernel_channel = 6, conv2_kernel_nums = 16;float* device_conv2__OutputImage;float* device_conv2__kernel_weight;float* device_conv2__kernel_bias;wbCheck(cudaMalloc((void**)&device_conv2__OutputImage, conv2_output_height * conv2_output_height * conv2_output_channels * sizeof(float)));wbCheck(cudaMalloc((void**)&device_conv2__kernel_weight, conv2_kernel_height * conv2_kernel_height * conv2_kernel_channel * conv2_kernel_nums * sizeof(float)));//5*5*6*15wbCheck(cudaMalloc((void**)&device_conv2__kernel_bias, conv2_kernel_nums * sizeof(float)));//16wbCheck(cudaMemcpy(device_conv2__kernel_weight, &conv2_weight[0], conv2_kernel_height * conv2_kernel_height * conv2_kernel_channel * conv2_kernel_nums * sizeof(float), cudaMemcpyHostToDevice));wbCheck(cudaMemcpy(device_conv2__kernel_bias, &conv2_bias[0], conv2_kernel_nums * sizeof(float), cudaMemcpyHostToDevice));dim3 conv2_threadsperBlock(conv2_output_height, conv2_output_height); //(8,8)dim3 conv2_blocksperGrid(16);//ReLu2int relu2_input_channels = conv2_output_channels;//16int relu2_input_height = conv2_output_height;//8int relu2_output_height = relu2_input_height;//8float* device_relu2_Output_image;wbCheck(cudaMalloc((void**)&device_relu2_Output_image, relu2_output_height * relu2_output_height * relu2_input_channels * sizeof(float)));dim3 relu2_threadsperBlock(conv2_output_height, conv2_output_height); //(8,8)dim3 relu2_blocksperGrid(16);//Max pool2int pool2_input_height = relu2_output_height;int pool2_output_height = 4;//(pool2_input_height - 1)/2+1 ;int pool2_stride = 2, pool2_kernel_height = 2;int pool2_channels = relu2_input_channels;//16float* device_pool2_Output_image;wbCheck(cudaMalloc((void**)&device_pool2_Output_image, pool2_output_height* pool2_output_height* pool2_channels * sizeof(float)));dim3 pool2_threadsperBlock(pool2_output_height, pool2_output_height);//4dim3 pool2_blocksperGrid(16);//fc1int fc1_input_channels = pool2_channels;//16int fc1_input_height = pool2_output_height; //4int fc1_output_height = 120;float* device_fc1__kernel_weight;float* device_fc1__kernel_bias;float* device_fc1_Output_image;wbCheck(cudaMalloc((void**)&device_fc1__kernel_weight, fc1_input_height* fc1_input_height* fc1_input_channels* fc1_output_height * sizeof(float)));//4*4*16*120wbCheck(cudaMalloc((void**)&device_fc1__kernel_bias, fc1_output_height * sizeof(float)));//120wbCheck(cudaMalloc((void**)&device_fc1_Output_image, fc1_output_height * sizeof(float)));//120wbCheck(cudaMemcpy(device_fc1__kernel_weight, &fc1_weight[0], fc1_input_height* fc1_input_height* fc1_input_channels* fc1_output_height * sizeof(float), cudaMemcpyHostToDevice));wbCheck(cudaMemcpy(device_fc1__kernel_bias, &fc1_bias[0], fc1_output_height * sizeof(float), cudaMemcpyHostToDevice));dim3 fc1_threadsperBlock(1);//(16)dim3 fc1_blocksperGrid(fc1_output_height);//(120)//relu fc1int relu_fc1_input_channels = 1;//1int relu_fc1_input_height = fc1_output_height;//120int relu_fc1_output_height = relu_fc1_input_height;//120float* device_relu_fc1_Output_image;wbCheck(cudaMalloc((void**)&device_relu_fc1_Output_image, relu_fc1_output_height * sizeof(float)));dim3 relu_fc1_threadsperBlock(1); //(8,8)dim3 relu_fc1_blocksperGrid(relu_fc1_output_height);//fc2 int fc2_input_channels = 1;int fc2_input_height = relu_fc1_output_height; //120int fc2_output_height = 84;float* device_fc2__kernel_weight;float* device_fc2__kernel_bias;float* device_fc2_Output_image;wbCheck(cudaMalloc((void**)&device_fc2__kernel_weight, fc2_input_height* fc2_input_channels* fc2_output_height * sizeof(float)));//120*84wbCheck(cudaMalloc((void**)&device_fc2__kernel_bias, fc2_output_height * sizeof(float)));//84wbCheck(cudaMalloc((void**)&device_fc2_Output_image, fc2_output_height * sizeof(float)));//84wbCheck(cudaMemcpy(device_fc2__kernel_weight, &fc2_weight[0], fc2_input_height* fc2_input_channels* fc2_output_height * sizeof(float), cudaMemcpyHostToDevice));wbCheck(cudaMemcpy(device_fc2__kernel_bias, &fc2_bias[0], fc2_output_height * sizeof(float), cudaMemcpyHostToDevice));dim3 fc2_threadsperBlock(1);//(16)dim3 fc2_blocksperGrid(fc2_output_height);//(84)//Relu fc2int relu_fc2_input_channels = 1;//1int relu_fc2_input_height = fc2_output_height;//84int relu_fc2_output_height = relu_fc2_input_height;//84float* device_relu_fc2_Output_image;wbCheck(cudaMalloc((void**)&device_relu_fc2_Output_image, relu_fc2_output_height * sizeof(float)));dim3 relu_fc2_threadsperBlock(1); //(1)dim3 relu_fc2_blocksperGrid(relu_fc2_output_height);//84//fc3int fc3_input_channels = 1;int fc3_input_height = relu_fc2_output_height; //84int fc3_output_height = 10;float* host_fc3_Output_image;host_fc3_Output_image = (float*)malloc(sizeof(float) * fc3_output_height);float* device_fc3__kernel_weight;float* device_fc3__kernel_bias;float* device_fc3_Output_image;wbCheck(cudaMalloc((void**)&device_fc3__kernel_weight, fc3_input_height* fc3_input_channels* fc3_output_height * sizeof(float)));//120*84wbCheck(cudaMalloc((void**)&device_fc3__kernel_bias, fc3_output_height * sizeof(float)));//84wbCheck(cudaMalloc((void**)&device_fc3_Output_image, fc3_output_height * sizeof(float)));//84wbCheck(cudaMemcpy(device_fc3__kernel_weight, &fc3_weight[0], fc3_input_height* fc3_input_channels* fc3_output_height * sizeof(float), cudaMemcpyHostToDevice));wbCheck(cudaMemcpy(device_fc3__kernel_bias, &fc3_bias[0], fc3_output_height * sizeof(float), cudaMemcpyHostToDevice));dim3 fc3_threadsperBlock(1);//(16)dim3 fc3_blocksperGrid(fc3_output_height);//(84)int correct_nums = 0, predict_label;// images.size()int index = 0,k=0;auto start = std::chrono::high_resolution_clock::now();for (int t = 0; t < images.size(); t++) {//Host to Device//Conv1wbCheck(cudaMemcpy(device_InputImage, &images[t][0], images[t].size() * sizeof(float), cudaMemcpyHostToDevice));// images[0].size()*sizeof(float)Convolution1 << < blocksperGrid, threadsperBlock >> > (device_InputImage, device_OutputImage, device_kernel_weight, device_kernel_bias, input_height, output_height, kernel_height);//wbCheck(cudaGetLastError());//wbCheck(cudaDeviceSynchronize());//ReLu1ReLu << < blocksperGrid, threadsperBlock >> > (device_OutputImage, device_relu_Output_image, relu_input_height, relu_output_height);//wbCheck(cudaGetLastError());//wbCheck(cudaDeviceSynchronize());//Max Pool 1MaxPool1 << <blocksperGrid, pool1_threadsperBlock >> > (device_relu_Output_image, device_pool1_Output_image, pool1_input_height, pool1_output_height, pool1_kernel_height, stride, pool1_channels);//wbCheck(cudaGetLastError());//wbCheck(cudaDeviceSynchronize());//Conv2Convolution2 << < conv2_blocksperGrid, conv2_threadsperBlock >> > (device_pool1_Output_image, device_conv2__OutputImage, device_conv2__kernel_weight, device_conv2__kernel_bias, conv2_input_height, conv2_output_height, conv2_kernel_height, conv2_input_channels);//wbCheck(cudaGetLastError());//wbCheck(cudaDeviceSynchronize());//ReLu2ReLu << <relu2_blocksperGrid, relu2_threadsperBlock >> > (device_conv2__OutputImage, device_relu2_Output_image, relu2_input_height, relu2_output_height);//wbCheck(cudaGetLastError());//wbCheck(cudaDeviceSynchronize());//Max Pool 2MaxPool1 << <pool2_blocksperGrid, pool2_threadsperBlock >> > (device_relu2_Output_image, device_pool2_Output_image, pool2_input_height, pool2_output_height, pool2_kernel_height, pool2_stride, pool2_channels);//wbCheck(cudaGetLastError());//wbCheck(cudaDeviceSynchronize());//fc1Fc1_naive << <fc1_blocksperGrid, fc1_threadsperBlock >> > (device_pool2_Output_image, device_fc1_Output_image, device_fc1__kernel_weight, device_fc1__kernel_bias, fc1_input_height, fc1_input_channels);//wbCheck(cudaGetLastError());//wbCheck(cudaDeviceSynchronize());//relu(fc1)ReLu_fc1 << <relu_fc1_blocksperGrid, relu_fc1_threadsperBlock >> > (device_fc1_Output_image, device_relu_fc1_Output_image);//wbCheck(cudaGetLastError());//wbCheck(cudaDeviceSynchronize());//fc2Fc2_naive << <fc2_blocksperGrid, fc2_threadsperBlock >> > (device_relu_fc1_Output_image, device_fc2_Output_image, device_fc2__kernel_weight, device_fc2__kernel_bias, fc2_input_height, fc2_input_channels);//wbCheck(cudaGetLastError());//wbCheck(cudaDeviceSynchronize());//relu(fc2)ReLu_fc1 << <relu_fc2_blocksperGrid, relu_fc2_threadsperBlock >> > (device_fc2_Output_image, device_relu_fc2_Output_image);//wbCheck(cudaGetLastError());//wbCheck(cudaDeviceSynchronize());//fc3Fc3_naive << <fc3_blocksperGrid, fc3_threadsperBlock >> > (device_relu_fc2_Output_image, device_fc3_Output_image, device_fc3__kernel_weight, device_fc3__kernel_bias, fc3_input_height, fc3_input_channels);//wbCheck(cudaGetLastError());//wbCheck(cudaDeviceSynchronize());//wbCheck(cudaMemcpy(host_fc3_Output_image, device_fc3_Output_image, fc3_output_height * sizeof(float), cudaMemcpyDeviceToHost));cudaMemcpy(host_fc3_Output_image, device_fc3_Output_image, fc3_output_height * sizeof(float), cudaMemcpyDeviceToHost);index = 0;for (k = 0; k < 10; k++) {if (host_fc3_Output_image[k] > host_fc3_Output_image[index]) {index = k;}}if (index == labels[t])correct_nums++;//Conv1//wbCheck(cudaMemset(device_InputImage, 0, input_height * input_height * input_channels * sizeof(float)));cudaMemset(device_InputImage, 0, input_height * input_height * input_channels * sizeof(float));//wbCheck(cudaMemset(device_OutputImage, 0, output_height * output_height * output_channels * sizeof(float)));cudaMemset(device_OutputImage, 0, output_height * output_height * output_channels * sizeof(float));//ReLu1//wbCheck(cudaMemset(device_relu_Output_image, 0, relu_input_height * relu_input_height * relu_input_channels * sizeof(float)));cudaMemset(device_relu_Output_image, 0, relu_input_height * relu_input_height * relu_input_channels * sizeof(float));//Max Pool 1//wbCheck(cudaMemset(device_pool1_Output_image, 0, pool1_output_height * pool1_output_height * pool1_channels * sizeof(float)));cudaMemset(device_pool1_Output_image, 0, pool1_output_height * pool1_output_height * pool1_channels * sizeof(float));//Conv2//wbCheck(cudaMemset(device_conv2__OutputImage, 0, conv2_output_height * conv2_output_height * conv2_output_channels * sizeof(float)));cudaMemset(device_conv2__OutputImage, 0, conv2_output_height* conv2_output_height* conv2_output_channels * sizeof(float));//Relu2//wbCheck(cudaMemset(device_relu2_Output_image, 0,relu2_output_height * relu2_output_height * relu2_input_channels * sizeof(float)));cudaMemset(device_relu2_Output_image, 0, relu2_output_height * relu2_output_height * relu2_input_channels * sizeof(float));//Max Pool2//wbCheck(cudaMemset(device_pool2_Output_image, 0, pool2_output_height * pool2_output_height * pool2_channels * sizeof(float)));cudaMemset(device_pool2_Output_image, 0, pool2_output_height * pool2_output_height * pool2_channels * sizeof(float));//fc1 device_fc1_Output_image//wbCheck(cudaMemset(device_fc1_Output_image, 0, fc1_output_height * sizeof(float)));cudaMemset(device_fc1_Output_image, 0, fc1_output_height * sizeof(float));//Relu fc1//wbCheck(cudaMemset(device_relu_fc1_Output_image, 0, relu_fc1_output_height * sizeof(float))); cudaMemset(device_relu_fc1_Output_image, 0, relu_fc1_output_height * sizeof(float));//fc2//wbCheck(cudaMemset(device_fc2_Output_image, 0, fc2_output_height * sizeof(float)));cudaMemset(device_fc2_Output_image, 0, fc2_output_height * sizeof(float));//Relu fc2//wbCheck(cudaMemset(device_relu_fc2_Output_image, 0, relu_fc2_output_height * sizeof(float)));cudaMemset(device_relu_fc2_Output_image, 0, relu_fc2_output_height * sizeof(float));//fc3//wbCheck(cudaMemset(device_fc3_Output_image, 0, fc3_output_height * sizeof(float)));cudaMemset(device_fc3_Output_image, 0, fc3_output_height * sizeof(float));}// CUDA SynccudaDeviceSynchronize();// calculate timeauto end = std::chrono::high_resolution_clock::now();std::chrono::duration<double> diff = end - start;// print resultstd::cout << std::fixed << std::setprecision(4) << diff.count() << ":"<<float(correct_nums)/float(images.size());//cudaFree(dev_image);//Conv1cudaFree(device_InputImage);cudaFree(device_OutputImage);cudaFree(device_kernel_weight);cudaFree(device_kernel_bias);//RelucudaFree(device_relu_Output_image);//Pool1cudaFree(device_pool1_Output_image);//Conv2cudaFree(device_conv2__OutputImage);cudaFree(device_conv2__kernel_weight);cudaFree(device_conv2__kernel_bias);//Relu2cudaFree(device_relu2_Output_image);//Pool2cudaFree(device_pool2_Output_image);//fc1cudaFree(device_fc1__kernel_weight);cudaFree(device_fc1__kernel_bias);cudaFree(device_fc1_Output_image);//Relu fc1cudaFree(device_relu_fc1_Output_image);//fc2cudaFree(device_fc2__kernel_weight);cudaFree(device_fc2__kernel_bias);cudaFree(device_fc2_Output_image);//Relu fc2cudaFree(device_relu_fc2_Output_image);//fc3cudaFree(device_fc3__kernel_weight);cudaFree(device_fc3__kernel_bias);cudaFree(device_fc3_Output_image);return 0;
}
总结
以上便是如何用C++ CUDA手搓一个简单的神经网络,本人也是初学者,鉴于网上相关资料较少才粗略写下这篇教程,很多地方写的不够优雅,如有问题欢迎指出。