与2D人体姿态检测一样,在ARKit 中,我们不必关心底层的人体骨骼关节点检测算法,也不必自己去调用这些算法,在运行使用 ARBodyTrackingConfiguration 配置的 ARSession 之后,基于摄像头图像的3D人体姿态估计任务也会启动,我们可以通过 session(_ session: ARSession, didUpdate anchors:[ARAnchor])代理方法直接获取检测到的ARBodyAnchor。
在 ARKit 中,与检测2D图像或者 3D物体一样,在检测到3D 人体后会生成一个ARBodyAnchor 用于在现实世界和虚拟空间之间建立关联关系,绑定虚拟元素到检测的人体上。在获取 ARBodyAnchor 后,就可以通过 ARBodyAnchor. skeleton. definition. jointNames 获取所有3D人体骨骼关节点名称,通过ARBodyAnchor. skeleton. modelTransform(for:)方法取指定关节点相对 ARBodyAnchor 的位置姿态信息,通过 ARBodyAnchor. skeleton. localTransform(for: ARSkeleton. JointName)方法获取指定关节相对于其父节点的位置姿态信息。示例代码如下代码所示。
func session(_ session: ARSession, didUpdate anchors: [ARAnchor]) {guard let anchor = anchors.first as? ARBodyAnchor else {return}if !isPrinted {isPrinted = true//获取root节点在世界坐标系中的姿态let hipWordPosition = anchor.transformprint("root transform: \(hipWordPosition)")//获取3d骨骼对象let skeleton = anchor.skeleton//获取相对于root节点所有节点的姿态信息数组let jointTranforms = skeleton.jointModelTransforms//获取在世界空间坐标系中所有节点的姿态信息数组let localTransform = skeleton.jointLocalTransforms//遍历姿态信息数字,通过下标遍历for (i, jointTransform) in jointTranforms.enumerated() {let name = anchor.skeleton.definition.jointNames[i]let parentIndex = skeleton.definition.parentIndices[i]guard parentIndex != -1 else {continue}let parentJointTransform = jointTranforms[parentIndex]let parentName = anchor.skeleton.definition.jointNames[parentIndex]print("name: \(name),index: \(i), transform: \(String(describing: jointTransform)), parent name: \(parentName),parent index: \(parentIndex) parent transform: \(String(describing: parentJointTransform))")}//通过名字遍历let jointNames = anchor.skeleton.definition.jointNamesfor name in jointNames {let landmark = anchor.skeleton.modelTransform(for: ARSkeleton.JointName(rawValue: name))let index = anchor.skeleton.definition.index(for: ARSkeleton.JointName(rawValue: name))print("\(name),\(String(describing: landmark)),the index is \(index) parent index is \(anchor.skeleton.definition.parentIndices[index])")}}}代码演示了如何获取 ARKit 生成的 ARBodyAnchor;如何获取3D人体所有骨骼关节点名字集合,以及各关节点及其父节点索引;如何利用关节点名字获取该关节点相对 ARBodyAnchor 的位置信息。捕捉人体3D 姿态信息后除了进行运动姿态分析最重要的用途就是驱动3D 模型,在理解ARKit 提供的3D人体骨骼关节点数据结构信息及关联关系之后,我们就可以利用这些数据实时驱动三维模型,基本思路如下:
(1)建立一个与关节点表一致,拥有相同人体骨骼关节点的三维模型。
(2) 开启 3D人体姿态估计功能。
(3)建立 ARKit 3D 人体姿态估计骨骼关节点与三维模型骨骼关节点的对应关系,并利用3D人体姿态估计骨骼关节点数据驱动三维模型骨骼关节点。
如前文所述,我们可以从生成的 ARBodyAnchor 中获取所有骨骼关节点的位置信息,利用这些位息,就可以将模型关节点与检测到的人体骨骼关节点关联起来。为了简单起见,下面我们演示利用检的人体 ARBodyAnchor,在人眼处绘制两个球体。代码如下所示。
func session(_ session: ARSession, didUpdate anchors: [ARAnchor]) {guard let anchor = anchors.first as? ARBodyAnchor else {return}let bodyPosition = simd_make_float3(anchor.transform.columns.3) //位置平移信息robotAnchor.position = bodyPosition + robotOffsetrobotAnchor.orientation = Transform(matrix: anchor.transform).rotationif let robotCharacter = robotCharacter,robotCharacter.parent == nil {robotAnchor.addChild(robotCharacter)}//更新眼睛小球位置,guard let leftMatrix = anchor.skeleton.modelTransform(for: ARSkeleton.JointName(rawValue: "left_eye_joint")),let rightMatrix = anchor.skeleton.modelTransform(for: ARSkeleton.JointName(rawValue: "right_eye_joint")) else {return}leftEye.position = simd_make_float3( leftMatrix.columns.3)rightEye.position = simd_make_float3(rightMatrix.columns.3)//跟节点的位置付值给anchoreyeAnchor.position = simd_make_float3(anchor.transform.columns.3)}在代码中,我们首先创建了两个球体,代表人体的左右两只眼睛,然后在 session (: didUipdateanchors:)方法中检查 ARBodyAnchor,利用检测到的3D人体骨骼左右眼关节点(left_eye_joint 和 righ.eye_joint)信息设置并实时更新两个球体的位置及方向。需要注意的是,在实际使用人体骨骼关节点位置信息时,通过 modelTransform(for:)方法获取的关节点位置是相对于 ARBodyAnchor的位置,并不是世界坐标空间中的坐标。在上述代码中,获取某特定关节点位置信息我们使用了 modelTransform(for:)方法,通过关节点名字获取该关节点位置数据,因为关节点的位置数据存储在数组中,使用bodyAnchor.skeleton.jointModelTransforms[index]的方式效率更高,如左眼索引为54,直接将 54作为参数传递即可以获取人体左眼位置数据。上节表列出了所有91 个骨骼关节点的索引值,可以直接使用。运行该示例,在ARKit 检测到人体时,会在人体双眼处放置两个球体,效果如图所示。

采用同样的方法,可以将获取的所有人体3D骨骼关节点数据绑定到3D模型中的骨骼关节点上,并以此来驱动3D模型的运动,这是以手工的方式绑定检测到的骨骼关节点与模型。在 RealityKit 中,使用了一个名为 BodyTrackedEntity 的实体类描述带骨骼绑定的人体模型,如果模型骨骼关节点命名与相互之间的关系与上节表所示一致,也可以直接通过使用 Body TrackedEntity.joint Transforms [3] = Transform (matrix: body Anchor. skeleton. model Transtorm (for: ARSkeleton. JointName.head)!)语句将检测到的人体关节点位置信息赋给人体模型,从而达到驱动模型的目的。
ARKit检测到的3D人体骨骼关节点有91个,采用人工绑定骨骼关节点的工作量很大且很容易出错,为此,RealityKit 会自动检测场景中加载的 BodyTrackedEntity 实体对象,并尝试自动执行将检测到的人体骨骼关节点与模型骨骼关节点匹配,如果模型骨骼关节点命名和相互之间的关系与表7-3所示一致,则无须人工手动绑定,RealityKit会自动进行关节点绑定。因此,在模型骨骼完全符合要求的情况下,利用ARKit检测到的3D人体关节点驱动模型变得格外简单,只需要加载模型为 BodyTrackedEntity 实体对象,并添加到 AnchorEntity 中。代码如下所示。
//
//  BodyTracking3DView.swift
//  ARKitDeamo
//
//  Created by zhaoquan du on 2024/2/1.
//import SwiftUIimport SwiftUI
import ARKit
import RealityKit
import Combinestruct BodyTracking3DView: View {var body: some View {BodyTracking3DViewContainer().edgesIgnoringSafeArea(.all).navigationTitle("人体骨架3D检测")}
}struct BodyTracking3DViewContainer:UIViewRepresentable {func makeUIView(context: Context) ->ARView {let arView = ARView(frame: .zero)return arView}func updateUIView(_ uiView: UIViewType, context: Context) {guard ARBodyTrackingConfiguration.isSupported else {return}context.coordinator.arView = uiViewlet config = ARBodyTrackingConfiguration()config.frameSemantics = .bodyDetectionconfig.automaticSkeletonScaleEstimationEnabled = trueuiView.session.delegate = context.coordinatoruiView.session.run(config)}func makeCoordinator() -> Coordinator {Coordinator()}class Coordinator: NSObject,ARSessionDelegate {var arView : ARView? = nilvar isPrinted = falsevar robotCharacter: BodyTrackedEntity?let robotOffset: SIMD3<Float> = [-0.1, 0, 0]let robotAnchor = AnchorEntity()func loadRobot(){var cancellable: AnyCancellable? = nilcancellable = Entity.loadBodyTrackedAsync(named: "robot.usdz").sink { completion inif case let .failure(error) = completion {print("无法加载模型,错误:\(error.localizedDescription)")}cancellable?.cancel()} receiveValue: { body inbody.scale = [1.0,1.0,1.0]self.robotCharacter = bodyself.arView?.scene.addAnchor(self.robotAnchor)cancellable?.cancel()}}func session(_ session: ARSession, didAdd anchors: [ARAnchor]) {guard let anchor = anchors.first as? ARBodyAnchor else {return}
//            createSphere()loadRobot()}func session(_ session: ARSession, didUpdate anchors: [ARAnchor]) {guard let anchor = anchors.first as? ARBodyAnchor else {return}let bodyPosition = simd_make_float3(anchor.transform.columns.3) //位置平移信息robotAnchor.position = bodyPosition + robotOffsetrobotAnchor.orientation = Transform(matrix: anchor.transform).rotationif let robotCharacter = robotCharacter,robotCharacter.parent == nil {robotAnchor.addChild(robotCharacter)}}}}
在代码中,我们首先使用异步的方式加载3D人体模型,并对模型中的骨骼信息进行检查,如果模型骨骼都符合要求则生成可供驱动的3D 模型对象,然后在 session(:didUpdate anchors:)方法中实时更新模型的姿态信息。上述代码对 robotAnchor 位置进行了偏移处理,这是因为我们获取的ARBodyAnchor 所在位置为检测到的3D人体关节点的Root 位置,如果不进行偏移,则模型与人体会重合显示,代码中我们将模型向X轴负方向移动了 1m(ARBodyAnchor 位置三维空间中的位置,可以向任何方向偏移),我们也可以不加这个偏移。编译运行代码,将设备摄像头对准真实人体,在检测到人体时,加载一个机器人,并且人体姿态可以实时驱动机器人模型同步运动,效果如下图所示。

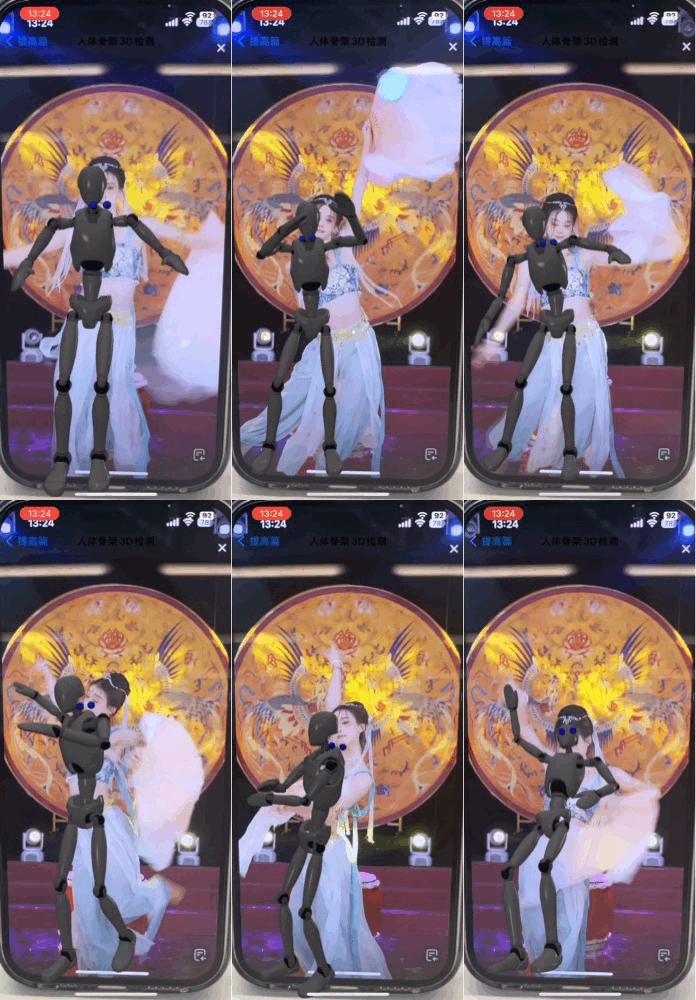
经过测试,目前 ARKit 可以正确检测追踪人体正面或背面站立姿态,对坐姿也能比较好地跟踪,但不能检测跟踪倒立、俯卧姿态。并且我们在测试中发现,实时跟踪一个真实人体与跟踪显示器上视频中的人体跟踪精度似乎没有区别,使用iPad Pro 与iPhone 跟踪精度也似乎没有区别。
在人体尺寸估计方面,使用纯图像处理时,虚拟模型有时会出现跳跃或者突然改变大小的现象。在配备了 LiDAR 传感器的设备上,由于可以直接从 LiDAR 传感器中采集到人体深度信息,因此在人体尺寸估计方面有很大提升,相比使用纯图像方式,估计的尺寸精度更高,对虚拟模型的大小控制更合理。
从本节与2D检测实例可以看到,在运行 ARSession 进行人体检测跟踪时,将 ARBody TrackingConfiguration.frameSemantics 设置为 bodyDetection(即默认值),既可以检测2D人体骨骼关节点,也可以检测3D人体骨骼关节点,区别是检测的2D 人体骨骼关节点是在屏幕空间中,而检测的3D人体骨骼关节点是在世界空间中,因此,我们一般会在 session(:didUpdate frame:)代理方法中处理2D人体检测,在 session(:didUpdate 提示也可以在 session(:didUpdate anchors:)代理方法中处理2D人体检测,在使用 session(:didUpdateanchors:)方法处理2D人体检测时,由于获取的ARBodyAnchor 是在世界空间中,因此需要按照 3D人体检测的步骤进行处理。
具体代码地址:https://github.com/duzhaoquan/ARkitDemo.git
