本文介绍如何使用条件变量控制并发的同步操作、C++ 并发三剑客,函数式编程
一.条件变量
1.概念
C++条件变量(condition variable)是一种多线程编程中常用的同步机制,用于线程间的通信和协调。它允许一个或多个线程等待某个条件的发生,当条件满足时,线程被唤醒并继续执行。
在C++中,条件变量通常与互斥锁(mutex)一起使用,以确保线程之间的安全访问共享资源。互斥锁用于保护共享资源的访问,而条件变量用于在某个条件满足时通知等待的线程。
#include <iostream>
#include <thread>
#include <mutex>
#include <condition_variable>std::mutex mtx;
std::condition_variable cv;
bool isReady = false;void workerThread()
{std::unique_lock<std::mutex> lock(mtx);while (!isReady){cv.wait(lock); // 等待条件变量满足}std::cout << "Worker thread is awake!" << std::endl;
}int main()
{std::thread worker(workerThread);std::this_thread::sleep_for(std::chrono::seconds(2)); // 模拟一些耗时操作{std::lock_guard<std::mutex> lock(mtx);isReady = true;cv.notify_one(); // 唤醒等待的线程}worker.join();return 0;
} 主线程创建了一个工作线程,并在工作线程中等待条件变量isReady为true。主线程在等待一段时间后,将isReady设置为true,并通过cv.notify_one()唤醒工作线程。工作线程在等待期间调用cv.wait(lock),这会使线程进入等待状态,直到条件变量被唤醒。一旦条件满足,工作线程被唤醒并输出消息。
其中wait参数有三种使用方式:
| wait | wait_for | wait_until | |
| 函数原型 | void wait(std::unique_lock<std::mutex>& lock); | template< class Rep, class Period > std::cv_status wait_for(std::unique_lock<std::mutex>& lock, const std::chrono::duration<Rep, Period>& rel_time); | template< class Clock, class Duration > std::cv_status wait_until(std::unique_lock<std::mutex>& lock, const std::chrono::time_point<Clock, Duration>& abs_time); |
| 功能 | 调用wait释放锁,等待notify。被唤醒后加锁 | 1.调用wait释放锁,等待notify。被唤醒后加锁。 2.等待时间超过指定的相对时间,超时后继续加锁。 | 1.调用wait释放锁,等待notify。被唤醒后加锁。 2.等待时间超过指定的相对时间,无论是否超时仍加锁。 3.等待超过指定时间 |
| 返回值 | 无 | 等待时间内被唤醒,则返回std::cv_status::no_timeout; 如果等待时间超时,则返回std::cv_status::timeout | 与waitfor一致 |
| 示例 | | | |
2.使用条件变量构建线程安全的栈区
回顾:
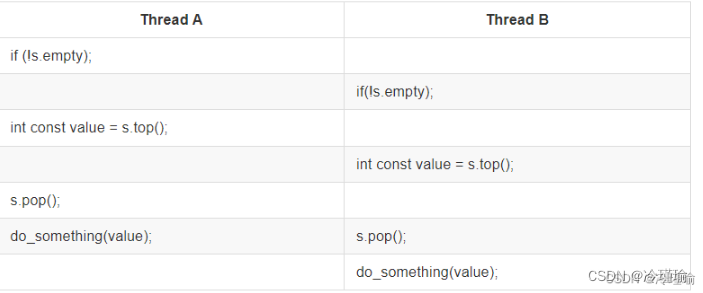
在第三章节 -构建线程安全的栈区 为了避免数据竞争,对于pop操作在线程中调用empty判断是否为空,如果不为空,则pop,因为empty和pop内部分别加锁,是两个原子操作,导致pop时可能会因为其他线程提前pop导致队列为空,从而引发崩溃。
void push(T new_value)
{std::lock_guard<std::mutex> lock(m);data.push(std::move(new_value));
}T pop()
{std::lock_guard<std::mutex> lock(m);auto element = data.top();data.pop();return element;
}threadsafe_stack1<int> safe_stack;
safe_stack.push(1);
std::thread t1([&safe_stack]()
{if (!safe_stack.empty()) {std::this_thread::sleep_for(std::chrono::seconds(1));safe_stack.pop();}
});
std::thread t2([&safe_stack]()
{if (!safe_stack.empty()) {std::this_thread::sleep_for(std::chrono::seconds(1));safe_stack.pop();}
}); 
通过添加《传入引用》或《返回弹出元素的指针》来解决上面异常。但是两种方式都存在一定的弊端:
传入引用弊端是需要在函数外部构建临时变量影响效率且需要抛出空栈。
返回智能指针异常下会导致空指针产生。
这么都不是很友好,所以我们可以通过条件变量完善之前的程序,重新实现一个线程安全队列。
#include <iostream>
#include <thread>
#include <stack>
#include <memory>
#include <mutex>
#include <condition_variable>using namespace std;template<typename T>
class threadQueue
{
public:threadQueue(): mutx(), condVar(), stackQueue(){};~threadQueue(){};void push(T value){lock_guard<mutex> lk(mutx);stackQueue.push(value);condVar.notify_one();}void waitAndpop(T &stackQueue_){unique_lock<mutex> lk(mutx);/*wait函数第二个参数确保队列有数据才进行条件变量后续操作,相当于增加一层判断,更加准确*/condVar.wait(lk, [this](){return !stackQueue.empty();});stackQueue_ = stackQueue.top();stackQueue.pop();}shared_ptr<T> waitAndPop(){unique_lock<mutex> lk(mutx);condVar.wait(lk, [this](){return !stackQueue.empty();});shared_ptr<T> res = make_shared<T>(stackQueue.top());stackQueue.pop();return res;}bool tryPop(T &value){lock_guard<mutex> lk(mutx);if(stackQueue.empty()){return false;}value = stackQueue.top();stackQueue.pop();return true;}shared_ptr<T> tryPop(){lock_guard<mutex> lk(mutx);if (stackQueue.empty())return std::shared_ptr<T>();shared_ptr<T> res = make_shared<T>(stackQueue.top());stackQueue.pop();return res;}private:mutable mutex mutx;condition_variable condVar;stack<T> stackQueue;
};mutex mutxThread;template<typename T>
void funcProducer(threadQueue<T> &thdQueue)
{for(;;){for(size_t i = 0; i < __LONG_MAX__; i++){thdQueue.push(i);lock_guard<mutex> lk(mutxThread);cout<<"funcProducer:"<<i<<endl;this_thread::sleep_for(chrono::milliseconds(100));}}
}template<typename T>
void funcWorker1(threadQueue<T> &thdQueue)
{for(;;){auto data = thdQueue.waitAndPop();lock_guard<mutex> lk(mutxThread);cout<<"funcWorker1 waitAndpop:"<<*(data)<<endl;// this_thread::sleep_for(chrono::milliseconds(500));}
}template<typename T>
void funcWorker2(threadQueue<T> &thdQueue)
{for(;;){auto data = thdQueue.tryPop();if(data != nullptr){lock_guard<mutex> lk(mutxThread);cout<<"funcWorker2 waitAndpop:"<<*(data)<<endl;}// this_thread::sleep_for(chrono::milliseconds(500));}
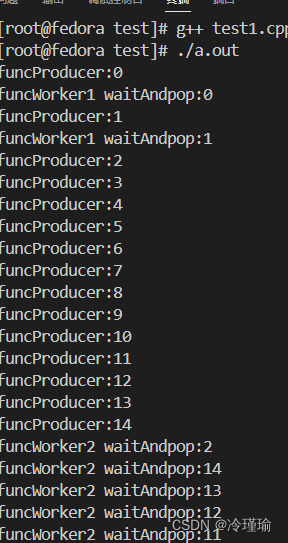
}int main()
{threadQueue<int> thdQueue;thread t1(funcProducer<int>, ref(thdQueue));thread t2(funcWorker1<int>, ref(thdQueue));thread t3(funcWorker2<int>, ref(thdQueue));t1.join();t2.join();t3.join();
}

二.C++ 并发三剑客
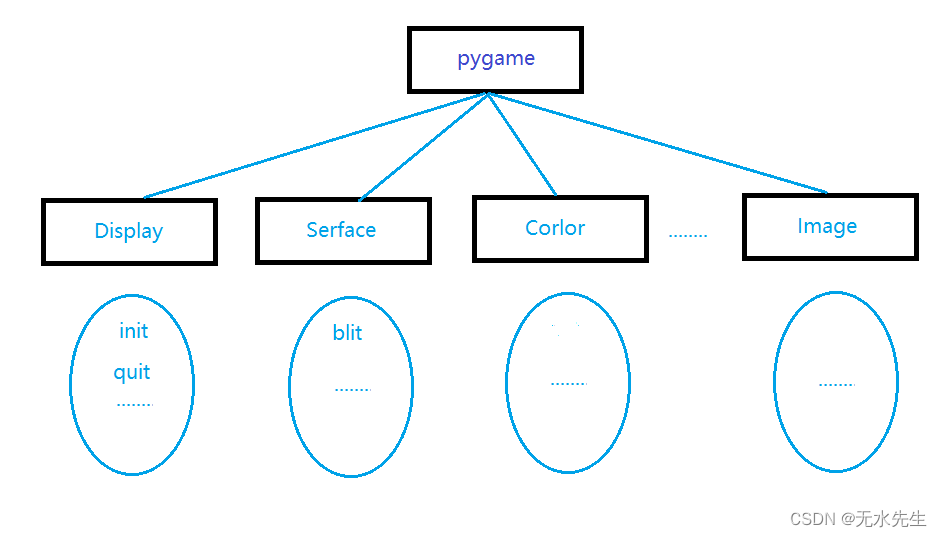
简单介绍一下future, promise和async三者之间的关系。其具体实现请看本章节第四小节

1.async
std::async 是一个用于异步执行函数的模板函数,它返回一个 std::future 对象,该对象用于获取函数的返回值。其主要应用于I/O密集型任务,如网络请求或文件读写,其中操作可能需要等待,但CPU不需要做太多工作.(thread适用于CPU密集型任务)
async可选填参数:
指定launch::async:表示任务执行在另一线程。
指定launch::deferred:表示延迟执行任务,调用get或者wait时才会执行,不会创建线程,惰性执行在当前线程。
不填写或同时指定:属于未定义行为,编译器会根据实际情况决定采用哪种策略(通常创建线程)
1.1 async异步任务
async启用异步执行后,在其内部会创建一个线程,任务完成后线程自动销毁,不需要join等操作。
#include <iostream>
#include <thread>
#include <memory>
#include <future>using namespace std;void func()
{int i = 0;for(;;){cout<<"func"<<endl;this_thread::sleep_for(chrono::seconds(1));if(++i == 10) {break;}}cout<<" thread end"<<endl;
}int main()
{std::future<void> the_answer=std::async(launch::async, func);//deferredfor(int i = 0; i < 15; ++i){cout<<"main run"<<endl;this_thread::sleep_for(chrono::seconds(1));}return 1;
}
刚运行时可以看到存在两个线程

线程退出后:

1.2 async延时执行
当指定launch::deferred表示延迟执行任务,调用get或者wait时才会在调用线程中执行。 std::future::get() 和 std::future::wait() 是 C++ 中用于处理异步任务的两个方法.
1.2.1 future::get()
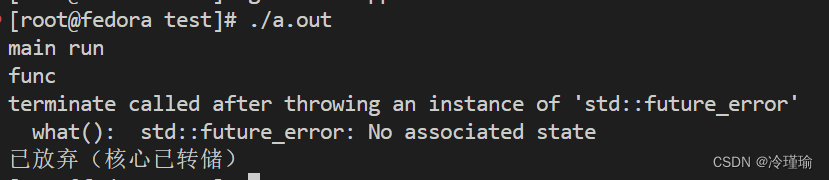
这是一个阻塞调用,用于获取 std::future 对象表示的值或异常。如果异步任务还没有完成,get() 会阻塞当前线程,直到任务完成。如果任务已经完成,get() 会立即返回任务的结果。get() 只能调用一次,因为它会移动或消耗掉 std::future 对象的状态。一旦 get() 被调用,std::future 对象就不能再被用来获取结果。如果调用两次,会出现如下结果:
#include <iostream>
#include <thread>
#include <memory>
#include <future>using namespace std;void func()
{cout<<"func"<<endl;
}int main()
{std::future<void> the_answer=std::async(launch::deferred, func);//deferredcout<<"main run"<<endl;this_thread::sleep_for(chrono::seconds(1));the_answer.get();the_answer.get();return 1;
} 
为避免多次调用get造成异常,尽量使用wait
1.2.2 future::wait()
std::future::wait() 也是一个阻塞调用,但它与 get() 的主要区别在于 wait() 不会返回任务的结果。它只是等待异步任务完成。如果任务已经完成,wait() 会立即返回。如果任务还没有完成,wait() 会阻塞当前线程,直到任务完成。与 get() 不同,wait() 可以被多次调用,它不会消耗掉 std::future 对象的状态。
#include <iostream>
#include <thread>
#include <memory>
#include <future>using namespace std;int func()
{std::this_thread::sleep_for(std::chrono::milliseconds(1000));cout<<"func"<<endl;return 10;
}int main()
{future<int> the_answer = async(launch::deferred, func);cout<<"main run"<<endl;auto start = std::chrono::high_resolution_clock::now(); the_answer.wait();the_answer.wait();auto end = std::chrono::high_resolution_clock::now();auto duration = std::chrono::duration_cast<std::chrono::milliseconds>(end - start); cout << "the_answer.wait run time: " << duration.count() << " ms" << endl;return 1;
}
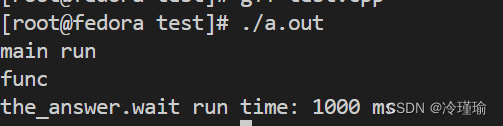
可以看到只运行了1000ms, 当第一个wait运行结束表示任务执行结束,而第二个wait会立马返回。
| wait | get |
| 阻塞线程,知道任务运行完毕 | 阻塞线程,知道任务运行完毕 |
| 可多次调用,当任务执行完毕后wait将不在起作用,会立马返回。 | 不可多次调用,异常 |
| 执行任务,不获取结果 | 执行任务,获取结果 |
- 也可以通过wait_for(std::chrono::seconds(0)(要求任务立马返回),判断任务是否已经完成
if (the_answer.wait_for(std::chrono::seconds(0)) == std::future_status::ready)
{cout<<"task already over"<<endl;return 0;
}
2.promise和packaged_task
promise和packaged_task都是C++中的异步编程工具,用于在多线程环境下进行任务的分离和结果的传递。
promise是一种用于在一个线程中产生结果,并在另一个线程中获取结果的机制。它允许一个线程(称为"提供者")在某个时间点设置一个值或异常,而另一个线程(称为"消费者")在需要时获取该值或异常。
packaged_task是一种将可调用对象(如函数、函数对象或Lambda表达式)封装为一个可以异步执行的任务的机制。
两者都是与future结合使用,通过future获取结果或者值。
2.1.future与packaged_task
packaged_task是一个可调用目标,它包装了一个任务,该任务可以在另一个线程上运行。它可以捕获任务的返回值或异常,并将其存储在future对象中,以便以后使用。
使用future和packaged_task通常的做法是:
1) 创建一个std::packaged_task对象,该对象包装了要执行的任务。
funciton my_task
packaged_task<int()> task(my_task);
2) 调用packaged_task对象的get_future()方法,该方法返回一个与任务关联的future对象。
future<int> result = task.get_future();3) 在另一个线程上调用std::packaged_task对象的operator(),以执行任务。
thread t(move(task));4) 在需要任务结果的地方,调用与任务关联的future对象的get()方法,以获取任务的返回值或异常。
int value = result.get();示例:
#include <iostream>
#include <thread>
#include <memory>
#include <future>using namespace std;int my_task() {this_thread::sleep_for( chrono::seconds(5));cout << "my task run 5 s" <<  endl;return 42;
}
int main()
{// 创建一个包装了任务的 packaged_task 对象 packaged_task<int()> task(my_task);// 获取与任务关联的 future 对象 future<int> result = task.get_future();// cout<<"task.get_future()"<<task.get_future().get()<<endl;// 在另一个线程上执行任务 thread t(move(task));t.detach(); // 将线程与主线程分离,以便主线程可以等待任务完成 // 等待任务完成并获取结果 cout << "will get result"<<endl;int value = result.get();cout << "The result is: " << value << endl;} 
在上面的示例中,我们创建了一个包装了任务的std::packaged_task对象,并获取了与任务关联的std::future对象。然后,我们在另一个线程上执行任务,并等待任务完成并获取结果。最后,我们输出结果。
2.2.future与promise
2.2.1 设置值
packaged_task主要是异步过程中任务,promise在异步过程中处理数值。
#include <iostream>
#include <thread>
#include <future>void set_value(std::promise<int>& prom) {std::this_thread::sleep_for(std::chrono::seconds(2));// 设置结果为42prom.set_value(42);
}int main() {std::promise<int> prom;std::future<int> fut = prom.get_future();std::thread t(set_value, std::ref(prom));// 在主线程中等待结果int result = fut.get();std::cout << "Result: " << result << std::endl;t.join();return 0;
} 值得注意的是在调用fut.get()方法时,如果promise的值还没有被设置,则该方法会阻塞当前线程,直到值被设置为止。
2.2.2 设置异常
promise还有一个set_exception()方法,用于设置异常。该方法接受std::exception_ptr参数,该参数可以通过调用std::current_exception()方法获取。
#include <iostream>
#include <thread>
#include <future>void set_exception(std::promise<int>& prom) {try {// 模拟一些可能抛出异常的操作throw std::runtime_error("Something went wrong");} catch (...) {// 捕获异常并设置到 promise 中prom.set_exception(std::current_exception());}
}int main() {std::promise<int> prom;std::future<int> fut = prom.get_future();std::thread t(set_exception, std::ref(prom));try {// 在主线程中等待结果int result = fut.get();std::cout << "Result: " << result << std::endl;} catch (const std::exception& e) {std::cout << "Exception caught: " << e.what() << std::endl;}t.join();return 0;
}
set_exception 函数中,我们模拟了一些可能抛出异常的操作,并使用prom.set_exception (std::current_exception()) 将当前捕获的异常设置到 promise 中。在主线程中,我们使用 fut.get() 等待并获取结果。如果在另一个线程中发生了异常,我们可以在主线程中使用 try-catch 块捕获并处理异常。
3 future与shared_future
当需要多个线程等待同一个执行结果时,需要使用std::shared_future。
适合使用std::shared_future的场景,多个线程等待同一个异步操作的结果:
#include <iostream>
#include <thread>
#include <future>void myFunction(std::promise<int>&& promise)
{std::this_thread::sleep_for(std::chrono::seconds(1));promise.set_value(42); // 设置 promise 的值
}
void threadFunction(std::shared_future<int> future)
{try {int result = future.get();std::cout << "Result: " << result<<"this thread id:"<<std::this_thread::get_id() << std::endl;}catch (const std::future_error& e) {std::cout << "Future error: " << e.what() << std::endl;}
}
int main()
{std::promise<int> promise;std::shared_future<int> future = promise.get_future();std::thread myThread1(myFunction, std::move(promise)); // 将 promise 移动到线程中// 使用 share() 方法获取新的 shared_future 对象  std::thread myThread2(threadFunction, future);std::thread myThread3(threadFunction, future);myThread1.join();myThread2.join();myThread3.join();return 0;
} 
在这个示例中,创建了一个std::promise<int>对象promise和一个与之关联的std::shared_future<int>对象future。然后,我们将promise对象移动到另一个线程myThread1中,该线程将执行myFunction函数,并在完成后设置promise的值。我们还创建了两个线程myThread2和myThread3,它们将等待future对象的结果。如果myThread1成功地设置了promise的值,那么future.get()将返回该值。这些线程可以同时访问和等待future对象的结果,而不会相互干扰。
4. 自顶向下实现
4.1 用packaged_task实现async
async异步任务相当于创建线程,不再予以实现。
async延时执行示例如下:
#include <iostream>
#include <thread>
#include <future>
#include <functional>using Func = std::function<int(int)>;std::future<int> myAsync(Func task, int i)
{std::packaged_task<int(int)> packaged(task);std::future<int> fu = packaged.get_future();std::thread t(std::move(packaged), i);t.detach();return fu;
}int main()
{auto task = [](int i) { std::this_thread::sleep_for(std::chrono::seconds(1)); return i+100; };std::future<int> f = myAsync(task, 5);std::cout << f.get() << std::endl;return 0;
}
async指定deferred 表示延时进行,其内部与上述内部实现类似,先使用packaged打包需要执行的任务,然后将任务与future绑定,将任务move到线程中,执行完毕后通过future.get获取任务执行结果。如此便满足第二章节图片内容结构。
4.2 使用promise实现packaged_task
通过promise设置值来完成packaged_task反馈。
#include <iostream>
#include <thread>
#include <future>
#include <functional>//typename关键字在C++中的主要作用是告诉编译器某个名称是一个类型而不是变量或函数。
template<typename Type, typename... Args>
class myPackTask
{
public:myPackTask(std::function<Type(Args...)> _func):func_(_func){}std::future<Type> get_future(){return promise_.get_future();}void operator()(Args... args){Type result = func_(args...);promise_.set_value(result);}private:std::function<Type(Args...)> func_;std::promise<Type> promise_;
};int add(int a, int b) {return a + b;
}int main() {myPackTask<int, int, int> task(add);std::future<int> future = task.get_future(); std::thread thread(std::move(task), 2, 3);  int result = future.get();  std::cout << "Result: " << result << std::endl;thread.join();  // 等待线程结束return 0;
}
4.3 实现promise
其主要思想就是通过条件变量通知get所在线程调用的地方。
#include <iostream>
#include <thread>
#include <mutex>
#include <condition_variable>template<typename T>
class Promise {
public:Promise() : value(nullptr), ready(false) {}void set(const T& val) {std::unique_lock<std::mutex> lock(mutex);value = std::make_shared<T>(val);ready = true;condition.notify_all();}T get() {std::unique_lock<std::mutex> lock(mutex);condition.wait(lock, [this] { return ready; });return *value;}private:std::shared_ptr<T> value;bool ready;std::mutex mutex;std::condition_variable condition;
};int main() {Promise<int> promise;std::thread producer([&promise]() {std::this_thread::sleep_for(std::chrono::seconds(2));promise.set(42);});std::thread consumer([&promise]() {int result = promise.get();std::cout << "Got value: " << result << std::endl;});producer.join();consumer.join();return 0;
}
三.并行与函数式编程
以下内容摘自恋恋风尘,博主讲解C++并发非常不错,力荐
1 快速排序
先使用C++ 设计一个快速排序方法
#include <iostream>
#include <thread>
#include <memory>
#include <future>template<typename T>
void quick_sort_recursive(T arr[], int start, int end) {if (start >= end) return;T key = arr[start];int left = start, right = end;while(left < right) {while (arr[right] >= key && left < right) right--;while (arr[left] <= key && left < right) left++;std::swap(arr[left], arr[right]);}if (arr[left] < key) {std::swap(arr[left], arr[start]);}quick_sort_recursive(arr, start, left - 1);quick_sort_recursive(arr, left + 1, end);
}
template<typename T>
void quick_sort(T arr[], int len) {quick_sort_recursive(arr, 0, len - 1);
}int main() {int num_arr[] = { 5,3,7,6,4,1,0,2,9,10,8 };int length = sizeof(num_arr) / sizeof(int);quick_sort(num_arr, length );std::cout << "sorted result is ";for (int i = 0; i < length; i++) {std::cout << " " << num_arr[i];}std::cout << std::endl;
}
2 使用函数式编程快速排序
函数式编程可以被看作是将函数视为数学中的公式。在函数式编程中,函数被视为一种纯粹的数学映射,它接受输入并产生输出,没有副作用或可变状态。这种思想源于数学中的函数概念,其中函数被定义为将输入映射到输出的关系。
在第一小节实现快速排序是一种面向过程的编程方式,我们可以通过定义一个函数来实现快速排序算法。这个函数接受一个数组作为输入,并通过一系列的步骤来实现快速排序的逻辑。这些步骤包括选择基准元素、划分数组、递归调用等。
而使用函数式编程,强调使用纯函数来构建程序,通过函数的组合和转换来处理数据。函数式编程避免使用可变状态和共享状态。
#include <iostream>
#include <thread>
#include <memory>
#include <future>
#include <list>
#include <algorithm>template<typename T>
std::list<T> sequential_quick_sort(std::list<T> input)
{if (input.empty()){return input;}std::list<T> result;//  ① 将input中的第一个元素放入result中,并且将这第一个元素从input中删除result.splice(result.begin(), input, input.begin());  //  ② 取result的第一个元素,将来用这个元素做切割,切割input中的列表。T const& pivot = *result.begin();    //  ③std::partition 是一个标准库函数,用于将容器或数组中的元素按照指定的条件进行分区,// 使得满足条件的元素排在不满足条件的元素之前。// 所以经过计算divide_point指向的是input中第一个大于等于pivot的元素auto divide_point = std::partition(input.begin(), input.end(),[&](T const& t) {return t < pivot; });    // ④ 我们将小于pivot的元素放入lower_part中std::list<T> lower_part;lower_part.splice(lower_part.end(), input, input.begin(),divide_point);  // ⑤我们将lower_part传递给sequential_quick_sort 返回一个新的有序的从小到大的序列//lower_part 中都是小于divide_point的值auto new_lower(sequential_quick_sort(std::move(lower_part)));    // ⑥我们剩余的input列表传递给sequential_quick_sort递归调用,input中都是大于divide_point的值。auto new_higher(sequential_quick_sort(std::move(input)));    //⑦到此时new_higher和new_lower都是从小到大排序好的列表//将new_higher 拼接到result的尾部result.splice(result.end(), new_higher);    //将new_lower 拼接到result的头部result.splice(result.begin(), new_lower);   return result;
}int main() {std::list<int> numlists = { 6,1,0,7,5,2,9,-1 };auto sort_result = sequential_quick_sort(numlists);std::cout << "sorted result is ";for (auto iter = sort_result.begin(); iter != sort_result.end(); iter++) {std::cout << " " << (*iter);}std::cout << std::endl;
}
3 并行处理快速排序
在快速排序中,我们以某个数字作为基准(一般开头), 分为前半部分和后半部分,然后前半部分和后半部分单独计算。
并行排序的思想是将前半部分(或后半部分)单独拷贝一份,置于async中(不指定启动方式,编译器会根据计算次数决定什么时候异步执行什么时候串行),进行并行计算
#include <iostream>
#include <thread>
#include <memory>
#include <future>
#include <list>
#include <algorithm>template<typename T>
std::list<T> parallel_quick_sort(std::list<T> input)
{if (input.empty()){return input;}std::list<T> result;result.splice(result.begin(), input, input.begin());T const& pivot = *result.begin();auto divide_point = std::partition(input.begin(), input.end(),[&](T const& t) {return t < pivot; });std::list<T> lower_part;lower_part.splice(lower_part.end(), input, input.begin(),divide_point);// ①因为lower_part是副本,所以并行操作不会引发逻辑错误,这里可以启动future做排序std::future<std::list<T>> new_lower(std::async(¶llel_quick_sort<T>, std::move(lower_part)));// ②auto new_higher(parallel_quick_sort(std::move(input))); result.splice(result.end(), new_higher); result.splice(result.begin(), new_lower.get()); return result;
}int main()
{std::list<int> numlists = { 6,1,0,7,5,2,9,-1 };auto sort_result = parallel_quick_sort(numlists);std::cout << "sorted result is ";for (auto iter = sort_result.begin(); iter != sort_result.end(); iter++) {std::cout << " " << (*iter);}std::cout << std::endl;
}
![[力扣 Hot100]Day28 两数相加](https://img-blog.csdnimg.cn/direct/5bdba9fe66b34592a656017f053aa9cc.png)