文章目录
- SpringBoot 源码分析
- 一、源码分析 - 自动装配
- 1、@SpringBootApplication
- 2、@EnableAutoConfiguration
- 3、AutoConfigurationImportSelector
- 4、SpringFactoriesLoader
- 5、META-INF/spring.factories
- 6、SpringMVC相关装配
- 二、源码分析 - 启动加载
- 1、SpringApplication - 静态run
- 2、SpringApplication - 构造方法
- 3、SpringApplication - 实例run
- 4、IoC容器的初始化
- 5、内置Tomcat原理
- 三、自动装配 - 相关注解
- 1、自动装配 - 条件注解
- 2、自动装配 - 顺序注解
- 四、自定义 starter
- 1、pom文件
- 2、Properties实体类
- 3、Config配置类
- 4、spring.factories
- 5、使用自动装配
SpringBoot 源码分析
一、源码分析 - 自动装配
1、@SpringBootApplication
// 自动装配的开始
@SpringBootApplication
public class BasicProjectApplication {public static void main(String[] args) {SpringApplication.run(BasicProjectApplication.class, args);}
}
@Target({ElementType.TYPE})
@Retention(RetentionPolicy.RUNTIME)
@Documented
@Inherited
// @Configuration的子注解
@SpringBootConfiguration
// 开启自动装配
@EnableAutoConfiguration
// 开启扫描机制,扫描启动类所在包(但是不包含类型排除和自动配置的Filter)
@ComponentScan(excludeFilters = { @Filter(type = FilterType.CUSTOM, classes = TypeExcludeFilter.class),@Filter(type = FilterType.CUSTOM, classes = AutoConfigurationExcludeFilter.class)
})
public @interface SpringBootApplication {.....}
2、@EnableAutoConfiguration
package org.springframework.boot.autoconfigure;@Target({ElementType.TYPE})
@Retention(RetentionPolicy.RUNTIME)
@Documented
@Inherited
@AutoConfigurationPackage
// 通过 @Import 引入 AutoConfigurationImportSelector
@Import({AutoConfigurationImportSelector.class})
public @interface EnableAutoConfiguration {String ENABLED_OVERRIDE_PROPERTY = "spring.boot.enableautoconfiguration";Class<?>[] exclude() default {};String[] excludeName() default {};
}
3、AutoConfigurationImportSelector
ImportSelector 接口用于实现动态地选择需要被导入到容器中的配置类的逻辑。
public interface ImportSelector {/*** @param importingClassMetadata 用于描述使用了 @Import 注解的配置类的注解元数据。* @return 数组中的每个元素都是一个全限定类名,表示需要被导入到容器中的配置类。*/ String[] selectImports(AnnotationMetadata importingClassMetadata);@Nullabledefault Predicate<String> getExclusionFilter() {return null;}
}
AutoConfigurationImportSelector 实现了 ImportSelector 接口,并在 selectImports 方法中根据特定的条件或逻辑来选择需要导入的配置类,实现更加灵活和动态的配置。
public class AutoConfigurationImportSelector implements DeferredImportSelector, BeanClassLoaderAware, ResourceLoaderAware, BeanFactoryAware, EnvironmentAware, Ordered {// 这里的参数 annotationMetadata,就是 @EnableAutoConfiguration 注解的元数据public String[] selectImports(AnnotationMetadata annotationMetadata) {if (!this.isEnabled(annotationMetadata)) {return NO_IMPORTS;} else {AutoConfigurationEntry autoConfigurationEntry = // 获取自动配置类this.getAutoConfigurationEntry(annotationMetadata);return StringUtils.toStringArray(autoConfigurationEntry.getConfigurations());}}protected static class AutoConfigurationEntry {private final List<String> configurations; // 需要导入的private final Set<String> exclusions; // 不需要导入的}protected AutoConfigurationEntry getAutoConfigurationEntry(AnnotationMetadata annotationMetadata) {if (!this.isEnabled(annotationMetadata)) {return EMPTY_ENTRY;} else {AnnotationAttributes attributes = this.getAttributes(annotationMetadata);List<String> configurations = // 获取所有候选的配置类this.getCandidateConfigurations(annotationMetadata, attributes);configurations = this.removeDuplicates(configurations);Set<String> exclusions = this.getExclusions(annotationMetadata, attributes);this.checkExcludedClasses(configurations, exclusions);configurations.removeAll(exclusions);configurations = this.getConfigurationClassFilter().filter(configurations);this.fireAutoConfigurationImportEvents(configurations, exclusions);return new AutoConfigurationEntry(configurations, exclusions);}}protected List<String> getCandidateConfigurations(AnnotationMetadata metadata, AnnotationAttributes attributes) {// 获取所有配置类的类全名List<String> configurations = SpringFactoriesLoader.loadFactoryNames(this.getSpringFactoriesLoaderFactoryClass(), // EnableAutoConfiguration.classthis.getBeanClassLoader());Assert.notEmpty(configurations, "No auto configuration classes found in META-INF/spring.factories. If you are using a custom packaging, make sure that file is correct.");return configurations;}protected Class<?> getSpringFactoriesLoaderFactoryClass() {return EnableAutoConfiguration.class;}}
4、SpringFactoriesLoader
// org.springframework.core.io.support.SpringFactoriesLoader/*** 这里的 factoryType 就是 EnableAutoConfiguration.class*/
public static List<String> loadFactoryNames(Class<?> factoryType, @Nullable ClassLoader classLoader) {// org.springframework.boot.autoconfigure.EnableAutoConfigurationString factoryTypeName = factoryType.getName();// 获取 META-INF/spring.factories 文件中 EnableAutoConfiguration 对应的配置类的类全名return (List)loadSpringFactories(classLoader).getOrDefault(factoryTypeName, Collections.emptyList());
}private static Map<String, List<String>> loadSpringFactories(@Nullable ClassLoader classLoader) {MultiValueMap<String, String> result = (MultiValueMap)cache.get(classLoader);if (result != null) {return result;} else {try {// 扫描jar包路径下的 META-INF/spring.factories 文件Enumeration<URL> urls = classLoader != null ? classLoader.getResources("META-INF/spring.factories") : ClassLoader.getSystemResources("META-INF/spring.factories");// 把 META-INF/spring.factories 解析成 MapMultiValueMap<String, String> result = new LinkedMultiValueMap();// ...cache.put(classLoader, result);return result;} catch (IOException var13) {throw new IllegalArgumentException("Unable to load factories from location [META-INF/spring.factories]", var13);}}
}
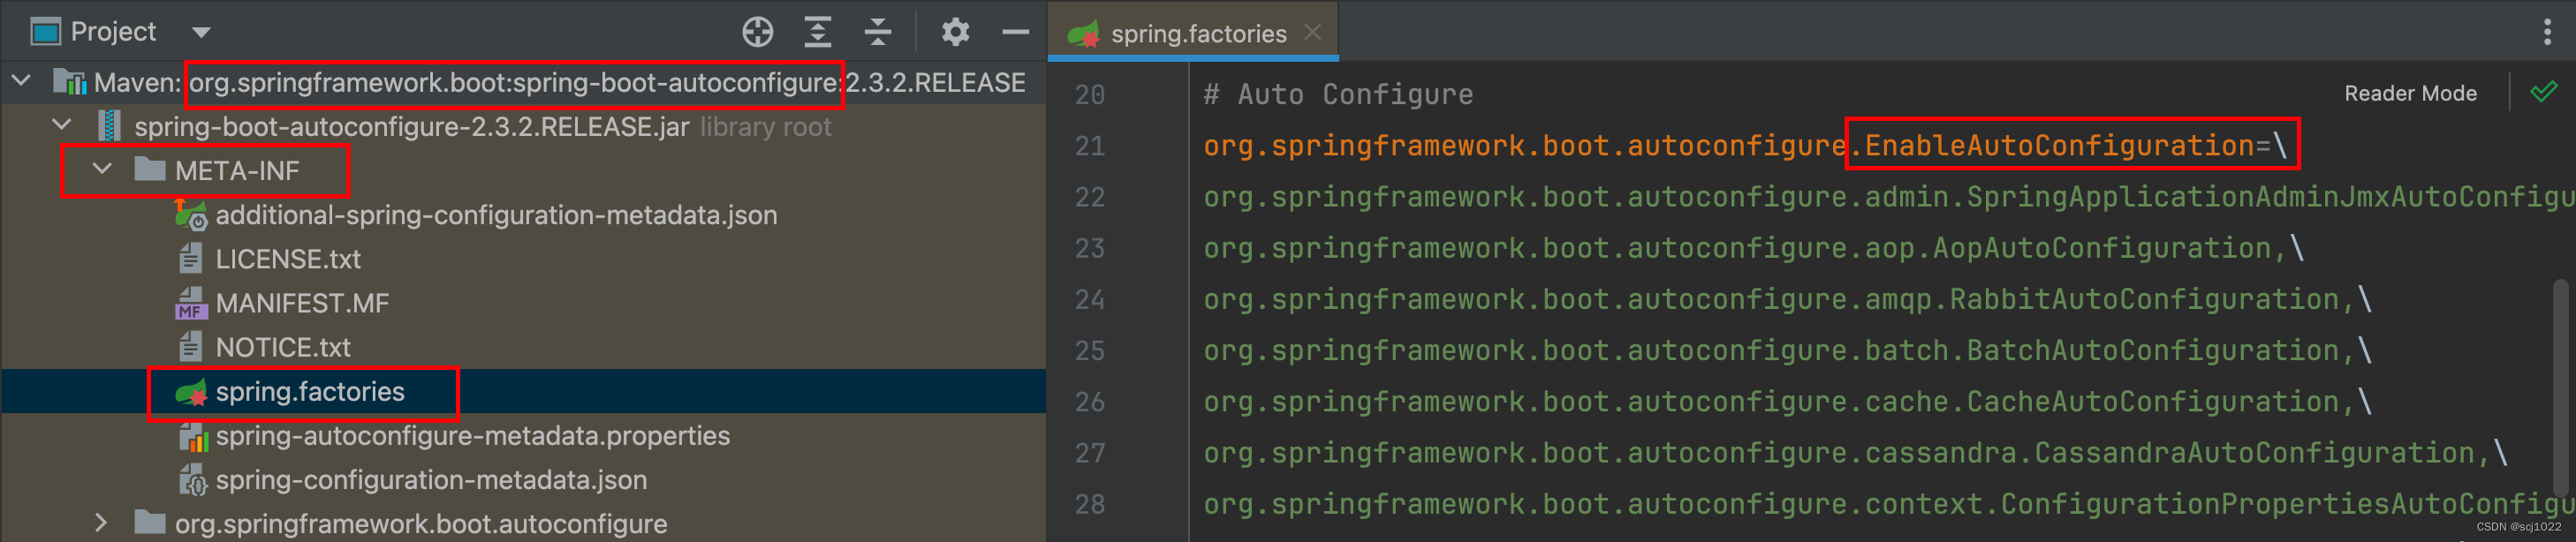
5、META-INF/spring.factories
下面看一下 META-INF/spring.factories 里的 EnableAutoConfiguration 对应的配置类
我们在里面挑一个常用的 DataSourceAutoConfiguration类看一下
@Configuration(proxyBeanMethods = false)
@ConditionalOnClass({DataSource.class, EmbeddedDatabaseType.class})
@ConditionalOnMissingBean(type = {"io.r2dbc.spi.ConnectionFactory"})
@EnableConfigurationProperties({DataSourceProperties.class})
@Import({DataSourcePoolMetadataProvidersConfiguration.class, DataSourceInitializationConfiguration.class})
public class DataSourceAutoConfiguration {}
@ConfigurationProperties(prefix = "spring.datasource")
public class DataSourceProperties implements BeanClassLoaderAware, InitializingBean {private String driverClassName;private String url;private String username;private String password;// ...
}
通过 @ConfigurationProperties + @EnableConfigurationProperties 自动读取配置文件中的配置
spring:datasource:driver-class-name: com.mysql.jdbc.Driverurl: .....username: rootpassword: root
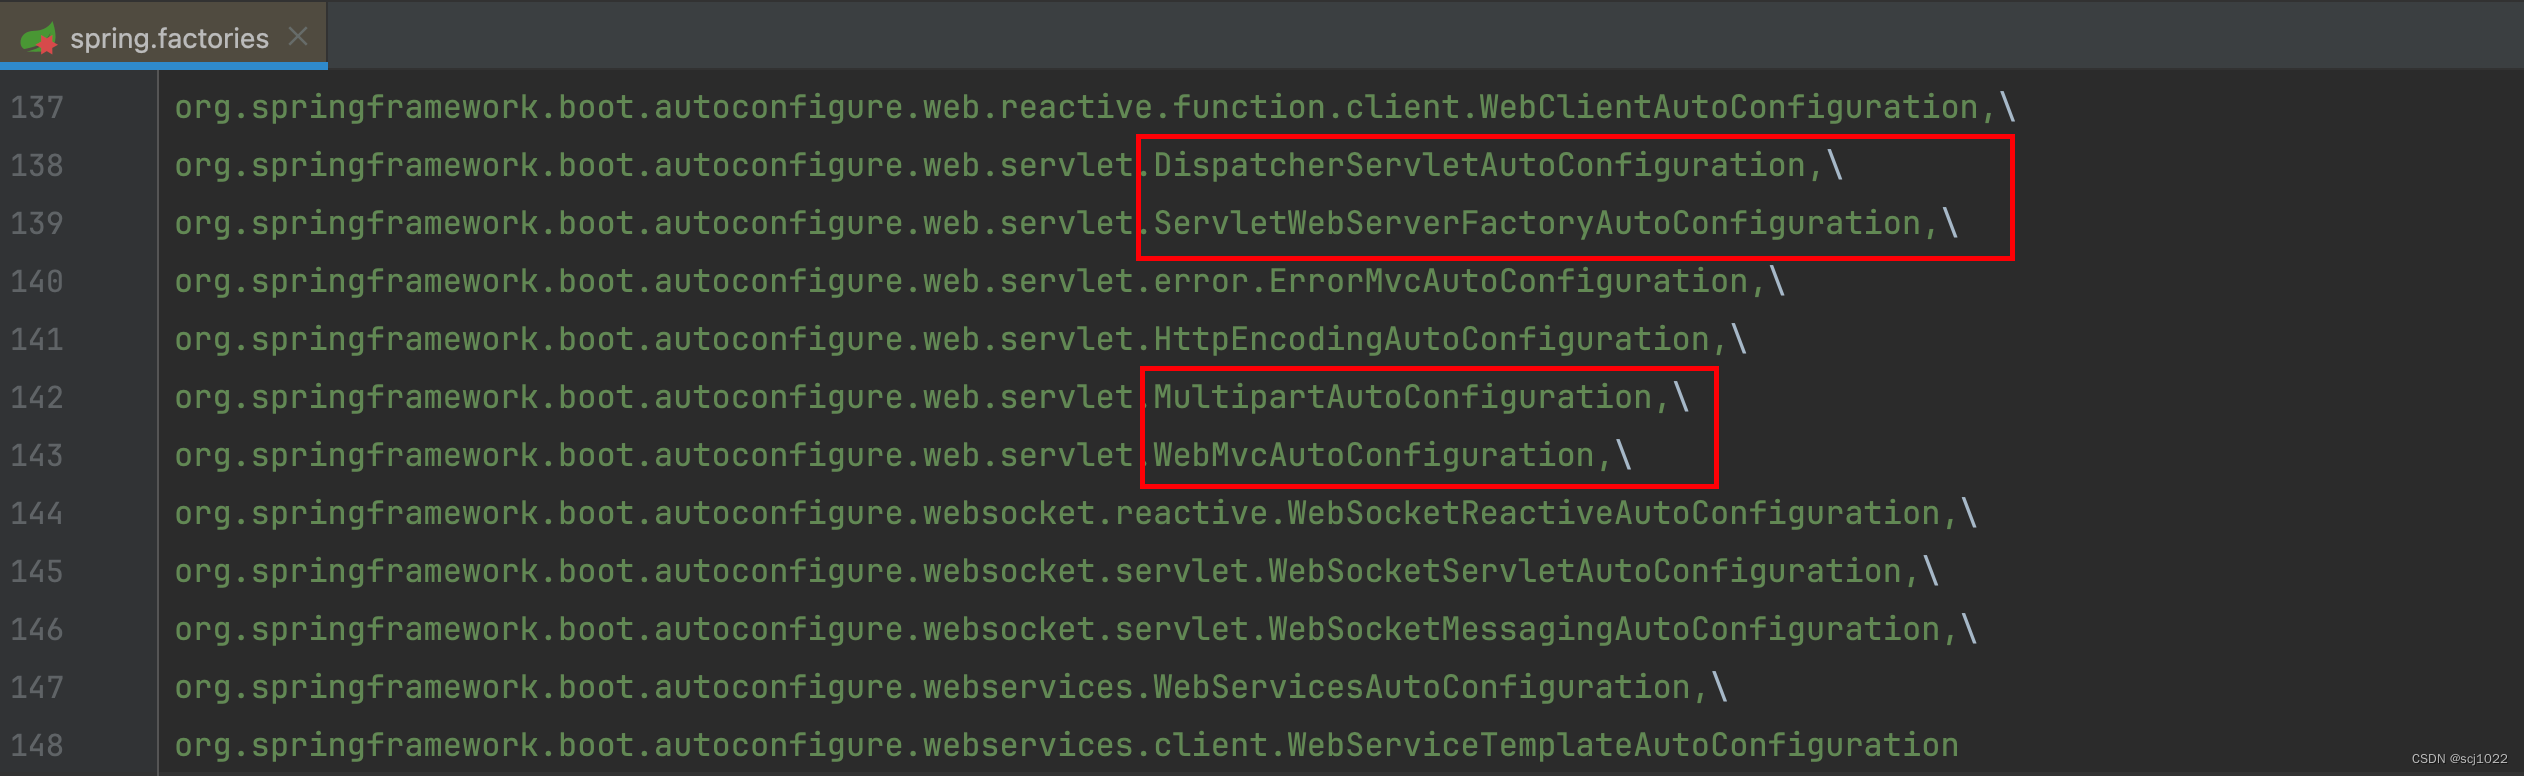
6、SpringMVC相关装配
@Configuration(proxyBeanMethods = false)
@ConditionalOnWebApplication(type = Type.SERVLET)
@ConditionalOnClass({Servlet.class, DispatcherServlet.class, WebMvcConfigurer.class})
@ConditionalOnMissingBean({WebMvcConfigurationSupport.class})
@AutoConfigureOrder(-2147483638)
// 在 DispatcherServletAutoConfiguration 配置类之后配置
@AutoConfigureAfter({DispatcherServletAutoConfiguration.class, TaskExecutionAutoConfiguration.class, ValidationAutoConfiguration.class})
public class WebMvcAutoConfiguration {// MVC的相关的配置.....
}
@AutoConfigureOrder(Integer.MIN_VALUE)
@Configuration(proxyBeanMethods = false)
@ConditionalOnWebApplication(type = Type.SERVLET)
@ConditionalOnClass({DispatcherServlet.class})
// 在 ServletWebServerFactoryAutoConfiguration 配置类之后配置
@AutoConfigureAfter({ServletWebServerFactoryAutoConfiguration.class})
public class DispatcherServletAutoConfiguration {@Configuration(proxyBeanMethods = false)@Conditional({DefaultDispatcherServletCondition.class})@ConditionalOnClass({ServletRegistration.class})@EnableConfigurationProperties({WebMvcProperties.class})protected static class DispatcherServletConfiguration {protected DispatcherServletConfiguration() {}// 前端控制器 DispatcherServlet@Bean(name = {"dispatcherServlet"})public DispatcherServlet dispatcherServlet(WebMvcProperties webMvcProperties) {DispatcherServlet dispatcherServlet = new DispatcherServlet();// ...return dispatcherServlet;}// 文件上传相关bean@Bean@ConditionalOnBean({MultipartResolver.class})@ConditionalOnMissingBean(name = {"multipartResolver"})public MultipartResolver multipartResolver(MultipartResolver resolver) {return resolver;}}
}
@Configuration(proxyBeanMethods = false)
@AutoConfigureOrder(Integer.MIN_VALUE)
@ConditionalOnClass({ServletRequest.class})
@ConditionalOnWebApplication(type = Type.SERVLET)
@EnableConfigurationProperties({ServerProperties.class})
@Import({BeanPostProcessorsRegistrar.class, ServletWebServerFactoryConfiguration.EmbeddedTomcat.class,	// 内置TomcatServletWebServerFactoryConfiguration.EmbeddedJetty.class, ServletWebServerFactoryConfiguration.EmbeddedUndertow.class})
public class ServletWebServerFactoryAutoConfiguration {...}
二、源码分析 - 启动加载
1、SpringApplication - 静态run
看完了自动装配,我们继续看一下启动加载,还是从启动类开始
@SpringBootApplication
public class BasicProjectApplication {public static void main(String[] args) {SpringApplication.run(BasicProjectApplication.class, args);}
}
// org.springframework.boot.SpringApplicationpublic static ConfigurableApplicationContext run(Class<?> primarySource, String... args) {return run(new Class[]{primarySource}, args);
}public static ConfigurableApplicationContext run(Class<?>[] primarySources, String[] args) {// 构建 SpringApplication实例 并执行run方法return (new SpringApplication(primarySources)).run(args);
}
可以看到,启动类中的 SpringApplication.run ,最终会先构建 SpringApplication实例,再执行实例的run方法。
2、SpringApplication - 构造方法
// org.springframework.boot.SpringApplication// SpringApplication的构造方法
public SpringApplication(Class<?>... primarySources) {this((ResourceLoader)null, primarySources);
}public SpringApplication(ResourceLoader resourceLoader, Class<?>... primarySources) {this.sources = new LinkedHashSet();this.bannerMode = Mode.CONSOLE;this.logStartupInfo = true;this.addCommandLineProperties = true;this.addConversionService = true;this.headless = true;this.registerShutdownHook = true;this.additionalProfiles = new HashSet();this.isCustomEnvironment = false;this.lazyInitialization = false;// 资源加载器this.resourceLoader = resourceLoader;// primarySources 就是 启动类Assert.notNull(primarySources, "PrimarySources must not be null");this.primarySources = new LinkedHashSet(Arrays.asList(primarySources));// 判断Web程序的类型(无、基于Servlet的、基于响应式编程模型的)this.webApplicationType = WebApplicationType.deduceFromClasspath();// getSpringFactoriesInstances 就是获取 META-INF/spring.factories 中对应类的实例this.setInitializers(this.getSpringFactoriesInstances(ApplicationContextInitializer.class));this.setListeners(this.getSpringFactoriesInstances(ApplicationListener.class));// 推断 Spring Boot 应用程序的主类this.mainApplicationClass = this.deduceMainApplicationClass();
}private <T> Collection<T> getSpringFactoriesInstances(Class<T> type) {return this.getSpringFactoriesInstances(type, new Class[0]);
}private <T> Collection<T> getSpringFactoriesInstances(Class<T> type, Class<?>[] parameterTypes, Object... args) {ClassLoader classLoader = this.getClassLoader();// loadFactoryNames应该很熟悉了,在「自动装配」里边讲过Set<String> names = new LinkedHashSet(SpringFactoriesLoader.loadFactoryNames(type, classLoader));// 构建实例List<T> instances = this.createSpringFactoriesInstances(type, parameterTypes, classLoader, args, names);// 排序返回AnnotationAwareOrderComparator.sort(instances);return instances;
}
3、SpringApplication - 实例run
构建完 SpringApplication 实例之后,就开始调用实例的run方法了
// org.springframework.boot.SpringApplicationpublic static ConfigurableApplicationContext run(Class<?>[] primarySources, String[] args) {return (new SpringApplication(primarySources)).run(args);
}public ConfigurableApplicationContext run(String... args) {StopWatch stopWatch = new StopWatch();stopWatch.start();// Spring容器ConfigurableApplicationContext context = null;Collection<SpringBootExceptionReporter> exceptionReporters = new ArrayList();this.configureHeadlessProperty();// 开始监听SpringApplicationRunListeners listeners = this.getRunListeners(args);listeners.starting();Collection exceptionReporters;try {ApplicationArguments applicationArguments = new DefaultApplicationArguments(args);// 准备EnvironmentConfigurableEnvironment environment = this.prepareEnvironment(listeners, applicationArguments);this.configureIgnoreBeanInfo(environment);// 打印程序启动时的横幅标语Banner printedBanner = this.printBanner(environment);// 构建Spring容器context = this.createApplicationContext();exceptionReporters = this.getSpringFactoriesInstances(SpringBootExceptionReporter.class, new Class[]{ConfigurableApplicationContext.class}, context);// 准备IoC容器this.prepareContext(context, environment, listeners, applicationArguments, printedBanner);// IoC容器的初始化this.refreshContext(context);// IoC容器初始化之后的一些操作this.afterRefresh(context, applicationArguments);stopWatch.stop();if (this.logStartupInfo) {(new StartupInfoLogger(this.mainApplicationClass)).logStarted(this.getApplicationLog(), stopWatch);}listeners.started(context);this.callRunners(context, applicationArguments);} catch (Throwable var10) {this.handleRunFailure(context, var10, exceptionReporters, listeners);throw new IllegalStateException(var10);}try {listeners.running(context);return context;} catch (Throwable var9) {this.handleRunFailure(context, var9, exceptionReporters, (SpringApplicationRunListeners)null);throw new IllegalStateException(var9);}
}
4、IoC容器的初始化
在执行 SpringApplication 实例的run方法时,通过refreshContext方法进行IoC容器的初始化
// org.springframework.boot.SpringApplicationprivate void refreshContext(ConfigurableApplicationContext context) {refresh((ApplicationContext) context);if (this.registerShutdownHook) {try {context.registerShutdownHook();}catch (AccessControlException ex) {// Not allowed in some environments.}}
}@Deprecated
protected void refresh(ApplicationContext applicationContext) {Assert.isInstanceOf(ConfigurableApplicationContext.class, applicationContext);refresh((ConfigurableApplicationContext) applicationContext);
}protected void refresh(ConfigurableApplicationContext applicationContext) {// IoC容器的初始化applicationContext.refresh();
}
然后,就到我们熟悉的 refresh() 方法了,总共有12大步骤(这属于Spring源码的内容,这里就不展开了)
// org.springframework.context.support.AbstractApplicationContext@Override
public void refresh() throws BeansException, IllegalStateException {synchronized (this.startupShutdownMonitor) {// Prepare this context for refreshing.prepareRefresh();// Tell the subclass to refresh the internal bean factory.ConfigurableListableBeanFactory beanFactory = obtainFreshBeanFactory();// Prepare the bean factory for use in this context.prepareBeanFactory(beanFactory);try {// Allows post-processing of the bean factory in context subclasses.postProcessBeanFactory(beanFactory);// Invoke factory processors registered as beans in the context.invokeBeanFactoryPostProcessors(beanFactory);// Register bean processors that intercept bean creation.registerBeanPostProcessors(beanFactory);// Initialize message source for this context.initMessageSource();// Initialize event multicaster for this context.initApplicationEventMulticaster();// Initialize other special beans in specific context subclasses.onRefresh();// Check for listener beans and register them.registerListeners();// Instantiate all remaining (non-lazy-init) singletons.finishBeanFactoryInitialization(beanFactory);// Last step: publish corresponding event.finishRefresh();} catch (BeansException ex) {// logger...// Destroy already created singletons to avoid dangling resources.destroyBeans();// Reset 'active' flag.cancelRefresh(ex);// Propagate exception to caller.throw ex;}finally {// Reset common introspection caches in Spring's core, since we// might not ever need metadata for singleton beans anymore...resetCommonCaches();}}
}
5、内置Tomcat原理
我们看到 refresh() 方法12大步骤中的 onRefresh() 方法,默认是空实现
// org.springframework.context.support.AbstractApplicationContextprotected void onRefresh() throws BeansException {// For subclasses: do nothing by default.
}
ServletWebServerApplicationContext 重写了onRefresh方法:
// org.springframework.boot.web.servlet.context.ServletWebServerApplicationContext@Override
protected void onRefresh() {super.onRefresh();try {// tomcat容器就是在这里创建并启动的createWebServer();}catch (Throwable ex) {throw new ApplicationContextException("Unable to start web server", ex);}
}private void createWebServer() {WebServer webServer = this.webServer;ServletContext servletContext = getServletContext();if (webServer == null && servletContext == null) {ServletWebServerFactory factory = getWebServerFactory();// 创建web容器this.webServer = factory.getWebServer(getSelfInitializer());getBeanFactory().registerSingleton("webServerGracefulShutdown",new WebServerGracefulShutdownLifecycle(this.webServer));getBeanFactory().registerSingleton("webServerStartStop",new WebServerStartStopLifecycle(this, this.webServer));}else if (servletContext != null) {try {getSelfInitializer().onStartup(servletContext);}catch (ServletException ex) {throw new ApplicationContextException("Cannot initialize servlet context", ex);}}initPropertySources();
}
// org.springframework.boot.web.embedded.tomcat.TomcatServletWebServerFactory@Override
public WebServer getWebServer(ServletContextInitializer... initializers) {if (this.disableMBeanRegistry) {Registry.disableRegistry();}// 创建TomcatTomcat tomcat = new Tomcat();File baseDir = (this.baseDirectory != null) ? this.baseDirectory : createTempDir("tomcat");tomcat.setBaseDir(baseDir.getAbsolutePath());Connector connector = new Connector(this.protocol);connector.setThrowOnFailure(true);tomcat.getService().addConnector(connector);customizeConnector(connector);tomcat.setConnector(connector);tomcat.getHost().setAutoDeploy(false);configureEngine(tomcat.getEngine());for (Connector additionalConnector : this.additionalTomcatConnectors) {tomcat.getService().addConnector(additionalConnector);}prepareContext(tomcat.getHost(), initializers);// 启动Tomcatreturn getTomcatWebServer(tomcat);
}protected TomcatWebServer getTomcatWebServer(Tomcat tomcat) {return new TomcatWebServer(tomcat, getPort() >= 0, getShutdown());
}public TomcatWebServer(Tomcat tomcat, boolean autoStart, Shutdown shutdown) {Assert.notNull(tomcat, "Tomcat Server must not be null");this.tomcat = tomcat;// 自启动this.autoStart = autoStart;this.gracefulShutdown = (shutdown == Shutdown.GRACEFUL) ? new GracefulShutdown(tomcat) : null;// 初始化initialize();
}private void initialize() throws WebServerException {logger.info("Tomcat initialized with port(s): " + getPortsDescription(false));synchronized (this.monitor) {try {// ...this.tomcat.start();	// 启动Tomcat// ...} // ...}
}
三、自动装配 - 相关注解
1、自动装配 - 条件注解
@Conditional 是 Spring 框架中的一个元注解,根据注解的条件来决定是否应该应用某个配置类或组件。
Spring 还提供了许多子注解,用于更精细地定义条件。

| 常用注解 | 描述 |
|---|---|
| @ConditionalOnBean | 容器中存在指定的 Bean 时,配置才会生效。 |
| @ConditionalOnMissingBean | 容器中不存在指定的 Bean 时,配置才会生效。 |
| @ConditionalOnClass | 当指定的类存在时,配置才会生效。 |
| @ConditionalOnMissingClass | 当指定的类不存在时,配置才会生效。 |
| @ConditionalOnWebApplication | 只有在web环境下,配置才会生效。 |
| @ConditionalOnNotWebApplication | 只有在非web环境下,配置才会生效。 |
| @ConditionalOnJava | 系统的Java版本符合需求,配置才会生效。 |
| @ConditionalOnExpression | 满足指定的SpEL表达式,配置才会生效。 |
| @ConditionalOnProperty | 指定的属性有指定的值,配置才会生效。 |
| @ConditionalOnResource | 类路径下存在指定资源文件,配置才会生效。 |
| @ConditionalOnSingleCandidate | 容器中只有一个指定的Bean,或Bean是首选Bean |
2、自动装配 - 顺序注解
| 注解 | 描述 |
|---|---|
| @AutoConfigureAfter | 在指定配置类加载之后加载 |
| @AutoConfigureBefore | 在指定配置类加载之前加载 |
| @AutoConfigureOrder | 指定加载配置的优先级,默认0 |
四、自定义 starter
看完自动装配的源码,我们可以尝试自定义 starter,来实现自动装配。
1、pom文件
<?xml version="1.0" encoding="UTF-8"?>
<project xmlns="http://maven.apache.org/POM/4.0.0" xmlns:xsi="http://www.w3.org/2001/XMLSchema-instance"xsi:schemaLocation="http://maven.apache.org/POM/4.0.0 https://maven.apache.org/xsd/maven-4.0.0.xsd"><modelVersion>4.0.0</modelVersion><!-- 定义starter的坐标 --><groupId>jwt-utils</groupId><artifactId>jwt-spring-boot-starter</artifactId><version>1.0.0-SNAPSHOT</version><name>jwt-spring-boot-starter</name></project>
2、Properties实体类
@Data
@ConfigurationProperties(prefix = "auth")
public class ClientProperties {/*** 客户端名称*/private String clientId;/*** 客户端秘钥*/private String secret;/*** 拦截器拦截路径*/private List<String> includeFilterPaths;/*** 拦截器放行路径*/private List<String> excludeFilterPaths;
}
3、Config配置类
@Slf4j
@Configuration
// 只有配置了 auth.clientId 和 auth.secret 属性,当前配置才会生效。
@ConditionalOnProperty(prefix = "auth", name = {"clientId", "secret"})
@EnableConfigurationProperties(ClientProperties.class)
public class AuthAutoConfiguration {// 实现一些starter的逻辑....
}
4、spring.factories
在 resources/META-INF/spring.factories 目录下编写
org.springframework.boot.autoconfigure.EnableAutoConfiguration=\
com.auth.config.AuthAutoConfiguration
5、使用自动装配
在要使用的模块的pom文件中添加starter依赖
<dependency><groupId>jwt-utils</groupId><artifactId>jwt-spring-boot-starter</artifactId><version>1.0.0-SNAPSHOT</version>
</dependency>
在application.yaml文件添加配置
auth:clientId: user-servicesecret: 1234includeFilterPaths:- /path1- /path2