前言
《Spring Security学习(六)——配置多个Provider》有个很奇怪的现象,如果我们不添加DaoAuthenticationProvider到HttpSecurity中,似乎也能够达到类似的效果。那我们为什么要多此一举呢?从文章的效果来看确实是多此一举,但其实这里面暗藏玄机。也引出了本文的父子AuthenticationManager(ProviderManager)的话题。
探究父子AuthenticationManager(ProviderManager)体系
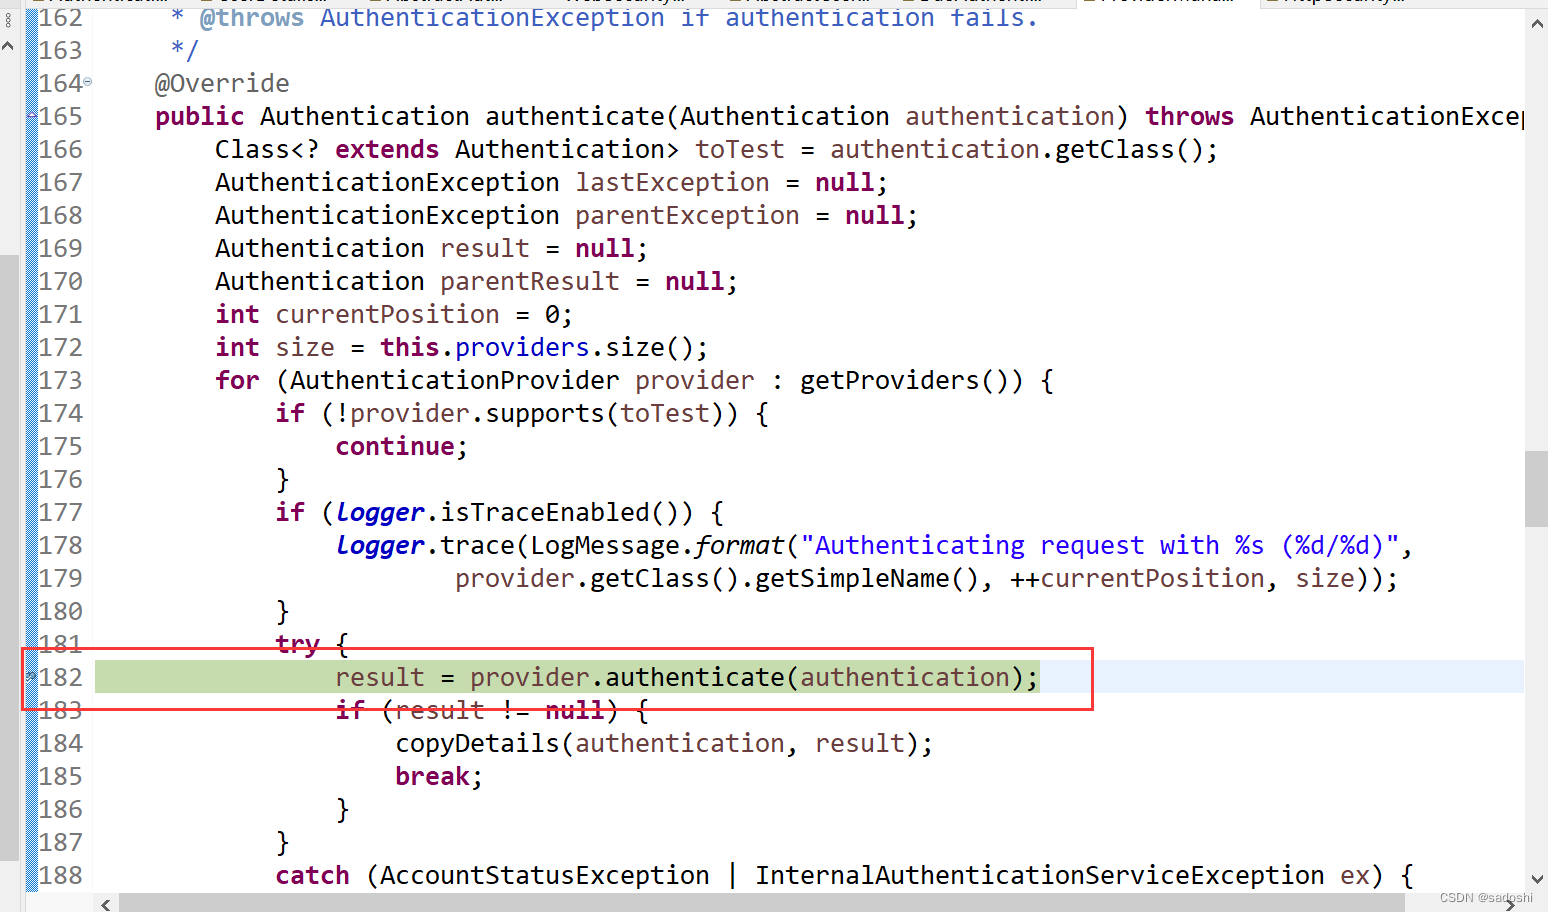
我们在Spring Security源码的ProviderManager(在org.springframework.security.authentication包中)中,在authenticate方法的以下位置断点调试:
然后查看断点的变量:
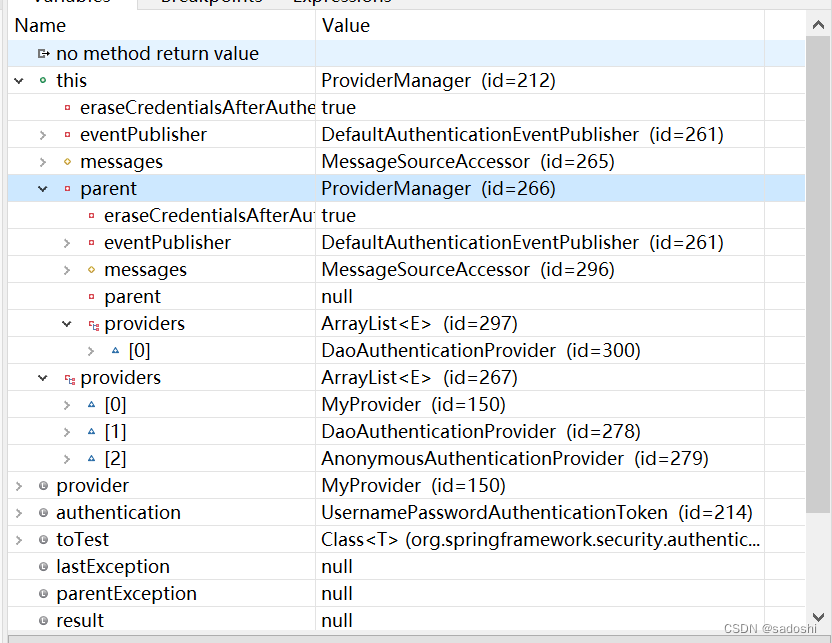
目前程序准备处理MyProvider的authenticate方法,目前providers列表中有三个provider,分别是我们添加的MyProvider和DaoAuthenticationProvider,还有一个AnonymousAuthenticationProvider是Spring Security在HttpSecurity初始化时加进去的(参考HttpSecurityConfiguration的httpSecurity方法)。
重点来了,我们还看到parent,里面有个DaoAuthenticationProvider。parent的ProviderManager和里面的DaoAuthenticationProvider又是什么时候加进去的?这个源码上有点复杂,我也不准备大段大段的粘出来(大概率读者一下子很难看懂),提示一下读者,在HttpSecurityConfiguration的httpSecurity方法的这一行:
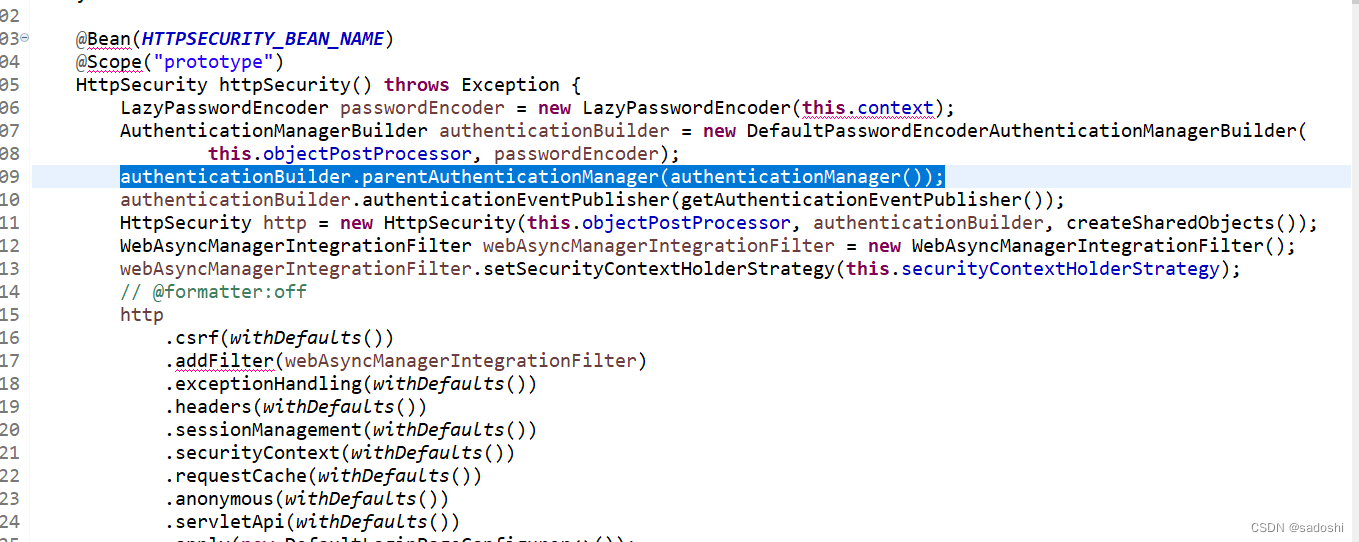
在蓝色标出的位置设置的父ProviderManager。这个父ProviderManager是AuthenticationConfiguration配置中创建InitializeUserDetailsBeanManagerConfigurer到Spring容器中,然后在Spring Security初始化时调用InitializeUserDetailsBeanManagerConfigurer的configue方法获取并设置ProviderManager,在父ProviderManager中设置DaoAuthenticationProvider也是类似的原理。
读者可以尝试删掉《Spring Securi习(六)——配置多个Provider》WebSecurityConfig中添加DaoAuthenticationProvider到HttpSecurity的代码,再断点调试一下。
父AuthenticationManager的作用
父子AuthenticationManager的机制是这样的:先对子AuthenticationManager中的AuthenticationProvider列表进行逐个匹配,若都无法匹配,则会对父AuthenticationManager中的AuthenticationProvider列表进行逐个匹配。
下面两张图是来自Spring Security官网文档的:
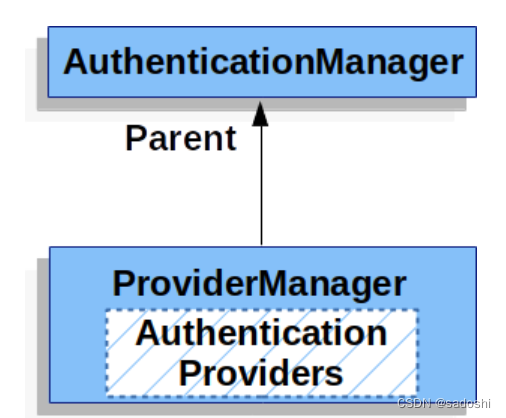
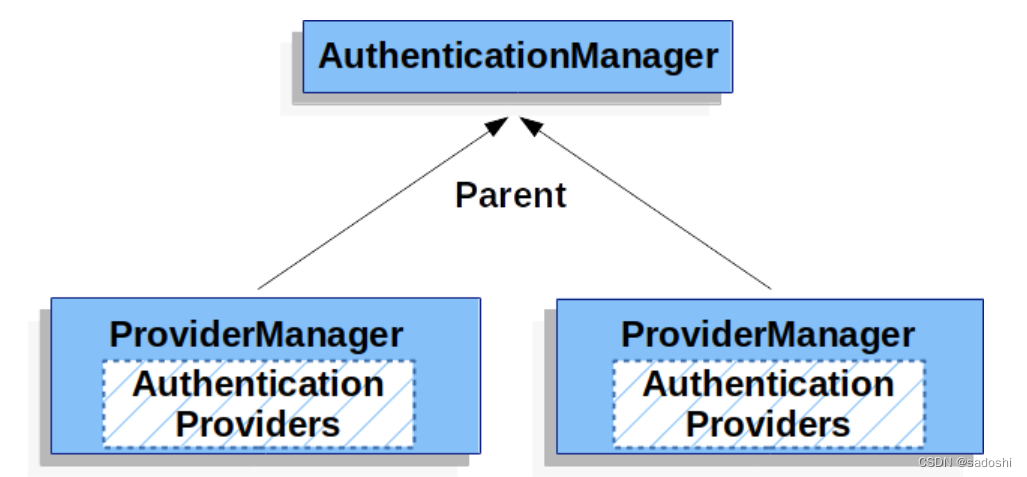
通过第二张图的多个子ProviderManager,我认为父AuthenticationManager的作用就是给多个子ProviderManager一个公共的匹配方式。
多个ProviderManager又是用在什么场景呢?根据Spring Security官网描述,是存在多个SecurityFilterChain,并且存在不同的登陆认证机制时使用。
自定义父ProviderManager
《Spring Security学习(六)——配置多个Provider》中直接调用http.authenticationProvider是把Provider加入子ProviderManager中。如果想加入到父ProviderManager中要怎么做呢?
查看过源码后,往父ProviderManager加Provider是比较复杂(当然也不是做不到),所以本次我们的目标是自定义父ProviderManager,加入需要的Provider,然后覆盖原父ProviderManager。
自定义一个新的Provider,从redis中取出账号密码进行比对,新建MyRedisProvider:
@Data
public class MyRedisProvider extends AbstractUserDetailsAuthenticationProvider{private UserDetailsServiceImpl userDetailsServiceImpl;private PasswordEncoder passwordEncoder;private static final String USER_NOT_FOUND_PASSWORD = "userNotFoundPassword";private volatile String userNotFoundEncodedPassword;@Overrideprotected UserDetails retrieveUser(String username, UsernamePasswordAuthenticationToken authentication)throws AuthenticationException {prepareTimingAttackProtection();try {UserDetails loadedUser = userDetailsServiceImpl.loadUserByRedis(username);if (loadedUser == null) {throw new InternalAuthenticationServiceException("UserDetailsService returned null, which is an interface contract violation");}return loadedUser;}catch (UsernameNotFoundException ex) {mitigateAgainstTimingAttack(authentication);throw ex;}catch (InternalAuthenticationServiceException ex) {throw ex;}catch (Exception ex) {throw new InternalAuthenticationServiceException(ex.getMessage(), ex);}}@Overrideprotected void additionalAuthenticationChecks(UserDetails userDetails,UsernamePasswordAuthenticationToken authentication) throws AuthenticationException {if (authentication.getCredentials() == null) {this.logger.debug("Failed to authenticate since no credentials provided");throw new BadCredentialsException(this.messages.getMessage("AbstractUserDetailsAuthenticationProvider.badCredentials", "Bad credentials"));}String presentedPassword = authentication.getCredentials().toString();if (!this.passwordEncoder.matches(presentedPassword, userDetails.getPassword())) {this.logger.debug("Failed to authenticate since password does not match stored value");throw new BadCredentialsException(this.messages.getMessage("AbstractUserDetailsAuthenticationProvider.badCredentials", "Bad credentials"));}}private void prepareTimingAttackProtection() {if (this.userNotFoundEncodedPassword == null) {this.userNotFoundEncodedPassword = this.passwordEncoder.encode(USER_NOT_FOUND_PASSWORD);}}private void mitigateAgainstTimingAttack(UsernamePasswordAuthenticationToken authentication) {if (authentication.getCredentials() != null) {String presentedPassword = authentication.getCredentials().toString();this.passwordEncoder.matches(presentedPassword, this.userNotFoundEncodedPassword);}}
}
和之前的MyProvider相比,仅仅是更改了第17行userDetailsServiceImpl.loadUserByRedis,从redis读取用户信息。当然在UserDetailsServiceImpl中我们也要加上loadUserByRedis方法:
@Component
public class UserDetailsServiceImpl implements UserDetailsService, InitializingBean{@Autowiredprivate SysUserService userService;@Autowiredprivate RedisTemplate redisTemplate;private static Map<String, SysUserEntity> userMap = new HashMap<String, SysUserEntity>();@Overridepublic void afterPropertiesSet() throws Exception {SysUserEntity memorySysUser = new SysUserEntity();memorySysUser.setUsername("test");memorySysUser.setPassword("test###");userMap.put("test", memorySysUser);SysUserEntity redisSysUser = new SysUserEntity();redisSysUser.setUsername("admin");redisSysUser.setPassword("admin123###");redisTemplate.opsForValue().set("admin", redisSysUser);}@Overridepublic UserDetails loadUserByUsername(String username) throws UsernameNotFoundException {QueryWrapper<SysUserEntity> queryWrapper = new QueryWrapper<SysUserEntity>();queryWrapper.eq("username", username);queryWrapper.last("limit 1");SysUserEntity user = userService.getOne(queryWrapper);if(user == null) {throw new UsernameNotFoundException("username not found");}return (new LoginUser(user));}public UserDetails loadUserByMemory(String username) throws UsernameNotFoundException {if(StrUtil.isNotEmpty(username)) {SysUserEntity user = userMap.get(username);if(user == null) {throw new UsernameNotFoundException("username not found");}return (new LoginUser(user));}return null;}public UserDetails loadUserByRedis(String username) throws UsernameNotFoundException {if(StrUtil.isNotEmpty(username)) {SysUserEntity user = (SysUserEntity)redisTemplate.opsForValue().get(username);if(user == null) {throw new UsernameNotFoundException("username not found");}return (new LoginUser(user));}return null;}
}
上述代码除了增加loadUserByRedis方法,为了在初始化时设置数据,还实现了InitializingBean接口的afterPropertiesSet方法,当然这只是测试使用。
为了使用redis,我们在pom.xml中引入相关依赖:
<dependency><groupId>org.springframework.boot</groupId><artifactId>spring-boot-starter-data-redis</artifactId></dependency><dependency><groupId>org.apache.commons</groupId><artifactId>commons-pool2</artifactId></dependency>另外要在application.yml文件增加redis配置:
spring:datasource:type: com.alibaba.druid.pool.DruidDataSourcedriverClassName: com.mysql.cj.jdbc.Driverdruid:url: jdbc:mysql://127.0.0.1:3306/security_test?useUnicode=true&characterEncoding=UTF-8&autoReconnect=true&useSSL=false&serverTimezone=Asia/Shanghaiusername: rootpassword: thymeleaf:prefix: classpath:/templates/redis:host: 127.0.0.1port: 6379password:lettuce:pool:max-active: 500max-idle: 300max-wait: 1000min-idle: 0database: 8增加一个配置类RedisConfig:
@Configuration
public class RedisConfig {@Beanpublic RedisTemplate<String, Serializable> redisTemplate(LettuceConnectionFactory connectionFactory){RedisTemplate<String, Serializable> redisTemplate = new RedisTemplate<String, Serializable>();redisTemplate.setKeySerializer(new StringRedisSerializer());redisTemplate.setValueSerializer(new GenericJackson2JsonRedisSerializer());redisTemplate.setConnectionFactory(connectionFactory);return redisTemplate;}
}
这样就可以使用RedisTemplate处理序列化的内容。
最后修改一下WebSecurityConfig:
@EnableWebSecurity
public class WebSecurityConfig{@Beanpublic MyPasswordEncoder PasswordEncoder() {return new MyPasswordEncoder();}@Beanpublic AuthenticationManager createParentAuthenticationManager() {List<AuthenticationProvider> providerList = new ArrayList<AuthenticationProvider>();MyRedisProvider myRedisProvider = new MyRedisProvider();myRedisProvider.setPasswordEncoder(PasswordEncoder());UserDetailsServiceImpl UserDetailsServiceImpl = SpringUtils.getBean(UserDetailsServiceImpl.class);myRedisProvider.setUserDetailsServiceImpl(UserDetailsServiceImpl);providerList.add(myRedisProvider);AuthenticationManager parentAuthenticationManager = new ProviderManager(providerList);return parentAuthenticationManager;}@Beanpublic SecurityFilterChain formLoginFilterChain(HttpSecurity http) throws Exception {http.authorizeHttpRequests(authorize -> authorize.anyRequest().authenticated()).formLogin(Customizer.withDefaults());MyProvider myProvider = new MyProvider();myProvider.setPasswordEncoder(PasswordEncoder());UserDetailsServiceImpl UserDetailsServiceImpl = SpringUtils.getBean(UserDetailsServiceImpl.class);myProvider.setUserDetailsServiceImpl(UserDetailsServiceImpl);http.authenticationProvider(myProvider);DaoAuthenticationProvider daoAuthenticationProvider = new DaoAuthenticationProvider();daoAuthenticationProvider.setPasswordEncoder(PasswordEncoder());daoAuthenticationProvider.setUserDetailsService(UserDetailsServiceImpl);http.authenticationProvider(daoAuthenticationProvider);AuthenticationManagerBuilder authenticationManagerBuilder = http.getSharedObject(AuthenticationManagerBuilder.class);ApplicationContext applicationContext = http.getSharedObject(ApplicationContext.class);AuthenticationManager parentAuthenticationManager = applicationContext.getBean(AuthenticationManager.class);authenticationManagerBuilder.parentAuthenticationManager(parentAuthenticationManager);return http.build();}
}
9-19行创建自定义的myRedisProvider,配置好加密器、userDetailsService、然后放到新建的ProviderManager中,通过@Bean注解注入到Spring容器中。39-42行从Spring Security上下文中获取9-19行注入Spring容器的ProviderManager并设置为父AuthenticationManager。
注:之前看过有的文章说直接通过@Bean注入容器就可以了。但是我自己调试过不行,查看了源码父AuthenticationManager默认是new创建的,并没有从容器中获取的逻辑。如果读者有相关的逻辑和实现方式也请进行指正。
之后启动应用,访问/hello路径,然后尝试输入jake/123、test/test、admin/admin123,应该都能通过。
小结
本文主要讲述了父子AuthenticationManager的机制,并且实现了如何自定义父ProviderManager。其实对于一般的应用是没必要这么搞的,如Spring Security官网所说,主要用在多种不同认证体系下。所以本文主要目的还是学习其内部机制为主。
