一、前言
部署yolo项目,是我这几个月以来做的事情,最近打算把这几个月试过的方法,踩过的坑,以博客的形式,分享一下。关于下面动态中讲到的如何用opencv部署,我在上一篇博客中已经详细讲到了:【yolov8部署实战】VS2019环境下使用C++和OpenCV环境部署yolo项目|含详细注释源码。这篇博客主要讲讲使用onnxruntime部署
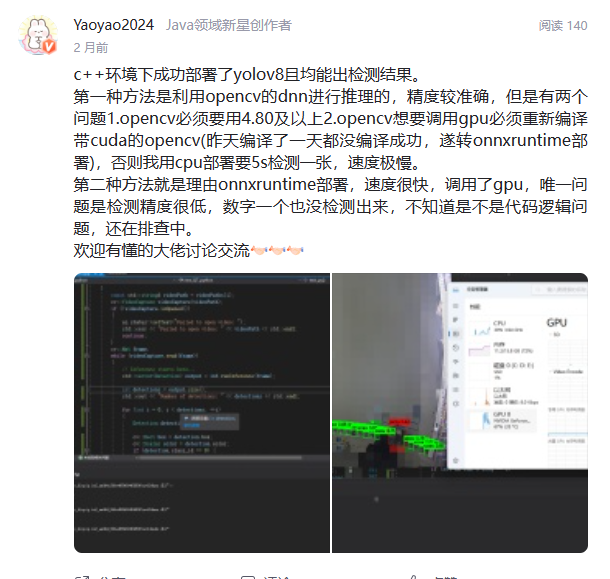
主要参考:https://github.com/Amyheart/yolov5v8-dnn-onnxruntime/tree/main
二、onnxruntime部署
2.0:环境依赖:
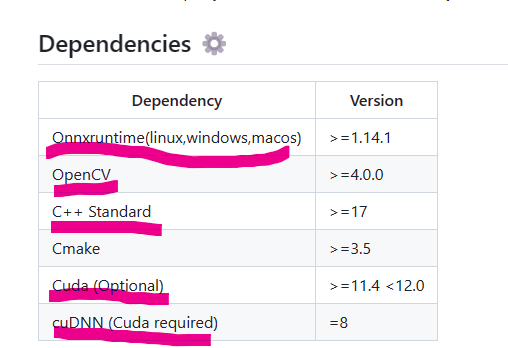
如果是只想要onnxruntime部署cpu版本的,即不调用gpu,则不需要配置后面两个(Cuda、cuDNN))Onnxruntime = onnxruntime-win-x64-gpu-1.16.0 or onnxruntime-win-x64-1.16.0都ok。若想调用gpu,图中所有环境必须配置好,且选用gpu版本的onnxruntime。
2.1:源代码
main.cpp
#include <iostream>
//#include <getopt.h>
#include "yolov8_ort.h"
int main(int argc, char *argv[])
{//**********************************onnxruntime推理*****************************************************************************************************std::string img_path = "D:/C++(2019)/data/video_good/init_photo.jpg";std::string video_path = "D:/C++(2019)/data/video_good/test_video.mp4";std::string model_path = "D:/C++(2019)/models/best.onnx";DCSP_CORE* yoloDetector = new DCSP_CORE;#ifdef USE_CUDA// GPU FP32 inferenceDCSP_INIT_PARAM params{ model_path, YOLO_ORIGIN_V8, {640, 640},  0.25,  0.1, 0.5, true };// GPU FP16 inference//DCSP_INIT_PARAM params{ model_path, YOLO_ORIGIN_V8_HALF, {640, 640},  0.25, 0.1, 0.5, true }; #else// CPU inferenceDCSP_INIT_PARAM params{ model_path, YOLO_ORIGIN_V5, {640, 640},0.25, 0.45, 0.5, false };#endifyoloDetector->CreateSession(params);int freq = 15;//采样频率int idx = 0;cv::VideoCapture videoCapture(video_path);if (!videoCapture.isOpened()) {ui.status->setText("Failed to open video!");//std::cout << "Failed to open video!" << std::endl;return;}// 创建一个窗口并设置窗口名称cv::namedWindow("Inference", cv::WINDOW_NORMAL);// 设置窗口的大小cv::resizeWindow("Inference", 800, 600);// # 循环读取每一帧图像while (true){idx++;cv::Mat frame;std::vector<DCSP_RESULT> res;//处理视频帧的时间戳。bool ret = videoCapture.grab();//从视频文件中抓取下一帧的图像。它返回一个布尔值,表示抓取是否成功。if (ret && idx % freq == 1){ret = videoCapture.retrieve(frame);yoloDetector->RunSession(frame, res);if (res.size() != 0)yoloDetector->DrawPred(frame, res);elsestd::cout << "Detect Nothing!" << std::endl;// 在指定的窗口中展示图像cv::imshow("Inference", frame);/*cv::waitKey(0);cv::destroyAllWindows();*/if (cv::waitKey(1) == 27)  // Press Esc to exit{cv::destroyAllWindows();break;}}}videoCapture.release();cv::destroyAllWindows();delete yoloDetector;return 0;
}
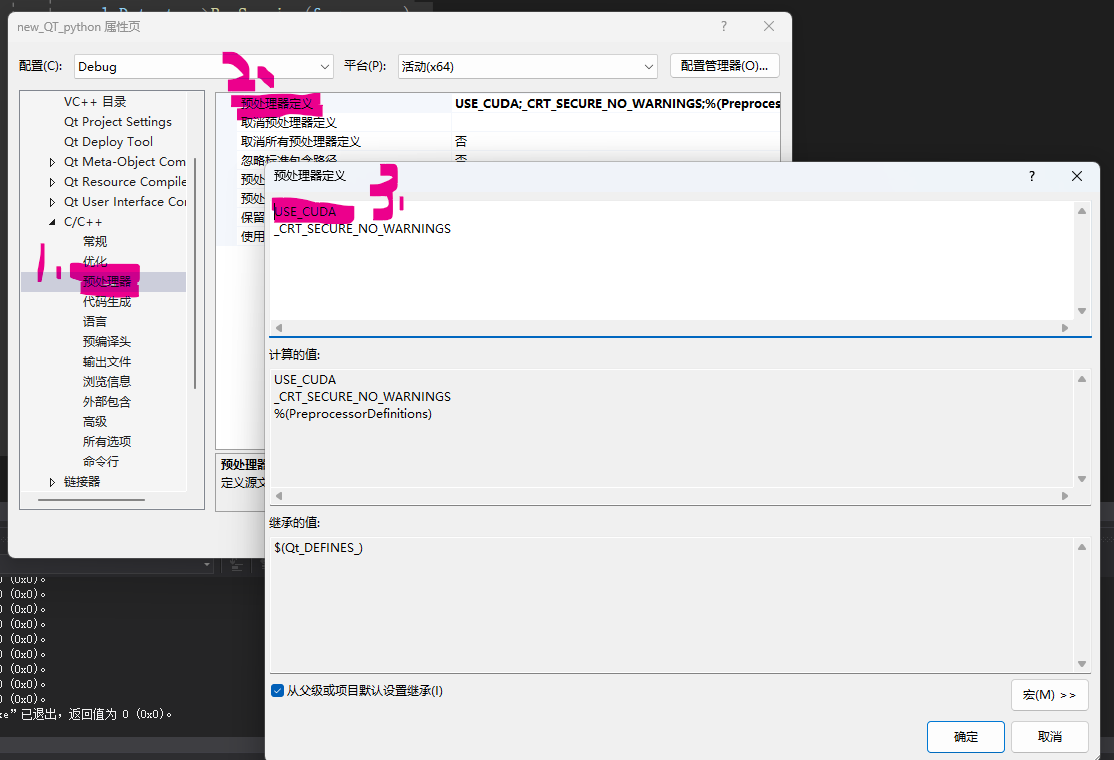
Tips:这里没有设置
getopt.h,也就是说没有一个专门定义宏的文件,你可以选择自己创建,或者像我下面图示中这样自己手动设置,你要不要调用GPU:
yolov8_ort.h:
#pragma once#define    RET_OK nullptr
#define    USE_CUDA#ifdef _WIN32
#include <Windows.h>
#include <direct.h>
#include <io.h>
#endif#include <string>
#include <vector>
#include <cstdio>
#include <opencv2/opencv.hpp>
#include "onnxruntime_cxx_api.h"#ifdef USE_CUDA
#include <cuda_fp16.h>
#endifenum MODEL_TYPE {//FLOAT32 MODELYOLO_ORIGIN_V5 = 0,//support v5 detector currentlyYOLO_ORIGIN_V8 = 1,//support v8 detector currentlyYOLO_POSE_V8 = 2,YOLO_CLS_V8 = 3,//FLOAT16 MODELYOLO_ORIGIN_V8_HALF = 4,YOLO_POSE_V8_HALF = 5,YOLO_CLS_V8_HALF = 6
};typedef struct _DCSP_INIT_PARAM {std::string ModelPath;MODEL_TYPE ModelType = YOLO_ORIGIN_V8;std::vector<int> imgSize = { 640, 640 };float modelConfidenceThreshold = 0.1;float RectConfidenceThreshold = 0.1;float iouThreshold = 0.1;bool CudaEnable = true;int LogSeverityLevel = 3;int IntraOpNumThreads = 1;
} DCSP_INIT_PARAM;typedef struct _DCSP_RESULT {int classId;std::string className;float confidence;cv::Rect box;cv::Mat boxMask;       //矩形框内maskcv::Scalar color;
} DCSP_RESULT;//DCSP_CORE是主类, 用于创建session, 预处理图像, 推理, 后处理等功能
class DCSP_CORE {
public:DCSP_CORE();~DCSP_CORE();public:void DrawPred(cv::Mat& img, std::vector<DCSP_RESULT>& result);//DrawPred绘制预测结果到图像上const char* CreateSession(DCSP_INIT_PARAM& iParams);//CreateSession函数用于创建OnnxRuntime session/** RunSession函数主要做图像预处理、推理和后处理工作:预处理:图像resize、padding填充等操作推理:构建输入张量,运行session执行推理后处理:解析输出,NMS非极大抑制、绘制预测框等*/char* RunSession(cv::Mat& iImg, std::vector<DCSP_RESULT>& oResult);char* WarmUpSession();//做预热测试,初始化CUDA设备template<typename N>/** TensorProcess函数专门处理张量数据,包括解析推理输出、NMS、置信度筛选等操作*/char* TensorProcess(clock_t& starttime_1, cv::Vec4d& params, cv::Mat& iImg, N& blob, std::vector<int64_t>& inputNodeDims,std::vector<DCSP_RESULT>& oResult);char* PreProcess(cv::Mat& iImg, std::vector<int> iImgSize, cv::Mat& oImg);/* std::vector<std::string> classes{ "person", "bicycle", "car", "motorcycle", "airplane", "bus", "train", "truck", "boat", "traffic light", "fire hydrant","stop sign", "parking meter", "bench", "bird", "cat", "dog", "horse", "sheep", "cow", "elephant", "bear", "zebra", "giraffe", "backpack", "umbrella","handbag", "tie", "suitcase", "frisbee", "skis", "snowboard", "sports ball", "kite", "baseball bat", "baseball glove", "skateboard", "surfboard","tennis racket", "bottle", "wine glass", "cup", "fork", "knife", "spoon", "bowl", "banana", "apple", "sandwich", "orange", "broccoli", "carrot","hot dog", "pizza", "donut", "cake", "chair", "couch", "potted plant", "bed", "dining table", "toilet", "tv", "laptop", "mouse", "remote", "keyboard","cell phone", "microwave", "oven", "toaster", "sink", "refrigerator", "book", "clock", "vase", "scissors", "teddy bear", "hair drier", "toothbrush" };*/std::vector<std::string> classes{ "screw", "number", "pump" };
private:Ort::Env env;Ort::Session* session;bool cudaEnable;Ort::RunOptions options;bool RunSegmentation = false;std::vector<const char*> inputNodeNames;std::vector<const char*> outputNodeNames;MODEL_TYPE modelType;std::vector<int> imgSize;float modelConfidenceThreshold;float rectConfidenceThreshold;float iouThreshold;float resizeScales;//letterbox scale};//void LetterBox(const cv::Mat& image, cv::Mat& outImage,
//    cv::Vec4d& params, //[ratio_x,ratio_y,dw,dh]
//    const cv::Size& newShape = cv::Size(640, 640),
//    bool autoShape = false,
//    bool scaleFill = false,
//    bool scaleUp = true,
//    int stride = 32,
//    const cv::Scalar& color = cv::Scalar(114, 114, 114));
yolov8_ort.cpp:
#define _CRT_SECURE_NO_WARNINGS
#include "yolov8_ort.h"
#include <regex>
#include <random>
#define benchmark#define min(a,b)            (((a) < (b)) ? (a) : (b))DCSP_CORE::DCSP_CORE() {}DCSP_CORE::~DCSP_CORE() {delete session;
}#ifdef USE_CUDA
namespace Ort
{template<>struct TypeToTensorType<half> { static constexpr ONNXTensorElementDataType type = ONNX_TENSOR_ELEMENT_DATA_TYPE_FLOAT16; };
}
#endiftemplate<typename T>
char* BlobFromImage(cv::Mat& iImg, T& iBlob) {int channels = iImg.channels();int imgHeight = iImg.rows;int imgWidth = iImg.cols;for (int c = 0; c < channels; c++) {for (int h = 0; h < imgHeight; h++) {for (int w = 0; w < imgWidth; w++) {iBlob[c * imgWidth * imgHeight + h * imgWidth + w] = typename std::remove_pointer<T>::type((iImg.at<cv::Vec3b>(h, w)[c]) / 255.0f);}}}return RET_OK;
}char* DCSP_CORE::PreProcess(cv::Mat& iImg, std::vector<int> iImgSize, cv::Mat& oImg) {if (iImg.channels() == 3){oImg = iImg.clone();cv::cvtColor(oImg, oImg, cv::COLOR_BGR2RGB);}else{cv::cvtColor(iImg, oImg, cv::COLOR_GRAY2RGB);}switch (modelType){case YOLO_ORIGIN_V8:case YOLO_POSE_V8:case YOLO_ORIGIN_V8_HALF:case YOLO_POSE_V8_HALF://LetterBox{if (iImg.cols >= iImg.rows){resizeScales = iImg.cols / (float)iImgSize.at(0);cv::resize(oImg, oImg, cv::Size(iImgSize.at(0), int(iImg.rows / resizeScales)));}else{resizeScales = iImg.rows / (float)iImgSize.at(0);cv::resize(oImg, oImg, cv::Size(int(iImg.cols / resizeScales), iImgSize.at(1)));}cv::Mat tempImg = cv::Mat::zeros(iImgSize.at(0), iImgSize.at(1), CV_8UC3);oImg.copyTo(tempImg(cv::Rect(0, 0, oImg.cols, oImg.rows)));oImg = tempImg;break;}case YOLO_CLS_V8://CenterCrop{int h = iImg.rows;int w = iImg.cols;int m = min(h, w);int top = (h - m) / 2;int left = (w - m) / 2;cv::resize(oImg(cv::Rect(left, top, m, m)), oImg, cv::Size(iImgSize.at(0), iImgSize.at(1)));break;}}return RET_OK;
}void LetterBox(const cv::Mat& image, cv::Mat& outImage, cv::Vec4d& params, const cv::Size& newShape = cv::Size(640, 640),bool autoShape = false, bool scaleFill = false, bool scaleUp = true, int stride = 32, const cv::Scalar& color = cv::Scalar(114, 114, 114))
{if (false) {int maxLen = MAX(image.rows, image.cols);outImage = cv::Mat::zeros(cv::Size(maxLen, maxLen), CV_8UC3);image.copyTo(outImage(cv::Rect(0, 0, image.cols, image.rows)));params[0] = 1;params[1] = 1;params[3] = 0;params[2] = 0;}cv::Size shape = image.size();float r = min((float)newShape.height / (float)shape.height,(float)newShape.width / (float)shape.width);if (!scaleUp)r = min(r, 1.0f);float ratio[2]{ r, r };int new_un_pad[2] = { (int)std::round((float)shape.width * r),(int)std::round((float)shape.height * r) };auto dw = (float)(newShape.width - new_un_pad[0]);auto dh = (float)(newShape.height - new_un_pad[1]);if (autoShape){dw = (float)((int)dw % stride);dh = (float)((int)dh % stride);}else if (scaleFill){dw = 0.0f;dh = 0.0f;new_un_pad[0] = newShape.width;new_un_pad[1] = newShape.height;ratio[0] = (float)newShape.width / (float)shape.width;ratio[1] = (float)newShape.height / (float)shape.height;}dw /= 2.0f;dh /= 2.0f;if (shape.width != new_un_pad[0] && shape.height != new_un_pad[1]){cv::resize(image, outImage, cv::Size(new_un_pad[0], new_un_pad[1]));}else {outImage = image.clone();}int top = int(std::round(dh - 0.1f));int bottom = int(std::round(dh + 0.1f));int left = int(std::round(dw - 0.1f));int right = int(std::round(dw + 0.1f));params[0] = ratio[0];params[1] = ratio[1];params[2] = left;params[3] = top;cv::copyMakeBorder(outImage, outImage, top, bottom, left, right, cv::BORDER_CONSTANT, color);
}void GetMask(const int* const _seg_params, const float& rectConfidenceThreshold, const cv::Mat& maskProposals, const cv::Mat& mask_protos, const cv::Vec4d& params, const cv::Size& srcImgShape, std::vector<DCSP_RESULT>& output) {int _segChannels = *_seg_params;int _segHeight = *(_seg_params + 1);int _segWidth = *(_seg_params + 2);int _netHeight = *(_seg_params + 3);int _netWidth = *(_seg_params + 4);cv::Mat protos = mask_protos.reshape(0, { _segChannels,_segWidth * _segHeight });cv::Mat matmulRes = (maskProposals * protos).t();cv::Mat masks = matmulRes.reshape(output.size(), { _segHeight,_segWidth });std::vector<cv::Mat> maskChannels;split(masks, maskChannels);for (int i = 0; i < output.size(); ++i) {cv::Mat dest, mask;//sigmoidcv::exp(-maskChannels[i], dest);dest = 1.0 / (1.0 + dest);cv::Rect roi(int(params[2] / _netWidth * _segWidth), int(params[3] / _netHeight * _segHeight), int(_segWidth - params[2] / 2), int(_segHeight - params[3] / 2));dest = dest(roi);cv::resize(dest, mask, srcImgShape, cv::INTER_NEAREST);//cropcv::Rect temp_rect = output[i].box;mask = mask(temp_rect) > rectConfidenceThreshold;output[i].boxMask = mask;}
}void DCSP_CORE::DrawPred(cv::Mat& img, std::vector<DCSP_RESULT>& result) {int detections = result.size();std::cout << "Number of detections:" << detections << std::endl;cv::Mat mask = img.clone();for (int i = 0; i < detections; ++i){DCSP_RESULT detection = result[i];cv::Rect box = detection.box;//这里来改变颜色cv::Scalar color = detection.color ;/* switch (detection.classId){case 0:color = cv::Scalar(0, 255, 0);break;case 1:color = cv::Scalar(255, 0, 0);break;case 2:color = cv::Scalar(0, 0, 255);break;}*/// Detection boxcv::rectangle(img, box, color, 2);mask(detection.box).setTo(color, detection.boxMask);// Detection box textstd::string classString = detection.className + ' ' + std::to_string(detection.confidence).substr(0, 4);cv::Size textSize = cv::getTextSize(classString, cv::FONT_HERSHEY_DUPLEX, 1, 2, 0);cv::Rect textBox(box.x, box.y - 40, textSize.width + 10, textSize.height + 20);cv::rectangle(img, textBox, color, cv::FILLED);cv::putText(img, classString, cv::Point(box.x + 5, box.y - 10), cv::FONT_HERSHEY_DUPLEX, 1, cv::Scalar(0, 0, 0), 2, 0);}// Detection maskif (RunSegmentation) cv::addWeighted(img, 0.5, mask, 0.5, 0, img); //将mask加在原图上面// // 创建一个窗口并设置窗口名称//cv::namedWindow("Inference", cv::WINDOW_NORMAL); 设置窗口的大小//cv::resizeWindow("Inference", 800, 600);// 在指定的窗口中展示图像/*cv::imshow("Inference", img);*//*cv::imshow("Inference", img);*///cv::imwrite("out.bmp", img);/* cv::waitKey();cv::destroyWindow("Inference");*/
}const char* DCSP_CORE::CreateSession(DCSP_INIT_PARAM& iParams) {const char* Ret = RET_OK;std::regex pattern("[\u4e00-\u9fa5]");bool result = std::regex_search(iParams.ModelPath, pattern);if (result) {Ret = "[DCSP_ONNX]:Model path error.Change your model path without chinese characters.";std::cout << Ret << std::endl;return Ret;}try {modelConfidenceThreshold = iParams.modelConfidenceThreshold;rectConfidenceThreshold = iParams.RectConfidenceThreshold;iouThreshold = iParams.iouThreshold;imgSize = iParams.imgSize;modelType = iParams.ModelType;env = Ort::Env(ORT_LOGGING_LEVEL_WARNING, "Yolo");Ort::SessionOptions sessionOption;if (iParams.CudaEnable) {cudaEnable = iParams.CudaEnable;OrtCUDAProviderOptions cudaOption;cudaOption.device_id = 0;sessionOption.AppendExecutionProvider_CUDA(cudaOption);}sessionOption.SetGraphOptimizationLevel(GraphOptimizationLevel::ORT_ENABLE_ALL);sessionOption.SetIntraOpNumThreads(iParams.IntraOpNumThreads);sessionOption.SetLogSeverityLevel(iParams.LogSeverityLevel);#ifdef _WIN32int ModelPathSize = MultiByteToWideChar(CP_UTF8, 0, iParams.ModelPath.c_str(), static_cast<int>(iParams.ModelPath.length()), nullptr, 0);wchar_t* wide_cstr = new wchar_t[ModelPathSize + 1];MultiByteToWideChar(CP_UTF8, 0, iParams.ModelPath.c_str(), static_cast<int>(iParams.ModelPath.length()), wide_cstr, ModelPathSize);wide_cstr[ModelPathSize] = L'\0';const wchar_t* modelPath = wide_cstr;
#elseconst char* modelPath = iParams.ModelPath.c_str();
#endif // _WIN32session = new Ort::Session(env, modelPath, sessionOption);Ort::AllocatorWithDefaultOptions allocator;size_t inputNodesNum = session->GetInputCount();for (size_t i = 0; i < inputNodesNum; i++) {Ort::AllocatedStringPtr input_node_name = session->GetInputNameAllocated(i, allocator);char* temp_buf = new char[50];strcpy(temp_buf, input_node_name.get());inputNodeNames.push_back(temp_buf);}size_t OutputNodesNum = session->GetOutputCount();for (size_t i = 0; i < OutputNodesNum; i++) {Ort::AllocatedStringPtr output_node_name = session->GetOutputNameAllocated(i, allocator);char* temp_buf = new char[10];strcpy(temp_buf, output_node_name.get());outputNodeNames.push_back(temp_buf);}if (outputNodeNames.size() == 2) RunSegmentation = true;options = Ort::RunOptions{ nullptr };WarmUpSession();return RET_OK;}catch (const std::exception& e) {const char* str1 = "[DCSP_ONNX]:";const char* str2 = e.what();std::string result = std::string(str1) + std::string(str2);char* merged = new char[result.length() + 1];std::strcpy(merged, result.c_str());std::cout << merged << std::endl;delete[] merged;return "[DCSP_ONNX]:Create session failed.";}
}char* DCSP_CORE::RunSession(cv::Mat& iImg, std::vector<DCSP_RESULT>& oResult) {
#ifdef benchmarkclock_t starttime_1 = clock();
#endif // benchmarkchar* Ret = RET_OK;cv::Mat processedImg;cv::Vec4d params;//resize图片尺寸,PreProcess是直接resize,LetterBox有padding操作//PreProcess(iImg, imgSize, processedImg);LetterBox(iImg, processedImg, params, cv::Size(imgSize.at(1), imgSize.at(0)));if (modelType < 4) {float* blob = new float[processedImg.total() * 3];BlobFromImage(processedImg, blob);std::vector<int64_t> inputNodeDims = { 1, 3, imgSize.at(0), imgSize.at(1) };TensorProcess(starttime_1, params, iImg, blob, inputNodeDims, oResult);}else {
#ifdef USE_CUDAhalf* blob = new half[processedImg.total() * 3];BlobFromImage(processedImg, blob);std::vector<int64_t> inputNodeDims = { 1,3,imgSize.at(0),imgSize.at(1) };TensorProcess(starttime_1, params, iImg, blob, inputNodeDims, oResult);
#endif}return Ret;
}template<typename N>
char* DCSP_CORE::TensorProcess(clock_t& starttime_1, cv::Vec4d& params, cv::Mat& iImg, N& blob, std::vector<int64_t>& inputNodeDims, std::vector<DCSP_RESULT>& oResult)
{/*Step1* 创建一个输入张量inputTensor* 内存信息:使用Ort::MemoryInfo::CreateCpu函数创建一个CPU内存信息对象,并指定内存分配器和内存类型为CPU。数据指针:blob,即之前处理过的图像数据。数据元素数量:3 * 图像的宽度 * 图像的高度。数据维度:inputNodeDims.data(),即输入节点的维度信息。维度数量:inputNodeDims.size(),即输入节点的维度数量。*/Ort::Value inputTensor = Ort::Value::CreateTensor<typename std::remove_pointer<N>::type>(Ort::MemoryInfo::CreateCpu(OrtDeviceAllocator, OrtMemTypeCPU), blob, 3 * imgSize.at(0) * imgSize.at(1), inputNodeDims.data(), inputNodeDims.size());
#ifdef benchmarkclock_t starttime_2 = clock();
#endif // benchmark/*Step2* 使用session->Run函数运行推理*   运行选项:options,可能是一些配置选项,不在提供的代码片段中展示。输入节点名称数组的数据指针:inputNodeNames.data(),即输入节点的名称。输入张量的数据指针:&inputTensor,即输入张量的地址。输入张量的数量:1,因为只有一个输入张量。输出节点名称数组的数据指针:outputNodeNames.data(),即输出节点的名称。输出节点数量:outputNodeNames.size(),即输出节点的数量。*/auto outputTensor = session->Run(options, inputNodeNames.data(), &inputTensor, 1, outputNodeNames.data(), outputNodeNames.size());
#ifdef benchmarkclock_t starttime_3 = clock();
#endif // benchmark/*Step3:解析输出张量:获取输出张量的形状信息和数据。* - 获取输出张量的形状信息:使用GetTensorTypeAndShapeInfo函数获取输出张量的类型和形状信息,并将形状信息存储在_outputTensorShape中。* - 获取输出张量的数据指针:使用GetTensorMutableData函数获取输出张量的可变数据指针,并将数据指针存储在output中。**/std::vector<int64_t> _outputTensorShape;_outputTensorShape = outputTensor[0].GetTensorTypeAndShapeInfo().GetShape();auto output = outputTensor[0].GetTensorMutableData<typename std::remove_pointer<N>::type>();delete blob;//删除blob:释放之前动态分配的blob内存/*Step4:处理输出张量数据:根据不同的modelType进行处理**/// yolov5 has an output of shape (batchSize, 25200, 85) (Num classes + box[x,y,w,h] + confidence[c])// yolov8 has an output of shape (batchSize, 84,  8400) (Num classes + box[x,y,w,h])// yolov5int dimensions = _outputTensorShape[1];int rows = _outputTensorShape[2];cv::Mat rowData(dimensions, rows, CV_32F, output);// yolov8if (rows > dimensions) {dimensions = _outputTensorShape[2];rows = _outputTensorShape[1];rowData = rowData.t();}std::vector<int> class_ids;std::vector<float> confidences;std::vector<cv::Rect> boxes;std::vector<std::vector<float>> picked_proposals;float* data = (float*)rowData.data;for (int i = 0; i < dimensions; ++i) {switch (modelType) {case 0://V5_ORIGIN_FP32{float confidence = data[4];if (confidence >= modelConfidenceThreshold){float* classes_scores = data + 5;cv::Mat scores(1, classes.size(), CV_32FC1, classes_scores);cv::Point class_id;double max_class_score;minMaxLoc(scores, 0, &max_class_score, 0, &class_id);if (max_class_score > rectConfidenceThreshold){if (RunSegmentation) {int _segChannels = outputTensor[1].GetTensorTypeAndShapeInfo().GetShape()[1];std::vector<float> temp_proto(data + classes.size() + 5, data + classes.size() + 5 + _segChannels);picked_proposals.push_back(temp_proto);}confidences.push_back(confidence);class_ids.push_back(class_id.x);float x = (data[0] - params[2]) / params[0];float y = (data[1] - params[3]) / params[1];float w = data[2] / params[0];float h = data[3] / params[1];int left = MAX(round(x - 0.5 * w + 0.5), 0);int top = MAX(round(y - 0.5 * h + 0.5), 0);if ((left + w) > iImg.cols) { w = iImg.cols - left; }if ((top + h) > iImg.rows) { h = iImg.rows - top; }boxes.emplace_back(cv::Rect(left, top, int(w), int(h)));}}break;}case 1://V8_ORIGIN_FP32case 4://V8_ORIGIN_FP16{float* classesScores = data + 4;//获取各个类别的得分classesScores。cv::Mat scores(1, this->classes.size(), CV_32FC1, classesScores);cv::Point class_id;double maxClassScore;cv::minMaxLoc(scores, 0, &maxClassScore, 0, &class_id);//找到最大得分的类别class_id和对应的最大得分maxClassScore。if (maxClassScore > rectConfidenceThreshold) {if (RunSegmentation) {int _segChannels = outputTensor[1].GetTensorTypeAndShapeInfo().GetShape()[1];std::vector<float> temp_proto(data + classes.size() + 4, data + classes.size() + 4 + _segChannels);picked_proposals.push_back(temp_proto);}confidences.push_back(maxClassScore);class_ids.push_back(class_id.x);float x = (data[0] - params[2]) / params[0];float y = (data[1] - params[3]) / params[1];float w = data[2] / params[0];float h = data[3] / params[1];int left = MAX(round(x - 0.5 * w + 0.5), 0);int top = MAX(round(y - 0.5 * h + 0.5), 0);if ((left + w) > iImg.cols) { w = iImg.cols - left; }if ((top + h) > iImg.rows) { h = iImg.rows - top; }boxes.emplace_back(cv::Rect(left, top, int(w), int(h)));}break;}}data += rows;}std::vector<int> nmsResult;cv::dnn::NMSBoxes(boxes, confidences, rectConfidenceThreshold, iouThreshold, nmsResult);std::vector<std::vector<float>> temp_mask_proposals;for (int i = 0; i < nmsResult.size(); ++i) {int idx = nmsResult[i];DCSP_RESULT result;result.classId = class_ids[idx];result.confidence = confidences[idx];result.box = boxes[idx];result.className = classes[result.classId];std::random_device rd;std::mt19937 gen(rd());std::uniform_int_distribution<int> dis(100, 255);result.color = cv::Scalar(dis(gen), dis(gen), dis(gen));if (result.box.width != 0 && result.box.height != 0) oResult.push_back(result);if (RunSegmentation) temp_mask_proposals.push_back(picked_proposals[idx]);}if (RunSegmentation) {cv::Mat mask_proposals;for (int i = 0; i < temp_mask_proposals.size(); ++i)mask_proposals.push_back(cv::Mat(temp_mask_proposals[i]).t());std::vector<int64_t> _outputMaskTensorShape;_outputMaskTensorShape = outputTensor[1].GetTensorTypeAndShapeInfo().GetShape();int _segChannels = _outputMaskTensorShape[1];int _segWidth = _outputMaskTensorShape[2];int _segHeight = _outputMaskTensorShape[3];float* pdata = outputTensor[1].GetTensorMutableData<float>();std::vector<float> mask(pdata, pdata + _segChannels * _segWidth * _segHeight);int _seg_params[5] = { _segChannels, _segWidth, _segHeight, inputNodeDims[2], inputNodeDims[3] };cv::Mat mask_protos = cv::Mat(mask);GetMask(_seg_params, rectConfidenceThreshold, mask_proposals, mask_protos, params, iImg.size(), oResult);}#ifdef benchmarkclock_t starttime_4 = clock();double pre_process_time = (double)(starttime_2 - starttime_1) / CLOCKS_PER_SEC * 1000;double process_time = (double)(starttime_3 - starttime_2) / CLOCKS_PER_SEC * 1000;double post_process_time = (double)(starttime_4 - starttime_3) / CLOCKS_PER_SEC * 1000;if (cudaEnable) {std::cout << "[DCSP_ONNX(CUDA)]: " << pre_process_time << "ms pre-process, " << process_time<< "ms inference, " << post_process_time << "ms post-process." << std::endl;}else {std::cout << "[DCSP_ONNX(CPU)]: " << pre_process_time << "ms pre-process, " << process_time<< "ms inference, " << post_process_time << "ms post-process." << std::endl;}
#endif // benchmarkreturn RET_OK;}char* DCSP_CORE::WarmUpSession() {clock_t starttime_1 = clock();cv::Mat iImg = cv::Mat(cv::Size(imgSize.at(0), imgSize.at(1)), CV_8UC3);cv::Mat processedImg;cv::Vec4d params;//resize图片尺寸,PreProcess是直接resize,LetterBox有padding操作//PreProcess(iImg, imgSize, processedImg);LetterBox(iImg, processedImg, params, cv::Size(imgSize.at(1), imgSize.at(0)));if (modelType < 4) {float* blob = new float[iImg.total() * 3];BlobFromImage(processedImg, blob);std::vector<int64_t> YOLO_input_node_dims = { 1, 3, imgSize.at(0), imgSize.at(1) };Ort::Value input_tensor = Ort::Value::CreateTensor<float>(Ort::MemoryInfo::CreateCpu(OrtDeviceAllocator, OrtMemTypeCPU), blob, 3 * imgSize.at(0) * imgSize.at(1),YOLO_input_node_dims.data(), YOLO_input_node_dims.size());auto output_tensors = session->Run(options, inputNodeNames.data(), &input_tensor, 1, outputNodeNames.data(), outputNodeNames.size());delete[] blob;clock_t starttime_4 = clock();double post_process_time = (double)(starttime_4 - starttime_1) / CLOCKS_PER_SEC * 1000;if (cudaEnable) {std::cout << "[DCSP_ONNX(CUDA)]: " << "Cuda warm-up cost " << post_process_time << " ms. " << std::endl;}}else {
#ifdef USE_CUDAhalf* blob = new half[iImg.total() * 3];BlobFromImage(processedImg, blob);std::vector<int64_t> YOLO_input_node_dims = { 1,3,imgSize.at(0),imgSize.at(1) };Ort::Value input_tensor = Ort::Value::CreateTensor<half>(Ort::MemoryInfo::CreateCpu(OrtDeviceAllocator, OrtMemTypeCPU), blob, 3 * imgSize.at(0) * imgSize.at(1), YOLO_input_node_dims.data(), YOLO_input_node_dims.size());auto output_tensors = session->Run(options, inputNodeNames.data(), &input_tensor, 1, outputNodeNames.data(), outputNodeNames.size());delete[] blob;clock_t starttime_4 = clock();double post_process_time = (double)(starttime_4 - starttime_1) / CLOCKS_PER_SEC * 1000;if (cudaEnable){std::cout << "[DCSP_ONNX(CUDA)]: " << "Cuda warm-up cost " << post_process_time << " ms. " << std::endl;}
#endif}return RET_OK;
}
四、代码分析
-
DCSP_CORE是主类,用于创建session,预处理图像,推理,后处理等功能。
-
CreateSession函数用于创建OnnxRuntime session,主要做了以下工作:
- 设置日志级别、设备(CPU/CUDA)、优化等配置
- 获取模型输入输出节点名称
- 根据模型类型初始化一些变量如分类类别数等
- 创建session
-
RunSession函数主要做图像预处理、推理和后处理工作:
- 预处理:图像resize、padding填充等操作
- 推理:构建输入张量,运行session执行推理
- 后处理:解析输出,NMS非极大抑制、绘制预测框等
-
TensorProcess函数专门处理张量数据,包括解析推理输出、NMS、置信度筛选等操作
-
DrawPred绘制预测结果到图像上
-
WarmUpSession做预热测试,初始化CUDA设备
-
一些工具函数如BlobFromImage、LetterBox用于图像与张量转换
-
定义模型类型、分类类别作为全局变量
-
使用OnnxRuntime C++ API实现了 end-to-end 的模型部署流程
主要特点是:
- 使用OnnxRuntime高效执行模型推理
- 完整实现预处理、推理、后处理流程
- 设计了类和函数分模块编程
- 支持CPU和CUDA加速
总体来看实现得很到位,利用OnnxRuntime成功部署和运行了yolov8模型。
五、后言
这里再次强调一下,如果想调用gpu,只下gpu版本的onnxruntime是不够的,必须把cuda和cudnn环境安排上。
另外,下篇博客计划分享一下yolov8分割模型的部署。
