本节介绍Android的四大组件之一ContentProvider的基本概念和常见用法:首先说明如何使用内容提供器封装内部数据的外部访问接口,然后阐述如何使用内容解析器通过外部接口操作内部数据,最后叙述如何利用内容解析器读写联系人信息,以及如何利用内容观察器监听收到的短信内容。
6.5.1 通过ContentProvider封装数据
Android提供了四大组件,分别是活动Activity、广播Broadcast、服务Service和内容提供器ContentProvider。其中内容提供器涵盖与内部数据存取有关的一系列组件,完整的内容组件由内容提供器ContentProvider、内容解析器ContentResolver、内容观察器ContentObserver三部分组成。
ContentProvider给App存取内部数据提供了统一的外部接口,让不同的应用之间得以互相共享数据。像上一章提到的SQLite可操作应用自身的内部数据库,上传和下载功能可操作后端服务器的文件,而ContentProvider可操作当前设备其他应用的内部数据,它是一种中间层次的数据存储形式。
在实际编码中,ContentProvider只是服务端App存储数据的抽象类,开发者需要在其基础上实现一个完整的内容提供器,并重写下列数据库管理方法。
● onCreate:创建数据库并获得数据库连接。
● insert:插入数据。
● delete:删除数据。
● update:更新数据。
● query:查询数据,并返回结果集的游标。
● getType:获取内容提供器支持的数据类型。
这些方法看起来是不是很像SQLite?没错,ContentProvider作为中间接口,本身并不直接保存数据,而是通过SQLiteOpenHelper与SQLiteDatabase间接操作底层的数据库。所以要想使用ContentProvider,首先得实现SQLite的数据库帮助器,然后由ContentProvider封装对外的接口。以封装用户信息为例,具体步骤主要分成以下3步。
1. 编写用户信息表的数据库帮助器
这个数据库帮助器就是常规的SQLite操作代码,实现过程参见本章的“6.2.3 数据库帮助器SQLiteOpenHelper”,完整代码如下:
package com.example.roomdatabase.entity;
//用户信息
public class UserInfo {public long rowid; // 行号public int xuhao; // 序号public String name; // 姓名public int age; // 年龄public long height; // 身高public float weight; // 体重public boolean married; // 婚否public String update_time; // 更新时间public String phone; // 手机号public String password; // 密码public UserInfo() {rowid = 0L;xuhao = 0;name = "";age = 0;height = 0L;weight = 0.0f;married = false;update_time = "";phone = "";password = "";}
}
package com.example.roomdatabase.database;import android.content.ContentValues;
import android.content.Context;
import android.database.Cursor;
import android.database.sqlite.SQLiteDatabase;
import android.database.sqlite.SQLiteOpenHelper;
import android.util.Log;import com.example.roomdatabase.entity.UserInfo;import java.util.ArrayList;
import java.util.List;public class UserDBHelper extends SQLiteOpenHelper {private static final String TAG = "UserDBHelper";private static final String DB_NAME = "user.db"; // 数据库的名称private static final int DB_VERSION = 1; // 数据库的版本号private static UserDBHelper mHelper = null; // 数据库帮助器的实例private SQLiteDatabase mDB = null; // 数据库的实例public static final String TABLE_NAME = "user_info"; // 表的名称private UserDBHelper(Context context) {super(context, DB_NAME, null, DB_VERSION);}private UserDBHelper(Context context, int version) {super(context, DB_NAME, null, version);}// 利用单例模式获取数据库帮助器的唯一实例public static UserDBHelper getInstance(Context context, int version) {if (version > 0 && mHelper == null) {mHelper = new UserDBHelper(context, version);} else if (mHelper == null) {mHelper = new UserDBHelper(context);}return mHelper;}// 打开数据库的读连接public SQLiteDatabase openReadLink() {if (mDB == null || !mDB.isOpen()) {mDB = mHelper.getReadableDatabase();}return mDB;}// 打开数据库的写连接public SQLiteDatabase openWriteLink() {if (mDB == null || !mDB.isOpen()) {mDB = mHelper.getWritableDatabase();}return mDB;}// 关闭数据库连接public void closeLink() {if (mDB != null && mDB.isOpen()) {mDB.close();mDB = null;}}// 创建数据库,执行建表语句@Overridepublic void onCreate(SQLiteDatabase db) {Log.d(TAG, "onCreate");String drop_sql = "DROP TABLE IF EXISTS " + TABLE_NAME + ";";Log.d(TAG, "drop_sql:" + drop_sql);db.execSQL(drop_sql);String create_sql = "CREATE TABLE IF NOT EXISTS " + TABLE_NAME + " ("+ "_id INTEGER PRIMARY KEY AUTOINCREMENT NOT NULL,"+ "name VARCHAR NOT NULL," + "age INTEGER NOT NULL,"+ "height INTEGER NOT NULL," + "weight FLOAT NOT NULL,"+ "married INTEGER NOT NULL," + "update_time VARCHAR NOT NULL"//演示数据库升级时要先把下面这行注释+ ",phone VARCHAR" + ",password VARCHAR"+ ");";Log.d(TAG, "create_sql:" + create_sql);db.execSQL(create_sql); // 执行完整的SQL语句}// 升级数据库,执行表结构变更语句@Overridepublic void onUpgrade(SQLiteDatabase db, int oldVersion, int newVersion) {Log.d(TAG, "onUpgrade oldVersion=" + oldVersion + ", newVersion=" + newVersion);if (newVersion > 1) {//Android的ALTER命令不支持一次添加多列,只能分多次添加String alter_sql = "ALTER TABLE " + TABLE_NAME + " ADD COLUMN " + "phone VARCHAR;";Log.d(TAG, "alter_sql:" + alter_sql);db.execSQL(alter_sql);alter_sql = "ALTER TABLE " + TABLE_NAME + " ADD COLUMN " + "password VARCHAR;";Log.d(TAG, "alter_sql:" + alter_sql);db.execSQL(alter_sql); // 执行完整的SQL语句}}// 根据指定条件删除表记录public int delete(String condition) {// 执行删除记录动作,该语句返回删除记录的数目return mDB.delete(TABLE_NAME, condition, null);}// 删除该表的所有记录public int deleteAll() {// 执行删除记录动作,该语句返回删除记录的数目return mDB.delete(TABLE_NAME, "1=1", null);}// 往该表添加一条记录public long insert(UserInfo info) {List<UserInfo> infoList = new ArrayList<UserInfo>();infoList.add(info);return insert(infoList);}// 往该表添加多条记录public long insert(List<UserInfo> infoList) {long result = -1;for (int i = 0; i < infoList.size(); i++) {UserInfo info = infoList.get(i);List<UserInfo> tempList = new ArrayList<UserInfo>();// 如果存在同名记录,则更新记录// 注意条件语句的等号后面要用单引号括起来if (info.name != null && info.name.length() > 0) {String condition = String.format("name='%s'", info.name);tempList = query(condition);if (tempList.size() > 0) {update(info, condition);result = tempList.get(0).rowid;continue;}}// 如果存在同样的手机号码,则更新记录if (info.phone != null && info.phone.length() > 0) {String condition = String.format("phone='%s'", info.phone);tempList = query(condition);if (tempList.size() > 0) {update(info, condition);result = tempList.get(0).rowid;continue;}}// 不存在唯一性重复的记录,则插入新记录ContentValues cv = new ContentValues();cv.put("name", info.name);cv.put("age", info.age);cv.put("height", info.height);cv.put("weight", info.weight);cv.put("married", info.married);cv.put("update_time", info.update_time);cv.put("phone", info.phone);cv.put("password", info.password);// 执行插入记录动作,该语句返回插入记录的行号result = mDB.insert(TABLE_NAME, "", cv);if (result == -1) { // 添加成功则返回行号,添加失败则返回-1return result;}}return result;}// 根据条件更新指定的表记录public int update(UserInfo info, String condition) {ContentValues cv = new ContentValues();cv.put("name", info.name);cv.put("age", info.age);cv.put("height", info.height);cv.put("weight", info.weight);cv.put("married", info.married);cv.put("update_time", info.update_time);cv.put("phone", info.phone);cv.put("password", info.password);// 执行更新记录动作,该语句返回更新的记录数量return mDB.update(TABLE_NAME, cv, condition, null);}public int update(UserInfo info) {// 执行更新记录动作,该语句返回更新的记录数量return update(info, "rowid=" + info.rowid);}// 根据指定条件查询记录,并返回结果数据列表public List<UserInfo> query(String condition) {String sql = String.format("select rowid,_id,name,age,height," +"weight,married,update_time,phone,password " +"from %s where %s;", TABLE_NAME, condition);Log.d(TAG, "query sql: " + sql);List<UserInfo> infoList = new ArrayList<UserInfo>();// 执行记录查询动作,该语句返回结果集的游标Cursor cursor = mDB.rawQuery(sql, null);// 循环取出游标指向的每条记录while (cursor.moveToNext()) {UserInfo info = new UserInfo();info.rowid = cursor.getLong(0); // 取出长整型数info.xuhao = cursor.getInt(1); // 取出整型数info.name = cursor.getString(2); // 取出字符串info.age = cursor.getInt(3); // 取出整型数info.height = cursor.getLong(4); // 取出长整型数info.weight = cursor.getFloat(5); // 取出浮点数//SQLite没有布尔型,用0表示false,用1表示trueinfo.married = (cursor.getInt(6) == 0) ? false : true;info.update_time = cursor.getString(7); // 取出字符串info.phone = cursor.getString(8); // 取出字符串info.password = cursor.getString(9); // 取出字符串infoList.add(info);}cursor.close(); // 查询完毕,关闭数据库游标return infoList;}// 根据手机号码查询指定记录public UserInfo queryByPhone(String phone) {UserInfo info = null;List<UserInfo> infoList = query(String.format("phone='%s'", phone));if (infoList.size() > 0) { // 存在该号码的登录信息info = infoList.get(0);}return info;}
}
2. 编写内容提供器的基础字段类
该类需要实现接口BaseColumns,同时加入几个常量定义。详细代码示例如下:
package com.example.roomdatabase.entity;import android.net.Uri;
import android.provider.BaseColumns;import com.example.roomdatabase.database.UserDBHelper;public class UserInfoContent implements BaseColumns {// 这里的名称必须与AndroidManifest.xml里的android:authorities保持一致public static final String AUTHORITIES = "com.example";//  内容提供器的外部表名public static final String TABLE_NAME = UserDBHelper.TABLE_NAME;// 访问内容提供器的URIpublic static final Uri CONTENT_URI = Uri.parse("content://" + AUTHORITIES + "/user");// 下面是该表的各个字段名称public static final String USER_NAME = "name";public static final String USER_AGE = "age";public static final String USER_HEIGHT = "height";public static final String USER_WEIGHT = "weight";public static final String USER_MARRIED = "married";// 默认的排序方法public static final String DEFAULT_SORT_ORDER = "_id desc";
}
3. 通过右键菜单创建内容提供器
右击App模块的包名目录,在弹出的右键菜单中依次选择New→Other→Content Provider,打开如图所示的组件创建对话框。
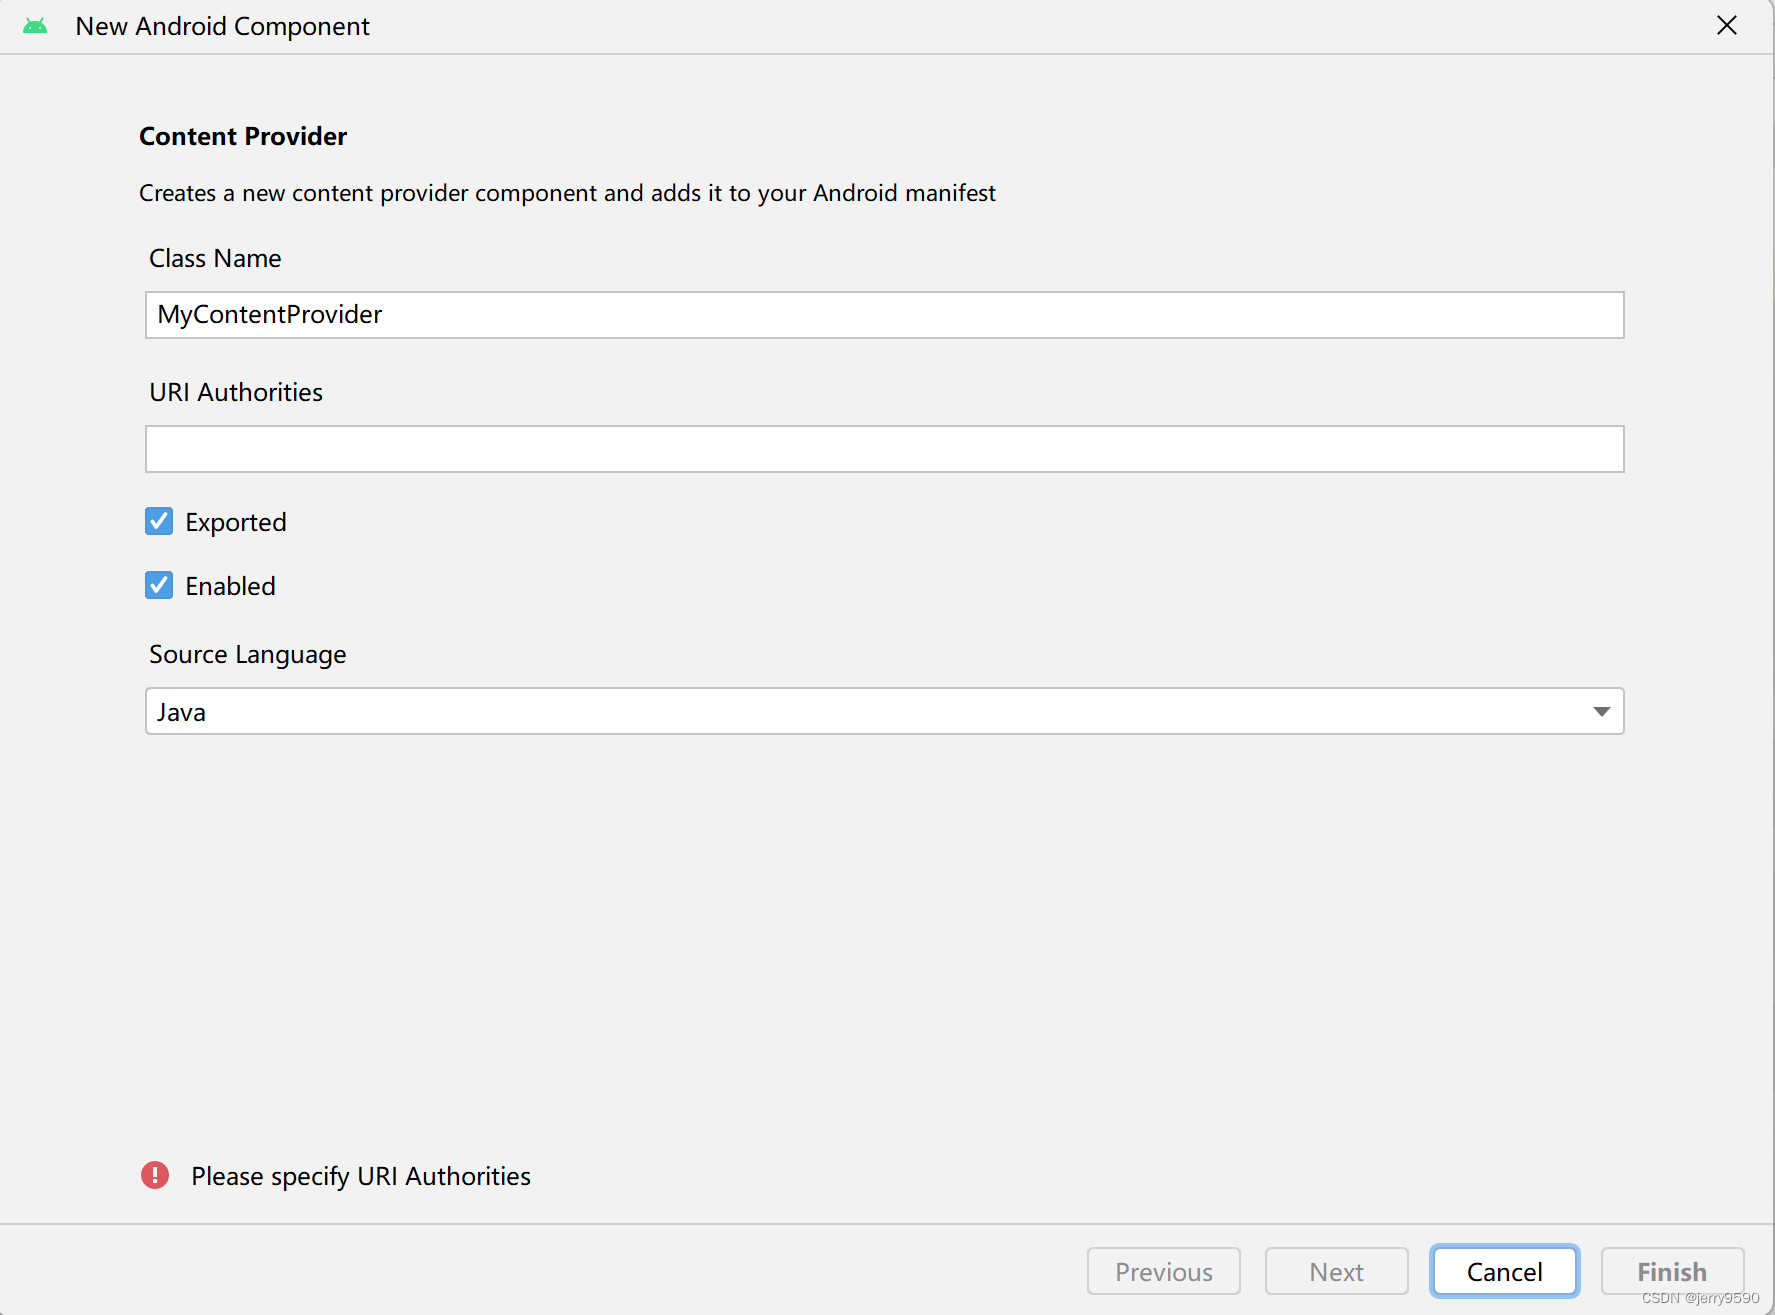
在创建对话框的Class Name一栏填写内容提供器的名称,比如UserInfoProvider;在URI Authorities一栏填写URI的授权串,比如“com.example”,注意这个授权串要跟 UserInfoContent里的一样;然后单击对话框右下角的Finish按钮,完成提供器的创建操作。
上述创建过程会自动修改App模块的两处地方,一处是往AndroidManifest.xml添加内容提供器的注册配置,配置信息示例如下:
<providerandroid:name=".entity.UserInfoProvider"android:authorities="com.example"android:enabled="true"android:exported="true" ></provider>另一处是在包名目录下生成名为UserInfoProvider.java的代码文件,打开一看发现该类继承了ContentProvider,并且提示重写onCreate、insert、delete、query、update、getType等方法,以便对数据进行增删改查等操作。这个提供器代码显然只有一个框架,还需补充详细的实现代码,为此重写onCreate方法,在此获取用户信息表的数据库帮助器实例,其他insert、delete、query等方法也要加入对应的数据库操作代码,修改之后的内容提供器代码如下:
package com.example.roomdatabase.entity;import android.content.ContentProvider;
import android.content.ContentUris;
import android.content.ContentValues;
import android.content.UriMatcher;
import android.database.Cursor;
import android.database.sqlite.SQLiteDatabase;
import android.net.Uri;import com.example.roomdatabase.database.UserDBHelper;public class UserInfoProvider extends ContentProvider {private final static String TAG = "UserInfoProvider";private UserDBHelper userDB; // 声明一个用户数据库的帮助器对象public static final int USER_INFO = 1; // Uri匹配时的代号public static final UriMatcher uriMatcher = new UriMatcher(UriMatcher.NO_MATCH);static { // 往Uri匹配器中添加指定的数据路径uriMatcher.addURI(UserInfoContent.AUTHORITIES, "/user", USER_INFO);}public UserInfoProvider() {}// 根据指定条件删除数据@Overridepublic int delete(Uri uri, String selection, String[] selectionArgs) {// Implement this to handle requests to delete one or more rows.int count = 0;if (uriMatcher.match(uri) == USER_INFO) { // 匹配到了用户信息表// 获取SQLite数据库的写连接SQLiteDatabase db = userDB.getWritableDatabase();// 执行SQLite的删除操作,并返回删除记录的数目count = db.delete(UserInfoContent.TABLE_NAME, selection, selectionArgs);db.close(); // 关闭SQLite数据库连接}return count;}// 获取Uri支持的数据类型,暂未实现@Overridepublic String getType(Uri uri) {// TODO: Implement this to handle requests for the MIME type of the data// at the given URI.throw new UnsupportedOperationException("Not yet implemented");}// 插入数据@Overridepublic Uri insert(Uri uri, ContentValues values) {// TODO: Implement this to handle requests to insert a new row.if (uriMatcher.match(uri) == USER_INFO) { // 匹配到了用户信息表// 获取SQLite数据库的写连接SQLiteDatabase db = userDB.getWritableDatabase();// 向指定的表插入数据,返回记录的行号long rowId = db.insert(UserInfoContent.TABLE_NAME, null, values);if (rowId > 0) { // 判断插入是否执行成功// 如果添加成功,就利用新记录的行号生成新的地址Uri newUri = ContentUris.withAppendedId(UserInfoContent.CONTENT_URI, rowId);// 通知监听器,数据已经改变getContext().getContentResolver().notifyChange(newUri, null);}db.close(); // 关闭SQLite数据库连接}return uri;}// 创建ContentProvider时调用,可在此获取具体的数据库帮助器实例@Overridepublic boolean onCreate() {// TODO: Implement this to initialize your content provider on startup.userDB = UserDBHelper.getInstance(getContext(), 1);return true;}// 根据指定条件查询数据库@Overridepublic Cursor query(Uri uri, String[] projection, String selection,String[] selectionArgs, String sortOrder) {Cursor cursor = null;if (uriMatcher.match(uri) == USER_INFO) { // 匹配到了用户信息表// 获取SQLite数据库的读连接SQLiteDatabase db = userDB.getReadableDatabase();// 执行SQLite的查询操作cursor = db.query(UserInfoContent.TABLE_NAME,projection, selection, selectionArgs, null, null, sortOrder);// 设置内容解析器的监听cursor.setNotificationUri(getContext().getContentResolver(), uri);}return cursor; // 返回查询结果集的游标}// 更新数据,暂未实现@Overridepublic int update(Uri uri, ContentValues values, String selection,String[] selectionArgs) {// TODO: Implement this to handle requests to update one or more rows.throw new UnsupportedOperationException("Not yet implemented");}
}
经过以上3个步骤之后,便完成了服务端App的接口封装工作,接下来再由其他App去访问服务端App的数据。
6.5.2 通过ContentResolver访问数据
上一小节提到了利用ContentProvider封装服务端App的数据,如果客户App想访问对方的内部数据,就要借助内容解析器ContentResolver。内容解析器是客户端App操作服务端数据的工具,与之对应的内容提供器则是服务端的数据接口。在活动代码中调用getContentResolver方法,即可获取内容解析器的实例。
ContentResolver提供的方法与ContentProvider壹壹对应,比如insert、delete、query、update、getType等,甚至连方法的参数类型都雷同。以添加操作为例,针对前面UserInfoProvider提供的数据接口,下面由内容解析器调用insert方法,使之往内容提供器中插入一条用户信息,记录添加代码如下:
<?xml version="1.0" encoding="utf-8"?>
<LinearLayout xmlns:android="http://schemas.android.com/apk/res/android"xmlns:app="http://schemas.android.com/apk/res-auto"xmlns:tools="http://schemas.android.com/tools"android:layout_width="match_parent"android:layout_height="match_parent"android:orientation="vertical"android:padding="5dp"tools:context=".ContentWriteActivity"><RelativeLayoutandroid:layout_width="match_parent"android:layout_height="56dp" ><TextViewandroid:id="@+id/tv_name"android:layout_width="wrap_content"android:layout_height="match_parent"android:gravity="center"android:text="姓名:"android:textColor="@color/black"android:textSize="17sp" /><EditTextandroid:id="@+id/et_name"android:layout_width="match_parent"android:layout_height="match_parent"android:layout_marginBottom="3dp"android:layout_marginTop="3dp"android:layout_toRightOf="@+id/tv_name"android:background="@drawable/editext_selector"android:gravity="left|center"android:hint="请输入姓名"android:inputType="text"android:maxLength="12"android:textColor="@color/black"android:textSize="17sp" /></RelativeLayout><RelativeLayoutandroid:layout_width="match_parent"android:layout_height="56dp" ><TextViewandroid:id="@+id/tv_age"android:layout_width="wrap_content"android:layout_height="match_parent"android:gravity="center"android:text="年龄:"android:textColor="@color/black"android:textSize="17sp" /><EditTextandroid:id="@+id/et_age"android:layout_width="match_parent"android:layout_height="match_parent"android:layout_marginBottom="3dp"android:layout_marginTop="3dp"android:layout_toRightOf="@+id/tv_age"android:background="@drawable/editext_selector"android:gravity="left|center"android:hint="请输入年龄"android:inputType="number"android:maxLength="2"android:textColor="@color/black"android:textSize="17sp" /></RelativeLayout><RelativeLayoutandroid:layout_width="match_parent"android:layout_height="56dp" ><TextViewandroid:id="@+id/tv_height"android:layout_width="wrap_content"android:layout_height="match_parent"android:gravity="center"android:text="身高:"android:textColor="@color/black"android:textSize="17sp" /><EditTextandroid:id="@+id/et_height"android:layout_width="match_parent"android:layout_height="match_parent"android:layout_marginBottom="3dp"android:layout_marginTop="3dp"android:layout_toRightOf="@+id/tv_height"android:background="@drawable/editext_selector"android:gravity="left|center"android:hint="请输入身高"android:inputType="number"android:maxLength="3"android:textColor="@color/black"android:textSize="17sp" /></RelativeLayout><RelativeLayoutandroid:layout_width="match_parent"android:layout_height="56dp" ><TextViewandroid:id="@+id/tv_weight"android:layout_width="wrap_content"android:layout_height="match_parent"android:gravity="center"android:text="体重:"android:textColor="@color/black"android:textSize="17sp" /><EditTextandroid:id="@+id/et_weight"android:layout_width="match_parent"android:layout_height="match_parent"android:layout_marginBottom="3dp"android:layout_marginTop="3dp"android:layout_toRightOf="@+id/tv_weight"android:background="@drawable/editext_selector"android:gravity="left|center"android:hint="请输入体重"android:inputType="numberDecimal"android:maxLength="5"android:textColor="@color/black"android:textSize="17sp" /></RelativeLayout><Buttonandroid:id="@+id/btn_add_user"android:layout_width="match_parent"android:layout_height="wrap_content"android:gravity="center"android:text="添加用户信息"android:textColor="@color/black"android:textSize="17sp" /><Buttonandroid:id="@+id/btn_jump"android:layout_width="match_parent"android:layout_height="wrap_content"android:gravity="center"android:text="跳转到用户信息"android:textColor="@color/black"android:textSize="17sp" />
</LinearLayout>
package com.example.roomdatabase;import androidx.appcompat.app.AppCompatActivity;import android.content.ContentValues;
import android.os.Bundle;
import android.view.View;
import android.widget.EditText;
import android.widget.Toast;import com.example.roomdatabase.entity.UserInfo;
import com.example.roomdatabase.entity.UserInfoContent;public class ContentWriteActivity extends AppCompatActivity implements View.OnClickListener {private static final String TAG = "ContentWriteActivity";private EditText et_name; // 声明一个编辑框对象private EditText et_age; // 声明一个编辑框对象private EditText et_height; // 声明一个编辑框对象private EditText et_weight; // 声明一个编辑框对象@Overrideprotected void onCreate(Bundle savedInstanceState) {super.onCreate(savedInstanceState);setContentView(R.layout.activity_content_write);et_name = findViewById(R.id.et_name);et_age = findViewById(R.id.et_age);et_height = findViewById(R.id.et_height);et_weight = findViewById(R.id.et_weight);findViewById(R.id.btn_add_user).setOnClickListener(this);findViewById(R.id.btn_jump).setOnClickListener(this);}@Overridepublic void onClick(View v) {if (v.getId() == R.id.btn_add_user) {UserInfo user = new UserInfo();user.name = et_name.getText().toString();user.age = Integer.parseInt(et_age.getText().toString());user.height = Integer.parseInt(et_height.getText().toString());user.weight = Float.parseFloat(et_weight.getText().toString());addUser(user); // 添加一条用户记录}}// 添加一条用户记录private void addUser(UserInfo user) {ContentValues name = new ContentValues();name.put("name", user.name);name.put("age", user.age);name.put("height", user.height);name.put("weight", user.weight);name.put("married", 0);name.put("update_time", DateUtil.getNowDateTime(""));// 通过内容解析器往指定Uri添加用户信息getContentResolver().insert(UserInfoContent.CONTENT_URI, name);Toast.makeText(this, "成功添加用户信息", Toast.LENGTH_SHORT).show();}
}至于删除操作就更简单了,只要下面一行代码就删除了所有记录:
getContentResolver().delete(UserInfoContent.CONTENT_URI,"1=1",null);查询操作稍微复杂一些,调用query方法会返回游标对象,这个游标正是SQLite的游标Cursor,详细用法参见本章的“6.2.3 数据库帮助器SQLiteOpenHelper”。query方法的参数有好几个,具体说明如下(依参数顺序排列):
● uri:Uri类型,指定本次操作的数据表路径。
● projection:字符串数组类型,指定将要查询的字段名称列表。
● selection:字符串类型,指定查询条件。
● selectionArgs:字符串数组类型,指定查询条件中的参数取值列表。
● sortOrder:字符串类型,指定排序条件。
下面是调用query方法从内容提供器查询所有用户信息的代码例子:
<?xml version="1.0" encoding="utf-8"?>
<LinearLayout xmlns:android="http://schemas.android.com/apk/res/android"xmlns:app="http://schemas.android.com/apk/res-auto"xmlns:tools="http://schemas.android.com/tools"android:layout_width="match_parent"android:layout_height="match_parent"android:orientation="vertical"tools:context=".ContentReadActivity"><Buttonandroid:id="@+id/btn_delete"android:layout_width="match_parent"android:layout_height="wrap_content"android:text="删除所有记录"android:textColor="@color/black"android:textSize="17sp" /><TextViewandroid:id="@+id/tv_desc"android:layout_width="match_parent"android:layout_height="wrap_content"android:paddingLeft="5dp"android:textColor="@color/black"android:textSize="17sp" /><ScrollViewandroid:layout_width="match_parent"android:layout_height="wrap_content"><LinearLayoutandroid:id="@+id/ll_list"android:layout_width="match_parent"android:layout_height="wrap_content"android:orientation="vertical" /></ScrollView>
</LinearLayout>
package com.example.roomdatabase;import androidx.appcompat.app.AppCompatActivity;import android.annotation.SuppressLint;
import android.database.Cursor;
import android.graphics.Color;
import android.os.Bundle;
import android.view.View;
import android.widget.LinearLayout;
import android.widget.TextView;
import android.widget.Toast;import com.example.roomdatabase.entity.UserInfo;
import com.example.roomdatabase.entity.UserInfoContent;import java.util.ArrayList;
import java.util.List;
@SuppressLint("Range")
public class ContentReadActivity extends AppCompatActivity implements View.OnClickListener {private static final String TAG = "ContentReadActivity";private TextView tv_desc; // 声明一个文本视图对象private LinearLayout ll_list; // 用户信息列表的线性布局@Overrideprotected void onCreate(Bundle savedInstanceState) {super.onCreate(savedInstanceState);setContentView(R.layout.activity_content_read);findViewById(R.id.btn_delete).setOnClickListener(this);tv_desc = findViewById(R.id.tv_desc);ll_list = findViewById(R.id.ll_list);showAllUser(); // 显示所有的用户记录}// 显示所有的用户记录private void showAllUser() {List<UserInfo> userList = new ArrayList<UserInfo>();// 通过内容解析器从指定Uri中获取用户记录的游标Cursor cursor = getContentResolver().query(UserInfoContent.CONTENT_URI, null, null, null, null);// 循环取出游标指向的每条用户记录while (cursor.moveToNext()) {UserInfo user = new UserInfo();user.name = cursor.getString(cursor.getColumnIndex(UserInfoContent.USER_NAME));user.age = cursor.getInt(cursor.getColumnIndex(UserInfoContent.USER_AGE));user.height = cursor.getInt(cursor.getColumnIndex(UserInfoContent.USER_HEIGHT));user.weight = cursor.getFloat(cursor.getColumnIndex(UserInfoContent.USER_WEIGHT));userList.add(user); // 添加到用户信息列表}cursor.close(); // 关闭数据库游标String contactCount = String.format("当前共找到%d个用户", userList.size());tv_desc.setText(contactCount);ll_list.removeAllViews(); // 移除线性布局下面的所有下级视图for (UserInfo user : userList) { // 遍历用户信息列表String contactDesc = String.format("姓名为%s,年龄为%d,身高为%d,体重为%f\n",user.name, user.age, user.height, user.weight);TextView tv_contact = new TextView(this); // 创建一个文本视图tv_contact.setText(contactDesc);tv_contact.setTextColor(Color.BLACK);tv_contact.setTextSize(17);int pad = Utils.dip2px(this, 5);tv_contact.setPadding(pad, pad, pad, pad); // 设置文本视图的内部间距ll_list.addView(tv_contact); // 把文本视图添加至线性布局}}@Overridepublic void onClick(View v) {if (v.getId() == R.id.btn_delete) {getContentResolver().delete(UserInfoContent.CONTENT_URI, "1=1", null);showAllUser();Toast.makeText(this, "已删除所有记录", Toast.LENGTH_SHORT).show();}}
}package com.example.roomdatabase;import android.content.Context;public class Utils {// 根据手机的分辨率从 dp 的单位 转成为 px(像素)public static int dip2px(Context context, float dpValue) {// 获取当前手机的像素密度(1个dp对应几个px)float scale = context.getResources().getDisplayMetrics().density;return (int) (dpValue * scale + 0.5f); // 四舍五入取整}// 根据手机的分辨率从 px(像素) 的单位 转成为 dppublic static int px2dip(Context context, float pxValue) {// 获取当前手机的像素密度(1个dp对应几个px)float scale = context.getResources().getDisplayMetrics().density;return (int) (pxValue / scale + 0.5f); // 四舍五入取整}// 获得屏幕的宽度public static int getScreenWidth(Context ctx) {return ctx.getResources().getDisplayMetrics().widthPixels;}// 获得屏幕的高度public static int getScreenHeight(Context ctx) {return ctx.getResources().getDisplayMetrics().heightPixels;}
}接下来分别演示通过内容解析器添加和查询用户信息的过程,其中记录添加页面为ContentWriteActivity.java,记录查询页面为ContentReadActivity.java。运行测试App,先打开记录添加页面,输入用户信息后点击“添加用户信息”按钮,由内容解析器执行插入操作,此时添加界面如图所示。

接着打开记录查询页面,内容解析器自动执行查询操作,并将查到的用户信息一一显示出来,此时查询界面如图所示。
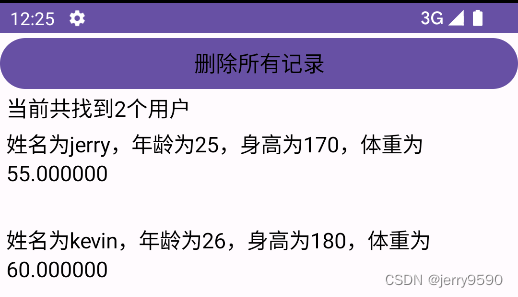
对比添加页面和查询页面的用户信息,可知成功查到了新增的用户记录。
6.5.3 利用ContentResolver读写联系人
在实际开发中,普通App很少会开放数据接口给其他应用访问,作为服务端接口的ContentProvider基本用不到。内容组件能够派上用场的情况,往往是App想要访问系统应用的通讯数据,比如查看联系人、短信、通话记录,以及对这些通讯数据进行增删改查。
在访问系统的通讯数据之前,得先在AndroidManifest.xml中添加相应的权限配置,常见的通讯权限配置主要有下面几个: