一、MyBatisPlus 简介
1.1 创建新模块
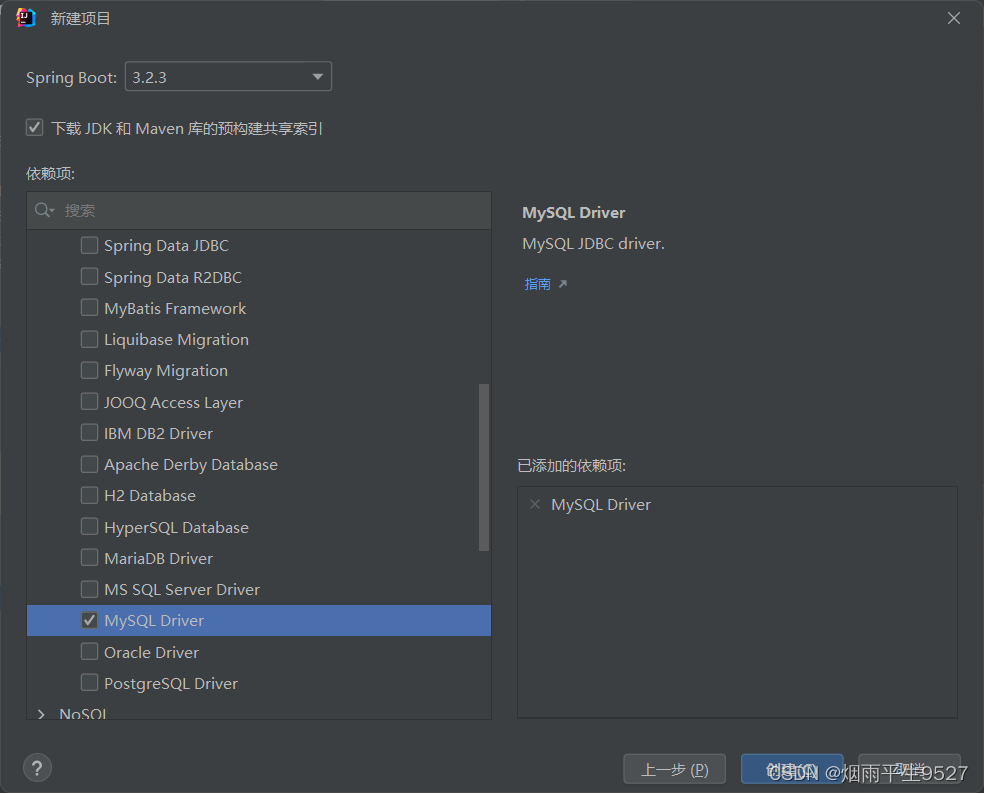
<dependency><groupId>com.baomidou</groupId><artifactId>mybatis-plus-boot-starter</artifactId><version>3.4.1</version></dependency>由于mp并未被收录到idea的系统内置配置,无法直接选择加入
1.2 yml配置
spring:datasource:url: 'jdbc:mysql://'username: rootpassword: sql:init:mode: alwayslogging:level:com.itheima: debugpattern:dateformat: HH:mm:ss
mybatis:mapper-locations: classpath*:mapper/*.xml
日志配置
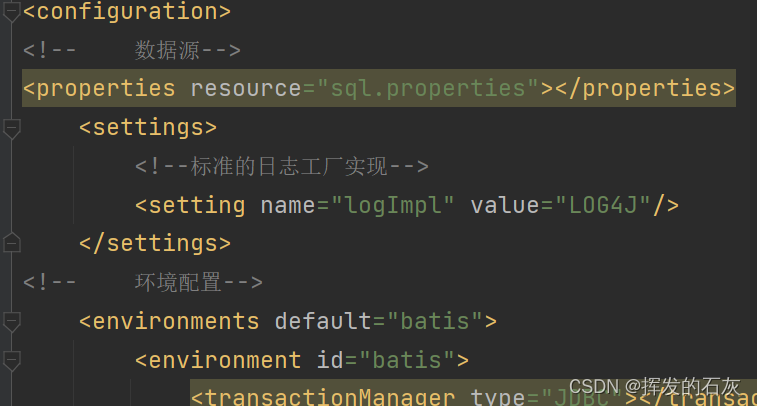
mybatis-plus:mapper-locations: classpath*:mapper/*.xmlconfiguration:log-impl: org.apache.ibatis.logging.stdout.StdOutImpl1.3实体类与表结构
package com.itheima.mp.domain.po;import lombok.Data;import java.time.LocalDateTime;@Data
public class User {/*** 用户id*/private Long id;/*** 用户名*/private String username;/*** 密码*/private String password;/*** 注册手机号*/private String phone;/*** 详细信息*/private String info;/*** 使用状态(1正常 2冻结)*/private Integer status;/*** 账户余额*/private Integer balance;/*** 创建时间*/private LocalDateTime createTime;/*** 更新时间*/private LocalDateTime updateTime;
}
1.4定义数据接口


package com.itheima.mp.mapper;import com.baomidou.mybatisplus.core.mapper.BaseMapper;
import com.itheima.mp.domain.po.User;
import org.apache.ibatis.annotations.Param;
import org.springframework.stereotype.Component;import java.util.List;
@Repository//代表持久层
//在对应的mapper上面继承基本的接口BaseMapper
public interface UserMapper extends BaseMapper<User>
{//所有的CRUD操作都已经编写完成了//你不需要像以前的配置一大堆文件了//仅限于单表操作
}
@Repository,声明为spring持久化组件(不声明使用时提示错误,但运行正常)
1.5启动类
package com.itheima.mp;import org.mybatis.spring.annotation.MapperScan;
import org.springframework.boot.SpringApplication;
import org.springframework.boot.autoconfigure.SpringBootApplication;@MapperScan("com.itheima.mp.mapper")
@SpringBootApplication
public class MpDemoApplication {public static void main(String[] args) {SpringApplication.run(MpDemoApplication.class, args);}}
注意点,我们需要再主启动类上去扫描我们的mapper包下的所有接
com.itheima.mp.mapper包下的Mapper接口。
方法二@Mapper
@Mapper,声明为mybatis映射接口。运行时动态生成接口代理类,设置后不必@MapperScan("com.itheima.mp.mapper")
package com.itheima.mp.mapper;import com.baomidou.mybatisplus.core.mapper.BaseMapper;
import com.itheima.mp.domain.po.User;
import org.apache.ibatis.annotations.Mapper;
import org.apache.ibatis.annotations.Param;
import org.springframework.stereotype.Component;
import org.springframework.stereotype.Repository;import java.util.List;
@Repository
@Mapper
public interface UserMapper extends BaseMapper<User>
{}
1.6测试功能
 @Autowiredprivate UserMapper userMapper;@Testvoid testInsert() {User user = new User();user.setId(5L);user.setUsername("Lucy");user.setPassword("123");user.setPhone("18688990011");user.setBalance(200);user.setInfo("{\"age\": 24, \"intro\": \"英文老师\", \"gender\": \"female\"}");user.setCreateTime(LocalDateTime.now());user.setUpdateTime(LocalDateTime.now());
//        userMapper.saveUser(user);userMapper.insert(user);}
编写测试类。声明启动事务控制,增/删/改必须在事务下执行;默认,spring测试环境下直接使用持久化组件产生的持久化操作会回滚。即,插入的数据会在测试成功后自动删除(在生产环境下避免污染数据库)。因此,在学习测试阶段关闭回滚
package com.yanyu.springjdbc;import jakarta.annotation.Resource;
import lombok.extern.java.Log;
import lombok.extern.slf4j.Slf4j;
import org.junit.jupiter.api.Test;
import org.springframework.beans.factory.annotation.Autowired;
import org.springframework.boot.test.context.SpringBootTest;
import org.springframework.test.annotation.Rollback;
import org.springframework.transaction.annotation.Transactional;import javax.sql.DataSource;
import java.sql.Connection;
import java.sql.SQLException;@SpringBootTest
@Transactional
@Rollback(value = false)
@Slf4j
class test1 {//DI注入数据源@ResourceDataSource dataSource;@Testpublic void contextLoads() throws SQLException {//看一下默认数据源System.out.println(dataSource.getClass());//获得连接Connection connection =   dataSource.getConnection();System.out.println(connection);//关闭连接connection.close();}
}
二、标准数据层开发
MyBatisPlus通过扫描实体类,并基于反射获取实体类信息作为数据库表信息。
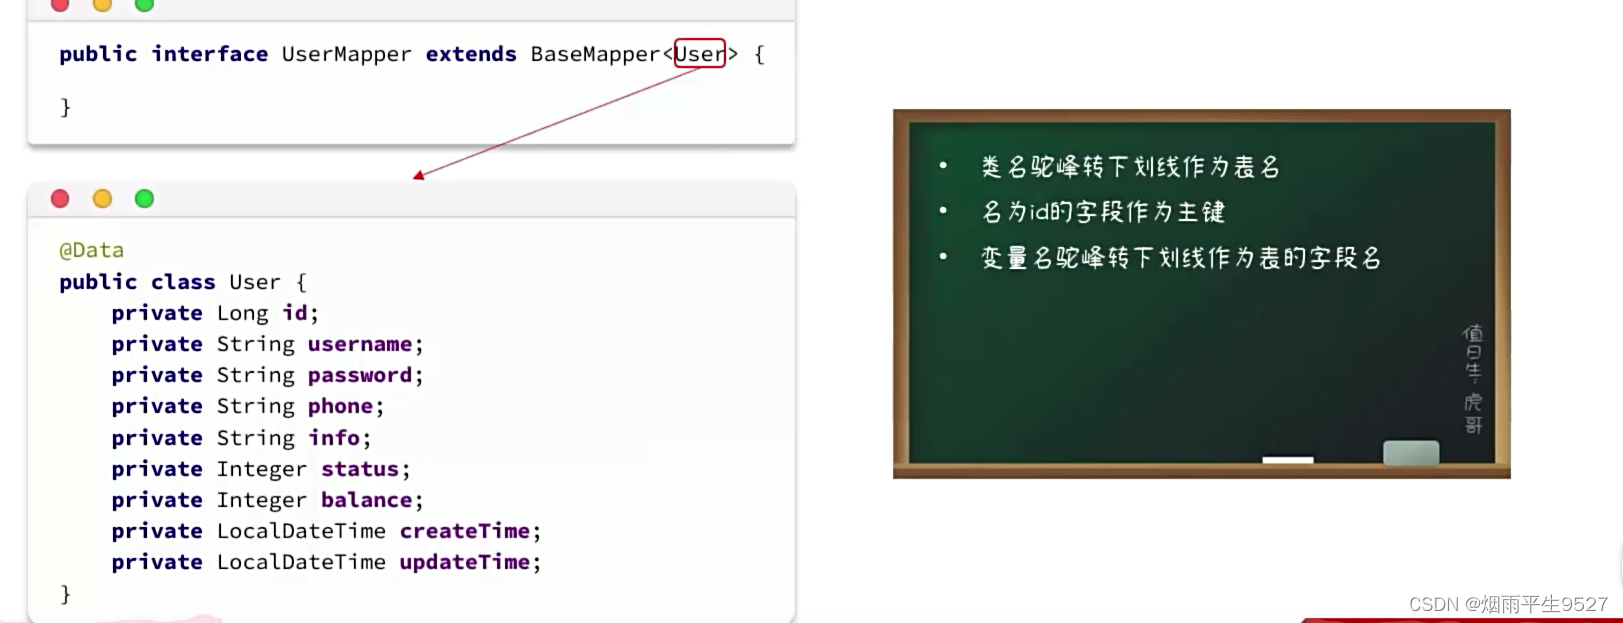
2.1常用表注解
@TableName:用来指定表名
@TableId:用来指定表中的主键字段信息
@TableField:用来指定表中的普通字段信息

IdType枚举:
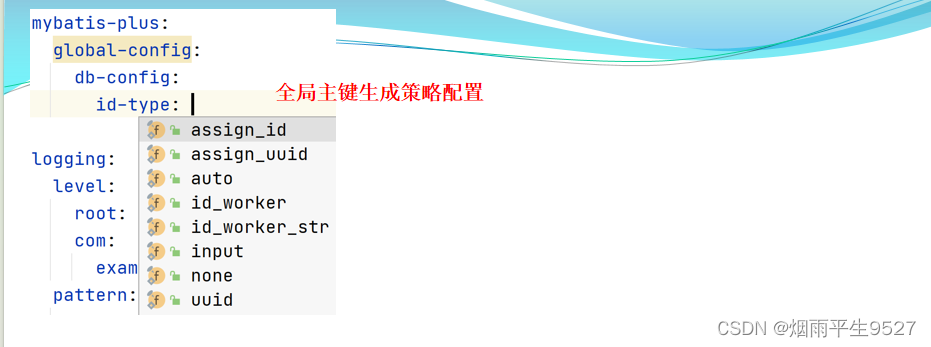
- AUTO:数据库自增长
- INPUT:通过set方法自行输入
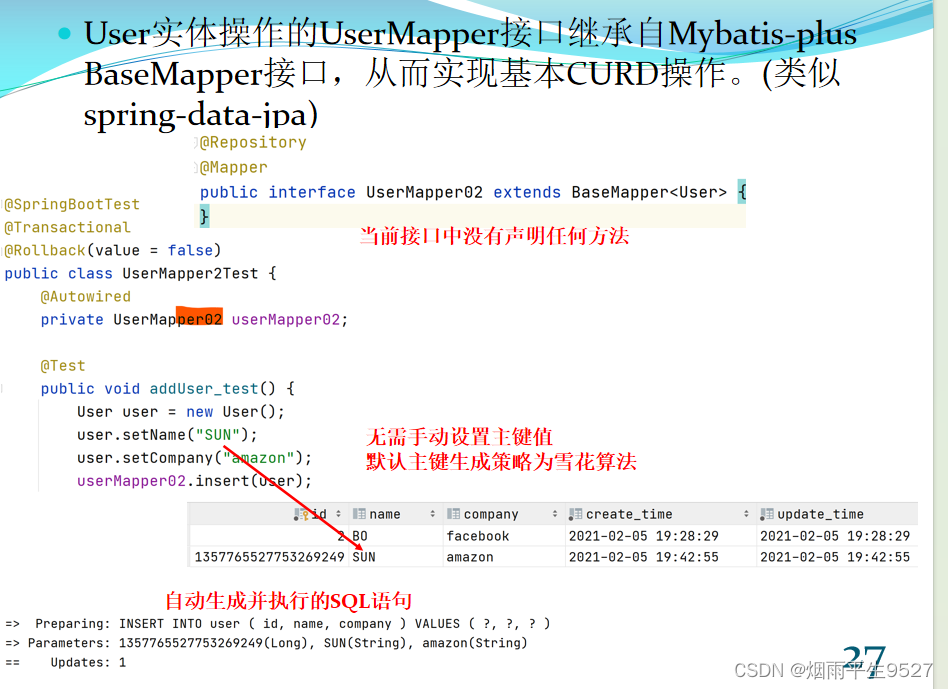
- ASSIGN_ID:分配 ID,接口IdentifierGenerator的方法nextId来生成id,默认实现类为DefaultIdentifierGenerator雪花算法
使用@TableField的常见场景:
- 成员变量名与数据库字段名不一致
- 成员变量名以is开头,且是布尔值
- 成员变量名与数据库关键字冲突
- 成员变量不是数据库字段
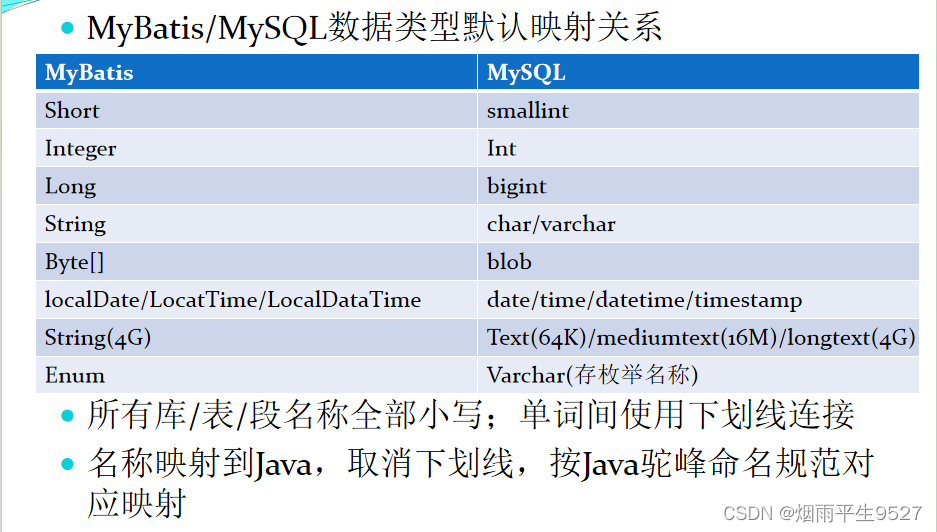
 2.2数据库映射关系
2.3BaseMapper
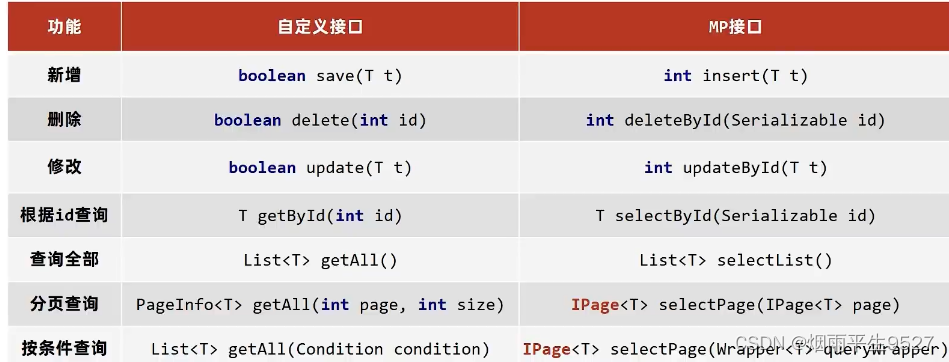
BaseMapper<T>,提供了通用CURD操作的接口
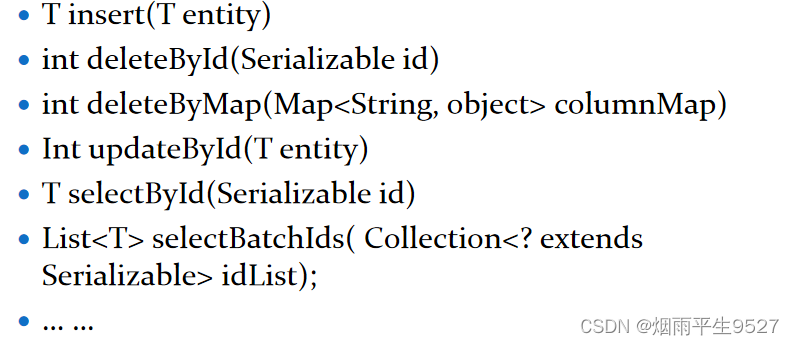
MP BaseMapper提供的方法均为操作单表查询,关联查询仍需基于join等SQL语句
2.4CRUD扩展
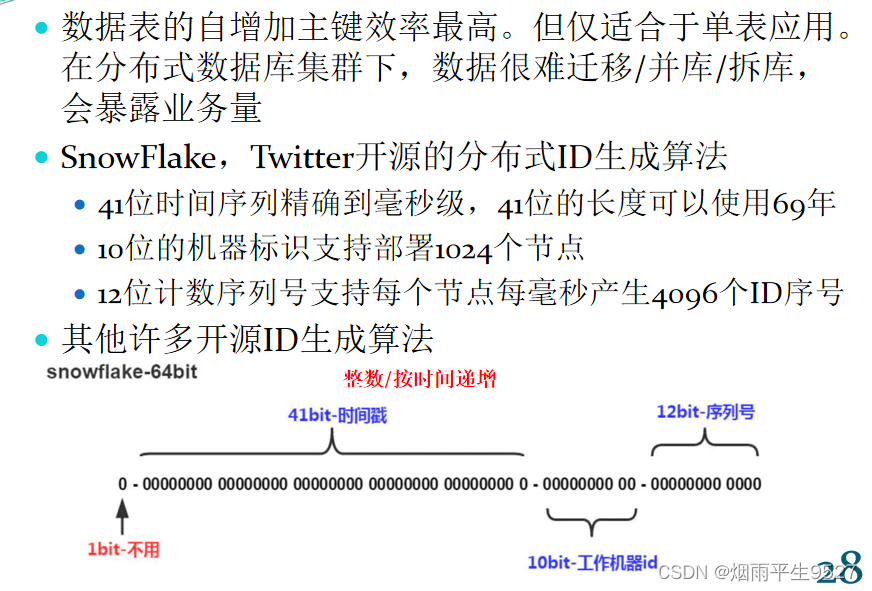
雪花算法
snowflake是Twitter开源的分布式ID生成算法,结果是一个long型的ID。其核心思想是:使用41bit作为毫秒数,10bit作为机器的ID(5个bit是数据中心,5个bit的机器ID),12bit作为毫秒内的流水号(意味着每个节点在每毫秒可以产生 4096 个 ID),最后还有一个符号位,永远是0。可以保证几乎全球唯一!
主键自增
我们需要配置主键自增
1、实体类字段上@TableId(type = IdType.ASSIGN_ID)
//默认:ID_WORKER全局唯一id2、数据库字段一定要是自增的!
自动填充
创建时间、修改时间!这些个操作都是自动化完成的,我们不希望手动更新!
阿里巴巴开发手册:所有的数据库表:gmt_create、gmr_modified、几乎所有的表都要配置上!而且需要自动化!
方式一:数据库级别(工作中不允许修改数据库)
1、在表中新增字段 create_time, update_time

2、再次测试插入方法,我们需要先把实体类同步!

3、再次更新查看结果即可
方式二:代码级别
1、删除数据库的默认值,更新操作!

2、实体类的字段属性上需要增加注解
//字段添加填充内容
@TableField(fill = FieldFill.INSERT)
private Date createTime;
@TableField(fill = FieldFill.UPDATE)
private Date updateTime;
3、编写处理器处理注解即可!
@Component  //一定不要忘记把处理器加到IOC容器中
@Slf4j
public class MyMetaObjectHandler implements MetaObjectHandler {//插入时候的填充策略@Overridepublic void insertFill(MetaObject metaObject) {log.info("start insert fill ......");//default MetaObjectHandler//setFieldValByName(String fieldName, Object fieldVal, MetaObject metaObject) this.setFieldValByName("createTime", new Date(), metaObject);this.setFieldValByName("updateTime", new Date(), metaObject);}//更新时候的填充策略@Overridepublic void updateFill(MetaObject metaObject) {log.info("start update fill ......");this.setUpdateFieldValByName("updateTime", new Date(), metaObject);}
}
4、测试插入
5、测试更新、观察时间即可!
乐观锁
在面试过程中,我们经常会被问道乐观锁,悲观锁!这个其实非常简单!
原子引用!
乐观锁:顾名思义十分乐观,他总是认为不会出现问题,无论干什么不去上锁!如果出现了问题,再次更新值测试!
悲观锁:顾名思义十分悲观,他总是任务总是出现问题,无论干什么都会上锁!再去操作!
我们这里主要讲解,乐观锁机制!
乐观锁实现方式:
- 取出记录,获取当前version
- 更新时,带上这个version
- 执行更新时,set version = new version where version = oldversion
- 如果version不对,就更新失败
乐观锁:1、先查询,获得版本号 version = 1
-- A
update user set name = "ChanV", version = version + 1
where id = 2 and version = 1-- B 线程抢先完成,这个时候 version = 2,会导致 A 修改失败!
update user set name = "ChanV", version = version + 1
where id = 2 and version = 1
1、给数据库中增加version字段!
2、我们实体类加对应的字段
@Version    //乐观锁version注解
private Integer version;
查询操作
//测试查询
@Test
public void testSelectById(){User user = userMapper.selectById(1L);System.out.println(user);
}//测试批量查询!
@Test
public void testSelectBatchId(){List<User> users = userMapper.selectBatchIds(Arrays.asList(1, 2, 3));users.forEach(System.out::println);
}//条件查询之一使用map操作
@Test
public void testSelectByBatchIds(){HashMap<String, Object> map = new HashMap<>();//自定义要查询map.put("name", "ChanV");map.put("age", 20);List<User> users = userMapper.selectByMap(map);users.forEach(System.out::println);
}
删除操作与逻辑删除
基本的删除操作
//测试删除
@Test
public void testDeleteById(){userMapper.deleteById(1L);
}//通过id批量删除
@Test
public void testDeleteBatchId(){userMapper.deleteBatchIds(Arrays.asList(2, 3, 4));
}//通过map删除
@Test
public void testDeleteMap(){HashMap<String, Object> map = new HashMap<>();map.put("name", "陈伟");userMapper.deleteByMap(map);
}
三、核心功能
3.1条件构造器
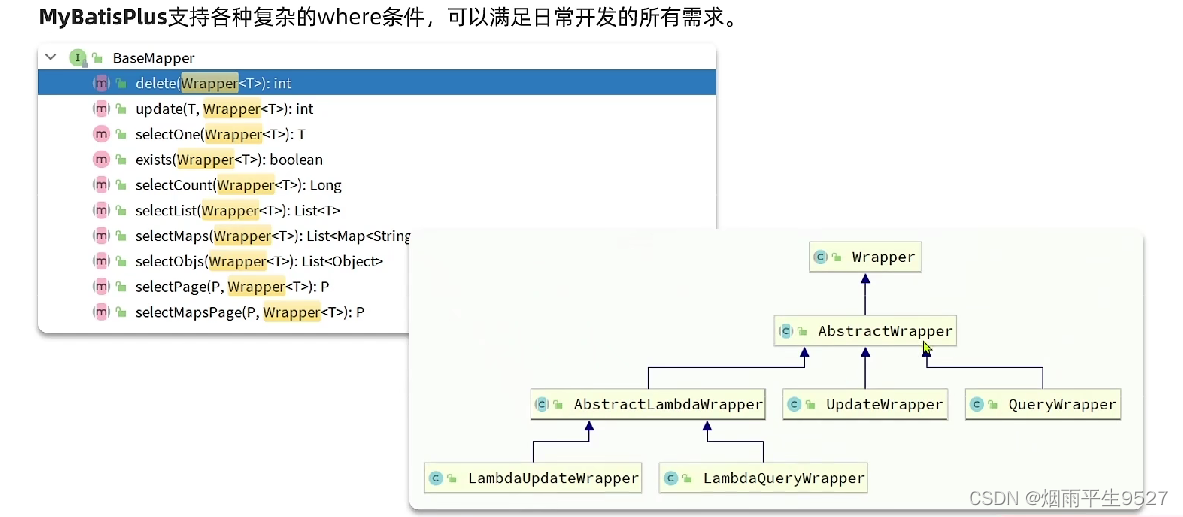
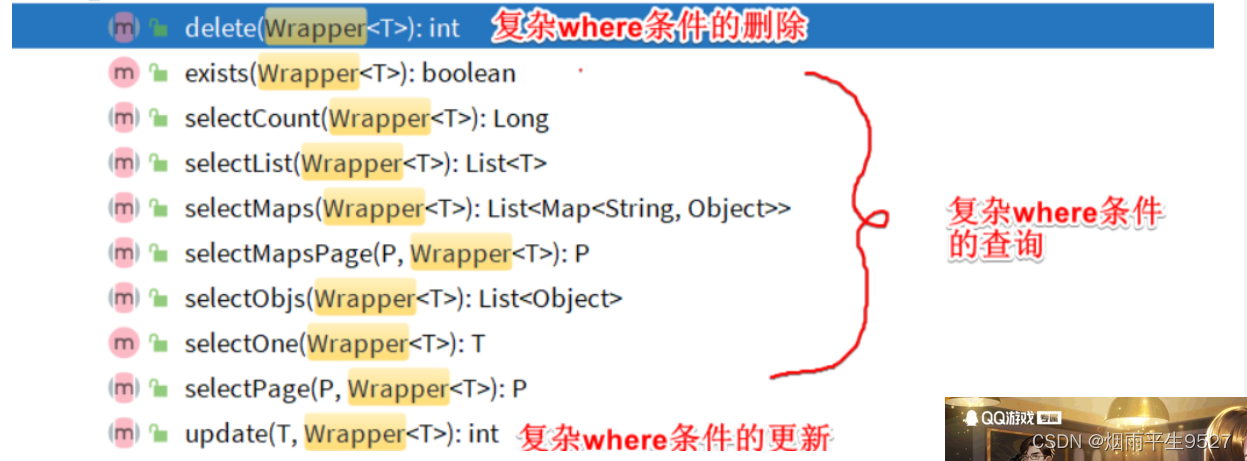
除了新增以外,修改、删除、查询的SQL语句都需要指定where条件。因此BaseMapper中提供的相关方法除了以id作为where条件以外,还支持更加复杂的where条件。
我们写一些复杂的SQL就可以使用他来替代!
测试1
@Testvoid test1(){//查询名字ChanvQueryWrapper<User> wrapper = new QueryWrapper<>();wrapper.select("id","username","info","balance").like("username","o").ge("balance",1000);User user = userMapper.selectOne(wrapper);System.out.println(user);}AbstractWrapper
Wrapper的子类AbstractWrapper提供了where中包含的所有条件构造方法:
eq、allEq、ne
eq:等于,参数一个条件
allEq:全等于,参数是一个map集合,可以一次匹配多个条件,
ne:不等于
gt、ge、lt、le
gt:大于,ge:大于等于,lt:小于,le:小于等于
between、notBetween
between:在值1和值2之间,notBetween:不在值1和值2之间
like、notLike、likeLeft、likeRight
like:’%值%’,notLike:’%值%’,likeLeft:’%值’,likeRight:'值%'
isNull、isNotNull
isNull:字段 IS NULL,isNotNull:字段 IS NOT NULL
in、notIn
in:字段 IN (v0, v1, …),notIn:字段 NOT IN (value.get(0), value.get(1), …)
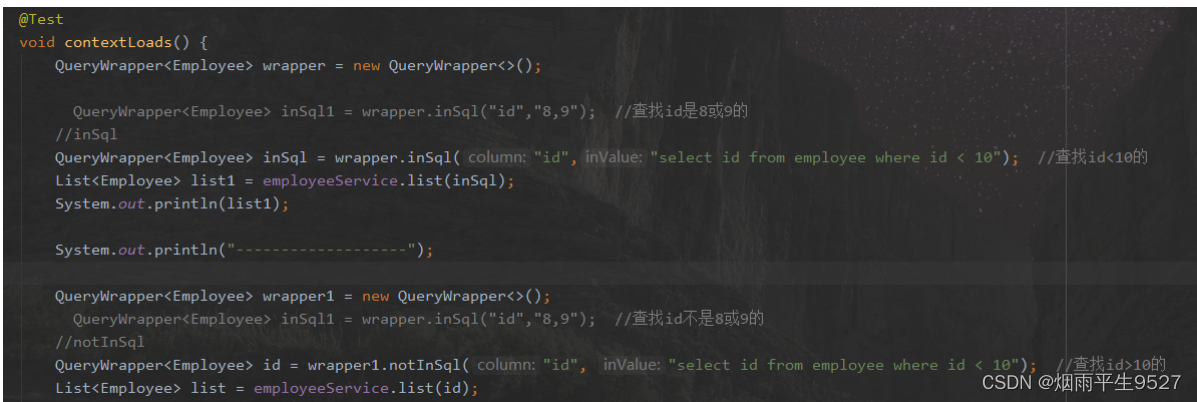
inSql、notInSql
inSql:字段 IN ( sql语句 ),notInSql:字段 NOT IN ( sql语句 )
or、and
or:拼接 OR,
and 嵌套
注意事项:
主动调用or表示紧接着下一个方法不是用and连接!(不调用or则默认为使用and连接)
 exists、notExists
exists:拼接 EXISTS ( sql语句 ),notExists:拼接 NOT EXISTS ( sql语句 )
orderBy、orderByAsc、orderByDesc
orderBy:指定是否排序,升序还是降序
orderByAsc:排序:ORDER BY 字段, … ASC,orderByDesc:排序:ORDER BY 字段, … DESC
QueryWrapper
而
QueryWrapper在AbstractWrapper的基础上拓展了一个select方法,允许指定查询字段
说明:
继承自 AbstractWrapper ,自身的内部属性 entity 也用于生成 where 条件
及 LambdaQueryWrapper, 可以通过 new QueryWrapper().lambda() 方法获取
QueryWrapper<User> queryWrapper = new QueryWrapper<>();
queryWrapper.select("id", "name", "age");
List<User> userList = userMapper.selectList(queryWrapper);
QueryWrapper更新操作
@Testpublic void updateQueryWrapper(){User_plus user=new User_plus();//设置更新字段user.setName("张飞");QueryWrapper<User_plus> queryWrapper=new QueryWrapper<>();//设置更新条件queryWrapper.eq("id",1);int i = user_plusDAO.update(user,queryWrapper);System.out.println(i);}lambda
在QueryWrapper中,可以通过调用lambda()方法获取LambdaQueryWrapper对象。LambdaQueryWrapper是QueryWrapper的一个子类,它提供了更加方便的链式调用方式,可以更方便地构建查询条件。例如:
LambdaQueryWrapper<User> lambdaQueryWrapper = new QueryWrapper<User>().lambda();
lambdaQueryWrapper.eq(User::getName, "张三").lt(User::getAge, 30);
List<User> userList = userMapper.selectList(lambdaQueryWrapper);
UpdateWrapper
而
UpdateWrapper在AbstractWrapper的基础上拓展了一个set方法,允许指定SQL中的SET部分:
说明:
继承自
AbstractWrapper,自身的内部属性entity也用于生成 where 条件
及LambdaUpdateWrapper, 可以通过new UpdateWrapper().lambda()方法获取!
测试二
// 更新id为1,2,4的用户的余额,扣200@Testvoid testUpdateWrapper() {// List<Long> ids = new ArrayList<>(Arrays.asList(1L, 2L, 4L)); //JDK8 可以使用这种方式List<Long> ids = List.of(1L, 2L, 4L); // JDK9 之后才有的of方法// 1.生成SQLUpdateWrapper<User> userUpdateWrapper = new UpdateWrapper<User>().setSql("balance = balance -200").in("id", ids); // WHERE id in (1, 2, 4)// 2.更新,注意第一个参数可以给null,也就是不填更新字段和数据,// 而是基于UpdateWrapper中的setSql来更新userMapper.update(null, userUpdateWrapper);}
set
set(String column, Object val)
set(boolean condition, String column, Object val)
UpdateWrapper<User> updateWrapper = new UpdateWrapper<>();
updateWrapper.eq("id", 1).set("age", 25);
userMapper.update(null, updateWrapper);
setSql
通测试二
lambda
UpdateWrapper<User> updateWrapper = new UpdateWrapper<>();
updateWrapper.eq(User::getId, 1).set(User::getAge, 25);
userMapper.update(null, updateWrapper);
LambdaQueryWrapper
无论是
QueryWrapper还是UpdateWrapper在构造条件的时候都需要写死字段名称,会出现字符串魔法值。这在编程规范中显然是不推荐的。
那怎么样才能不写字段名,又能知道字段名呢?其中一种办法是基于变量的
gettter方法结合反射技术。因此我们只要将条件对应的字段的getter方法传递给MybatisPlus,它就能计算出对应的变量名了。而传递方法可以使用JDK8中的方法引用和Lambda表达式。因此
MybatisPlus又提供了一套基于Lambda的Wrapper,包含两个:
-LambdaQueryWrapper
LambdaUpdateWrapper
分别对应QueryWrapper和UpdateWrapper
@Testvoid testLambdaQueryWrapper() {// 1.构建查询条件 where name like "%o%" AND balance >= 1000LambdaQueryWrapper<User> userLambdaQueryWrapper = new LambdaQueryWrapper<User>().select(User::getId, User::getUsername, User::getInfo, User::getBalance).like(User::getUsername, "o").ge(User::getBalance, 1000);// 2.查询数据List<User> users = userMapper.selectList(userLambdaQueryWrapper);users.forEach(System.out::println);}// 更新用户名为jack的用户的余额为2000@Testvoid testLambdaUpdateByQueryWrapper() {// 1.构建查询条件 where name = "Jack"LambdaQueryWrapper<User> wrapper = new LambdaQueryWrapper<User>().eq(User::getUsername, "Jack");// 2.更新数据,user中非null字段都会作为set语句User user = new User();user.setBalance(2000);userMapper.update(user, wrapper);}
总结
条件构造器的用法:
- QueryWrapper和LambdaQueryWrapper通常用来构建select、delete、update的where条件部分
- UpdateWrapper和LambdaUpdateWrapper通常只有在set语句比较特殊才使用
- 尽量使用LambdaQueryWrapper和LambdaUpdateWrapper,避免硬编码
3.2.自定义SQL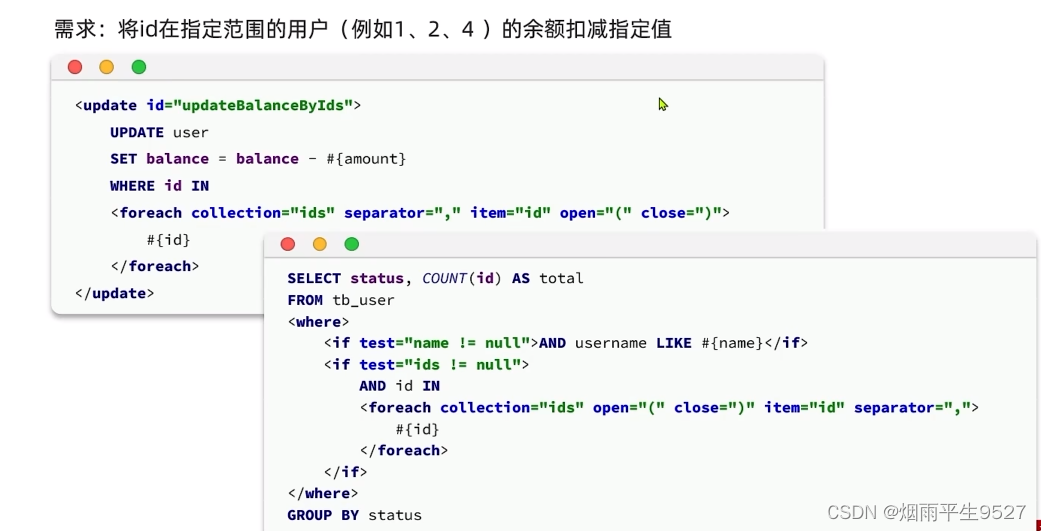
SQL语句最好都维护在持久层,而不是业务层。就当前案例来说,由于条件是in语句,只能将SQL写在Mapper.xml文件,利用foreach来生成动态SQL。
这实在是太麻烦了。假如查询条件更复杂,动态SQL的编写也会更加复杂。所以,MybatisPlus提供了自定义SQL功能,可以让我们利用Wrapper生成查询条件,再结合Mapper.xml编写SQL(写死,改半自动)
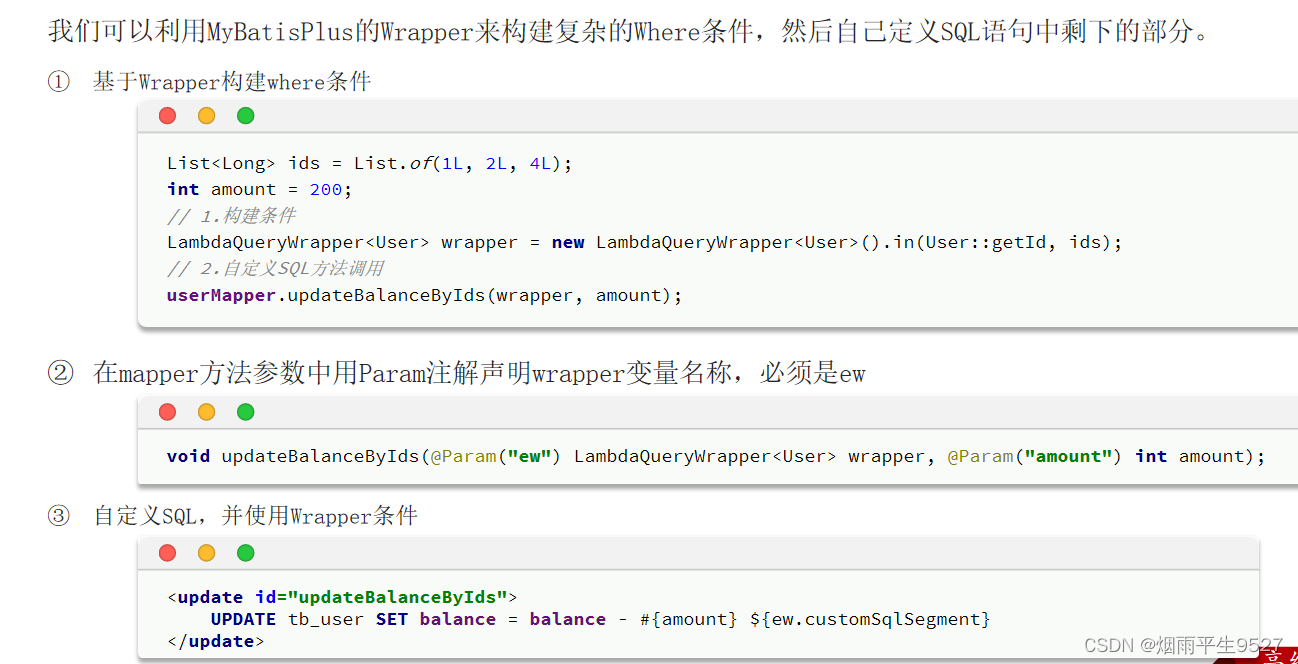
基础语法
我们可以利用MyBatisPlus的Wrapper来构建复杂的Where条件,然后自己定义SQL语句中剩下的部分。
多表关联
理论上来讲MyBatisPlus是不支持多表查询的,不过我们可以利用Wrapper中自定义条件结合自定义SQL来实现多表查询的效果。
例如,我们要查询出所有收货地址在北京的并且用户id在1、2、4之中的用户
要是自己基于mybatis实现SQL,大概是这样的:
<select id="queryUserByIdAndAddr" resultType="com.itheima.mp.domain.po.User">SELECT *FROM user uINNER JOIN address a ON u.id = a.user_idWHERE u.id<foreach collection="ids" separator="," item="id" open="IN (" close=")">#{id}</foreach>AND a.city = #{city}</select>
可以看出其中最复杂的就是WHERE条件的编写,如果业务复杂一些,这里的SQL会更变态。
但是基于自定义SQL结合Wrapper的玩法,我们就可以利用Wrapper来构建查询条件,然后手写SELECT及FROM部分,实现多表查询。
查询条件这样来构建:
@Test
void testCustomJoinWrapper() {// 1.准备自定义查询条件QueryWrapper<User> wrapper = new QueryWrapper<User>().in("u.id", List.of(1L, 2L, 4L)).eq("a.city", "北京");// 2.调用mapper的自定义方法List<User> users = userMapper.queryUserByWrapper(wrapper);users.forEach(System.out::println);
}
然后在UserMapper中自定义方法:
@Select("SELECT u.* FROM user u INNER JOIN address a ON u.id = a.user_id ${ew.customSqlSegment}")
List<User> queryUserByWrapper(@Param("ew")QueryWrapper<User> wrapper);
当然,也可以在UserMapper.xml中写SQL:'
<select id="queryUserByWrapper" resultType="com.itheima.mp.domain.po.User">SELECT * FROM user u INNER JOIN address a ON u.id = a.user_id ${ew.customSqlSegment}
</select>
3.3Service接口
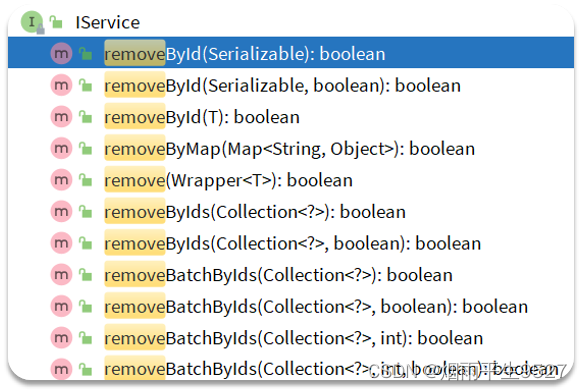
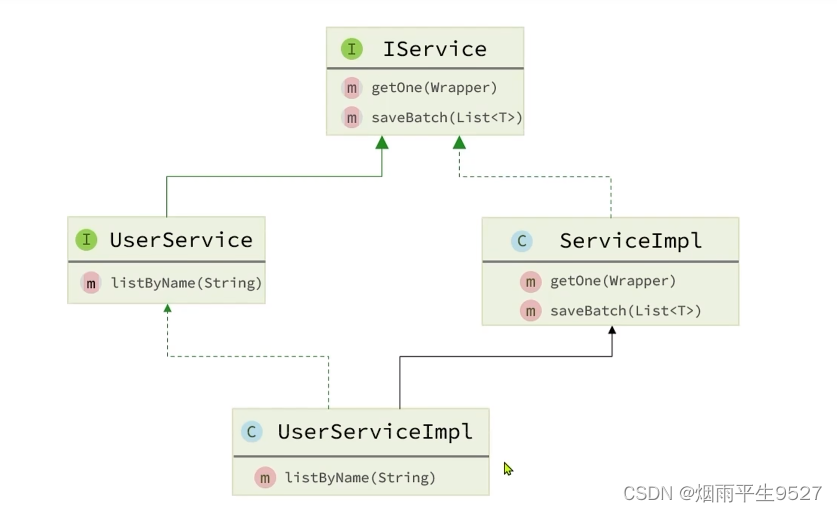
MybatisPlus不仅提供了BaseMapper,还提供了通用的Service接口及默认实现,封装了一些常用的service模板方法。
通用接口为IService,默认实现为ServiceImpl,其中封装的方法可以分为以下几类:
save:新增remove:删除update:更新get:查询单个结果list:查询集合结果count:计数page:分页查询
CRUD
新增:
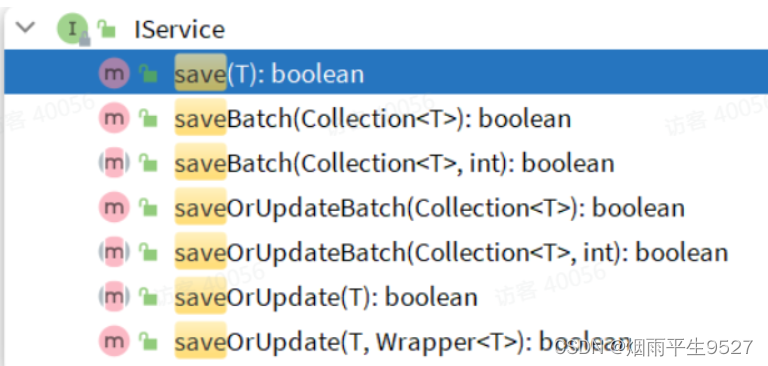
save是新增单个元素saveBatch是批量新增saveOrUpdate是根据id判断,如果数据存在就更新,不存在则新增saveOrUpdateBatch是批量的新增或修改
案例说明
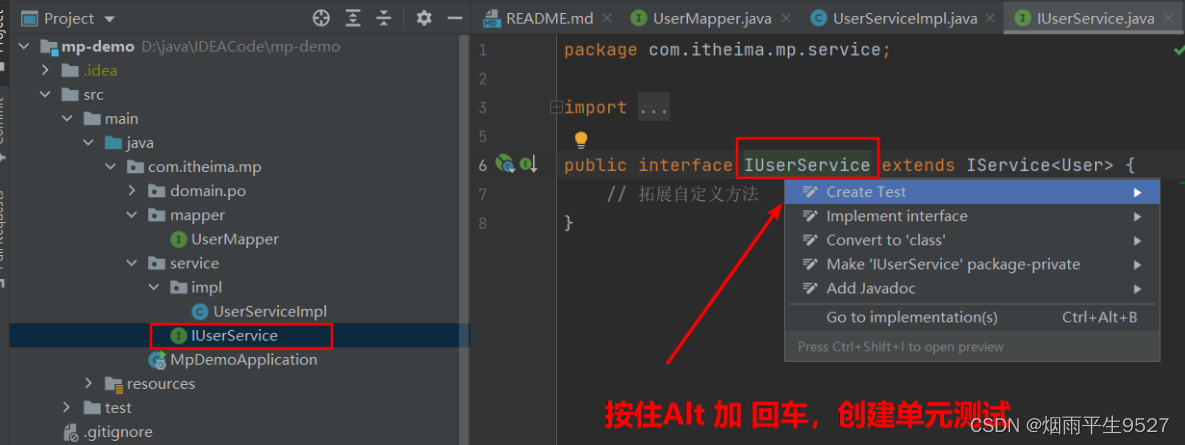
package com.itheima.mp.service;import com.baomidou.mybatisplus.extension.service.IService;
import com.itheima.mp.domain.po.User;public interface IUserService extends IService<User> {}
package com.itheima.mp.service.impl;import com.baomidou.mybatisplus.core.conditions.Wrapper;
import com.baomidou.mybatisplus.core.mapper.BaseMapper;
import com.baomidou.mybatisplus.extension.service.IService;
import com.baomidou.mybatisplus.extension.service.impl.ServiceImpl;
import com.itheima.mp.domain.po.User;
import com.itheima.mp.mapper.UserMapper;
import com.itheima.mp.service.IUserService;
import org.springframework.stereotype.Service;@Servicepublic class UserServiceImpl extends ServiceImpl<UserMapper, User> implements IUserService
{}测试
package com.itheima.mp.service;import com.baomidou.mybatisplus.core.metadata.OrderItem;
import com.baomidou.mybatisplus.extension.plugins.pagination.Page;
import com.itheima.mp.domain.po.User;
import com.itheima.mp.domain.po.UserInfo;
import org.junit.jupiter.api.Test;
import org.springframework.beans.factory.annotation.Autowired;
import org.springframework.boot.test.context.SpringBootTest;import java.time.LocalDateTime;
import java.util.ArrayList;
import java.util.List;@SpringBootTest
class IUserServiceTest {@Autowiredprivate IUserService userService;@Testvoid testSaveUser() {User user = new User();// user.setId(5L);user.setUsername("LiLei");user.setPassword("123");user.setPhone("18688990013");user.setBalance(200);user.setInfo(UserInfo.of(24, "英文老师", "female"));user.setCreateTime(LocalDateTime.now());user.setUpdateTime(LocalDateTime.now());userService.save(user);}}
删除
removeById:根据id删除removeByIds:根据id批量删除removeByMap:根据Map中的键值对为条件删除remove(Wrapper<T>):根据Wrapper条件删除:暂不支持removeBatchByIds
修改:
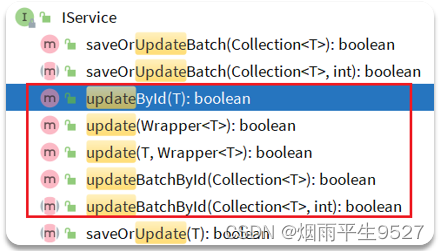
- updateById:根据id修改
- update(Wrapper<T>):根据UpdateWrapper修改,Wrapper中包含set和where部分
- update(T,Wrapper<T>):按照T内的数据修改与Wrapper匹配到的数据
- updateBatchById:根据id批量修改
查询
Get:
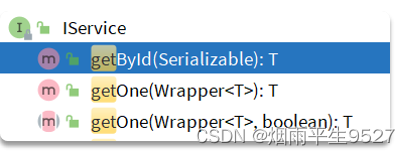
getById:根据id查询1条数据getOne(Wrapper<T>):根据Wrapper查询1条数据getBaseMapper:获取Service内的BaseMapper实现,某些时候需要直接调用Mapper内的自定义SQL时可以用这个方法获取到Mapper
List:

listByIds:根据id批量查询list(Wrapper<T>):根据Wrapper条件查询多条数据list():查询所有
Count:

count():统计所有数量count(Wrapper<T>):统计符合Wrapper条件的数据数量
getBaseMapper:
当我们在service中要调用Mapper中自定义SQL时,就必须获取service对应的Mapper,就可以通过这个方法:
Lambda
@Overridepublic List<User> queryUsers(String name, Integer status, Integer minBalance, Integer maxBalance) {return lambdaQuery().like(name != null, User::getUsername, name).eq(status != null, User::getStatus, status).ge(minBalance != null, User::getBalance, minBalance).le(maxBalance != null, User::getBalance, maxBalance).list();}可以发现lambdaQuery方法中除了可以构建条件,还需要在链式编程的最后添加一个list(),这是在告诉MP我们的调用结果需要是一个list集合。这里不仅可以用list(),可选的方法有:
- .one():最多1个结果
- .list():返回集合结果
- .count():返回计数结果
MybatisPlus会根据链式编程的最后一个方法来判断最终的返回结果。
@Override@Transactionalpublic void deductBalance(Long id, Integer money) {// 1.查询用户User user = getById(id);// 2.校验用户状态if (user == null || user.getStatus() == UserStatus.FROZEN) {throw new RuntimeException("用户状态异常!");}// 3.校验余额是否充足if (user.getBalance() < money) {throw new RuntimeException("用户余额不足!");}// 4.扣减余额 update tb_user set balance = balance - ?int remainBalance = user.getBalance() - money;lambdaUpdate().set(User::getBalance, remainBalance).set(remainBalance == 0, User::getStatus, UserStatus.FROZEN).eq(User::getId, id).eq(User::getBalance, user.getBalance()) // 乐观锁.update();}.批量新增
IService中的批量新增功能使用起来非常方便,但有一点注意事项,我们先来测试一下。
首先我们测试逐条插入数据:
@Test
void testSaveOneByOne() {long b = System.currentTimeMillis();for (int i = 1; i <= 100000; i++) {userService.save(buildUser(i));}long e = System.currentTimeMillis();System.out.println("耗时:" + (e - b));
}private User buildUser(int i) {User user = new User();user.setUsername("user_" + i);user.setPassword("123");user.setPhone("" + (18688190000L + i));user.setBalance(2000);user.setInfo("{\"age\": 24, \"intro\": \"英文老师\", \"gender\": \"female\"}");user.setCreateTime(LocalDateTime.now());user.setUpdateTime(user.getCreateTime());return user;
}
然后再试试MybatisPlus的批处理:'
@Test
void testSaveBatch() {// 准备10万条数据List<User> list = new ArrayList<>(1000);long b = System.currentTimeMillis();for (int i = 1; i <= 100000; i++) {list.add(buildUser(i));// 每1000条批量插入一次if (i % 1000 == 0) {userService.saveBatch(list);list.clear();}}long e = System.currentTimeMillis();System.out.println("耗时:" + (e - b));
}
