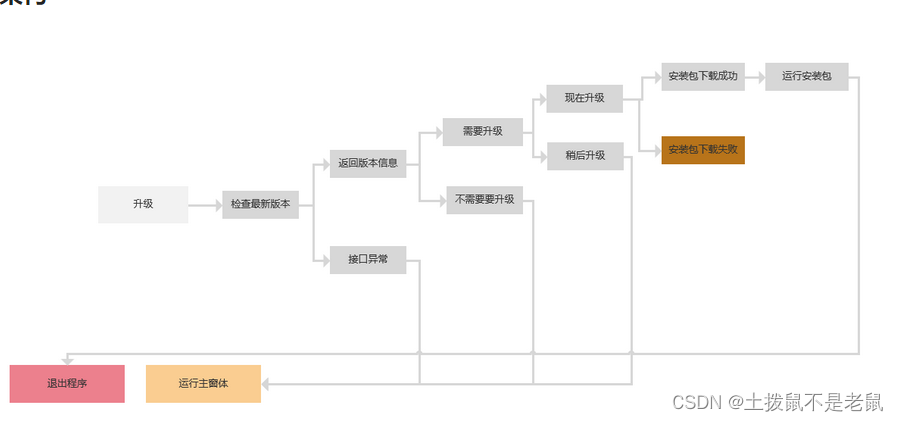
需求:
公司内部的一个客户端工具,想加上一个自动升级功能。
服务端:
1,服务端使用python3.7 ,搭配 fastapi 和uvicorn 写一个简单的服务,开出一个get接口,用于客户端读取安装包的版本,描述,和路径。
2,使用 python 自带的 http.server 启动一个文件服务器,将安装包存入,并将地址写到步骤1的json文件中。
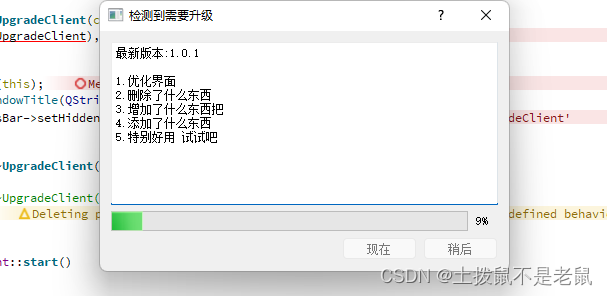
json文件长这个样子,每次客户端都解析这个文件,如果最新的版本大于当前的版本,则从url下载文件,并自动执行文件。
{"ver":"1.0.1","desc":"1.优化界面\n2.删除了什么东西\n3.增加了什么东西把\n4.添加了什么东西\n5.特别好用 试试吧","file":"test_1_0.exe","url":"http://xxx.xxx.xxx:8002/pkg/test/WinSCP.exe"
}
服务很简单, 主要就是提供一个get接口。
from fastapi import FastAPI
import jsonclass MyApp:def __init__(self, title: str = "UpgradeServer", version: str = "1.0.0"):self.app = FastAPI(title=title, version=version)# Additional initialization or configuration can be done heredef configure_routes(self):@self.app.get("/")def root():return {"不为无益之事,何以遣有涯之生!"}@self.app.get("/cur_ver/{item}")def cur_ver(item:str=None):path = "pkg/"+item+"/"+item+".json"with open(path, 'r') as file:# 从文件中加载JSON数据data = json.load(file)print(data['ver'])return datadef run(self, host: str = "0.0.0.0", port: int = 8001):import uvicornuvicorn.run(self.app, host=host, port=port)if __name__ == "__main__":my_app = MyApp()my_app.configure_routes()my_app.run()
客户端:
1,客户端是一个 QDialog,每次启动时 从服务端获取最新的版本号,大于则开始下载安装包,下载完成后,则执行安装包。
2,使用的时候 将客户端放到main函数中,并传入当前的版本号。

//.h 文件
#ifndef UPGRADECLIENT_H
#define UPGRADECLIENT_H#include <QDialog>
#include <QNetworkAccessManager>
#include <QNetworkRequest>
#include <QNetworkReply>
#include <QThread>
#include <QMutex>
#include <QEventLoop>
#include <QFile>namespace Ui {
class UpgradeClient;
}enum class Status{Init,Error,NeedUpgrade,NoUpgradde,Abandon,DownloadFinished,
};class UpgradeClient : public QDialog
{Q_OBJECTpublic:explicit UpgradeClient(const QString& ver,QWidget *parent = nullptr);~UpgradeClient();int start();private slots:void on_laterBtn_clicked();void on_nowBtn_clicked();private:Ui::UpgradeClient *ui;QNetworkAccessManager manager;QNetworkReply *verReply{nullptr};QNetworkReply *downloadReply{nullptr};//当前版本QString curVer;//最新版本 描述 名称 urlQString latestVer;QString pkgDesc;QString pkgName;QString pkgUrl;//判断当前状态Status curStatus{Status::Init};//安装包存储文件QFile pkgFile;//事件循环 用于等待版本检擦QEventLoop eventLoop;private://检查当前版本void checkVer();//下载安装包void downloadPkg(const QString& _name,const QString& _url);//解析json数据void parseJson(const QByteArray &jsonData);//比较版本bool compareVer(int lMajor,int lMinor,int lPath,int cMajor,int cMinor,int cPath);//运行安装包bool runPkg(const QString& filename);protected:void closeEvent(QCloseEvent *event) override;};#endif // UPGRADECLIENT_H//cpp 文件
#include "upgradeclient.h"
#include "ui_upgradeclient.h"
#include <QFile>
#include <QJsonDocument>
#include <QJsonObject>
#include <QJsonArray>
#include <QtConcurrent>
#include <chrono>//检查版本 url
const QString checkVerUrl{"http://xxx.xxx.xxx:8001/cur_ver/test"};UpgradeClient::UpgradeClient(const QString& ver,QWidget *parent) :QDialog (parent),ui(new Ui::UpgradeClient),curVer(ver)
{ui->setupUi(this);this->setWindowTitle(QStringLiteral("检测到需要升级"));ui->progressBar->setHidden(true);
}UpgradeClient::~UpgradeClient()
{qDebug()<<"~UpgradeClient()";delete ui;
}int UpgradeClient::start()
{checkVer();eventLoop.exec();if(curStatus==Status::NeedUpgrade){this->exec();if(curStatus==Status::DownloadFinished){return 0;}}else{this->reject();}return -1;
}void UpgradeClient::on_laterBtn_clicked()
{curStatus = Status::Abandon;this->reject();
}void UpgradeClient::on_nowBtn_clicked()
{if(pkgName.isEmpty())return;downloadPkg(pkgName,pkgUrl);ui->laterBtn->setEnabled(false);ui->nowBtn->setEnabled(false);
}void UpgradeClient::checkVer()
{curStatus = Status::Init;QUrl url;url.setUrl(checkVerUrl);QNetworkRequest request(url);verReply = manager.get(request);QObject::connect(verReply, &QNetworkReply::finished, this,[&]() {if (verReply->error() == QNetworkReply::NoError) {QByteArray responseData = verReply->readAll();qDebug() << "Response:" << responseData;parseJson(responseData);} else {qDebug() << "Error:" << verReply->errorString();curStatus = Status::Error;}eventLoop.quit();});
}void UpgradeClient::downloadPkg(const QString& _name,const QString& _url)
{QUrl url;url.setUrl(_url);QNetworkRequest request(url);QString currentPath = QCoreApplication::applicationDirPath();QString filename = currentPath+"/"+_name;pkgFile.setFileName(filename);if (pkgFile.open(QIODevice::WriteOnly)){downloadReply = manager.get(request);connect(downloadReply, &QNetworkReply::downloadProgress, this, [&](qint64 bytesReceived, qint64 bytesTotal){if(bytesTotal!=0){int progress = static_cast<int>((bytesReceived * 100) / bytesTotal);qDebug()<<"process "<<progress;ui->progressBar->setHidden(false);ui->progressBar->setValue(progress);}});connect(downloadReply,&QNetworkReply::readyRead,this,[&](){pkgFile.write(downloadReply->readAll());});connect(downloadReply, &QNetworkReply::finished, this, [&,filename](){if(curStatus==Status::Abandon)return;if (verReply->error() == QNetworkReply::NoError){pkgFile.flush();pkgFile.close();if(ui->progressBar->value()<98){curStatus = Status::Error;ui->logLabel->setText(QStringLiteral("下载安装包出错!"));}else{if(!this->runPkg(filename)){curStatus = Status::Error;ui->logLabel->setText(QStringLiteral("安装程序执行失败!"));}else{curStatus = Status::DownloadFinished;this->accept();}}}else{curStatus = Status::Error;qDebug() << "Error:" << downloadReply->errorString();ui->logLabel->setText(QStringLiteral("下载出错:")+downloadReply->errorString());}});}else {qDebug() << "Error: Could not open file for writing";curStatus = Status::Error;this->reject();}
}void UpgradeClient::parseJson(const QByteArray &jsonData)
{QJsonDocument jsonDocument = QJsonDocument::fromJson(jsonData);if (!jsonDocument.isNull()) {if (jsonDocument.isObject()) {QJsonObject jsonObject = jsonDocument.object();latestVer = jsonObject["ver"].toString();pkgDesc = jsonObject["desc"].toString();pkgName = jsonObject["file"].toString();pkgUrl = jsonObject["url"].toString();qDebug()<<"curVer:"<<curVer<<" "<<"latestVer:"<<latestVer;QStringList latestV = latestVer.split(".");QStringList curV = curVer.split(".");if(latestV.size()==3&&curV.size()==3){int  lMajorV = latestV.at(0).toUInt();int  lMinorV = latestV.at(1).toUInt();int  lPathV = latestV.at(2).toUInt();int  cMajorV = curV.at(0).toUInt();int  cMinorV = curV.at(1).toUInt();int  cPathV = curV.at(2).toUInt();if(compareVer(lMajorV,lMinorV,lPathV,cMajorV,cMinorV,cPathV)){ui->textEdit->append(QStringLiteral("最新版本:%1\n").arg(latestVer));ui->textEdit->append(pkgDesc);curStatus = Status::NeedUpgrade;}else{curStatus = Status::NoUpgradde;}}else{curStatus = Status::Error;}}else{curStatus = Status::Error;}} else {qDebug() << "Error: Failed to parse JSON data";curStatus = Status::Error;}
}bool UpgradeClient::compareVer(int  lMajor, int  lMinor, int  lPath, int  cMajor, int  cMinor, int  cPath)
{int  localVersion[3]{cMajor,cMinor,cPath};int  latestVersion[3]{lMajor,lMinor,lPath};int k = memcmp(localVersion,latestVersion,sizeof(int)*3);qDebug()<<"compareVer "<<k;if(k==0){return false;}else if(k<0){return true;}else{return false;}
}bool UpgradeClient::runPkg(const QString &filename)
{QStringList arguments;bool success = QProcess::startDetached(filename,arguments);if (success) {qDebug() << "External program started as a detached process.";} else {qDebug() << "Failed to start external program.";}return success;
}void UpgradeClient::closeEvent(QCloseEvent *event)
{qDebug()<<"closeEvent";curStatus = Status::Abandon;if(verReply){verReply->close();verReply->deleteLater();}if(downloadReply){downloadReply->close();downloadReply->deleteLater();}if(pkgFile.isOpen()){pkgFile.close();}QDialog::closeEvent(event);
}//ui文件
<?xml version="1.0" encoding="UTF-8"?>
<ui version="4.0"><class>UpgradeClient</class><widget class="QWidget" name="UpgradeClient"><property name="geometry"><rect><x>0</x><y>0</y><width>409</width><height>240</height></rect></property><property name="windowTitle"><string>Form</string></property><layout class="QGridLayout" name="gridLayout"><item row="0" column="0"><widget class="QTextEdit" name="textEdit"><property name="readOnly"><bool>true</bool></property></widget></item><item row="1" column="0"><widget class="QProgressBar" name="progressBar"><property name="value"><number>0</number></property><property name="textVisible"><bool>true</bool></property><property name="invertedAppearance"><bool>false</bool></property><property name="format"><string>%p%</string></property></widget></item><item row="2" column="0"><layout class="QHBoxLayout" name="horizontalLayout"><item><widget class="QLabel" name="logLabel"><property name="text"><string/></property></widget></item><item><spacer name="horizontalSpacer"><property name="orientation"><enum>Qt::Horizontal</enum></property><property name="sizeHint" stdset="0"><size><width>40</width><height>20</height></size></property></spacer></item><item><widget class="QPushButton" name="nowBtn"><property name="text"><string>现在</string></property></widget></item><item><widget class="QPushButton" name="laterBtn"><property name="text"><string>稍后</string></property></widget></item></layout></item></layout></widget><resources/><connections/>
</ui>
效果:
1,启动检测升级。

2, 点击 【现在】 开始下载 安装包。
docker 部署一下服务端:
1. 下载镜像:docker pull python3.7
2. 启动容器:docker run -it -p 8001:8001 -p 8002:8002 --name upgrade python:3.7 /bin/bash
3. 安装环境:pip3.7 install fastapi &pip3.7 install uvicorn
4. 拷贝文件:docker cp upgrade upgrade:/home
5. 退出容器:Ctrl+P+Q