wpf截屏系列
第一章 使用GDI实现截屏(本章)
第二章 使用GDI+实现截屏
第三章 使用DockPanel制作截屏框
第四章 实现截屏框热键截屏
第五章 实现截屏框实时截屏
第六章 使用ffmpeg命令行实现录屏
文章目录
- wpf截屏系列
- 前言
- 一、导入gdi32
- 方法一、NuGet获取
- (1)、获取gdi32
- (2)、获取user32
- 方法二、Dllimport
- 二、实现步骤
- 1、创建兼容DC
- 2、创建位图
- 3、获取位图信息
- 4、BitBlt
- 5、获取数据
- 6、销毁资源
- 三、封装成对象
- 四、完整代码
- 五、使用示例
- 1、快照
- (1)比例值区域截取
- (2)实际值区域截取
- (3)WPF中使用
- 2、采集
- (1)、异步
- (2)、同步
- (3)、WPF中使用(异步)
- 总结
- 附录
前言
wpf截屏时通常可以采用gdi+,调用起来比较方便。使用gdi也能实现截屏,截屏数据也能转成BitmapSource对象,当然调用流程会复杂一些,而且需要引入win32方法,唯一比较容易的就是可以直接绘制异或鼠标。
一、导入gdi32
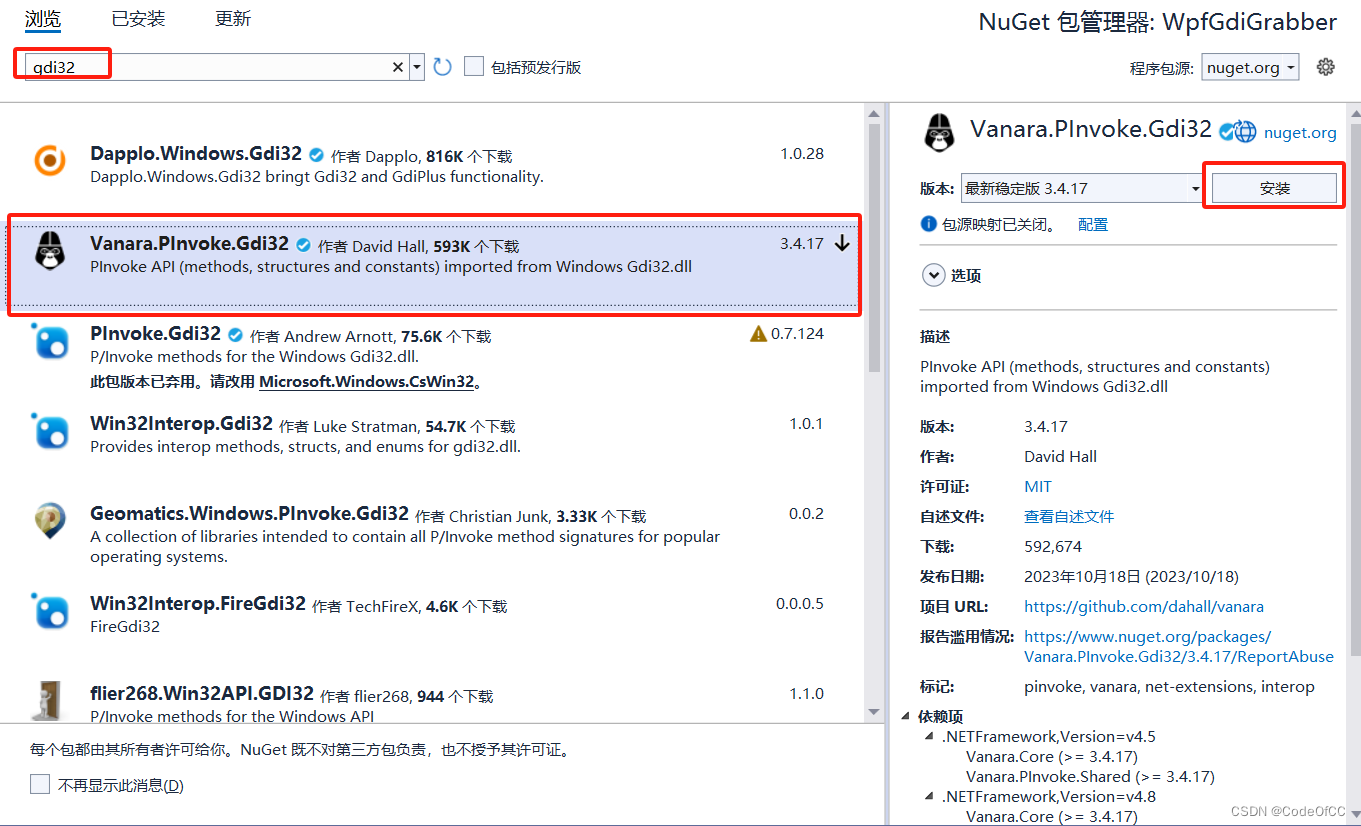
方法一、NuGet获取
这种方法好处是简单方便,缺点是增加了依赖dll,生成的程序容量大一些且附带一些dll。
(1)、获取gdi32
(2)、获取user32

方法二、Dllimport
使用DllImport将需要的win32 api导入。这样做工作量比较大,但是好处是无依赖,生成程序很小。
示例如下:
[DllImport(User32, SetLastError = false, ExactSpelling = true)]
public static extern IntPtr GetDC([In, Optional] IntPtr ptr);
完整的gdi需要导入的所有接口见附录。
二、实现步骤
1、创建兼容DC
IntPtr srcHdc = IntPtr.Zero;
IntPtr dstHdc = IntPtr.Zero;
srcHdc = GetDC(hWnd);
dstHdc = CreateCompatibleDC(srcHdc);
2、创建位图
BITMAPINFO bmi = new BITMAPINFO();
IntPtr hBitmap = IntPtr.Zero;
IntPtr oldBitmap = IntPtr.Zero;
bmi.bmiHeader.biSize = (uint)Marshal.SizeOf<BITMAPINFOHEADER>();
bmi.bmiHeader.biWidth = capWidth;
bmi.bmiHeader.biHeight = -capHeight;
bmi.bmiHeader.biPlanes = 1;
bmi.bmiHeader.biBitCount = 24;
bmi.bmiHeader.biCompression = BitmapCompressionMode.BI_RGB;
bmi.bmiHeader.biSizeImage = 0;
bmi.bmiHeader.biXPelsPerMeter = 0;
bmi.bmiHeader.biYPelsPerMeter = 0;
bmi.bmiHeader.biClrUsed = 0;
bmi.bmiHeader.biClrImportant = 0;
hBitmap = CreateDIBSection(dstHdc, in bmi, DIBColorMode.DIB_RGB_COLORS, out pvBits, IntPtr.Zero, 0);
oldBitmap = SelectObject(dstHdc, hBitmap);
3、获取位图信息
需要获取位图的行对齐stride
BITMAP bitmap;
temp = Marshal.AllocHGlobal(Marshal.SizeOf<BITMAP>());
if (GetObject(hBitmap, Marshal.SizeOf<BITMAP>(), temp) == 0)
{throw new Exception("GetObject Failed");
}
bitmap = Marshal.PtrToStructure<BITMAP>(temp);
4、BitBlt
BitBlt(dstHdc, capX, capY, capWidth, capHeight, srcHdc, capX, capY, RasterOperationMode.SRCCOPY | RasterOperationMode.CAPTUREBLT)
5、获取数据
//行对齐
int stride=bitmap.bmWidthBytes;
//宽
int width=bitmap.bmWidth;
//高
int height=bitmap.bmHeight;
//位图数据
IntPtr pBuffer=bitmap.bmBits;
BITMAP转成WriteableBitmap(BitmapSource)
public static WriteableBitmap ToWriteableBitmap(this BITMAP bitmap)
{var wb = new WriteableBitmap(bitmap.bmWidth, bitmap.bmHeight, 0, 0, bitmap.bmBitsPixel == 32 ? PixelFormats.Bgra32 : PixelFormats.Bgr24, null);wb.WritePixels(new Int32Rect(0, 0, bitmap.bmWidth, bitmap.bmHeight), bitmap.bmBits, bitmap.bmHeight * bitmap.bmWidthBytes, bitmap.bmWidthBytes, 0, 0);return wb;
}
6、销毁资源
if (dstHdc != IntPtr.Zero)
{if (oldBitmap != IntPtr.Zero){var ret = SelectObject(dstHdc, oldBitmap);if (ret == IntPtr.Zero){errors += "SelectObject Failed";}}if (!DeleteDC(dstHdc)){errors += "DeleteDC Failed";}
}
if (srcHdc != IntPtr.Zero)
{if (!ReleaseDC(hWnd, srcHdc)){errors += "ReleaseDC Failed";}
}
if (!DeleteObject(hBitmap))
{errors += "DeleteObject Failed";
}
if (temp != IntPtr.Zero) Marshal.FreeHGlobal(temp);
三、封装成对象
/************************************************************************
* @Project:  	GdiGrabber
* @Decription:  gdi图片采集
* 可以根据提供的句柄采集图片或者获取快照。提供了采集区域提供了实际值和比例值
* 两种接口。采集提供了同步和异步两种方式,在主线程或者UI线程建议用异步,在非
* UI线程建议用同步。
* @Verision:  	v1.0.0
* @Author:  	Xin Nie
* @Create:  	2024/03/13 23:57:00
* @LastUpdate:  2024/03/13 23:57:00
************************************************************************
* Copyright @ 2024. All rights reserved.
************************************************************************/
public static class GdiGrabber
{/// <summary>/// 快照/// </summary>/// <param name="x"></param>/// <param name="y"></param>/// <param name="width"></param>/// <param name="height"></param>/// <param name="hwnd"></param>/// <returns></returns>public static WriteableBitmap? Snapshot(int x, int y, int width, int height, nint hWnd = 0, bool isPaintMouse = true);/// <summary>/// 快照/// 按比例,在任意分辨率,比如0,0,1,1就是全屏。/// </summary>/// <param name="x">比例,0-1</param>/// <param name="y">比例,0-1</param>/// <param name="width">比例,0-1</param>/// <param name="height">比例,0-1</param>/// <param name="hwnd"></param>/// <returns></returns>public static WriteableBitmap? Snapshot(double x, double y, double width, double height, nint hWnd = 0, bool isPaintMouse = true);/// <summary>/// 采集,异步/// 按比例,在任意分辨率,比如0,0,1,1就是全屏。/// 用法 await foreach(var i in GdiGrabber.Capture){}/// 注意,在UI线程可以直接使用。/// 在非UI线程需要确保Dispatcher的运行,比如在线程最后调用Dispatcher.Run()、或 Dispatcher.PushFrame。/// </summary>/// <param name="x">比例,0-1</param>/// <param name="y">比例,0-1</param>/// <param name="width">比例,0-1</param>/// <param name="height">比例,0-1</param>/// <param name="hWnd">句柄,为0则采集桌面</param>/// <param name="isPaintMouse">是否绘制鼠标</param>/// <returns>采集的数据对象</returns>public static IAsyncEnumerable<BITMAP> Capture(double x, double y, double width, double height, nint hWnd = 0, bool isPaintMouse = true);/// <summary>/// 采集,异步/// 用法 await foreach(var i in GdiGrabber.Capture){}/// 注意,在UI线程可以直接使用。/// 在非UI线程需要确保Dispatcher的运行,比如在线程最后调用Dispatcher.Run()、或 Dispatcher.PushFrame。/// </summary>/// <param name="x"></param>/// <param name="y"></param>/// <param name="width"></param>/// <param name="height"></param>/// <param name="hWnd">句柄,为0则采集桌面</param>/// <param name="isPaintMouse">是否绘制鼠标</param>/// <returns>采集的数据对象</returns>/// <exception cref="Exception"></exception>public static async IAsyncEnumerable<BITMAP> Capture(int x, int y, int width, int height, nint hWnd = 0, bool isPaintMouse = true);public static /*IEnumerable<BITMAP>*/void CaptureSync(double x, double y, double width, double height, Func<BITMAP, bool> onGrab, nint hWnd = 0, bool isPaintMouse = true);/// <summary>/// 采集,同步/// </summary>/// <param name="x"></param>/// <param name="y"></param>/// <param name="width"></param>/// <param name="height"></param>/// <param name="hWnd">句柄,为0则采集桌面</param>/// <param name="isPaintMouse">是否绘制鼠标</param>/// <param name="onGrab">采集回调,返回是否继续采集。之所以采用回调是因为,更好的设计应该是使用yeild return,但是会出现内存异常读写问题,暂时无法解决。/// </param>/// <returns>采集的数据对象</returns>/// <exception cref="Exception"></exception>public static /*IEnumerable<BITMAP>*/void CaptureSync(int x, int y, int width, int height, Func<BITMAP, bool> onGrab, nint hWnd = 0, bool isPaintMouse = false);/// <summary>/// 将BITMAP转换成WriteableBitmap/// 作者的设备测试此操作1080p耗时8ms/// </summary>/// <param name="bitmap">this</param>/// <returns>WriteableBitmap</returns>public static WriteableBitmap ToWirteableBitmap(this BITMAP bitmap);/// <summary>/// 将BITMAP数据拷贝到riteableBitmap/// 作者的设备测试此操作1080p耗时2ms/// </summary>/// <param name="bitmap">this</param>/// <param name="wb">WriteableBitmap</param>public static void CopyToWriteableBitmap(this BITMAP bitmap, WriteableBitmap wb);
}
四、完整代码
vs2022 .net6.0 wpf项目,采用DllImport的方式无任何依赖。
之后上传
五、使用示例
1、快照
(1)比例值区域截取
截取全屏(任意分辨率)
WriteableBitmap? wb= GdiGrabber.Snapshot(0,0,1.0,1.0);
(2)实际值区域截取
WriteableBitmap? wb= GdiGrabber.Snapshot(0,0,600,600);
(3)WPF中使用
WpfGdiGrabber.xaml
<Window x:Class="WpfGdiGrabber.MainWindow"xmlns="http://schemas.microsoft.com/winfx/2006/xaml/presentation"xmlns:x="http://schemas.microsoft.com/winfx/2006/xaml"xmlns:d="http://schemas.microsoft.com/expression/blend/2008"xmlns:mc="http://schemas.openxmlformats.org/markup-compatibility/2006"xmlns:local="clr-namespace:WpfGdiGrabber"mc:Ignorable="d"Title="MainWindow" Height="450" Width="800"><Grid  ><Image x:Name="img"></Image></Grid>
</Window>
WpfGdiGrabber.cs
using AC;
using System.Windows;
using System.Windows.Media.Imaging;
namespace WpfGdiGrabber
{/// <summary>/// Interaction logic for MainWindow.xaml/// </summary>public partial class MainWindow : Window{public MainWindow(){InitializeComponent();WriteableBitmap? wb = GdiGrabber.Snapshot(0, 0, 1.0, 1.0);}}
}
效果预览

2、采集
(1)、异步
UI线程使用
await foreach (var i in GdiGrabber.Capture(0, 0, 1.0, 1.0, 0))
{   //img为Image控件if (img.Source == null)img.Source = i.ToWriteableBitmap();elsei.CopyToWriteableBitmapp(img.Source as WriteableBitmap);
}
非UI线程使用,需要启动一个Dispatcher用于调度消息以及阻塞线程避免结束。
new Thread(async () =>{bool isExit = false;var frame = new DispatcherFrame();var func = async () =>{//循环采集await foreach (var i in GdiGrabber.Capture(0, 0, 1.0, 1.0, 0)){//Dispatcher将操作切换到UI线程执行Dispatcher.Invoke(() =>{//WriteableBitmap是和线程绑定的,需要在UI线程创建此对象。WriteableBitmap? wb = i.ToWriteableBitmap();});//退出采集if (isExit) break;}//退出消息循环frame.Continue = false;};func();//启动Dispatcher消息循环,此行阻塞Dispatcher.PushFrame(frame);})
{ IsBackground = true }.Start();
(2)、同步
同步的方式会阻塞,建议在非UI线程中使用。但要注意WriteableBitmap 需要在UI线程中创建才能被控件使用。
GdiGrabber.CaptureSync(0, 0, 1.0, 1.0,  (bitmap) =>
{//获取到WriteableBitmap对象WriteableBitmap wb = bitmap.ToWriteableBitmap();//返回true为继续截屏,false为停止。return true;
});
(3)、WPF中使用(异步)
WpfGdiGrabber.xaml
<Window x:Class="WpfGdiGrabber.MainWindow"xmlns="http://schemas.microsoft.com/winfx/2006/xaml/presentation"xmlns:x="http://schemas.microsoft.com/winfx/2006/xaml"xmlns:d="http://schemas.microsoft.com/expression/blend/2008"xmlns:mc="http://schemas.openxmlformats.org/markup-compatibility/2006"xmlns:local="clr-namespace:WpfGdiGrabber"mc:Ignorable="d"Title="MainWindow" Height="450" Width="800"><Grid  ><Image x:Name="img"></Image></Grid>
</Window>
WpfGdiGrabber.cs
using AC;
using System.Windows;
using System.Windows.Media.Imaging;
namespace WpfGdiGrabber
{/// <summary>/// Interaction logic for MainWindow.xaml/// </summary>public partial class MainWindow : Window{public MainWindow(){InitializeComponent();Capture();}async void Capture(){await foreach (var i in GdiGrabber.Capture(0, 0, 1.0, 1.0, 0)){if (img.Source == null)img.Source = i.ToWriteableBitmap();elsei.CopyToWriteableBitmap(img.Source as WriteableBitmap);}}}
}
效果预览
总结
以上就是今天要讲的内容,本文实现了的GDI截屏与GDI+对比性能略差一些,但也是可以一定程度满足使用,比如用来截屏或者制作放大镜。而且有一个好处是可以做到无额外依赖。总的来说,可以作为一种备选方案或者测试方案。
附录
DllImport
[StructLayout(LayoutKind.Sequential)]public struct BITMAP{public int bmType;public int bmWidth;public int bmHeight;public int bmWidthBytes;public ushort bmPlanes;public ushort bmBitsPixel;public IntPtr bmBits;}class WinApiImport{const string Gdi32 = "gdi32.dll";const string User32 = "user32.dll";[StructLayout(LayoutKind.Sequential), Serializable]public struct POINT{public int X;public int Y;}[StructLayout(LayoutKind.Sequential), Serializable]public struct RECT{public int left;public int top;public int right;public int bottom;}[StructLayout(LayoutKind.Sequential, Size = 4)]public struct RGBQUAD{public byte rgbBlue;public byte rgbGreen;public byte rgbRed;public byte rgbReserved;}[StructLayout(LayoutKind.Sequential)]public struct BITMAPINFO{public BITMAPINFOHEADER bmiHeader;[MarshalAs(UnmanagedType.ByValArray, SizeConst = 1)]public RGBQUAD[] bmiColors;}public enum BitmapCompressionMode : uint{BI_RGB = 0,BI_RLE8 = 1,BI_RLE4 = 2,BI_BITFIELDS = 3,BI_JPEG = 4,BI_PNG = 5}[StructLayout(LayoutKind.Sequential, Pack = 2)]public struct BITMAPINFOHEADER{public uint biSize;public int biWidth;public int biHeight;public ushort biPlanes;public ushort biBitCount;public BitmapCompressionMode biCompression;public uint biSizeImage;public int biXPelsPerMeter;public int biYPelsPerMeter;public uint biClrUsed;public uint biClrImportant;}public enum DIBColorMode : int{DIB_RGB_COLORS = 0,DIB_PAL_COLORS = 1}public enum CursorState{CURSOR_HIDDEN = 0,CURSOR_SHOWING = 0x00000001,CURSOR_SUPPRESSED = 0x00000002,}[StructLayout(LayoutKind.Sequential, CharSet = CharSet.Auto)]public struct CURSORINFO{public uint cbSize;public CursorState flags;public IntPtr hCursor;public POINT ptScreenPos;}[StructLayout(LayoutKind.Sequential)]public sealed class ICONINFO{public bool fIcon;public int xHotspot;public int yHotspot;public IntPtr hbmMask;public IntPtr hbmColor;}public enum RasterOperationMode{SRCCOPY = 0x00CC0020,SRCPAINT = 0x00EE0086,SRCAND = 0x008800C6,SRCINVERT = 0x00660046,SRCERASE = 0x00440328,NOTSRCCOPY = 0x00330008,NOTSRCERASE = 0x001100A6,MERGECOPY = 0x00C000CA,MERGEPAINT = 0x00BB0226,PATCOPY = 0x00F00021,PATPAINT = 0x00FB0A09,PATINVERT = 0x005A0049,DSTINVERT = 0x00550009,BLACKNESS = 0x00000042,WHITENESS = 0x00FF0062,NOMIRRORBITMAP = -2147483648,CAPTUREBLT = 0x40000000}[DllImport(User32, CharSet = CharSet.Auto, ExactSpelling = true, SetLastError = true)][return: MarshalAs(UnmanagedType.Bool)][System.Security.SecurityCritical]public static extern bool GetClientRect(IntPtr hWnd, out RECT lpRect);[DllImport(User32, SetLastError = false, ExactSpelling = true)]public static extern IntPtr GetDesktopWindow();[DllImport(User32, SetLastError = false, ExactSpelling = true)][return: MarshalAs(UnmanagedType.Bool)]public static extern bool ClientToScreen(IntPtr hWnd, ref POINT lpPoint);[DllImport(User32, SetLastError = false, ExactSpelling = true)]public static extern IntPtr GetDC([In, Optional] IntPtr ptr);[DllImport(Gdi32, ExactSpelling = true, SetLastError = true)]public static extern IntPtr CreateCompatibleDC([Optional] IntPtr hDC);[DllImport(Gdi32, SetLastError = false, ExactSpelling = true)]public static extern IntPtr CreateDIBSection([In, Optional] IntPtr hdc, in BITMAPINFO pbmi, DIBColorMode usage, out IntPtr ppvBits, [In, Optional] IntPtr hSection, [In, Optional] uint offset);[DllImport(Gdi32, SetLastError = false, CharSet = CharSet.Auto)]public static extern int GetObject(IntPtr hgdiobj, int cbBuffer, IntPtr lpvObject);[DllImport(Gdi32, ExactSpelling = true, SetLastError = true)]public static extern IntPtr SelectObject(IntPtr hDC, IntPtr hObject);[DllImport(Gdi32, ExactSpelling = true, SetLastError = true)][return: MarshalAs(UnmanagedType.Bool)]public static extern bool BitBlt(IntPtr hdc, int nXDest, int nYDest, int nWidth, int nHeight, IntPtr hdcSrc, int nXSrc, int nYSrc, RasterOperationMode dwRop);[DllImport(Gdi32, ExactSpelling = true, SetLastError = true)][return: MarshalAs(UnmanagedType.Bool)][System.Security.SecurityCritical]public static extern bool DeleteDC(IntPtr hdc);[DllImport(User32, SetLastError = false, ExactSpelling = true)][return: MarshalAs(UnmanagedType.Bool)]public static extern bool ReleaseDC(IntPtr hWnd, IntPtr hDC);[DllImport(Gdi32, ExactSpelling = true, SetLastError = true)][return: MarshalAs(UnmanagedType.Bool)]public static extern bool DeleteObject(IntPtr hObject);[DllImport(User32, SetLastError = true, ExactSpelling = true)][return: MarshalAs(UnmanagedType.Bool)]public static extern bool GetCursorInfo(ref CURSORINFO pci);[DllImport(User32, SetLastError = true, ExactSpelling = true)]public static extern IntPtr CopyIcon(IntPtr hIcon);[DllImport(User32, SetLastError = true, ExactSpelling = true)][return: MarshalAs(UnmanagedType.Bool)]public static extern bool GetIconInfo(IntPtr hIcon, [In, Out] ICONINFO piconinfo);[DllImport(User32, SetLastError = true, ExactSpelling = true)][return: MarshalAs(UnmanagedType.Bool)]public static extern bool DrawIcon(IntPtr hDC, int X, int Y, IntPtr hIcon);[DllImport(User32, SetLastError = true, ExactSpelling = true)][return: MarshalAs(UnmanagedType.Bool)]public static extern bool DestroyCursor(IntPtr hCursor);[DllImport(User32, SetLastError = true, CharSet = CharSet.Auto)]public static extern IntPtr LoadCursor(IntPtr hInstance, string lpCursorName);}