简介
- 用来快速构建、运行、管理应用的工具
- 简单说,帮助我们部署项目以及项目所依赖的各种组件
- 典型的运维工具
安装
1.卸载旧版
首先如果系统中已经存在旧的Docker,则先卸载:
yum remove docker \docker-client \docker-client-latest \docker-common \docker-latest \docker-latest-logrotate \docker-logrotate \docker-engine
下面的显示说明没有安装过Docker
已加载插件:fastestmirror, langpacks
参数 docker 没有匹配
参数 docker-client 没有匹配
参数 docker-client-latest 没有匹配
参数 docker-common 没有匹配
参数 docker-latest 没有匹配
参数 docker-latest-logrotate 没有匹配
参数 docker-logrotate 没有匹配
参数 docker-engine 没有匹配
不删除任何软件包
2.配置Docker的yum库
首先要安装一个yum工具(软件包管理器,相当于手机中的应用商店)
yum install -y yum-utils
执行结果
已加载插件:fastestmirror, langpacks
Loading mirror speeds from cached hostfile* base: mirrors.ustc.edu.cn* extras: mirrors.ustc.edu.cn* updates: mirrors.ustc.edu.cn
软件包 yum-utils-1.1.31-54.el7_8.noarch 已安装并且是最新版本
无须任何处理
安装成功后,执行命令,配置Docker的yum源:
yum-config-manager --add-repo https://download.docker.com/linux/centos/docker-ce.repo
执行结果
已加载插件:fastestmirror, langpacks
adding repo from: https://download.docker.com/linux/centos/docker-ce.repo
grabbing file https://download.docker.com/linux/centos/docker-ce.repo to /etc/yum.repos.d/docker-ce.repo
repo saved to /etc/yum.repos.d/docker-ce.repo
3.安装Docker
最后,执行命令,安装Docker
yum install -y docker-ce docker-ce-cli containerd.io docker-buildx-plugin docker-compose-plugin
执行结果
已加载插件:fastestmirror, langpacks
Loading mirror speeds from cached hostfile* base: mirrors.ustc.edu.cn* extras: mirrors.ustc.edu.cn* updates: mirrors.ustc.edu.cn
正在解决依赖关系
--> 正在检查事务
---> 软件包 containerd.io.x86_64.0.1.6.28-3.1.el7 将被 安装
--> 正在处理依赖关系 container-selinux >= 2:2.74,它被软件包 containerd.io-1.6.28-3.1.el7.x86_64 需要
---> 软件包 docker-buildx-plugin.x86_64.0.0.13.0-1.el7 将被 安装
---> 软件包 docker-ce.x86_64.3.25.0.4-1.el7 将被 安装
--> 正在处理依赖关系 docker-ce-rootless-extras,它被软件包 3:docker-ce-25.0.4-1.el7.x86_64 需要
---> 软件包 docker-ce-cli.x86_64.1.25.0.4-1.el7 将被 安装
---> 软件包 docker-compose-plugin.x86_64.0.2.24.7-1.el7 将被 安装
--> 正在检查事务
---> 软件包 container-selinux.noarch.2.2.119.2-1.911c772.el7_8 将被 安装
---> 软件包 docker-ce-rootless-extras.x86_64.0.25.0.4-1.el7 将被 安装
--> 正在处理依赖关系 fuse-overlayfs >= 0.7,它被软件包 docker-ce-rootless-extras-25.0.4-1.el7.x86_64 需要
--> 正在处理依赖关系 slirp4netns >= 0.4,它被软件包 docker-ce-rootless-extras-25.0.4-1.el7.x86_64 需要
--> 正在检查事务
---> 软件包 fuse-overlayfs.x86_64.0.0.7.2-6.el7_8 将被 安装
--> 正在处理依赖关系 libfuse3.so.3(FUSE_3.2)(64bit),它被软件包 fuse-overlayfs-0.7.2-6.el7_8.x86_64 需要
--> 正在处理依赖关系 libfuse3.so.3(FUSE_3.0)(64bit),它被软件包 fuse-overlayfs-0.7.2-6.el7_8.x86_64 需要
--> 正在处理依赖关系 libfuse3.so.3()(64bit),它被软件包 fuse-overlayfs-0.7.2-6.el7_8.x86_64 需要
---> 软件包 slirp4netns.x86_64.0.0.4.3-4.el7_8 将被 安装
--> 正在检查事务
---> 软件包 fuse3-libs.x86_64.0.3.6.1-4.el7 将被 安装
--> 解决依赖关系完成依赖关系解决===============================================================================Package               架构   版本                      源                大小
===============================================================================
正在安装:containerd.io         x86_64 1.6.28-3.1.el7            docker-ce-stable  35 Mdocker-buildx-plugin  x86_64 0.13.0-1.el7              docker-ce-stable  14 Mdocker-ce             x86_64 3:25.0.4-1.el7            docker-ce-stable  26 Mdocker-ce-cli         x86_64 1:25.0.4-1.el7            docker-ce-stable  14 Mdocker-compose-plugin x86_64 2.24.7-1.el7              docker-ce-stable  13 M
为依赖而安装:container-selinux     noarch 2:2.119.2-1.911c772.el7_8 extras            40 kdocker-ce-rootless-extrasx86_64 25.0.4-1.el7              docker-ce-stable 9.4 Mfuse-overlayfs        x86_64 0.7.2-6.el7_8             extras            54 kfuse3-libs            x86_64 3.6.1-4.el7               extras            82 kslirp4netns           x86_64 0.4.3-4.el7_8             extras            81 k事务概要
===============================================================================
安装  5 软件包 (+5 依赖软件包)总下载量:111 M
安装大小:392 M
Downloading packages:
警告:/var/cache/yum/x86_64/7/extras/packages/container-selinux-2.119.2-1.911c772.el7_8.noarch.rpm: 头V3 RSA/SHA256 Signature, 密钥 ID f4a80eb5: NOKEY
container-selinux-2.119.2-1.911c772.el7_8.noarch.rpm 的公钥尚未安装
(1/10): container-selinux-2.119.2-1.911c772.el7_8.noarch. |  40 kB   00:00
警告:/var/cache/yum/x86_64/7/docker-ce-stable/packages/containerd.io-1.6.28-3.1.el7.x86_64.rpm: 头V4 RSA/SHA512 Signature, 密钥 ID 621e9f35: NOKEY
containerd.io-1.6.28-3.1.el7.x86_64.rpm 的公钥尚未安装
(2/10): containerd.io-1.6.28-3.1.el7.x86_64.rpm           |  35 MB   00:16
(3/10): docker-buildx-plugin-0.13.0-1.el7.x86_64.rpm      |  14 MB   00:19
(4/10): docker-ce-25.0.4-1.el7.x86_64.rpm                 |  26 MB   00:08
(5/10): docker-ce-rootless-extras-25.0.4-1.el7.x86_64.rpm | 9.4 MB   00:02
(6/10): fuse-overlayfs-0.7.2-6.el7_8.x86_64.rpm           |  54 kB   00:00
(7/10): slirp4netns-0.4.3-4.el7_8.x86_64.rpm              |  81 kB   00:00
(8/10): fuse3-libs-3.6.1-4.el7.x86_64.rpm                 |  82 kB   00:00
(9/10): docker-compose-plugin-2.24.7-1.el7.x86_64.rpm     |  13 MB   00:02
(10/10): docker-ce-cli-25.0.4-1.el7.x86_64.rpm            |  14 MB   00:12
-------------------------------------------------------------------------------
总计                                              3.5 MB/s | 111 MB  00:32
从 https://download.docker.com/linux/centos/gpg 检索密钥
导入 GPG key 0x621E9F35:用户ID     : "Docker Release (CE rpm) <docker@docker.com>"指纹       : 060a 61c5 1b55 8a7f 742b 77aa c52f eb6b 621e 9f35来自       : https://download.docker.com/linux/centos/gpg
从 file:///etc/pki/rpm-gpg/RPM-GPG-KEY-CentOS-7 检索密钥
导入 GPG key 0xF4A80EB5:用户ID     : "CentOS-7 Key (CentOS 7 Official Signing Key) <security@centos.org>"指纹       : 6341 ab27 53d7 8a78 a7c2 7bb1 24c6 a8a7 f4a8 0eb5软件包     : centos-release-7-9.2009.1.el7.centos.x86_64 (@anaconda)来自       : /etc/pki/rpm-gpg/RPM-GPG-KEY-CentOS-7
Running transaction check
Running transaction test
Transaction test succeeded
Running transaction正在安装    : 2:container-selinux-2.119.2-1.911c772.el7_8.noarch        1/10正在安装    : containerd.io-1.6.28-3.1.el7.x86_64                       2/10正在安装    : slirp4netns-0.4.3-4.el7_8.x86_64                          3/10正在安装    : docker-buildx-plugin-0.13.0-1.el7.x86_64                  4/10正在安装    : fuse3-libs-3.6.1-4.el7.x86_64                             5/10正在安装    : fuse-overlayfs-0.7.2-6.el7_8.x86_64                       6/10正在安装    : docker-compose-plugin-2.24.7-1.el7.x86_64                 7/10正在安装    : 1:docker-ce-cli-25.0.4-1.el7.x86_64                       8/10正在安装    : docker-ce-rootless-extras-25.0.4-1.el7.x86_64             9/10正在安装    : 3:docker-ce-25.0.4-1.el7.x86_64                          10/10验证中      : docker-compose-plugin-2.24.7-1.el7.x86_64                 1/10验证中      : fuse3-libs-3.6.1-4.el7.x86_64                             2/10验证中      : containerd.io-1.6.28-3.1.el7.x86_64                       3/10验证中      : fuse-overlayfs-0.7.2-6.el7_8.x86_64                       4/10验证中      : docker-buildx-plugin-0.13.0-1.el7.x86_64                  5/10验证中      : slirp4netns-0.4.3-4.el7_8.x86_64                          6/10验证中      : 2:container-selinux-2.119.2-1.911c772.el7_8.noarch        7/10验证中      : 1:docker-ce-cli-25.0.4-1.el7.x86_64                       8/10验证中      : 3:docker-ce-25.0.4-1.el7.x86_64                           9/10验证中      : docker-ce-rootless-extras-25.0.4-1.el7.x86_64            10/10已安装:containerd.io.x86_64 0:1.6.28-3.1.el7docker-buildx-plugin.x86_64 0:0.13.0-1.el7docker-ce.x86_64 3:25.0.4-1.el7docker-ce-cli.x86_64 1:25.0.4-1.el7docker-compose-plugin.x86_64 0:2.24.7-1.el7作为依赖被安装:container-selinux.noarch 2:2.119.2-1.911c772.el7_8docker-ce-rootless-extras.x86_64 0:25.0.4-1.el7fuse-overlayfs.x86_64 0:0.7.2-6.el7_8fuse3-libs.x86_64 0:3.6.1-4.el7slirp4netns.x86_64 0:0.4.3-4.el7_8完毕!
验证安装是否成功
docker -v
Docker version 25.0.4, build 1a576c5docker images
# 无法连接到docker的守护进程,说明docker没有启动
Cannot connect to the Docker daemon at unix:///var/run/docker.sock. Is the docker daemon running?
docker -v: 查看docker安装版本
docker images: 可以列出本地主机上已有镜像的基本信息
4.启动和校验
# 启动Docker
systemctl start docker# 停止Docker
systemctl stop docker# 重启
systemctl restart docker# 设置开机自启
systemctl enable docker# 执行docker ps命令,如果不报错,说明安装启动成功
docker ps
5.配置镜像加速
部署应用速度快,这里以阿里云镜像加速为例。
5.1.注册阿里云账号
首先访问阿里云网站:
https://www.aliyun.com/
注册一个账号。
5.2.开通镜像服务
在首页的产品中,找到阿里云的容器镜像服务:
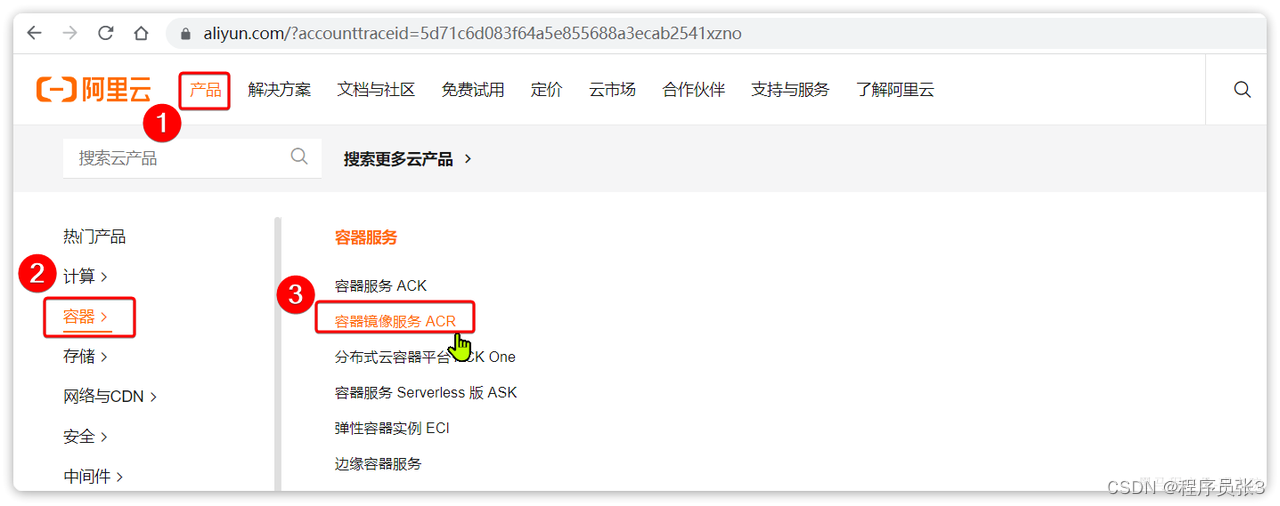
点击后进入控制台:
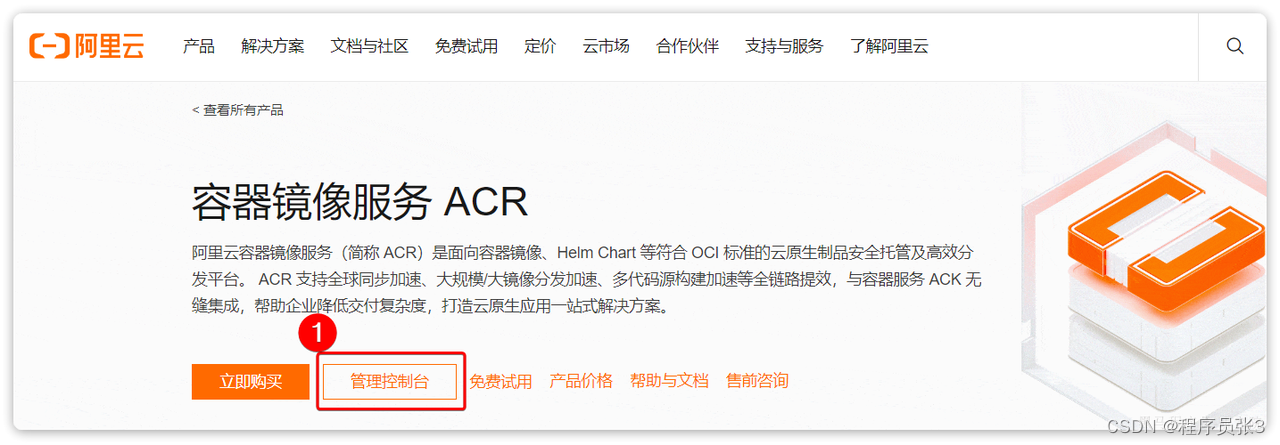
首次可能需要选择立刻开通,然后进入控制台。
5.3.配置镜像加速
找到镜像工具下的镜像加速器:
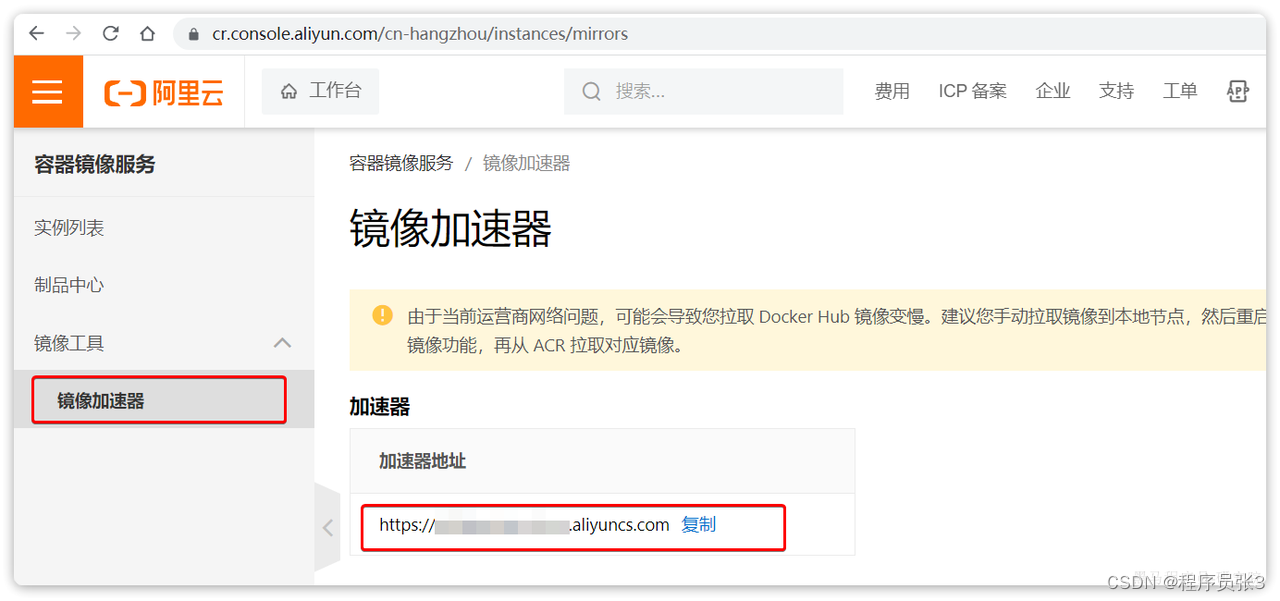
页面向下滚动,即可找到配置的文档说明:
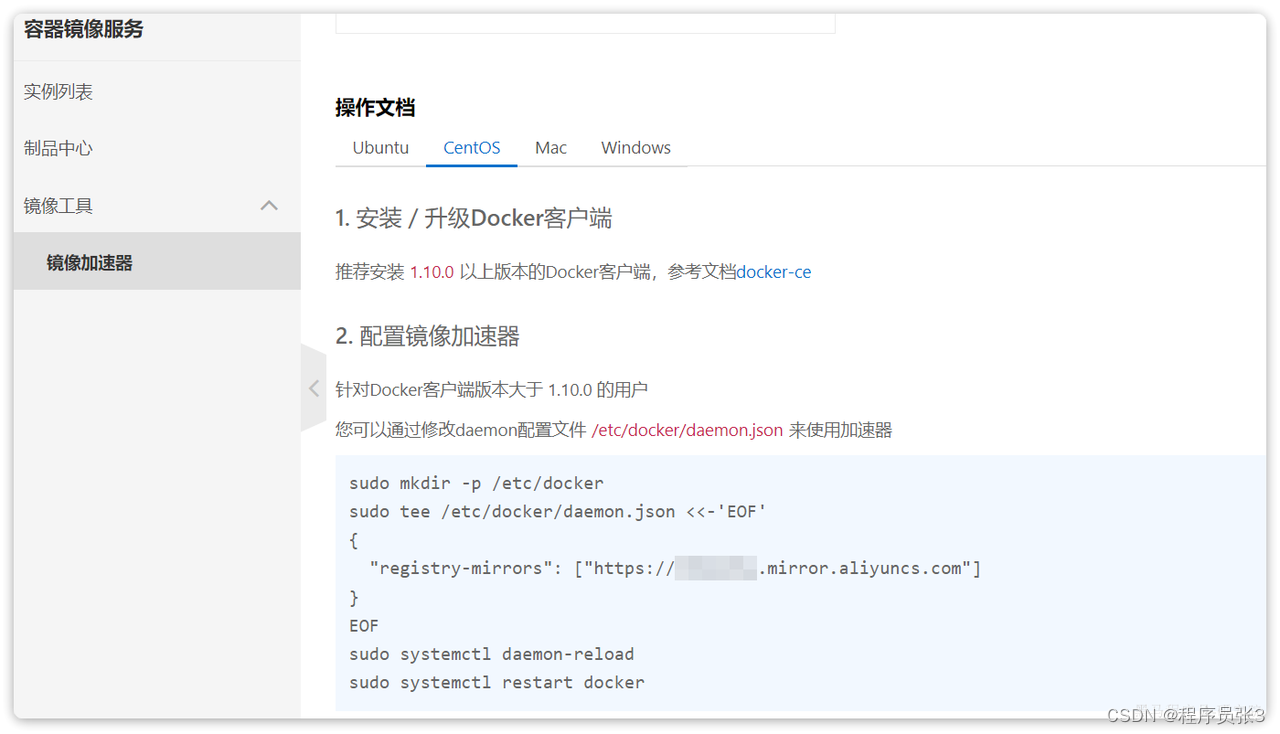
具体命令如下:
# 创建目录
mkdir -p /etc/docker# 复制内容,注意把其中的镜像加速地址改成你自己的
tee /etc/docker/daemon.json <<-'EOF'
{"registry-mirrors": ["https://xxxx.mirror.aliyuncs.com"]
}
EOF# 重新加载配置
systemctl daemon-reload# 重启Docker
systemctl restart docker




![C++初阶 | [九] list 及 其模拟实现](https://img-blog.csdnimg.cn/direct/8c3a103837d44647bb678924151f8e5e.png)

