学习来源
布局
wpf布局原则
一个窗口中只能包含一个元素
不应显示设置元素尺寸
不应使用坐标设置元素的位置
可以嵌套布局容器
StackPanel-->表单条件查找布局
DataGrid
wpf布局容器
StackPanel: 水平或垂直排列元素,Orientation属性分别: Horizontal / Vertical
WrapPanel : 水平或垂直排列元素、针对剩余空间不足会进行换行或换列进行排列
DockPanel : 根据容器的边界、元素进行Dock.Top、Left、Right、Bottom设置
Grid : 类似table表格、可灵活设置行列并放置控件元素、比较常用
Canvas : 使用固定的坐标设置元素的位置、不具备锚定停靠等功能。
Grid
<Grid><Grid.RowDefinitions><!--自适应,根据内容的高度设置--><!--<RowDefinition Height="AUTO"/>--><!--绝对定位--><!--<RowDefinition Height="200"/>--><!--比例--><RowDefinition Height="2*"/><RowDefinition/></Grid.RowDefinitions><Grid.ColumnDefinitions><ColumnDefinition/><ColumnDefinition/></Grid.ColumnDefinitions><!--<Button Background="Yellow" Height="150"></Button><Button Background="Red" Height="50"></Button>--><Button Grid.Column="1"></Button><Button Grid.Column="1" Grid.Row="1" Background="Black"></Button><Button Grid.Row="1" Background="Blue"></Button><!--跨行列--><!--<Button Grid.Row="1" Grid.ColumnSpan="2" Background="Red"></Button>--></Grid>
布局容器
<Grid><Grid.RowDefinitions><RowDefinition/><RowDefinition/></Grid.RowDefinitions><Grid.ColumnDefinitions><ColumnDefinition/><ColumnDefinition/></Grid.ColumnDefinitions><StackPanel><Button Width="100" Height="50">Button</Button><Button Width="100" Height="50">Button</Button><Button Width="100" Height="50">Button</Button><Button Width="100" Height="50">Button</Button><Button Width="100" Height="50">Button</Button><Button Width="100" Height="50">Button</Button><Button Width="100" Height="50">Button</Button></StackPanel><WrapPanel Grid.Row="1" Orientation="Vertical"><Button Width="100" Height="50">Button</Button><Button Width="100" Height="50">Button</Button><Button Width="100" Height="50">Button</Button><Button Width="100" Height="50">Button</Button><Button Width="100" Height="50">Button</Button><Button Width="100" Height="50">Button</Button><Button Width="100" Height="50">Button</Button></WrapPanel><DockPanel Grid.Column="1" LastChildFill="False"> <Button Width="80" Height="50" DockPanel.Dock="Bottom">Button1</Button><Button Width="80" Height="50" DockPanel.Dock="Left">Button1</Button><Button Width="80" Height="50" DockPanel.Dock="Right">Button1</Button><Button Width="80" Height="50" DockPanel.Dock="Top">Button1</Button></DockPanel><UniformGrid Grid.Row="1" Grid.Column="1" Rows="3" Columns="3"><Button>Button</Button><Button>Button</Button><Button>Button</Button><Button>Button</Button><Button>Button</Button><Button>Button</Button><Button>Button</Button><Button>Button</Button></UniformGrid></Grid>
Canvas
<Canvas Margin="10,10,10,10" Background="White" ><Rectangle Name="rect" Canvas.Left="100" Canvas.Top="180" Fill="Black" Stroke="Red"  Width="200" Height="200"/><Ellipse  Name="el" Canvas.Left="500" Canvas.Top="150" Fill="Azure" Stroke="Green" Width="180" Height="180"/>
</Canvas>
样式
WPF中的各类控件元素, 都可以自由的设置其样式。 诸如:
字体(FontFamily)
字体大小(FontSize)
背景颜色(Background)
字体颜色(Foreground)
边距(Margin)
水平位置(HorizontalAlignment)
垂直位置(VerticalAlignment) 等等。
<Window.Resources><Style x:Key="TextBlockStyle" TargetType="{x:Type TextBlock}"><Setter Property="FontFamily" Value="宋体"/><Setter Property="FontSize" Value="30"/><Setter Property="Foreground" Value="Red"/><Setter Property="FontWeight" Value="Bold"/></Style></Window.Resources><StackPanel HorizontalAlignment="Center" VerticalAlignment="Center"><TextBlock Text="字体一" Style="{StaticResource TextBlockStyle}"/><TextBlock Text="字体一" Style="{StaticResource TextBlockStyle}"/><TextBlock Text="字体一" Style="{StaticResource TextBlockStyle}"/></StackPanel>
触发器
顾名思义, 触发器可以理解为, 当达到了触发的条件, 那么就执行预期内的响应, 可以是样式、数据变化、动画等。
触发器通过 Style.Triggers集合连接到样式中, 每个样式都可以有任意多个触发器, 并且每个触发器都是 System.Windows.TriggerBase的派生类实例, 以下是触发器的类型
Trigger : 监测依赖属性的变化、触发器生效
MultiTrigger : 通过多个条件的设置、达到满足条件、触发器生效
DataTrigger : 通过数据的变化、触发器生效
MultiDataTrigger : 多个数据条件的触发器
EventTrigger : 事件触发器, 触发了某类事件时, 触发器生效。
Trigger
<Window.Resources><Style x:Key="TextBlockStyle" TargetType="{x:Type TextBlock}"><Style.Triggers><Trigger Property="IsMouseOver" Value="true"><Setter Property="Foreground" Value="Blue"/></Trigger></Style.Triggers><Setter Property="FontFamily" Value="宋体"/><Setter Property="FontSize" Value="30"/><Setter Property="Foreground" Value="Red"/><Setter Property="FontWeight" Value="Bold"/></Style></Window.Resources><StackPanel HorizontalAlignment="Center" VerticalAlignment="Center"><TextBlock Text="字体一" Style="{StaticResource TextBlockStyle}"/><TextBlock Text="字体一" Style="{StaticResource TextBlockStyle}"/><TextBlock Text="字体一" Style="{StaticResource TextBlockStyle}"/></StackPanel>
MultiTrigger
<Window.Resources><Style x:Key="TextBlockStyle" TargetType="{x:Type Button}"><Style.Triggers><MultiTrigger><MultiTrigger.Conditions><Condition Property="IsMouseOver" Value="true"/><Condition Property="IsPressed" Value="true"/></MultiTrigger.Conditions><MultiTrigger.Setters><Setter Property="Foreground" Value="Black"/></MultiTrigger.Setters></MultiTrigger></Style.Triggers><Setter Property="FontFamily" Value="宋体"/><Setter Property="FontSize" Value="30"/><Setter Property="Foreground" Value="Red"/><Setter Property="FontWeight" Value="Bold"/></Style></Window.Resources><StackPanel HorizontalAlignment="Center" VerticalAlignment="Center"><Button Content="按钮一" Style="{StaticResource TextBlockStyle}"/><Button Content="按钮一" Style="{StaticResource TextBlockStyle}"/><Button Content="按钮一" Style="{StaticResource TextBlockStyle}"/></StackPanel>
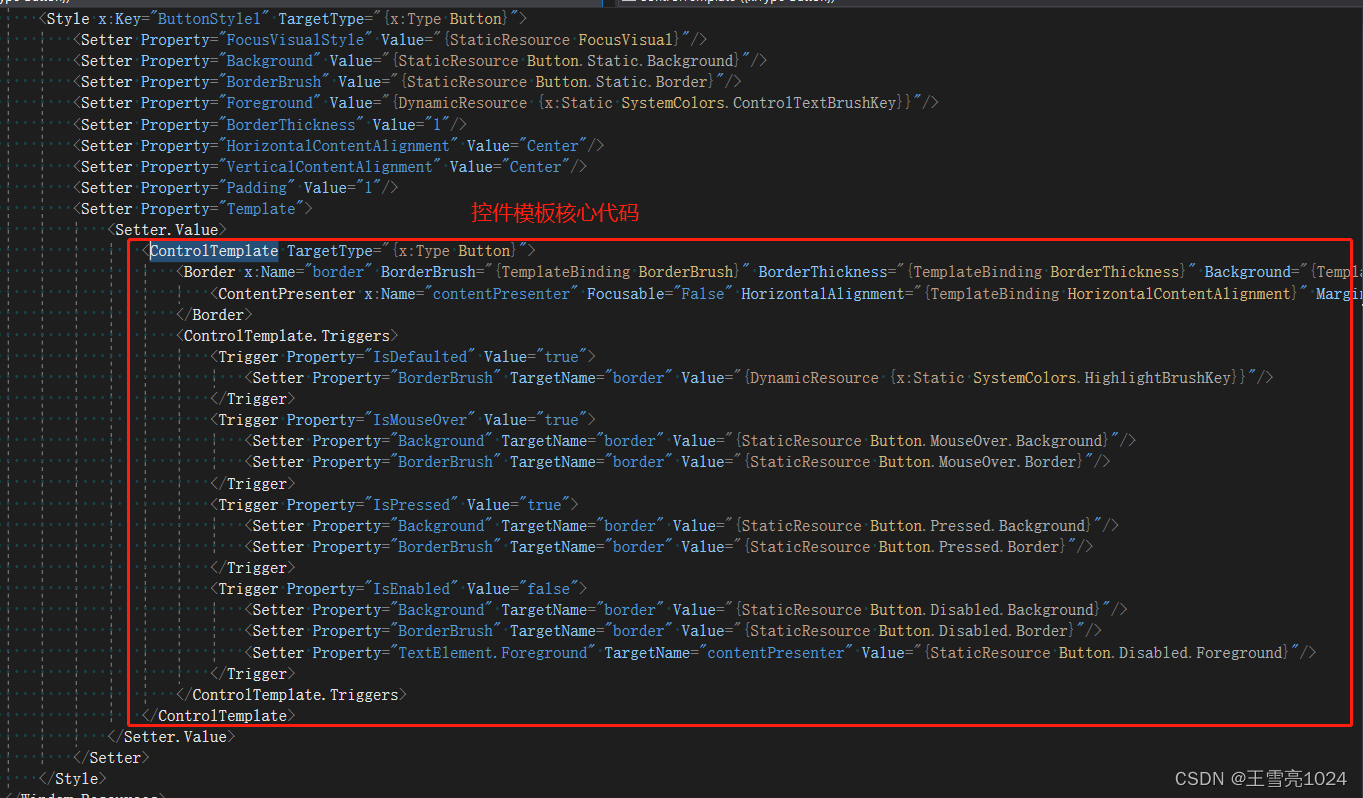
控件模板
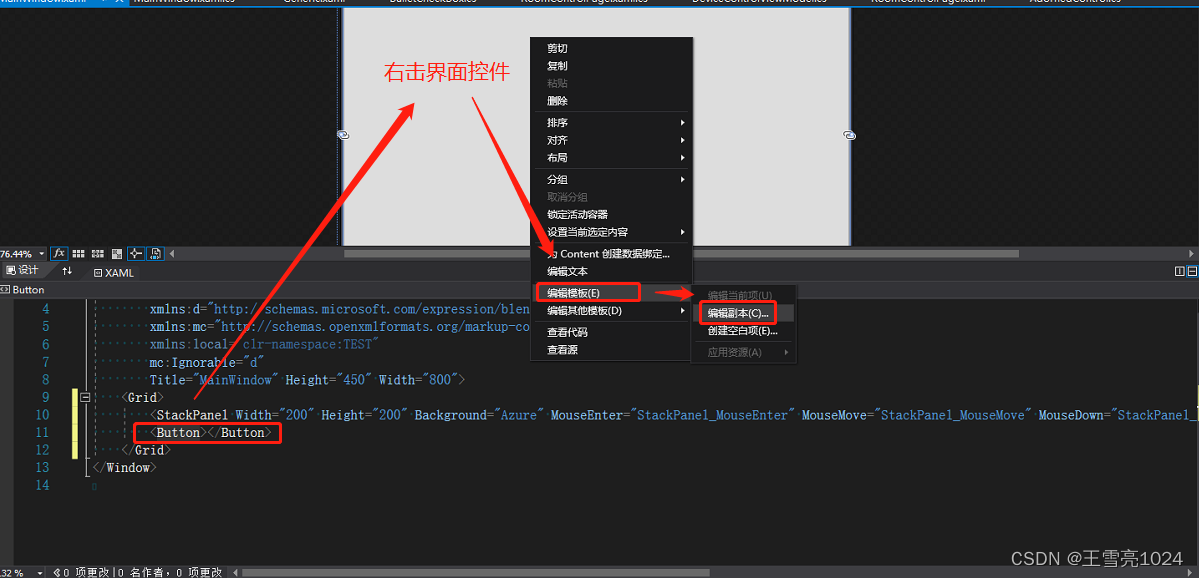
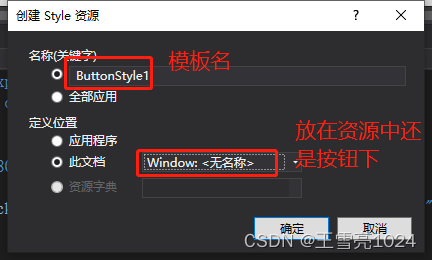
回到当前的xaml文件中
数据模板
https://www.cnblogs.com/wzh2010/p/6425060.html
元素绑定 资源绑定 DataContext绑定 属性绑定、按钮绑定
元素绑定
OneWay(单向绑定) : 当源属性发生变化更新目标属性, 类似上面的例子中, 滑动变化更新文本的数据 TwoWay(双向绑定) : 当源属性发生变化更新目标属性, 目标属性发生变化也更新源属性。 OneTime(单次模式) : 根据第一次源属性设置目标属性, 在此之后所有改变都无效。 OneWayToSource : 和OneWay类型, 只不过整个过程倒置。 Default : 既可以是双向,也可以是单项, 除非明确表明某种模式, 否则采用该默认绑定
单向绑定
<StackPanel HorizontalAlignment="Center" VerticalAlignment="Center"><Slider x:Name="slider" Width="200"/><TextBox Text="{Binding ElementName=slider,Path=Value,UpdateSourceTrigger=PropertyChanged}" ></TextBox></StackPanel>
单次模式
<StackPanel HorizontalAlignment="Center" VerticalAlignment="Center"><Slider x:Name="slider" Width="200" Value="2"/><TextBox Text="{Binding ElementName=slider,Path=Value,Mode=OneTime,UpdateSourceTrigger=PropertyChanged}" ></TextBox></StackPanel>
绑定到非元素
Source绑定
<Window.Resources><TextBox x:Key="txt">Hello World</TextBox></Window.Resources><StackPanel HorizontalAlignment="Center" VerticalAlignment="Center"><TextBox Text="{Binding Source={StaticResource txt},Path=Text}" ></TextBox></StackPanel>
DataSource绑定
public MainWindow(){InitializeComponent();nameTextBox.DataContext = new Person() { name="xlwang"};}public class Person {public String name { get; set; }}<Window.Resources><TextBox x:Key="txt">Hello World</TextBox></Window.Resources><StackPanel HorizontalAlignment="Center" VerticalAlignment="Center"><TextBox x:Name="nameTextBox" Text="{Binding name,FallbackValue='Not Found'}" Width="200" ></TextBox></StackPanel>
数据绑定
mvvm
实现思路:实现通知接口 实现Icommand接口 创建界面对应的viewmodel 界面后台初始化数据 界面绑定数据
实现通知接口
class NotificationObject : INotifyPropertyChanged{public event PropertyChangedEventHandler PropertyChanged;public void RaisePropertyChanged(string propetyName) {if (this.PropertyChanged != null) {this.PropertyChanged.Invoke(this,new PropertyChangedEventArgs(propetyName));}}}
实现ICommand接口
class DelegateCommand : ICommand{public event EventHandler CanExecuteChanged;public bool CanExecute(object parameter){if (CanExecuteFun == null){return true;}return this.CanExecuteFun(parameter);}public void Execute(object parameter){if (ExecuteAction == null){return;}this.ExecuteAction(parameter);}public Action<object> ExecuteAction { get; set; }public Func<object,bool> CanExecuteFun { get; set; }}
创建界面对应的viewmodel
class Window2ViewModel:NotificationObject{public Window2ViewModel(){this.addCommand = new DelegateCommand();this.addCommand.ExecuteAction = new Action<object>(this.add);}private double _val1;public double val1{get { return _val1; }set { _val1 = value;this.RaisePropertyChanged("val1");}}private double _val2;public double val2{get { return _val2; }set{_val2 = value;this.RaisePropertyChanged("val2");}}private double _result;public double result{get { return _result; }set{_result = value;this.RaisePropertyChanged("result");}}public DelegateCommand addCommand { get; set; }private void add(object param) {this.result = this.val1 + this.val2;}}
界面数据绑定
public Window2(){InitializeComponent();this.DataContext = new Window2ViewModel();}
界面
<StackPanel><!--<TextBox x:Name="txt1" Text="{Binding val1}"></TextBox><TextBox x:Name="txt2" Text="{Binding val2}"></TextBox><TextBox x:Name="result" Text="{Binding result}"></TextBox>--><Slider x:Name="s1" Value="{Binding val1}"></Slider><Slider x:Name="s2" Value="{Binding val2}"></Slider><Slider x:Name="result" Value="{Binding result}"></Slider><Button Content="提交" Command="{Binding addCommand}"></Button></StackPanel>
mvvvm练习
window.xaml
<Window x:Class="wpf_study.Window1"xmlns="http://schemas.microsoft.com/winfx/2006/xaml/presentation"xmlns:x="http://schemas.microsoft.com/winfx/2006/xaml"xmlns:d="http://schemas.microsoft.com/expression/blend/2008"xmlns:mc="http://schemas.openxmlformats.org/markup-compatibility/2006"xmlns:local="clr-namespace:wpf_study"mc:Ignorable="d"Title="Window1" Height="450" Width="800" ><Window.Resources></Window.Resources><Grid><Grid.RowDefinitions><RowDefinition Height="60"></RowDefinition><RowDefinition></RowDefinition></Grid.RowDefinitions><StackPanel><Button Content="添加" Command="{Binding addCommand}" ></Button></StackPanel><DataGrid Grid.Row="1" x:Name="dg" AutoGenerateColumns="False" ColumnWidth="*" ItemsSource="{Binding stuList}"><DataGrid.Columns><DataGridTextColumn Header="序号" Binding="{Binding id}"></DataGridTextColumn><DataGridTextColumn Header="姓名" Binding="{Binding UserName}"></DataGridTextColumn><DataGridTemplateColumn Header="操作"><DataGridTemplateColumn.CellTemplate><DataTemplate><StackPanel Orientation="Horizontal"><Button Content="修改" ></Button><Button Content="删除" CommandParameter="{Binding id}"Command="{Binding DataContext.delCommand,RelativeSource={RelativeSource Mode=FindAncestor,AncestorType=DataGrid}}"></Button></StackPanel></DataTemplate></DataGridTemplateColumn.CellTemplate></DataGridTemplateColumn></DataGrid.Columns></DataGrid></Grid>
</Window>
window.xaml.cs
using GalaSoft.MvvmLight.Command;
using System;
using System.Collections.Generic;
using System.ComponentModel;
using System.Linq;
using System.Text;
using System.Threading.Tasks;
using System.Windows;
using System.Windows.Controls;
using System.Windows.Data;
using System.Windows.Documents;
using System.Windows.Input;
using System.Windows.Media;
using System.Windows.Media.Imaging;
using System.Windows.Shapes;
using wpf_study.viewmodel;namespace wpf_study
{/// <summary>/// Window1.xaml 的交互逻辑/// </summary>public partial class Window1 : Window{public Window1(){InitializeComponent();this.DataContext = new Window1ModelView();}}
}
windowModelView.cs
using GalaSoft.MvvmLight;
using GalaSoft.MvvmLight.Command;
using System;
using System.Collections.Generic;
using System.Collections.ObjectModel;
using System.Linq;
using System.Text;
using System.Threading.Tasks;
using System.Windows;namespace wpf_study.viewmodel
{class Window1ModelView:ViewModelBase{#region 暴露命令private RelayCommand _addCommand;public RelayCommand addCommand{get{if (_addCommand == null){_addCommand = new RelayCommand(() => {int rand = new Random().Next(0, 1000);stuList.Add(new Student() { UserName = String.Format("random{0}", rand), id = rand });});}return _addCommand;}}private RelayCommand<int> _delCommand;public RelayCommand<int> delCommand{get{if (_delCommand == null){_delCommand = new RelayCommand<int>((o) => {MessageBox.Show("删除" + o);});}return _delCommand;}}#endregion#region 暴露数据private ObservableCollection<Student> _stuList;public ObservableCollection<Student> stuList{get { return _stuList; }set{_stuList = value;RaisePropertyChanged("stuList");}}#endregionpublic Window1ModelView() {stuList = new ObservableCollection<Student>();stuList.Add(new Student() { UserName = "小王", id = 1 });stuList.Add(new Student() { UserName = "小李", id = 2 });stuList.Add(new Student() { UserName = "小张", id = 3 });stuList.Add(new Student() { UserName = "小黑", id = 4 });}}public class Student:ViewModelBase{private string userName;public string UserName{get { return userName; }set { userName = value;RaisePropertyChanged("UserName");}}private int _id;public int id{get { return _id; }set {_id = value;RaisePropertyChanged("id");}}}
}
大练习
使用布局容器,排版出下面布局