android WMS服务
WMS的定义
窗口的分类
WMS的启动
WindowManager
Activity、Window、DecorView、ViewRootImpl 之间的关系
WindowToken
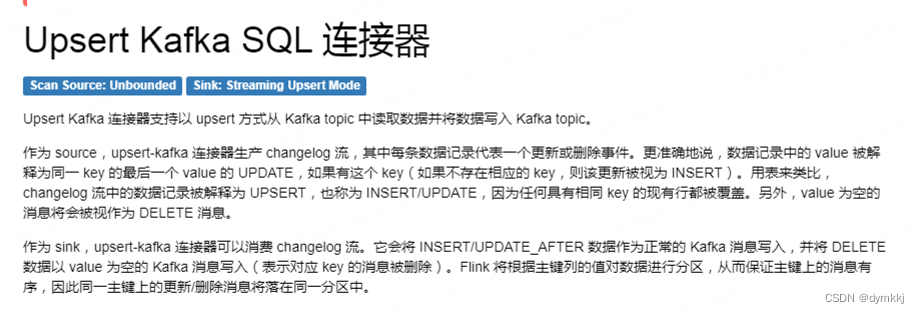
WMS的定义
WMS是WindowManagerService的简称,它是android系统的核心服务之一,它在android的显示功能中扮演着极为重要的角色。一般来说,WMS具有以下四个重要的功能:
- 窗口管理:负责响应进程的添加、移除窗口、启动窗口的业务,以及管理窗口的坐标、层级、大小、令牌等属性。
- 窗口动画:负责处理窗口切换时的动画效果。
- 事件处理:负责处理系统按键、触摸事件给合适的窗口去处理,以及处理部分输入法的交互逻辑。
- Surface管理:为所有window分配合适的surface,并将排序后的surface交给SurfaceFlinger做进一步的显示工作。
窗口的分类
应用窗口,层级:1~99
子窗口,层级:1000~1999
系统窗口,层级:2000~2999
其中应用窗口层级最低,范围在1~99,系统窗口层级最高,2000~2999,层级越高,意味着越靠近用户,高层级的窗口会覆盖底层级的窗口。
WMS的启动
WMS和AMS,PKMS一样,都是由SystemServer进程启动的,我们看一下代码:
private void startOtherServices(@NonNull TimingsTraceAndSlog t) {...wm = WindowManagerService.main(context, inputManager, !mFirstBoot, mOnlyCore,new PhoneWindowManager(), mActivityManagerService.mActivityTaskManager);ServiceManager.addService(Context.WINDOW_SERVICE, wm, /* allowIsolated= */ false,DUMP_FLAG_PRIORITY_CRITICAL | DUMP_FLAG_PROTO);ServiceManager.addService(Context.INPUT_SERVICE, inputManager,/* allowIsolated= */ false, DUMP_FLAG_PRIORITY_CRITICAL);t.traceEnd();t.traceBegin("SetWindowManagerService");mActivityManagerService.setWindowManager(wm);t.traceEnd();t.traceBegin("WindowManagerServiceOnInitReady");wm.onInitReady();t.traceEnd();...
}
通过上面代码可知,通过main方法启动服务,然后注册到ServiceManager中,
我们继续跟踪到main方法:
public static WindowManagerService main(final Context context, final InputManagerService im,final boolean showBootMsgs, final boolean onlyCore, WindowManagerPolicy policy,ActivityTaskManagerService atm) {return main(context, im, showBootMsgs, onlyCore, policy, atm,SurfaceControl.Transaction::new, Surface::new, SurfaceControl.Builder::new);
}@VisibleForTesting
public static WindowManagerService main(final Context context, final InputManagerService im,final boolean showBootMsgs, final boolean onlyCore, WindowManagerPolicy policy,ActivityTaskManagerService atm, Supplier<SurfaceControl.Transaction> transactionFactory,Supplier<Surface> surfaceFactory,Function<SurfaceSession, SurfaceControl.Builder> surfaceControlFactory) {DisplayThread.getHandler().runWithScissors(() ->sInstance = new WindowManagerService(context, im, showBootMsgs, onlyCore, policy,atm, transactionFactory, surfaceFactory, surfaceControlFactory), 0);return sInstance;
}
可以看到main方法中就new了一个WindowManagerService对象并返回出去。
WindowManager

Window 是一个抽象类,代表一个窗口,其具体的实现类为 PhoneWindow ,它对 View进行管理。
WindowManager 是一个接口类,继承自接口 ViewManager,它是用来管理 Window 的。它的具体实现类为 WindowManagerImpI。
WindowManagerGlobal 是实际操作的类,是一个单例,每个进程中只有一个实例对象,该实例对象在 WindowManagerGlobal 中。
在 WindowManagerGlobal 中,会创建 ViewRootImpl 实例对象,每个根 View 对应一个 ViewRootImpl 实例对象。
想要对 Window (View)进行添加、更新和删除操作,可以使用 WindowManager 来执行。最终的操作是通过 Binder 交给 WMS 来执行的。
我们正常需要添加一个view的视图:
// 获取 WindowManager
WindowManager wm = (WindowManager) getApplicationContext().getSystemService(WINDOW_SERVICE);
// 获取需要添加的View
View view = View.inflate(MainActivity.this, R.layout.item, null);
WindowManager.LayoutParams params = new WindowManager.LayoutParams();
params.type = WindowManager.LayoutParams.TYPE_APPLICATION_OVERLAY;
// 设置不拦截焦点
params.flags = WindowManager.LayoutParams.FLAG_NOT_FOCUSABLE |
WindowManager.LayoutParams.FLAG_NOT_TOUCH_MODAL;
params.width = (int) (60 * getResources().getDisplayMetrics().density);
params.height = (int) (60 * getResources().getDisplayMetrics().density);
// 且设置坐标系 左上角
params.gravity = Gravity.LEFT | Gravity.TOP;
params.format = PixelFormat.TRANSPARENT;
int width = wm.getDefaultDisplay().getWidth();
int height = wm.getDefaultDisplay().getHeight();
params.y = height / 2 - params.height / 2;
wm.addView(view, params);
其实我们调用的就是WindowManagerImpl中的addview,我们跟踪一下,看看这个创建窗口的过程是怎么发送给WMS的。
WindowManagerImpl:
public final class WindowManagerImpl implements WindowManager {private final WindowManagerGlobal mGlobal = WindowManagerGlobal.getInstance();@Overridepublic void addView(@NonNull View view, @NonNull ViewGroup.LayoutParams params) {applyDefaultToken(params);mGlobal.addView(view, params, mContext.getDisplayNoVerify(), mParentWindow,mContext.getUserId());}
}
WindowManagerGlobal
ArrayList<View> mViews = new ArrayList<View>();
ArrayList<ViewRootImpl> mRoots = new ArrayList<ViewRootImpl>();
ArrayList<WindowManager.LayoutParams> mParams = new ArrayList<WindowManager.LayoutParams>();public void addView(View view, ViewGroup.LayoutParams params,Display display, Window parentWindow) {// ...省略代码...// 1.根节点的LayoutParams必须为WindowManager.LayoutParams类型,因为确定根View的大小需要使用。if (!(params instanceof WindowManager.LayoutParams)) {throw new IllegalArgumentException("Params must be WindowManager.LayoutParams");}final WindowManager.LayoutParams wparams = (WindowManager.LayoutParams) params;if (parentWindow != null) {// 2.如果这个窗口有父窗口,则需要调整 wparams 的大小,使 wparams 的大小不超过父容器的大小。parentWindow.adjustLayoutParamsForSubWindow(wparams);} else {// ...省略代码...}ViewRootImpl root;View panelParentView = null;synchronized (mLock) {// ...省略代码...// 3.将传入的根View添加到ViewRootImpl对象中(一个根View 对应一个 ViewRootImpl)。root = new ViewRootImpl(view.getContext(), display);// 4.将调整后的 wparams 赋值给根 View。view.setLayoutParams(wparams);// 5.将根 View、根View对应的ViewRootImpl、根View的布局参数LayoutParams分别存入三个集合中。mViews.add(view);mRoots.add(root);mParams.add(wparams);try {// 6.执行 ViewRootImpl.setView() 方法。root.setView(view, wparams, panelParentView);} catch (RuntimeException e) {// ...省略代码...}}
}
ViewRootImpl
// 用于远程通信的Binder
IWindowSession mWindowSession = WindowManagerGlobal.getWindowSession();public void setView(View view, WindowManager.LayoutParams attrs, View panelParentView) {synchronized (this) {if (mView == null) {// ...省略代码...// 1.调用requestLayout方法进行绘制。requestLayout();try {mOrigWindowType = mWindowAttributes.type;mAttachInfo.mRecomputeGlobalAttributes = true;collectViewAttributes();// 2.获取远程服务进行通信(IWindowSession对象的获取在第4部分分析)res = mWindowSession.addToDisplayAsUser(mWindow, mSeq, mWindowAttributes,getHostVisibility(), mDisplay.getDisplayId(), mTmpFrame,mAttachInfo.mContentInsets, mAttachInfo.mStableInsets,mAttachInfo.mOutsets, mAttachInfo.mDisplayCutout, mInputChannel,mTempInsets);setFrame(mTmpFrame);} catch (RemoteException e) {// ...省略代码...}// ...省略代码...}}
}public void requestLayout() {if (!mHandlingLayoutInLayoutRequest) {checkThread();mLayoutRequested = true;// 该方法的分析过程请看本文 “scheduleTraversals() 执行流程” 部分。scheduleTraversals();}
}
从代码中我们可以看到,在 setView() 方法中,会调用 mWindowSession.addToDisplayAsUser() 来与远程服务进行通信 (mWindowSession 是一个 Binder 对象),我们继续看:
Session
public int addToDisplayAsUser(IWindow window, int seq, WindowManager.LayoutParams attrs,int viewVisibility, int displayId, int userId, Rect outFrame,Rect outContentInsets, Rect outStableInsets, DisplayCutout.ParcelableWrapper outDisplayCutout, InputChannel outInputChannel,InsetsState outInsetsState, InsetsSourceControl[] outActiveControls) {return mService.addWindow(this, window, seq, attrs, viewVisibility, displayId,outFrame,outContentInsets, outStableInsets, outDisplayCutout, outInputChannel,outInsetsState, outActiveControls, userId);}WindowManagerService
// WindowManagerService.class
public int addWindow(Session session, IWindow client, int seq,LayoutParams attrs, int viewVisibility, int displayId, Rect outFrame,Rect outContentInsets, Rect outStableInsets, Rect outOutsets,DisplayCutout.ParcelableWrapper outDisplayCutout, InputChannel outInputChannel,InsetsState outInsetsState) {int[] appOp = new int[1];// 1.mPolicy其实是PhoneWindowManager,根据Window的属性来检测权限。int res = mPolicy.checkAddPermission(attrs, appOp);// 没有权限就直接返回。if (res != WindowManagerGlobal.ADD_OKAY) {return res;}...synchronized (mGlobalLock) {.../** 2.通过 displayId 来获得窗口要添加到哪个 DisplayContent 上,如果没有找到DisplayContent,*  则返回 WindowManagerGlobal.ADD_INVALID_DISPLAY 这一状态,其中 DisplayContent 用来描述一块屏幕。*/final DisplayContent displayContent = getDisplayContentOrCreate(displayId, attrs.token);if (displayContent == null) {return WindowManagerGlobal.ADD_INVALID_DISPLAY;}...// 3. 1000 =< type <= 1999,则该Window属于 SubWindow。if (type >= FIRST_SUB_WINDOW && type <= LAST_SUB_WINDOW) {parentWindow = windowForClientLocked(null, attrs.token, false);// ...省略2个条件判断代码(1.依附的parentWindow不能为空;2.parentWindow类型也不能是子窗口类型)...// 依附的parentWindow不能为空if (parentWindow == null) {ProtoLog.w(WM_ERROR, "Attempted to add window with token that is not a             window: "+ "%s.  Aborting.", attrs.token);return WindowManagerGlobal.ADD_BAD_SUBWINDOW_TOKEN;}if (parentWindow.mAttrs.type >= FIRST_SUB_WINDOW&& parentWindow.mAttrs.type <= LAST_SUB_WINDOW) {ProtoLog.w(WM_ERROR, "Attempted to add window with token that is a sub-window: " + "%s.  Aborting.", attrs.token);return WindowManagerGlobal.ADD_BAD_SUBWINDOW_TOKEN;}}...AppWindowToken atoken = null;final boolean hasParent = parentWindow != null;// 4.获取 WindowTokenWindowToken token = displayContent.getWindowToken(hasParent ? parentWindow.mAttrs.token : attrs.token);// If this is a child window, we want to apply the same type checking rules as the// parent window type.final int rootType = hasParent ? parentWindow.mAttrs.type : type;...if (token == null) {...// 5.没有获取到WindowToken就自己创建一个。token = new WindowToken(this, binder, type, false, displayContent,session.mCanAddInternalSystemWindow, isRoundedCornerOverlay);} else if (rootType >= FIRST_APPLICATION_WINDOW && rootType <= LAST_APPLICATION_WINDOW) {// 应用程序的窗口类型,就将WindowToken转换为AppWindowToken类型。atoken = token.asAppWindowToken();...}...// 7.每个WindowState 都代表一个窗口。final WindowState win = new WindowState(this, session, client, token, parentWindow,appOp[0], seq, attrs, viewVisibility, session.mUid,session.mCanAddInternalSystemWindow);...final DisplayPolicy displayPolicy = displayContent.getDisplayPolicy();// 8.根据窗口的 type 对窗口的 LayoutParams 的一些参数进行修改。displayPolicy.adjustWindowParamsLw(win, win.mAttrs, Binder.getCallingPid(), Binder.getCallingUid());win.setShowToOwnerOnlyLocked(mPolicy.checkShowToOwnerOnly(attrs));// 9.准备将窗口添加到系统中res = displayPolicy.prepareAddWindowLw(win, attrs);...win.attach();// 10.将 WindowState 添加到 mWindowMap 中mWindowMap.put(client.asBinder(), win);...// 11.将 WindowState 添加到该 WindowState 对应的 WindowToken 中。win.mToken.addWindow(win);...}...return res;
}
通过binder完成了和服务端的通信。addview主要做了这么几件事:
addWindow 方怯主要做了下面 4 件事 :
- 对添加的窗口进行检查,如果窗口不满足条件,就结束添加逻辑。
- WindowToken 相关的处理,比如有的窗口类型需要提供 WindowToken ,没有提供的话就不会执行下面的代码逻辑,有的窗口类型则需要由 WMS 隐式创建认 WindowToken。
- WindowState 的创建和相关处理,将 WindowToken 和 WindowState 相关联 。
- 创建和配置 DisplayContent,完成窗口添加到系统前的准备工作 。
Activity、Window、DecorView、ViewRootImpl 之间的关系
我们看一下activity的UI视图结构:
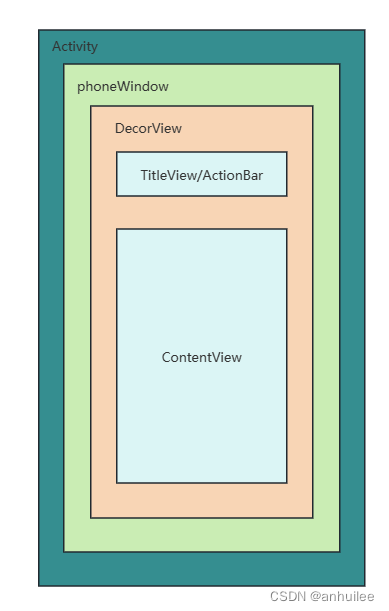
Activity
Activity 只负责生命周期的控制和事件的处理,并不负责视图控制,真正控制视图的是 Window。
一个 Activity 包含了一个Window,Window 才是真正代表一个窗口,它用于绘制用户的UI界面
Window
Window 是视图的承载器,内部持有一个 DecorView,而这个DecorView才是 view 的根布局。
Window 是一个抽象类,实际在 Activity 中持有的是其子类 PhoneWindow。
PhoneWindow
PhoneWindow 中有个内部类 DecorView,通过创建 DecorView 来加载 Activity.setContentView() 设置的 layout 布局。
Window 通过 WindowManager 将 DecorView 加载其中,并将 DecorView 交给 ViewRootImpl,进行视图绘制以及其他交互。
DecorView
DecorView 是所有应用窗口的根节点, 是 FrameLayout 的子类,它可以被认为是 Android 视图树的根视图。
ViewRootImpl
连接 DecorView 和 WindowManagerService 的纽带。
View 的三大流程 (measure、layout、draw) 和事件分发等都是通过 ViewRootImpl 来执行的。
源码分析
// Activity
final void attach(Context context, ActivityThread aThread,Instrumentation instr, IBinder token, int ident,Application application, Intent intent, ActivityInfo info,CharSequence title, Activity parent, String id,NonConfigurationInstances lastNonConfigurationInstances,Configuration config, String referrer, IVoiceInteractor voiceInteractor,Window window, ActivityConfigCallback activityConfigCallback, IBinder assistToken) {attachBaseContext(context);mFragments.attachHost(null /*parent*/);// 1.创建了PhoneWindow对象,在Activity中持有了Window。mWindow = new PhoneWindow(this, window, activityConfigCallback);mWindow.setWindowControllerCallback(this);// 2.将 Activity 作为参数传递给 Window,所以在 Window 中持有了 Activity 。mWindow.setCallback(this);// ...省略代码...// 3.设置 WindowManager,来关联 Window 和 DecorView。mWindow.setWindowManager((WindowManager)context.getSystemService(Context.WINDOW_SERVICE),mToken, mComponent.flattenToString(),(info.flags & ActivityInfo.FLAG_HARDWARE_ACCELERATED) != 0);// 4.在 Activity 中持有 WindowManager。mWindowManager = mWindow.getWindowManager();// ...省略代码...
}
在Activity中,主要做了以下几件事:
- 创建一个 PhoneWindow,使 Activity 持有 Window。
- 将 Activity作为参数传递给 Window,此时 Window 与 Activity 就相互有了关联。
- 给 Window 设置一个 WindowManager,来关联 Window 和 DecorView。
- 通过 Window.getWindowManager()获取 WindowManager,使 Activity 持有 WindowManager 的引用。
继续执行onCreate方法:
// Activity
public void setContentView(@LayoutRes int layoutResID) {// getWindow() 其实就是PhoneWindow,所以这里会触发 PhoneWindow.setContentView()方法。getWindow().setContentView(layoutResID);initWindowDecorActionBar(); //创建ActionBar
}// PhoneWindow.class
public void setContentView(int layoutResID) {if (mContentParent == null) {// 1.mContentParent为空,创建一个DecroView。// mContentParent 其实就是DecroView中id=com.android.internal.R.id.content的容器控件。installDecor();} else if (!hasFeature(FEATURE_CONTENT_TRANSITIONS)) {// 2.mContentParent不为空,删除其中的View。mContentParent.removeAllViews();}// 3.将 layoutResID 布局文件加载并添加到 mContentParent 容器控件中。mLayoutInflater.inflate(layoutResID, mContentParent);// ...省略代码...
}// PhoneWindow.class
private void installDecor() {mForceDecorInstall = false;if (mDecor == null) {// 1.创建DecorViewmDecor = generateDecor(-1); // ...省略代码...} else {// 这里会将当前 Window 传入 DecorView,使 DecorView 与 Window 关联。mDecor.setWindow(this);}if (mContentParent == null) {// 2.为DecorView设置布局格式,并返回mContentParentmContentParent = generateLayout(mDecor);// ...省略代码...}
}protected DecorView generateDecor(int featureId) {// ...省略代码...// 创建一个DecorView 根视图 View。return new DecorView(context, featureId, this, getAttributes());
}// PhoneWindow.class
protected ViewGroup generateLayout(DecorView decor) {// 从主题文件中获取样式信息TypedArray a = getWindowStyle();// 1.根据样式信息设置Feature特性// ...省略代码...// 2.根据不同的features加载不同的layout文件// Inflate the window decor.int layoutResource;int features = getLocalFeatures();if ((features & (1 << FEATURE_SWIPE_TO_DISMISS)) != 0) {layoutResource = R.layout.screen_swipe_dismiss;setCloseOnSwipeEnabled(true);}// ...省略代码(条件判断获取layoutResource)...// 3.加载上面的 layoutResource 文件 mDecor.onResourcesLoaded(mLayoutInflater, layoutResource);// 4.获取 DecorView 中的 id=ID_ANDROID_CONTENT 的容器控件。// ID_ANDROID_CONTENT = com.android.internal.R.id.content;ViewGroup contentParent = (ViewGroup)findViewById(ID_ANDROID_CONTENT);// ...省略代码...return contentParent;
}// DecorView.class
void onResourcesLoaded(LayoutInflater inflater, int layoutResource) {// ...省略代码...// 加载 layoutResource 文件final View root = inflater.inflate(layoutResource, null);// ...省略代码...mContentRoot = (ViewGroup) root;initializeElevation();
}
这里将 Window 作为参数传入 DecorView,使 DecorView 与 Window 关联。
然后在ActivityThread. handleResumeActivity中
// ActivityThread.class
public void handleResumeActivity(IBinder token, boolean finalStateRequest, boolean isForward, String reason) {// ...省略代码...// TODO Push resumeArgs into the activity for consideration// 1.将 Activity 回复到 RESUME 状态。final ActivityClientRecord r = performResumeActivity(token, finalStateRequest, reason);// ...省略代码...final Activity a = r.activity;// ...省略代码...if (r.window == null && !a.mFinished && willBeVisible) {// 2.获取在 Activity.attach() 方法中就创建了 PhoneWindow 对象。r.window = r.activity.getWindow();View decor = r.window.getDecorView();// 这里使 Decor 不可见。decor.setVisibility(View.INVISIBLE);// 3.获取 Activity 中持有的 WindowManager。ViewManager wm = a.getWindowManager();WindowManager.LayoutParams l = r.window.getAttributes();a.mDecor = decor;l.type = WindowManager.LayoutParams.TYPE_BASE_APPLICATION;l.softInputMode |= forwardBit;if (r.mPreserveWindow) {a.mWindowAdded = true;r.mPreserveWindow = false;ViewRootImpl impl = decor.getViewRootImpl();if (impl != null) {impl.notifyChildRebuilt();}}if (a.mVisibleFromClient) {if (!a.mWindowAdded) {//将 Activity.WindowAdded 标记为true,避免在 Activity.makeVisible() 是重复进行 Window 添加操作。a.mWindowAdded = true;// 4.将根 View(DecorView)通过 WindowManager 添加到 Window 中。wm.addView(decor, l);} else {a.onWindowAttributesChanged(l);}}}// ...省略代码...// The window is now visible if it has been added, we are not// simply finishing, and we are not starting another activity.if (!r.activity.mFinished && willBeVisible && r.activity.mDecor != null && !r.hideForNow) {// ...省略代码...r.activity.mVisibleFromServer = true;mNumVisibleActivities++;if (r.activity.mVisibleFromClient) {// 5.这个方法内部会是 DecorView 可见。r.activity.makeVisible();}}
}public ActivityClientRecord performResumeActivity(IBinder token, boolean finalStateRequest, String reason) {// 1.每一个 ActivityClientRecord 都代表着一个 Activity 。final ActivityClientRecord r = mActivities.get(token);// ...省略代码...try {r.activity.onStateNotSaved();r.activity.mFragments.noteStateNotSaved();checkAndBlockForNetworkAccess();if (r.pendingIntents != null) {// 这里会触发 Activity.onNewIntent()方法。deliverNewIntents(r, r.pendingIntents);r.pendingIntents = null;}if (r.pendingResults != null) {// 这里会触发 Activity.onActivityResult()方法。deliverResults(r, r.pendingResults, reason);r.pendingResults = null;}// 这里会触发 Activity.onResume()方法。r.activity.performResume(r.startsNotResumed, reason);r.state = null;r.persistentState = null;// 这里将当前 Activity 的生命周期状态设置为 ON_RESUME。r.setState(ON_RESUME);reportTopResumedActivityChanged(r, r.isTopResumedActivity, "topWhenResuming");} catch (Exception e) {// ...省略代码...}return r;
}// Activity.class
void makeVisible() {if (!mWindowAdded) {ViewManager wm = getWindowManager();wm.addView(mDecor, getWindow().getAttributes());mWindowAdded = true;}// 将 DecorView设置为可见。mDecor.setVisibility(View.VISIBLE);
}
在rusume生命周期中,主要做了以下这些事
- 获取 DecorView 对象,并设置 DecorView 可见性为不可见。
- 获取 Activity 中持有的 WindowManager。
- 将 DecorView 通过 WindowManager 添加到 Window 中显示。
- 在 Activity.makeVisible() 方法中,最终将 DecorView 设置为可见。
WindowToken
WindowToken是窗口令牌,是一种特殊的Binder令牌,WMS用它唯一的标识系统中的一个窗口。
class WindowToken extends WindowContainer<WindowState> { ... // The actual token. final IBinder token;
}
我们通过源码可知,这个windowToken里有一个IBinder对象token,这个token控制着界面显示,这就是为什么Dialog不能使用Application的Context,我们来分析一下。
在Activity的OnCreate创建一个Dialog:
override fun onCreate(savedInstanceState: Bundle?) { super.onCreate(savedInstanceState) setContentView(R.layout.activity_main) val dialog = AlertDialog.Builder(this) dialog.run{ title = "我是标题" setMessage("我是内容") } dialog.show()
}
他的构造参数需要传入一个context对象,这个context的要求不能是ApplicationContext等其他context,只能是 ActivityContext。如果我们使用Application传入会怎么样呢?
override fun onCreate(savedInstanceState: Bundle?) { ... // 注意这里添加了主题 val dialog = AlertDialog.Builder(applicationContext,R.style.AppTheme) ...
}
崩溃了: Unable to add window -- token null is not valid; is your activity running?
首先我们看到报错是在ViewRootImpl.setView,我们看这个地方关于token的判断:
public void setView(View view, WindowManager.LayoutParams attrs, View panelParentView) { ... int res; ... res = mWindowSession.addToDisplay(mWindow, mSeq, mWindowAttributes, getHostVisibility(), mDisplay.getDisplayId(), mTmpFrame, mAttachInfo.mContentInsets, mAttachInfo.mStableInsets, mAttachInfo.mOutsets, mAttachInfo.mDisplayCutout, mInputChannel, mTempInsets); ... if (res < WindowManagerGlobal.ADD_OKAY) { ... switch (res) { case WindowManagerGlobal.ADD_BAD_APP_TOKEN: case WindowManagerGlobal.ADD_BAD_SUBWINDOW_TOKEN: // code1 throw new WindowManager.BadTokenException( "Unable to add window -- token " + attrs.token + " is not valid; is your activity running?");     ... } ... } ...
}
我们可以快速看出在code 1的地方抛出了异常,是根据一个变量res来判别的,这个res出自方法addToDisplayAsUser, 那么token的判别肯定在这个方法里面了,res只是一个判别的结果,那么我们是必须进入这个addToDisplayAsUser里去看一下,根据上面源码,继续追踪到WindowManagerService.addView:
public int addWindow(Session session, IWindow client, int seq, LayoutParams attrs, int viewVisibility, int displayId, Rect outFrame, Rect outContentInsets, Rect outStableInsets, Rect outOutsets, DisplayCutout.ParcelableWrapper outDisplayCutout, InputChannel outInputChannel, InsetsState outInsetsState) { ... WindowState parentWindow = null; ... // 获取parentWindow parentWindow = windowForClientLocked(null, attrs.token, false); ... final boolean hasParent = parentWindow != null; // 获取token WindowToken token = displayContent.getWindowToken( hasParent ? parentWindow.mAttrs.token : attrs.token); ... // 验证token if (token == null) { if (rootType >= FIRST_APPLICATION_WINDOW && rootType <= LAST_APPLICATION_WINDOW) { Slog.w(TAG_WM, "Attempted to add application window with unknown token " + attrs.token + ".  Aborting."); return WindowManagerGlobal.ADD_BAD_APP_TOKEN; } ...//各种验证 } ...
}
从代码中可以得出,当token==null的时候,会进行各种判断,第一个返回的就是 WindowManagerGlobal.ADD_BAD_APP_TOKEN ,这样我们就快速找到token的类型:WindowToken。那 么根据我们这一路跟过来,最终找到token的类型了。
我们回到刚才的WindowManagerGlobal.addView:
public void addView(View view, ViewGroup.LayoutParams params, Display display, Window parentWindow) { ... final WindowManager.LayoutParams wparams = (WindowManager.LayoutParams) params; if (parentWindow != null) { parentWindow.adjustLayoutParamsForSubWindow(wparams); } ... ViewRootImpl root; ... root = new ViewRootImpl(view.getContext(), display); ... try { root.setView(view, wparams, panelParentView); }  ...
}
这里我们只需要看WindowManager.LayoutParams参数,parentWindow是与windowManagerPhoneWindow, 所以这里肯定不是null,进入到 adjustLayoutParamsForSubWindow 方法进行调整参数。最后执行ViewRootImpl的 setView方法。到这里WindowManager.LayoutParams这个参数还没有被设置token,那么最有可能是在 adjustLayoutParamsForSubWindow 方法中了,我们进去代码看看:
void adjustLayoutParamsForSubWindow(WindowManager.LayoutParams wp) { CharSequence curTitle = wp.getTitle(); if (wp.type >= WindowManager.LayoutParams.FIRST_SUB_WINDOW && wp.type <= WindowManager.LayoutParams.LAST_SUB_WINDOW) { // 子窗口token获取逻辑 if (wp.token == null) { View decor = peekDecorView(); if (decor != null) { wp.token = decor.getWindowToken(); } } ... } else if (wp.type >= WindowManager.LayoutParams.FIRST_SYSTEM_WINDOW && wp.type <= WindowManager.LayoutParams.LAST_SYSTEM_WINDOW) { // 系统窗口token获取逻辑 ... } else { // 应用窗口token获取逻辑 if (wp.token == null) { wp.token = mContainer == null ? mAppToken : mContainer.mAppToken; } ... } ...
}
最终看到了token的赋值了,这里分为三种情况:应用层窗口、子窗口和系统窗口,分别进行token赋值。 应用窗口直接得到的是与WindowManager对应的PhoneWindow的mAppToken,而子窗口是得到DecorView的 token,系统窗口属于比较特殊的窗口,使用Application也可以弹出,但是需要权限,这里不深入讨论。而这里的关键就是:这个dialog是什么类型的窗口?以及windowManager对应的PhoneWindow中有没有token?
而这个判断跟我们前面赋值的不同WindowManagerImpl有直接的关系。那么这里,就需要到Activity和Application 创建WindowManager的过程一看究竟了。 Activity与Application的WindowManager 首先我们看到Activity的window创建流程。这里需要了解Activity的启动流程。跟踪Activity的启动流程,最终会到 ActivityThread的performLaunchActivity:
private Activity performLaunchActivity(ActivityClientRecord r, Intent customIntent) { ... // 最终会调用这个方法来创建window // 注意r.token参数 activity.attach(appContext, this, getInstrumentation(), r.token, r.ident, app, r.intent, r.activityInfo, title, r.parent, r.embeddedID, r.lastNonConfigurationInstances, config, r.referrer, r.voiceInteractor, window, r.configCallback, r.assistToken); ...
}
这个方法执行了activity的attach方法来初始化window,同时我们看到参数里有了r.token这个参数,这个token最终会给到哪里,我们赶紧继续看下去:
final void attach(Context context, ActivityThread aThread, Instrumentation instr, IBinder token, int ident, Application application, Intent intent, ActivityInfo info, CharSequence title, Activity parent, String id, NonConfigurationInstances lastNonConfigurationInstances, Configuration config, String referrer, IVoiceInteractor voiceInteractor, Window window, ActivityConfigCallback activityConfigCallback, IBinder assistToken) { ... // 创建window mWindow = new PhoneWindow(this, window, activityConfigCallback); ... // 创建windowManager // 注意token参数 mWindow.setWindowManager( (WindowManager)context.getSystemService(Context.WINDOW_SERVICE), mToken, mComponent.flattenToString(), (info.flags & ActivityInfo.FLAG_HARDWARE_ACCELERATED) != 0); mWindowManager = mWindow.getWindowManager(); ...
}
attach方法里创建了PhoneWindow以及相应的WindowManager,再把创建的windowManager给到activity的 mWindowManager属性。我们看到创建WindowManager的参数里有token,我们继续看下去:
public void setWindowManager(WindowManager wm, IBinder appToken, String appName, boolean hardwareAccelerated) { mAppToken = appToken; mAppName = appName; mHardwareAccelerated = hardwareAccelerated; if (wm == null) { wm = (WindowManager)mContext.getSystemService(Context.WINDOW_SERVICE); } mWindowManager = ((WindowManagerImpl)wm).createLocalWindowManager(this);
}
这里利用应用服务的windowManager给Activity创建了WindowManager,同时把token保存在了PhoneWindow 内。到这里我们明白Activity的PhoneWindow是拥有token的。那么Application呢?
Application执行的是ContextImpl的getSystemService方法,而这个方法返回的是应用服务的windowManager, Application本身并没有创建自己的PhoneWindow和WindowManager,所以也没有给PhoneWindow赋值token的过程。 因此,Activity有自己PhoneWindow、WindowManager,同时它的PhoneWindow含有token;而 Application并没有自己的PhoneWindow,它返回的WindowManager是应用服务windowManager,并没有赋值token的过程。
我们再回过头看一下Dialog的show方法:
public void show() { ... WindowManager.LayoutParams l = mWindow.getAttributes(); ... WindowManager mWindowManager =(WindowManager) context.getSystemService(Context.WINDOW_SERVICE);mWindowManager.addView(mDecor, l); ...
}
dialog在调用show方法时,首先会获取一个WindowManager对象,然后通过WindowManager的addView方法,将dialog的PhoneWindow中的decorView添加到窗口中。获取这个WindowManager的时候,是通过一个context获取的,这里的context可能是 Activity,也可能是Application,他们的getSystemService返回的windowManager是不一样的,看代码:
//Activity.class
public Object getSystemService(@ServiceName @NonNull String name) { if (getBaseContext() == null) { throw new IllegalStateException( "System services not available to Activities before onCreate()"); } if (WINDOW_SERVICE.equals(name)) { // 返回的是自身的WindowManager return mWindowManager; } else if (SEARCH_SERVICE.equals(name)) { ensureSearchManager(); return mSearchManager; } return super.getSystemService(name);
} //ContextImpl.class
public Object getSystemService(String name) { return SystemServiceRegistry.getSystemService(this, name);
}
Activity返回的其实是自己的WindowManager,而Application是执行ContextImpl的方法,返回的是应用服务 windowManager。
当我们使用Activity来弹出dialog的时候,此时Activity的DecorView已经是显示到屏幕上了,也就是我们的Activity是有界面了,这个情况下,它就是属于子窗口的类型被添加到PhoneWindow中,而它的token就是DecorView的 token,此时DecorView已经被显示到屏幕上,它本身是拥有token的;
而如果是第一次显示,也就是应用界面,那么他的token就是Activity初始化传入的token。 但是如果使用的是Application,因为它内部并没有token,那么这里获取到的token等于null,后面到WMS也就会抛出异常了。而这也就使用Activity可以弹出Dialog而Application不可以的原因,因为受到了token的限制。
总结:
- token在创建ActivityRecord的时候一起被创建,他是一个IBinder对象,实现了接口IApplicationToken。
- token创建后会发送到WMS,在WMS中封装成WindowToken,并存在一个 HashMap。
- token会随着ActivityRecord被发送到本地进程,ActivityThread根据AMS的指令执行Activity启动逻辑。
- Activity启动的过程中会创建PhoneWindow和对应的WindowManager,同时把token存在PhoneWindow中。
- 通过Activity的WindowManager添加view,弹出dialog时会把PhoneWindow中的token放在窗口LayoutParams 中。
- 通过viewRootImpl向WMS进行验证,WMS在LayoutParams拿到IBinder之后就可以在Map中获取 WindowToken。
- 根据获取的结果就可以判断该token的合法情况。