SE-SSD模型训练
- 1 基于Det3d搭建SE-SSD环境
- 2 自定义数据准备
- 2.1 自定义数据集标注
- 2.2 训练数据生成
- 2.3 数据集分割
- 3 训练KITTI数据集
- 3.1 数据准备
- 3.2 配置修改
- 3.3 模型训练
1 基于Det3d搭建SE-SSD环境
Det3D环境搭建参考:【3D目标检测】环境搭建(OpenPCDet、MMdetection3d、Det3d)
SE-SSD源码链接:https://github.com/Vegeta2020/SE-SSD
首先激活Det3d环境(上述链接已经搭建好的环境):
conda activate det3d
新建
3_det3d_projects文件夹(自定义名称),用于储存基于Det3D架构的模型源码项目,将SE-SSD源码存储在里面
目录结构如下:
SE-SSD环境部署指令
cd ~/3_det3d_projects
git clone https://github.com/Vegeta2020/SE-SSD.git
cd ./SE-SSD/det3d/core/iou3d
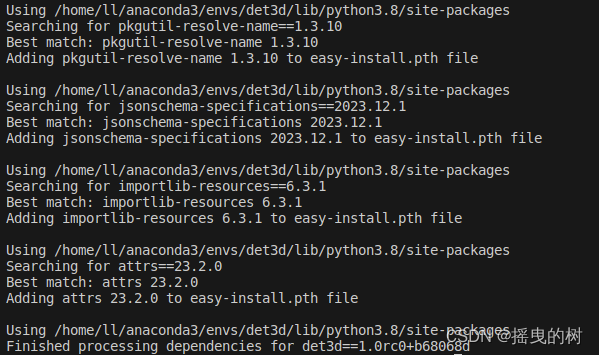
python setup.py install
cd ./SE-SSD
pip install ipykernel nbconvert numba==0.48 -i https://pypi.tuna.tsinghua.edu.cn/simple
python setup.py build developgit clone https://github.com/jackd/ifp-sample.git
pip install -e ifp-sample
成功安装如下:

以下未说明均在SE-SSD目录下
2 自定义数据准备
2.1 自定义数据集标注
参考链接:【3D目标检测】OpenPCDet自定义数据集训练
2.2 训练数据生成
官方参考链接:https://github.com/V2AI/Det3D/blob/master/GETTING_STARTED.md
数据组织结果如下:
# For KITTI Dataset
└── SE-SSD/data/kitti├── training    <-- 7481 train data├── image_2 <-- for visualization├── calib├── label_2├── velodyne└── velodyne_reduced <-- empty directory└── testing     <-- 7580 test data├── image_2 <-- for visualization├── calib├── velodyne└── velodyne_reduced <-- empty directory
# KITTI
python tools/create_data.py kitti_data_prep --root_path=KITTI_DATASET_ROOT
2.3 数据集分割
"""
2024.03.21
author:alian
数据预处理操作
1.数据集分割
"""
import os
import random
import shutil
import numpy as npdef get_train_val_txt_kitti_det3d(src_path):"""3D算法库:Det3D数据格式:KITTI# For KITTI Dataset└── KITTI_DATASET_ROOT├── training    <-- 7481 train data|   ├── image_2 <-- for visualization|   ├── calib|   ├── label_2|   ├── velodyne|   └── velodyne_reduced <-- empty directory└── testing     <-- 7580 test data├── image_2 <-- for visualization├── calib├── velodyne└── velodyne_reduced <-- empty directorysrc_path: KITTI_DATASET_ROOT kitti文件夹"""# 1.自动生成数据集划分文件夹ImageSetsset_path = "%s/ImageSets/"%src_pathif os.path.exists(set_path):  # 如果文件存在shutil.rmtree(set_path)  # 清空原始数据os.makedirs(set_path)  # 重新创建else:os.makedirs(set_path)  # 自动新建文件夹# 2.训练样本分割  生成train.txt val.txt trainval.txttrain_list = os.listdir(os.path.join(src_path,'training','velodyne'))random.shuffle(train_list)  # 打乱顺序,随机采样# 设置训练和验证的比例train_p = 0.8# 开始写入分割文件f_train = open(os.path.join(set_path, "train.txt"), 'w')f_val = open(os.path.join(set_path, "val.txt"), 'w')f_trainval = open(os.path.join(set_path, "trainval.txt"), 'w')for i,src in enumerate(train_list):if i<int(len(train_list)*train_p): # 训练集的数量f_train.write(src[:-4] + '\n')f_trainval.write(src[:-4] + '\n')else:f_val.write(src[:-4] + '\n')f_trainval.write(src[:-4] + '\n')# 3.测试样本分割  生成test.txttest_list = os.listdir(os.path.join(src_path,'testing','velodyne'))f_test = open(os.path.join(set_path, "test.txt"), 'w')for i,src in enumerate(test_list):f_test.write(src[:-4] + '\n')if __name__=='__main__':"""src_path: 数据目录"""src_path = '/media/ll/L/llr/a2023_my_3d/Det3D/data/custom'get_train_val_txt_kitti_det3d(src_path)
输入:数据集路径
输出:在输入的数据集路径下生成
└── ImageSets├── train.txt├── val.txt├── test.txt└── trainval.txt
3 训练KITTI数据集
先训练公开数据集,验证代码可行性
3.1 数据准备
tools/creat_data.py
import copy
from pathlib import Path
import pickleimport firefrom det3d.datasets.kitti import kitti_common as kitti_ds
from det3d.datasets.utils.create_gt_database import create_groundtruth_database
from det3d.torchie import Configdef kitti_data_prep(root_path):kitti_ds.create_kitti_info_file(root_path)kitti_ds.create_reduced_point_cloud(root_path)create_groundtruth_database("KITTI", root_path, Path(root_path) / "kitti_infos_train.pkl")if __name__ == "__main__":# 数据集目录kitti_data_prep("/media/ll/L/llr/a2023_my_3d/3_det3d_projects/SE-SSD/data/kitti")
运行指令
Python tools/creat_data.py
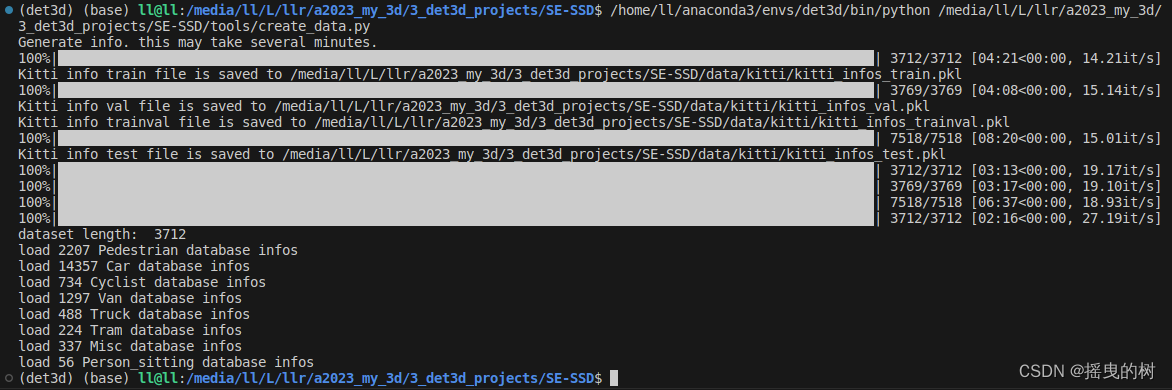
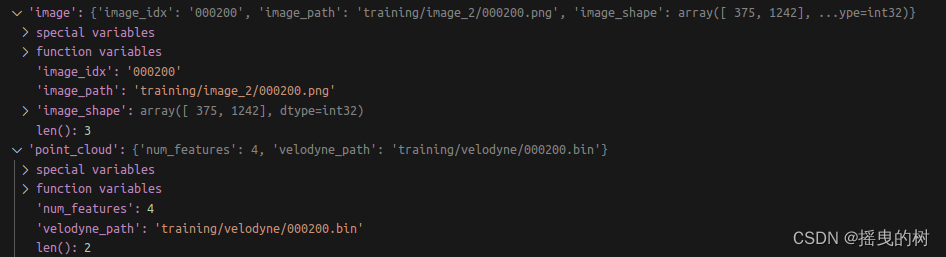
其中kitti_infos_train.pkl的数据信息如下:
储存了所有数据的信息(以文件为单位)

包括:图像、点云、标定、标签信息
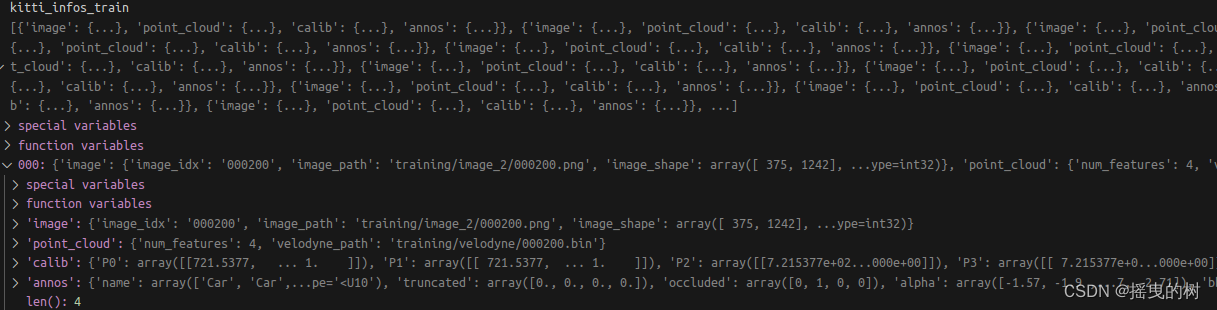
其中图像和点云信息如下:
其中标签信息如下:
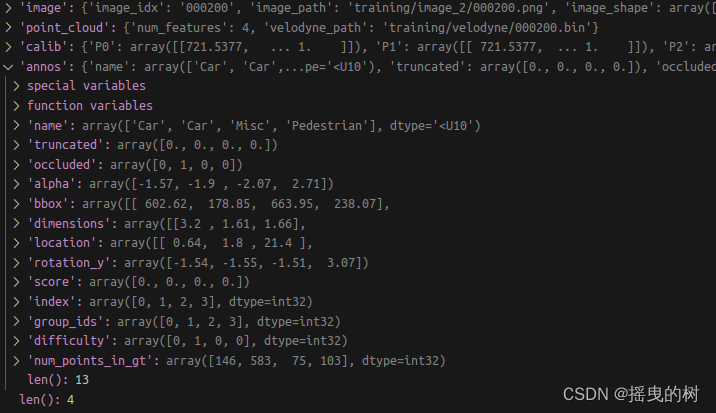
标注信息解析:
第1列(字符串):代表物体类别(type)
总共有9类,分别是:Car、Van、Truck、Pedestrian、Person_sitting、Cyclist、Tram、Misc、DontCare。
其中DontCare标签表示该区域没有被标注,比如由于目标物体距离激光雷达太远。为了防止在评估过程中(主要是计算precision),将本来是目标物体但是因为某些原因而没有标注的区域统计为假阳性(false positives),评估脚本会自动忽略DontCare区域的预测结果。第2列(浮点数):代表物体是否被截断(truncated)
数值在0(非截断)到1(截断)之间浮动,数字表示指离开图像边界对象的程度。第3列(整数):代表物体是否被遮挡(occluded)
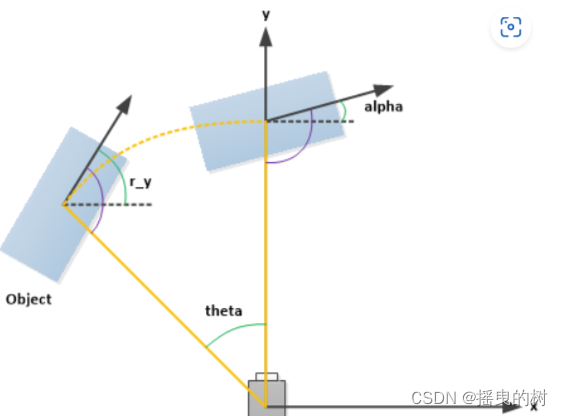
整数0、1、2、3分别表示被遮挡的程度。第4列(弧度数):物体的观察角度(alpha)
取值范围为:-pi ~ pi(单位:rad),它表示在相机坐标系下,以相机原点为中心,相机原点到物体中心的连线为半径,将物体绕相机y轴旋转至相机z轴,此时物体方向与相机x轴的夹角(如下图所示,y轴垂直与屏幕)第5~8列(浮点数):物体的2D边界框大小(bbox)
四个数分别是xmin、ymin、xmax、ymax(单位:pixel),表示2维边界框的左上角和右下角的坐标。第9~11列(浮点数):3D物体的尺寸(dimensions)
分别是高、宽、长(单位:米)第12-14列(浮点数):3D物体的位置(location)
分别是x、y、z(单位:米),特别注意的是,这里的xyz是在相机坐标系下3D物体的中心点位置。第15列(弧度数):3D物体的空间方向(rotation_y)
取值范围为:-pi ~pi(单位:rad),它表示,在照相机坐标系下,物体的全局方向角(物体前进方向与相机坐标系x轴的夹角),如下图所示。第16列(浮点数):检测的置信度(score)
其中dbinfos_train.pkl的数据信息如下:
根据类别来划分样本实例


重要说明:
当准备数据集时,./Det3d/det3d
当训练模型时,./Det3d/0det3d
原因解释:
数据准备时,使用Det3d的det3d
模型训练时则用回SE-SSD的det3d
└── 3_det3d_projects├── SE-SSD├── det3d└── ......└── ......
└── Det3D├── 0det3d(数据集准备好后,改变名字,否则后续使用SE-SSD会找不到自己的det3d)└── ......
3.2 配置修改
修改examples/second/configs/config.py配置
主要修改三个部分
- 数据集目录
- 权重保存目录
- 预训练权重目录
import itertools
import logging
from pathlib import Pathfrom det3d.builder import build_box_coder
from det3d.utils.config_tool import get_downsample_factor
import glob# norm_cfg = dict(type='SyncBN', eps=1e-3, momentum=0.01)
norm_cfg = Nonetasks = [dict(num_class=1, class_names=["Car"],),]class_names = list(itertools.chain(*[t["class_names"] for t in tasks]))# training and testing settings
box_coder = dict(type="ground_box3d_coder", n_dim=7, linear_dim=False, encode_angle_vector=False,)# exp_sesssd_release_v0_0: based on v1_0, remove sada
# exp_sesssd_release_v1_0: default settings of sesssd# torch.set_printoptions(precision=4, sci_mode=False)
my_paras = dict(batch_size=4,data_mode="train",        # "train" or "trainval": the set to train the model;enable_ssl=True,         # Ensure "False" in CIA-SSD trainingeval_training_set=False,  # True: eval on "data_mode" set; False: eval on validation set.[Ensure "False" in training; Switch in Testing]# unusedenable_difficulty_level=False,remove_difficulty_points=False,  # act with neccessary condition: enable_difficulty_level=True.gt_random_drop=-1,data_aug_random_drop=-1,far_points_first=False,data_aug_with_context=-1,        # enlarged size for w and l in data aug.gt_aug_with_context=-1,gt_aug_similar_type=False,min_points_in_gt=-1,loss_iou=None,
)# model settings
model = dict(type="VoxelNet",pretrained=None,reader=dict(type="VoxelFeatureExtractorV3", num_input_features=4, norm_cfg=norm_cfg,),backbone=dict(type="SpMiddleFHD", num_input_features=4, ds_factor=8, norm_cfg=norm_cfg,),neck=dict(type="SSFA",layer_nums=[5,],ds_layer_strides=[1,],ds_num_filters=[128,],us_layer_strides=[1,],us_num_filters=[128,],num_input_features=128,norm_cfg=norm_cfg,logger=logging.getLogger("RPN"),),bbox_head=dict(type="MultiGroupHead",mode="3d",in_channels=sum([128,]),norm_cfg=norm_cfg,tasks=tasks,weights=[1,],box_coder=build_box_coder(box_coder),encode_background_as_zeros=True,loss_norm=dict(type="NormByNumPositives", pos_cls_weight=1.0, neg_cls_weight=1.0,),loss_cls=dict(type="SigmoidFocalLoss", alpha=0.25, gamma=2.0, loss_weight=1.0,),use_sigmoid_score=True,loss_bbox=dict(type="WeightedSmoothL1Loss", sigma=3.0, code_weights=[1.0, 1.0, 1.0, 1.0, 1.0, 1.0, 1.0], codewise=True, loss_weight=2.0, ),encode_rad_error_by_sin=True,loss_aux=dict(type="WeightedSoftmaxClassificationLoss", name="direction_classifier", loss_weight=0.2,),direction_offset=0.0,#loss_iou=my_paras['loss_iou'],),
)target_assigner = dict(type="iou",anchor_generators=[dict(type="anchor_generator_range",sizes=[1.6, 3.9, 1.56],  # w, l, hanchor_ranges=[0, -40.0, -1.0, 70.4, 40.0, -1.0],rotations=[0, 1.57],matched_threshold=0.6,unmatched_threshold=0.45,class_name="Car",),],sample_positive_fraction=-1,sample_size=512,region_similarity_calculator=dict(type="nearest_iou_similarity",),pos_area_threshold=-1,tasks=tasks,
)assigner = dict(box_coder=box_coder,target_assigner=target_assigner,out_size_factor=8,debug=False,enable_similar_type=True,
)train_cfg = dict(assigner=assigner)test_cfg = dict(nms=dict(use_rotate_nms=True,use_multi_class_nms=False,nms_pre_max_size=1000,nms_post_max_size=100,nms_iou_threshold=0.01,),score_threshold=0.3,post_center_limit_range=[0, -40.0, -5.0, 70.4, 40.0, 5.0],max_per_img=100,
)# dataset settings----------------------------------------------------------------------------------
data_root_prefix = "/media/ll/L/llr/a2023_my_3d/3_det3d_projects/SE-SSD/data/kitti"  # 数据集目录
dataset_type = "KittiDataset"db_sampler = dict(type="GT-AUG",enable=True,db_info_path=glob.glob('%s/dbinfos_train.pkl'%data_root_prefix)[0],sample_groups=[dict(Car=15,),],db_prep_steps=[dict(filter_by_min_num_points=dict(Car=5,)),dict(filter_by_difficulty=[-1],),    # todo: need to check carefully],global_random_rotation_range_per_object=[0, 0],rate=1.0,gt_random_drop=my_paras['gt_random_drop'],gt_aug_with_context=my_paras['gt_aug_with_context'],gt_aug_similar_type=my_paras['gt_aug_similar_type'],
)
train_preprocessor = dict(mode="train",shuffle_points=True,gt_loc_noise=[1.0, 1.0, 0.5],gt_rot_noise=[-0.785, 0.785],global_rot_noise=[-0.785, 0.785],global_scale_noise=[0.95, 1.05],global_rot_per_obj_range=[0, 0],global_trans_noise=[0.0, 0.0, 0.0],remove_points_after_sample=True,gt_drop_percentage=0.0,gt_drop_max_keep_points=15,remove_environment=False,remove_unknown_examples=my_paras.get("remove_difficulty_points", False),db_sampler=db_sampler,class_names=class_names,   # 'Car'symmetry_intensity=False,enable_similar_type=True,min_points_in_gt=my_paras["min_points_in_gt"],data_aug_with_context=my_paras["data_aug_with_context"],data_aug_random_drop=my_paras["data_aug_random_drop"],
)val_preprocessor = dict(mode="val",shuffle_points=False,remove_environment=False,remove_unknown_examples=False,
)voxel_generator = dict(range=[0, -40.0, -3.0, 70.4, 40.0, 1.0],voxel_size=[0.05, 0.05, 0.1],max_points_in_voxel=5,max_voxel_num=20000,far_points_first=my_paras['far_points_first'],
)train_pipeline = [dict(type="LoadPointCloudFromFile"),dict(type="LoadPointCloudAnnotations", with_bbox=True, enable_difficulty_level=my_paras.get("enable_difficulty_level", False)),dict(type="Preprocess", cfg=train_preprocessor),dict(type="Voxelization", cfg=voxel_generator),dict(type="AssignTarget", cfg=train_cfg["assigner"]),dict(type="Reformat"),# dict(type='PointCloudCollect', keys=['points', 'voxels', 'annotations', 'calib']),
]
test_pipeline = [dict(type="LoadPointCloudFromFile"),dict(type="LoadPointCloudAnnotations", with_bbox=True),dict(type="Preprocess", cfg=val_preprocessor),dict(type="Voxelization", cfg=voxel_generator),dict(type="AssignTarget", cfg=train_cfg["assigner"]),dict(type="Reformat"),
]
training_pipeline = test_pipeline if my_paras['eval_training_set'] else train_pipelinedata_root = data_root_prefix  #  数据集目录
train_anno = glob.glob('%s/*_infos_train.pkl'%data_root_prefix)[0]
val_anno = glob.glob('%s/*val.pkl'%data_root_prefix)[0]
test_anno = glob.glob('%s/*test.pkl'%data_root_prefix)[0]
trainval_anno = glob.glob('%s/*trainval.pkl'%data_root_prefix)[0]data = dict(samples_per_gpu=my_paras['batch_size'],  # batch_size: 4workers_per_gpu=2,  # default: 2train=dict(type=dataset_type,root_path=data_root,info_path=train_anno,class_names=class_names,pipeline=training_pipeline,),val=dict(type=dataset_type,root_path=data_root,info_path=val_anno,class_names=class_names,pipeline=test_pipeline,),test=dict(type=dataset_type,root_path=data_root,info_path=test_anno,class_names=class_names,pipeline=test_pipeline,),trainval=dict(type=dataset_type,root_path=data_root,info_path=trainval_anno,class_names=class_names,pipeline=test_pipeline,),train_unlabel_val=dict(type=dataset_type,root_path=data_root,info_path=val_anno,class_names=class_names,pipeline=train_pipeline,labeled=False,),train_unlabel_test=dict(type=dataset_type,root_path=data_root,info_path=test_anno,class_names=class_names,pipeline=train_pipeline,labeled=False,),
)# for cia optimizer
optimizer = dict(type="adam", amsgrad=0.0, wd=0.01, fixed_wd=True, moving_average=False,)
optimizer_config = dict(grad_clip=dict(max_norm=35, norm_type=2))
lr_config = dict(type="one_cycle", lr_max=0.003, moms=[0.95, 0.85], div_factor=10.0, pct_start=0.4,)  # learning policy in training hookscheckpoint_config = dict(interval=1)
log_config = dict(interval=10,hooks=[dict(type="TextLoggerHook"),],) # dict(type='TensorboardLoggerHook')# runtime settings-----------------------------------------------------------------------------------------
TAG = 'exp_se_ssd_v1_1'  #  权重文件保存目录
work_dir = "/media/ll/L/llr/a2023_my_3d/3_det3d_projects/SE-SSD/examples/second/" + TAG
total_epochs = 60
device_ids = range(8)
dist_params = dict(backend="nccl", init_method="env://")
log_level = "INFO"
# 预训练权重文件
load_from = "/media/ll/L/llr/a2023_my_3d/3_det3d_projects/SE-SSD/examples/second/pre_trained_model/cia-ssd-model.pth"
resume_from = None
workflow = [("train", 60), ("val", 1)] if my_paras['enable_ssl'] else [("train", 60), ("val", 1)]
save_file = False if TAG == "debug" or TAG == "exp_debug" or Path(work_dir, "Det3D").is_dir() else True
3.3 模型训练
下载预训练权重文件
SE-SSE预训练权重:https://drive.google.com/file/d/1M2nP_bGpOy0Eo90xWFoTIUkjhdw30Pjs/view?usp=sharing
CIA-SSD预训练权重:https://drive.google.com/file/d/1SElYNQCsr4gctqLxmB6Fc4t7Ed8SgBgs/view?usp=sharing
修改tools/train.py配置文件的路径
大概在29行
def parse_args():parser = argparse.ArgumentParser(description="Train a detector")# 修改这里!!!!!parser.add_argument("--config", default='/media/ll/L/llr/a2023_my_3d/3_det3d_projects/SE-SSD/examples/second/configs/config.py', help="train config file path")parser.add_argument("--work_dir", help="the dir to save logs and models")parser.add_argument("--resume_from", help="the checkpoint file to resume from")parser.add_argument("--validate", action="store_true", help="whether to evaluate the checkpoint during training",)parser.add_argument("--gpus", type=int, default=1, help="number of gpus to use " "(only applicable to non-distributed training)",)parser.add_argument("--seed", type=int, default=None, help="random seed")parser.add_argument("--launcher",choices=["none", "pytorch", "slurm", "mpi"],default="none",help="job launcher",)parser.add_argument("--local_rank", type=int, default=0)parser.add_argument("--autoscale-lr",action="store_true",help="automatically scale lr with the number of gpus",)parser.add_argument("--save_file", type=bool, default=True, help="whether save code files as backup", )args = parser.parse_args()if "LOCAL_RANK" not in os.environ:os.environ["LOCAL_RANK"] = str(args.local_rank)return args
训练指令:
python tools/train.py


以上就实现了SE-SSD在KITTI数据上的训练!