1、环境准备
1.1、g++的安装与使用
1.1.1、安装
方式一:Xcode安装
苹果的开发集成工具是Xcode.app,其中包含一堆命令行工具。
在 App store 可以看到其大小有好几个G,有点大。
方式二:Command Line Tools 安装
Command Line Tools是MacOS开发工具Xcode的命令行工具,安装Xcode会自动安装但是由于Xcode体局巨大所以可以通过别的方式只安装
Command Line Tools。这里就不演示了。
1.1.2、验证是否安装成功
执行如下指令能看到 clang 相关的输出即可。
g++ --version
1.1.3、使用
创建名为main.cpp内容如下的程序文件:
#include <iostream>
#include <vector>
#include <set>
#include <map>
using namespace std;int main()
{set<string> myset1;set<string> myset2;myset1.insert("nihao1");myset1.insert("nihao2");myset1.insert("nihao3");myset1.insert("nihao4");myset2.insert("nihao1");myset2.insert("nihao2");myset2.insert("nihao3");myset2.insert("nihao4");// myset2.insert("nihao5");map<set<string>, string> tmp_map;tmp_map[myset1] = "1";if (tmp_map.find(myset2) != tmp_map.end()){cout << "myset1 == myset2!" << endl;}else{cout << "myset1 != myset2!" << endl;}
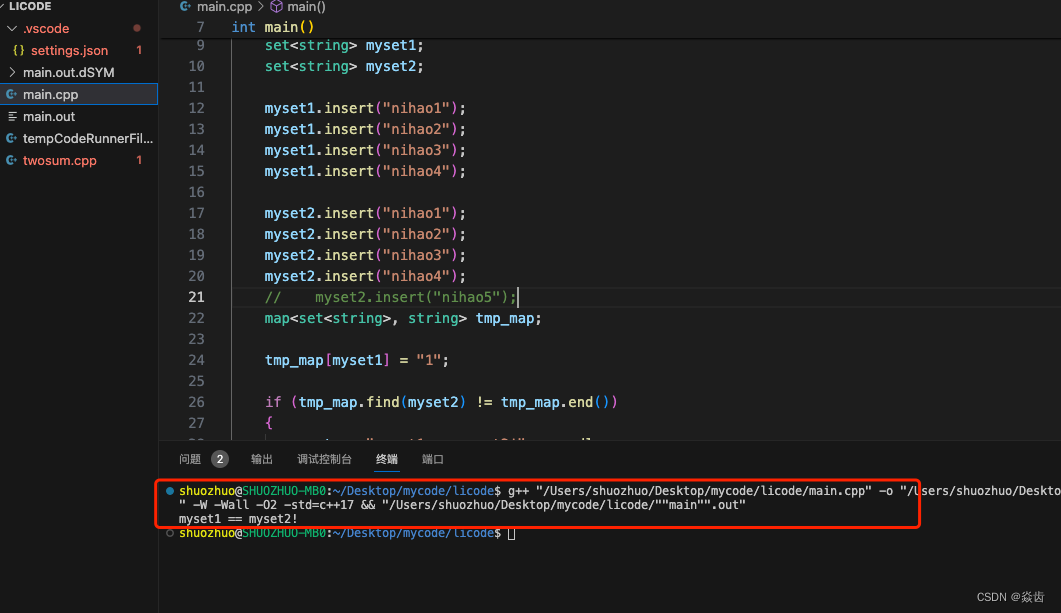
}g++ main.cpp -o main.out #指定输出文件名名称
g++ main.cpp -o main.out -O2 #指定编译优化
g++ main.cpp -o main.out -std=c++11 #指定C++版本
g++ main.cpp -o main.out -W Wall #开启显示告警信息的编译选项
g++ main.cpp -o main.out -g #开启调试(会附加写调试信息,方便调试代码)#所以,完整的relase编译如下
g++ <filename>.cpp <other_cpp_files> -o <filename>.out -W Wall -O2 -std=c++11#完整的debug编译如下
g++ <filename>.cpp <other_cpp_files> -o <filename>.out -W Wall -g -std=c++111.2、vscode及插件安装
1.2.1、搜vscode官网下载安装
1.2.2、介绍
开源、功能强大(高亮/自动补齐都是最基本的功能);
轻量,相对xcode轻量太多;
几乎可以用来编写所有的语言、甚至写文档,只要安装对应插件即可;
个性化配置程度高;
1.2.3、安装插件
① C/C++: 选择Microsoft提供的那个,一般都是第一个。
② Code Runner: 也可以运行 java、pythongo等很多语言,强烈建议安装。
③ Chinese (Simplified): 如果需要中文可以装这个插件
④ vscode-icon-mac: 资源管理器中的文件都会显示对应的图标,能好看不少
⑤ Bracket Pair Colorizer(彩虹括号): 可以看到配对括号会有相同颜色标识⑥Chinese (Simplified): 代码自动补齐插件
1.2.4、创建一个目录作为 workspace
Desktop/mycode/licode
2、vscode基本使用
(1)打开终端(下方窗口)
查看 → 终端
也可以使用快捷键 Command+J
(2)更改颜色主题
快捷键: Command(Ctrl) + k + t
也可以 右下角(齿轮) → 主题 效果一样
(3)代码行注释/取消行注释
Command(Ctrl) + "/"
也可以 编辑 → 切换行注释
(4)代码块注释/取消块注释
快捷键: Option(Alt) + shift +A
也可以 编辑 → 切换块注释
(5)代码格式化
Option(Alt) + Shift + F
也可以 右键 → 格式化文档(Format Document)
(6)代码结构提示(snippet)
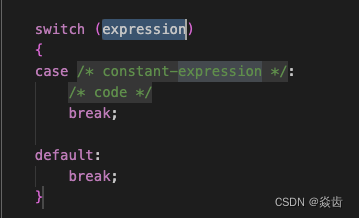
输入 switch ,点击出现的提示"Code snippet for switch";就可以自动补齐关键字相应的提示。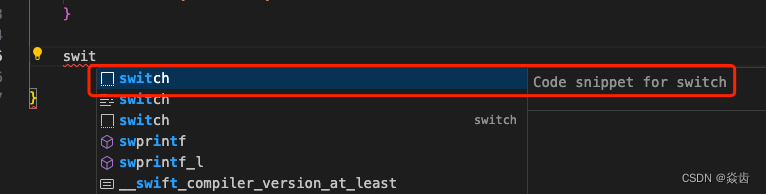 点击后自动补齐框架:
(7)光标相关操作
Command(Ctrl) + 方向(上下左右)  #文件首/文件尾/行首/行尾
Shift + 方向(上下左右)   #选择目标内容
Shift + 鼠标            #选择当前光标和鼠标点击之间的内容
Option(Alt) + 方向      #左右一次移动一个单词的举例; 上下则是把当前行向上或者向下移动一行。注:上述快捷键可以配合使用。例如:
从当前光标位置直接选到文件开头: Command + Shit + ↑ 即可实现。Command +C/V/X :默认就是赋值/粘贴光标所在行同时编辑多个地方:
按住Option(Alt) + 鼠标双击选择多个东西:然后就可以对选中的多个文件同时编辑了。
3、setting.json
(1)打开设置页面
快捷键: Command + ,
也可以 左下角齿轮 → 设置
也可以 上边栏Code → 首选项 → 设置(2)用户(User)级别的设置 与 工作区(Workspace)级别的设置
后者仅仅对当前工作空间生效;前者则对全局所有生效。

- 所谓工作区就理解为 当前工作的文件夹即可。
- 工作区设置和用户/全局设置同时存在时,工作区设置优先级更高。
- 建议 workspace 维度修改配置,其对应的配置文件为 .vscode/settings.json 。
- 用户(全局)设置也会对应一个 settings.json 配置文件。
workspace的设置位于如下路径。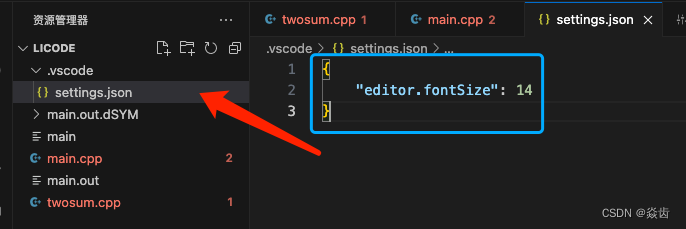
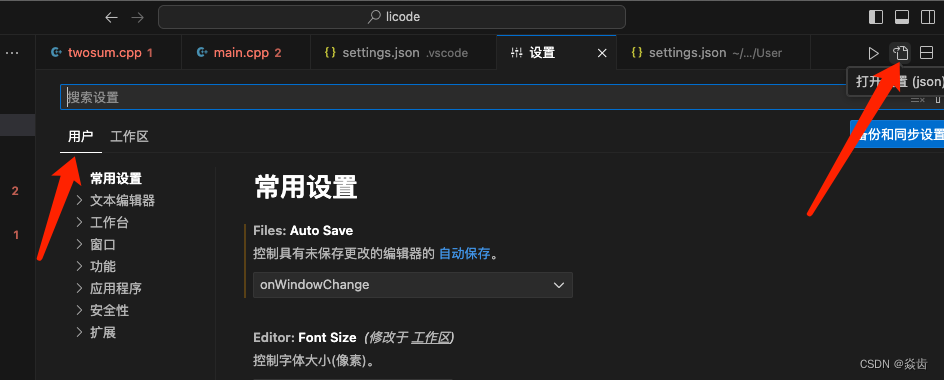
user(全局)的 settings.json 配置文件可以通过如下方式打开。
(3)然后想要设置什么就搜什么
搜 "format google" #采用google的格式化方式
搜 "font size" #调整字体
搜 "theme" #调整主题
(4)将 用户 维度的配置搞一份到工作区
每个配置前面都有一个齿轮符号。
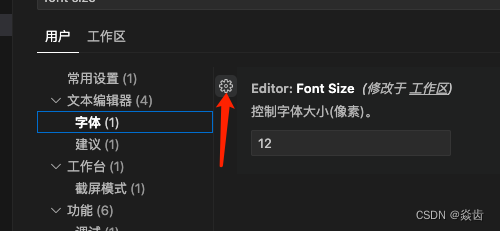
点击后可以“重置设置”也可以“复制设置id”,复制的这个id就可以作为settings.json的key。
(5)更多快捷键设置
左下角齿轮 → 键盘快捷键方式 , 然后就可以设置了。
4、代码运行自动化(Code Runner)
其实就是让vscode自动编译、运行我们的代码。替代我们之前看到的终端重复敲命令。
简介:依赖code runner插件,重点是在 settings.json 中做相应的配置。
这个插件的具体配置参见官网:
https://marketplace.visualstudio.com/items?itemName=formulahendry.code-runner
下面提供了一个配置样例:
{"editor.fontSize": 14,"window.zoomLevel": 0,//添加希望被忽略的文件(左侧文件栏隐藏不展示)// "files.exclude": {//     "**/*.dSYM": true,//     "**/*.out": true,  //相当于*.out的文件都不在左侧文件列表显示// }//设置每种语言的执行器"code-runner.executorMap": {"php": "C:\\php\\php.exe","python": "python","go": "go run","html": "\"C:\\Program Files (x86)\\Google\\Chrome\\Application\\chrome.exe\"","java": "cd $dir && javac $fileName && java $fileNameWithoutExt",//"c": "cd $dir && gcc $fileName -o $fileNameWithoutExt && $dir$fileNameWithoutExt",/*---------------编译、运行只有一个文件的c工程-------------*/"c": "gcc $fullFileName -o $dir\"$fileNameWithoutExt\"\".out\" -W -Wall -O2 -std=c++17 && $dir\"$fileNameWithoutExt\"\".out\"",/*---------------编译、运行只有一个文件的cpp工程-------------*/// 如果执行的目录下的main.cpp,如下指令替换后即为:// g++ main.cpp -o /home/licode/main.out -W Wall -O2 -std-c++17 && /home/licode/main.out "cpp": "g++ $fullFileName -o $dir\"$fileNameWithoutExt\"\".out\" -W -Wall -O2 -std=c++17 && $dir\"$fileNameWithoutExt\"\".out\"",//"cpp": "g++ $fullFileName -o $dir$fileNameWithoutExt.out -W -Wall -O2 -std=c++17 && $dir\"$fileNameWithoutExt\"\".out\"",/*---------------编译、运行多个cpp文件-------------*///"cpp": "g++ $fullFileName <file_to_link> -o $dir\"$fileNameWithoutExt\"\".out\" -W -Wall -O2 -std=c++17 && $dir\"$fileNameWithoutExt\"\".out\"",},//是否清空输出页面"code-runner.clearPreviousOutput": true,//是否保存所有文件(在运行之前)"code-runner.saveAllFilesBeforeRun": false,//是否保存当前文件(在运行之前)"code-runner.saveFileBeforeRun": true,//"code-runner.showExecutionMessage": true,//To set whether to run code in Integrated Terminal (only support to run whole file in Integrated Terminal, neither untitled file nor code snippet) (default is false):"code-runner.runInTerminal": true,//设为false的话可以执行选中的部分代码(注:对于C++来说设为false没意义)"code-runner.ignoreSelection": true,
}
然后 main.cpp 文件 右键 → Run Code 就可以自动编译并执行了。
更多使用方法参见官网就好,这里简单说几点方便后续使用。
第一点:光标停留在配置项时会自动出现说明
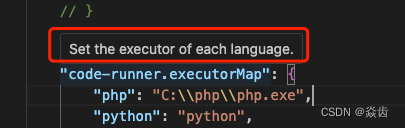
第二点:也是有自动补齐的
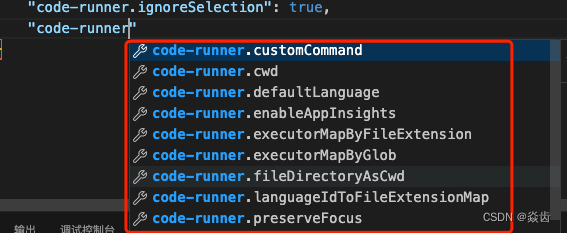
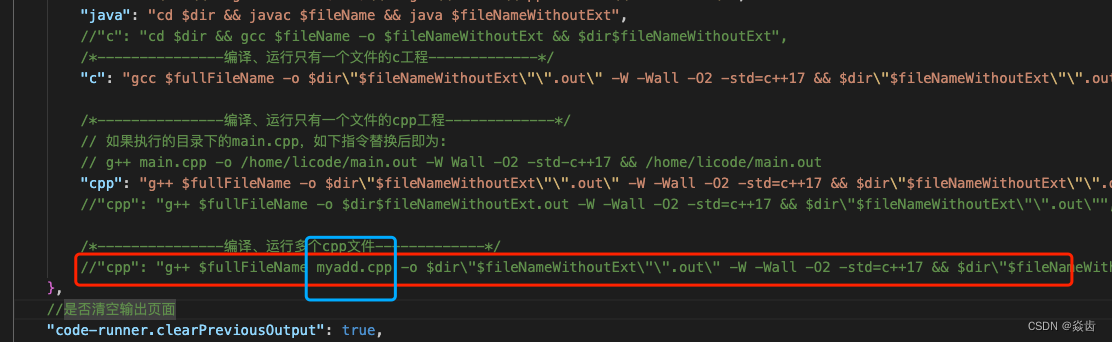
注意:这里如果想要支持多个文件的自动化指定还是需要自己修改 settings.json 的。
如下图所示,需要修改并放开:
5、vscode调试C++代码
调试主要就是两个文件 tasks.json 和 launch.json ,把这两个文件搞清楚就行了。
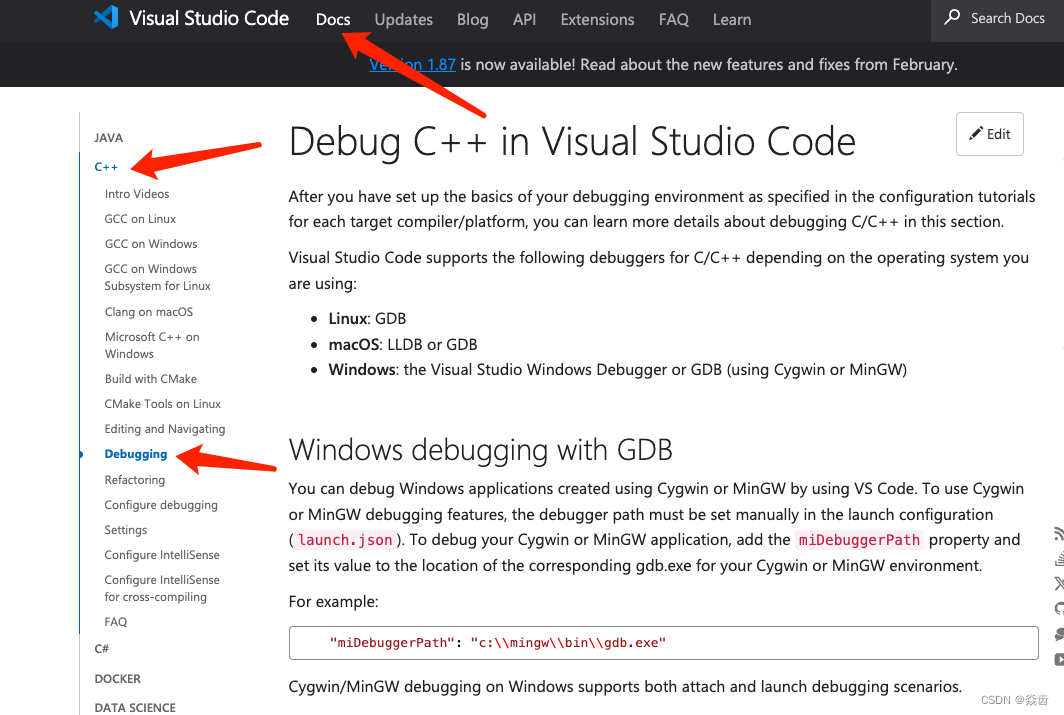
同理,没有什么比官方文档更详尽。 Visual Studio Code - Code Editing. Redefined
如下可以看到C++调试相关。 Debug C++ in Visual Studio Code
5.1、配置tasks.json
{// Tasks in VS Code can be configured to run scripts and start processes// so that many of these existing tools can be used from within VS Code // without having to enter a command line or write new code.// Workspace or folder specific tasks are configured from the tasks.json file in the .vscode folder for a workspace."version": "2.0.0","tasks": [{// The task's label used in the user interface.// Terminal -> Run Task... 看到的名字"label": "g++ compile",// The task's type. For a custom task, this can either be shell or process.// If shell is specified, the command is interpreted as a shell command (for example: bash, cmd, or PowerShell).// If process is specified, the command is interpreted as a process to execute."type": "shell",// shell: 输入命令// The actual command to execute.// 因为g++已经在环境变量中了,所以我们这里写命令就行不用写g++的绝对路径"command": "g++","args": ["${file}", // 表示当前文件(绝对路径)// 在这里添加你还需要链接的.cpp文件"-o","${fileDirname}/${fileBasenameNoExtension}.out","-W","-Wall","-g","-std=c++17",],// Defines to which execution group this task belongs to.// It supports "build" to add it to the build group and "test" to add it to the test group.// Tasks that belong to the build/test group can be executed by running Run Build/Test Task from the Command Palette (sft cmd P).// Valid values:// "build",// {"kind":"build","isDefault":true}, // "test",// {"kind":"test","isDefault":true}, // "none"."group": {"kind": "build","isDefault": true, // Defines if this task is the default task in the group.},// Configures the panel that is used to present the task's output and reads its input."presentation": {// Controls whether the executed command is echoed to the panel. Default is true."echo": true, // 打开可以看到编译的命令,把命令本身输出一次// Controls whether the terminal running the task is revealed or not. Default is "always".// always: Always reveals the terminal when this task is executed.// silent: Only reveals the terminal if the task exits with an error or the problem matcher finds an error.(会显示错误,但不会显示警告)// never: Never reveals the terminal when this task is executed."reveal": "silent", // 控制在集成终端中是否显示。如果没问题那我不希望终端被切换、如果有问题我希望能看到编译过程哪里出错,所以选silent(可能always会好一些)// Controls whether the panel takes focus. Default is false."focus": false, // 我的理解是:是否将鼠标移过去。因为这个是编译任务,我们不需要输入什么东西,所以选false// Controls if the panel is shared between tasks, dedicated to this task or a new one is created on every run."panel": "shared", // shared:不同任务的输出使用同一个终端panel(为了少生成几个panel我们选shared)// Controls whether to show the `Terminal will be reused by tasks, press any key to close it` message."showReuseMessage": true, // 就一句话,你想看就true,不想看就false// Controls whether the terminal is cleared before executing the task."clear": false, // 还是保留之前的task输出信息比较好。所以不清理},// Other two choices: options & runOptions (cmd I to use IntelliSense)"options": {// The current working directory of the executed program or script. If omitted Code's current workspace root is used."cwd": "${workspaceFolder}",// 默认就是这个,删掉也没问题},// problemMatcher: 用正则表达式提取g++的输出中的错误信息并将其显示到VS Code下方的Problems窗口// check: https://code.visualstudio.com/docs/editor/tasks#_defining-a-problem-matcher"problemMatcher": {"owner": "cpp","fileLocation": "absolute","pattern": {"regexp": "^(.*):(\\d+):(\\d+):\\s+(warning|error):\\s+(.*)$","file": 1,"line": 2,"column": 3,"severity": 4,"message": 5,},},// 官网教程 https://code.visualstudio.com/docs/cpp/config-clang-mac#_build-helloworldcpp // 提到了另一种problemMatcher,但试了之后好像不起作用,甚至还把我原本的电脑搞出了一些问题……},{"label": "Open Terminal.app","type": "shell","command": "osascript -e 'tell application \"Terminal\"\ndo script \"echo now VS Code is able to open Terminal.app\"\nend tell'","problemMatcher": [],"group": "none",}]}5.2、配置launch.json文件
注意事项:
(1)使用M1芯片mac时要给给vscode安装 CodeLLDB 插件;
(2)另外还要将type的值从“cppdbg”改成“lldb”;
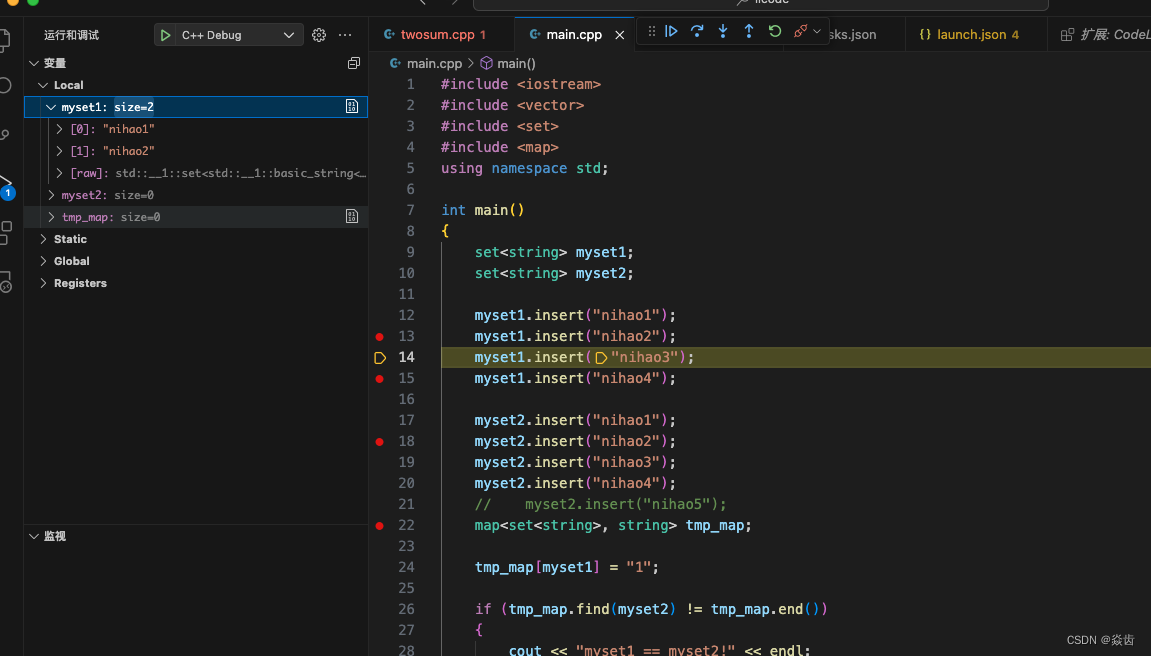
{// One of the key features of Visual Studio Code is its great debugging support.// VS Code's built-in debugger helps accelerate your edit, compile and debug loop.// VS Code keeps debugging configuration information in a launch.json file// located in a .vscode folder in your workspace (project root folder)."version": "0.2.0","configurations": [{/* ------ these three options are mandatory ------ */// The type of debugger to use for this launch configuration."type": "lldb", // C++ debug// The request type of this launch configuration. Currently, launch and attach are supported.// If you come from a server or desktop background, // it's quite normal to have your editor launch your process for you, // and your editor automatically attaches its debugger to the newly launched process.// A launch configuration starts your app in debug mode before VS Code attaches to it.// 大概意思是说,如果你开始debug的时候你的项目已经启起来了,那就attach(把debug的工具附加上去)// 如果你开始debug的时机和你启动项目的时机是相同的,那就launch"request": "launch", // debug的类型,launch表示启动,attach表示附加// The reader-friendly name to appear in the Debug launch configuration drop-down."name": "C++ Debug", // 在VSCode侧边栏Run那里看到的名字(可以随便起)/* ------ some optional attributes available to all launch configurations ------ */// To launch a task before the start of a debug session, set this attribute to the label of a task specified in tasks.json."preLaunchTask": "g++ compile", //在调试之前要进行的工作 compile是在 tasks.json 的编译任务里面的label/* ------ Many debuggers support some of the following attributes: ------ */// executable or file to run when launching the debugger// !!不要在程序和代码的路径及文件名中出现空格!!否则无法调试(我尝试解决这个问题,但真的无法解决)"program": "${fileDirname}/${fileBasenameNoExtension}.out", // debug的对象(-g编译出来的二进制文件),需要和.vscode/tasks.json中生成的可执行文件一致// arguments passed to the program to debug"args": [], // 比如运行你的程序添加输入参数(argc/argv),需要在这里添加// Environment variables to add to the environment for the program"environment": [], // 放置环境变量// current working directory for finding dependencies and other files"cwd": "${workspaceFolder}",// break immediately when the program launches"stopAtEntry": false,// If true, a console is launched for the debuggee.// If false, on Linux and Windows, it will appear in the Integrated Console."externalConsole": true,// 为true则会打开系统终端在其中进行交互// 如果为 true,则为调试对象启动控制台。如果为 false,它在 Linux 和 Windows 上会显示在集成控制台中// macOS不适用:https://code.visualstudio.com/docs/cpp/launch-json-reference#_externalconsole/* ------ Customizing GDB or LLDB ------ */// Indicates the debugger that VS Code will connect to. Must be set to gdb or lldb. // 但是macOS只安装了llbd(有可能是安装命令行工具的时候安装的),那就用lldb吧"MIMode": "lldb",}]}然后就可以调试了,如下:
5.3、c_cpp_properties.json是干什么的?
参照官方说明: https://code.visualstudio.com/docs/cpp/c-cpp-properties-schema-reference
感觉c_cpp_properties.json仅仅是用来替换掉在设置或者是settings.json中出现的 C_Cpp.default.*的这些选项,把这些设置提了出来放到这个文件里面,这个文件也会对这些设置提供一些好的语法,让你更方便的设置这些项;也可以在tasks.json和launch.json中调用这些配置。
如果不需要设置C_Cpp.default.*里面的选项,那么就不需要这个c_cpp_properties.json。
我的教程直接从命令行入手了,这里面的设置我都直接用g++编译器的参数代替了,所以不需要设置这些选项。
6、思考
调试个C++程序搞的这么复杂,干脆用别的ide得了(刷题的时候)。
参考:这里