1. 技术点
SpringBoot、MyBatis、thymeleaf、MySQL、ECharts 等
此案例使用的地图是在ECharts社区中查找的:makeapie echarts社区图表可视化案例

2. 准备条件
在mysql中创建数据库echartsdb,数据库中创建表t_location_count表,表中设置两个字段location与count,添加表中的数据。如:附件中的 echartsdb.sql
3. SpringBoot整合MyBatis
3.1 创建SpringBoot项目

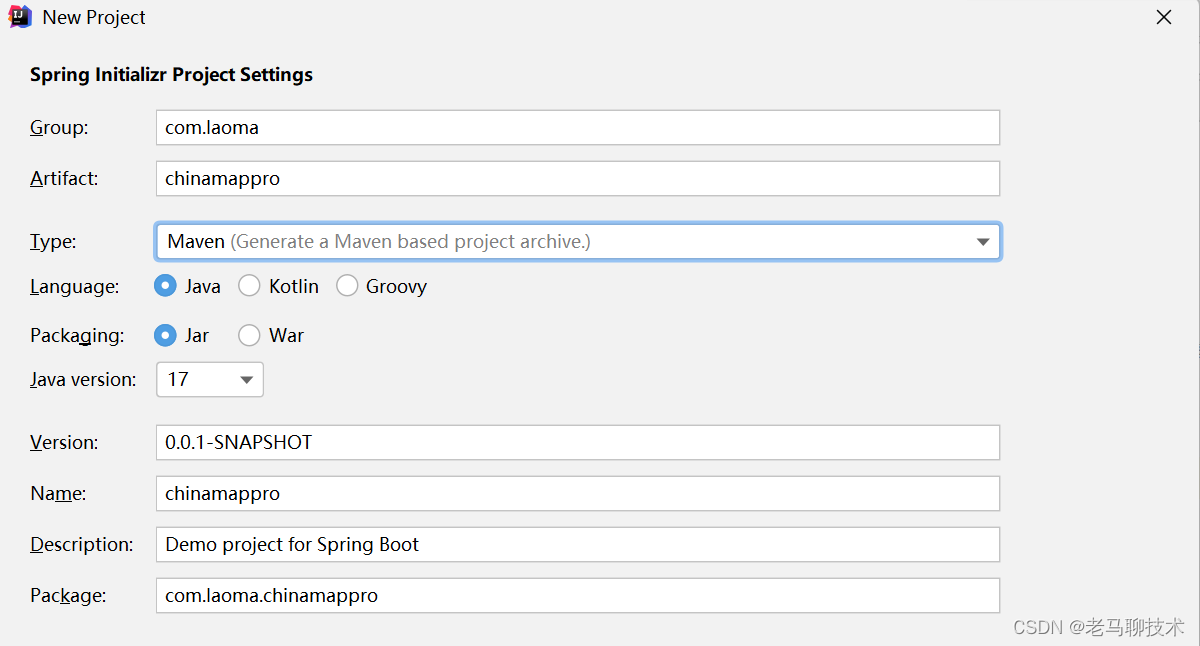


3.2 项目的修改
3.2.1 删除mvn相关文件
3.2.2 pom.xml 依赖的修改
SpringBoot 版本为:2.3.5.RELEASE 、JDK修改为 1.8 等
具体内容,查看下文
<?xml version="1.0" encoding="UTF-8"?>
<project xmlns="http://maven.apache.org/POM/4.0.0" xmlns:xsi="http://www.w3.org/2001/XMLSchema-instance"xsi:schemaLocation="http://maven.apache.org/POM/4.0.0 https://maven.apache.org/xsd/maven-4.0.0.xsd"><modelVersion>4.0.0</modelVersion><parent><groupId>org.springframework.boot</groupId><artifactId>spring-boot-starter-parent</artifactId><version>2.3.5.RELEASE</version><relativePath/> <!-- lookup parent from repository --></parent><groupId>com.laoma</groupId><artifactId>chinamappro</artifactId><version>0.0.1-SNAPSHOT</version><name>chinamappro</name><description>Demo project for Spring Boot</description><properties><java.version>1.8</java.version></properties><dependencies><dependency><groupId>org.springframework.boot</groupId><artifactId>spring-boot-starter-web</artifactId></dependency><dependency><groupId>org.springframework.boot</groupId><artifactId>spring-boot-starter-thymeleaf</artifactId></dependency><dependency><groupId>org.mybatis.spring.boot</groupId><artifactId>mybatis-spring-boot-starter</artifactId><version>2.0.1</version></dependency><dependency><groupId>org.springframework.boot</groupId><artifactId>spring-boot-starter-jdbc</artifactId></dependency><dependency><groupId>mysql</groupId><artifactId>mysql-connector-java</artifactId><version>8.0.29</version></dependency><dependency><groupId>org.projectlombok</groupId><artifactId>lombok</artifactId><version>1.18.20</version></dependency><dependency><groupId>org.springframework.boot</groupId><artifactId>spring-boot-starter-test</artifactId><scope>test</scope></dependency></dependencies><build><plugins><plugin><groupId>org.springframework.boot</groupId><artifactId>spring-boot-maven-plugin</artifactId></plugin></plugins></build></project>
4. 创建项目的相关内容
4.1 项目结构设计:controller、service、mapper、pojo 等,resources/templates下创建index.html 页面,如下:

具体代码如下:
===LocationCount===@Data
public class LocationCount {private String location;private Integer count;
}===LocationCountController===@Controller
public class LocationCountController {@Autowiredprivate LocationCountService locationCountService;@RequestMapping("/")public String index(){return "index";}@ResponseBody@RequestMapping("/getData")public Object getData(){return locationCountService.getData();}
}===LocationCountService===public interface LocationCountService {List<LocationCount> getData();
}===LocationCountServiceImpl===@Service
public class LocationCountServiceImpl implements LocationCountService {@Autowiredprivate LocationCountMapper locationCountMapper;@Overridepublic List<LocationCount> getData() {return locationCountMapper.getData();}
}===LocationCountMapper===@Mapper
public interface LocationCountMapper {@Select("SELECT * FROM t_location_count")List<LocationCount> getData();
}===index.html===<!DOCTYPE html>
<html lang="en" xmlns:th="http://www.thymeleaf.org">
<head><meta charset="UTF-8"><title>ECharts地图</title>
</head>
<body>可视化界面
</body>
</html>
4.2 application.properties 配置
spring.application.name=chinamapprospring.datasource.driver-class-name=com.mysql.cj.jdbc.Driver
spring.datasource.url=jdbc:mysql://192.168.170.100:3306/echartsdb
spring.datasource.username=root
spring.datasource.password=123456mybatis.type-aliases-package=com.neuedu.chinamappro.pojo
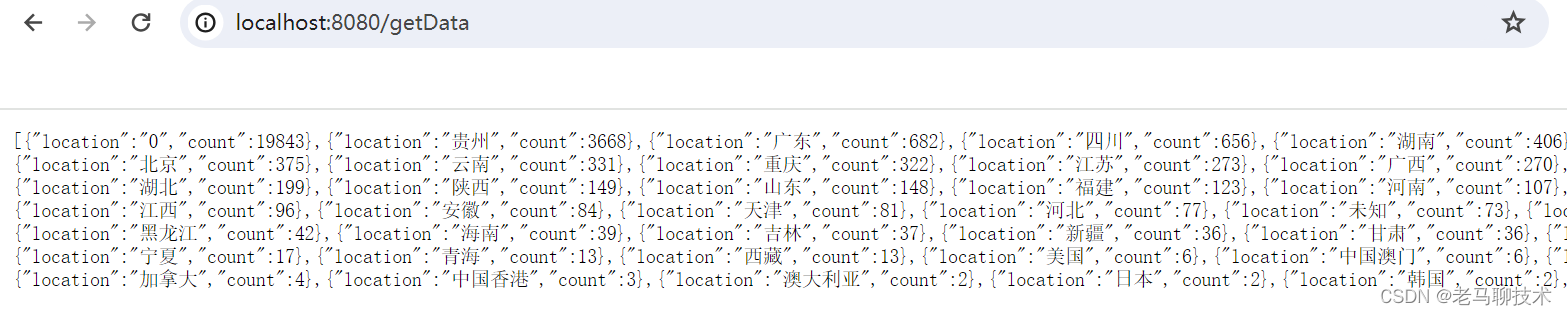
4.3 启动项目,访问 http://localhost:8080/getData 进行测试
5. echarts 插件引入及配置
5.1 需要使用echarts文件及地图文件china,使用文件及版本
jquery2.2.4 、echarts5.0.1、china
对应的文件查看:附件
5.2 项目中引入对应的文件:
resouces/static 下创建js目录,将对应的文件存入进去,如下图:

5.3. index.html 中引入 js文件
<!DOCTYPE html>
<html lang="en" xmlns:th="http://www.thymeleaf.org">
<head><meta charset="UTF-8"><title>ECharts地图</title><script type="text/javascript" th:src="@{/js/jquery.min.js}"></script><script type="text/javascript" th:src="@{/js/echarts.min.js}"></script><script type="text/javascript" th:src="@{/js/china.js}"></script>
</head>
<body>可视化界面
</body>
</html>
5.4 在html中创建地图的存储容器并创建地图对应的js文件
<!DOCTYPE html>
<html lang="en" xmlns:th="http://www.thymeleaf.org">
<head><meta charset="UTF-8"><title>ECharts地图</title><script type="text/javascript" th:src="@{/js/jquery.min.js}"></script><script type="text/javascript" th:src="@{/js/echarts.min.js}"></script><script type="text/javascript" th:src="@{/js/china.js}"></script>
</head>
<body><div id="map" style="width: 500px;height: 350px"></div><script type="text/javascript" th:src="@{/js/map.js}"></script>
</body>
</html>
5.5 map.js 中具体内容如下:
5.5.1 map.js 中对应的内容可以从ECharts社区官网进行获取(上面有官网地址)


进入官网之后,从显示的地图中找到各自需要的地图样式,点击进去即可,例如:

找到对应的地图代码,还需要根据自己的需要进行微调,如下是某个地图的效果图
5.5.2 map.js 具体代码
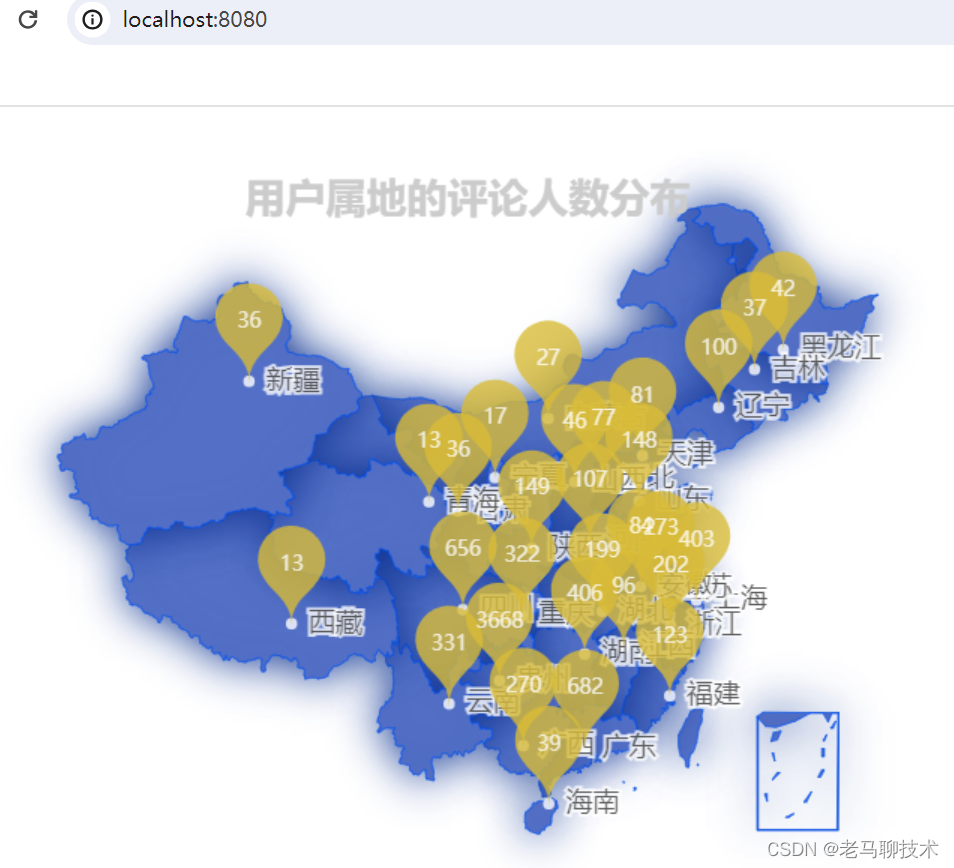
$(document).ready(function (){var myChart = echarts.init(document.getElementById('map'));fetch("/getData").then(response => response.json()).then(res => {//-获取数据--start--var data = [];for(var item of res){let obj = {name: item.location,value: item.count}data.push(obj)}//-获取数据--end--//-:省份的坐标var geoCoordMap = {'台湾': [121.5135,25.0308],'黑龙江': [127.9688, 45.368],'内蒙古': [110.3467, 41.4899],"吉林": [125.8154, 44.2584],'北京市': [116.4551, 40.2539],"辽宁": [123.1238, 42.1216],"河北": [114.4995, 38.1006],"天津": [117.4219, 39.4189],"山西": [112.3352, 37.9413],"陕西": [109.1162, 34.2004],"甘肃": [103.5901, 36.3043],"宁夏": [106.3586, 38.1775],"青海": [101.4038, 36.8207],"新疆": [87.9236, 43.5883],"西藏": [91.11, 29.97],"四川": [103.9526, 30.7617],"重庆": [108.384366, 30.439702],"山东": [117.1582, 36.8701],"河南": [113.4668, 34.6234],"江苏": [118.8062, 31.9208],"安徽": [117.29, 32.0581],"湖北": [114.3896, 30.6628],"浙江": [119.5313, 29.8773],"福建": [119.4543, 25.9222],"江西": [116.0046, 28.6633],"湖南": [113.0823, 28.2568],"贵州": [106.6992, 26.7682],"云南": [102.9199, 25.4663],"广东": [113.12244, 23.009505],"广西": [108.479, 23.1152],"海南": [110.3893, 19.8516],'上海': [121.4648, 31.2891],};var max = 480, min = 9; // todovar maxSize4Pin = 100, minSize4Pin = 20;var convertData = function (data) {var res = [];for (var i = 0; i < data.length; i++) {var geoCoord = geoCoordMap[data[i].name];if (geoCoord) {res.push({name: data[i].name,value: geoCoord.concat(data[i].value)});}}return res;};option = {//-地图的背景颜色的设置,使用的是渐变色,影响了文件的显示效果//-后期可以将背景颜色去掉这个页面使用个背景图片/*backgroundColor: {type: 'linear',x: 0,y: 0,x2: 1,y2: 1,colorStops: [{offset: 0, color: '#0f378f' // 0% 处的颜色}, {offset: 1, color: '#00091a' // 100% 处的颜色}],globalCoord: false // 缺省为 false},*/title: {top:20,text: '用户属地的评论人数分布',subtext: '',x: 'center',textStyle: {color: '#ccc'}},tooltip: {trigger: 'item',formatter: function (params) {if(typeof(params.value)[2] == "undefined"){return params.name + ' : ' + params.value;}else{return params.name + ' : ' + params.value[2];}}},/*   legend: {orient: 'vertical',y: 'bottom',x: 'right',data:['pm2.5'],textStyle: {color: '#fff'}},*/legend: {orient: 'vertical',y: 'bottom',x:'right',data:['pm2.5'],textStyle: {color: '#fff'}},visualMap: {show: false,min: 0,max: 500,left: 'left',top: 'bottom',text: ['高', '低'], // 文本,默认为数值文本calculable: true,seriesIndex: [1],inRange: {}},geo: {map: 'china',show: true,roam: true,label: {normal: {show: false},emphasis: {show: false,}},itemStyle: {normal: {areaColor: '#3a7fd5',borderColor: '#0a53e9',//线shadowColor: '#092f8f',//外发光shadowBlur: 20},emphasis: {areaColor: '#0a2dae',//悬浮区背景}}},series : [{symbolSize: 5,label: {normal: {formatter: '{b}',position: 'right',show: true},emphasis: {show: true}},itemStyle: {normal: {color: '#fff'}},name: 'light',type: 'scatter',coordinateSystem: 'geo',data: convertData(data),},{type: 'map',map: 'china',geoIndex: 0,aspectScale: 0.75, //长宽比showLegendSymbol: false, // 存在legend时显示label: {normal: {show: false},emphasis: {show: false,textStyle: {color: '#fff'}}},roam: true,itemStyle: {normal: {areaColor: '#031525',borderColor: '#FFFFFF',},emphasis: {areaColor: '#2B91B7'}},animation: false,data: data},{name: 'Top 5',type: 'scatter',coordinateSystem: 'geo',symbol: 'pin',symbolSize: [50,50],label: {normal: {show: true,textStyle: {color: '#fff',fontSize: 9,},formatter (value){return value.data.value[2]}}},itemStyle: {normal: {color: '#D8BC37', //标志颜色}},data: convertData(data),showEffectOn: 'render',rippleEffect: {brushType: 'stroke'},hoverAnimation: true,zlevel: 1},]};myChart.setOption(option);});
});
启动项目,访问:http://localhost:8080/ ,效果图如下
至此,整个案例整理结束!


![2024.4.3-[作业记录]-day08-CSS 盒子模型(溢出显示、伪元素)](https://img-blog.csdnimg.cn/direct/c7082b4f54ad45c99ff727abf0085e49.png)


![[VulnHub靶机渗透] pWnOS 2.0](https://img-blog.csdnimg.cn/direct/0b9dd1d29c6e4c6181c58ee04faba763.png)