目录
- 一、整体框架
- 二、流程+代码分析
- 2.1 Boot ROM
- 2.2 Boot Loader
- 2.3 Kernel层
- Kernel代码部分
- 2.4 Init进程
- Init进程代码部分
- 2.5 zygote进程
- zygote代码部分
- 2.6 SystemServer进程
- SystemServer代码部分
- 2.7 启动Launcher与SystemUI
- 三、SystemServices
- 3.1 引导服务
- 3.2 核心服务
- 3.3 其他服务
- 四、总结
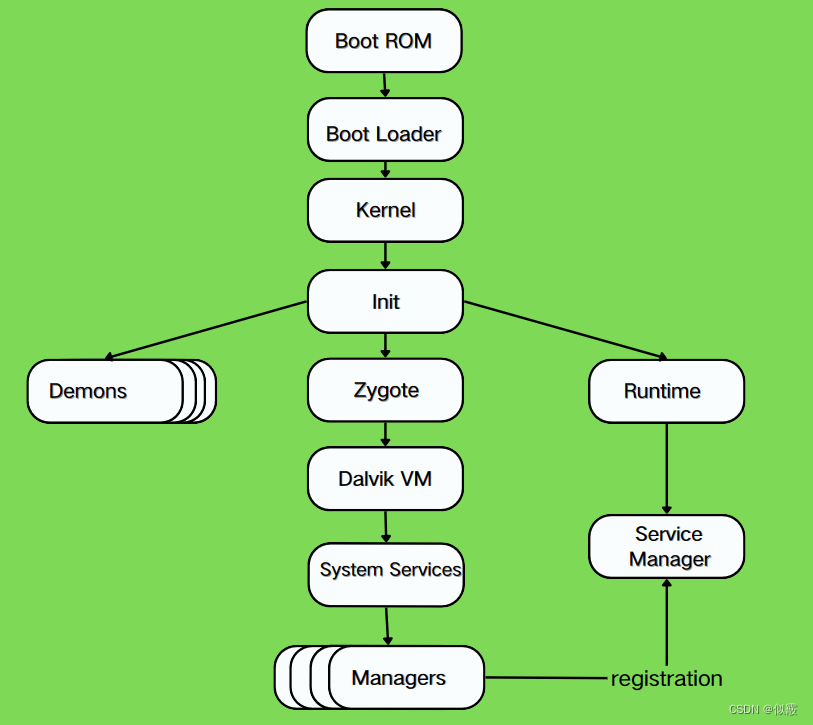
一、整体框架

二、流程+代码分析
按照开机流程,重点分析安卓init进程及之后上层部分的代码
2.1 Boot ROM
BOOT ROM :当手机处于关机状态时,长按Power键开机,引导芯片开始从固化在ROM里的预设出代码开始执行,然后加载引导程序到RAM;
ROM是存储在设备芯片中的只读存储器(ROM),负责在设备上电后最先运行的引导程序。Boot ROM的主要作用是初始化硬件设备(如内存、CPU、外设等),加载并执行Boot Loader。Boot ROM通常是设备制造商预先写入芯片中的固化程序,用于引导设备启动。
2.2 Boot Loader
Boot Loader:这是启动Android系统之前的引导程序,主要是检查RAM,初始化硬件参数等功能。
Boot Loader是位于设备存储器中的引导加载程序,负责在Boot ROM之后被加载和执行。Boot Loader的主要任务包括:
初始化设备硬件,如内存管理、外设初始化等。
加载Linux Kernel到内存中,并启动Linux Kernel。
提供启动选项和引导参数的设置。
启动Linux Kernel后,Boot Loader的任务就完成了,控制权交给Linux Kernel。
2.3 Kernel层
Kernel是指Android内核层,到这里才刚刚开始进入Android系统。
swapper进程(pid=0):
启动Kernel的swapper进程(pid=0):该进程又称为idle进程, 系统初始化过程Kernel由无到有开创的第一个进程, 用于初始化进程管理、内存管理,加载Display,Camera Driver,Binder Driver等相关工作;
kthreadd进程(pid=2):
启动kthreadd进程(pid=2):是Linux系统的内核进程,会创建内核工作线程kworkder,软中断线程ksoftirqd,thermal等内核守护进程。kthreadd进程是所有内核进程的鼻祖。
Linux Kernel是整个系统的核心部分,负责管理硬件资源、提供系统调度和内存管理等功能。Android系统开机启动流程中的Linux Kernel阶段:
- 1.
加载Linux Kernel:
在Boot Loader加载完成后,Boot Loader会将Linux Kernel从存储器中加载到设备的内存中,并开始执行Linux Kernel的启动代码。- 2.
初始化阶段:
Linux Kernel启动后,首先会进行一系列初始化操作,包括初始化内核数据结构、硬件设备、内存管理等。这些初始化操作是确保系统能够正常运行的基础。- 3.
设备检测和驱动加载:
Linux Kernel会进行设备检测,识别设备硬件,并加载相应的设备驱动程序。这些设备驱动程序负责与硬件设备进行通信和控制,确保系统能够正确地访问和操作硬件设备。
Kernel代码部分
不同版本略有区别
kernel/msm-4.14/init/main.c
kernel_init开始启动init进程
asmlinkage __visible void __init start_kernel(void)
{/****省略部分代码,涉及到内核、堆栈、进程管理等内容的初始化***//* Do the rest non-__init'ed, we're now alive *///进入用户空间,执行后续初始化操作rest_init();prevent_tail_call_optimization();
}static noinline void __ref rest_init(void)
{struct task_struct *tsk;int pid;rcu_scheduler_starting();/** We need to spawn init first so that it obtains pid 1, however* the init task will end up wanting to create kthreads, which, if* we schedule it before we create kthreadd, will OOPS.*///通过 kernel_thread 函数创建两个内核线程 kernel_init 和 kthreadd。//其中 kernel_init 进程用于执行 /bin/init 程序,成为用户空间的第一个进程(PID 为 1),而 kthreadd 则是系统中所有内核线程的父进程。//kernel_thread() 是一个创建内核线程的函数,它的原型定义在 include/linux/kthread.h 头文件中//第一个参数是一个函数指针,指向要在新线程中执行的函数。第二个参数是传递给 fn 函数的参数,如果不需要传递参数,则可以将其设置为 NULL。第三个参数用于指定新线程的行为,可以使用标志值对其进行设置。//kernel_thread(kernel_init, NULL, CLONE_FS) 的作用是创建一个内核线程,并在其中执行 kernel_init 函数。由于第二个参数为 NULL,因此 kernel_init 函数不会接收任何参数。而 CLONE_FS 标志表示新线程会继承当前进程的文件系统相关的属性,例如根目录、当前工作目录等等pid = kernel_thread(kernel_init, NULL, CLONE_FS);/** Pin init on the boot CPU. Task migration is not properly working* until sched_init_smp() has been run. It will set the allowed* CPUs for init to the non isolated CPUs.*/rcu_read_lock();tsk = find_task_by_pid_ns(pid, &init_pid_ns);set_cpus_allowed_ptr(tsk, cpumask_of(smp_processor_id()));rcu_read_unlock();numa_default_policy();pid = kernel_thread(kthreadd, NULL, CLONE_FS | CLONE_FILES);rcu_read_lock();kthreadd_task = find_task_by_pid_ns(pid, &init_pid_ns);rcu_read_unlock();/** Enable might_sleep() and smp_processor_id() checks.* They cannot be enabled earlier because with CONFIG_PRREMPT=y* kernel_thread() would trigger might_sleep() splats. With* CONFIG_PREEMPT_VOLUNTARY=y the init task might have scheduled* already, but it's stuck on the kthreadd_done completion.*///system_state 是一个全局变量,表示系统的当前状态。它的取值包括以下几种://SYSTEM_BOOTING:表示系统正在启动。//SYSTEM_RUNNING:表示系统已经启动并正在正常运行。//SYSTEM_HALT:表示系统已经关闭并停止了所有运行。//SYSTEM_POWER_OFF:表示系统已经关闭,但是可能仍然有硬件在运行。//SYSTEM_SCHEDULING:表示系统正在进行进程调度,即系统已经进入正常运行状态。//即表示系统已经完成了启动过程,并正常地开始了进程调度。这意味着内核已经初始化完毕,可以正常地执行用户进程和系统服务。system_state = SYSTEM_SCHEDULING;//通过complete(&kthreadd_done) 向 kthreadd 进程发出完成信号,以便 kthreadd 进程可以开始创建其它内核线程complete(&kthreadd_done);/** The boot idle thread must execute schedule()* at least once to get things moving:*/schedule_preempt_disabled();/* Call into cpu_idle with preempt disabled */cpu_startup_entry(CPUHP_ONLINE);
}static int __ref kernel_init(void *unused)
{/****省略部分代码,设置进程的状态***///设置系统状态为运行状态system_state = SYSTEM_RUNNING;/****省略部分代码,设置进程的状态***///如果ramdisk_execute_command与execute_command非空,则调用run_init_process()函数尝试执行该命令,并将返回值保存在ret变量中。如果返回值为0,表示执行成功,就直接返回0表示初始化成功if (ramdisk_execute_command) {ret = run_init_process(ramdisk_execute_command);if (!ret)return 0;pr_err("Failed to execute %s (error %d)\n",ramdisk_execute_command, ret);}/** We try each of these until one succeeds.** The Bourne shell can be used instead of init if we are* trying to recover a really broken machine.*/if (execute_command) {ret = run_init_process(execute_command);if (!ret)return 0;panic("Requested init %s failed (error %d).",execute_command, ret);}//会依次寻找以下目录中的可执行文件进行执行,只要一个执行成功就直接返回0,否则触发异常//"/bin/init"是在Android系统源码编译时编译出的一个可执行程序,路径为Android设备上的"system/bin/init",而这个init程序则是由system/core/init/main.cpp文件编译生成的if (!try_to_run_init_process("/sbin/init") ||!try_to_run_init_process("/etc/init") ||!try_to_run_init_process("/bin/init") ||!try_to_run_init_process("/bin/sh"))return 0;panic("No working init found.  Try passing init= option to kernel. ""See Linux Documentation/admin-guide/init.rst for guidance.");
}static int try_to_run_init_process(const char *init_filename)
{int ret;ret = run_init_process(init_filename);if (ret && ret != -ENOENT) {pr_err("Starting init: %s exists but couldn't execute it (error %d)\n",init_filename, ret);}return ret;
}static int run_init_process(const char *init_filename)
{argv_init[0] = init_filename;//do_execve()函数的作用是加载并执行一个新的用户程序,它接受以下参数://filename:一个struct filename类型的指针,表示要执行的可执行文件的路径和名称。//argv:一个以NULL结尾的字符串数组,表示要传递给新程序的命令行参数。//envp:一个以NULL结尾的字符串数组,表示要传递给新程序的环境变量。//函数返回一个整数值,代表执行结果。如果执行成功,函数不会返回,而是直接切换到新程序的上下文;如果执行失败,函数返回一个负值,代表错误代码。return do_execve(getname_kernel(init_filename),(const char __user *const __user *)argv_init,(const char __user *const __user *)envp_init);
}
system/core/init/Android.bp
phony {name: "init",required: ["init_second_stage",],
}cc_binary {name: "init_second_stage",recovery_available: true,stem: "init",defaults: ["init_defaults"],static_libs: ["libinit"],required: ["e2fsdroid","init.rc","mke2fs","sload_f2fs","make_f2fs","ueventd.rc",],srcs: ["main.cpp"],symlinks: ["ueventd"],target: {recovery: {cflags: ["-DRECOVERY"],exclude_shared_libs: ["libbinder","libutils",],},},
}
2.4 Init进程
init进程是linux系统中用户空间的第一个进程,进程号为1。
当bootloader启动后,启动kernel,kernel启动完后,在用户空间启动init进程,再通过init进程,来读取init.rc中的相关配置。
从而来启动其他相关进程以及其他操作。 init进程被赋予了很多重要工作,init进程启动主要分为两个阶段:
- 1.第一个阶段完成以下内容:
ueventd/watchdogd跳转及环境变量设置
挂载文件系统并创建目录
初始化日志输出、挂载分区设备
启用SELinux安全策略
开始第二阶段前的准备- 2.第二个阶段完成以下内容:
初始化属性系统
执行SELinux第二阶段并恢复一些文件安全上下文
新建epoll并初始化子进程终止信号处理函数
设置其他系统属性并开启属性服务
Init进程代码部分
system/core/init/main.cpp
int main(int argc, char** argv) {
#if __has_feature(address_sanitizer)__asan_set_error_report_callback(AsanReportCallback);
#endifif (!strcmp(basename(argv[0]), "ueventd")) {return ueventd_main(argc, argv);}if (argc > 1) {if (!strcmp(argv[1], "subcontext")) {android::base::InitLogging(argv, &android::base::KernelLogger);const BuiltinFunctionMap& function_map = GetBuiltinFunctionMap();return SubcontextMain(argc, argv, &function_map);}if (!strcmp(argv[1], "selinux_setup")) {//第二次通过first_stage_init执行SetupSelinuxreturn SetupSelinux(argv);}if (!strcmp(argv[1], "second_stage")) {//第三次设置selinux后启动SecondStageMainreturn SecondStageMain(argc, argv);}}//代码会执行多次,首次通过try_to_run_init_process执行时没有额外的命令行参数,所以会直接执行FirstStageMainreturn FirstStageMain(argc, argv);
}
FirstStageMain流程:
system/core/init/first_stage_init.cpp
int FirstStageMain(int argc, char** argv) {if (REBOOT_BOOTLOADER_ON_PANIC) {InstallRebootSignalHandlers();}boot_clock::time_point start_time = boot_clock::now();std::vector<std::pair<std::string, int>> errors;//定义了一个宏CHECKCALL(x),如果参数x执行返回的结果为不成功,则会将错误结果保存到errors中。//errors.emplace_back(#x " failed", errno) 的作用是将错误信息添加到 errors 容器中。#x 是一个预处理器宏,表示参数 x 的字符串字面值。这里 #x " failed" 将会被替换为类似 "mount() failed" 的字符串。//errno 是一个全局变量,用于保存最近一次系统调用失败的错误码。通过将 errno 作为第二个参数传递给 emplace_back() 函数,可以将错误码与错误信息一起存储在 errors 容器中。
#define CHECKCALL(x) \if ((x) != 0) errors.emplace_back(#x " failed", errno);// Clear the umask.umask(0);//创建和挂载启动所需的目录文件//clearenv():清除当前进程的环境变量。//setenv():设置环境变量 PATH。//mount():挂载文件系统,包括 tmpfs、devpts、proc、sysfs 和 selinuxfs 等。//mkdir():创建目录 /dev/pts 和 /dev/socket。//mknod():创建设备节点,包括 /dev/kmsg、/dev/kmsg_debug、/dev/random、/dev/urandom、/dev/ptmx 和 /dev/null 等。CHECKCALL(clearenv());CHECKCALL(setenv("PATH", _PATH_DEFPATH, 1));// Get the basic filesystem setup we need put together in the initramdisk// on / and then we'll let the rc file figure out the rest.CHECKCALL(mount("tmpfs", "/dev", "tmpfs", MS_NOSUID, "mode=0755"));CHECKCALL(mkdir("/dev/pts", 0755));CHECKCALL(mkdir("/dev/socket", 0755));CHECKCALL(mount("devpts", "/dev/pts", "devpts", 0, NULL));
#define MAKE_STR(x) __STRING(x)CHECKCALL(mount("proc", "/proc", "proc", 0, "hidepid=2,gid=" MAKE_STR(AID_READPROC)));
#undef MAKE_STR// Don't expose the raw commandline to unprivileged processes.CHECKCALL(chmod("/proc/cmdline", 0440));std::string cmdline;android::base::ReadFileToString("/proc/cmdline", &cmdline);gid_t groups[] = {AID_READPROC};CHECKCALL(setgroups(arraysize(groups), groups));CHECKCALL(mount("sysfs", "/sys", "sysfs", 0, NULL));CHECKCALL(mount("selinuxfs", "/sys/fs/selinux", "selinuxfs", 0, NULL));CHECKCALL(mknod("/dev/kmsg", S_IFCHR | 0600, makedev(1, 11)));if constexpr (WORLD_WRITABLE_KMSG) {CHECKCALL(mknod("/dev/kmsg_debug", S_IFCHR | 0622, makedev(1, 11)));}CHECKCALL(mknod("/dev/random", S_IFCHR | 0666, makedev(1, 8)));CHECKCALL(mknod("/dev/urandom", S_IFCHR | 0666, makedev(1, 9)));// This is needed for log wrapper, which gets called before ueventd runs.CHECKCALL(mknod("/dev/ptmx", S_IFCHR | 0666, makedev(5, 2)));CHECKCALL(mknod("/dev/null", S_IFCHR | 0666, makedev(1, 3)));// These below mounts are done in first stage init so that first stage mount can mount// subdirectories of /mnt/{vendor,product}/.  Other mounts, not required by first stage mount,// should be done in rc files.// Mount staging areas for devices managed by vold// See storage config details at http://source.android.com/devices/storage/CHECKCALL(mount("tmpfs", "/mnt", "tmpfs", MS_NOEXEC | MS_NOSUID | MS_NODEV,"mode=0755,uid=0,gid=1000"));// /mnt/vendor is used to mount vendor-specific partitions that can not be// part of the vendor partition, e.g. because they are mounted read-write.CHECKCALL(mkdir("/mnt/vendor", 0755));// /mnt/product is used to mount product-specific partitions that can not be// part of the product partition, e.g. because they are mounted read-write.CHECKCALL(mkdir("/mnt/product", 0755));// /debug_ramdisk is used to preserve additional files from the debug ramdiskCHECKCALL(mount("tmpfs", "/debug_ramdisk", "tmpfs", MS_NOEXEC | MS_NOSUID | MS_NODEV,"mode=0755,uid=0,gid=0"));
#undef CHECKCALL//将标准输入输出重定向到 /dev/null 设备节点,为了避免在启动过程中产生不必要的输出。SetStdioToDevNull(argv);// Now that tmpfs is mounted on /dev and we have /dev/kmsg, we can actually// talk to the outside world...//初始化内核日志记录器,并调用 LogInit() 函数记录系统启动日志InitKernelLogging(argv);//函数遍历 errors 变量,如果出现错误,则打印错误信息并终止系统启动。否则,函数将打印一条 INFO 级别的日志,表明第一阶段初始化已经开始if (!errors.empty()) {for (const auto& [error_string, error_errno] : errors) {LOG(ERROR) << error_string << " " << strerror(error_errno);}LOG(FATAL) << "Init encountered errors starting first stage, aborting";}LOG(INFO) << "init first stage started!";//调用opendir("/") 函数尝试打开根目录。opendir函数用于打开一个目录,并返回一个指向 DIR 结构的指针。如果成功打开目录,则返回指向目录的指针;否则返回 NULL。//使用 std::unique_ptr 对象来管理 DIR 结构的生命周期。在这里,unique_ptr 接收两个参数:第一个参数是 opendir("/") 的返回指针,表示要进行管理的对象;第二个参数是一个函数指针 decltype(&closedir),表示释放资源的方式。//由于 DIR 结构是由 opendir 函数分配的内存,在使用完之后需要调用 closedir 函数进行释放。所以,这里的 decltype(&closedir) 表示调用 closedir 函数来释放 DIR 结构。auto old_root_dir = std::unique_ptr<DIR, decltype(&closedir)>{opendir("/"), closedir};if (!old_root_dir) {PLOG(ERROR) << "Could not opendir(\"/\"), not freeing ramdisk";}//使用 stat() 函数获取根目录("/")的信息,并将结果保存在名为 old_root_info 的 struct stat 结构体中。//stat用于获取指定路径的文件或目录的信息,并将结果保存在传入的结构体中struct stat old_root_info;if (stat("/", &old_root_info) != 0) {PLOG(ERROR) << "Could not stat(\"/\"), not freeing ramdisk";old_root_dir.reset();}//根据 ALLOW_FIRST_STAGE_CONSOLE 宏定义和 cmdline 参数来判断是否需要启动控制台。如果 ALLOW_FIRST_STAGE_CONSOLE 宏定义为 true,则调用 FirstStageConsole(cmdline) 函数来获取启动控制台的参数;否则,直接将 want_console 设置为 0,表示禁用控制台。auto want_console = ALLOW_FIRST_STAGE_CONSOLE ? FirstStageConsole(cmdline) : 0;//LoadKernelModules() 函数会根据 IsRecoveryMode() 和 ForceNormalBoot(cmdline) 的返回值来判断当前是否处于恢复模式或强制正常引导模式。如果是,则尝试加载特定的内核模块;否则,加载所有必需的内核模块//通过检查 LoadKernelModules() 函数的返回值来判断内核模块是否加载成功。如果加载失败,则根据 want_console 参数来输出相应的错误日志。如果 want_console 不为 DISABLED,则表示需要启动控制台来进行调试;否则,直接输出 FATAL 级别的错误日志并终止程序if (!LoadKernelModules(IsRecoveryMode() && !ForceNormalBoot(cmdline), want_console)) {if (want_console != FirstStageConsoleParam::DISABLED) {LOG(ERROR) << "Failed to load kernel modules, starting console";} else {LOG(FATAL) << "Failed to load kernel modules";}}//如果want_console等于FirstStageConsoleParam::CONSOLE_ON_FAILURE,需要在加载内核模块失败时启动控制台if (want_console == FirstStageConsoleParam::CONSOLE_ON_FAILURE) {StartConsole();}//通过检查 ForceNormalBoot(cmdline) 的返回值来判断当前是否处于强制正常引导模式。如果是,则继续执行下面的操作;否则,直接跳过该代码段。if (ForceNormalBoot(cmdline)) {//使用 mkdir() 函数创建一个名为 "/first_stage_ramdisk" 的目录,并将其权限设置为 0755。mkdir("/first_stage_ramdisk", 0755);// SwitchRoot() must be called with a mount point as the target, so we bind mount the// target directory to itself here.//接着,使用 mount() 函数将 "/first_stage_ramdisk" 目录绑定到自身。这样做的目的是为了确保在切换根文件系统之前,"/first_stage_ramdisk" 目录已经被挂载。if (mount("/first_stage_ramdisk", "/first_stage_ramdisk", nullptr, MS_BIND, nullptr) != 0) {LOG(FATAL) << "Could not bind mount /first_stage_ramdisk to itself";}//调用 SwitchRoot("/first_stage_ramdisk") 函数将根文件系统切换到 "/first_stage_ramdisk" 目录所在的 RAM 磁盘映像。SwitchRoot() 函数的作用是将当前进程的根文件系统切换到另一个目录或文件系统中,并将当前工作目录和进程环境也相应地切换到新的文件系统中。SwitchRoot("/first_stage_ramdisk");}// If this file is present, the second-stage init will use a userdebug sepolicy// and load adb_debug.prop to allow adb root, if the device is unlocked.//在存在 "/force_debuggable" 文件时,设置调试用的 RAM 磁盘。它会将指定的文件复制到目标路径,并设置一个环境变量,以便后续的初始化程序能够使用这些文件进行调试if (access("/force_debuggable", F_OK) == 0) {std::error_code ec;  // to invoke the overloaded copy_file() that won't throw.if (!fs::copy_file("/adb_debug.prop", kDebugRamdiskProp, ec) ||!fs::copy_file("/userdebug_plat_sepolicy.cil", kDebugRamdiskSEPolicy, ec)) {LOG(ERROR) << "Failed to setup debug ramdisk";} else {// setenv for second-stage init to read above kDebugRamdisk* files.setenv("INIT_FORCE_DEBUGGABLE", "true", 1);}}//根据DoFirstStageMount()函数,检查挂载必需分区是否成功。如果挂载失败,则输出错误if (!DoFirstStageMount()) {LOG(FATAL) << "Failed to mount required partitions early ...";}struct stat new_root_info;//对根目录进行查询if (stat("/", &new_root_info) != 0) {//输出log,指示无法获取根目录的文件信息PLOG(ERROR) << "Could not stat(\"/\"), not freeing ramdisk";old_root_dir.reset();}//对比旧根目录和新根目录的设备号(st_dev)是否相同,如果不相同,则调用 FreeRamdisk() 函数if (old_root_dir && old_root_info.st_dev != new_root_info.st_dev) {//代表着在根文件系统更改的情况下,需要释放旧的 RAM 磁盘资源,以便重新分配给新的根文件系统FreeRamdisk(old_root_dir.get(), old_root_info.st_dev);}SetInitAvbVersionInRecovery();setenv(kEnvFirstStageStartedAt, std::to_string(start_time.time_since_epoch().count()).c_str(),1);const char* path = "/system/bin/init";const char* args[] = {path, "selinux_setup", nullptr};auto fd = open("/dev/kmsg", O_WRONLY | O_CLOEXEC);dup2(fd, STDOUT_FILENO);dup2(fd, STDERR_FILENO);close(fd);//再次执行/system/bin/init文件,并设置selinux_setupexecv(path, const_cast<char**>(args));// execv() only returns if an error happened, in which case we// panic and never fall through this conditional.PLOG(FATAL) << "execv(\"" << path << "\") failed";return 1;
}
SetupSelinux流程
system/core/init/selinux.cpp
int SetupSelinux(char** argv) {SetStdioToDevNull(argv);InitKernelLogging(argv);if (REBOOT_BOOTLOADER_ON_PANIC) {InstallRebootSignalHandlers();}boot_clock::time_point start_time = boot_clock::now();MountMissingSystemPartitions();// Set up SELinux, loading the SELinux policy.SelinuxSetupKernelLogging();//加载SeLinux配置SelinuxInitialize();// We're in the kernel domain and want to transition to the init domain.  File systems that// store SELabels in their xattrs, such as ext4 do not need an explicit restorecon here,// but other file systems do.  In particular, this is needed for ramdisks such as the// recovery image for A/B devices.if (selinux_android_restorecon("/system/bin/init", 0) == -1) {PLOG(FATAL) << "restorecon failed of /system/bin/init failed";}setenv(kEnvSelinuxStartedAt, std::to_string(start_time.time_since_epoch().count()).c_str(), 1);//再次启动/system/bin/init,这次启动second_stageconst char* path = "/system/bin/init";const char* args[] = {path, "second_stage", nullptr};execv(path, const_cast<char**>(args));// execv() only returns if an error happened, in which case we// panic and never return from this function.PLOG(FATAL) << "execv(\"" << path << "\") failed";return 1;
}void SelinuxRestoreContext() {LOG(INFO) << "Running restorecon...";selinux_android_restorecon("/dev", 0);selinux_android_restorecon("/dev/kmsg", 0);if constexpr (WORLD_WRITABLE_KMSG) {selinux_android_restorecon("/dev/kmsg_debug", 0);}selinux_android_restorecon("/dev/null", 0);selinux_android_restorecon("/dev/ptmx", 0);selinux_android_restorecon("/dev/socket", 0);selinux_android_restorecon("/dev/random", 0);selinux_android_restorecon("/dev/urandom", 0);selinux_android_restorecon("/dev/__properties__", 0);selinux_android_restorecon("/dev/block", SELINUX_ANDROID_RESTORECON_RECURSE);selinux_android_restorecon("/dev/device-mapper", 0);selinux_android_restorecon("/apex", 0);selinux_android_restorecon("/linkerconfig", 0);// adb remount, snapshot-based updates, and DSUs all create files during// first-stage init.selinux_android_restorecon(SnapshotManager::GetGlobalRollbackIndicatorPath().c_str(), 0);selinux_android_restorecon("/metadata/gsi", SELINUX_ANDROID_RESTORECON_RECURSE |SELINUX_ANDROID_RESTORECON_SKIP_SEHASH);
}
又走入SecondStageMain流程,在secondstage期间会初始化系统的property服务,最终调用LoadBootScripts方法读取解析init.rc文件。根据配置的init.rc文件去分阶段启动对应的servicemanager和zygote服务。
system/core/init/init.cpp
int SecondStageMain(int argc, char** argv) {if (REBOOT_BOOTLOADER_ON_PANIC) {InstallRebootSignalHandlers();}/****省略部分代码,设置环境状态***///初始化系统属性PropertyPropertyInit();// Umount the debug ramdisk after property service has read the .prop files when it means to.if (load_debug_prop) {UmountDebugRamdisk();}// Mount extra filesystems required during second stage init//挂载额外的目录MountExtraFilesystems();// Now set up SELinux for second stage.SelinuxSetupKernelLogging();//初始化 SELinux 标签库SelabelInitialize();//恢复 SELinux 上下文。SelinuxRestoreContext();Epoll epoll;if (auto result = epoll.Open(); !result.ok()) {PLOG(FATAL) << result.error();}InstallSignalFdHandler(&epoll);InstallInitNotifier(&epoll);//启动属性服务StartPropertyService(&property_fd);/****省略部分代码,设置环境状态***/ActionManager& am = ActionManager::GetInstance();ServiceList& sm = ServiceList::GetInstance();//读取init.rc文件LoadBootScripts(am, sm);// Turning this on and letting the INFO logging be discarded adds 0.2s to// Nexus 9 boot time, so it's disabled by default.if (false) DumpState();// Make the GSI status available before scripts start running.auto is_running = android::gsi::IsGsiRunning() ? "1" : "0";SetProperty(gsi::kGsiBootedProp, is_running);auto is_installed = android::gsi::IsGsiInstalled() ? "1" : "0";SetProperty(gsi::kGsiInstalledProp, is_installed);//增加系统初始化事件,将指定的动作添加到系统内置动作的队列中am.QueueBuiltinAction(SetupCgroupsAction, "SetupCgroups");am.QueueBuiltinAction(SetKptrRestrictAction, "SetKptrRestrict");am.QueueBuiltinAction(TestPerfEventSelinuxAction, "TestPerfEventSelinux");//将事件触发器添加到系统事件触发器的队列中am.QueueEventTrigger("early-init");// Queue an action that waits for coldboot done so we know ueventd has set up all of /dev...am.QueueBuiltinAction(wait_for_coldboot_done_action, "wait_for_coldboot_done");// ... so that we can start queuing up actions that require stuff from /dev.am.QueueBuiltinAction(MixHwrngIntoLinuxRngAction, "MixHwrngIntoLinuxRng");am.QueueBuiltinAction(SetMmapRndBitsAction, "SetMmapRndBits");Keychords keychords;am.QueueBuiltinAction([&epoll, &keychords](const BuiltinArguments& args) -> Result<void> {for (const auto& svc : ServiceList::GetInstance()) {keychords.Register(svc->keycodes());}keychords.Start(&epoll, HandleKeychord);return {};},"KeychordInit");// Trigger all the boot actions to get us started.am.QueueEventTrigger("init");// Repeat mix_hwrng_into_linux_rng in case /dev/hw_random or /dev/random// wasn't ready immediately after wait_for_coldboot_doneam.QueueBuiltinAction(MixHwrngIntoLinuxRngAction, "MixHwrngIntoLinuxRng");// Don't mount filesystems or start core system services in charger mode.std::string bootmode = GetProperty("ro.bootmode", "");if (bootmode == "charger") {am.QueueEventTrigger("charger");} else {am.QueueEventTrigger("late-init");}// Run all property triggers based on current state of the properties.am.QueueBuiltinAction(queue_property_triggers_action, "queue_property_triggers");while (true) {// By default, sleep until something happens.auto epoll_timeout = std::optional<std::chrono::milliseconds>{};auto shutdown_command = shutdown_state.CheckShutdown();if (shutdown_command) {HandlePowerctlMessage(*shutdown_command);}//依次执行对应trigger的Command,会最终分步执行到所有rc文件的启动if (!(prop_waiter_state.MightBeWaiting() || Service::is_exec_service_running())) {am.ExecuteOneCommand();}/****省略部分代码***/}return 0;
}static void LoadBootScripts(ActionManager& action_manager, ServiceList& service_list) {Parser parser = CreateParser(action_manager, service_list);//获取系统属性ro.boot.init_rc的值作为脚本的路径,如果为空则按顺序解析脚本//1 /system/etc/init/   用于核心系统项,例如 SurfaceFlinger, MediaService, Zygote和logd。//2 /vendor/etc/init/   是针对SoC供应商的项目,如SoC核心功能所需的actions或守护进程。//3 /odm/etc/init/      用于设备制造商的项目,如actions或运动传感器或其他外围功能所需的守护进程。//4 /product/etc/init   用于定制化产品的启动配置和操作std::string bootscript = GetProperty("ro.boot.init_rc", "");if (bootscript.empty()) {//解析时根据找到路径读取到的文件按照顺序排序后放到一个Vector中,再遍历此Vector,调用ReadFile函数将rc文件的内容全部保存为字符串,存在data中,然后调用ParseData进行解析parser.ParseConfig("/system/etc/init/hw/init.rc");if (!parser.ParseConfig("/system/etc/init")) {//如果解析失加入到败,则late_import_paths中,之后再次解析late_import_paths.emplace_back("/system/etc/init");}// late_import is available only in Q and earlier release. As we don't// have system_ext in those versions, skip late_import for system_ext.parser.ParseConfig("/system_ext/etc/init");if (!parser.ParseConfig("/product/etc/init")) {late_import_paths.emplace_back("/product/etc/init");}if (!parser.ParseConfig("/odm/etc/init")) {late_import_paths.emplace_back("/odm/etc/init");}if (!parser.ParseConfig("/vendor/etc/init")) {late_import_paths.emplace_back("/vendor/etc/init");}} else {parser.ParseConfig(bootscript);}
}
解析rc文件,其中rootdir/init.rc为
system/core/rootdir/init.rc
on initsysclktz 0# Start essential services.start servicemanagerstart hwservicemanagerstart vndservicemanageron late-inittrigger early-fs# Now we can start zygote for devices with file based encryptionstop zygote_mmitrigger zygote-starton zygote-start && property:ro.crypto.state=unencrypted# A/B update verifier that marks a successful boot.exec_start update_verifier_nonencryptedstart statsdstart netdstart zygotestart zygote_secondary
servicemanager.rc
frameworks/native/cmds/servicemanager/servicemanager.rc
service servicemanager /system/bin/servicemanagerclass core animationuser systemgroup system readproccriticalonrestart restart healthdonrestart restart zygoteonrestart restart audioserveronrestart restart mediaonrestart restart surfaceflingeronrestart restart inputflingeronrestart restart drmonrestart restart cameraserveronrestart restart keystoreonrestart restart gatekeeperdonrestart restart thermalservicewritepid /dev/cpuset/system-background/tasksshutdown critical
Service Manager的主程序,负责初始化Binder服务管理器和处理Binder通信相关的操作,确保Binder服务正常运行并处理通信事件。
初始化Binder驱动和Binder服务管理器。
注册Service Manager服务。
设置Binder通信的上下文对象和回调函数。
进入事件处理循环,等待和处理Binder通信的事件。
frameworks/native/cmds/servicemanager/main.cpp
int main(int argc, char** argv) {if (argc > 2) {LOG(FATAL) << "usage: " << argv[0] << " [binder driver]";}const char* driver = argc == 2 ? argv[1] : "/dev/binder";//进行binder驱动的初始化sp<ProcessState> ps = ProcessState::initWithDriver(driver);ps->setThreadPoolMaxThreadCount(0);ps->setCallRestriction(ProcessState::CallRestriction::FATAL_IF_NOT_ONEWAY);//构造ServiceManager,ServiceManager是Binder服务的管理类,它允许注册和获取服务实例sp<ServiceManager> manager = new ServiceManager(std::make_unique<Access>());//将manager对象自己注册成名字是"manager"的服务if (!manager->addService("manager", manager, false /*allowIsolated*/, IServiceManager::DUMP_FLAG_PRIORITY_DEFAULT).isOk()) {LOG(ERROR) << "Could not self register servicemanager";}//将manager对象设置为当前线程的上下文对象,IPCThreadState是Binder的线程状态类,用来管理每个线程的Binder环境IPCThreadState::self()->setTheContextObject(manager);//将当前线程设置为上下文管理器,使得当前线程成为 Binder 的上下文管理器ps->becomeContextManager(nullptr, nullptr);sp<Looper> looper = Looper::prepare(false /*allowNonCallbacks*/);//将BinderCallback 设置到looper中,用于处理Binder通信的回调。BinderCallback是自定义的回调类,用于处理Binder通信的回调事件BinderCallback::setupTo(looper);//将ClientCallbackCallback设置到looper中,用于处理客户端回调的回调事件。ClientCallbackCallback是自定义的回调类,用于处理客户端回调的回调事件ClientCallbackCallback::setupTo(looper, manager);while(true) {//通过 looper->pollAll(-1) 等待和处理事件。pollAll(-1) 表示等待直到有事件到达才返回looper->pollAll(-1);}// should not be reachedreturn EXIT_FAILURE;
}
2.5 zygote进程
Android系统在启动之后,首先启动init进程,init.c中解析了init.rc文件,而在android 5.1的源码中,在init.rc文件中没有发现关于zygote的section段。查找之后在import段看到了
import /init.${ro.zygote}.rc
从上边的语句可以看出init.rc不再直接引入一个固定的文件,而是根据属性ro.zygote的内容来引入不同的文件。
从android5.0开始,android开始支持64位的编译,zygote本身也就有了32位和64位的区别,所以在这里用ro.zygote属性来控制启动不同版本的zygote进程。
init.rc位于/system/core/rootdir下。在这个路径下还包括四个关于zygote的rc文件。分别是Init.zygote32.rc,Init.zygote32_64.rc,Init.zygote64.rc,Init.zygote64_32.rc。由硬件决定调用哪个文件。
在Init.zygote32.rc文件中,代码如下。
service zygote /system/bin/app_process -Xzygote /system/bin --zygote --start-system-serverclass main #class是一个option,指定zygote服务的类型是mainsocket zygote stream 660 root system #socket关键字表示一个option。创建一个名为dev/socket/zygote,类型为stream,权限660的socket。onrestart write /sys/android_power/request_state wake #onrestart是一个option,说明在zygote重启时需要执行的commandonrestart write /sys/power/state ononrestart restart mediaonrestart restart netd
在Init.zygote32.rc中,定义了一个zygote服务:zygote,由关键字service告诉init进程创建一个名为zygote的进程,这个进程要执行的程序是/system/bin/app_process,给这个进程四个参数,分别是
-Xzygote
/system/bin
–zygote
–start-system-server
在Init.zygote32_64文件中,代码如下。
service zygote /system/bin/app_process32 -Xzygote /system/bin --zygote --start-system-server --socket-name=zygoteclass mainsocket zygote stream 660 root systemonrestart write /sys/android_power/request_state wakeonrestart write /sys/power/state ononrestart restart mediaonrestart restart netdservice zygote_secondary /system/bin/app_process64 -Xzygote /system/bin --zygote --socket-name=zygote_secondaryclass mainsocket zygote_secondary stream 660 root systemonrestart restart zygote
在Init.zygote32_64.rc文件中,定义了两个zygote服务:zygote和zygote_secondary。这两个服务最大的区别是启动的可执行文件不同,一个是app_process32,一个是app_process64。由关键字service告诉init进程创建一个名为zygote的进程,这个进程的要执行的程是/system/bin/app_process32,给这个进程传递了有五个参数,分别是
-Xzygote
/system/bin
–zygote
–start-system-server
–socket-name=zygote
zygote最初的名字是app_process,他对应的源代码是app_main()。
zygote代码部分
frameworks/base/cmds/app_process/app_main.cpp
Zygote进程的孵化过程
int main(int argc, char* const argv[])
{std::string bootmode = GetProperty("ro.bootmode", "");//如果处于FFBM(Factory FastBoot Mode,工厂快速引导模式)时直接返回if ((strncmp(bootmode.c_str(), "ffbm-00", 7) == 0)|| (strncmp(bootmode.c_str(), "ffbm-01", 7) == 0)) {return 0;}if (!LOG_NDEBUG) {String8 argv_String;for (int i = 0; i < argc; ++i) {argv_String.append("\"");argv_String.append(argv[i]);argv_String.append("\" ");}ALOGV("app_process main with argv: %s", argv_String.string());}//创建了android运行时环境AppRuntime runtime(argv[0], computeArgBlockSize(argc, argv));// Process command line arguments// ignore argv[0]//将argc[0]舍去argc--;argv++;// Everything up to '--' or first non '-' arg goes to the vm.//// The first argument after the VM args is the "parent dir", which// is currently unused.//// After the parent dir, we expect one or more the following internal// arguments ://// --zygote : Start in zygote mode// --start-system-server : Start the system server.// --application : Start in application (stand alone, non zygote) mode.// --nice-name : The nice name for this process.//// For non zygote starts, these arguments will be followed by// the main class name. All remaining arguments are passed to// the main method of this class.//// For zygote starts, all remaining arguments are passed to the zygote.// main function.//// Note that we must copy argument string values since we will rewrite the// entire argument block when we apply the nice name to argv0.//// As an exception to the above rule, anything in "spaced commands"// goes to the vm even though it has a space in it.const char* spaced_commands[] = { "-cp", "-classpath" };// Allow "spaced commands" to be succeeded by exactly 1 argument (regardless of -s).bool known_command = false;int i;for (i = 0; i < argc; i++) {if (known_command == true) {runtime.addOption(strdup(argv[i]));// The static analyzer gets upset that we don't ever free the above// string. Since the allocation is from main, leaking it doesn't seem// problematic. NOLINTNEXTLINEALOGV("app_process main add known option '%s'", argv[i]);known_command = false;continue;}for (int j = 0;j < static_cast<int>(sizeof(spaced_commands) / sizeof(spaced_commands[0]));++j) {if (strcmp(argv[i], spaced_commands[j]) == 0) {known_command = true;ALOGV("app_process main found known command '%s'", argv[i]);}}if (argv[i][0] != '-') {//根据传入的路径,会break掉循环break;}if (argv[i][1] == '-' && argv[i][2] == 0) {++i; // Skip --.break;}runtime.addOption(strdup(argv[i]));// The static analyzer gets upset that we don't ever free the above// string. Since the allocation is from main, leaking it doesn't seem// problematic. NOLINTNEXTLINEALOGV("app_process main add option '%s'", argv[i]);}// Parse runtime arguments.  Stop at first unrecognized option.bool zygote = false;bool startSystemServer = false;bool application = false;String8 niceName;String8 className;++i;  // Skip unused "parent dir" argument.//++i后,i的值为2,此时argv[i]对应的是--zygote//根据传入的参数执行while (i < argc) {const char* arg = argv[i++];if (strcmp(arg, "--zygote") == 0) {zygote = true;niceName = ZYGOTE_NICE_NAME;} else if (strcmp(arg, "--start-system-server") == 0) {startSystemServer = true;} else if (strcmp(arg, "--application") == 0) {application = true;} else if (strncmp(arg, "--nice-name=", 12) == 0) {niceName.setTo(arg + 12);} else if (strncmp(arg, "--", 2) != 0) {className.setTo(arg);break;} else {--i;break;}}Vector<String8> args;if (!className.isEmpty()) {// We're not in zygote mode, the only argument we need to pass// to RuntimeInit is the application argument.//// The Remainder of args get passed to startup class main(). Make// copies of them before we overwrite them with the process name.args.add(application ? String8("application") : String8("tool"));runtime.setClassNameAndArgs(className, argc - i, argv + i);if (!LOG_NDEBUG) {String8 restOfArgs;char* const* argv_new = argv + i;int argc_new = argc - i;for (int k = 0; k < argc_new; ++k) {restOfArgs.append("\"");restOfArgs.append(argv_new[k]);restOfArgs.append("\" ");}ALOGV("Class name = %s, args = %s", className.string(), restOfArgs.string());}} else {//classname为空,根据之前的循环,再次加上args.add(String8("start-system-server")// We're in zygote mode.maybeCreateDalvikCache();if (startSystemServer) {args.add(String8("start-system-server"));}char prop[PROP_VALUE_MAX];if (property_get(ABI_LIST_PROPERTY, prop, NULL) == 0) {LOG_ALWAYS_FATAL("app_process: Unable to determine ABI list from property %s.",ABI_LIST_PROPERTY);return 11;}String8 abiFlag("--abi-list=");abiFlag.append(prop);args.add(abiFlag);// In zygote mode, pass all remaining arguments to the zygote// main() method.for (; i < argc; ++i) {args.add(String8(argv[i]));}}if (!niceName.isEmpty()) {runtime.setArgv0(niceName.string(), true /* setProcName */);}if (zygote) {//执行ZygoteInit.java的main方法runtime.start("com.android.internal.os.ZygoteInit", args, zygote);} else if (className) {runtime.start("com.android.internal.os.RuntimeInit", args, zygote);} else {fprintf(stderr, "Error: no class name or --zygote supplied.\n");app_usage();LOG_ALWAYS_FATAL("app_process: no class name or --zygote supplied.");}
}
frameworks/base/core/jni/AndroidRuntime.cpp
void AndroidRuntime::start(const char* className, const Vector<String8>& options, bool zygote)
{ALOGD(">>>>>> START %s uid %d <<<<<<\n",className != NULL ? className : "(unknown)", getuid());static const String8 startSystemServer("start-system-server");// Whether this is the primary zygote, meaning the zygote which will fork system server.bool primary_zygote = false;/** 'startSystemServer == true' means runtime is obsolete and not run from* init.rc anymore, so we print out the boot start event here.*///根据options参数判断是否是第一次启动zygotefor (size_t i = 0; i < options.size(); ++i) {if (options[i] == startSystemServer) {primary_zygote = true;/* track our progress through the boot sequence */const int LOG_BOOT_PROGRESS_START = 3000;LOG_EVENT_LONG(LOG_BOOT_PROGRESS_START,  ns2ms(systemTime(SYSTEM_TIME_MONOTONIC)));}}//设置android root目录环境变量const char* rootDir = getenv("ANDROID_ROOT");if (rootDir == NULL) {rootDir = "/system";if (!hasDir("/system")) {LOG_FATAL("No root directory specified, and /system does not exist.");return;}setenv("ANDROID_ROOT", rootDir, 1);}const char* artRootDir = getenv("ANDROID_ART_ROOT");if (artRootDir == NULL) {LOG_FATAL("No ART directory specified with ANDROID_ART_ROOT environment variable.");return;}const char* i18nRootDir = getenv("ANDROID_I18N_ROOT");if (i18nRootDir == NULL) {LOG_FATAL("No runtime directory specified with ANDROID_I18N_ROOT environment variable.");return;}const char* tzdataRootDir = getenv("ANDROID_TZDATA_ROOT");if (tzdataRootDir == NULL) {LOG_FATAL("No tz data directory specified with ANDROID_TZDATA_ROOT environment variable.");return;}//const char* kernelHack = getenv("LD_ASSUME_KERNEL");//ALOGD("Found LD_ASSUME_KERNEL='%s'\n", kernelHack);/* start the virtual machine *///启动虚拟机,并执行相应初始化操作的函数。startVm函数会启动一个Java虚拟机,并将其保存在mJavaVM变量中。该函数会返回一个JNIEnv指针,用于后续与Java层进行交互。JniInvocation jni_invocation;jni_invocation.Init(NULL);JNIEnv* env;if (startVm(&mJavaVM, &env, zygote, primary_zygote) != 0) {return;}//在虚拟机启动完成后执行一些初始化操作onVmCreated(env);/** Register android functions.*///注册 Android 相关的本地方法if (startReg(env) < 0) {ALOGE("Unable to register all android natives\n");return;}/** We want to call main() with a String array with arguments in it.* At present we have two arguments, the class name and an option string.* Create an array to hold them.*/jclass stringClass;jobjectArray strArray;jstring classNameStr;stringClass = env->FindClass("java/lang/String");assert(stringClass != NULL);strArray = env->NewObjectArray(options.size() + 1, stringClass, NULL);assert(strArray != NULL);classNameStr = env->NewStringUTF(className);assert(classNameStr != NULL);env->SetObjectArrayElement(strArray, 0, classNameStr);for (size_t i = 0; i < options.size(); ++i) {jstring optionsStr = env->NewStringUTF(options.itemAt(i).string());assert(optionsStr != NULL);env->SetObjectArrayElement(strArray, i + 1, optionsStr);}/** Start VM.  This thread becomes the main thread of the VM, and will* not return until the VM exits.*/char* slashClassName = toSlashClassName(className != NULL ? className : "");jclass startClass = env->FindClass(slashClassName);if (startClass == NULL) {ALOGE("JavaVM unable to locate class '%s'\n", slashClassName);/* keep going */} else {jmethodID startMeth = env->GetStaticMethodID(startClass, "main","([Ljava/lang/String;)V");if (startMeth == NULL) {ALOGE("JavaVM unable to find main() in '%s'\n", className);/* keep going */} else {//调用静态方法env->CallStaticVoidMethod(startClass, startMeth, strArray);#if 0if (env->ExceptionCheck())threadExitUncaughtException(env);
#endif}}free(slashClassName);ALOGD("Shutting down VM\n");if (mJavaVM->DetachCurrentThread() != JNI_OK)ALOGW("Warning: unable to detach main thread\n");if (mJavaVM->DestroyJavaVM() != 0)ALOGW("Warning: VM did not shut down cleanly\n");
}
frameworks/base/core/java/com/android/internal/os/ZygoteInit.java
在zygote中会通过jni启动java侧的zygoteInit.java类,用来加载动态库以及初始化SystemServer。
public static void main(String argv[]) {ZygoteServer zygoteServer = null;// Mark zygote start. This ensures that thread creation will throw// an error.ZygoteHooks.startZygoteNoThreadCreation();// Zygote goes into its own process group.try {//设置进程组idOs.setpgid(0, 0);} catch (ErrnoException ex) {throw new RuntimeException("Failed to setpgid(0,0)", ex);}Runnable caller;try {// Store now for StatsLogging later.final long startTime = SystemClock.elapsedRealtime();final boolean isRuntimeRestarted = "1".equals(SystemProperties.get("sys.boot_completed"));String bootTimeTag = Process.is64Bit() ? "Zygote64Timing" : "Zygote32Timing";TimingsTraceLog bootTimingsTraceLog = new TimingsTraceLog(bootTimeTag,Trace.TRACE_TAG_DALVIK);bootTimingsTraceLog.traceBegin("ZygoteInit");//创建子进程之前执行一些预先的初始化操作RuntimeInit.preForkInit();boolean startSystemServer = false;String zygoteSocketName = "zygote";String abiList = null;boolean enableLazyPreload = false;for (int i = 1; i < argv.length; i++) {if ("start-system-server".equals(argv[i])) {//通过jni调用时设置startSystemServer = true;} else if ("--enable-lazy-preload".equals(argv[i])) {enableLazyPreload = true;} else if (argv[i].startsWith(ABI_LIST_ARG)) {abiList = argv[i].substring(ABI_LIST_ARG.length());} else if (argv[i].startsWith(SOCKET_NAME_ARG)) {zygoteSocketName = argv[i].substring(SOCKET_NAME_ARG.length());} else {throw new RuntimeException("Unknown command line argument: " + argv[i]);}}/****省略部分代码***/// In some configurations, we avoid preloading resources and classes eagerly.// In such cases, we will preload things prior to our first fork.if (!enableLazyPreload) {bootTimingsTraceLog.traceBegin("ZygotePreload");EventLog.writeEvent(LOG_BOOT_PROGRESS_PRELOAD_START,SystemClock.uptimeMillis());//加载动态库,后续进行jni调用preload(bootTimingsTraceLog);EventLog.writeEvent(LOG_BOOT_PROGRESS_PRELOAD_END,SystemClock.uptimeMillis());bootTimingsTraceLog.traceEnd(); // ZygotePreload}// Do an initial gc to clean up after startupbootTimingsTraceLog.traceBegin("PostZygoteInitGC");gcAndFinalize();bootTimingsTraceLog.traceEnd(); // PostZygoteInitGCbootTimingsTraceLog.traceEnd(); // ZygoteInit//初始化函数,用于在Zygote进程中初始化本地状态Zygote.initNativeState(isPrimaryZygote);ZygoteHooks.stopZygoteNoThreadCreation();//创建ZygoteServer,ZygoteServer用来监听来自应用程序的请求,并根据请求创建相应的子进程zygoteServer = new ZygoteServer(isPrimaryZygote);if (startSystemServer) {//fork SystemServer进程Runnable r = forkSystemServer(abiList, zygoteSocketName, zygoteServer);// {@code r == null} in the parent (zygote) process, and {@code r != null} in the// child (system_server) process.if (r != null) {//通过反射调用systemserver的main方法r.run();return;}}Log.i(TAG, "Accepting command socket connections");// The select loop returns early in the child process after a fork and// loops forever in the zygote.caller = zygoteServer.runSelectLoop(abiList);} catch (Throwable ex) {Log.e(TAG, "System zygote died with exception", ex);throw ex;} finally {if (zygoteServer != null) {zygoteServer.closeServerSocket();}}}private static Runnable forkSystemServer(String abiList, String socketName,ZygoteServer zygoteServer) {/****省略部分代码***//* Hardcoded command line to start the system server *///systemServer创建时需要的信息String args[] = {"--setuid=1000","--setgid=1000","--setgroups=1001,1002,1003,1004,1005,1006,1007,1008,1009,1010,1018,1021,1023,"+ "1024,1032,1065,3001,3002,3003,3006,3007,3009,3010,3011","--capabilities=" + capabilities + "," + capabilities,"--nice-name=system_server","--runtime-args","--target-sdk-version=" + VMRuntime.SDK_VERSION_CUR_DEVELOPMENT,"com.android.server.SystemServer",};ZygoteArguments parsedArgs = null;int pid;try {//将args转化成ZygoteArguments对象parsedArgs = new ZygoteArguments(args);//检查是否设置了调试器相关的系统属性Zygote.applyDebuggerSystemProperty(parsedArgs);//检查是否使用了 --invoke-with 参数来运行应用程序。Zygote.applyInvokeWithSystemProperty(parsedArgs);if (Zygote.nativeSupportsTaggedPointers()) {/* Enable pointer tagging in the system server. Hardware support for this is present* in all ARMv8 CPUs. */parsedArgs.mRuntimeFlags |= Zygote.MEMORY_TAG_LEVEL_TBI;}/* Enable gwp-asan on the system server with a small probability. This is the same* policy as applied to native processes and system apps. */parsedArgs.mRuntimeFlags |= Zygote.GWP_ASAN_LEVEL_LOTTERY;if (shouldProfileSystemServer()) {parsedArgs.mRuntimeFlags |= Zygote.PROFILE_SYSTEM_SERVER;}/* Request to fork the system server process */pid = Zygote.forkSystemServer(parsedArgs.mUid, parsedArgs.mGid,parsedArgs.mGids,parsedArgs.mRuntimeFlags,null,parsedArgs.mPermittedCapabilities,parsedArgs.mEffectiveCapabilities);} catch (IllegalArgumentException ex) {throw new RuntimeException(ex);}/* For child process */if (pid == 0) {if (hasSecondZygote(abiList)) {waitForSecondaryZygote(socketName);}zygoteServer.closeServerSocket();return handleSystemServerProcess(parsedArgs);}return null;}private static Runnable handleSystemServerProcess(ZygoteArguments parsedArgs) {/****省略部分代码***/if (parsedArgs.mInvokeWith != null) {/****省略部分代码***/ } else {ClassLoader cl = null;if (systemServerClasspath != null) {cl = createPathClassLoader(systemServerClasspath, parsedArgs.mTargetSdkVersion);Thread.currentThread().setContextClassLoader(cl);}/** Pass the remaining arguments to SystemServer.*///com.android.server.SystemServer即解析到的parsedArgs.mRemainingArgsreturn ZygoteInit.zygoteInit(parsedArgs.mTargetSdkVersion,parsedArgs.mDisabledCompatChanges,parsedArgs.mRemainingArgs, cl);}}public static final Runnable zygoteInit(int targetSdkVersion, long[] disabledCompatChanges,String[] argv, ClassLoader classLoader) {/****省略部分代码***/return RuntimeInit.applicationInit(targetSdkVersion, disabledCompatChanges, argv,classLoader);}
frameworks/base/core/java/com/android/internal/os/Zygote.java
static int forkSystemServer(int uid, int gid, int[] gids, int runtimeFlags,int[][] rlimits, long permittedCapabilities, long effectiveCapabilities) {ZygoteHooks.preFork();//通过jni调用native方法,最终fork一个进程int pid = nativeForkSystemServer(uid, gid, gids, runtimeFlags, rlimits,permittedCapabilities, effectiveCapabilities);// Set the Java Language thread priority to the default value for new apps.Thread.currentThread().setPriority(Thread.NORM_PRIORITY);ZygoteHooks.postForkCommon();return pid;}
frameworks/base/core/java/com/android/internal/os/RuntimeInit.java
protected static Runnable applicationInit(int targetSdkVersion, long[] disabledCompatChanges,String[] argv, ClassLoader classLoader) {// If the application calls System.exit(), terminate the process// immediately without running any shutdown hooks. It is not possible to// shutdown an Android application gracefully. Among other things, the// Android runtime shutdown hooks close the Binder driver, which can cause// leftover running threads to crash before the process actually exits.nativeSetExitWithoutCleanup(true);//设置targetSdkVersion与兼容性更改VMRuntime.getRuntime().setTargetSdkVersion(targetSdkVersion);VMRuntime.getRuntime().setDisabledCompatChanges(disabledCompatChanges);//封装argvfinal Arguments args = new Arguments(argv);// The end of of the RuntimeInit event (see #zygoteInit).Trace.traceEnd(Trace.TRACE_TAG_ACTIVITY_MANAGER);// Remaining arguments are passed to the start class's static mainreturn findStaticMain(args.startClass, args.startArgs, classLoader);}protected static Runnable findStaticMain(String className, String[] argv,ClassLoader classLoader) {Class<?> cl;try {cl = Class.forName(className, true, classLoader);} catch (ClassNotFoundException ex) {throw new RuntimeException("Missing class when invoking static main " + className,ex);}Method m;try {//反射获取main方法m = cl.getMethod("main", new Class[] { String[].class });} catch (NoSuchMethodException ex) {throw new RuntimeException("Missing static main on " + className, ex);} catch (SecurityException ex) {throw new RuntimeException("Problem getting static main on " + className, ex);}int modifiers = m.getModifiers();if (! (Modifier.isStatic(modifiers) && Modifier.isPublic(modifiers))) {throw new RuntimeException("Main method is not public and static on " + className);}/** This throw gets caught in ZygoteInit.main(), which responds* by invoking the exception's run() method. This arrangement* clears up all the stack frames that were required in setting* up the process.*///将method封装成MethodAndArgsCaller对象返回return new MethodAndArgsCaller(m, argv);}static class MethodAndArgsCaller implements Runnable {/** method to call */private final Method mMethod;/** argument array */private final String[] mArgs;public MethodAndArgsCaller(Method method, String[] args) {mMethod = method;mArgs = args;}//MethodAndArgsCaller继承自Runnable并实现了run方法,在ZygoteInit.java中调用forkSystemServer(abiList, zygoteSocketName, zygoteServer)返回Runnable对象后回调他的run方法//run方法的实现,通过反射调用systemserver的main方法public void run() {try {mMethod.invoke(null, new Object[] { mArgs });} catch (IllegalAccessException ex) {throw new RuntimeException(ex);} catch (InvocationTargetException ex) {Throwable cause = ex.getCause();if (cause instanceof RuntimeException) {throw (RuntimeException) cause;} else if (cause instanceof Error) {throw (Error) cause;}throw new RuntimeException(ex);}}}
2.6 SystemServer进程
SystemServer代码部分
frameworks/base/services/java/com/android/server/SystemServer.java
SystemServer启动后会启动Binder线程池,这样就可以与其他进程进行Binder跨进程通信,同时创建SystemServiceManager,它用来对系统服务进行创建、启动和生命周期管理,接着创建主线程Looper并进入循环等待消息,还会启其他系统服务,如AMS,WMS,PMS等。
    public static void main(String[] args) {new SystemServer().run();}public SystemServer() {// Check for factory test mode.mFactoryTestMode = FactoryTest.getMode();// Remember if it's runtime restart(when sys.boot_completed is already set) or rebootmRuntimeRestart = "1".equals(SystemProperties.get("sys.boot_completed"));}private void run() {try {traceBeginAndSlog("InitBeforeStartServices");//在android.log输出:"I SystemServer: InitBeforeStartServices"// 保证系统时间大于1970,部分API在时间小于此时会崩溃if (System.currentTimeMillis() < EARLIEST_SUPPORTED_TIME) {Slog.w(TAG, "System clock is before 1970; setting to 1970.");SystemClock.setCurrentTimeMillis(EARLIEST_SUPPORTED_TIME);}// 如果没有设置时区,统一设置为GMTString timezoneProperty =  SystemProperties.get("persist.sys.timezone");if (timezoneProperty == null || timezoneProperty.isEmpty()) {Slog.w(TAG, "Timezone not set; setting to GMT.");SystemProperties.set("persist.sys.timezone", "GMT");}// 设置系统语言,只有SystemServer进程和系统app允许修改// NOTE: Most changes made here will need an equivalent change to// core/jni/AndroidRuntime.cppif (!SystemProperties.get("persist.sys.language").isEmpty()) {final String languageTag = Locale.getDefault().toLanguageTag();SystemProperties.set("persist.sys.locale", languageTag);SystemProperties.set("persist.sys.language", "");SystemProperties.set("persist.sys.country", "");SystemProperties.set("persist.sys.localevar", "");}// The system server should never make non-oneway callsBinder.setWarnOnBlocking(true);// 正式进入Android SystemServerSlog.i(TAG, "Entered the Android system server!");//在android.log输出:"I SystemServer: Entered the Android system server!"int uptimeMillis = (int) SystemClock.elapsedRealtime();//开机时间//在event.log里输出:"I boot_progress_system_run: 11663",后面的数字代表开机时长,单位msEventLog.writeEvent(EventLogTags.BOOT_PROGRESS_SYSTEM_RUN, uptimeMillis);if (!mRuntimeRestart) {//非runtime重启或者手机重启进入//在event.log里输出:"sysui_histogram: [boot_system_server_init,11663]"MetricsLogger.histogram(null, "boot_system_server_init", uptimeMillis);}//设置运行时属性,防止如OTA更新导致运行时不同步//也就是设置虚拟机库文件SystemProperties.set("persist.sys.dalvik.vm.lib.2", VMRuntime.getRuntime().vmLibrary());// 启动采样分析器,进行性能统计if (SamplingProfilerIntegration.isEnabled()) {SamplingProfilerIntegration.start();mProfilerSnapshotTimer = new Timer();mProfilerSnapshotTimer.schedule(new TimerTask() {@Overridepublic void run() {//SystemServer性能统计,每小时统计一次,统计结果输出为文件SamplingProfilerIntegration.writeSnapshot("system_server", null);}}, SNAPSHOT_INTERVAL, SNAPSHOT_INTERVAL);//private static final long SNAPSHOT_INTERVAL = 60 * 60 * 1000; // 1hr}// 清除vm内存增长上限,由于启动过程需要较多的虚拟机内存空间VMRuntime.getRuntime().clearGrowthLimit();// 系统服务会一直运行,所以设置内存的可能有效使用率为0.8,也就是增强程序堆内存的处理效率//为啥是0.8??VMRuntime.getRuntime().setTargetHeapUtilization(0.8f);// 针对部分设备依赖于运行时就产生指纹信息,因此需要在开机完成前已经定义Build.ensureFingerprintProperty();// 访问环境变量前,需要明确指定用户Environment.setUserRequired(true);// 系统服务中拒绝接收任何Bundle以避免抛出BadParcelableExceptionBaseBundle.setShouldDefuse(true);// 确保系统Binder运行在前台优先级BinderInternal.disableBackgroundScheduling(true);// 设置系统服务的最大Binder线程数为31BinderInternal.setMaxThreads(sMaxBinderThreads);// 设置当前进程的优先级为前台优先级,且不允许转为后台优先级android.os.Process.setThreadPriority(android.os.Process.THREAD_PRIORITY_FOREGROUND);android.os.Process.setCanSelfBackground(false);Looper.prepareMainLooper();//主线程的Looper就在当前线程运行// 初始化本地服务,也就是加载库文件: android_servers.so// 该库包含的源码在frameworks/base/services/目录下System.loadLibrary("android_servers");// 检测上次关机过程是否失败,该方法可能不会返回[2.7.1]performPendingShutdown();// 创建系统上下文,详细见Application创建流程createSystemContext();// 创建SystemServiceManagermSystemServiceManager = new SystemServiceManager(mSystemContext);mSystemServiceManager.setRuntimeRestarted(mRuntimeRestart);LocalServices.addService(SystemServiceManager.class, mSystemServiceManager);// 为可以并行化的init任务准备线程池SystemServerInitThreadPool.get();} finally {traceEnd(); }//启动各类服务try {traceBeginAndSlog("StartServices");// 在android.log里输出:"SystemServer: StartServices"startBootstrapServices();//启动引导服务[2.7.2]startCoreServices();//启动核心服务[2.7.3]startOtherServices();//启动其他服务[2.7.4]// 关闭SystemServerInitThreadPool// 在android.log输出:"SystemServerInitThreadPool: Shutdown successful"SystemServerInitThreadPool.shutdown();} catch (Throwable ex) {Slog.e("System", "******************************************");Slog.e("System", "************ Failure starting system services", ex);throw ex;} finally {traceEnd();}// 对于调试版本,日志事件循环停止到dropbox进行分析。if (StrictMode.conditionallyEnableDebugLogging()) {Slog.i(TAG, "Enabled StrictMode for system server main thread.");}if (!mRuntimeRestart && !isFirstBootOrUpgrade()) {// 非重启且非第一次开机或者更新时进入int uptimeMillis = (int) SystemClock.elapsedRealtime();// 在event.log中输出:"I sysui_histogram: [boot_system_server_ready,26127]"MetricsLogger.histogram(null, "boot_system_server_ready", uptimeMillis);final int MAX_UPTIME_MILLIS = 60 * 1000;if (uptimeMillis > MAX_UPTIME_MILLIS) {//开机时长超过60s,打印至android.logSlog.wtf(SYSTEM_SERVER_TIMING_TAG,"SystemServer init took too long. uptimeMillis=" + uptimeMillis);}}// 正常情况下,无限循环等待消息Looper.loop();throw new RuntimeException("Main thread loop unexpectedly exited");// 抛出异常}private void startOtherServices(@NonNull TimingsTraceAndSlog t) {/****省略部分代码***/t.traceBegin("MakePowerManagerServiceReady");try {// TODO: use boot phasemPowerManagerService.systemReady(mActivityManagerService.getAppOpsService());} catch (Throwable e) {reportWtf("making Power Manager Service ready", e);}t.traceEnd();mActivityManagerService.systemReady(() -> {Slog.i(TAG, "Making services ready");t.traceBegin("StartActivityManagerReadyPhase");mSystemServiceManager.startBootPhase(t, SystemService.PHASE_ACTIVITY_MANAGER_READY);t.traceEnd();/****省略部分代码***/ t.traceBegin("StartSystemUI");try {startSystemUi(context, windowManagerF);} catch (Throwable e) {reportWtf("starting System UI", e);}/****省略部分代码***/  }, t);t.traceEnd(); // startOtherServices
}private static void startSystemUi(Context context, WindowManagerService windowManager) {PackageManagerInternal pm = LocalServices.getService(PackageManagerInternal.class);Intent intent = new Intent();intent.setComponent(pm.getSystemUiServiceComponent());intent.addFlags(Intent.FLAG_DEBUG_TRIAGED_MISSING);//Slog.d(TAG, "Starting service: " + intent);context.startServiceAsUser(intent, UserHandle.SYSTEM);windowManager.onSystemUiStarted();}
2.7 启动Launcher与SystemUI
frameworks/base/services/core/java/com/android/server/pm/PackageManagerService.java
public ComponentName getSystemUiServiceComponent() {return ComponentName.unflattenFromString(mContext.getResources().getString(com.android.internal.R.string.config_systemUIServiceComponent));}
frameworks/base/services/core/java/com/android/server/am/ActivityManagerService.java
public void systemReady(final Runnable goingCallback, @NonNull TimingsTraceAndSlog t) {/****省略部分代码***/synchronized (this) {// Only start up encryption-aware persistent apps; once user is// unlocked we'll come back around and start unaware appst.traceBegin("startPersistentApps");//启动persist应用startPersistentApps(PackageManager.MATCH_DIRECT_BOOT_AWARE);t.traceEnd();if (bootingSystemUser) {t.traceBegin("startHomeOnAllDisplays");//启动LaunchermAtmInternal.startHomeOnAllDisplays(currentUserId, "systemReady");t.traceEnd();}}/****省略部分代码***/
}//根据category和action来获取Launcher主页
Intent getHomeIntent() {Intent intent = new Intent(mTopAction, mTopData != null ? Uri.parse(mTopData) : null);intent.setComponent(mTopComponent);intent.addFlags(Intent.FLAG_DEBUG_TRIAGED_MISSING);if (mFactoryTest != FactoryTest.FACTORY_TEST_LOW_LEVEL) {intent.addCategory(Intent.CATEGORY_HOME);}return intent;}
frameworks/base/services/core/java/com/android/server/wm/ActivityTaskManagerService.java
@Override
public boolean startHomeOnAllDisplays(int userId, String reason) {synchronized (mGlobalLock) {return mRootWindowContainer.startHomeOnAllDisplays(userId, reason);}
}
frameworks/base/services/core/java/com/android/server/wm/RootWindowContainer.java
boolean startHomeOnAllDisplays(int userId, String reason) {boolean homeStarted = false;//遍历所有的display,去启动Launcherfor (int i = getChildCount() - 1; i >= 0; i--) {final int displayId = getChildAt(i).mDisplayId;homeStarted |= startHomeOnDisplay(userId, reason, displayId);}return homeStarted;}boolean startHomeOnDisplay(int userId, String reason, int displayId) {return startHomeOnDisplay(userId, reason, displayId, false /* allowInstrumenting */,false /* fromHomeKey */);}boolean startHomeOnDisplay(int userId, String reason, int displayId, boolean allowInstrumenting,boolean fromHomeKey) {// Fallback to top focused display or default display if the displayId is invalid.if (displayId == INVALID_DISPLAY) {final ActivityStack stack = getTopDisplayFocusedStack();displayId = stack != null ? stack.getDisplayId() : DEFAULT_DISPLAY;}final DisplayContent display = getDisplayContent(displayId);boolean result = false;//遍历display上的Tdafor (int tcNdx = display.getTaskDisplayAreaCount() - 1; tcNdx >= 0; --tcNdx) {final TaskDisplayArea taskDisplayArea = display.getTaskDisplayAreaAt(tcNdx);result |= startHomeOnTaskDisplayArea(userId, reason, taskDisplayArea,allowInstrumenting, fromHomeKey);}return result;}boolean startHomeOnTaskDisplayArea(int userId, String reason, TaskDisplayArea taskDisplayArea,boolean allowInstrumenting, boolean fromHomeKey) {// Fallback to top focused display area if the provided one is invalid.if (taskDisplayArea == null) {final ActivityStack stack = getTopDisplayFocusedStack();taskDisplayArea = stack != null ? stack.getDisplayArea(): getDefaultTaskDisplayArea();}Intent homeIntent = null;ActivityInfo aInfo = null;if (taskDisplayArea == getDefaultTaskDisplayArea()) {homeIntent = mService.getHomeIntent();aInfo = resolveHomeActivity(userId, homeIntent);//检查是否要显示其他的Launcher到tda上} else if (shouldPlaceSecondaryHomeOnDisplayArea(taskDisplayArea)) {Pair<ActivityInfo, Intent> info = resolveSecondaryHomeActivity(userId, taskDisplayArea);aInfo = info.first;homeIntent = info.second;}if (aInfo == null || homeIntent == null) {return false;}//检查tda上是否可以启动Launcherif (!canStartHomeOnDisplayArea(aInfo, taskDisplayArea, allowInstrumenting)) {return false;}// Updates the home component of the intent.homeIntent.setComponent(new ComponentName(aInfo.applicationInfo.packageName, aInfo.name));homeIntent.setFlags(homeIntent.getFlags() | FLAG_ACTIVITY_NEW_TASK);// Updates the extra information of the intent.if (fromHomeKey) {homeIntent.putExtra(WindowManagerPolicy.EXTRA_FROM_HOME_KEY, true);mWindowManager.cancelRecentsAnimation(REORDER_KEEP_IN_PLACE, "startHomeActivity");}// Update the reason for ANR debugging to verify if the user activity is the one that// actually launched.final String myReason = reason + ":" + userId + ":" + UserHandle.getUserId(aInfo.applicationInfo.uid) + ":" + taskDisplayArea.getDisplayId();mService.getActivityStartController().startHomeActivity(homeIntent, aInfo, myReason,taskDisplayArea);return true;}
frameworks/base/services/core/java/com/android/server/wm/ActivityStartController.java
void startHomeActivity(Intent intent, ActivityInfo aInfo, String reason,TaskDisplayArea taskDisplayArea) {final ActivityOptions options = ActivityOptions.makeBasic();options.setLaunchWindowingMode(WINDOWING_MODE_FULLSCREEN);if (!ActivityRecord.isResolverActivity(aInfo.name)) {// The resolver activity shouldn't be put in home stack because when the foreground is// standard type activity, the resolver activity should be put on the top of current// foreground instead of bring home stack to front.options.setLaunchActivityType(ACTIVITY_TYPE_HOME);}final int displayId = taskDisplayArea.getDisplayId();//设置displayIdoptions.setLaunchDisplayId(displayId);options.setLaunchTaskDisplayArea(taskDisplayArea.mRemoteToken.toWindowContainerToken());// The home activity will be started later, defer resuming to avoid unneccerary operations// (e.g. start home recursively) when creating home stack.mSupervisor.beginDeferResume();final ActivityStack homeStack;try {// Make sure home stack exists on display area.创建Launcher的TaskhomeStack = taskDisplayArea.getOrCreateRootHomeTask(ON_TOP);} finally {mSupervisor.endDeferResume();}//调用ActivityStart去启动LaunchermLastHomeActivityStartResult = obtainStarter(intent, "startHomeActivity: " + reason).setOutActivity(tmpOutRecord).setCallingUid(0).setActivityInfo(aInfo).setActivityOptions(options.toBundle()).execute();mLastHomeActivityStartRecord = tmpOutRecord[0];if (homeStack.mInResumeTopActivity) {// If we are in resume section already, home activity will be initialized, but not// resumed (to avoid recursive resume) and will stay that way until something pokes it// again. We need to schedule another resume.mSupervisor.scheduleResumeTopActivities();}}
三、SystemServices
Zygote启动后fork的第一个进程为SystemServer,在手机中的进程别名为"system_server",主要用来启动系统中的服务,Zygote fork后,进入SystemServer的main()。
SystemServer在启动过程中,先初始化一些系统变量,加载类库,创建Context对象,创建SystemServiceManager对象等候再启动服务
启动的服务分为 引导服务(Boot Service)、核心服务(Core Service)和其他服务(Other Service)三大类,共90(不同安卓版本略有区别)多个服务。
SystemServer在启动服务前,会尝试与Zygote建立Socket通信,通信成功后才去启动服务,启动的服务都单独运行在SystemServer的各自线程中,同属于SystemServer进程。
3.1 引导服务
引导服务 Boot Service :ActivityManagerService, PowerManagerService, LightsService, DisplayManagerService, PackageManagerService, UserManagerService, sensor等服务

3.2 核心服务
核心服务Core Service:BatteryService,UsageStatsService,WebViewUpdateService、BugreportManagerService、GpuService等

3.3 其他服务
其他服务 Other Service:开始处理一大堆尚未重构和整理的东西,这里的服务很多:

四、总结
在bootloader启动后,首先启动Linux Kernel,初始化系统环境。接着启动init进程,开始配置驱动、挂载文件系统以及创建文件,同时初始化selinux。init进程分为firststage和secondstage两部分启动,在secondstage阶段会初始化系统的property服务,最后调用LoadBootScripts方法来读取并解析init.rc文件。根据配置的init.rc文件,会逐阶段启动相应的servicemanager和zygote服务。
init阶段分为以下几个部分:
“early-init” 阶段:在这个阶段,系统会执行一些初始化操作,例如挂载文件系统、设置 SELinux 策略等。
“init” 阶段:系统会配置系统属性、启动并管理服务以及执行脚本等操作。
“late-init” 阶段:用于执行一些需要在init阶段之后才能进行的操作,例如加载虚拟机等。
- 在init阶段,会启动servicemanager进程,用以创建binder映射,实现binder机制,并负责管理系统服务的注册、查找和启动。
- 在late-init阶段,会启动Zygote进程,Zygote进程用来孵化安卓应用进程,初始化jni服务等。
- 在Zygote中,通过jni启动java侧的zygoteInit.java类,用来加载动态库以及初始化SystemServer。
- SystemServer启动后会启动Binder线程池,实现与其他进程的Binder跨进程通信,创建SystemServiceManager对系统服务进行创建、启动和生命周期管理,创建主线程Looper并进入循环等待消息,同时启动其他系统服务,如AMS、WMS、PMS等。
- 在AMS启动后,SystemServer通过AMS会启动Launcher与SystemUI,完成系统的启动过程。